JAGUAR XFR 2010 1.G Repair Manual
XFR 2010 1.G
JAGUAR
JAGUAR
https://www.carmanualsonline.info/img/21/7642/w960_7642-0.png
JAGUAR XFR 2010 1.G Repair Manual
Page 1005 of 3039
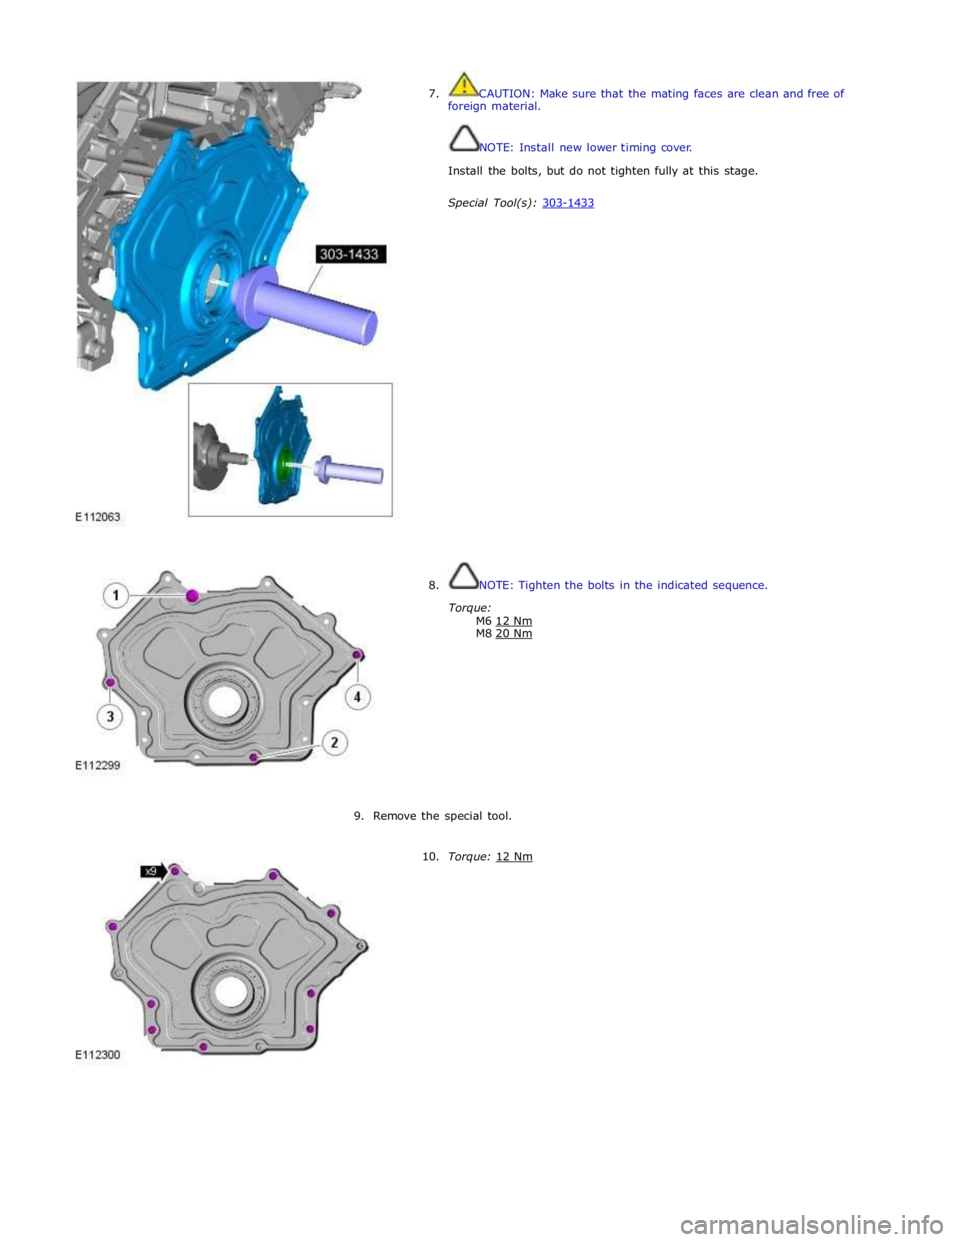
7. CAUTION: Make sure that the mating faces are clean and free of
foreign material.
NOTE: Install new lower timing cover.
Install the bolts, but do not tighten fully at this stage.
Special Tool(s): 303-1433
8. NOTE: Tighten the bolts in the indicated sequence.
Torque:
M6 12 Nm M8 20 Nm
9. Remove the special tool.
10. Torque: 12 Nm
Page 1006 of 3039
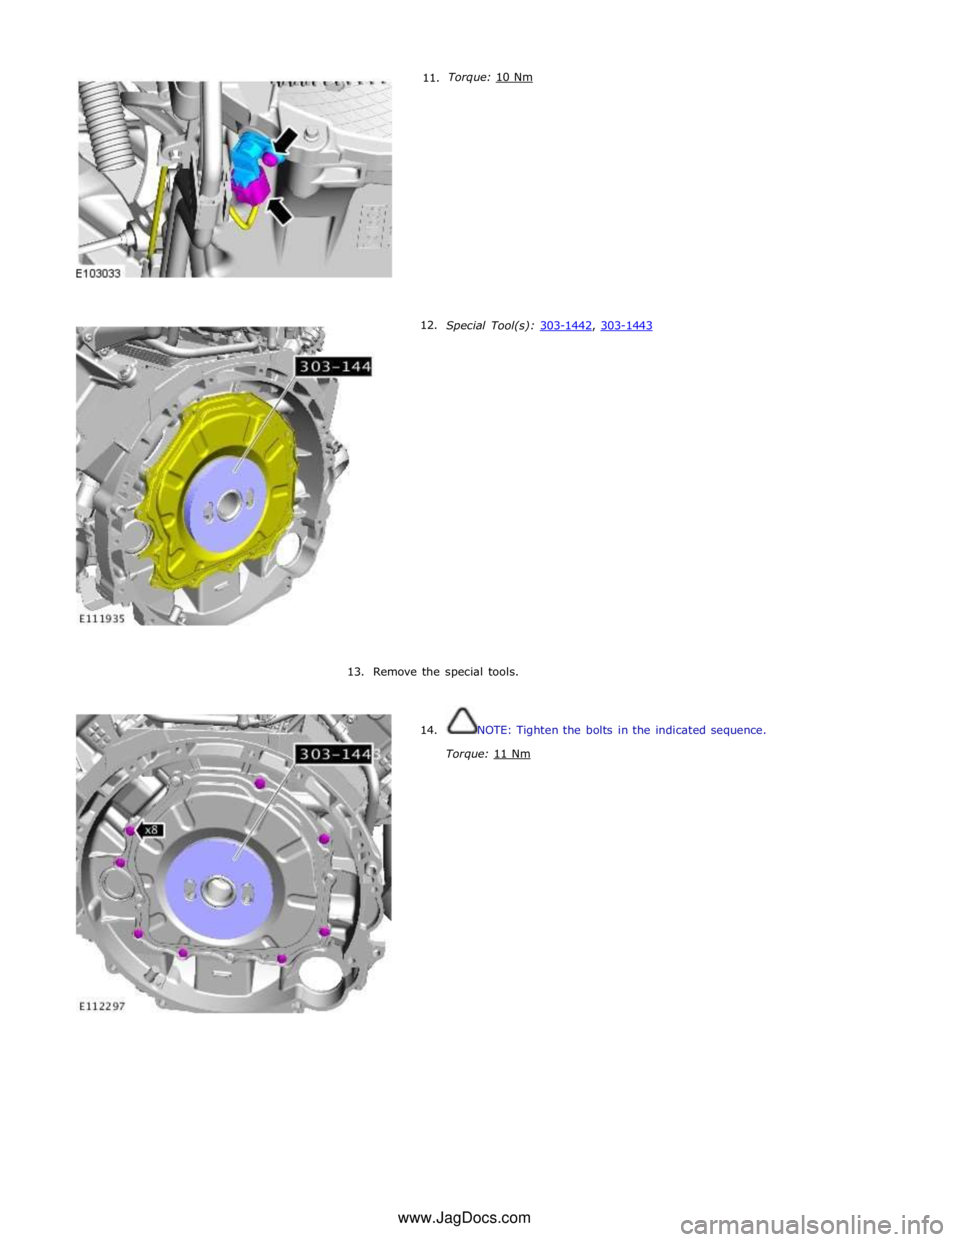
11.
12. Torque: 10 Nm
Special Tool(s): 303-1442, 303-1443
13. Remove the special tools.
14. NOTE: Tighten the bolts in the indicated sequence.
Torque: 11 Nm www.JagDocs.com
Page 1017 of 3039
49. CAUTIONS:
Install all the bolts finger tight before final tightening.
The bolts can only be used 3 times, mark the bolts with a center punch.
If 2 punch marks are visible, discard the bolts.
Install the bolts in the noted position.
NOTES:
Make sure that the crankshaft is not rotated.
Make sure the crankshaft and flexplate mating faces are clean before
installation.
Tighten the retaining bolts working diagonally.
Torque:
Stage 1:45 Nm Stage 2:90°
50. Refer to: Engine (303-01D Engine - V8 S/C 5.0L Petrol, Installation).
51. Refer to: Crankshaft Pulley (303-01D Engine - V8 S/C 5.0L Petrol, Removal and Installation).
52. Lower the vehicle.
53. Refer to: Battery Disconnect and Connect (414-01 Battery, Mounting and Cables, General Procedures).
Page 1018 of 3039
Engine - V8 S/C 5.0L Petrol - Oil Pump
Removal and Installation
Removal Published: 07-Oct-2011
1. Refer to: Battery Disconnect and Connect (414-01 Battery, Mounting and Cables, General Procedures).
2. WARNING: Make sure to support the vehicle with axle stands.
Raise and support the vehicle.
3. Refer to: Oil Pan Extension (303-01C Engine - V8 5.0L Petrol, Removal and Installation).
4. NOTE: Tsubaki timing drive only.
5. NOTE: INA timing drive only.
Page 1024 of 3039
9. CAUTION: Make sure that the tensioner spring is
correctly located.
NOTE: INA timing drive only.
Torque: 21 Nm
10. Refer to: Oil Pan Extension (303-01C Engine - V8 5.0L Petrol, Removal and Installation).
11. Refer to: Battery Disconnect and Connect (414-01 Battery, Mounting and Cables, General Procedures).
Page 1025 of 3039
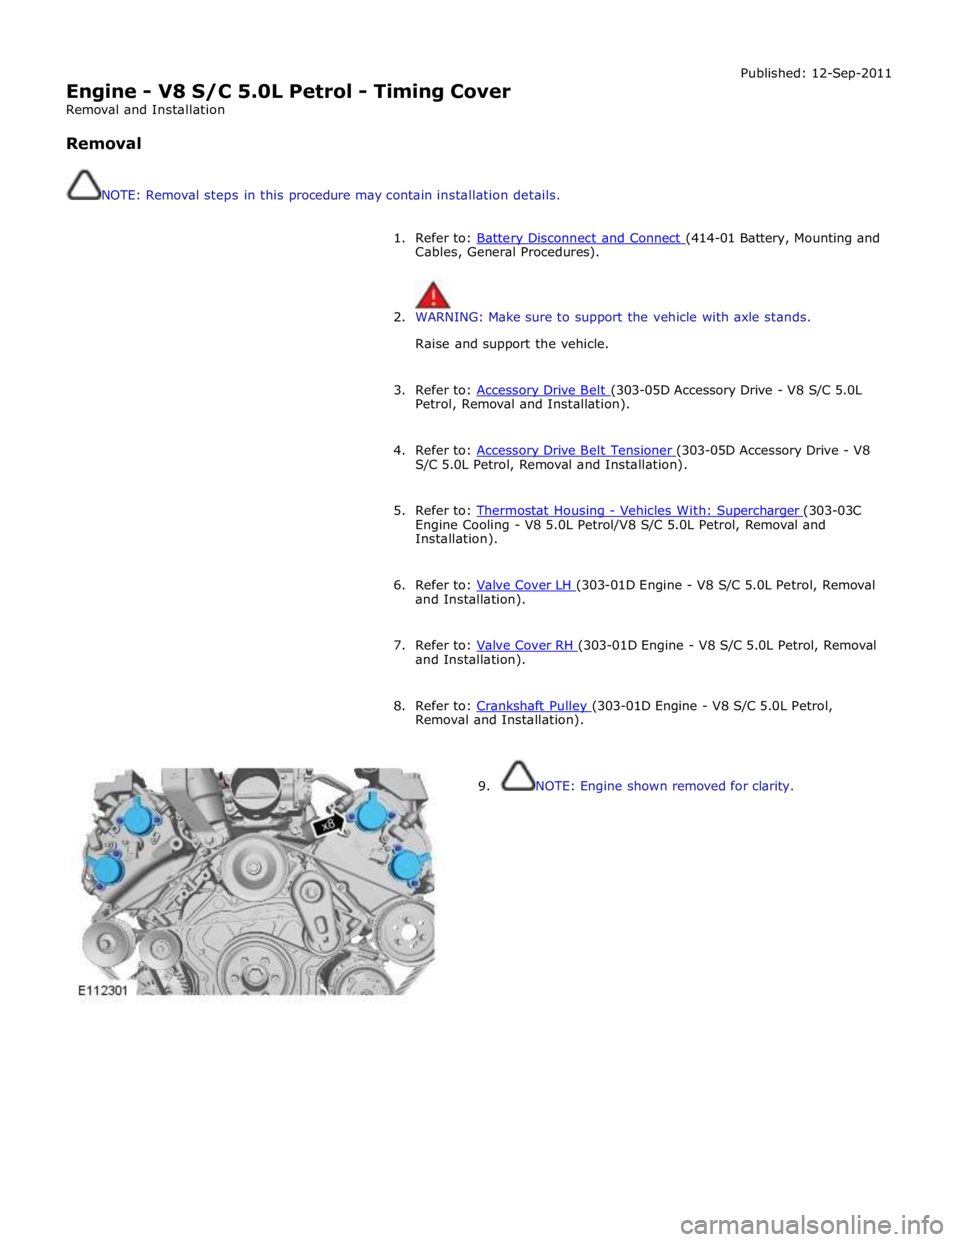
Engine - V8 S/C 5.0L Petrol - Timing Cover
Removal and Installation
Removal
NOTE: Removal steps in this procedure may contain installation details. Published: 12-Sep-2011
1. Refer to: Battery Disconnect and Connect (414-01 Battery, Mounting and Cables, General Procedures).
2. WARNING: Make sure to support the vehicle with axle stands.
Raise and support the vehicle.
3. Refer to: Accessory Drive Belt (303-05D Accessory Drive - V8 S/C 5.0L Petrol, Removal and Installation).
4. Refer to: Accessory Drive Belt Tensioner (303-05D Accessory Drive - V8 S/C 5.0L Petrol, Removal and Installation).
5. Refer to: Thermostat Housing - Vehicles With: Supercharger (303-03C Engine Cooling - V8 5.0L Petrol/V8 S/C 5.0L Petrol, Removal and
Installation).
6. Refer to: Valve Cover LH (303-01D Engine - V8 S/C 5.0L Petrol, Removal and Installation).
7. Refer to: Valve Cover RH (303-01D Engine - V8 S/C 5.0L Petrol, Removal and Installation).
8. Refer to: Crankshaft Pulley (303-01D Engine - V8 S/C 5.0L Petrol, Removal and Installation).
9. NOTE: Engine shown removed for clarity.
Page 1031 of 3039
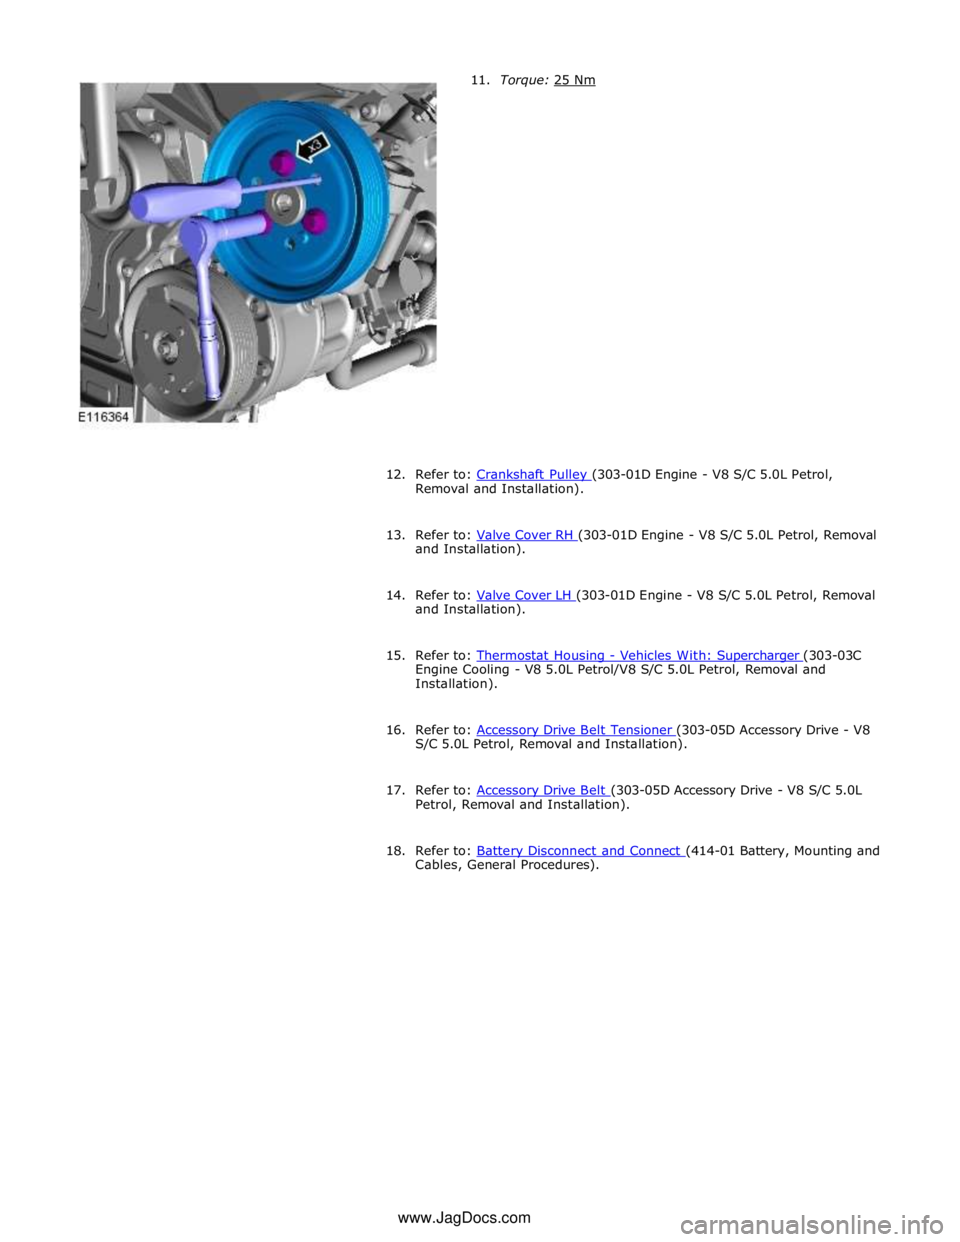
12.
Refer to: Crankshaft Pulley (303-01D Engine - V8 S/C 5.0L Petrol, Removal and Installation).
13. Refer to: Valve Cover RH (303-01D Engine - V8 S/C 5.0L Petrol, Removal and Installation).
14. Refer to: Valve Cover LH (303-01D Engine - V8 S/C 5.0L Petrol, Removal and Installation).
15. Refer to: Thermostat Housing - Vehicles With: Supercharger (303-03C Engine Cooling - V8 5.0L Petrol/V8 S/C 5.0L Petrol, Removal and
Installation).
16. Refer to: Accessory Drive Belt Tensioner (303-05D Accessory Drive - V8 S/C 5.0L Petrol, Removal and Installation).
17. Refer to: Accessory Drive Belt (303-05D Accessory Drive - V8 S/C 5.0L Petrol, Removal and Installation).
18. Refer to: Battery Disconnect and Connect (414-01 Battery, Mounting and Cables, General Procedures). www.JagDocs.com
Page 1032 of 3039
Engine - V8 S/C 5.0L Petrol - Timing Drive Components
Removal and Installation
Special Tool(s)
303-1445
Timing Tool – Camshaft Alignment
303-1447
Timing Tool
303-1448
Locking Tool
303-1452
Camshaft Rotating Tool
303-1482
Tensioner Tool Removal
CAUTION: Check all timing components for wear and install new components if required.
NOTES:
Removal steps in this procedure may contain installation details. Published: 12-Jun-2014
Page 1033 of 3039
Some variation in the illustrations may occur, but the essential information is always correct.
1. Disconnect the battery ground cable.
Refer to: Battery Disconnect and Connect (414-01 Battery, Mounting and Cables, General Procedures).
2. WARNING: Make sure to support the vehicle with axle stands.
Raise and support the vehicle.
3. Refer to: Timing Cover (303-01C Engine - V8 5.0L Petrol, Removal and Installation).
4.
5. CAUTION: Only rotate the crankshaft clockwise.
Install the special tool.
Special Tool(s): 303-1447
Page 1040 of 3039
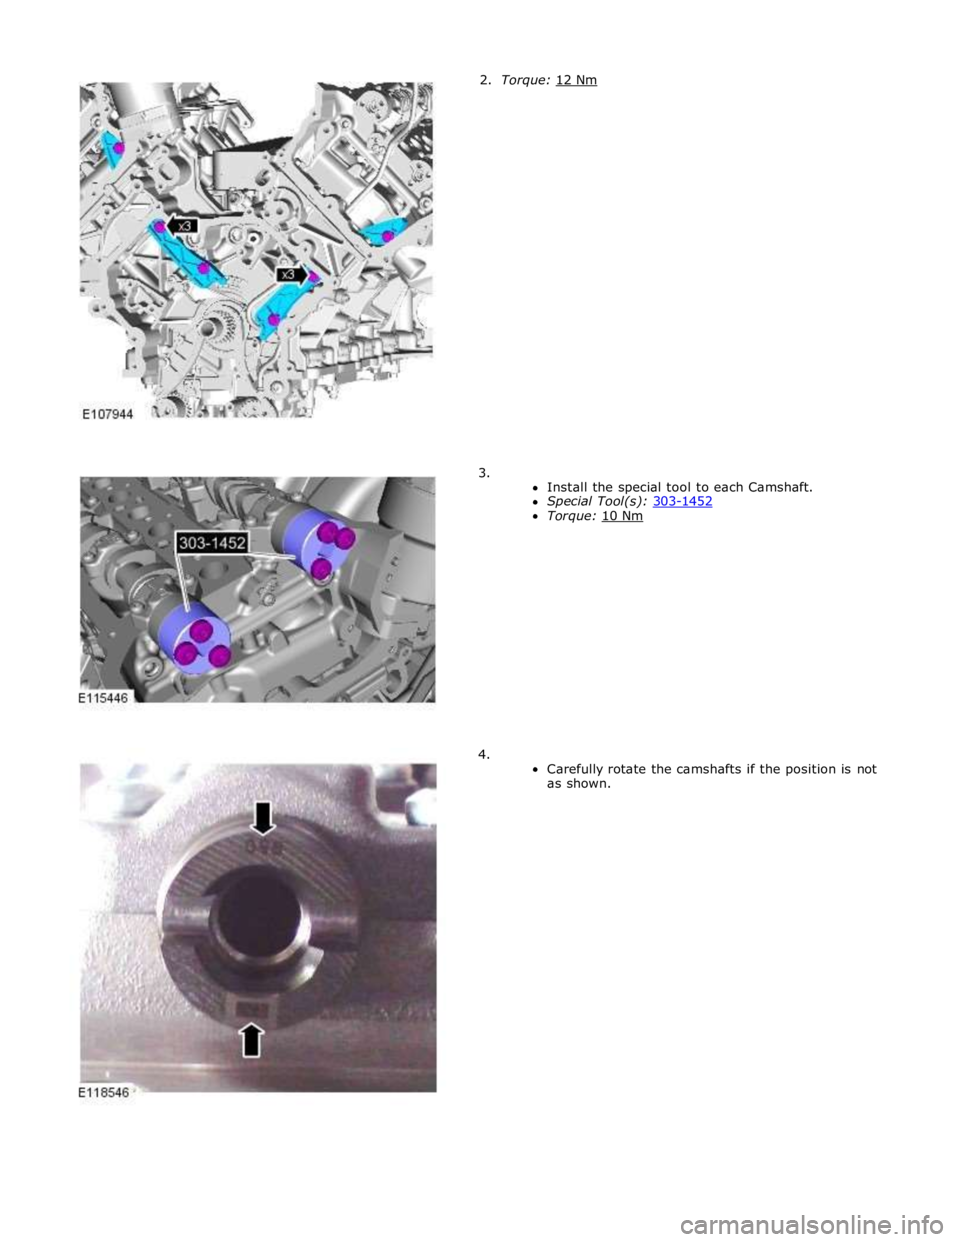
2. Torque: 12 Nm 3.
Install the special tool to each Camshaft.
Special Tool(s): 303-1452 Torque: 10 Nm
4.
Carefully rotate the camshafts if the position is not
as shown.
