engine JAGUAR XJ6 1994 2.G Manual Online
[x] Cancel search | Manufacturer: JAGUAR, Model Year: 1994, Model line: XJ6, Model: JAGUAR XJ6 1994 2.GPages: 521, PDF Size: 17.35 MB
Page 169 of 521
Automatic Transmission (V12 & AJ16 Supercharged) Powertrain
0
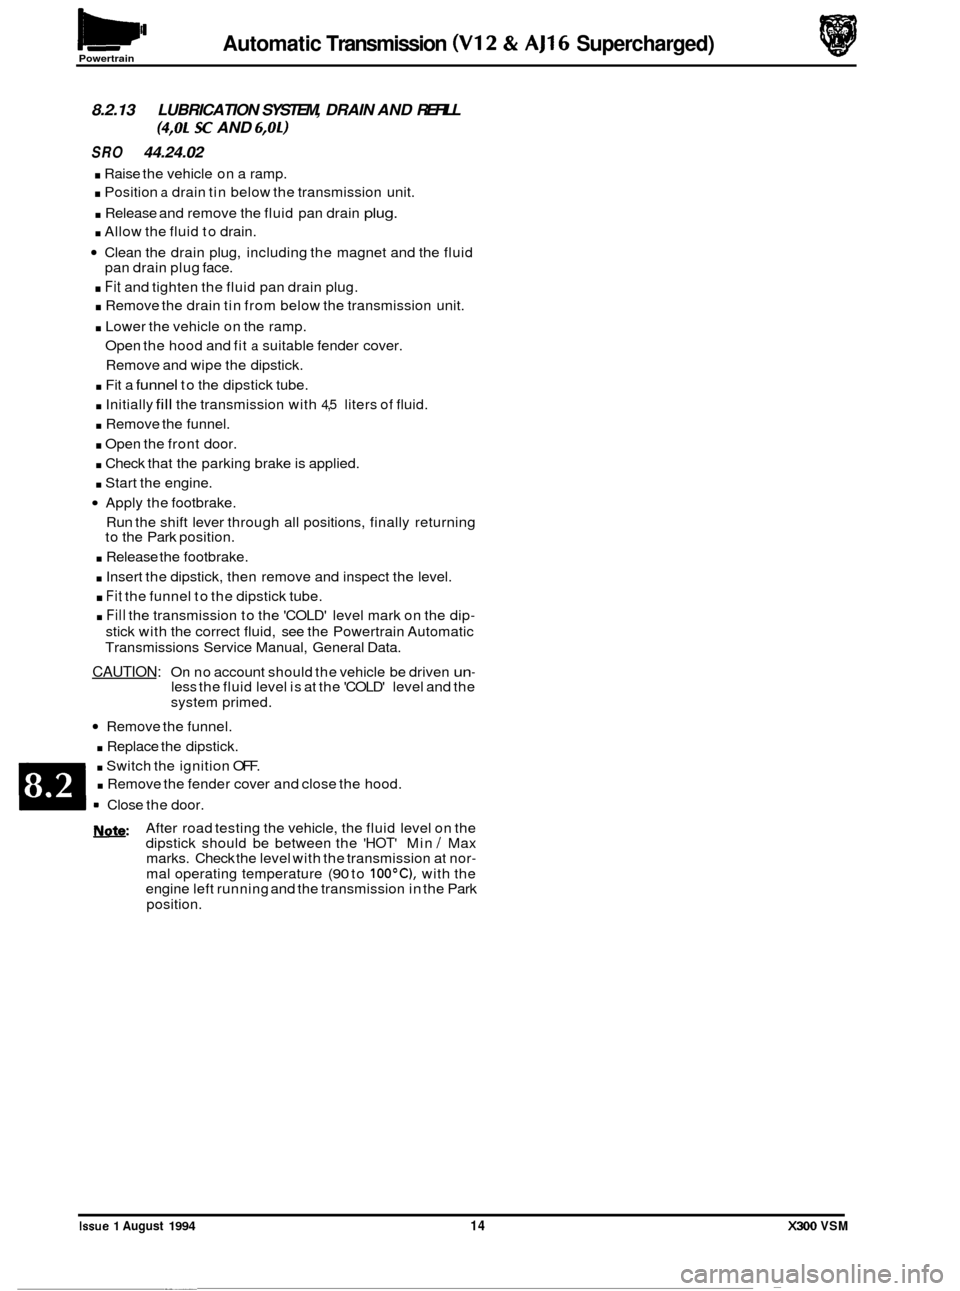
8.2.13 LUBRICATION SYSTEM, DRAIN AND REFILL
(4,OL SC AND 6,OL)
SRO 44.24.02
. Raise the vehicle on a ramp.
. Position a drain tin below the transmission unit.
. Release and remove the fluid pan drain plug.
. Allow the fluid to drain.
Clean the drain plug, including the magnet and the fluid
pan drain plug face.
. Fit and tighten the fluid pan drain plug.
. Remove the drain tin from below the transmission unit.
. Lower the vehicle on the ramp.
Open the hood and fit
a suitable fender cover.
Remove and wipe the dipstick.
. Fit a funnel to the dipstick tube.
. Initially fill the transmission with 4,5 liters of fluid.
. Remove the funnel.
. Open the front door.
. Check that the parking brake is applied.
. Start the engine.
Apply the footbrake.
Run the shift lever through all positions, finally returning
to the Park position.
. Release the footbrake.
. Insert the dipstick, then remove and inspect the level.
. Fit the funnel to the dipstick tube.
. Fill the transmission to the 'COLD' level mark on the dip-
stick with the correct fluid, see the Powertrain Automatic
Transmissions Service Manual, General Data.
CAUTION: On no account should the vehicle be driven un- less the fluid level is at the 'COLD' level and the
system primed.
0
Remove the funnel.
. Replace the dipstick.
. Switch the ignition OFF.
. Remove the fender cover and close the hood.
= Close the door.
J&&Q: 0 After road testing the vehicle, the fluid level on the
dipstick should be between the 'HOT' Min I Max
marks. Check the level with the transmission at nor-
mal operating temperature (90 to 100°C), with the
engine left running and the transmission in the Park
position.
m
0
Issue 1 August 1994 14 X300 VSM ~
__
Page 199 of 521
@ Steering
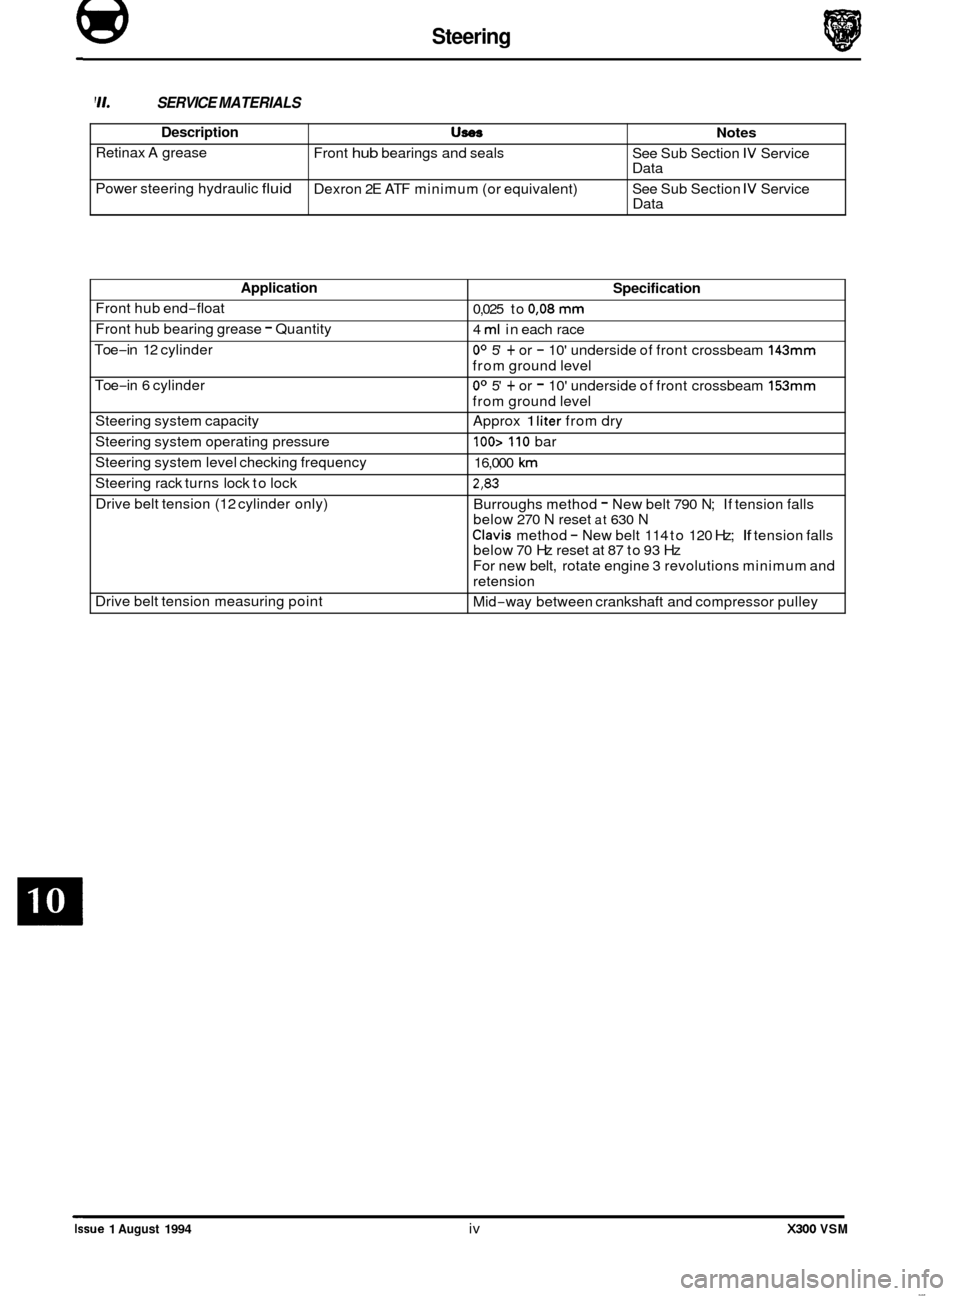
Description
Retinax A grease
Power steering hydraulic
fluid
'11. SERVICE MATERIALS
U- Notes
Front hub bearings and seals
Dexron 2E ATF minimum (or equivalent) See
Sub Section IV Service
Data
See Sub Section
IV Service
Data
Application
Front hub end-float
Front hub bearing grease
- Quantity
Toe
-in 12 cylinder
Toe
-in 6 cylinder
Steering system capacity
Steering system operating pressure
Steering system level checking frequency
Drive belt tension (12 cylinder only)
Steering
rack turns lock to lock
Drive belt tension measuring point
Specification
0,025 to 0,08 mm
4 ml in each race
Oo 5' + or - 10' underside of front crossbeam 143mm
from ground level
Oo 5' + or - 10' underside of front crossbeam 153mm
from ground level
Approx
1 liter from dry
100> 110 bar
16,000
km
2,83
Burroughs method - New belt 790 N; If tension falls
below 270 N reset at 630 N
Clavis method - New belt 114 to 120 Hz; If tension falls
below 70 Hz reset at 87 to 93 Hz
For new belt, rotate engine 3 revolutions minimum and
retension
Mid
-way between crankshaft and compressor pulley
Issue 1 August 1994 iv X300 VSM
Page 201 of 521
@ Steering
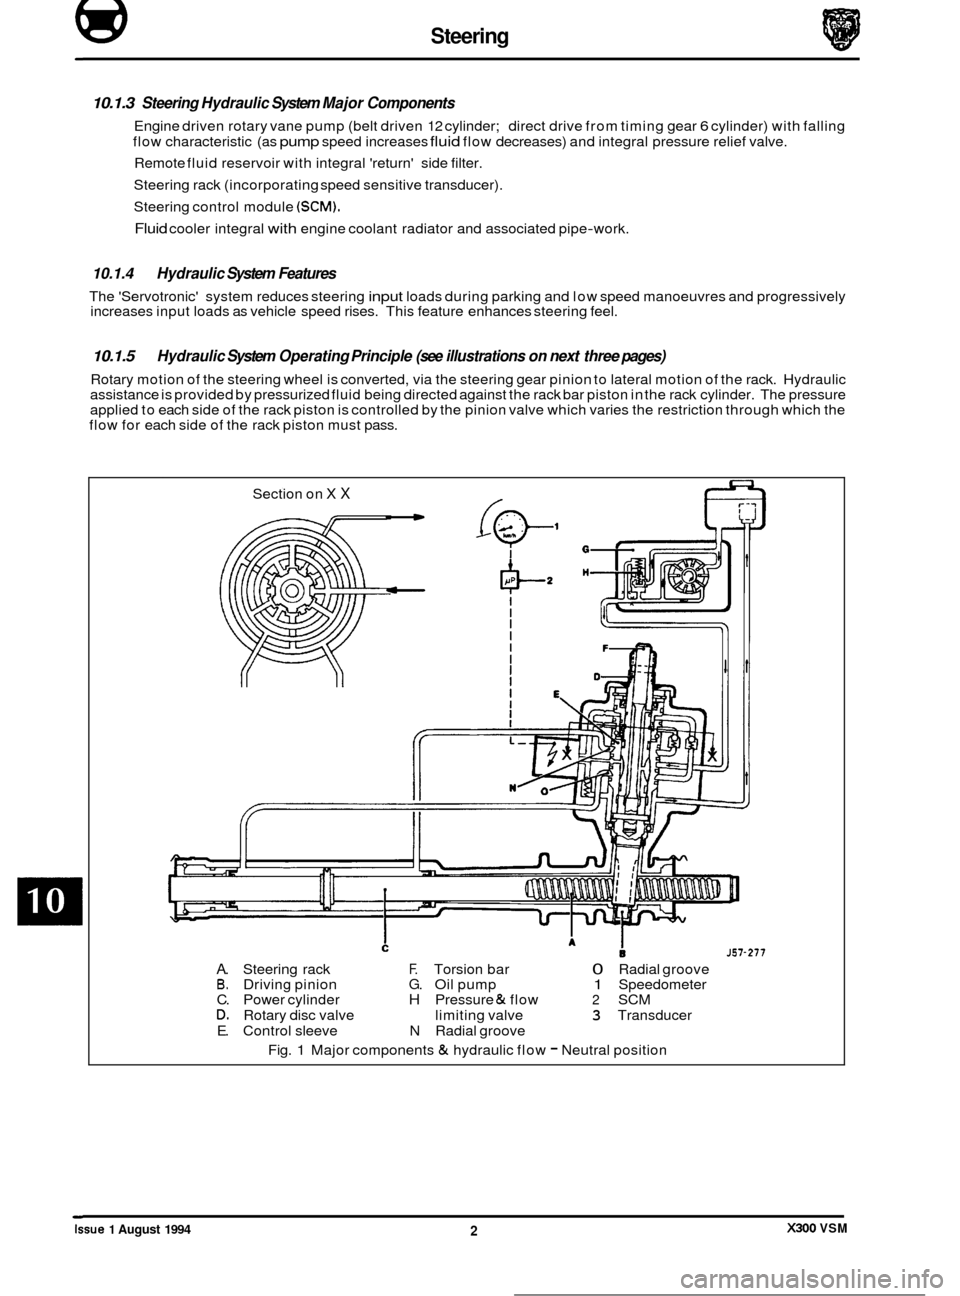
10.1.3 Steering Hydraulic System Major Components
Engine driven rotary vane pump (belt driven 12 cylinder; direct drive from timing gear 6 cylinder) with falling
flow characteristic (as
pump speed increases fluid flow decreases) and integral pressure relief valve.
Remote fluid reservoir with integral 'return' side filter.
Steering rack (incorporating speed sensitive transducer).
Steering control module
(SCM).
Fluid cooler integral with engine coolant radiator and associated pipe-work.
10.1.4 Hydraulic System Features
The 'Servotronic' system reduces steering input loads during parking and low speed manoeuvres and progressively
increases input loads as vehicle speed rises. This feature enhances steering feel.
10.1.5
Rotary motion of the steering wheel is converted, via the steering gear pinion to lateral motion of the rack. Hydraulic
assistance is provided by pressurized fluid being directed against the rack bar piston in the rack cylinder. The pressure
applied to each side of the rack piston is controlled by the pinion valve which varies the restriction through which the
flow for each side of the rack piston must pass.
Hydraulic System Operating Principle (see illustrations on next three pages)
Section on X X
J57-277
A. Steering rack F. Torsion bar 0 Radial groove B. Driving pinion G. Oil pump 1 Speedometer
C. Power cylinder H Pressure & flow 2 SCM D. Rotary disc valve limiting valve 3 Transducer
E. Control sleeve N Radial groove
Fig.
1 Major components & hydraulic flow - Neutral position ~
Issue 1 August 1994 X300 VSM 2
Page 204 of 521
10.2 SERVICE
PROCEDURES - SAFETY RELATED
10.2.1
Airbag
The electrically activated driver's side airbag is attached to the steering wheel hub and is fed by two wires from the
column stalk assembly. Electrical input to the column stalk assembly for the airbag is provided by a dedicated harness
which is encased in a yellow sleeve. A mechanism in the stalk assembly called the 'cable reel cassette' provides conti
-
nuity from the static column to the steering wheel. The 'cable reel cassette' is driven by a tang which locates in the
steering wheel. Because the connection is by wires, and the cassette assembly is only capable of approximately five
(5) full turns,
it is critically important that initial positioning is correct, see Section 15. It is equally important that fitting of the steering wheel, connection of the column, lower shaft and steering rackshould
ONLY be made with the steering rack in the center of its travel.
WARNING: DO NOT REMOVE THE STEERING COLUMN FROM THE VEHICLE WITH THE STEERING WHEEL AT- TACHED UNLESS THE STEERING IS CENTERED AND THE COLUMN LOCK IS ENGAGED. IF THE LOCK
BARREL
IS TO BE RENEWED, 'LOCK-WIRE THE ASSEMBLY TO PREVENT ROTATION. FAILURE TO OB- SERVE THIS AND CONSEQUENT DAMAGE TO THE 'CABLE REEL CASSETTE MAY RESULT IN AN INOP- ERATIVE AIRBAG SYSTEM. SEE LABEL ON STEERING WHEEL HUB.
10.3 SERVICE PROCEDURES
10.3.1 Working Practices
It is not recommended that either the steering rack or engine driven pump assemblies are repaired in any way other
than in accordance with the repair procedures described in this manual. The fluid reservoir and filter is a disposable
assembly and no attempt should be made to clean it internally. Genuine replacement units must be fitted following
routine service or diagnostic confirmation of the failure of any component.
The importance of cleanliness cannot be over
-stressed, not only with new parts but also those which may havefailed.
In-service contamination of the hydraulic system is a major cause of failures and may be avoided with good working
practices and care. All new units and pipes must be supplied with suitable blanks in every orifice. Should a unit not
have blanks fitted, do not use
it - return it to the supplier with an appropriate reason for your action.
To help the manufacturer diagnose problems and avoid post-removal contamination; provide full details of the fault
and plug all connections as soon as they are released. All suspect units must be returned to Jaguar Cars complete
with relevant documentation.
CAUTION: It is imperative that the power steering system does not become contaminated in any way. Always de- cant fluid from afresh sealed container and clean the area around the reservoir neck both before and after topping-up. Never return drained fluid to the system.
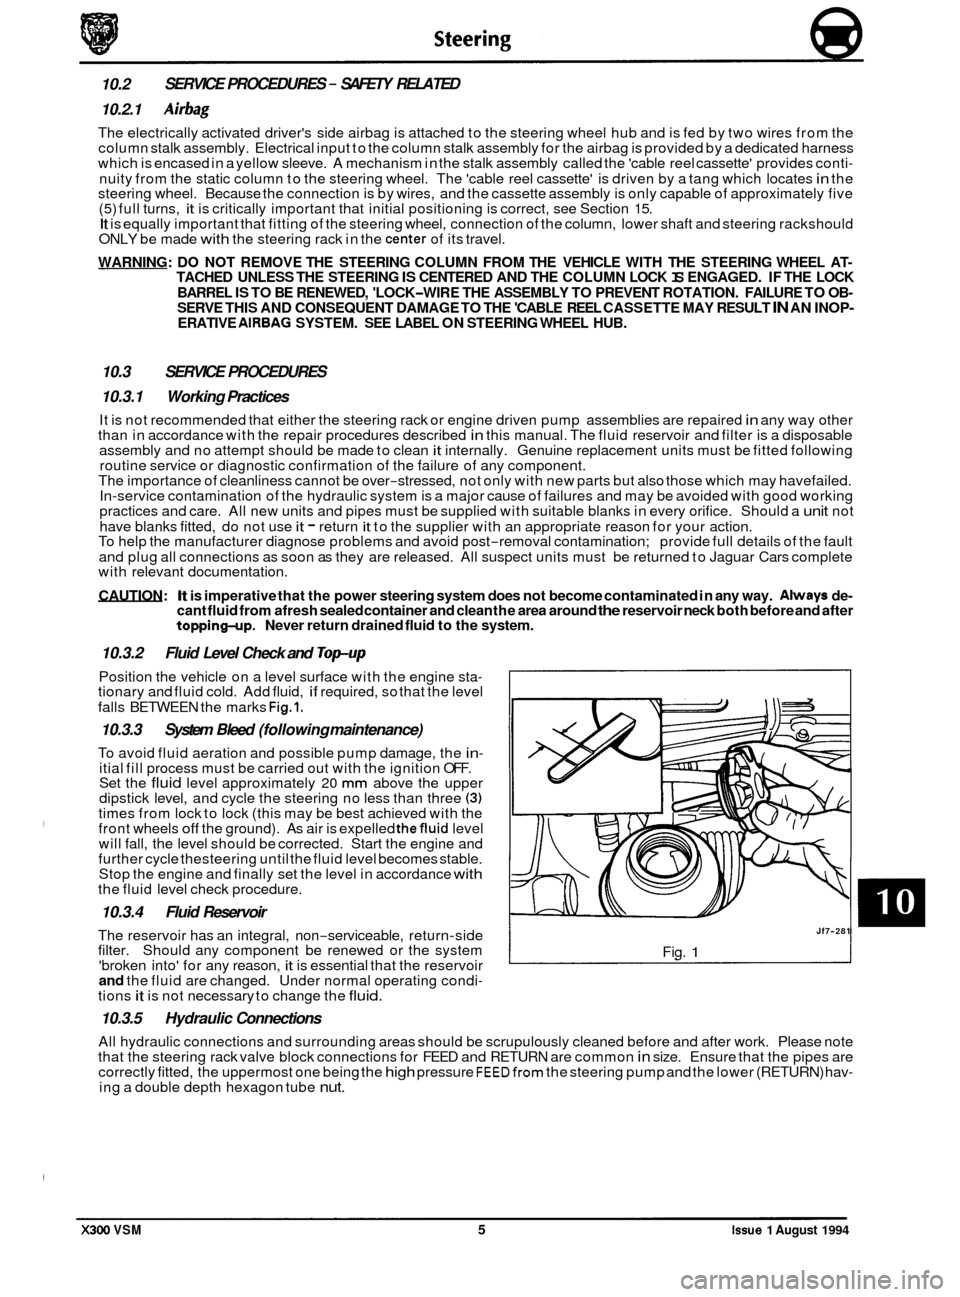
10.3.2
Position the vehicle on a level surface with the engine sta- tionary and fluid cold. Add fluid, if required, so that the level
falls BETWEEN the marks
Fig.1.
10.3.3 System Bleed (following maintenance)
To avoid fluid aeration and possible pump damage, the in- itial fill process must be carried out with the ignition OFF.
Set the fluid level approximately 20 mm above the upper
dipstick level, and cycle the steering no less than three (3) times from lock to lock (this may be best achieved with the
front wheels off the ground). As air is expelled thefluid level
will fall, the level should be corrected. Start the engine and
further cycle thesteering until the fluid level becomes stable.
Stop the engine and finally set the level in accordance
with the fluid level check procedure.
10.3.4 Fluid Reservoir
The reservoir has an integral, non-serviceable, return-side
filter. Should any component be renewed or the system
'broken into' for any reason,
it is essential that the reservoir and the fluid are changed. Under normal operating condi- tions it is not necessary to change the fluid.
10.3.5 Hydraulic Connections
Fluid
Level Check and
Top-up
Jf7-281
Fig. 1
All hydraulic connections and surrounding areas should be scrupulously cleaned before and after work. Please note
that the steering rack valve block connections for FEED and RETURN are common in size. Ensure that the pipes are
correctly fitted, the uppermost one being the high pressure FEEDfrom the steering pump and the lower (RETURN) hav- ing a double depth hexagon tube nut.
X300 VSM 5 issue 1 August 1994
Page 205 of 521
@ Steering
Cause
Fluid level low?
Drive belt slack
(V12)
Pump drive loose (6cyl)
center pressures low
Air in system due to loose connection
Pump shaft seal faulty (fluid loss)
Delivery pressure or flow too low
Return flow restricted by blocked reser
-
voir filter
Both check valves blocked
Rack damper too
tight
Lower column incorrectly set
Excessive upper column friction
Faulty rotary valve or seal
Drive belt slack
(VI217
Engine idle speed too low
Pump drive loose
(6cyl)
Air in system due to loose connection
Pump shaft seal faulty (fluid
loss)
Delivery pressure or flow too low
Fluid level low?
tire pressures
high
Air in system due to loose connection
Stiff or seized steering joint
Rack damper too tight
Castor or tracking error
Lower column over extended
Fluid level low?
Air
in system due to loose connection
Pump shaft seal faulty (fluid
loss)
Rack damper loose
Pinion bearing faulty
Rack or column fixings loose
Rack mounting bracket loose
Rack mounting bush loose
Free play in column assembly
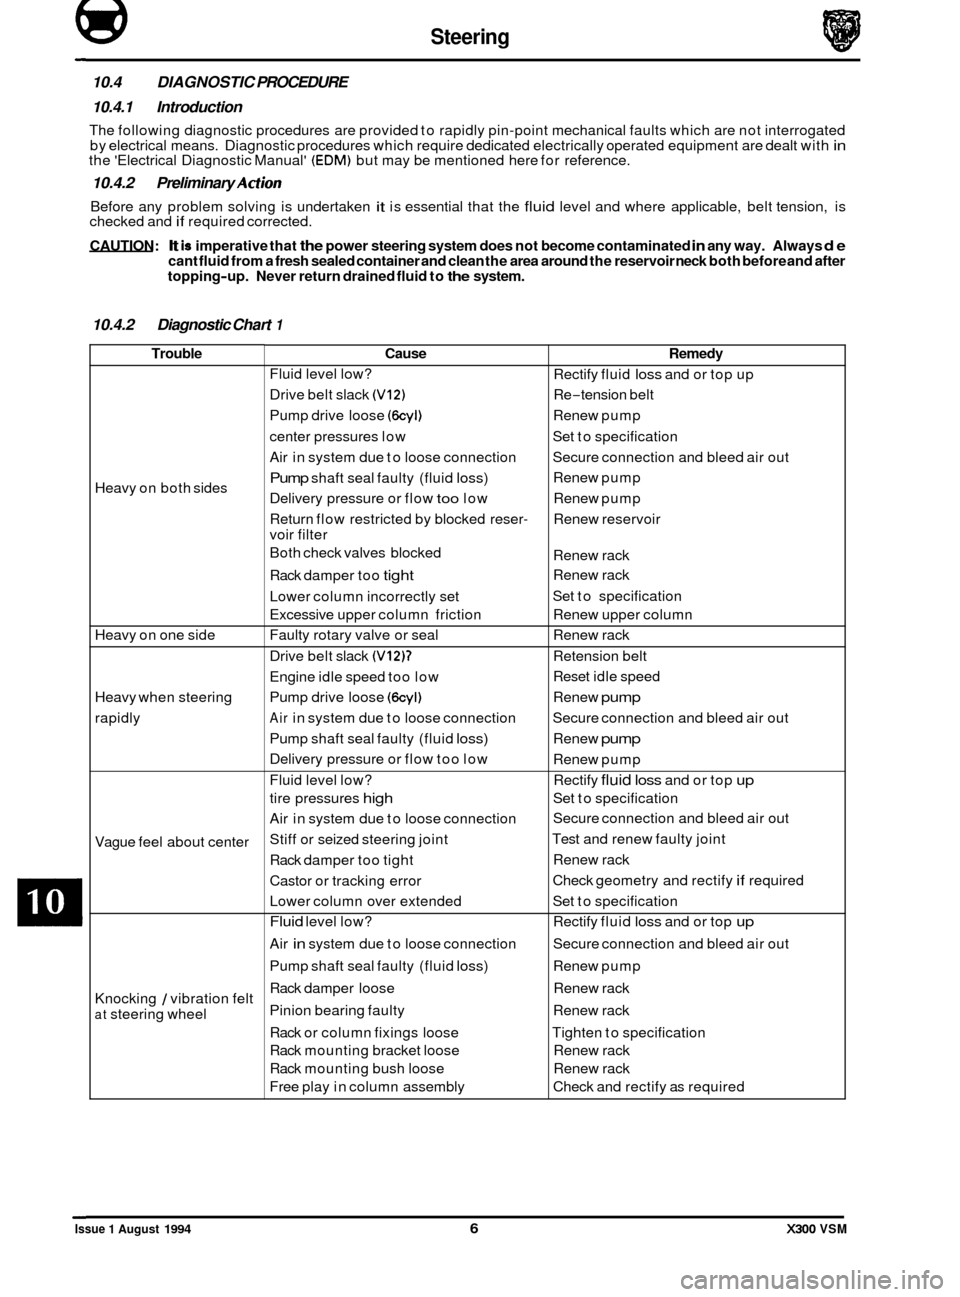
10.4 DIAGNOSTIC PROCEDURE
10.4.1 Introduction
The following diagnostic procedures are provided to rapidly pin-point mechanical faults which are not interrogated
by electrical means. Diagnostic procedures which require dedicated electrically operated equipment are dealt with in the 'Electrical Diagnostic Manual' (EDM) but may be mentioned here for reference.
10.4.2 Preliminary Action
Before any problem solving is undertaken it is essential that the fluid level and where applicable, belt tension, is
checked and if required corrected.
CAUTION: It is imperative that the power steering system does not become contaminated in any way. Always de cant fluid from a fresh sealed container and clean the area around the reservoir neck both before and after
topping-up. Never return drained fluid to the system.
10.4.2 Diagnostic Chart 1
Remedy
Rectify fluid loss and or top up
Re
-tension belt
Renew pump
Set to specification
Secure connection and bleed air out
Renew pump
Renew pump
Renew reservoir
Renew rack
Renew rack
Set to specification
Renew upper column
Renew rack
Retension belt
Reset idle speed
Renew
pump
Secure connection and bleed air out
Renew
pump
Renew pump
Rectify
fluid loss and or top up
Set to specification
Secure connection and bleed air out
Test and renew faulty joint
Renew rack
Check geometry and rectify
if required
Set to specification
Rectify fluid
loss and or top up
Secure connection and bleed air out
Renew pump
Renew rack
Renew rack
Tighten to specification
Renew rack
Renew rack
Check and rectify as required
Trouble
Heavy on both sides
Heavy on one side
Heavy when steering
rapidly
Vague feel about center
Knocking
1 vibration felt
at steering wheel
0
0
0
0
Issue 1 August 1994 6 X300 VSM
Page 207 of 521
@ Steering
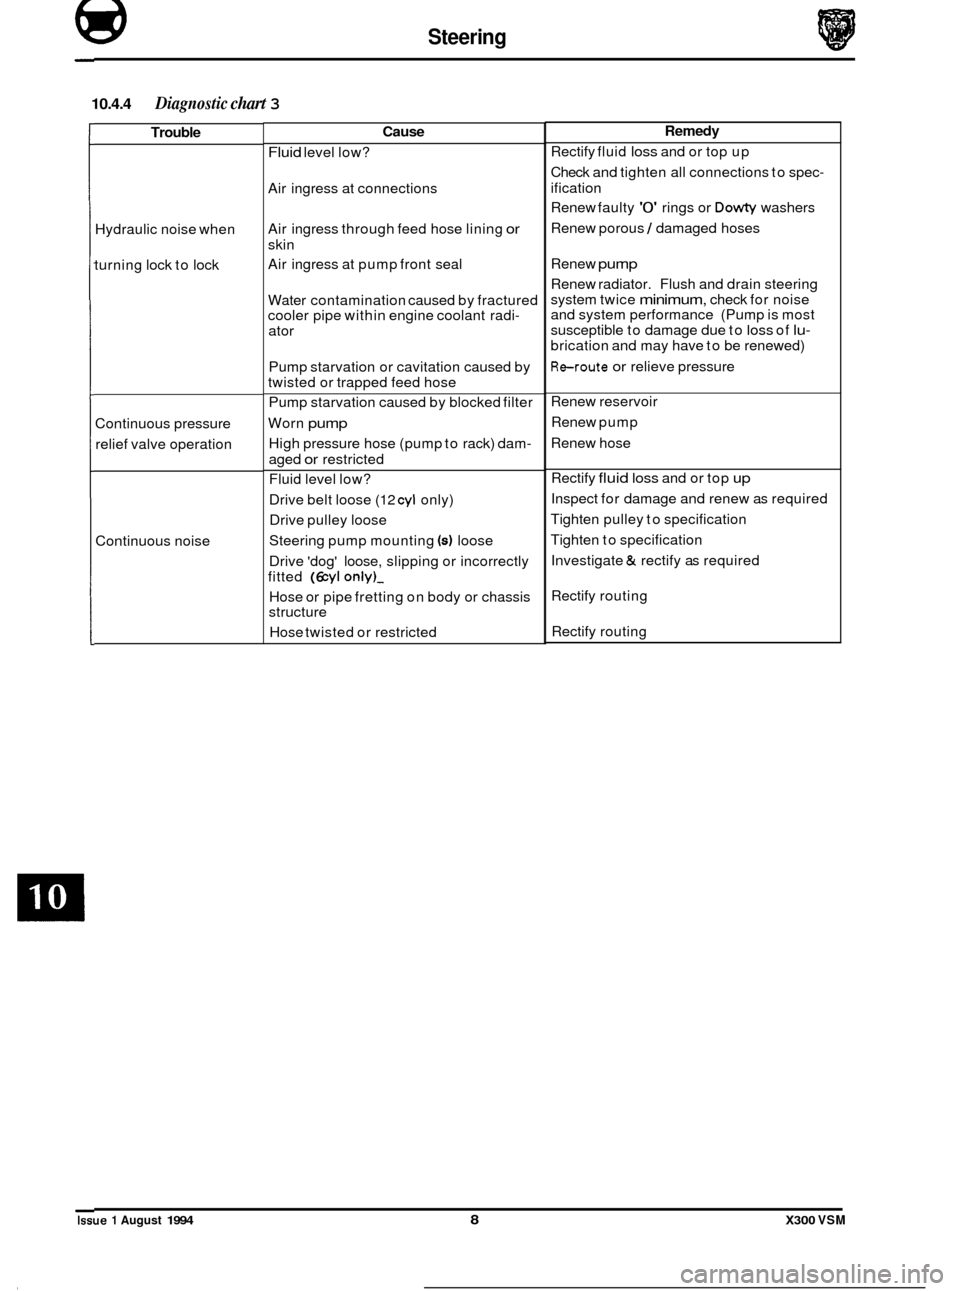
10.4.4 Diagnostic chart 3
Trouble
Hydraulic noise when
turning lock to lock
Continuous pressure
relief valve operation
Continuous noise
Cause
Fluid level low?
Air ingress at connections
Air ingress through feed hose lining
or
skin
Air ingress at pump front seal
Water contamination caused by fractured
cooler pipe within engine coolant radi
-
ator
Pump starvation or cavitation caused by
twisted or trapped feed hose
Pump starvation caused by blocked filter
Worn
pump
High pressure hose (pump to rack) dam-
aged or restricted
Fluid level low?
Drive belt loose
(12 cyl only)
Drive pulley loose
Steering pump mounting
(4 loose
Drive 'dog' loose, slipping or incorrectly
fitted
(6 cyl only)-
Hose or pipe fretting on body or chassis
structure
Hose twisted or restricted
Remedy
Rectify fluid loss and or top up
Check and tighten all connections to spec
-
ification
Renew faulty
'0' rings or Dowty washers
Renew porous
1 damaged hoses
Renew
pump
Renew radiator. Flush and drain steering
system twice
minimum, check for noise
and system performance (Pump is most
susceptible to damage due to
loss of lu-
brication and may have to be renewed)
Reroute or relieve pressure
Renew reservoir
Renew pump
Renew hose
Rectify
fluid loss and or top up
Inspect for damage and renew as required
Tighten pulley to specification
Tighten to specification
Investigate
& rectify as required
Rectify routing
Rectify routing
Issue 1 August 1994 8 X300 VSM
Page 216 of 521
may include:
0
0
Loose or worn wheel bearings.
Loose or worn suspensions or steering components.
0 Worn or damaged drive shaft slip yoke joint.
0 Front disc rotor runout.
o Loose engine or transmission supports.
0 Driveline alignment.
0 Engine driven accessories.
Suspension Systems
11.4 DIAGNOSIS AND TESTING
' 11.4.1 Tire Wear
Tires should be inspected as abnormal or excessive wear may becaused by incorrect wheel alignment, wheelbire im- balance, or incorrect tire pressure.
1 1.4.2 vibration and Roughness
Vibration, roughness, and shimmy conditions may be caused by excessive tire or wheel runout, worn or cupped tires,
or wheel and tire unbalance.
Most of these conditions are due to irregularities in the road surface, hence driving the vehicle on different types of
road surface will often indicate the cause of the condition.
Do not automatically suspect the tires when attempting to diagnose a vibration concern as other sources of vibration
Before investigating any other vibration concerns,
a roaG &est and a customer inter\,.dw (if possible) should be carried
out. This can provide much of the information needed to find the source of vibration.
Drive the vehicle on a road that is preferably smooth and free of undulation and
if vibration is apparent note, the speed at which thevibration occurs, whattype of vibration occurs in each speed range (mechanical or audible), howthevibra- tion is affected by changes in vehicle speed , engine speed and engine torque, and the type of vibration sensitivity
(torque sensitive, vehicle speed sensitive, or speed sensitive).
Some of the condition terms used when describing sources of vibration are explained as follows:
0 Torque Sensitive
This condition can be improved or worsened by accelerating, decelerating, coasting, maintaining
a steady
vehicle speed and application of engine torque.
0 Vehicle Speed Sensitive
This means that the vibration always occurs at the same vehicle speed and is not affected by engine torque,
engine rpm, or transmission gear selection.
B
0 Engine Speed Sensitive
This means that the vibration occurs
at varying vehicle speeds when a different transmission gear is selected.
It can sometimes be isolated by increasing or decreasing engine speed with the transmission in 'NEUTRAL', or
by stall testing with the engine in gear. If the condition is enginesensitive, the condition is not related to tires.
If the road tests indicates that the vibration is related to the tires or wheels,use a 'lire Wear Diagnosis Chart' to
investigate the cause of concern. Should the road test indicate that there is tire whine, but noshake or vibration,
the noise originates from the contact between the tire and the road surface.
X300 VSM 3 Issue 1 August 1994
Page 225 of 521
The input frequency from each wheel speed sensor signal is translated by the ABS I TC CM, into a comparable wheel
speed. The ABS / TC CM continually monitors the system. False wheel speed information, such as sudden speed
changes in excess of 20 km / h or excessive speeds, are detected as a 'sensor malfunction'. The ABS / TC CM reacts
to fault conditions in the following ways:
Inhibit- ABS/traction control is inhibited until the sensed speed returns to within an acceptable limit, whereupon ABS
/traction control is restored. Conventional braking is unaffected. Depending on vehicle speed the ABS/traction control
warning lights may come on.
DisaMe - ABS /traction control is Disabled (switched off) and the ABS /traction control warning lights come on. The
system will not be restored until the engine is switched off and restarted orthe fault has been rectified. Afterthe system
has been disabled, the warning lamps remain on until the vehicle has reached a speed of 20 km/ h during thefirst igni- tion cycle after fault rectification.
Full diagnostic information for the ABS /TC
CM is given in the Electrical Diagnostic Manual (EDM), Section 12.
Issue 1 August 1994 2 X300 VSM
Page 229 of 521
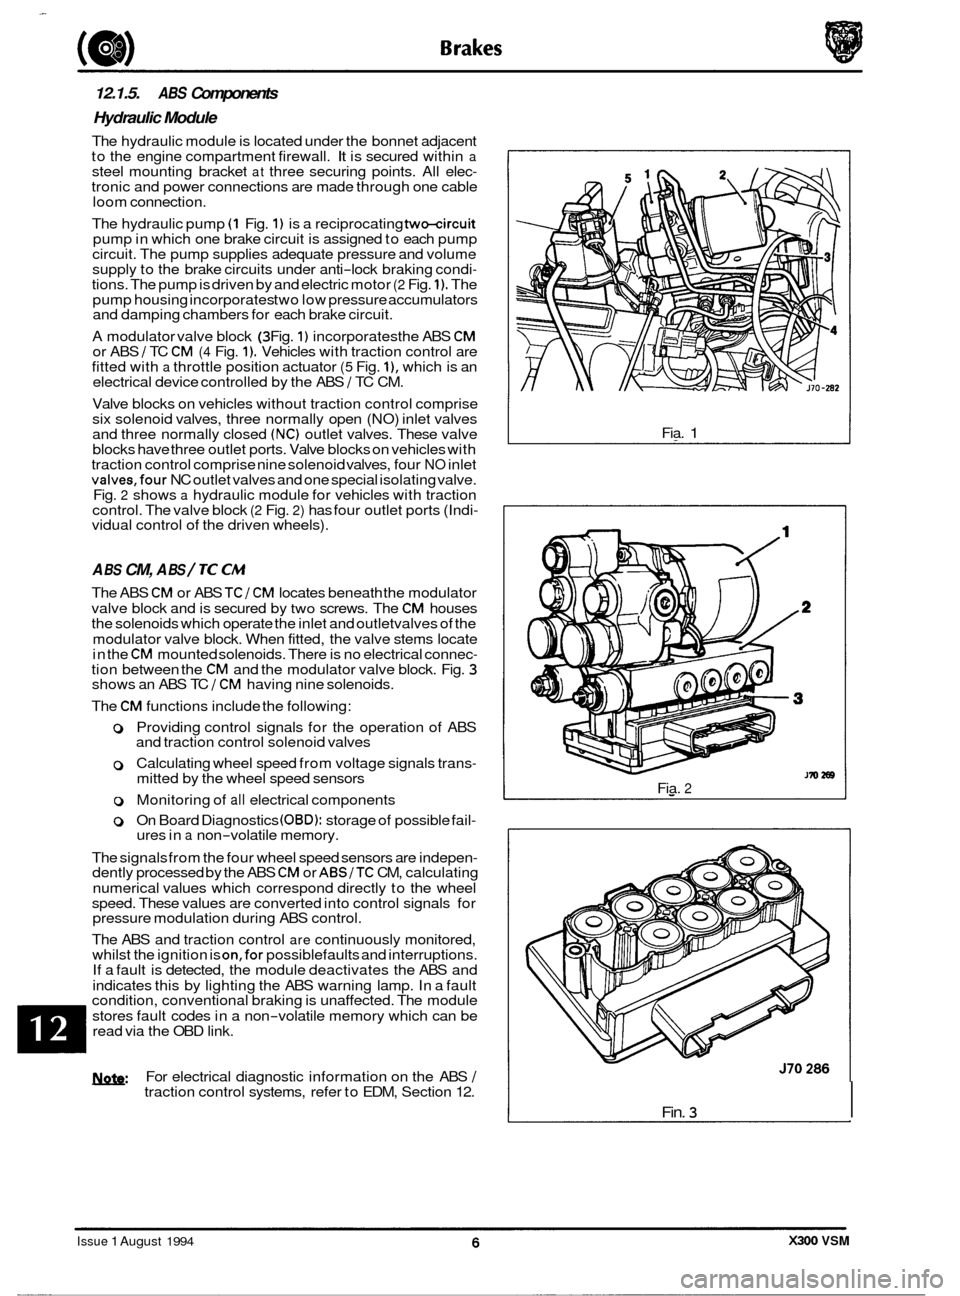
12.1.5. ABS Components
Hydraulic Module
The hydraulic module is located under the bonnet adjacent
to the engine compartment firewall. It is secured within a steel mounting bracket at three securing points. All elec- tronic and power connections are made through one cable
loom connect ion.
The hydraulic pump
(1 Fig. 1) is a reciprocating two-circuit pump in which one brake circuit is assigned to each pump
circuit. The pump supplies adequate pressure and volume
supply to the brake circuits under anti
-lock braking condi- tions. The pump is driven by and electric motor (2 Fig. 1). The
pump housing incorporates two low pressure accumulators
and damping chambers for each brake circuit.
A modulator valve block
(3 Fig. 1) incorporates the ABS CM or ABS / TC CM (4 Fig. 1). Vehicles with traction control are
fitted with a throttle position actuator (5 Fig. I), which is an
electrical device controlled by the ABS 1 TC CM.
Valve blocks on vehicles without traction control comprise
six solenoid valves, three normally open (NO) inlet valves
and three normally closed
(NC) outlet valves. These valve
blocks have three outlet ports. Valve blocks on vehicles with
traction control comprise nine solenoid valves, four
NO inlet valves,four NC outlet valves and one special isolating valve.
Fig. 2 shows a hydraulic module for vehicles with traction
control. The valve block (2 Fig. 2) has four outlet ports (Indi- vidual control of the driven wheels).
A BS CM, A BS / TC CM
The ABS CM or ABS TCI CM locates beneath the modulator
valve block and is secured by
two screws. The CM houses
the solenoids which operate the inlet and outletvalves of the
modulator valve block. When fitted, the valve stems locate
in the
CM mounted solenoids. There is no electrical connec- tion between the CM and the modulator valve block. Fig. 3 shows an ABS TC 1 CM having nine solenoids.
The
CM functions include the following:
0 Providing control signals for the operation of ABS
and traction control solenoid valves
0 Calculating wheel speed from voltage signals trans- mitted by the wheel speed sensors
0 Monitoring of all electrical components
0 On Board Diagnostics (OBD): storage of possible fail- ures in a non-volatile memory.
The signals from the four wheel speed sensors are indepen
- dently processed by the ABS CM or ABSITC CM, calculating
numerical values which correspond directly to the wheel
speed. These values are converted into control signals for
pressure modulation during ABS control.
The ABS and traction control
are continuously monitored,
whilst the ignition is on,for possiblefaults and interruptions.
If a fault is detected, the module deactivates the ABS and
indicates this by lighting the ABS warning lamp. In a fault
condition, conventional braking is unaffected. The module
stores fault codes in a non
-volatile memory which can be
read via the OBD link.
U: For electrical diagnostic information on the ABS I traction control systems, refer to EDM, Section 12. Fia.
1
Fia. 2
Fin. 3 I
J70286
Issue 1 August 1994 X300 VSM
Page 257 of 521

Body Components & Trim d-!P
13.2
13.2.1 Doors, Description
Doors are of welded, mild steel frames welded to the door panels; sponge rubber primary and secondary seals are
mounted on the doors. Internal insulation is provided by a foam water shedder attached to the door by press fitting and doublesided adhesive tape.
Front and rear door armrests are attached to supports riveted to each door frame; the attaching screws are fitted
with access covers. Upper and lower trim pads and a door pocket are attached to each of the doors by clips and screws. multi-plug connectors are used to provide a means of connecting the guard lamps, window lift switches and loud- speakers, external mirror and regulator (front doors only), which are housed within the doors.
Central locking is provided subject to market variations: Dead Locking for UK
/ Europe and Driver only unlock for N America. Door locks are eight disc, bayonet fixing, barrels with integral lock / unlock switches. Keys include ‘in-key’
transponders which are programmed to the vehicle via the Jaguar Diagnostic System also operate the engine immobi
- lisation system.
CAUTION: When removing the door panel water shedder, a foam membrane attached to each door panel by a com- bination of pressfitting (upper area) and bydouble-sided tape (bottom area), it is important that the shed- der is refitted correctly to maintain the water seal.
It is advisable not to disturb the bottom (taped) portion of the water shedder unless absolutely necessary
- it is possible to unclip the top of the shedder and bend it over to gain access to the inner panel.
If
it is necessary to disturb the bottom attachment, eg to remove the water shedder from the door panel,
the existing water shedder must be discarded and a new one fitted to ensure that the seal is maintained.
On refitting, the new water shedder should be pressed onto the door panel at the top and then the adhes- ive tape backing strip peeled off to enable the shedder to be pressed home at the bottom.
DOORS AND FUEL FILLER FLAP
13.2.2 front and Rear Door Trim Pad Veneer Panel,
Renew
SRO 76.47.11
76.47.12
. Reposition the inner door handle. See Fig. 1.
Remove the inner handle escutcheon plate blanking plate.
Undo and remove the inner handle escutcheon plate se-
. Remove the plate and gasket.
. Carefully Undo and remove the veneer panel.
Undo and remove the retaining clip securing screws.
. Remove the retaining clip assemblies.
9 Place the veneer panel aside.
Place the new veneer panel to the front.
Fit the retaining clip assemblies.
. Fit and tighten the retaining clip securing screws.
. Fit and fully seat the veneer panel to the door.
. Reposition the inner door handle.
. Fit the gasket and plate over the inner door handle.
. Fit and tighten the escutcheon plate securing screw.
. Refit the blanking plate.
curing
screw.
Fig.
1
0
0
0
0
Issue 1 August 1994 2 X300 VSM