JEEP CJ 1953 Owners Manual
Manufacturer: JEEP, Model Year: 1953, Model line: CJ, Model: JEEP CJ 1953Pages: 376, PDF Size: 19.96 MB
Page 91 of 376
'Jeep'
UNIVERSAL
SERIES SERVICE
MANUAL
Dl
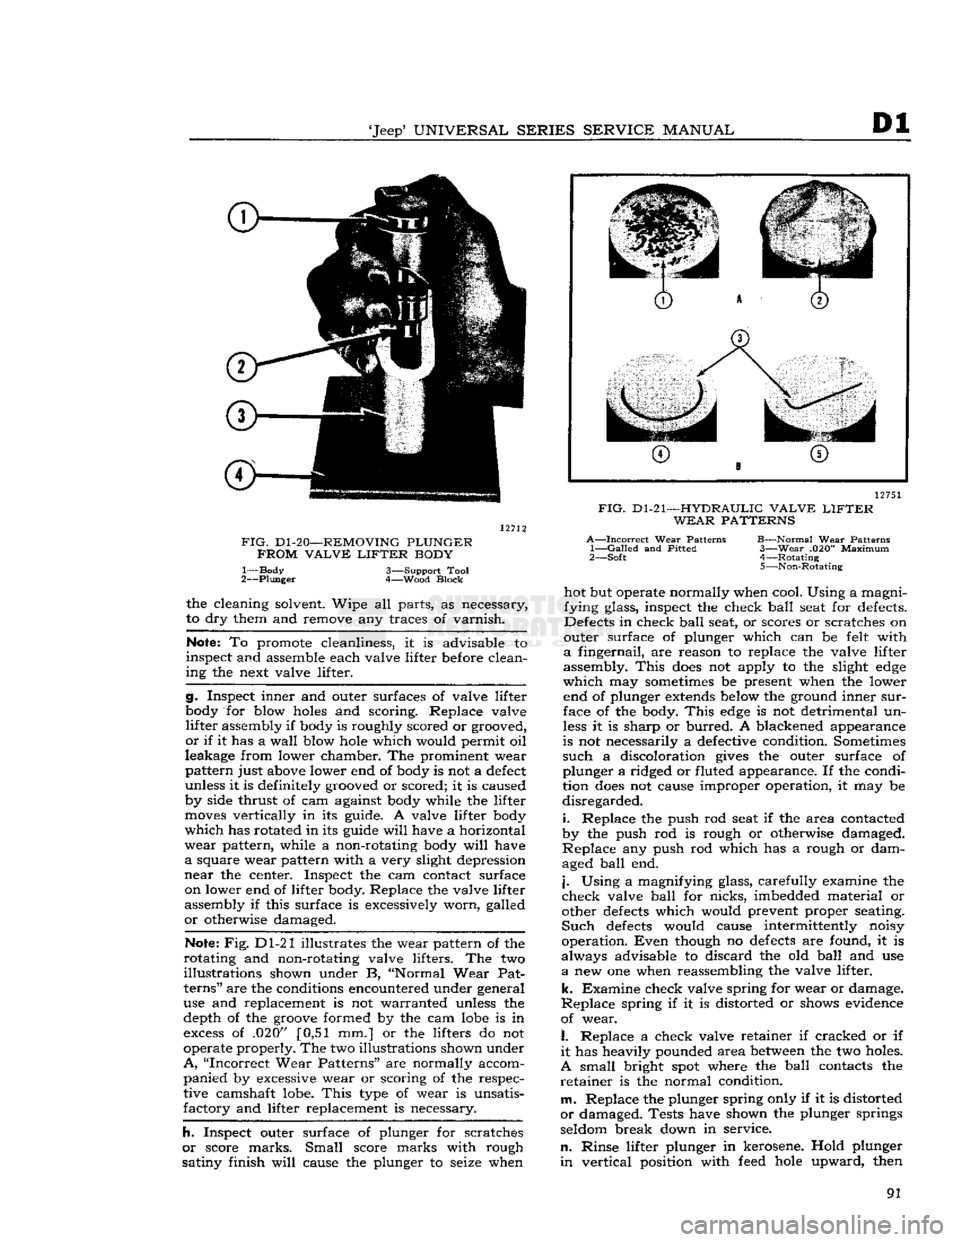
12712
FIG.
D1-20—REMOVING
PLUNGER
FROM
VALVE
LIFTER
BODY
1— Body 3—Support Tool
2—
Plunger
4—Wood Block the cleaning solvent. Wipe all parts, as necessary,
to dry them and remove any traces of varnish.
Note:
To promote cleanliness, it is advisable to
inspect and assemble each valve lifter before clean
ing the next valve lifter.
g. Inspect inner and outer surfaces of valve lifter
body for blow
holes
and scoring. Replace valve lifter assembly if body is roughly scored or grooved,
or
if it has a wall blow
hole
which would permit oil
leakage from lower chamber. The prominent wear
pattern just above lower end of body is not a
defect
unless it is definitely grooved or scored; it is caused
by side thrust of cam against body while the lifter
moves
vertically in its guide. A valve lifter body
which
has rotated in its guide
will
have a horizontal
wear
pattern, while a non-rotating body
will
have
a
square wear pattern with a very slight depression
near
the center. Inspect the cam contact surface on lower end of lifter body. Replace the valve lifter
assembly if this surface is excessively worn, galled
or
otherwise damaged.
Note:
Fig. Dl-21 illustrates the wear pattern of the
rotating and non-rotating valve lifters. The two
illustrations shown under B, "Normal Wear Pat
terns"
are the conditions encountered under general
use and replacement is not warranted unless the depth of the
groove
formed by the cam
lobe
is in
excess
of .020" [0,51 mm.] or the lifters do not
operate properly. The two illustrations shown under
A,
"Incorrect Wear Patterns" are normally accom panied by excessive wear or scoring of the respec
tive camshaft lobe.
This
type of wear is unsatis
factory and lifter replacement is necessary.
h.
Inspect outer surface of plunger for scratches
or
score marks.
Small
score marks with rough
satiny finish
will
cause the plunger to seize when 12751
FIG.
D1-21—HYDRAULIC
VALVE
LIFTER
WEAR PATTERNS
A—Incorrect
Wear Patterns B—Normal Wear Patterns
1—
Galled
and Pitted 3—Wear .020" Maximum
2— Soft 4—Rotating
5—Non-Rotating
hot but operate normally when cool. Using a magni
fying glass, inspect the check ball seat for defects.
Defects in check ball seat, or scores or scratches on
outer surface of plunger which can be felt with
a
fingernail, are reason to replace the valve lifter
assembly.
This
does
not apply to the slight
edge
which
may
sometimes
be present when the lower end of plunger
extends
below the ground inner
sur
face of the body.
This
edge
is not detrimental un
less
it is sharp or burred. A blackened appearance
is not necessarily a defective condition. Sometimes
such
a discoloration
gives
the outer surface of
plunger a ridged or fluted appearance. If the condi
tion
does
not cause improper operation, it may be
disregarded.
i.
Replace the push rod seat if the area contacted
by the push rod is rough or otherwise damaged.
Replace
any push rod which has a rough or dam
aged ball end.
j.
Using a magnifying glass, carefully examine the
check valve ball for nicks, imbedded material or
other
defects
which would prevent proper seating.
Such
defects
would cause intermittently noisy
operation.
Even
though no
defects
are found, it is
always advisable to discard the old ball and use
a
new one when reassembling the valve lifter,
k.
Examine check valve spring for wear or damage.
Replace
spring if it is distorted or shows evidence
of wear.
I.
Replace a check valve retainer if cracked or if
it
has heavily pounded area
between
the two holes.
A
small bright
spot
where the ball contacts the
retainer
is the normal condition.
m.
Replace the plunger spring only if it is distorted
or
damaged. Tests have shown the plunger springs
seldom break down in service.
n.
Rinse lifter plunger in kerosene. Hold plunger
in
vertical position with
feed
hole
upward, then 91
Page 92 of 376
Di
DAUNTLESS
V-6
ENGINE
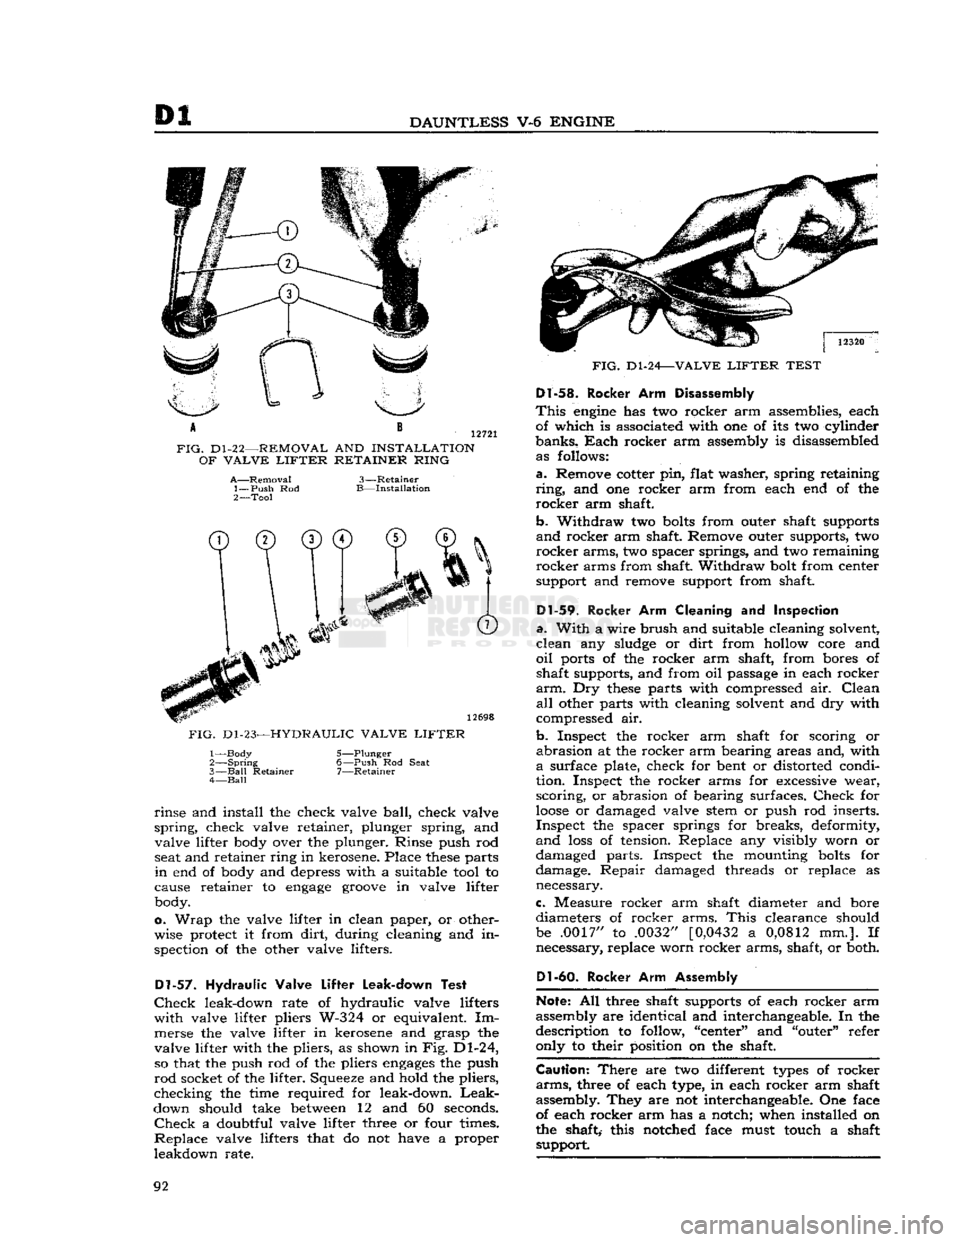
12721
FIG.
D1-22—REMOVAL
AND
INSTALLATION
OF
VALVE
LIFTER
RETAINER
RING
A—Removal'
1—
Push
Rod
2—
Tool
3-
B-
-Retainer
-Installation
T)
0
© ©
6
FIG.
D1-23—HYDRAULIC
VALVE
LIFTER
1—
Body
2—
Spring
3—
Ball
Retainer
4—
Ball
5— -Plunger
6—
Push
Rod
Seat
7—
-Retainer
rinse
and
install
the
check valve
ball,
check valve
spring,
check valve retainer, plunger spring,
and
valve lifter body over
the
plunger. Rinse push
rod
seat and retainer ring in kerosene. Place
these
parts
in
end of
body and depress with
a
suitable tool
to
cause retainer
to
engage
groove
in
valve lifter body.
o.
Wrap
the
valve lifter
in
clean paper,
or
other
wise protect
it
from
dirt,
during cleaning
and in
spection
of the
other valve lifters.
Dl-57.
Hydraulic Valve
Lifter
Leak-down
Test
Check
leak-down rate
of
hydraulic valve lifters
with
valve lifter pliers W-324
or
equivalent.
Im
merse
the
valve lifter
in
kerosene
and
grasp
the
valve lifter with
the
pliers,
as
shown
in
Fig. Dl-24, so that
the
push rod
of the
pliers
engages
the
push
rod
socket
of
the lifter. Squeeze and hold
the
pliers,
checking
the
time required
for
leak-down.
Leak-
down should take
between
12 and 60
seconds.
Check
a
doubtful valve lifter three
or
four times.
Replace
valve lifters that
do not
have
a
proper
leakdown rate.
FIG.
Dl-24—VALVE
LIFTER
TEST
Dl-58.
Rocker
Arm
Disassembly
This
engine
has two
rocker arm assemblies, each of which
is
associated with
one of its two
cylinder
banks.
Each
rocker arm assembly
is
disassembled as follows:
a.
Remove cotter pin, flat washer, spring retaining
ring,
and one
rocker
arm
from each
end of the
rocker
arm shaft.
b.
Withdraw
two
bolts
from outer shaft supports
and
rocker arm shaft. Remove outer supports,
two
rocker
arms, two spacer springs, and
two
remaining
rocker
arms from shaft. Withdraw bolt from center
support
and
remove support from shaft.
Dl-59.
Rocker
Arm Cleaning and
Inspection
a.
With
a
wire brush and suitable cleaning solvent,
clean
any
sludge
or
dirt
from hollow core
and
oil
ports
of the
rocker
arm
shaft, from bores
of
shaft supports, and from
oil
passage
in
each rocker
arm.
Dry
these
parts with compressed
air.
Clean
all
other parts with cleaning solvent and dry with
compressed
air.
b.
Inspect
the
rocker
arm
shaft
for
scoring
or
abrasion
at the
rocker arm bearing areas and, with
a
surface plate, check
for
bent
or
distorted condi
tion. Inspect
the
rocker arms
for
excessive wear,
scoring,
or
abrasion
of
bearing surfaces.
Check
for
loose
or
damaged valve stem
or
push
rod
inserts.
Inspect
the
spacer springs
for
breaks, deformity,
and
loss
of
tension. Replace
any
visibly worn
or
damaged parts. Inspect
the
mounting
bolts
for
damage.
Repair
damaged threads
or
replace
as
necessary.
c.
Measure rocker
arm
shaft diameter
and
bore
diameters
of
rocker arms.
This
clearance should be .0017"
to
.0032"
[0,0432
a
0,0812
mm.]. If
necessary, replace worn rocker arms, shaft,
or
both.
Dl-60.
Rocker
Arm Assembly
Note:
All three shaft supports
of
each rocker arm
assembly are identical and interchangeable. In
the
description
to
follow, "center"
and
"outer" refer only
to
their position
on the
shaft.
Caution:
There
are two
different
types
of
rocker
arms,
three
of
each type,
in
each rocker arm shaft
assembly. They
are not
interchangeable. One face
of each rocker arm
has a
notch; when installed
on
the shaft, this notched face must touch
a
shaft support.
92
Page 93 of 376
'Jeep'
UNIVERSAL
SERIES SERVICE
MANUAL
Dl Caution:
Oil ports of the rocker arm shaft must
coincide with oil return passages of the rocker
arms.
If they do not,
engine
oil has no return path
from
the cylinder head to the crankcase; in that
case,
engine
oil flows down the valve
stems
and
burns
in the cylinders.
There
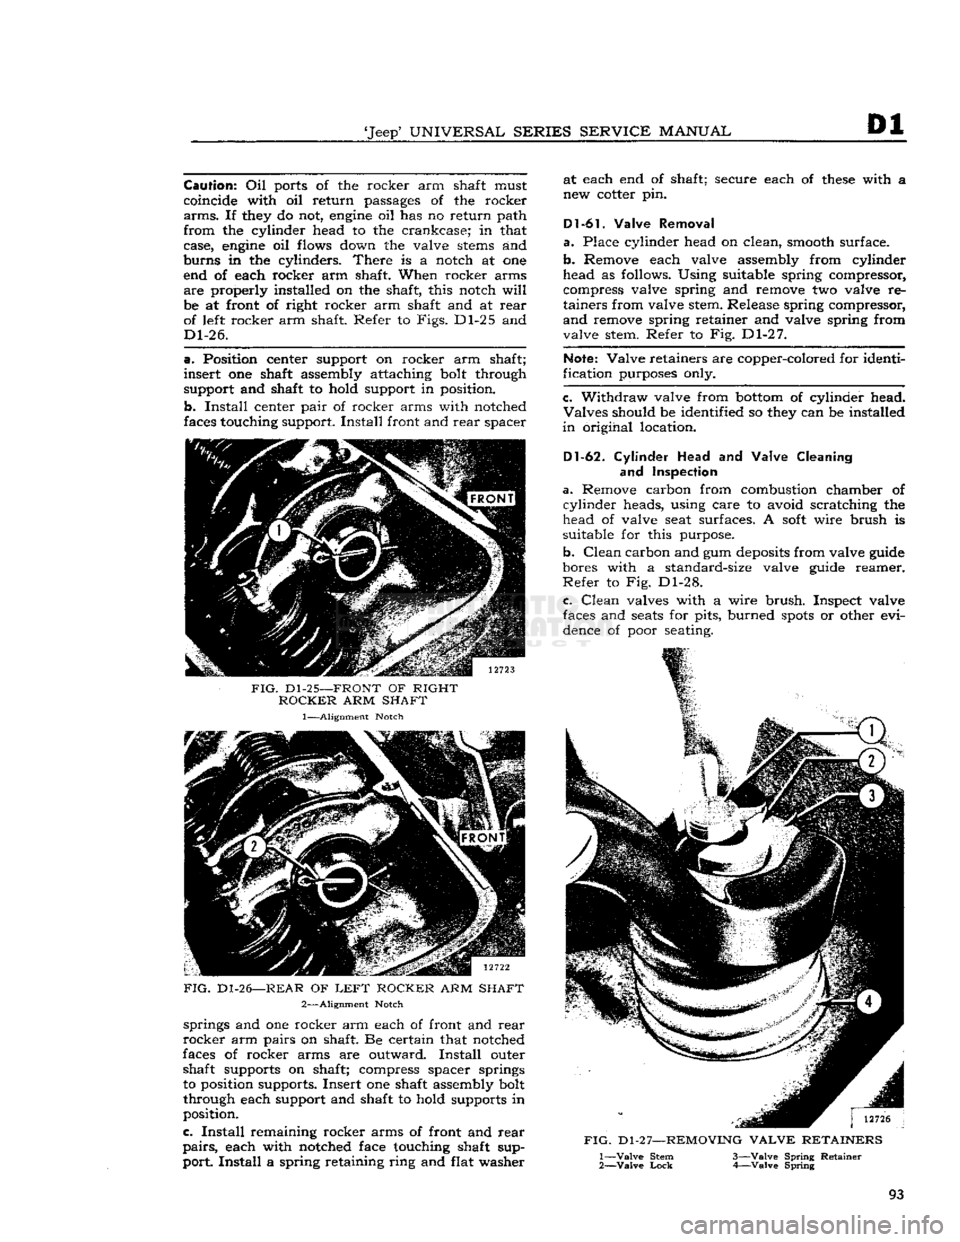
is a notch at one end of each rocker arm shaft. When rocker arms
are
properly installed on the shaft, this notch
will
be at front of right rocker arm shaft and at
rear
of left rocker arm shaft. Refer to
Figs.
Dl-25 and
Dl-26.
a.
Position center support on rocker arm shaft;
insert
one shaft assembly attaching bolt through
support and shaft to hold support in position.
b.
Install
center
pair
of rocker arms with notched
faces touching support.
Install
front and
rear
spacer
FIG.
Dl-25—FRONT
OF RIGHT
ROCKER
ARM SHAFT
1—Alignment Notch
FIG.
Dl-26—REAR OF
LEFT
ROCKER
ARM SHAFT 2—Alignment Notch springs and one rocker arm each of front and
rear
rocker
arm pairs on shaft. Be certain that notched
faces of rocker arms are outward.
Install
outer shaft supports on shaft; compress spacer springs
to position supports. Insert one shaft assembly bolt
through each support and shaft to hold supports in
position.
c.
Install
remaining rocker arms of front and
rear
pairs,
each with notched face touching shaft sup
port.
Install
a spring retaining ring and flat washer at each end of shaft; secure each of
these
with a
new cotter pin.
D1 -61.
Valve Removal
a.
Place cylinder head on clean, smooth surface.
b.
Remove each valve assembly from cylinder
head as follows. Using suitable spring compressor, compress valve spring and remove two valve re
tainers
from valve stem. Release spring compressor,
and
remove spring retainer and valve spring from
valve stem. Refer to Fig. Dl-27.
Note:
Valve retainers are copper-colored for identi
fication purposes only.
c.
Withdraw valve from
bottom
of cylinder head.
Valves
should be identified so they can be installed
in
original location.
D1-62.
Cylinder
Head and Valve Cleaning
and
Inspection
a.
Remove carbon from combustion chamber of
cylinder
heads, using care to avoid scratching the head of valve seat surfaces. A
soft
wire brush is
suitable for this purpose.
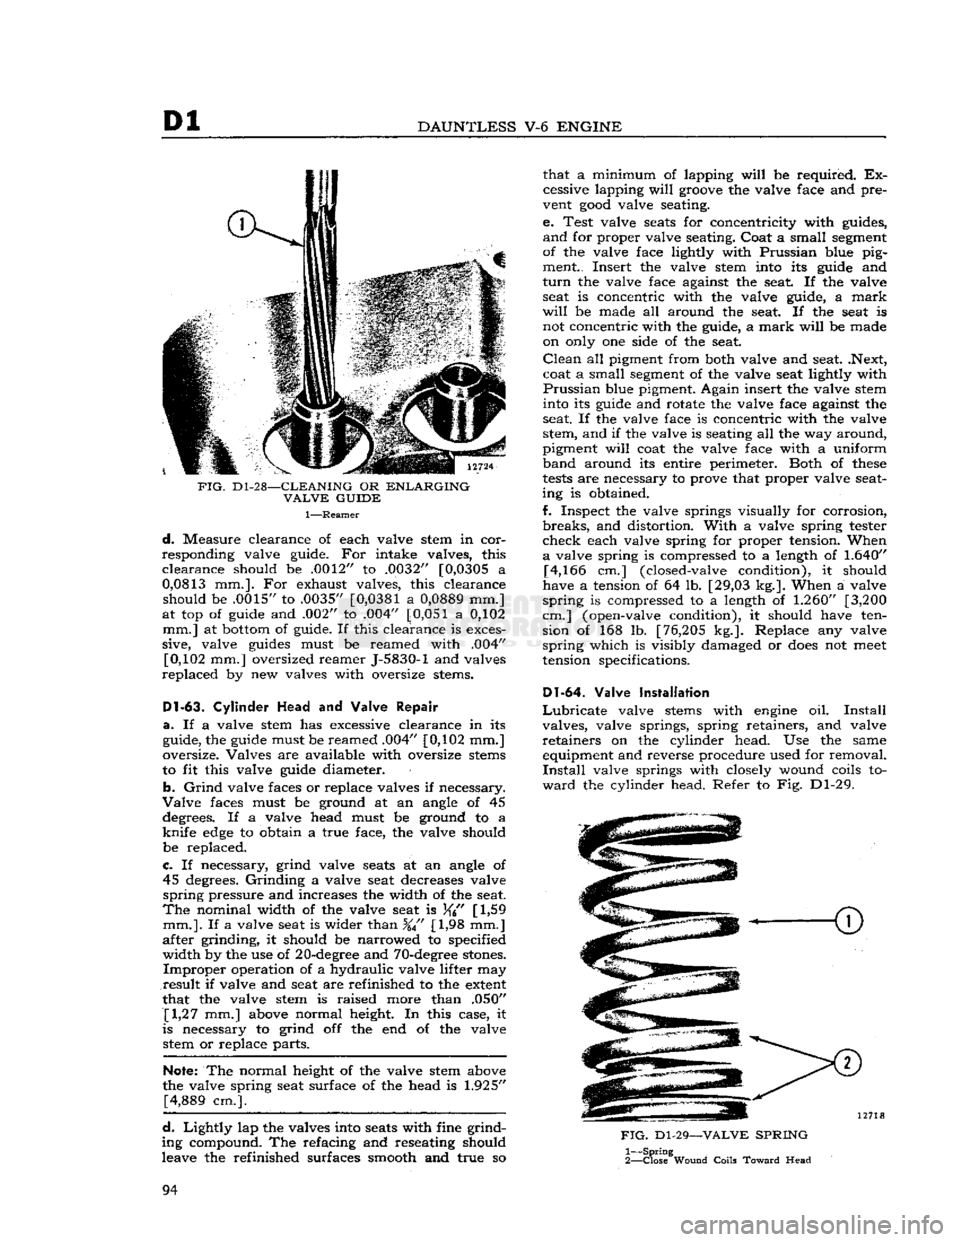
b.
Clean
carbon and gum
deposits
from valve guide
bores with a standard-size valve guide reamer.
Refer
to Fig. Dl-28.
c.
Clean
valves with a wire
brush.
Inspect valve
faces and
seats
for pits, burned
spots
or other evi dence of poor seating.
FIG.
D1 -2 7—REMOVING
VALVE
RETAINERS
1—
Valve
Stem 3—Valve Spring Retainer
2—
Valve
Lock
4—Valve Spring
93
Page 94 of 376
Dl
DAUNTLESS
V-6
ENGINE
FIG.
D1-28—CLEANING
OR
ENLARGING
VALVE
GUIDE
1—Reamer
d.
Measure clearance of each valve stem in cor
responding valve guide. For intake valves, this
clearance
should be .0012" to .0032" [0,0305 a
0,0813
mm.]. For exhaust valves, this clearance should be .0015" to .0035"
[0,0381
a
0,0889
mm.]
at top of guide and .002" to .004"
[0,051
a 0,102 mm.] at bottom of guide. If this clearance is exces
sive, valve guides must be reamed with .004" [0,102 mm.] oversized reamer J-5830-1 and valves
replaced
by new valves with oversize stems.
Dl-63.
Cylinder
Head
and Valve
Repair
a.
If a valve stem has excessive clearance in its
guide, the guide must be reamed .004" [0,102 mm.]
oversize. Valves are available with oversize stems
to fit this valve guide diameter.
b.
Grind
valve faces or replace valves if necessary.
Valve
faces must be ground at an angle of 45 degrees. If a valve head must be ground to a
knife
edge
to obtain a true face, the valve should
be replaced.
c.
If necessary, grind valve seats at an angle of 45 degrees.
Grinding
a valve seat decreases valve
spring
pressure and increases the width of the seat.
The
nominal width of the valve seat is
[
1,59
mm.].
If a valve seat is wider than %" [1,98 mm.]
after grinding, it should be narrowed to specified
width
by the use of 20-degree and 70-degree stones.
Improper
operation of a hydraulic valve lifter may
result
if valve and seat are refinished to the extent
that the valve stem is raised more than .050" [1,27 mm.] above normal height. In this case, it
is necessary to grind off the end of the valve stetti or replace parts.
Note:
The normal height of the valve stem above
the valve spring seat surface of the head is
1.925"
[4,889 cm.].
d.
Lightly
lap the valves into seats with fine grind
ing compound. The refacing and reseating should
leave the refinished surfaces smooth and true so that a minimum of lapping
will
be required. Ex
cessive lapping
will
groove the valve face and pre
vent
good
valve seating.
e. Test valve seats for concentricity with guides,
and
for proper valve seating. Coat a small segment
of the valve face lightly with Prussian blue pig ment.. Insert the valve stem into its guide and
turn
the valve face against the seat. If the valve seat is concentric with the valve guide, a
mark
will
be made all around the seat. If the seat is not concentric with the guide, a
mark
will
be made
on only one side of the seat.
Clean
all pigment from both valve and seat. .Next,
coat a small segment of the valve seat lightly with
Prussian
blue pigment. Again insert the valve stem into its guide and rotate the valve face against the
seat. If the valve face is concentric with the valve
stem, and if the valve is seating all the way around,
pigment
will
coat the valve face with a uniform
band
around its entire perimeter. Both of
these
tests
are necessary to prove that proper valve seat
ing is obtained.
f. Inspect the valve springs visually for corrosion,
breaks,
and distortion.
With
a valve spring tester
check
each valve spring for proper tension. When
a
valve spring is compressed to a length of
1.640"
[4,166 cm.] (closed-valve condition), it should
have a tension of 64 lb. [29,03 kg.]. When a valve
spring
is compressed to a length of
1.260"
[3,200
cm.] (open-valve condition), it should have ten sion of 168 lb. [76,205 kg.]. Replace any valve
spring
which is visibly damaged or
does
not
meet
tension specifications.
Dl-64.
Valve Installation
Lubricate
valve stems with engine oil.
Install
valves, valve springs, spring retainers, and valve
retainers
on the cylinder head. Use the same equipment and reverse procedure used for removal.
Install
valve springs with closely wound coils to
ward
the cylinder head. Refer to Fig. Dl-29.
FIG.
Dl-29—VALVE
SPRING
1—
Spring
2—
Close
Wound
Coils
Toward
Head
94
Page 95 of 376
'Jeep*
UNIVERSAL
SERIES
SERVICE
MANUAL
Dl
Dl-65.
Rocker Arm Cover Cleaning
and Inspection
a.
Clean
both rocker arm covers with suitable
cleaning solvent and dry thoroughly.
b.
Inspect each rocker arm cover visually for
scratches,
bends, dents, and tears. Replace cover
if
unserviceable.
Dl-66.
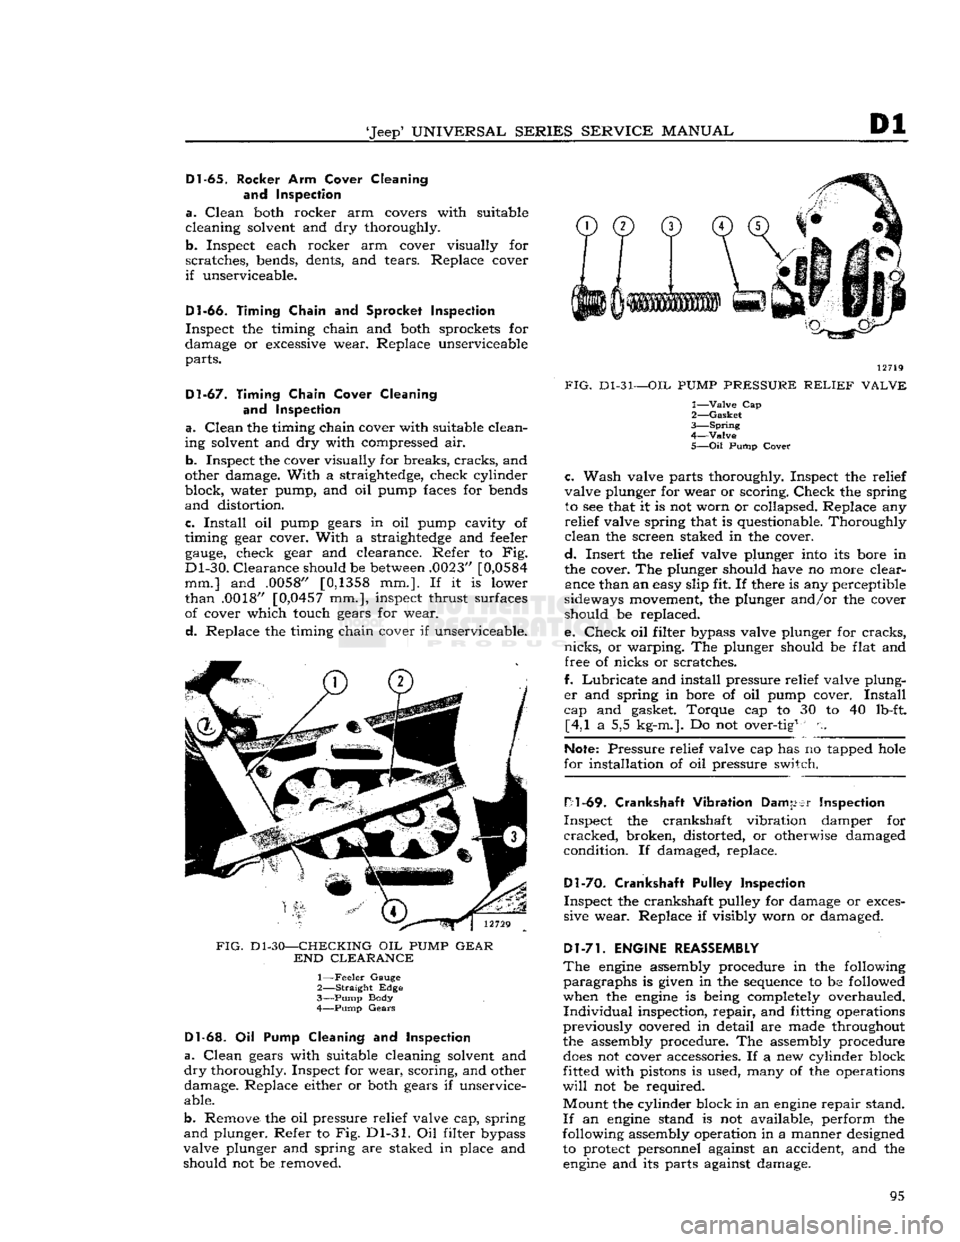
Timing Chain
and
Sprocket Inspection
Inspect
the timing chain and both sprockets for
damage or excessive wear. Replace unserviceable
parts.
Dl-67.
Timing Chain Cover Cleaning and Inspection
a.
Clean
the timing chain cover with suitable clean
ing solvent and dry with compressed air.
b.
Inspect the cover visually for breaks,
cracks,
and
other damage.
With
a straightedge, check cylinder
block, water pump, and oil pump faces for bends
and
distortion.
c.
Install
oil pump gears in oil pump cavity of
timing gear cover.
With
a straightedge and feeler
gauge,
check gear and clearance. Refer to Fig.
Dl-30.
Clearance
should be
between
.0023"
[0,0584
mm.] and .0058"
[0,1358
mm.]. If it is lower
than
.0018" [0,0457 mm.], inspect thrust surfaces
of cover which touch gears for wear.
d.
Replace the timing chain cover if unserviceable.
FIG.
Dl-30—CHECKING
OIL
PUMP
GEAR
END
CLEARANCE
1—
Feeler
Gauge
2—
Straight
Edge
3—
Pump
Body
4—
Pump
Gears
Dl-63.
Oil Pump Cleaning and
Inspection
a.
Clean
gears with suitable cleaning solvent and
dry
thoroughly. Inspect for wear, scoring, and other damage. Replace either or both gears if unservice
able.
b.
Remove the oil pressure relief valve cap, spring
and
plunger. Refer to Fig. Dl-31. Oil filter bypass
valve plunger and spring are staked in place and should not be removed. 12719
FIG.
Dl-31—OIL
PUMP
PRESSURE
RELIEF
VALVE
1—
Valve
Cap
2—
Gasket
3—
Spring
4—Valve
5—
Oil
Pump
Cover
c.
Wash valve parts thoroughly. Inspect the relief
valve plunger for wear or scoring.
Check
the spring to see that it is not worn or collapsed. Replace any
relief
valve spring that is questionable. Thoroughly
clean
the screen staked in the cover.
d.
Insert the relief valve plunger into its bore in
the cover. The plunger should have no more clear ance than an easy slip fit. If there is any perceptible
sideways movement, the plunger and/or the cover should be replaced.
e.
Check
oil filter bypass valve plunger for
cracks,
nicks,
or warping. The plunger should be flat and free of nicks or scratches.
f.
Lubricate
and install pressure relief valve plung
er
and spring in bore of oil pump cover.
Install
cap and gasket. Torque cap to 30 to 40 lb-ft. [4,1 a 5,5 kg-m.]. Do not over-tig1 n.
Note:
Pressure relief valve cap has no tapped
hole
for installation of oil pressure switch.
H1
-69.
Crankshaft Vibration
Damper
Inspection
Inspect
the crankshaft vibration damper for
cracked,
broken, distorted, or otherwise damaged
condition. If damaged, replace.
Dl-70.
Crankshaft Pulley Inspection
Inspect
the crankshaft pulley for damage or exces
sive wear. Replace if visibly worn or damaged.
Dl-71.
ENGINE REASSEMBLY
The
engine
assembly procedure in the following
paragraphs
is given in the sequence to be followed
when the
engine
is being completely overhauled.
Individual
inspection,
repair,
and fitting operations
previously covered in detail are made throughout
the assembly procedure. The assembly procedure
does
not cover accessories. If a new cylinder block
fitted with pistons is used, many of the operations
will
not be required.
Mount
the cylinder block in an
engine
repair stand.
If
an
engine
stand is not available, perform the
following assembly operation in a manner designed to protect personnel against an accident, and the
engine
and its parts against damage. 95
Page 96 of 376
Dl
DAUNTLESS
V-6
ENGINE
Note:
During
engine
reassembly, use Perfect Seal
Aerosol
Spray Sealer
Part
No.
994757
on all en
gine
gaskets to ensure against vacuum, oil, gasoline
and
water leaks. Apply to head gaskets, valve covers, water pumps, oil pan gaskets, radiator and
heater
hose
connections, felt gaskets, gasoline and
oil
line connections, stud bolts, spark plug threads,
and
grease retainer washers. Refer to manufac
turer's
instructions on container for proper appli
cation procedure.
Dl-72.
Cylinder
Block
and Crankshaft
Rear
Oil Seals
Braided
fabric seals are pressed into
grooves
of
cylinder
block and
rear
main bearing cap, to
rear
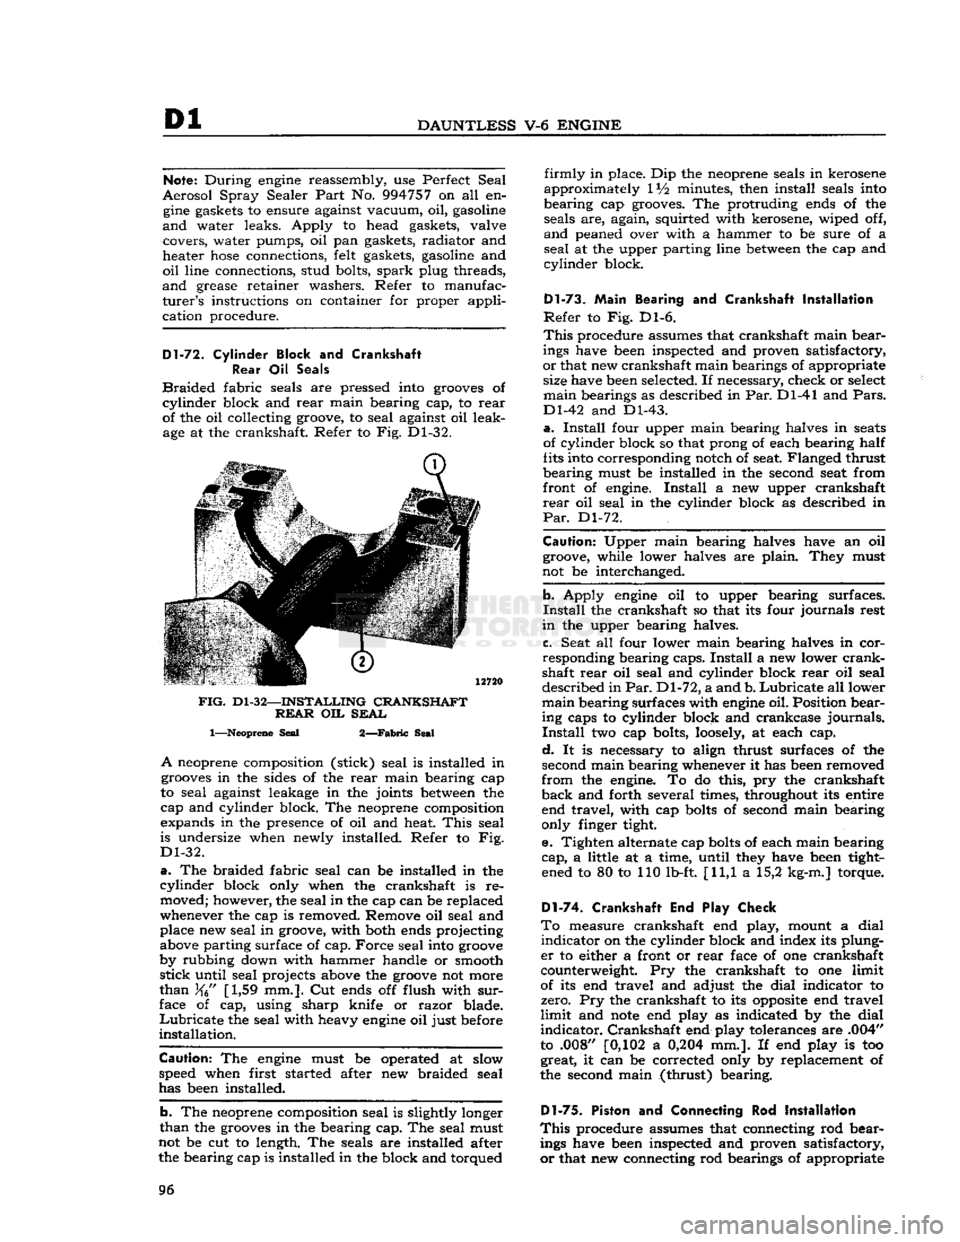
of the oil collecting groove, to seal against oil leak age at the crankshaft. Refer to Fig. Dl-32.
FIG.
Dl-32—INSTALLING
CRANKSHAFT REAR
OIL
SEAL
1—Neoprene
Seal
2—Fabric
Seal
A
neoprene composition (stick) seal is installed in
grooves
in the sides of the
rear
main bearing cap
to seal against leakage in the joints
between
the
cap and cylinder block. The neoprene composition
expands in the presence of oil and heat.
This
seal
is undersize when newly installed. Refer to Fig.
Dl-32.
a.
The braided fabric seal can be installed in the
cylinder
block only when the crankshaft is re moved; however, the seal in the cap can be replaced
whenever the cap is removed. Remove oil seal and place new seal in groove, with both ends projecting
above parting surface of cap. Force seal into
groove
by rubbing down with hammer handle or smooth
stick
until seal projects above the
groove
not more
than
[1,59 mm.]. Cut ends off flush with
sur
face of cap, using sharp knife or razor blade.
Lubricate
the seal with heavy
engine
oil just before
installation.
Caution:
The
engine
must be operated at slow
speed when first started after new braided seal
has been installed.
b. The neoprene composition seal is slightly longer
than
the
grooves
in the bearing cap. The seal must
not be cut to length. The seals are installed after the bearing cap is installed in the block and torqued
firmly
in place. Dip the neoprene seals in kerosene
approximately IV2 minutes, then install seals into
bearing cap grooves. The protruding ends of the seals are, again, squirted with kerosene, wiped off,
and
peaned over with a hammer to be sure of a
seal
at the upper parting line
between
the cap and
cylinder
block.
Dl-73.
Main
Bearing and Crankshaft
Installation
Refer
to Fig. Dl-6.
This
procedure assumes that crankshaft main bear
ings have been inspected and proven satisfactory,
or
that new crankshaft main bearings of appropriate size have been selected. If necessary, check or select
main
bearings as described in Par. Dl-41 and
Pars.
Dl-42 and Dl-43.
a.
Install
four upper main bearing halves in
seats
of cylinder block so that prong of each bearing half
fits into corresponding notch of seat. Flanged thrust
bearing must be installed in the second seat from
front of engine.
Install
a new upper crankshaft
rear
oil seal in the cylinder block as described in
Par.
Dl-72.
Caution:
Upper main bearing halves have an oil groove, while lower halves are plain. They must
not be interchanged.
b. Apply
engine
oil to upper bearing surfaces.
Install
the crankshaft so that its four journals rest
in
the upper bearing halves.
c. Seat all four lower main bearing halves in cor
responding bearing caps.
Install
a new lower
crank
shaft
rear
oil seal and cylinder block
rear
oil seal
described in
Par.
Dl-72, a and b.
Lubricate
all lower
main
bearing surfaces with
engine
oil. Position bear ing caps to cylinder block and crankcase journals.
Install
two cap bolts,
loosely,
at each cap.
d.
It is necessary to align thrust surfaces of the
second main bearing whenever it has been removed
from
the engine. To do this, pry the crankshaft
back
and forth several times, throughout its entire end travel, with cap
bolts
of second main bearing
only finger tight.
e. Tighten alternate cap
bolts
of each main bearing
cap,
a little at a time, until they have been tight ened to 80 to 110 lb-ft. [11,1 a 15,2 kg-m.] torque.
D1-74. Crankshaft End Play Check
To
measure crankshaft end play, mount a dial
indicator
on the cylinder block and index its plung
er
to either a front or
rear
face of one crankshaft
counterweight. Pry the crankshaft to one limit
of its end travel and adjust the dial indicator to
zero. Pry the crankshaft to its
opposite
end travel
limit
and
note
end play as indicated by the dial
indicator.
Crankshaft end play tolerances are .004"
to .008" [0,102 a
0,204
mm.]. If end play is too great, it can be corrected only by replacement of
the second main (thrust) bearing.
Dl-75.
Piston and Connecting Rod
Installation
This
procedure assumes that connecting rod bear ings have been inspected and proven satisfactory,
or
that new connecting rod bearings of appropriate 96
Page 97 of 376
'Jeep'
UNIVERSAL
SERIES SERVICE
MANUAL
Dl
size have
been
selected. If necessary, check or
select
connecting rod bearings as described in Par. Dl-49.
Note:
When a piston and connecting rod assembly
is properly installed, the oil spurt
hole
in the con necting rod
will
face the camshaft. The rib on the
edge
of the bearing cap
will
be on the same side
as the conical
boss
on the connecting rod web;
these
marks (rib and boss)
will
be toward the other
connecting rod on the same crankpin. The notch
on the piston
will
face the front of the
engine.
a.
Be certain that cylinder bores, pistons, connect
ing rod bearings and crankshaft journals are absolutely clean. Coat all bearing surfaces with
engine
oil.
b. Before installing a piston and connecting rod as
sembly into its bore, rotate the crankshaft so that
the corresponding crankpin is moved downward, away from the cylinder bore.
c. Remove bearing cap from connecting rod. With
upper bearing half seated in connecting rod, install connecting rod guides. These
guides
hold the upper
bearing half in place and prevent damage to the
crankshaft
crankpin during installation of the con
necting rod and piston assembly.
d.
Be certain that the gap in the oil ring rails faces
upward,
toward center of
engine.
Gaps of the com
pression rings shall not be aligned with each other
or
with the oil ring
rails.
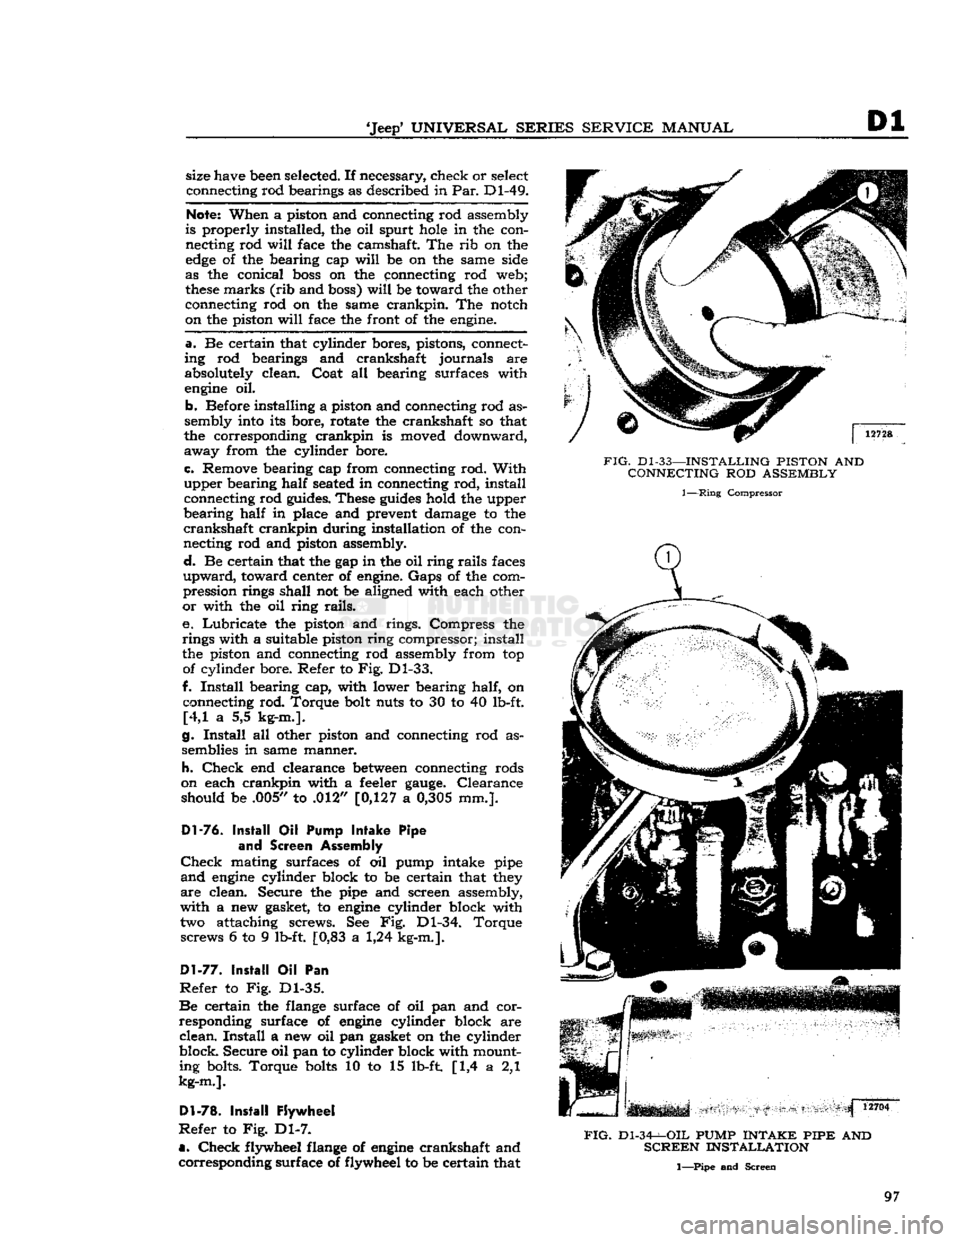
e. Lubricate the piston and rings. Compress the
rings with a suitable piston ring compressor; install
the piston and connecting rod assembly from top of cylinder bore. Refer to Fig. Dl-33.
f.
Install
bearing cap, with lower bearing half, on connecting rod. Torque bolt nuts to 30 to 40 lb-ft. [4,1 a 5,5 kg-m.].
g.
Install
all other piston and connecting rod as
semblies in same manner.
h.
Check
end clearance
between
connecting rods
on each crankpin with a feeler
gauge.
Clearance should be .005,/ to .012" [0,127 a
0,305
mm.].
Dl-76.
Install
Oil
Pump
Intake
Pipe
and
Screen Assembly
Check
mating surfaces of oil pump intake pipe
and
engine
cylinder block to be certain that they
are
clean. Secure the pipe and screen assembly,
with a new gasket, to
engine
cylinder block with two attaching screws. See Fig. Dl-34. Torque screws 6 to 9 lb-ft. [0,83 a 1,24 kg-m.].
Dl-77.
Install
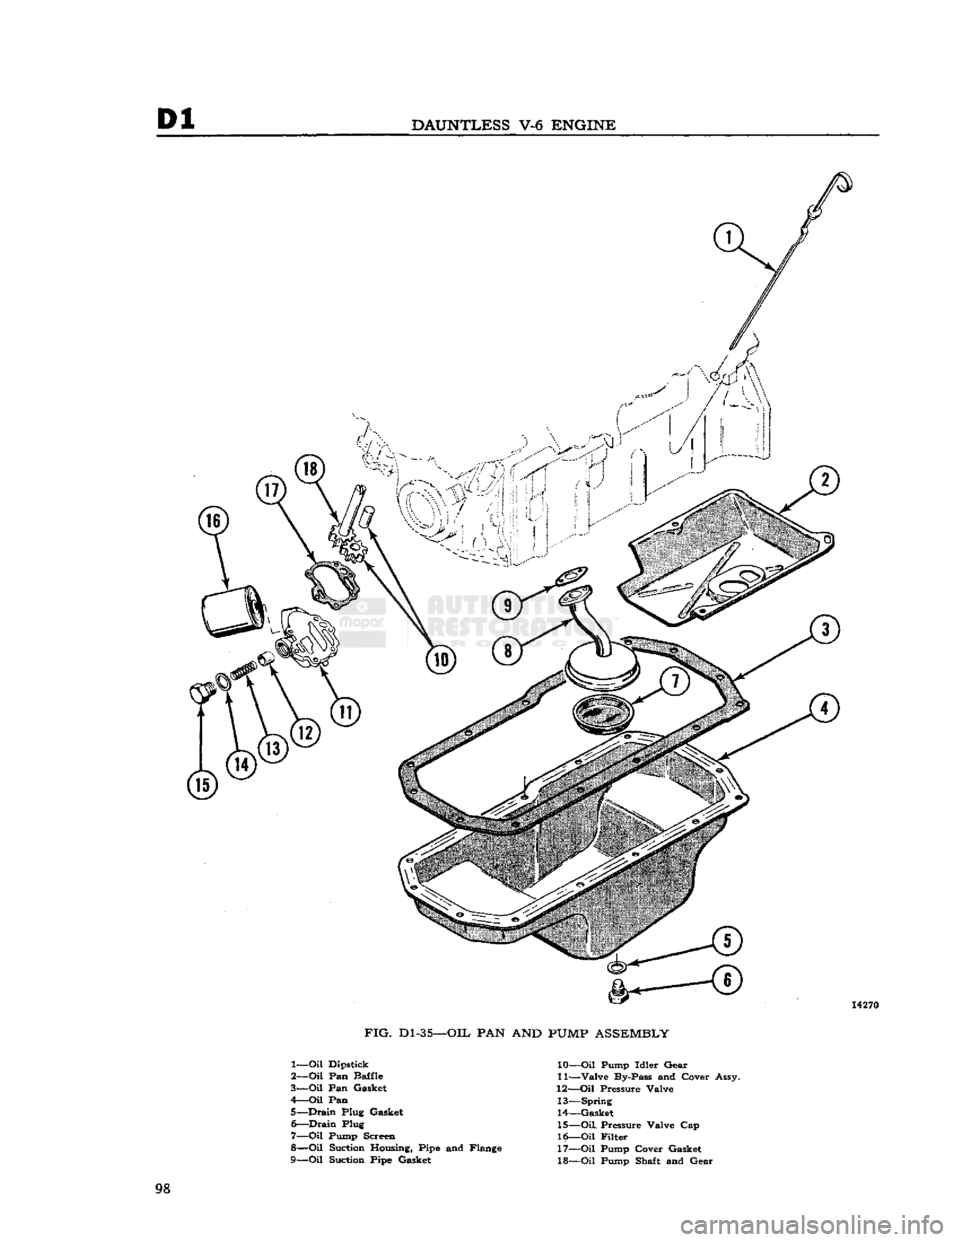
Oil Pan
Refer
to Fig. Dl-35.
Be
certain the flange surface of oil pan and cor
responding surface of
engine
cylinder block are
clean.
Install
a new oil pan gasket on the cylinder
block.
Secure
oil pan to cylinder block with mount ing bolts. Torque
bolts
10 to 15 lb-ft [1,4 a 2,1
kg-m.].
Dl-78.
Install
Flywheel
Refer
to Fig. Dl-7.
a.
Check
flywheel flange of
engine
crankshaft and corresponding surface of flywheel to
be
certain that
FIG.
Dl-33—INSTALLING
PISTON
AND
CONNECTING
ROD
ASSEMBLY
1—Ring
Compressor
FIG.
Dl-34-^-OIL
PUMP
INTAKE PIPE
AND
SCREEN
INSTALLATION
1—Pipe and Screen
97
Page 98 of 376
Dl
DAUNTLESS
V-6
ENGINE
14270
FIG.
D1-35—OIL
PAN AND PUMP
ASSEMBLY
1—
Oil
Dipstick
2—
Oil
Pan Baffle
3—
Oil
Pan Gasket
4—
Oil
Pan 5—
Drain
Plug Gasket 6—
Drain
Plug
7—
Oil
Pump Screen
8—
Oil
Suction Housing, Pipe and Flange
9—
Oil
Suction Pipe Gasket 10—
Oil
Pump Idler Gear
11—
Valve
By-Pass and Cover Assy.
12—
Oil
Pressure Valve 13—
Spring
14— Gasket
15—
Oil.
Pressure Valve Cap
16—
Oil
Filter 17—
Oil
Pump Cover Gasket
18—
Oil
Pump Shaft and Gear 98
Page 99 of 376
'Jeep'
UNIVERSAL SERIES SERVICE
MANUAL
Dl
both are clean. Any foreign material on either of
these
surfaces
will
cause flywheel run out and en
gine
vibration. Position flywheel to crankshaft and
secure with six mounting bolts. Torque mounting
bolts
50 to 65 lb-ft. [6,91 a 8,98 kg-m.].
Note:
Flywheel mounting
bolts
are unevenly
spaced so that flywheel can be installed in only
one position.
This
assures correct balance of fly
wheel and crankshaft.
b.
Mount a
dial
indicator on flywheel housing
flange of cylinder block and index its plunger to
the flywheel surface. Measure flywheel run out.
Maximum
allowable run out is .015"
[0,381
mm.].
Dl-82.
Install
Cylinder
Head Assembly
Refer
to Fig. Dl-9.
a.
Wipe cylinder head face of
engine
cylinder
block, and be certain no foreign material has fallen
into the cylinder bores, bolt holes, or in the valve
lifter
area.
It is
good
practice to clean out bolt
holes
with compressed air.
b.
Install
a new cylinder head gasket on the
cylin
der
block. Dowels in the block
will
hold the gasket
in
position. Always handle gaskets carefully to
avoid
kinking or damage to the surface treatment
of the gasket. Apply Perfect Seal Aerosol
Spray
Sealer
Part
No.
994757
on cylinder head gaskets.
Dl-79.
Install
Clutch
and Flywheel Housing
a.
Note
marks made on clutch assembly and fly
wheel during
engine
disassembly. Position clutch
assembly to flywheel, according to
marks,
and
fasten
loosely
with six attaching bolts. Torque
bolts
in rotation, one
turn
at a time, to 30 to 40 lb-ft. [4,1 a 5,5 kg-m.].
b.
Engage fork of clutch linkage to clutch and
position flywheel housing to
engine
cylinder block.
Secure
housing to block with six mounting bolts.
Torque
bolts
30 to 40 lb-ft. [4,1 a 5,5 kg-m.].
D1-80.
Install
Camshaft
Insert
camshaft into camshaft bearings of
engine
cylinder
block carefully to avoid damage to bear
ing surfaces. Make certain camshaft journals are
properly
seated in bearings.
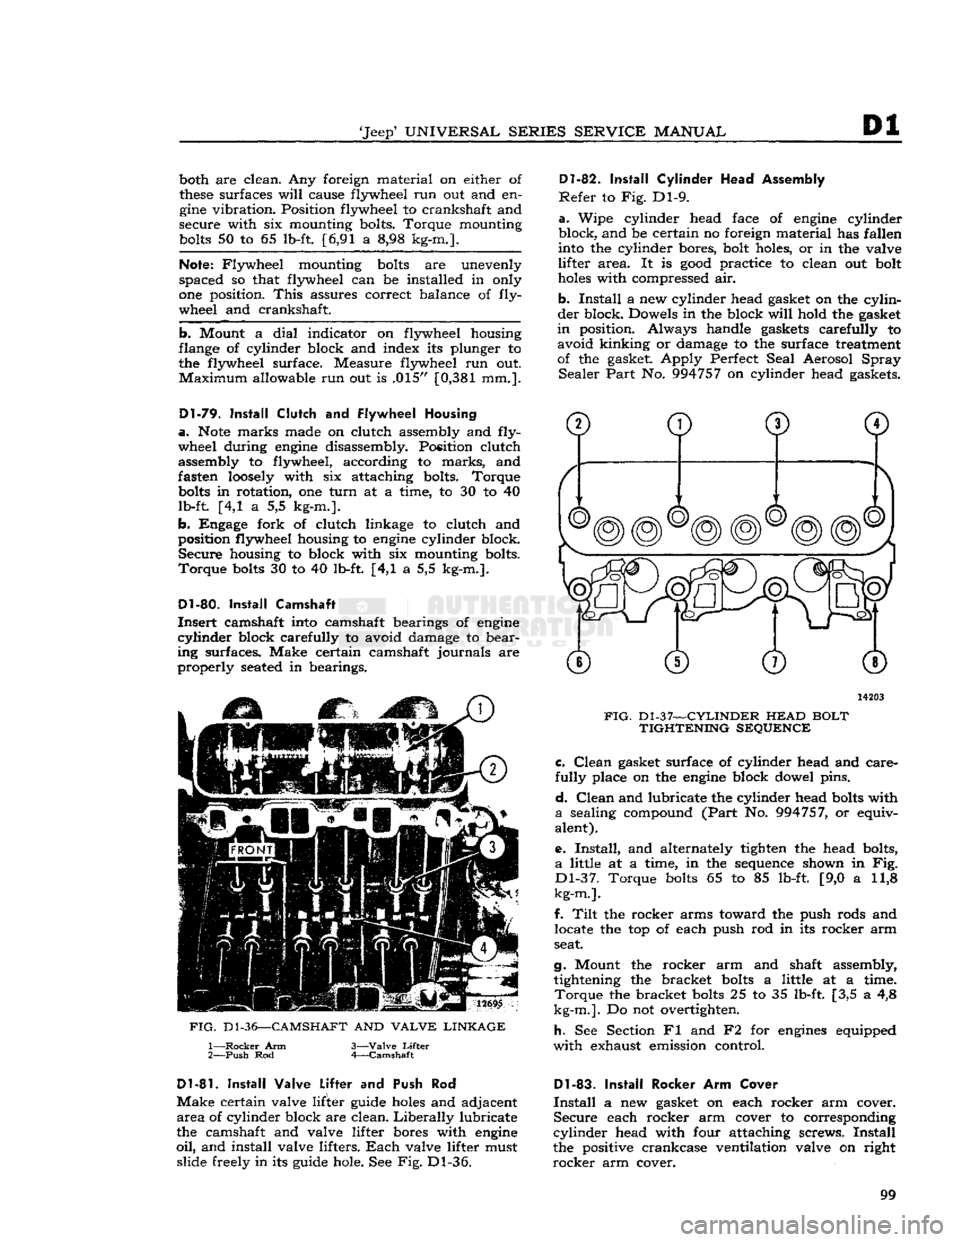
12695
FIG.
D1-36—CAMSHAFT
AND
VALVE LINKAGE
1—
Rocker
Arm
2—
Push
Rod 3—
Valve
Lifter
4—
Camshaft
14203
FIG.
Dl-37—CYLINDER
HEAD
BOLT TIGHTENING SEQUENCE c.
Clean
gasket surface of cylinder head and care
fully
place on the
engine
block dowel pins.
d.
Clean
and lubricate the cylinder head
bolts
with
a
sealing compound
(Part
No. 994757, or equiv
alent).
e.
Install,
and alternately tighten the head bolts,
a
little at a time, in the sequence shown in Fig.
Dl-37.
Torque
bolts
65 to 85 lb-ft. [9,0 a 11,8
kg-m.].
f.
Tilt
the rocker arms toward the push rods and locate the top of each push rod in its rocker arm
seat.
g.
Mount the rocker arm and shaft assembly, tightening the bracket
bolts
a little at a time.
Torque
the bracket
bolts
25 to 35 lb-ft. [3,5 a 4,8
kg-m.].
Do not overtighten.
h.
See Section Fl and F2 for
engines
equipped
with
exhaust emission control.
D1-81.
Install
Valve Lifter
and Push Rod
Make
certain valve lifter guide
holes
and adjacent
area
of cylinder block are clean.
Liberally
lubricate
the camshaft and valve lifter bores with
engine
oil,
and install valve lifters.
Each
valve lifter must slide freely in its guide hole. See Fig. Dl-36.
Dl-83.
Install
Rocker Arm Cover
Install
a new gasket on each rocker arm cover.
Secure
each rocker arm cover to corresponding
cylinder
head with four attaching screws.
Install
the positive crankcase ventilation valve on right
rocker
arm cover. 99
Page 100 of 376
Dl
DAUNTLESS
V-6
ENGINE
14262
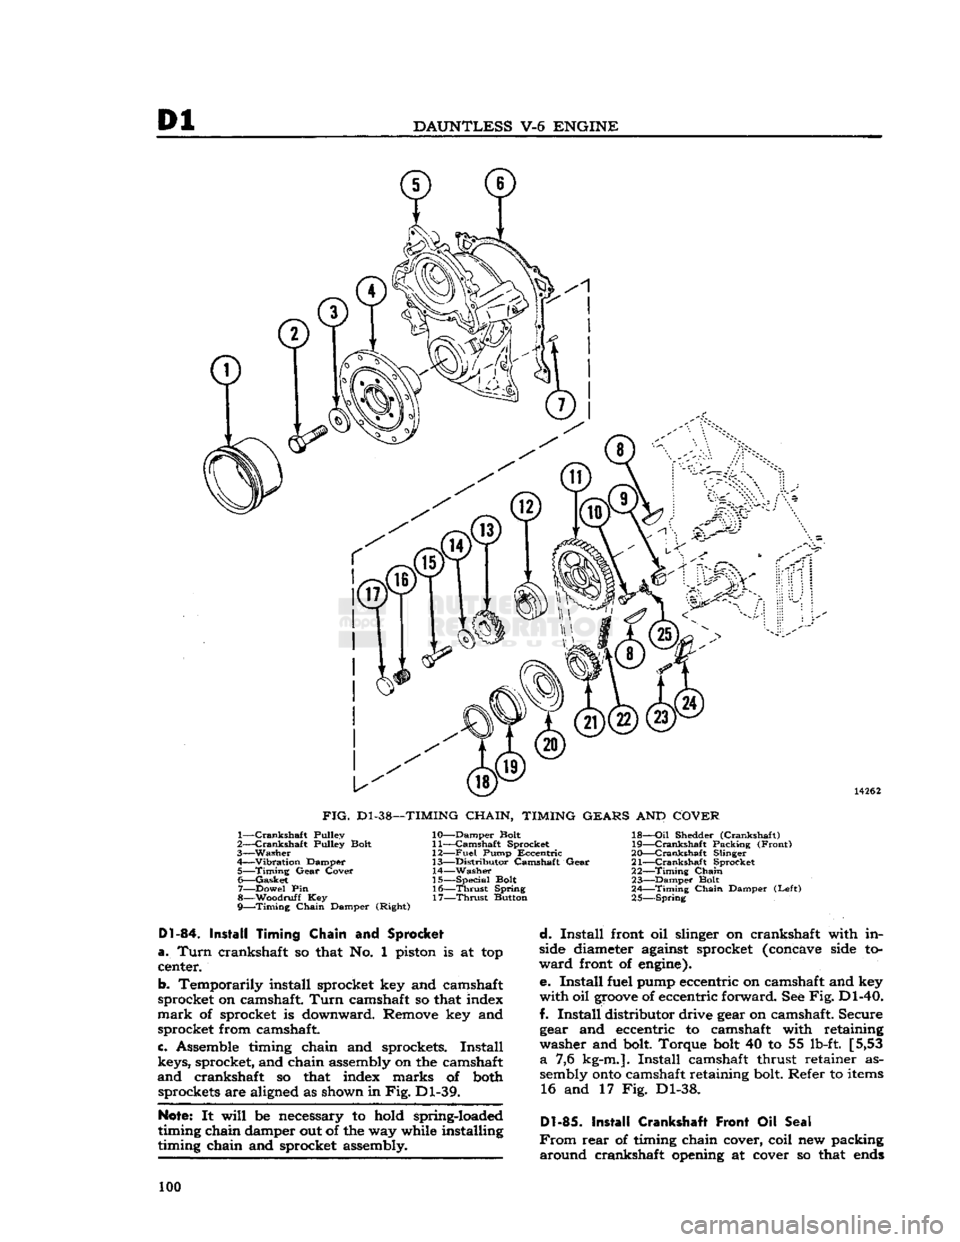
FIG.
D1-38—TIMING
CHAIN,
TIMING
GEARS
AND
COVER
1—
Crankshaft
Pulley
2—
Crankshaft
Pulley Bolt
3—
Washer
4—
Vibration
Damper 5—
Timing
Gear
Cover
6—
Gasket
7—
Dowel
Pin
g—Woodruff Key
9—Timing
Chain
Damper (Right) 10—
Damper
Bolt
11—
Camshaft
Sprocket
12—
Fuel
Pump
Eccentric
13—
Distributor
Camshaft
Gear
14—
Washer
15—
Special
Bolt 16—
-Thrust
Spring
17—
Thrust
Button 18—
Oil
Shedder
(Crankshaft)
19—
-Crankshaft
Packing
(Front)
20—
-Crankshaft
Slinger •
21—
Crankshaft
Sprocket
22—
Timing
Chain
23—
Damper
Bolt .
2
A
Timing
Chain
Damper
(Left)
25
Spring
D1-84.
Install Timing Chain
and
Sprocket
a.
Turn
crankshaft so that No. 1 piston is at top
center.
b.
Temporarily install sprocket key and camshaft
sprocket on camshaft.
Turn
camshaft so that index
mark
of sprocket is downward. Remove key and sprocket from camshaft.
c.
Assemble timing chain and sprockets.
Install
keys, sprocket, and chain assembly on the camshaft
and
crankshaft so that index marks of both sprockets are aligned as shown in
Fig.
Dl-39.
Note:
It
will
be necessary to hold spring-loaded
timing chain damper out of the way while installing
timing chain and sprocket assembly.
d.
Install
front oil slinger on crankshaft with in
side diameter against sprocket (concave side to
ward
front of engine).
e.
Install
fuel pump eccentric on camshaft and key
with
oil
groove
of eccentric forward. See
Fig.
Dl-40.
f.
Install
distributor drive gear on camshaft. Secure gear and eccentric to camshaft with retaining
washer and bolt. Torque
bolt
40 to 55 lb-ft. [5,53
a
7,6 kg-m.].
Install
camshaft thrust retainer as
sembly
onto
camshaft retaining bolt. Refer to
items
16 and 17 Fig. Dl-38.
Dl-85.
Install Crankshaft Front
Oil
Seal
From
rear
of timing chain cover, coil new packing
around
crankshaft opening at cover so that
ends
100