JEEP CJ 1953 Service Manual
Manufacturer: JEEP, Model Year: 1953, Model line: CJ, Model: JEEP CJ 1953Pages: 376, PDF Size: 19.96 MB
Page 111 of 376
'Jeep*
UNIVERSAL
SERIES
SERVICE
MANUAL
E
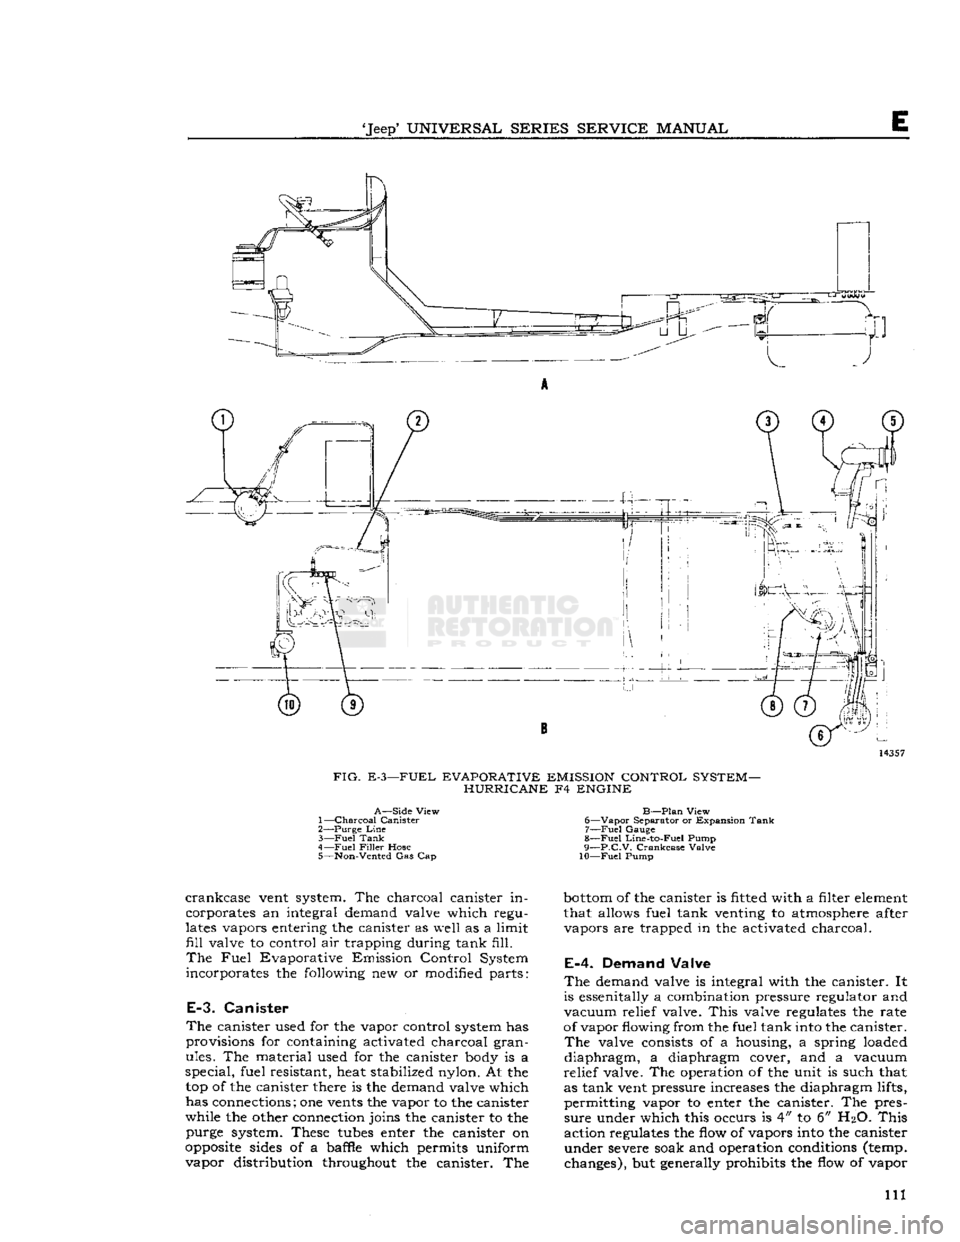
FIG.
E-3—FUEL EVAPORATIVE EMISSION CONTROL SYSTEM- HURRICANE F4 ENGINE
A—Side
View
1—
Charcoal Canister
2— Purge
Line
3—
Fuel
Tank
4—
Fuel
Filler
Hose 5—
Non-Vented
Gas Cap
B—Plan
View
6—
Vapor
Separator
or Expansion Tank 7—
Fuel
Gauge
8—
Fuel
Line-to-Fuel Pump
9—
p.C.V.
Crankcase
Valve
10—Fuel
Pump
crankcase
vent system. The charcoal canister in
corporates an integral demand valve
which
regu
lates
vapors entering the canister as
well
as a
limit
fill
valve
to control air trapping during tank
fill.
The
Fuel
Evaporative Emission Control System
incorporates the following new or modified parts:
E-3.
Canister
The canister used for the vapor control system has
provisions for containing activated charcoal gran ules. The material used for the canister body is a
special,
fuel resistant, heat stabilized nylon. At the top of the canister there is the demand valve which
has connections; one vents the vapor to the canister
while the other connection joins the canister to the purge system. These
tubes
enter the canister on
opposite
sides of a baffle which permits uniform
vapor distribution throughout the canister. The
bottom
of the canister is fitted with a filter element
that allows fuel tank venting to atmosphere after vapors are trapped in the activated charcoal.
E-4.
Demand Valve
The
demand valve is integral with the canister. It
is essenitally a combination pressure regulator and
vacuum
relief valve.
This
valve regulates the rate
of vapor
flowing
from the fuel tank into the canister.
The
valve consists of a housing, a spring loaded
diaphragm,
a diaphragm cover, and a vacuum
relief
valve. The operation of the unit is such that
as tank vent pressure increases the diaphragm lifts,
permitting vapor to enter the canister. The pres
sure
under which this occurs is 4" to 6"
H2O.
This
action regulates the flow of vapors into the canister
under severe soak and operation conditions (temp, changes), but generally prohibits the flow of vapor 111
Page 112 of 376
E
FUEL
SYSTEM
9
©
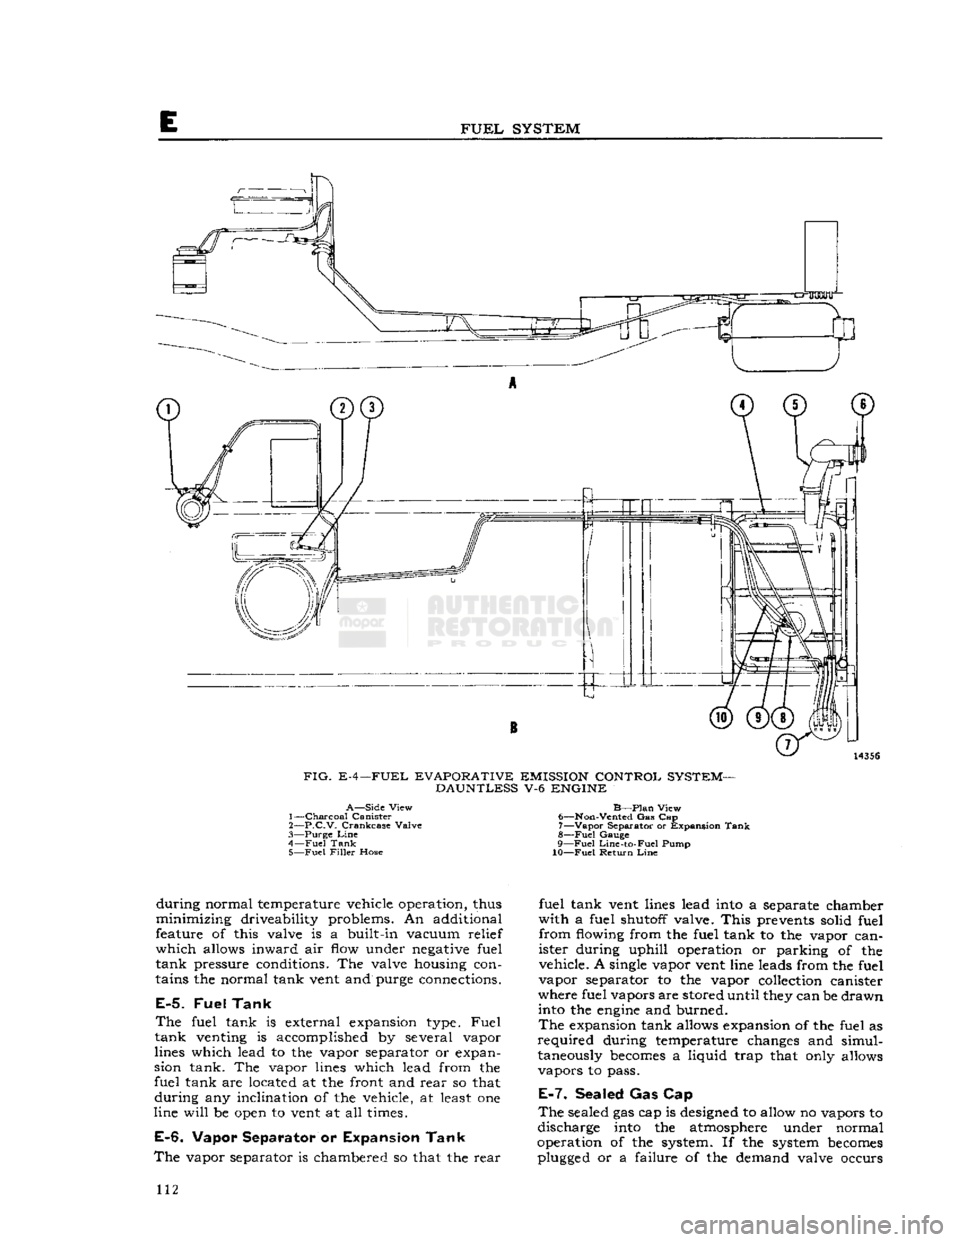
FIG.
E-4—FUEL
EVAPORATIVE
EMISSION
CONTROL
SYSTEM-
DAUNTLESS
V-6
ENGINE
A—Side
View
1—
Charcoal
Canister
2—
P.C.V.
Crankcase
Valve
3—
Purge
Line
4—
Fuel
Tank
5—
Fuel
Filler
Hose
B—Plan
View
6—
Non-Vented
Gas Cap 7—
Vapor
Separator or Expansion
Tank
g—Fuei
Gauge
9—Fuel
Line-to-Fuel
Pump
10—Fuei
Return
Line
during
normal temperature vehicle operation, thus
minimizing
driveability problems. An additional
feature of this valve is a built-in vacuum relief
which
allows inward air flow under negative fuel
tank
pressure conditions. The valve housing con
tains the normal tank vent and purge connections.
E-5.
Fuel Tank
The
fuel tank is external expansion type.
Fuel
tank
venting is accomplished by several vapor
lines which lead to the vapor separator or expan
sion tank. The vapor lines which lead from the
fuel tank are located at the front and
rear
so that
during
any inclination of the vehicle, at least one
line
will
be open to vent at all times.
E-6.
Vapor Separator
or
Expansion Tank
The
vapor separator is chambered so that the
rear
fuel tank vent lines lead into a separate chamber
with
a fuel shutofl valve.
This
prevents solid fuel
from
flowing from the fuel tank to the vapor can
ister during uphill operation or parking of the
vehicle. A single vapor vent line leads from the fuel
vapor separator to the vapor collection canister
where fuel vapors are stored until they can be drawn into the
engine
and burned.
The
expansion tank allows expansion of the fuel as
required
during temperature changes and simul taneously
becomes
a liquid trap that only allows
vapors to pass.
E-7.
Sealed
Gas Cap
The
sealed gas cap is designed to allow no vapors to
discharge into the atmosphere under normal
operation of the system. If the system
becomes
plugged or a failure of the demand valve occurs 112
Page 113 of 376
'Jeep*
UNIVERSAL
SERIES
SERVICE
MANUAL
E
there is a relief valve that
opens
to reduce high
(dangerous) pressures in the fuel tank. In con
junction
with the pressure relief valve there is a
vacuum
relief valve to
stop
collapse of the fuel
tank
in case of a plugged system or failure of the demand valve. When replacing the gas cap, the
same type must be used as originally installed.
E-8.
System Inspection Test
The
fuel emission vent system should be checked
carefully
to ensure the absence of any leaks to the
atmosphere of either liquid or vapor which might
affect the accuracy, safety, or performance of the control system.
To
assure that the sealed system has been properly
installed,
the following
test
procedure has been
developed.
Disconnect the vent line from the fuel tank system
to the activated charcoal canister, induce l/i p.s.i.
air
pressure. If this pressure can be maintained for
a
few seconds the vent system is assured to be sealed. DO NOT add air pressure to the canister
because damage can occur to the demand valve if
care
is not taken.
E-9.
Servicing the System
Periodic
Maintenance — Replace carbon canister filter at
12,000
miles
[19,200
km.] or 12 month intervals (more
often
for operation in dusty areas).
This
is the only regular maintenance service
required.
Canister
Filter
Replacement — Disconnect
hoses
from
top of canister, remove canister from mount
-
t
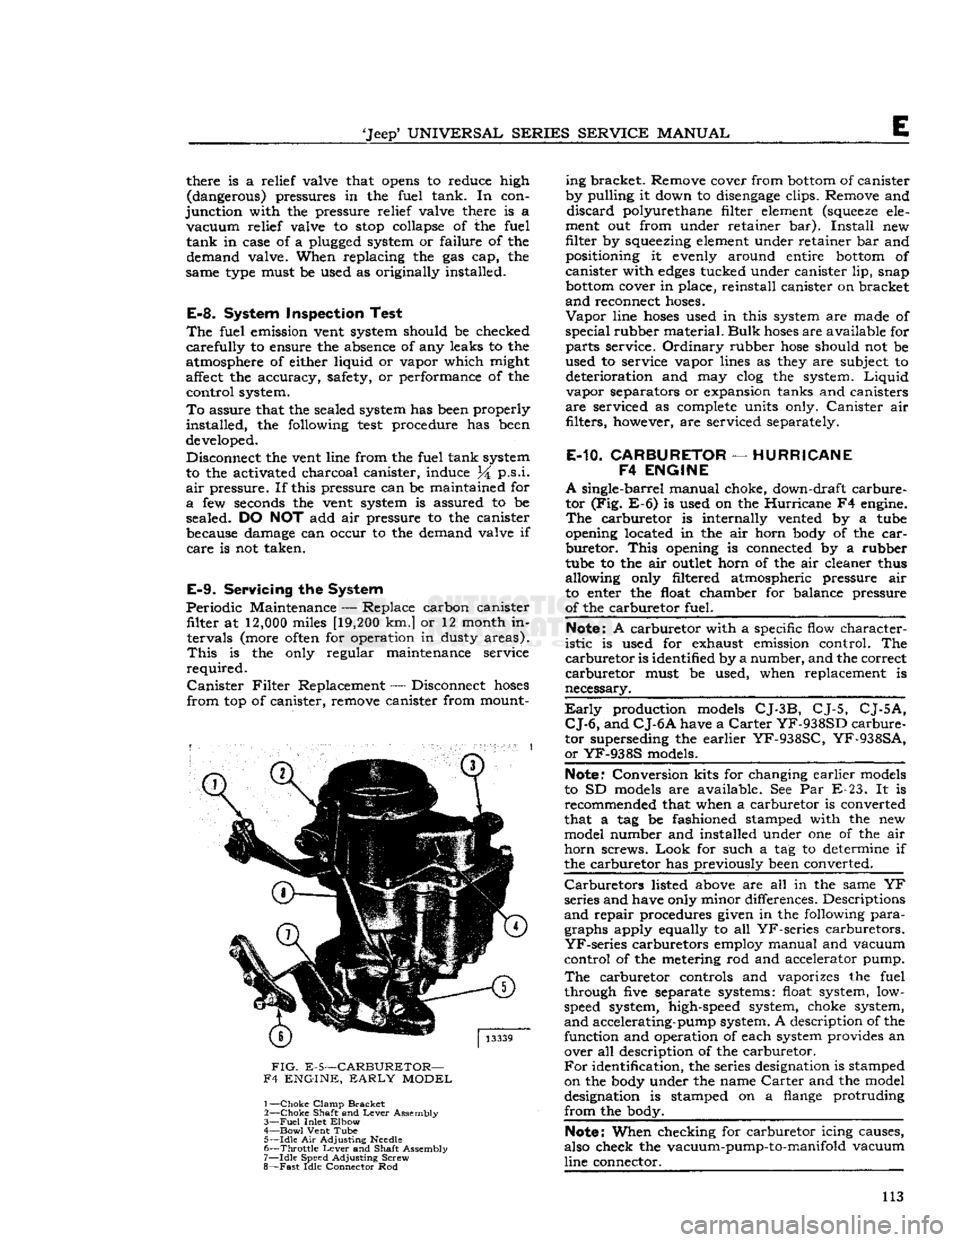
FIG.
E-5—CARBURETOR—
F4 ENGINE,
EARLY
MODEL
1—
Choke
Clamp
Bracket
2—
Choke
Shaft and
Lever
Assembly
3—
Fuel
Inlet
Elbow
4—
Bowl
Vent Tube 5—
Idle
Air Adjusting
Needle
6—
Throttle
Lever
and Shaft Assembly
7—
Idle
Speed Adjusting Screw
8—
Fast
Idle Connector Rod ing bracket. Remove cover from
bottom
of canister
by pulling it down to
disengage
clips. Remove and
discard
polyurethane filter element
(squeeze
ele
ment out from under retainer bar).
Install
new
filter by squeezing element under retainer bar and positioning it evenly around entire
bottom
of
canister with
edges
tucked under canister lip, snap
bottom
cover in place, reinstall canister on bracket
and
reconnect
hoses.
Vapor
line
hoses
used in this system are made of
special
rubber material.
Bulk
hoses
are available for
parts
service.
Ordinary
rubber
hose
should not be
used to service vapor lines as they are subject to deterioration and may clog the system.
Liquid
vapor separators or expansion tanks and canisters
are
serviced as complete units only.
Canister
air filters, however, are serviced separately.
E-10.
CARBURETOR
—
HURRICANE
F4
ENGINE
A
single-barrel manual choke, down-draft carbure
tor (Fig. E-6) is used on the
Hurricane
F4 engine.
The
carburetor is internally vented by a tube
opening located in the air horn body of the
car
buretor.
This
opening is connected by a rubber
tube to the air
outlet
horn of the air cleaner thus
allowing only filtered atmospheric pressure air
to enter the float chamber for balance pressure
of the carburetor fuel.
Note:
A carburetor with a specific flow character
istic
is used for exhaust emission control. The
carburetor
is identified by a number, and the correct
carburetor
must be used, when replacement is
necessary.
Early
production models
CJ-3B,
CJ-5,
CJ-5A,
CJ-6,
and
CJ-6A
have a
Carter
YF-938SD
carbure
tor superseding the earlier
YF-938SC,
YF-938SA,
or
YF-938S
models.
Note."
Conversion kits for changing earlier models
to SD models are available. See Par E-23. It is recommended that when a carburetor is converted
that a tag be fashioned stamped with the new model number and installed under one of the air
horn
screws.
Look
for such a tag to determine if
the carburetor has previously been converted.
Carburetors
listed above are all in the same YF
series and have only minor differences. Descriptions
and
repair procedures given in the following
para
graphs apply equally to all
YF-series
carburetors.
YF-series
carburetors employ manual and vacuum
control of the metering rod and accelerator pump.
The
carburetor controls and vaporizes the fuel
through five separate systems: float system, low-
speed system, high-speed system, choke system,
and
accelerating-pump system. A description of the function and operation of each system provides an over all description of the carburetor.
For
identification, the series designation is stamped
on the body under the name
Carter
and the model
designation is stamped on a flange protruding
from
the body.
Note:
When checking for carburetor icing causes,
also check the vacuum-pump-to-manifold vacuum
line connector. 113
Page 114 of 376
FUEL
SYSTEM
14261
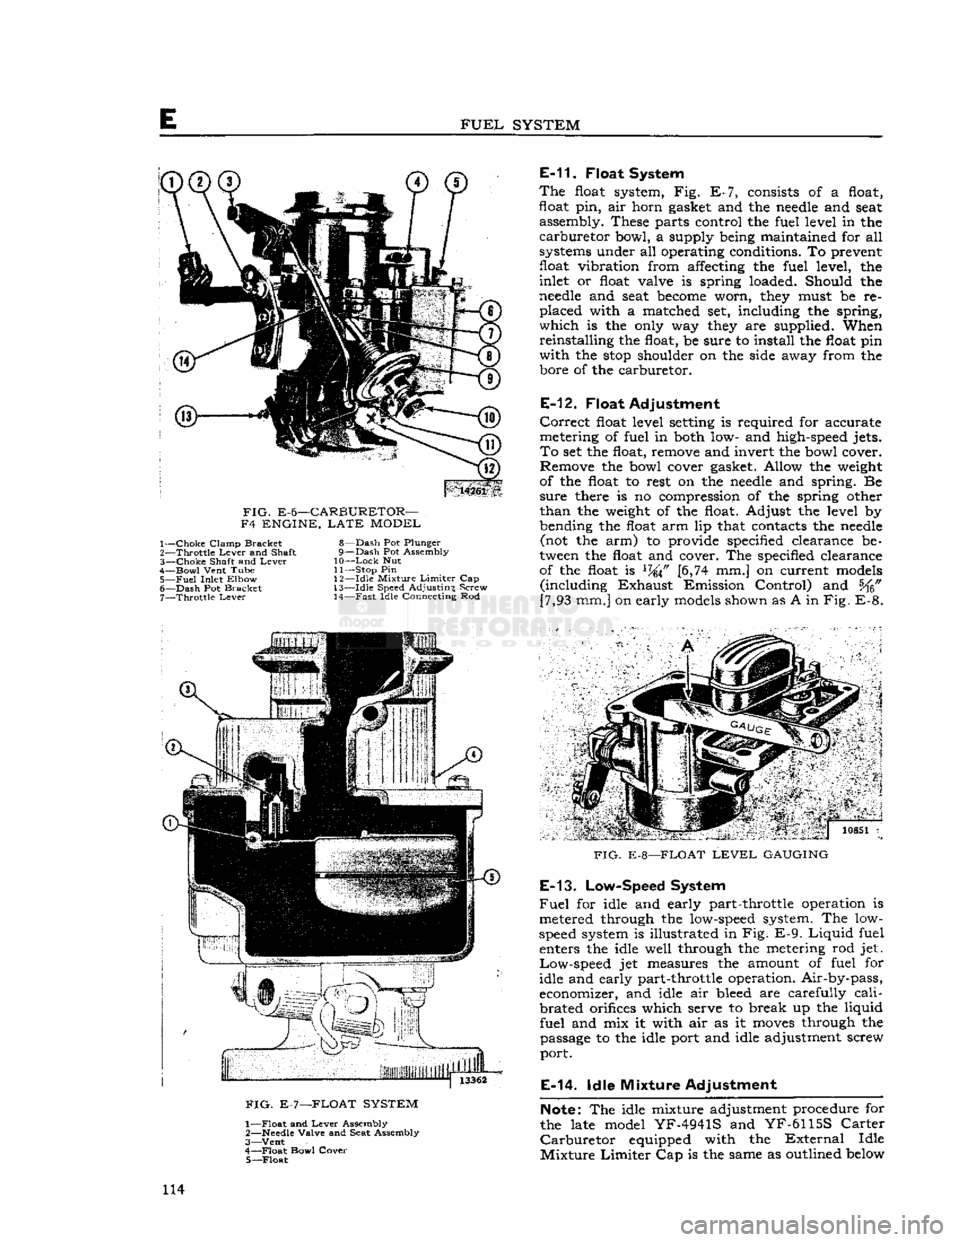
FIG.
E-6—CARBURETOR—
F4 ENGINE,
LATE
MODEL 1—
Choke
Clamp Bracket
2—
Throttle
Lever
and Shaft
3—
Choke
Shaft and
Lever
4—
Bowl
Vent Tube
5—
Fuel
Inlet Elbow
6—
Dash
Pot Bracket 7—
Throttle
Lever
8—
Dash
Pot Plunger
9—
Dash
Pot Assembly
10—
Lock
Nut
11— Stop Pin
1
2—Idle Mixture
Limiter
Cap
13—
Idle
Speed Adjusting Screw 14—
Fast
Idle Connecting Rod
E-11.
Float System
The
float system, Fig. E-7, consists of a float,
float
pin,
air horn gasket and the
needle
and seat assembly. These parts control the fuel level in the
carburetor
bowl, a supply being maintained for all
systems under all operating conditions. To prevent
float
vibration
from affecting the fuel level, the
inlet or float valve is spring loaded. Should the
needle
and seat
become
worn, they must be re
placed
with a matched set, including the spring,
which
is the only way they are supplied. When
reinstalling
the float, be sure to install the float pin
with
the
stop
shoulder on the side away from the bore of the carburetor.
E-12.
Float Adjustment
Correct
float level setting is required for accurate
metering of fuel in both low- and high-speed jets.
To
set the float, remove and invert the bowl cover. Remove the bowl cover gasket. Allow the weight
of the float to rest on the
needle
and spring. Be
sure
there is no compression of the spring other
than
the weight of the float. Adjust the level by
bending the float arm lip that contacts the
needle
(not the arm) to provide specified clearance be
tween the float and cover. The specified clearance of the float is
L74\F
[6,74 mm.] on current models
(including
Exhaust
Emission Control) and [7,93 mm.] on early models shown as A in
Fig.
E-8.
FIG.
E-7—FLOAT SYSTEM
1—
Float
and
Lever
Assembly
2—
Needle
Valve and Seat Assembly
3—
Vent
4—
Float
Bowl Cover 5—
Float
7 '.. j
io8Si
i
FIG.
E-8—FLOAT
LEVEL
GAUGING
E-13.
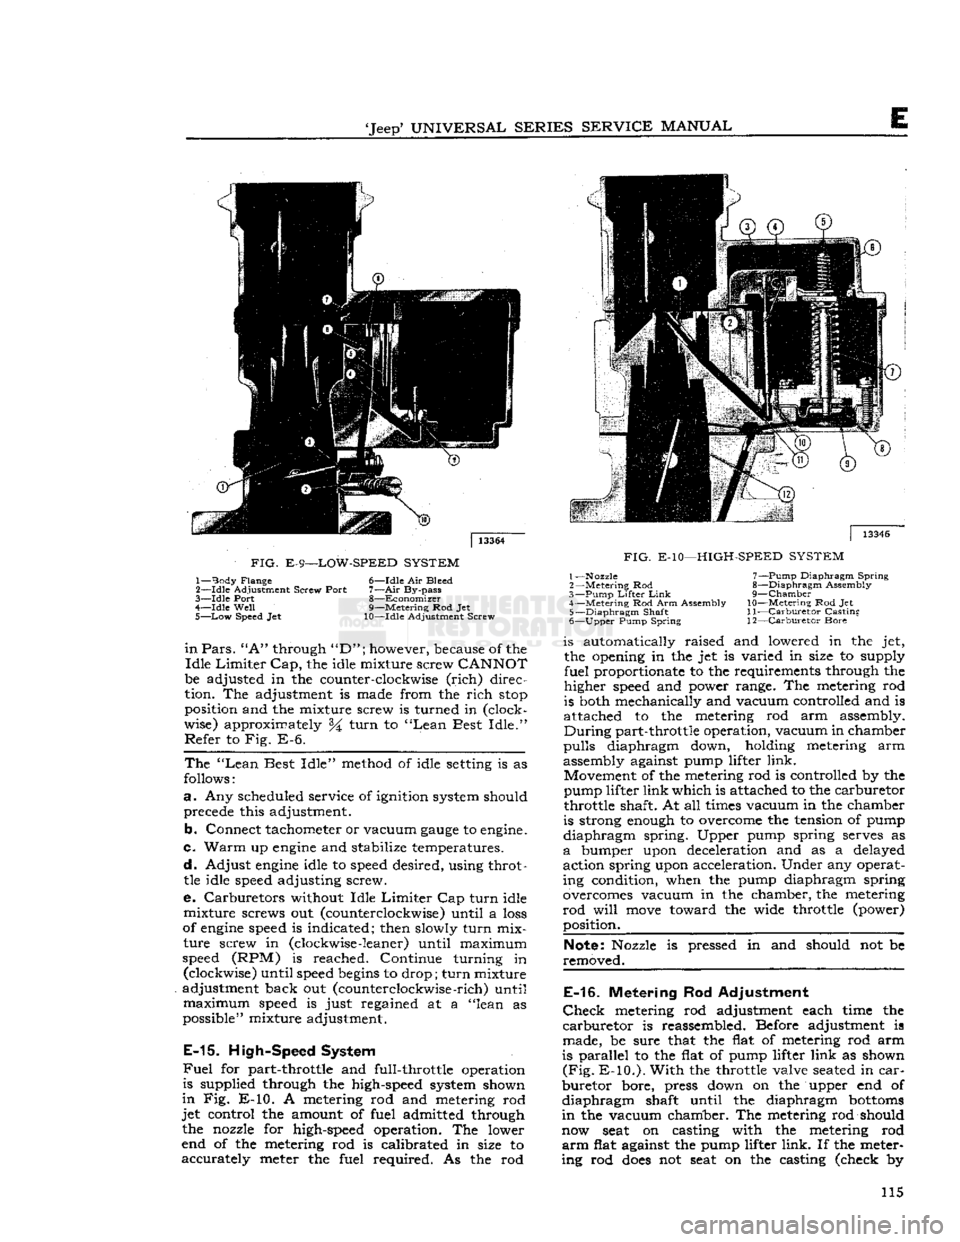
Low-Speed System
Fuel
for idle and early part-throttle operation is
metered through the low-speed system. The low-
speed system is illustrated in Fig.
E-9.
Liquid
fuel enters the idle well through the metering rod jet.
Low-speed
jet measures the amount of fuel for
idle and early part-throttle operation. Air-by-pass,
economizer, and idle air bleed are carefully
cali
brated
orifices which serve to break up the liquid
fuel
and mix it with air as it
moves
through the passage to the idle port and idle adjustment screw
port.
E-14.
Idle Mixture Adjustment
Note:
The idle mixture adjustment procedure for
the late model
YF-4941S
and
YF-6115S
Carter
Carburetor
equipped with the
External
Idle
Mixture
Limiter
Cap is the same as outlined below 114
Page 115 of 376
'Jeep*
UNIVERSAL
SERIES
SERVICE
MANUAL
E
FIG.
E-9—LOW-SPEED
SYSTEM
1—
Body
Flange 6—Idle Air Bleed
2—
-Idle
Adjustment Screw Port
7—Air
By-pass
3—
Idle
Port 8—Economizer
4—
Idle
Well
9—Metering Rod Jet
5—
Low
Speed Jet 10—Idle Adjustment Screw
in
Pars.
"A"
through
"D";
however, because of the
Idle
Limiter
Cap,
the idle mixture screw
CANNOT
be adjusted in the counter-clockwise
(rich)
direc
tion. The adjustment is made from the
rich
stop
position and the mixture screw is turned in (clock
wise) approximately %
turn
to
"Lean
Best
Idle."
Refer
to Fig. E-6.
The
"Lean
Best
Idle"
method of idle
setting
is as
follows:
a.
Any scheduled service of ignition system should precede this adjustment.
b.
Connect tachometer or vacuum
gauge
to
engine.
c.
Warm
up
engine
and stabilize temperatures.
d.
Adjust
engine
idle to
speed
desired, using throttle idle
speed
adjusting screw.
e. Carburetors without Idle
Limiter
Cap
turn
idle
mixture
screws out (counterclockwise) until a
loss
of
engine
speed
is indicated; then slowly
turn
mix
ture
screw in (clockwise
-leaner)
until maximum
speed
(RPM) is reached. Continue turning in (clockwise) until
speed
begins
to drop;
turn
mixture
adjustment back out (counterclockwise
-rich)
until
maximum
speed
is just regained at a "lean as
possible" mixture adjustment.
E-15.
High-Speed System
Fuel
for part-throttle and full-throttle operation
is supplied through the high-speed system shown
in
Fig. E-10. A metering rod and metering rod
jet
control the amount of fuel admitted through the nozzle for high-speed operation. The lower
end of the metering rod is calibrated in size to
accurately
meter the fuel required. As the rod
|
13346
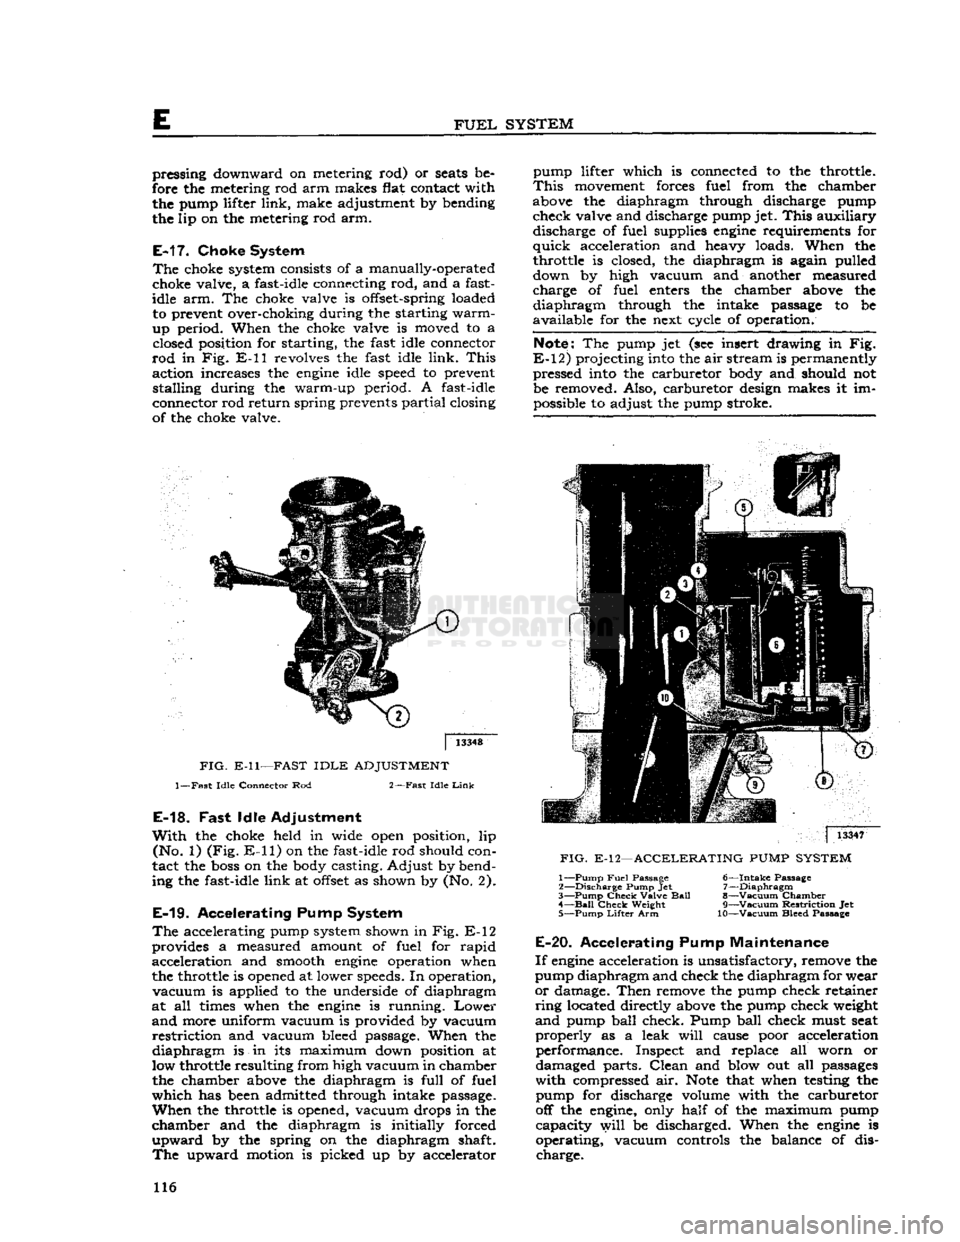
FIG.
E-10—HIGH-SPEED
SYSTEM
1—Nozzle 7—Pump Diaphragm
Spring
2
—Metering
Rod 8—Diaphragm Assembly
3—
Pump
Lifter
Link
9—Chamber
4—
Metering
Rod Arm Assembly
10—Metering
Rod Jet 5—
Diaphragm
Shaft
11—Carburetor
Casting
6—
Upper
Pump Spring 12—Carburetor Bore is automatically raised and lowered in the jet,
the opening in the jet is varied in size to supply
fuel
proportionate to the requirements through the
higher
speed
and power range. The metering rod
is both mechanically and vacuum controlled and is
attached to the metering rod arm assembly.
During
part-throttle operation, vacuum in chamber
pulls
diaphragm down, holding metering arm
assembly against pump lifter
link.
Movement of the metering rod is controlled by the
pump lifter
link
which is attached to the carburetor
throttle shaft. At all
times
vacuum in the chamber
is strong
enough
to overcome the tension of pump
diaphragm
spring. Upper pump spring serves as
a
bumper upon deceleration and as a delayed
action spring upon acceleration. Under any operat ing condition, when the pump diaphragm spring
overcomes vacuum in the chamber, the metering
rod
will
move
toward the wide throttle (power) position.
Note:
Nozzle is pressed in and should not be
removed.
E-16.
Metering Rod Adjustment
Check
metering rod adjustment each time the
carburetor
is reassembled. Before adjustment is
made, be sure that the flat of metering rod arm
is parallel to the flat of pump lifter
link
as shown
(Fig.
E-10.).
With
the throttle valve
seated
in
car
buretor
bore, press down on the upper end of
diaphragm
shaft until the diaphragm
bottoms
in
the vacuum chamber. The metering rod should
now
seat
on casting with the metering rod
arm
flat against the pump lifter
link.
If the meter
ing rod
does
not
seat
on the casting (check by 115
Page 116 of 376
E
FUEL
SYSTEM
pressing downward on metering rod) or
seats
be
fore the metering rod arm makes flat contact with the pump lifter link, make adjustment by bending
the lip on the metering rod arm.
E-17.
Choke System
The
choke system consists of a manually-operated
choke valve, a fast-idle connecting rod, and a fast-
idle arm. The choke valve is offset-spring loaded to prevent over-choking during the starting warm-
up period. When the choke valve is moved to a closed position for starting, the fast idle connector
rod
in Fig. E-ll revolves the fast idle link.
This
action increases the
engine
idle speed to prevent stalling during the warm-up period. A fast-idle
connector rod return spring prevents partial closing
of the choke valve. pump lifter which is connected to the throttle.
This
movement forces fuel from the chamber
above the diaphragm through discharge pump check valve and discharge pump jet.
This
auxiliary discharge of fuel supplies
engine
requirements for
quick
acceleration and heavy loads. When the
throttle is closed, the diaphragm is again pulled
down by high vacuum and another measured
charge of fuel enters the chamber above the
diaphragm
through the intake passage to be
available for the next cycle of operation.
Note:
The pump jet (see insert drawing in Fig.
E-12)
projecting into the air stream is permanently pressed into the carburetor body and should not
be removed. Also, carburetor design makes it im possible to adjust the pump stroke.
FIG.
E-ll—FAST
IDLE
ADJUSTMENT
1—Fast
Idle
Connector Rod
2—Fast
Idle
Link
E-18.
Fast
Idle Adjustment
With
the choke held in wide open position, lip (No. 1) (Fig.
E-ll)
on the fast-idle rod should con
tact the
boss
on the body casting. Adjust by bend
ing the fast-idle link at
offset
as shown by (No. 2).
E-19.
Accelerating Pump System
The
accelerating pump system shown in Fig. E-12
provides a measured amount of fuel for rapid acceleration and smooth
engine
operation when
the throttle is opened at lower speeds. In operation,
vacuum
is applied to the underside of diaphragm
at all times when the
engine
is running.
Lower
and
more uniform vacuum is provided by vacuum
restriction
and vacuum bleed passage. When the
diaphragm
is in its maximum down position at
low throttle resulting from high vacuum in chamber the chamber above the diaphragm is full of fuel
which
has been admitted through intake passage.
When
the throttle is opened, vacuum drops in the
chamber and the diaphragm is initially forced
upward
by the spring on the diaphragm shaft.
The
upward motion is picked up by accelerator
|
13347
FIG.
E-12—ACCELERATING
PUMP
SYSTEM
1—
Pump
Fuel
Passage
6—Intake
Passage
2—
Discharge
Pump Jet 7—Diaphragm
3—
Pump
Check
Valve
Ball
8—Vacuum Chamber 4—
Bail
Check
Weight
9—Vacuum
Restriction
Jet
5—
Pump
Lifter
Arm 10—Vacuum Bleed Passage
E-20.
Accelerating Pump Maintenance
If
engine
acceleration is unsatisfactory, remove the
pump diaphragm and check the diaphragm for wear
or
damage. Then remove the pump check retainer
ring
located directly above the pump check weight
and
pump ball check. Pump ball check must seat
properly
as a leak
will
cause poor acceleration performance. Inspect and replace all worn or
damaged parts.
Clean
and blow out all passages
with
compressed air.
Note
that when testing the pump for discharge volume with the carburetor
off the engine, only half of the maximum pump capacity
will
be discharged. When the
engine
is
operating, vacuum controls the balance of dis charge. 116
Page 117 of 376
'Jeep*
UNIVERSAL
SERIES
SERVICE
MANUAL
E
Note:
The
Carter
YF-6115S Carburetor has a
throttle
return spring
attached
from the carburetor
main
body
to the carburetor
throttle
shaft. The
purpose
of
this
spring is to return the
throttle
to
idle
speed
position
should a linkage failure occur.
E-21.
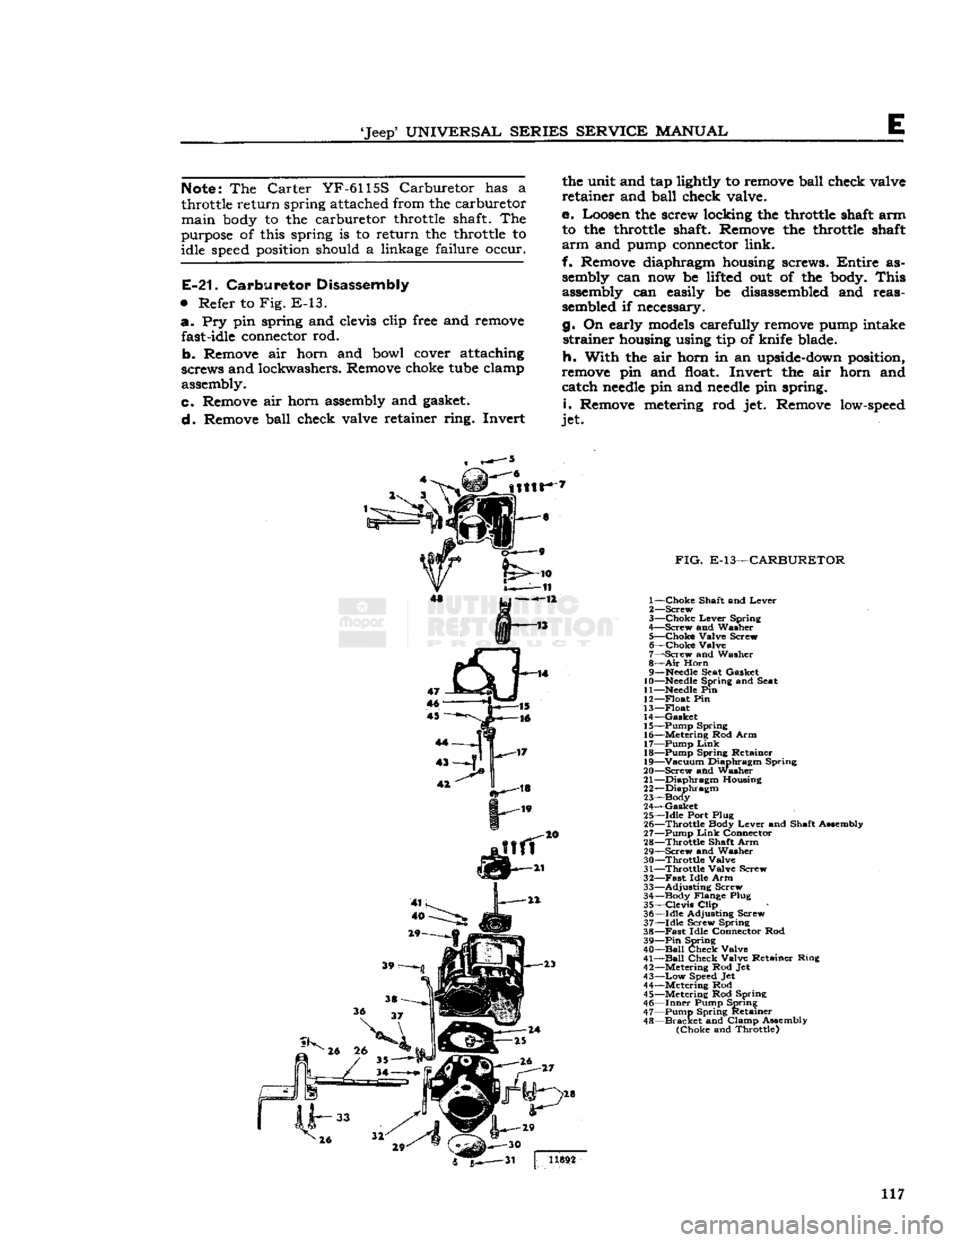
Carburetor Disassembly
•
Refer to Fig. E-13. a. Pry pin spring and
clevis
clip
free
and
remove
fast-idle
connector
rod.
b- Remove air horn and bowl
cover
attaching
screws and lockwashers. Remove
choke
tube
clamp
assembly.
c. Remove air horn
assembly
and
gasket.
d. Remove ball check valve retainer ring. Invert the unit and tap
lightly
to
remove
ball check valve
retainer and ball check valve.
e. Loosen the screw locking the
throttle
shaft
arm to the
throttle
shaft. Remove the
throttle
shaft
arm
and
pump
connector
link.
f. Remove diaphragm
housing
screws.
Entire
as
sembly
can now be
lifted
out of the
body.
This
assembly
can easily be
disassembled
and reas
sembled
if necessary.
g. On early
models
carefully
remove
pump
intake strainer
housing
using tip of knife blade.
h. With the air horn in an
upside-down
position,
remove
pin and
float.
Invert the air horn and catch
needle
pin and
needle
pin spring.
i.
Remove
metering
rod jet. Remove
low-speed
jet.
FIG.
E-13—CARBURETOR
1— Choke Shaft and Lever
2— Screw
3— Choke Lever Spring
4— Screw and Washer
5— Choke Valve Screw 6— Choke Valve
7— Screw and Washer
8—
Air
Horn
9—
Needle
Seat Gasket
10—
Needle
Spring and Seat
11—Needle
Pin
12— Float Pin
13— Float
14— Gasket 15— Pump Spring
16— Metering Rod Arm
17— Pump
Link
18— Pump Spring Retainer
19— Vacuum Diaphragm Spring
20— Screw and washer
21— Diaphragm Housing
22— Diaphragm
23—Body
24— Gasket
25— Idle Port Plug
26— Throttle Body Lever and Shaft Assembly
27— Pump
Link
Connector
28— Throttle Shaft Arm 29— Screw and Washer
30— Throttle Valve
31— Throttle Valve Screw
32—
Fast
Idle Arm 33— Adjusting Screw
34— Body Flange Plug
35— Clevis
Clip
36— Idle Adjusting Screw
37— Idle Screw Spring
38—
Fast
Idle Connector Rod 39—
Pin
Spring
40—
Ball
Check Valve
41—
Ball
Check Valve Retainer Ring
42— Metering Rod Jet
43—
Low
Speed
Jet
44— Metering Rod
45— Metering Rod Spring 46—
Inner
Pump Spring
47— Pump Spring Retainer
48—
Bracket
and Clamp Assembly (Choke and Throttle) 5^—31 | 1X892
117
Page 118 of 376
E
FUEL
SYSTEM
Note:
Do not remove pressed-in parts such as
nozzle, pump jet, or antipercolator air bleed.
j.
Remove body flange attaching screws, body flange assembly, and gasket.
k.
Remove idle-adjustment screw, spring, idle
port
rivet, throttle lever assembly, washer, fast
idle arm, throttle plate screws, throttle plate, and throttle shaft.
1. Remove throttle shaft seal by prying out seal
retainer.
Note:
Do not remove pressed-in vacuum passage
orifice.
m.
Remove choke valve screws and choke valve.
Unhook
choke spring and slide shaft from housing,
n.
Wash all parts in carburetor cleaning solution
and
blow out passages with compressed air. Do not immerse diaphragm or seals in cleaning solution.
Inspect
all parts for wear or damage. Always use
new gaskets when reassembling.
E-22.
Carburetor
Reassembly
•
Refer to Fig. E-13.
To
expedite
reassembly, it is advisable to group all
related
parts by the circuit to which they belong.
a.
Install
throttle shaft seal and retainer in flange casting.
b.
Install
fast-idle
arm,
washer, and lever assembly
on throttle shaft. Slide shaft into place and install throttle valve.
c.
Install
idle port rivet plug and idle adjusting
screw
and spring.
d.
Attach flange assembly to body casting. Use new gasket.
e.
Install
low-speed jet assembly.
f.
Early
production models install pump intake
strainer
in pump diaphragm housing and carefully
press into recess.
Note:
If strainer is even slightly damaged, a new
one must be installed.
g.
Install
pump diaphragm assembly in diaphragm housing.
Then,
install pump diaphragm spring
(lower)
and retainer.
h.
Install
pump lifter
link,
metering rod
arm,
upper
pump spring, and retainer.
I.
Install
metering rod jet.
Note:
No gasket is used with this jet.
j.
Install
diaphragm housing attaching screws in
the diaphragm housing, making sure that the
edges
of the diaphragm are not wrinkled.
Lower
into place and tighten screws evenly and securely,
k.
Install
throttle shaft seal, dust seal washer, and
shaft seal spring.
I.
Install
pump connector
link
in the throttle arm
assembly.
Install
throttle shaft arm assembly on
throttle shaft guiding connector
link
in pump lifter
link
hole.
CAUTION:
Linkage
must not bind in any throttle
position. If binding occurs,
loosen
clamp screw in
throttle arm, adjust slightly, then retighten screw.
m.
Install
pump check disc, disc retainer, and lock
ring.
n.
Install
metering rod and pin spring. Connect
metering rod spring.
o.
Check
and if necessary correct meter ing rod adjustment. Follow procedure of
Par.
E-16.
p.
Install
needle
seat and gasket assembly, needle,
float
and
float pin. The
stop
shoulder on the float
pin
must be on the side away from the bore of
the carburetor.
q.
Set float level to specifications. Follow pro cedure of
Par.
E-12.
r.
Install
air horn gasket and air horn assembly.
Install
attaching screws, lock washers, and choke
tube clamp assembly. Tighten center screws first,
s. Slide choke shaft and lever assembly into place
and
connect choke lever
spring.
Install
choke valve.
Center
the valve by tapping lightly, then hold in
place with fingers when tightening screws,
t.
Install
fast-idle connector rod with
offset
portion
of rod on top and pin spring on outside.
Install
fast-idle connecting rod spring.
E-23.
Correcting Acceleration
Flat
Spot
Early
production
Carburetor
Models 938-S, 938-
SA,
938-SC
Inasmuch
as a flat
spot
on acceleration or low speed
stumble can
come
from causes other than
car
buretor
malfunction, it is recommended that
engine
tuning be thoroughly checked before attempting
any
actual carburetor work. Make sure that
ignition, compression, and timing are correct and
that fuel pump is supplying enough gas. Also, the F-head
engine
employs a water-heated intake
manifold.
Proper vaporization of the fuel depends
on correct intake manifold temperature. Since this
temperature is controlled by the cooling system
thermostat, include an operational check of the
thermostat when diagnosing the stumble. Operating
temperatures consistently below
155°F.
can cause stumble.
If
the stumble persists, a
YF-938-S,
YF-938-SA,
or
YF-938-SC
carburetor can be converted to a
YF-938-SD
carburetor by installing Special Kit
924161, consisting of a pump discharge check
needle, a metering rod, and a metering rod jet. If this kit is installed, the pump discharge check
needle
replaces the original
ball,
weight, and re
tainer
and the small wire-type retainer used with
the
ball
check assembly must not be reinstalled.
When
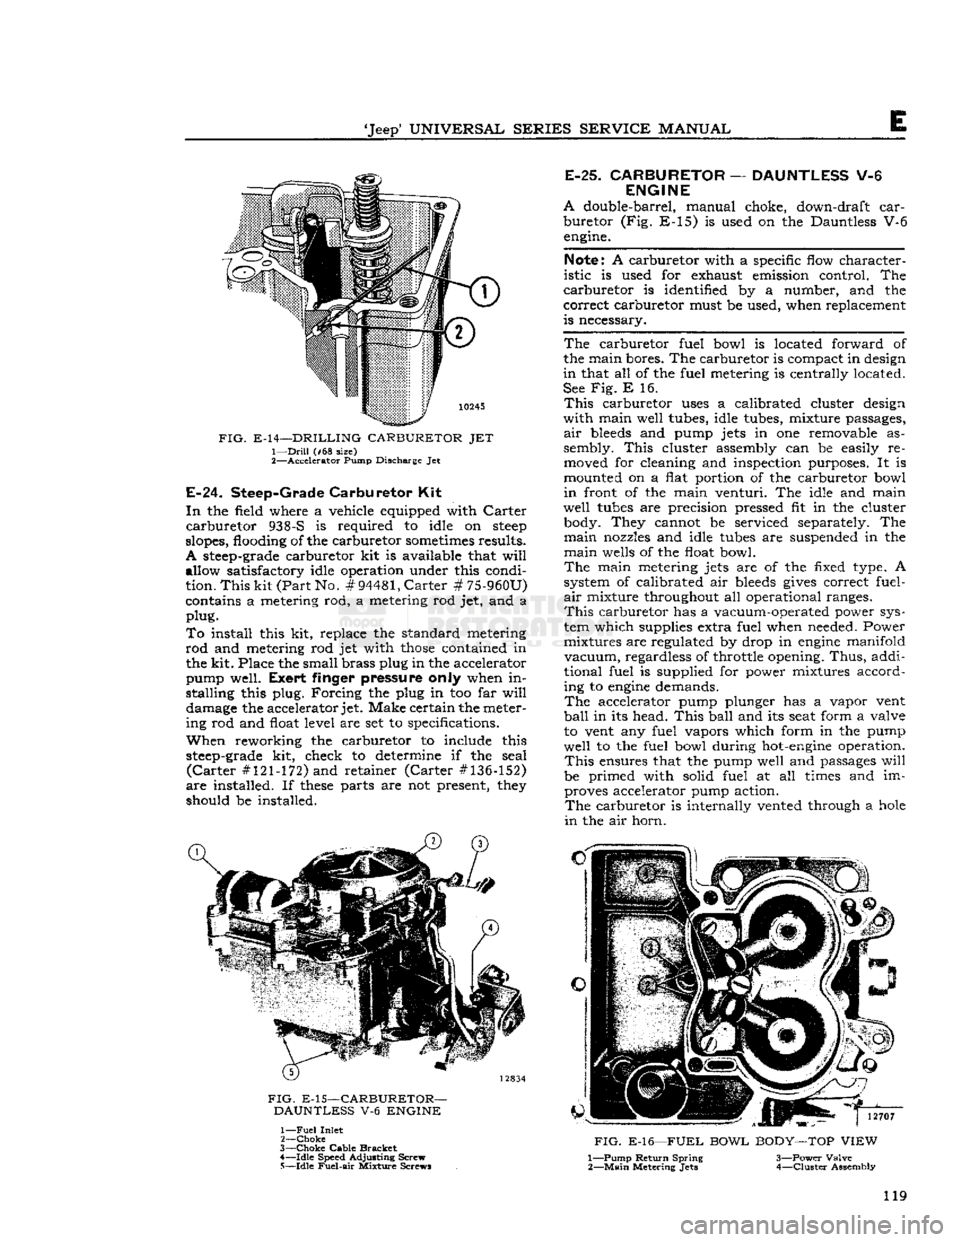
installing the kit, check the size of the pump discharge jet, No. 2, Fig. E-14.
Early
production
YF-938S
and
YF-938SA
carburetors have a .025" [0,635 mm.] jet installed. If the carburetor being
converted has a .025" jet it must be opened up to .031" [0,787 mm.] by running a No. 68
drill
through
the jet as shown in
Fig.
E-14.
The jet must be drilled
as it is a pressed in part and cannot be replaced.
Upon
completing the installation of the conversion
kit,
mark
or tag the carburetor to indicate that it
is a
YF-938SD.
118
Page 119 of 376
'Jeep'
UNIVERSAL
SERIES SERVICE
MANUAL
E
FIG.
E-14—DRILLING CARBURETOR JET 1—
Drill
(#68 size)
2—
Accelerator
Pump Discharge Jet
E-24.
Steep-Grade
Carburetor
Kit
In
the
field
where a vehicle equipped
with
Carter carburetor 938-S is required to
idle
on
steep
slopes,
flooding
of the carburetor sometimes results.
A
steep-grade
carburetor kit is available that
will
allow satisfactory
idle
operation under this condi
tion.
This kit (Part
No.
#94481,
Carter # 75-960U)
contains a metering rod, a metering rod jet, and a
plug.
To
install
this kit, replace the standard metering
rod
and metering rod jet
with
those
contained in the
kit.
Place the small
brass
plug
in the accelerator
pump
well.
Exert
finger pressure only when in
stalling
this
plug.
Forcing the
plug
in too far
will
damage
the accelerator
jet.
Make certain the meter
ing
rod and
float
level
are set to specifications.
When
reworking
the carburetor to include this
steep-grade
kit, check to determine if the seal (Carter #121-172) and retainer (Carter #136-152)
are installed. If
these
parts are not present, they
should
be installed.
FIG.
E-15—CARBURETOR-
DAUNTLESS V-6 ENGINE 1—
Fuel
Inlet
2—
Choke
3—
Choke
Cable
Bracket
4—
Idle
Speed Adjusting Screw 5—
Idle
Fuel-air
Mixture Screws
E-25.
CARBURETOR
—
DAUNTLESS
V-6
ENGINE
A
double-barrel, manual choke, down-draft car
buretor (Fig. E-15) is used on the Dauntless V-6 engine.
Note: A carburetor
with
a specific
flow
character
istic
is used for exhaust emission
control.
The
carburetor is
identified
by a number, and the
correct carburetor must be used, when replacement
is
necessary.
The carburetor
fuel
bowl
is located
forward
of
the main bores. The carburetor is compact in design
in
that all of the
fuel
metering is centrally located.
See Fig. E 16.
This
carburetor
uses
a calibrated cluster design
with
main
well
tubes,
idle
tubes, mixture
passages,
air
bleeds and pump jets in one removable as
sembly.
This cluster assembly can be easily re
moved
for cleaning and inspection purposes. It is
mounted
on a
flat
portion
of the carburetor
bowl
in
front
of the main
venturi.
The
idle
and main
well
tubes
are precision
pressed
fit in the cluster
body.
They cannot be serviced separately. The
main
nozzles and
idle
tubes
are
suspended
in the
main
wells of the
float
bowl.
The main metering jets are of the
fixed
type. A
system of calibrated air bleeds gives correct
fuel-
air
mixture throughout all operational
ranges.
This
carburetor has a vacuum-operated power sys
tem
which
supplies extra
fuel
when needed. Power
mixtures
are regulated by drop in engine
manifold
vacuum,
regardless of throttle opening. Thus, addi
tional
fuel
is supplied for power mixtures accord
ing
to engine demands.
The accelerator pump plunger has a vapor vent
ball
in its head. This
ball
and its
seat
form
a valve
to
vent any
fuel
vapors
which
form
in the pump
well
to the
fuel
bowl
during hot-engine operation.
This
ensures
that the pump
well
and
passages
will
be primed
with
solid
fuel
at all times and im proves accelerator pump action. The carburetor is
internally
vented through a hole
in
the air horn.
FIG.
E-16—FUEL BOWL BODY—TOP VIEW
1— Pump Return Spring 3—Power
Valve
2—
Main
Metering
Jets
4—Cluster Assembly
119
Page 120 of 376
E
FUEL
SYSTEM
There
are six adjustments: curb idle speed, curb
idle mixture, float level, float drop, accelerator pump, and fast idle.
This
carburetor has six basic systems: float, low
speed, main metering, power, accelerator pump
and
choke.
E-26.
Float System
The
float system controls fuel level in the
car
buretor fuel bowl. It maintains constant fuel level
to assure proper metering through all operating
ranges.
Fuel
enters the carburetor through the inlet screen
and
inlet valve. It flows past the valve
needle
and into the fuel bowl.
Fuel
continues to flow until
increasing
fuel level raises the float to a position
in
which it forces the inlet valve
needle
into its seat.
This
closes
the inlet valve. As fuel is used
from
the bowl, the float
moves
downward slightly.
This
allows the valve
needle
to
move
away from its
seat.
This
again allows fuel to enter the fuel bowl
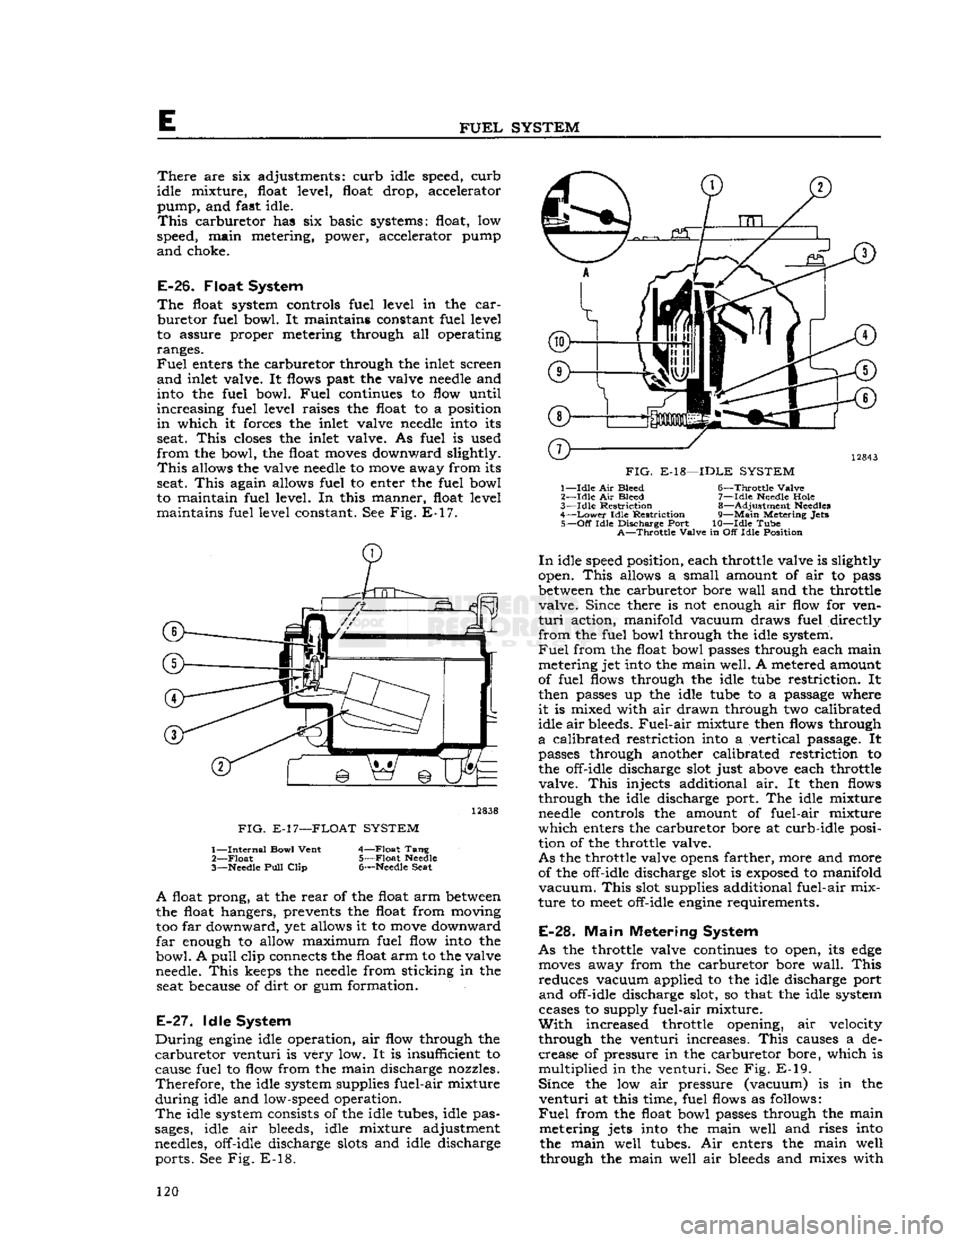
to maintain fuel level. In this manner, float level maintains fuel level constant. See Fig. E-17. 12838
FIG.
E-17—FLOAT
SYSTEM
1—
Internal
Bowl
Vent
4—Float Tang
2—
Float
5—Float Needle
3— Needle
Pull
Clip
6—Needle
Seat
A
float prong, at the
rear
of the float arm
between
the float hangers, prevents the float from moving too far downward, yet allows it to
move
downward
far
enough to allow maximum fuel flow into the
bowl. A
pull
clip connects the float arm to the valve needle.
This
keeps the
needle
from sticking in the seat because of
dirt
or gum formation.
E-27.
Idle System
During
engine
idle operation, air flow through the
carburetor
venturi is very low. It is insufficient to
cause fuel to flow from the main discharge nozzles.
Therefore,
the idle system supplies fuel-air mixture
during
idle and low-speed operation.
The
idle system consists of the idle tubes, idle pas
sages,
idle air bleeds, idle mixture adjustment
needles, off-idle discharge
slots
and idle discharge ports. See Fig. E-18.
FIG.
E-18—IDLE
SYSTEM
1—
Idle
Air Bleed 6—Throttle
Valve
2—
Idle
Air Bleed 7—Idle Needle
Hole
3—
Idle
Restriction
8—Adjustment Needles
4—
Lower
Idle
Restriction
9—Main
Metering
Jets
5—
Off
Idle
Discharge Port 10—Idle Tube
A—Throttle
Valve
in Off
Idle
Position
In
idle speed position, each throttle valve is slightly
open.
This
allows a small amount of air to pass
between
the carburetor bore
wall
and the throttle valve. Since there is not enough air flow for ven
turi
action, manifold vacuum draws fuel directly
from
the fuel bowl through the idle system.
Fuel
from the float bowl passes through each main metering jet into the main well. A metered amount
of fuel flows through the idle tube restriction. It
then passes up the idle tube to a passage where
it
is mixed with air drawn through two calibrated
idle air bleeds.
Fuel-air
mixture then flows through
a
calibrated restriction into a vertical passage. It passes through another calibrated restriction to the off-idle discharge slot just above each throttle
valve.
This
injects additional air. It then flows
through the idle discharge port. The idle mixture
needle
controls the amount of fuel-air mixture
which
enters the carburetor bore at curb-idle posi tion of the throttle valve.
As
the throttle valve
opens
farther, more and more of the off-idle discharge slot is
exposed
to manifold
vacuum.
This
slot supplies additional fuel-air mix
ture to
meet
off-idle
engine
requirements.
E-28.
Main
Metering System
As
the throttle valve continues to open, its
edge
moves
away from the carburetor bore
wall.
This
reduces vacuum applied to the idle discharge port
and
off-idle discharge slot, so that the idle system
ceases
to supply fuel-air mixture.
With
increased throttle opening, air velocity through the venturi increases.
This
causes a de
crease of pressure in the carburetor bore, which is multiplied in the venturi. See Fig. E-19.
Since
the low air pressure (vacuum) is in the
venturi
at this time, fuel flows as follows:
Fuel
from the float bowl passes through the main metering jets into the main well and rises into the main well tubes. Air enters the main well through the main well air
bleeds
and mixes with 120