JEEP CJ 1953 Service Manual
Manufacturer: JEEP, Model Year: 1953, Model line: CJ, Model: JEEP CJ 1953Pages: 376, PDF Size: 19.96 MB
Page 291 of 376
'Jeep*
UNIVERSAL
SERIES
SERVICE
MANUAL
N
N-6.
Lubricating
Unit Bearing
a.
After the bearing has been inspected and ap
proved for continued service, it must be
relubri-
cated
prior
to re-installation into the axle housing.
The
Unit Bearing assembly can be hand packed
with
grease on the axle shaft by the method out
lined
below.
Lithium
soap wheel bearing grease
Part
No.
998386
should be used to relubricate Unit
Bearing
assembly.
b.
Push seal away from bearing and
fill
the area
or
cavity
between
the seal and bearing with the recommended grease. Refer to Fig. N-9.
c.
After the cavity is
full
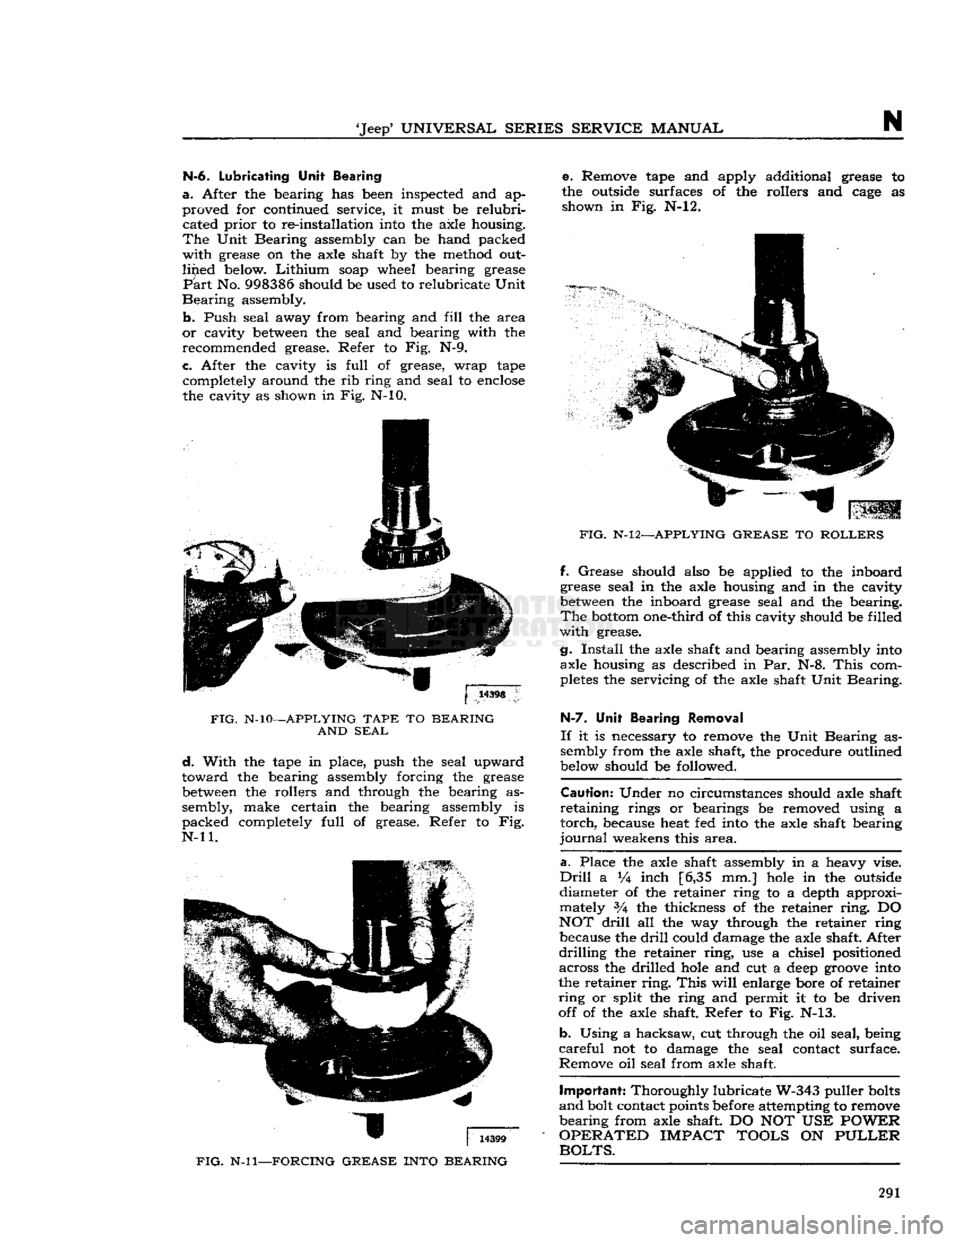
of grease, wrap tape completely around the rib ring and seal to
enclose
the cavity as shown in Fig. N-10.
FIG.
N-10—APPLYING
TAPE
TO
BEARING
AND
SEAL
d.
With
the tape in place, push the seal upward
toward
the bearing assembly forcing the grease
between
the rollers and through the bearing as
sembly, make certain the bearing assembly is
packed
completely
full
of grease. Refer to Fig.
N-ll.
FIG.
N-ll—FORCING
GREASE
INTO
BEARING
e. Remove tape and apply additional grease to
the outside surfaces of the rollers and
cage
as shown in Fig. N-l2.
FIG.
N-12—APPLYING
GREASE
TO
ROLLERS
ff.
Grease
should also be applied to the inboard
grease seal in the axle housing and in the cavity
between
the inboard grease seal and the bearing.
The
bottom
one-third of this cavity should be filled
with
grease.
g.
Install
the axle shaft and bearing assembly into axle housing as described in Par. N-8.
This
com
pletes
the servicing of the axle shaft Unit Bearing.
H-7.
Unit Bearing Removal
If
it is necessary to remove the Unit Bearing as
sembly from the axle shaft, the procedure outlined
below should be followed.
Caution:
Under no circumstances should axle shaft
retaining
rings or bearings be removed using a
torch,
because heat fed into the axle shaft bearing
journal
weakens this
area.
a.
Place the axle shaft assembly in a heavy vise.
Drill
a Vi inch [6,35 mm.]
hole
in the outside
diameter of the retainer ring to a depth approxi mately 3A the thickness of the retainer
ring.
DO
NOT
drill
all the way through the retainer ring because the
drill
could damage the axle shaft. After
drilling
the retainer
ring,
use a chisel positioned across the drilled
hole
and cut a
deep
groove
into
the retainer
ring.
This
will
enlarge bore of retainer
ring
or split the ring and permit it to be driven
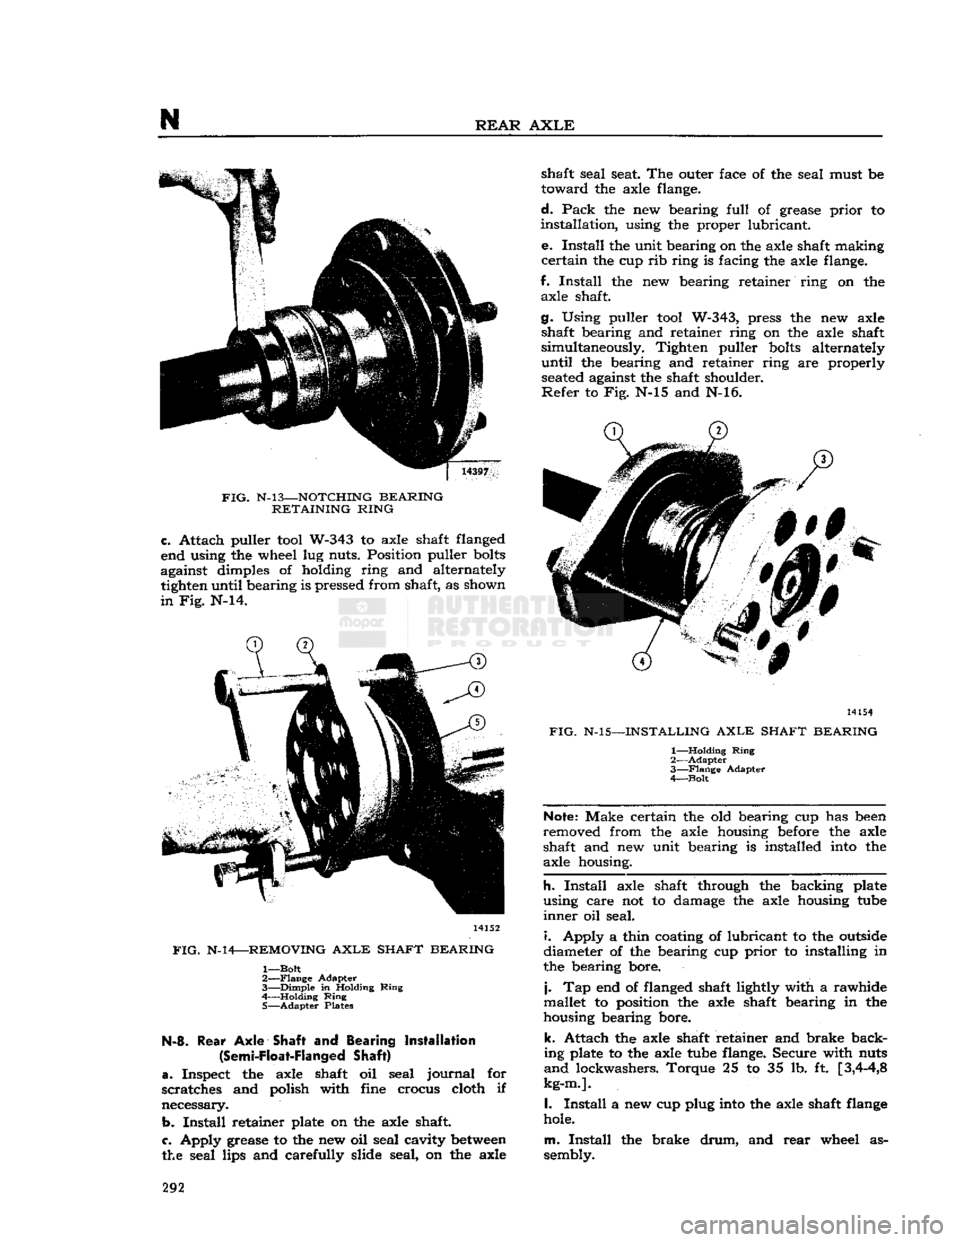
off of the axle shaft. Refer to Fig. N-13.
b.
Using a hacksaw, cut through the oil seal, being
careful
not to damage the seal contact surface.
Remove oil seal from axle shaft.
Important:
Thoroughly lubricate W-343 puller
bolts
and
bolt contact points before attempting to remove
bearing
from axle shaft DO NOT USE
POWER
OPERATED
IMPACT
TOOLS
ON
PULLER
BOLTS.
291
Page 292 of 376
N
REAR
AXLE
FIG.
N-l3—NOTCHING
BEARING
RETAINING
RING
c.
Attach puller
tool
W-343 to axle shaft flanged
end using the wheel lug nuts. Position puller
bolts
against dimples of holding ring and alternately tighten until bearing is pressed from shaft, as shown
in
Fig. N-14. 14152
FIG.
N-14—REMOVING
AXLE
SHAFT
BEARING
1—
Bolt
2—
Flange
Adapter
3—
Dimple
in Holding
Ring
4 Holding
Ring
5—
Adapter
Plates N-8.
Rear
Axle
Shaft and Bearing Installation
(Semi-Float-Flanged
Shaft)
a.
Inspect the axle shaft oil seal
journal
for
scratches and polish with fine crocus cloth if
necessary.
b.
Install
retainer plate on the axle shaft
c.
Apply grease to the new oil seal cavity
between
the seal lips and carefully slide seal, on the axle shaft seal seat. The outer face of the seal must be
toward
the axle flange.
d.
Pack
the new bearing
full
of grease
prior
to
installation,
using the proper lubricant.
e.
Install
the unit bearing on the axle shaft making
certain
the cup rib ring is facing the axle flange.
f.
Install
the new bearing retainer ring on the axle shaft.
g. Using puller
tool
W-343, press the new axle shaft bearing and retainer ring on the axle shaft
simultaneously. Tighten puller
bolts
alternately
until
the bearing and retainer ring are properly
seated
against the shaft shoulder.
Refer
to Fig. N-15 and N-16. 14154
FIG.
N-15—INSTALLING
AXLE
SHAFT
BEARING
1—
Holding
Ring
2—
Adapter
3—
Flange
Adapter
4—
Bolt
Note:
Make certain the old bearing cup has
been
removed from the axle housing
before
the axle
shaft and new unit bearing is installed
into
the
axle housing.
h.
Install
axle shaft through the backing plate
using care not to damage the axle housing
tube
inner
oil seal.
i.
Apply a thin coating of lubricant to the
outside
diameter of the bearing cup
prior
to installing in
the bearing bore.
j.
Tap end of flanged shaft lightly with a rawhide
mallet to position the axle shaft bearing in the
housing bearing bore.
k.
Attach the axle shaft retainer and brake back
ing plate to the axle
tube
flange. Secure with nuts
and
lockwashers. Torque 25 to 35 lb. ft
[3,4-4,8
kg-m.].
I.
Install
a new cup plug
into
the axle shaft
flange
hole.
m.
Install
the brake
drum,
and
rear
wheel as
sembly. 292
Page 293 of 376
'Jeep*
UNIVERSAL
SERIES
SERVICE
MANUAL
N
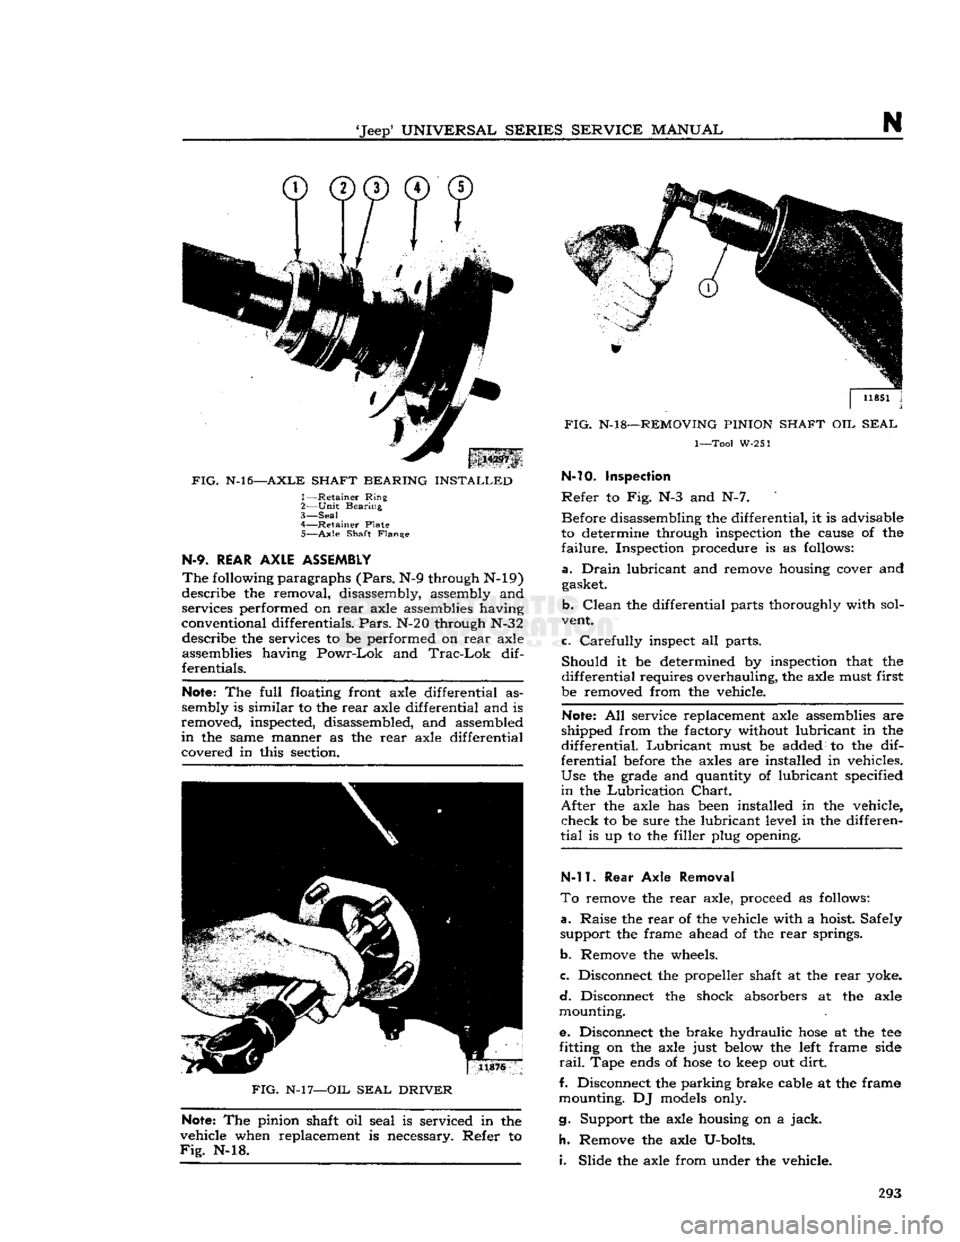
FIG.
N-l6—AXLE
SHAFT
BEARING
INSTALLED
1—
Retainer
Ring
2—
Unit
Bearing
3—
Seal
4—
Retainer
Plate
5—
Axle
Shaft
Flange
N-9.
REAR
AXLE
ASSEMBLY
The
following
paragraphs
(Pars.
N-9 through N-19)
describe the removal, disassembly, assembly and
services performed on
rear
axle assemblies having
conventional differentials.
Pars.
N-20 through N-32 describe the services to be performed on
rear
axle
assemblies having
Powr-Lok
and
Trac-Lok
dif
ferentials.
Note:
The
full
floating front axle differential as
sembly is similar to the
rear
axle differential and is
removed, inspected, disassembled, and assembled
in
the same manner as the
rear
axle differential
covered in this section.
FIG.
N-l
7—OIL
SEAL
DRIVER
Note:
The pinion shaft oil seal is serviced in the
vehicle when replacement is necessary. Refer to
Fig.
N-l8.
11851
j
J
FIG.
N-l8—REMOVING
PINION
SHAFT
OIL
SEAL
1—Tool
W-251 N-10. Inspection
Refer
to Fig. N-3 and N-7. Before disassembling the differential, it is advisable
to determine through inspection the cause of the
failure.
Inspection procedure is as follows:
a.
Drain
lubricant and remove housing cover and gasket.
b.
Clean
the differential parts thoroughly with sol
vent.
c.
Carefully
inspect all parts.
Should
it be determined by inspection that the
differential
requires overhauling, the axle must first
be removed from the vehicle.
Note:
All service replacement axle assemblies are
shipped from the factory without lubricant in the
differential.
Lubricant
must be added to the dif
ferential
before
the axles are installed in vehicles.
Use
the grade and quantity of lubricant specified
in
the
Lubrication
Chart.
After
the axle has
been
installed in the vehicle,
check
to be sure the lubricant level in the differen
tial
is up to the filler plug opening.
N-l
1.
Rear
Axle Removal
To
remove the
rear
axle, proceed as follows:
a.
Raise the
rear
of the vehicle with a hoist. Safely
support the frame ahead of the
rear
springs.
b.
Remove the wheels.
c.
Disconnect the propeller shaft at the
rear
yoke.
d.
Disconnect the shock absorbers at the axle
mounting.
e. Disconnect the brake hydraulic
hose
at the tee
fitting on the axle just
below
the
left
frame side
rail.
Tape
ends
of
hose
to
keep
out
dirt.
f. Disconnect the parking brake cable at the frame
mounting. DJ
models
only.
g. Support the axle housing on a
jack.
h.
Remove the axle U-bolts.
i.
Slide the axle from under the vehicle. 293
Page 294 of 376
N
REAR AXLE
N-l2.
Differential Case
Disassembly
Refer
to
Fig.
N-3 and N-7.
a.
Remove
the
axle shafts. Refer
to
Par.
N-ll for
rear
axle removal
and
Par.
M-4 for
front axle
re
moval.
b.
Remove
the
housing cover
and
four
cap
screws
holding
the two
differential side bearing caps
in
position. Make sure there
are
matching letters
or
some
type
of
identification marks
on the
caps
and
housing
so
that each
cap can be
reinstalled
in the
same position
and
location from which
it is re
moved.
c.
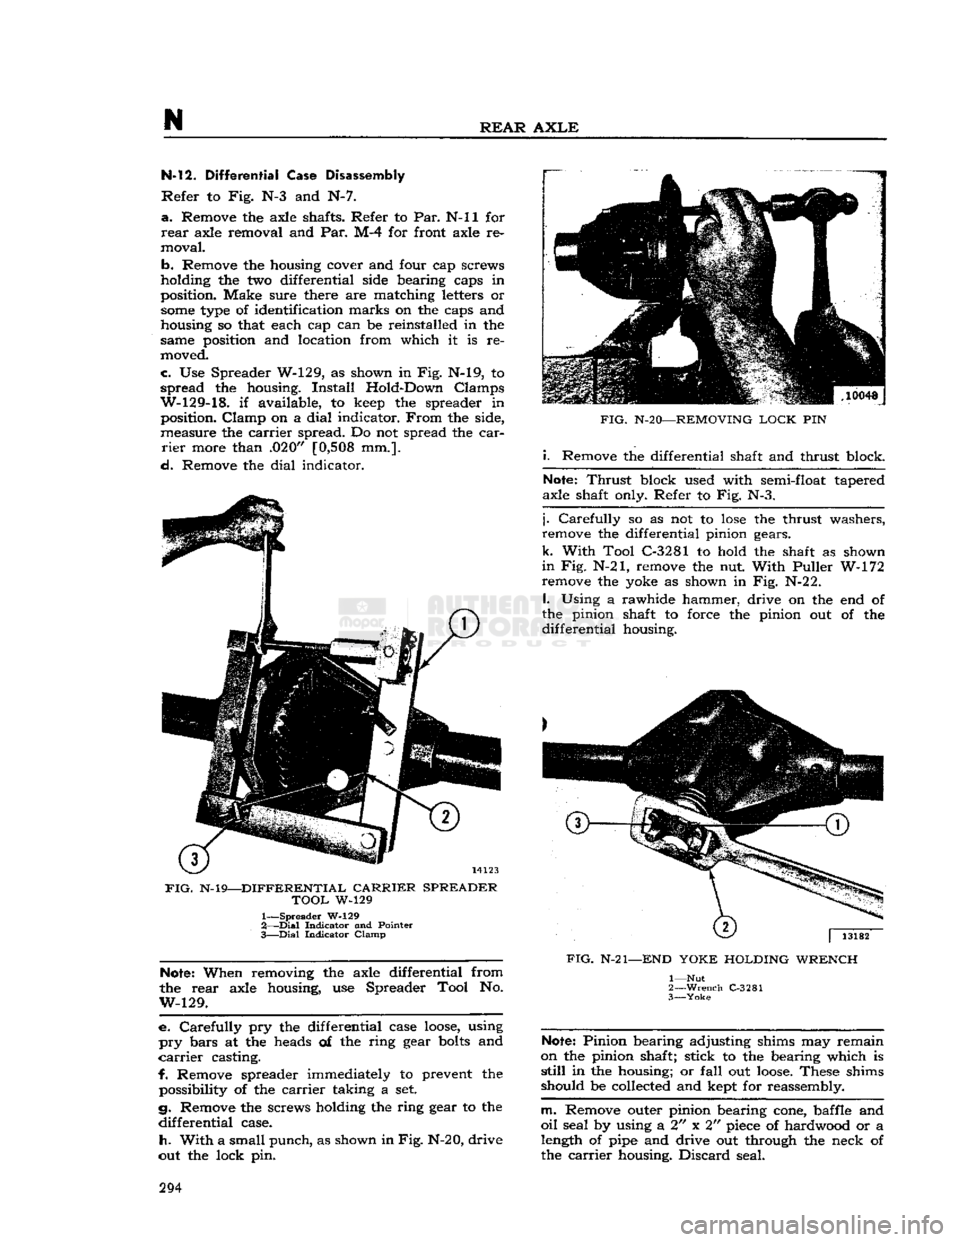
Use
Spreader W-129,
as
shown
in
Fig. N-l9,
to
spread
the
housing.
Install
Hold-Down Clamps
W-129-18.
if
available,
to
keep
the
spreader
in
position.
Clamp
on a
dial
indicator.
From
the
side,
measure
the
carrier
spread.
Do not
spread
the
car
rier
more than
.020"
[0,508
mm.].
d.
Remove
the
dial
indicator.
FIG.
N-19—DIFFERENTIAL
CARRIER
SPREADER
TOOL
W-129
1—
Spreader
W-129
2—
Dial
Indicator
and
Pointer
3—
Dial
Indicator
Clamp
Note:
When removing
the
axle differential from
the
rear
axle housing,
use
Spreader Tool
No.
W-129.
e.
Carefully
pry the
differential case
loose,
using
pry
bars
at the
heads
of the
ring gear
bolts
and
carrier
casting.
f.
Remove spreader immediately
to
prevent
the
possibility
of the
carrier
taking
a set.
g. Remove
the
screws holding
the
ring gear
to the
differential
case.
h.
With
a
small punch,
as
shown in
Fig.
N-20, drive
out
the
lock
pin.
FIG.
N-20—REMOVING
LOCK
PIN
i.
Remove
the
differential shaft
and
thrust block.
Note:
Thrust
block used with semi-float tapered
axle shaft only. Refer
to
Fig.
N-3.
j.
Carefully
so as not to
lose
the
thrust washers,
remove
the
differential pinion gears.
k.
With
Tool C-3281
to
hold
the
shaft
as
shown
in
Fig.
N-21,
remove
the nut.
With
Puller
W-172
remove
the
yoke
as
shown
in
Fig. N-2
2.
I.
Using
a
rawhide hammer, drive
on the end of
the pinion shaft
to
force
the
pinion
out of the
differential
housing.
FIG.
N-21—END
YOKE
HOLDING WRENCH
1— Nut
2—
Wrench
C-3281
3—
Yoke
Note:
Pinion bearing adjusting shims
may
remain
on
the
pinion shaft; stick
to the
bearing which
is
still
in the
housing;
or
fall
out
loose.
These shims
should
be
collected
and
kept
for
reassembly.
m.
Remove outer pinion bearing
cone,
baffle
and
oil
seal
by
using
a 2" x 2"
piece
of
hardwood
or a
length
of
pipe
and
drive
out
through
the
neck
of
the
carrier
housing.
Discard
seal. 294
Page 295 of 376
'Jeep*
UNIVERSAL
SERIES SERVICE
MANUAL
N
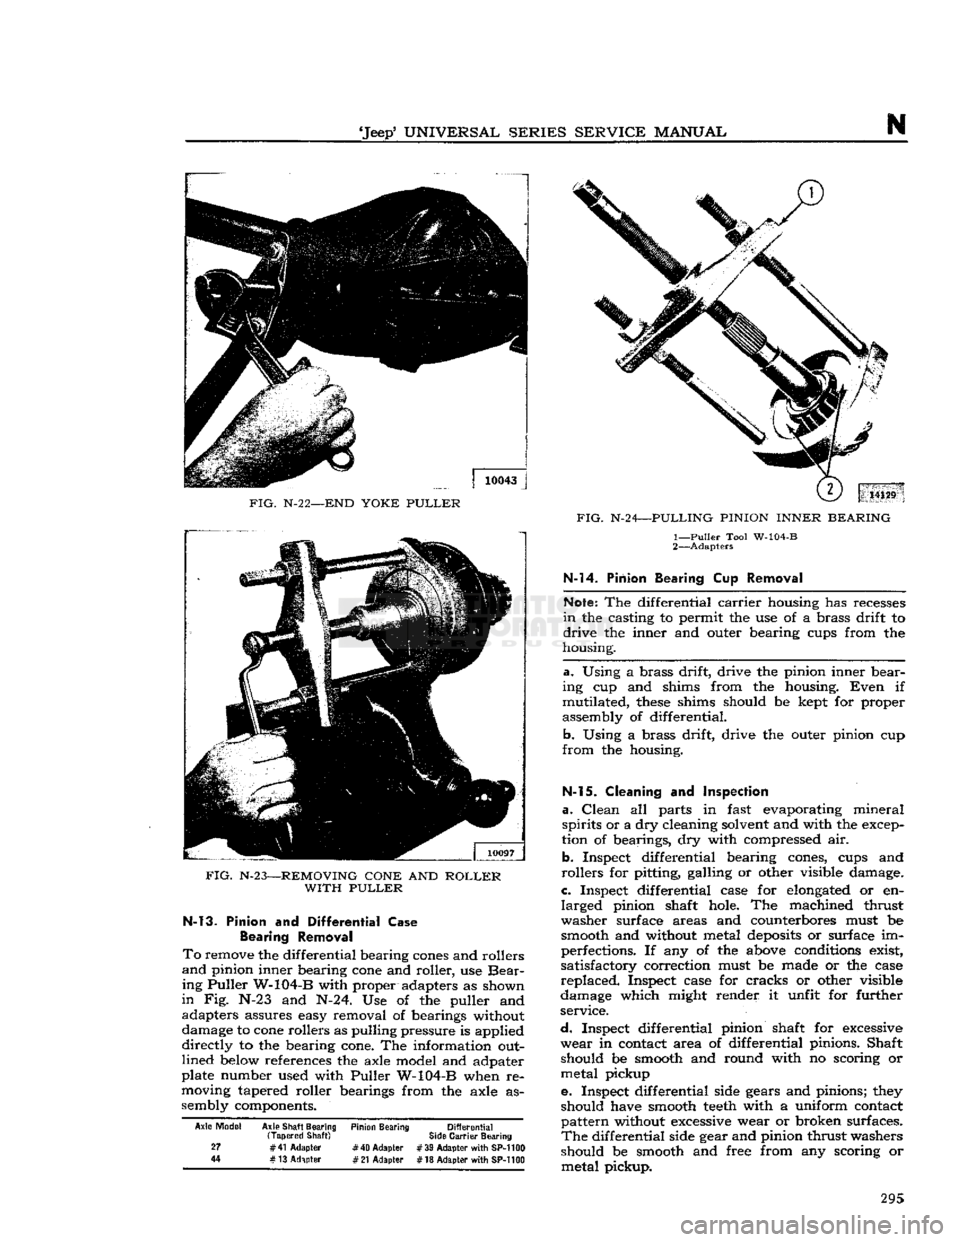
FIG.
N-2
2—END
YOKE PULLER
FIG.
N-23—REMOVING
CONE
AND
ROLLER
WITH
PULLER
N-13. Pinion
and
Differential
Case
Bearing
Removal
To
remove the differential bearing
cones
and rollers
and
pinion inner bearing
cone
and roller,
use
Bear
ing Puller W-104-B with proper adapters
as
shown
in
Fig. N-23 and N-24. Use of the
puller
and
adapters assures easy removal
of
bearings without
damage
to
cone
rollers as pulling pressure
is
applied
directly
to the
bearing
cone.
The information
out
lined
below
references
the
axle model and adpater
plate number used with Puller W-104-B when
re
moving tapered roller bearings from
the
axle
as
sembly components.
Axle Model Axle Shaft Bearing Pinion Bearing Differential (Tapered Shaft) Side Carrier Bearing
27
#
41
Adapter
#
40 Adapter
#
39
Adapter with
SP-1100
44
#13
Adapter
#21
Adapter
#
18
Adapter with SP-1100
FIG.
N-24—PULLING PINION
INNER
BEARING
1— Puller Tool W-104-B
2—
-Adapters
N-14. Pinion Bearing
Cup
Removal
Note:
The differential
carrier
housing
has recesses
in
the
casting
to
permit
the use of a
brass drift
to
drive
the
inner
and
outer bearing cups from
the
housing.
a.
Using
a
brass drift, drive
the
pinion inner bear
ing
cup and
shims from
the
housing.
Even
if
mutilated,
these
shims should
be
kept
for
proper
assembly
of
differential.
b. Using
a
brass drift, drive
the
outer pinion
cup
from
the
housing.
N-15. Cleaning
and
Inspection
a. Clean
all
parts
in
fast evaporating mineral
spirits or
a
dry cleaning solvent and with
the
excep
tion
of
bearings,
dry
with compressed air.
b. Inspect differential bearing
cones,
cups
and
rollers
for
pitting, galling
or
other visible damage.
c. Inspect differential case
for
elongated
or en
larged pinion shaft hole.
The
machined thrust
washer surface areas
and
counterbores must
be
smooth
and
without metal
deposits
or
surface
im
perfections.
If any of the
above
conditions exist,
satisfactory correction must
be
made
or the
case replaced. Inspect case
for
cracks
or
other visible
damage which might render
it
unfit
for
further
service.
d.
Inspect differential pinion shaft
for
excessive
wear
in
contact area
of
differential pinions. Shaft should
be
smooth
and
round with
no
scoring
or
metal pickup
e.
Inspect differential side gears and pinions;
they
should have
smooth
teeth
with
a
uniform contact
pattern without
excessive
wear
or
broken surfaces.
The
differential side gear and pinion thrust washers
should
be
smooth
and
free from
any
scoring
or
metal pickup.
295
Page 296 of 376
N
REAR
AXLE
f. Inspect axle shaft thrust block for
excessive
wear
or visible damage. The wear surface on the op
posite
ends
of the blocks, must be smooth.
Note:
Thrust
block used with semi-float tapered
axles only.
g. Inspect differential pinion shaft lock pin for
damage or
looseness
in case. Replace pin or case as necessary.
h.
Inspect drive gear and pinion for worn or
chipped
teeth
or damaged attaching
bolt
threads.
If
replacement is necessary, replace both the drive
gear and drive pinion as
they
are available in
matched
sets
only.
i.
Inspect drive pinion bearing
cones,
cups and
rollers
for pitting, galling,
excessive
wear, or other
visible damage. If inspection reveals that either are
unfit for further service, replace both cup and
cone,
j.
Inspect differential
carrier
for cracks or other
visible damage which would render it unfit for
further
service. Raised metal on the shoulder of
bearing cup bores
incurred
in removing pinion cups should be flattened by use of a flat
nose
punch.
k.
Inspect drive pinion for damaged bearings
journals
and mounting shim surface or excessively
worn
splines. If replacement is necessary, replace both the drive pinion and drive gear as
they
are
available in matched
sets
only.
I.
Inspect companion
flange
for
cracks,
worn
splines, pitted, rough or corroded oil seal contacting
surface.
Repair
or replace companion
flange
as
necessary.
m.
Inspect drive pinion bearing shim pack for
broken,
damaged or distorted shims. Replace if
necessary during establishment of pinion bearing
preload.
N-16.
Pinion
Installation
and Adjustment
Refer
to
Fig.
N-3 and N-7.
Adjustment
of the pinion is accomplished by the use of shims placed
between
the inner bearing cup
and
the axle housing and
between
the pinion shoulder and the outer bearing. The shims behind
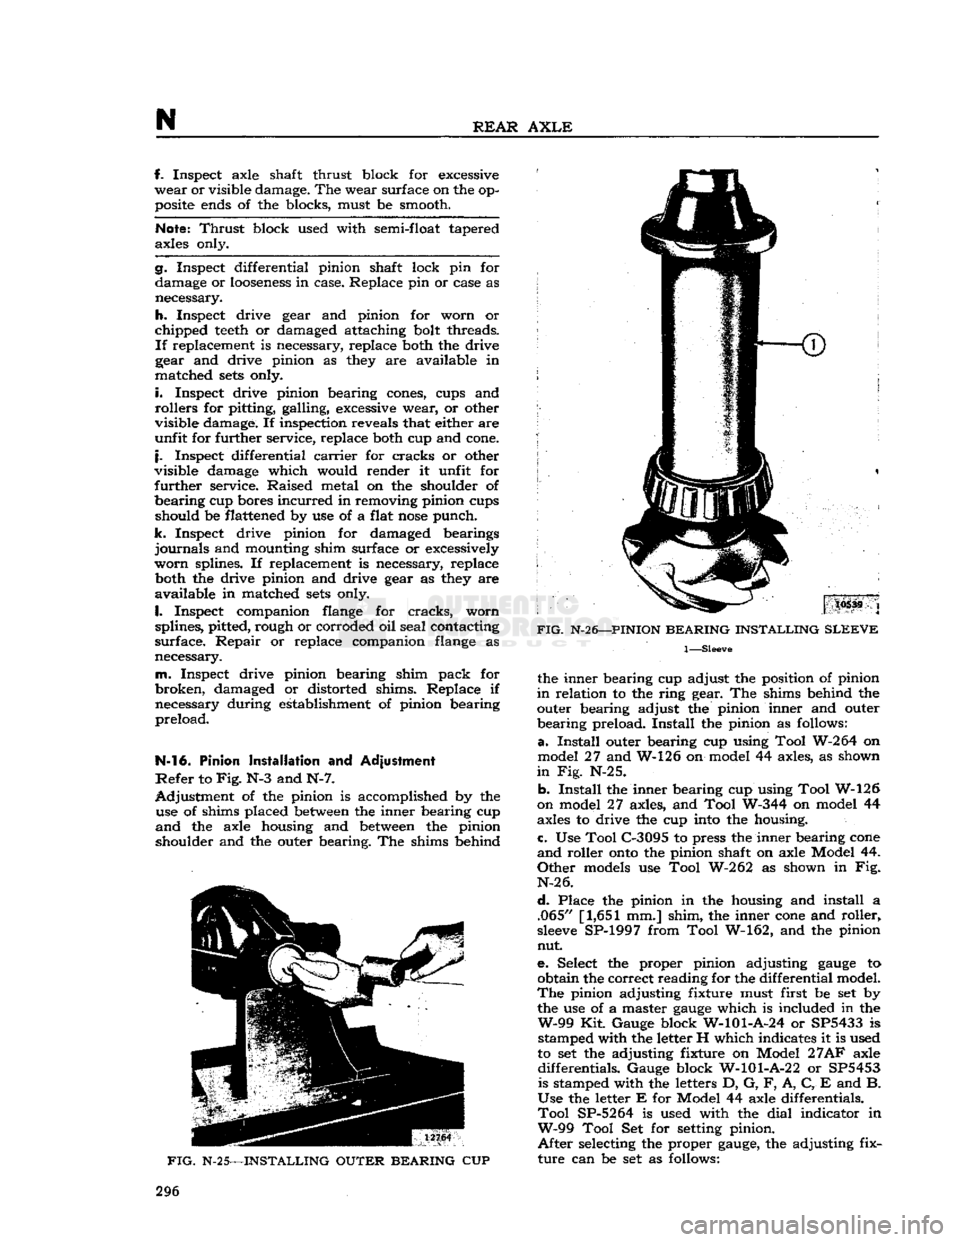
FIG.
N-2
5—INSTALLING
OUTER BEARING
CUP
FIG.
N-26—PINION
BEARING INSTALLING
SLEEVE
1—Sleeve
the inner bearing cup adjust the position of pinion
in
relation to the ring gear. The shims behind the outer bearing adjust the pinion inner and outer
bearing preload.
Install
the pinion as follows:
a.
Install
outer bearing cup using Tool W-264 on model 27 and W-126 on model 44 axles, as shown
in
Fig. N-25.
b.
Install
the inner bearing cup using Tool W-126
on model 27 axles, and Tool W-344 on model 44
axles to drive the cup
into
the housing.
c. Use Tool C-3095 to press the inner bearing
cone
and
roller
onto
the pinion shaft on axle Model 44.
Other
models
use Tool W-262 as shown in Fig.
N-26.
d.
Place the pinion in the housing and install a .065"
[1,651
mm.] shim, the inner
cone
and roller*
sleeve
SP-1997 from Tool W-162, and the pinion
nut.
e. Select the proper pinion adjusting
gauge
to obtain the correct reading for the differential model.
The
pinion adjusting fixture must first be set by the use of a master
gauge
which is included in the
W-99
Kit. Gauge block W-101-A-24 or SP5433 is stamped with the letter H which indicates it is used
to set the adjusting fixture on Model
27AF
axle differentials. Gauge block W-101-A-22 or SP5453 is stamped with the letters D, G, F, A, C, E and B.
Use the letter E for Model 44 axle differentials.
Tool
SP-5264 is used with the
dial
indicator in
W-99
Tool Set for
setting
pinion.
After
selecting the proper
gauge,
the adjusting fix
ture can be set as follows: 296
Page 297 of 376
'Jeep'
UNIVERSAL
SERIES SERVICE
MANUAL
N
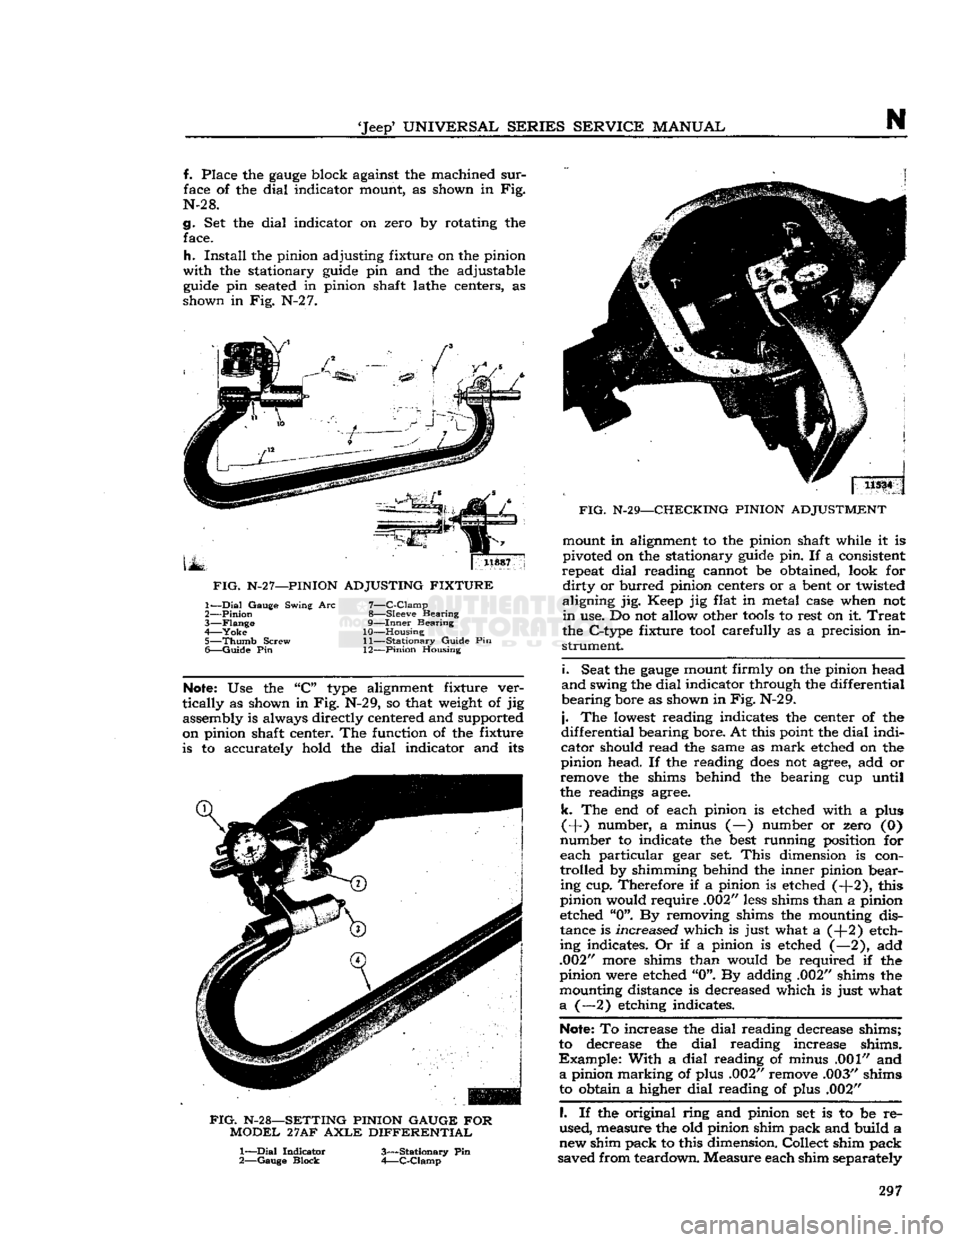
f. Place the
gauge
block against the machined
sur
face of the dial indicator mount, as shown in Fig.
N-2 8.
g. Set the dial indicator on zero by rotating the face.
h.
Install
the pinion adjusting fixture on the pinion
with
the stationary
guide
pin and the adjustable
guide
pin
seated
in pinion shaft lathe centers, as
shown in Fig. N-2 7.
FIG.
N-2
7—PINION
ADJUSTING FIXTURE
7—
C-Clamp
8— Sleeve Bearing
9—
Inner
Bearing
10— Housing 11—
Stationary
Guide Pin
1—
Dial
Gauge Swing Arc
2—
Pinion
3—
Flange
4—
Yoke
5—
Thumb
Screw
6—
Guide
Pin 12—Pinion Housing
Note:
Use the "C"
type
alignment fixture ver
tically
as shown in Fig. N-29, so that
weight
of jig assembly is always directly centered and supported
on pinion shaft center. The function of the fixture is to accurately hold the dial indicator and its
FIG.
N-28—SETTING
PINION
GAUGE FOR
MODEL
27AF
AXLE
DIFFERENTIAL
1—
Dial
Indicator
2—
Gauge
Block
3—
Stationary
Pin
4—
C-Clamp
j
11534 j
FIG.
N-29—CHECKING
PINION
ADJUSTMENT mount in alignment to the pinion shaft while it is
pivoted on the stationary
guide
pin. If a consistent
repeat dial reading cannot be obtained, look for
dirty
or burred pinion centers or a
bent
or twisted
aligning jig. Keep jig flat in metal case when not
in
use. Do not allow other
tools
to rest on it
Treat
the C-type fixture
tool
carefully as a precision in
strument.
i.
Seat the
gauge
mount firmly on the pinion head
and
swing the dial indicator through the differential
bearing bore as shown in
Fig.
N-29.
j.
The
lowest
reading indicates the center of the
differential bearing bore. At this point the dial indi
cator should read the same as
mark
etched on the
pinion head. If the reading
does
not agree, add or
remove the shims behind the bearing cup until
the readings agree.
k.
The end of each pinion is etched with a plus
(+) number, a minus (—) number or zero (0)
number to indicate the
best
running position for
each particular gear set.
This
dimension is con
trolled by shimming behind the inner pinion bear ing cup. Therefore if a pinion is etched (-f-2), this
pinion would require .002"
less
shims than a pinion
etched "0". By removing shims the mounting dis
tance is increased which is just what a (+2) etch
ing indicates. Or if a pinion is etched (—2), add
.002" more shims than would be required if the
pinion were etched "0". By adding .002" shims the mounting distance is decreased which is just what
a
(—2) etching indicates.
Note:
To increase the dial reading decrease shims;
to decrease the dial reading increase shims.
Example:
With a dial reading of minus .001" and
a
pinion marking of plus .002" remove .003" shims
to obtain a higher dial reading of plus .002"
I.
If the original ring and pinion set is to be re
used, measure the old pinion shim pack and build a
new shim pack to this dimension. Collect shim pack
saved from teardown. Measure each shim separately 297
Page 298 of 376
N
REAR
AXLE
with
a micrometer and add
together
to get total
shim
pack thickness from original buildup.
Note
the (-j-) or (—) etching on both the old pinion and the new one, and adjust the thickness of new shim
pack
to compensate for the difference
between
these
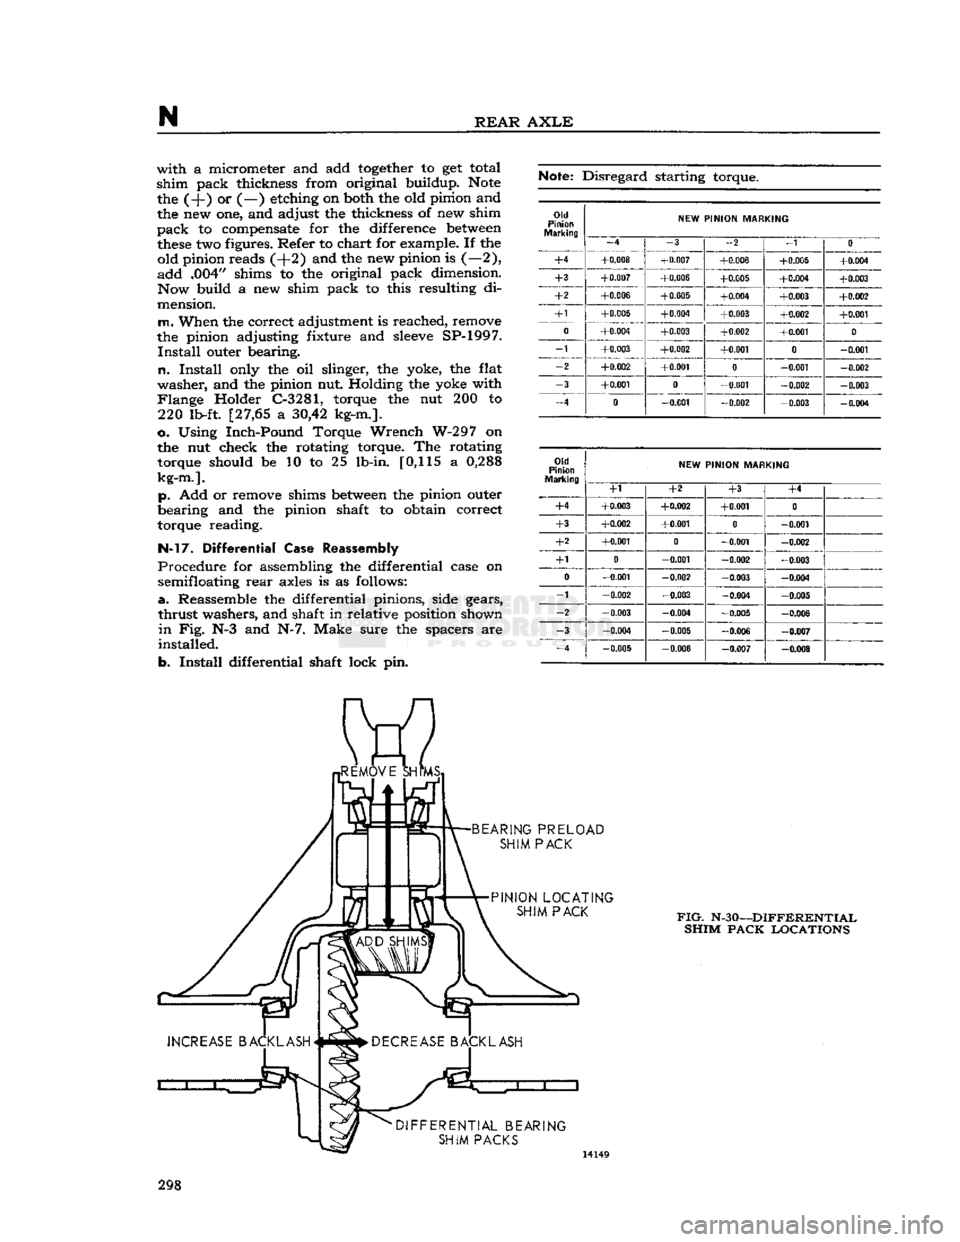
two figures. Refer to chart for example. If the old pinion reads (+2) and the new pinion is (—2),
add
.004" shims to the original pack dimension. Now build a new shim pack to this resulting di
mension.
m.
When the correct adjustment is reached, remove
the pinion adjusting fixture and
sleeve
SP-1997.
Install
outer bearing.
n.
Install
only the oil slinger, the yoke, the flat
washer,
and the pinion nut Holding the yoke with
Flange
Holder C-3281, torque the nut 200 to 220 lb-ft. [27,65 a
30,42
kg-m.].
o. Using Inch-Pound Torque Wrench W-297 on
the nut check the rotating torque. The rotating torque should be 10 to 25 lb-in. [0,115 a
0,288
kg-m.].
p. Add or remove shims
between
the pinion outer
bearing and the pinion shaft to obtain correct
torque reading.
N-l7.
Differential Case Reassembly
Procedure
for assembling the differential case on semifloating
rear
axles is as follows:
a.
Reassemble the differential pinions, side gears,
thrust
washers, and shaft in relative position shown
in
Fig. N-3 and N-7. Make sure the spacers are
installed.
b.
Install
differential shaft lock pin.
Note:
Disregard starting torque.
Old
Pinion
NEW
PINION MARKING
-4 -3
-2 _1
0
+4
+0.008
+0.007
+0.006 +0.005 +0.004
+3
+0.007 +0.006
+0.005 +0.004
+0.003
+2
+0.006
+0.005
+0.004 +0.003 +0.002
+1
+0.005 +0.004
+0.003 +0.002 +0.001
0
+0.004
+0.003 +0.002
+0.001
0
_1
+0.003 +0.002 +0.001
0
-0.001
-2
+0.002 +0.001
0
-0.001 -0.002
-3
+0.001
0
-0.001 -0.002
-0.003
-4
0
-0.001 -0.002
-0.003 -0.004
Old
Pinion
Marking
NEW
PINION MARKING
Old
Pinion
Marking
+1 +2
+3
+4
+4
+0.003 +0.002 +0.001
0
+3
+0.002
+0.001
0
-0.001
+2
+0.001
0
-0.001 -0.002
+1 0
-0.001
-0.002 -0.003
0
-0.001 -0.002
-0.003 -0.004
-1
-0.002 -0.003
-0.004
-0 005
-2
-0.003 -0.004 -0.005 -0.006
-3
-0.004 -0.005
-0.006 -0.007
_4
-0.005 -0.006
-0.007 -0.008
FIG.
N-30—DIFFERENTIAL
SHIM PACK LOCATIONS
298
Page 299 of 376
'Jeep9
UNIVERSAL
SERIES SERVICE
MANUAL
N
c.
Check
side gear clearance as described in Par.
N-18.
d.
Examine contacting surfaces of ring gear and
differential case for
burrs
or foreign matter.
e.
Assemble ring gear on differential case with assembly
hole
on each lined up.
f.
Tap ring gear
into
place with mallet.
g.
Install
ring gear screws. Torque 35 to 55 lb-ft. [4,84 a 7,60 kg-m.].
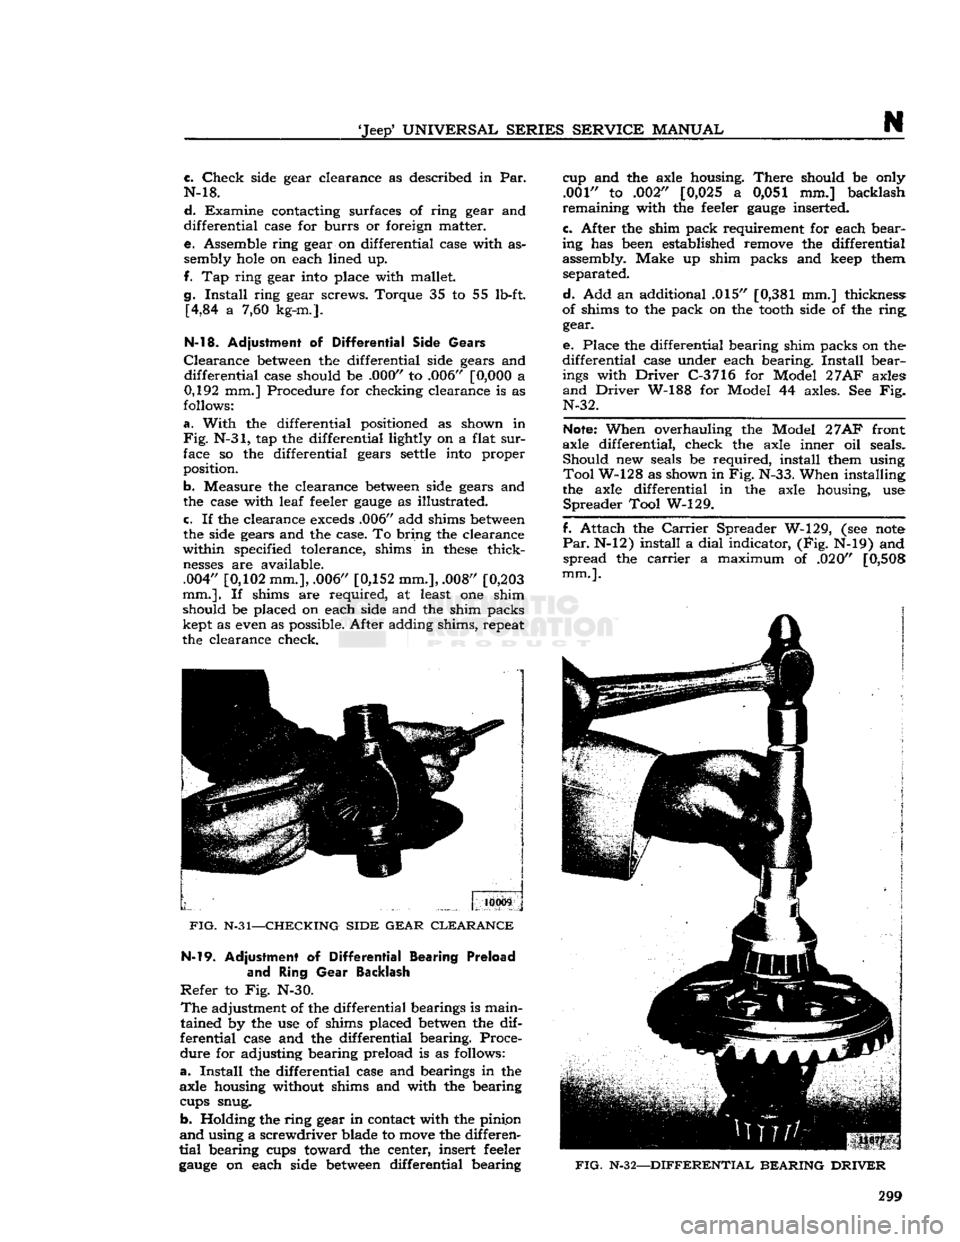
N-18.
Adjustment
of
Differential
Side
Gears
Clearance
between
the differential side gears and differential case should be .000" to .006"
[0,000
a
0,192 mm.] Procedure for checking clearance is as
follows:
a.
With
the differential positioned as shown in
Fig.
N-31, tap the differential lightly on a flat
sur
face so the differential gears
settle
into
proper
position.
b. Measure the clearance
between
side gears and
the case with leaf feeler
gauge
as illustrated. c. If the clearance
exceds
.006" add shims
between
the side gears and the case. To bring the clearance
within specified tolerance, shims in
these
thick
nesses
are available.
.004"
[0,102
mm.], .006"
[0,152
mm.], .008"
[0,203
mm.].
If shims are required, at least one shim
should be placed on each side and the shim packs kept as even as possible. After adding shims, repeat
the clearance check.
10009
FIG.
N-31—CHECKING SIDE GEAR CLEARANCE N-l9.
Adjustment of
Differential
Bearing Preload
and
Ring
Gear
Backlash
Refer
to Fig. N-30.
The
adjustment of the differential bearings is main
tained by the use of shims placed
betwen
the dif
ferential case and the differential bearing. Proce
dure for adjusting bearing preload is as follows:
a.
Install
the differential case and bearings in the
axle housing without shims and with the bearing
cups snug.
b. Holding the ring gear in contact with the pinipn
and
using a screwdriver blade to
move
the differen
tial
bearing cups toward the center, insert feeler
gauge
on each side
between
differential bearing cup and the axle housing.
There
should be only
.001" to .002"
[0,025
a 0,051 mm.] backlash
remaining with the feeler
gauge
inserted.
c.
After the shim pack requirement for each bear
ing has
been
established remove the differential
assembly. Make up shim packs and
keep
them separated.
d.
Add an additional .015"
[0,381
mm.] thickness:
of shims to the pack on the
tooth
side of the ring gear.
e.
Place the differential bearing shim packs on the
differential case under each bearing.
Install
bear
ings
with
Driver
C-3716 for Model
27AF
axles
and
Driver
W-188 for Model 44 axles. See Fig. N-32.
Note:
When overhauling the Model
27AF
front
axle differential, check the axle inner oil seals. Should new seals be required, install them using
Tool
W-128 as shown in Fig. N-33. When installing
the axle differential in the axle housing, use
Spreader
Tool W-129.
f. Attach the
Carrier
Spreader W-129, (see
note
Par.
N-12) install a
dial
indicator, (Fig. N-19) and spread the
carrier
a maximum of .020"
[0,508
mm.].
FIG.
N-32—DIFFERENTIAL BEARING DRIVER
299
Page 300 of 376
N
REAR AXLE
11874
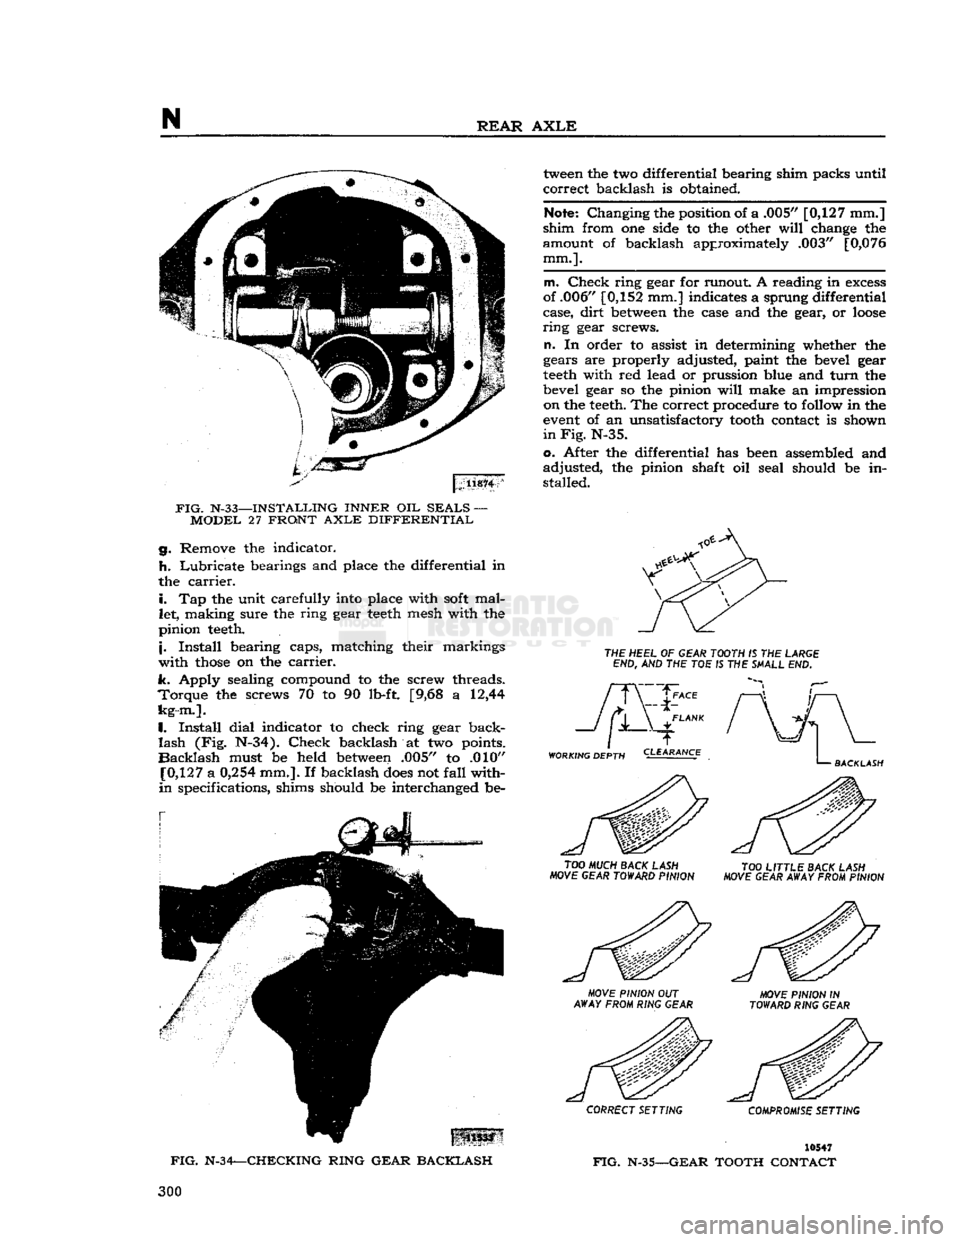
FIG.
N-33—INSTALLING INNER OIL SEALS — MODEL 27 FRONT
AXLE
DIFFERENTIAL g. Remove the indicator.
h.
Lubricate bearings and place the differential in
the
carrier.
i.
Tap the unit carefully
into
place with
soft
mallet, making sure the ring gear
teeth
mesh with the
pinion
teeth.
j.
Install bearing caps, matching their markings
with
those
on the
carrier.
k. Apply sealing compound to the screw threads.
Torque
the screws 70 to 90 lb-ft. [9,68 a 12,44
kg-m.].
I.
Install dial indicator to check ring gear back
lash
(Fig. N-34). Check backlash at two points.
Backlash
must be held
between
.005" to .010"
[0,127
a
0,254
mm.]. If backlash
does
not fall with
in
specifications, shims should be interchanged be
tween
the two differential bearing shim packs until
correct backlash is obtained.
Note:
Changing the position of a .005"
[0,127
mm.]
shim from one side to the other
will
change the
amount of backlash approximately .003"
[0,076
mm.].
m. Check ring gear for runout. A reading in
excess
of .006"
[0,152
mm.] indicates a sprung differential
case, dirt
between
the case and the gear, or
loose
ring
gear screws.
n.
In order to assist in determining whether the
gears are properly adjusted, paint the bevel gear
teeth
with red lead or prussion blue and turn the
bevel gear so the pinion
will
make an impression on the
teeth.
The correct procedure to
follow
in the
event
of an unsatisfactory
tooth
contact is shown
in Fig.
N-35.
o. After the differential has
been
assembled and
adjusted, the pinion shaft oil seal should be in
stalled.
THE
HEEL
OF
GEAR TOOTH
IS THE
LARGE
END,
AND THE TOE IS THE
SHALL
END.
WORKING DEPTH
TOO
MUCH BACK LASH
MOVE GEAR TOWARD PINION
TOO
LITTLE BACK LASH
MOVE GEAR AWAY FROM PINION
\:
US33
FIG.
N-34—CHECKING RING GEAR BACKLASH
MOVE
PINION
OUT
AWAY FROM RING GEAR MOVE PINION
IN
TOWARD RING GEAR
CORRECT SETTING COMPROMISE SETTING
10547
FIG.
N-35—GEAR
TOOTH CONTACT 300