KIA CARNIVAL 2007 Workshop Manual
CARNIVAL 2007
KIA
KIA
https://www.carmanualsonline.info/img/2/57045/w960_57045-0.png
KIA CARNIVAL 2007 Workshop Manual
Trending: steering gear, starter, low oil pressure, child lock, fault codes, recommended oil, sport mode
Page 871 of 1575
[RHD]
BRAKE PEDAL BRAKE SWITCH ADJUSTMENT
PEDAL HEIGHT1. Disconnect the brake switch connector, loosen the brake switch locknut (A), and brake off the brake switch (B) until
it is no longer touching the brake pedal.
2. Lift up the carpet. At the insulator cutout, measure the pedal height (C) from the middle of the left- side center of
the pedal pad (D).
Standard pedal height( with carpet removed): 192.4 mm(7.57 in.)
3.Loosen the pushrod locknut (A), and screw the pushrod in or out with pliers until the standard pedal height from the
floor is reached. After adjustment, tighten the locknut firmly. Do not adjust the pedal height with the pushrod
depressed.
Page 872 of 1575
BRAKE SWITCH CLEARANCE
Screw in the brake switch until its plunger is fully depressed (threded end (A) touching the pad (B) on the pedal arm)
then brake off the switch 3/4 turn to make 0.5 ~ 1.0 mm(0.0197 ~ 0.0394 in.) of clearance between the brake switch
connector. Make sure that the brake lights go off when the pedal is released.
PEDAL FREE PLAY
1.With the engine off, inspect the pedal free play (A) on the pedal pad (B) by pushing the pedal by hand.
Free play: 3 ~ 8 mm (0.12 ~ 0.31 in.)
2.If the pedal free play is out of specification, adjust the brake switch (C). If the pedal free play is insufficient, it may
result in brake drag.
INSPECTION OF FRONT DISC BRAKE PAD
1.Check the brake pad thickness through the caliper body inspection hole.
Pad thickness
Standard value : 10.5 mm ( 0.41 in)
Service limit : 2 mm (0.0787 in)
Page 873 of 1575
a.If the pad thickness is out of specilfication, left and right pads must be replaced as a complete set.
b. When the thickness difference between the left pad and right pad is large, check the sliding condition of
the piston and the guide rod.
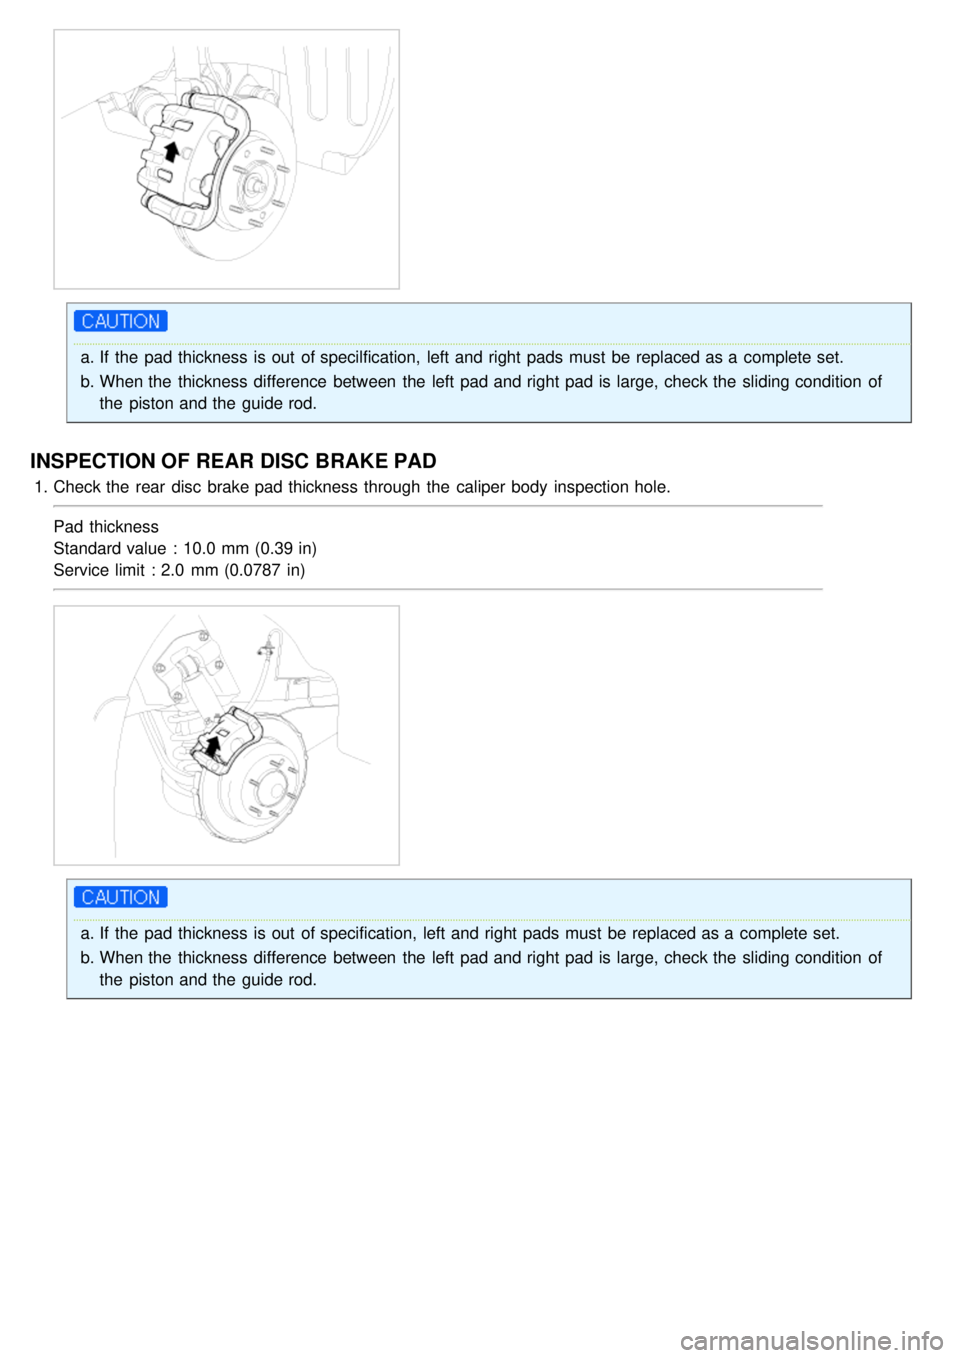
INSPECTION OF REAR DISC BRAKE PAD
1.Check the rear disc brake pad thickness through the caliper body inspection hole.
Pad thickness
Standard value : 10.0 mm (0.39 in)
Service limit : 2.0 mm (0.0787 in)
a.If the pad thickness is out of specification, left and right pads must be replaced as a complete set.
b. When the thickness difference between the left pad and right pad is large, check the sliding condition of
the piston and the guide rod.
Page 874 of 1575
Page 875 of 1575
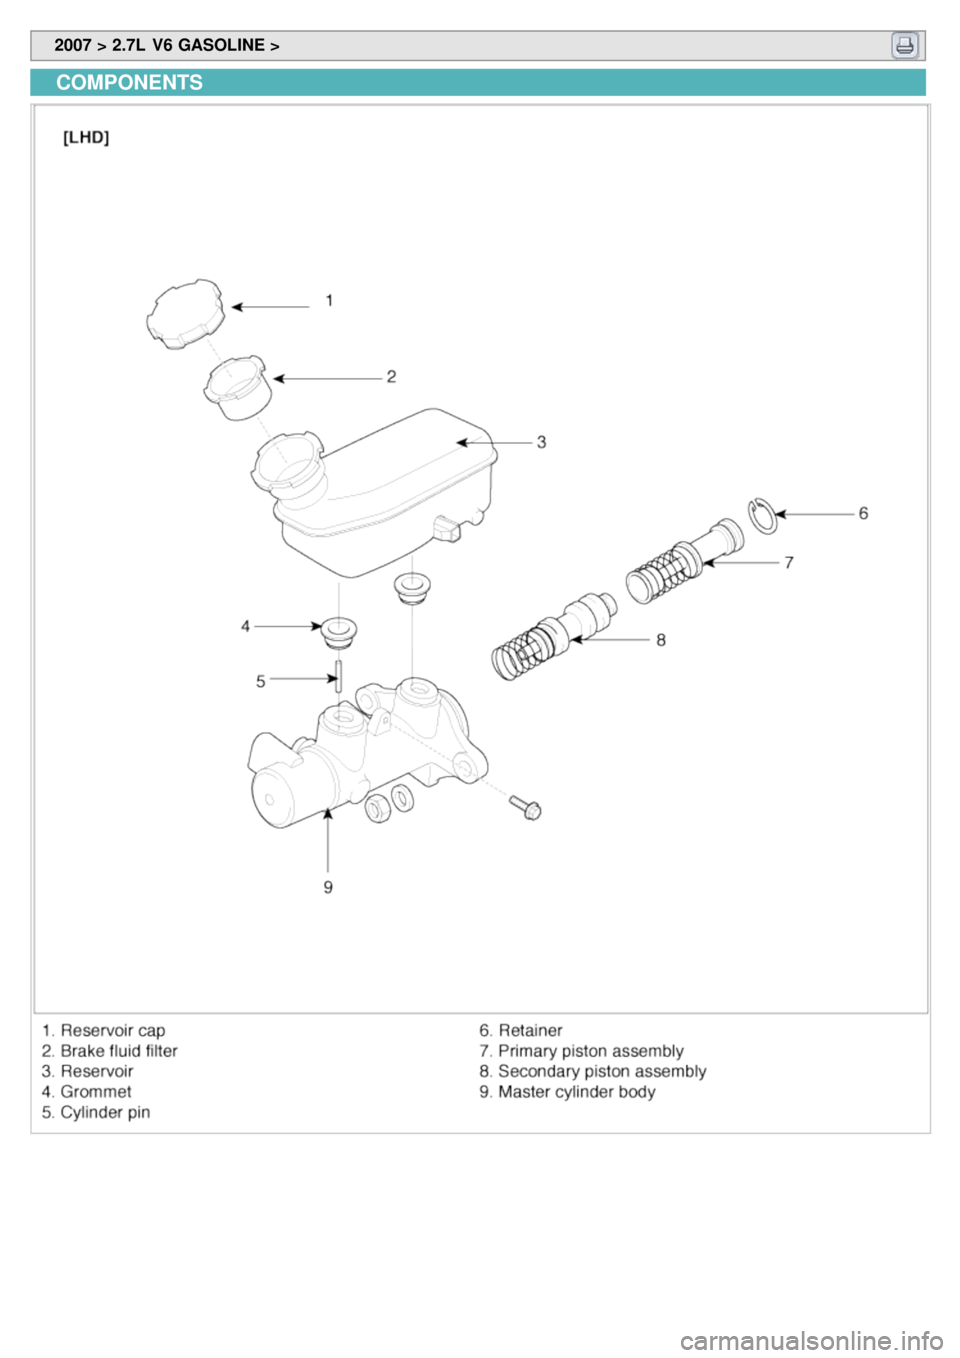
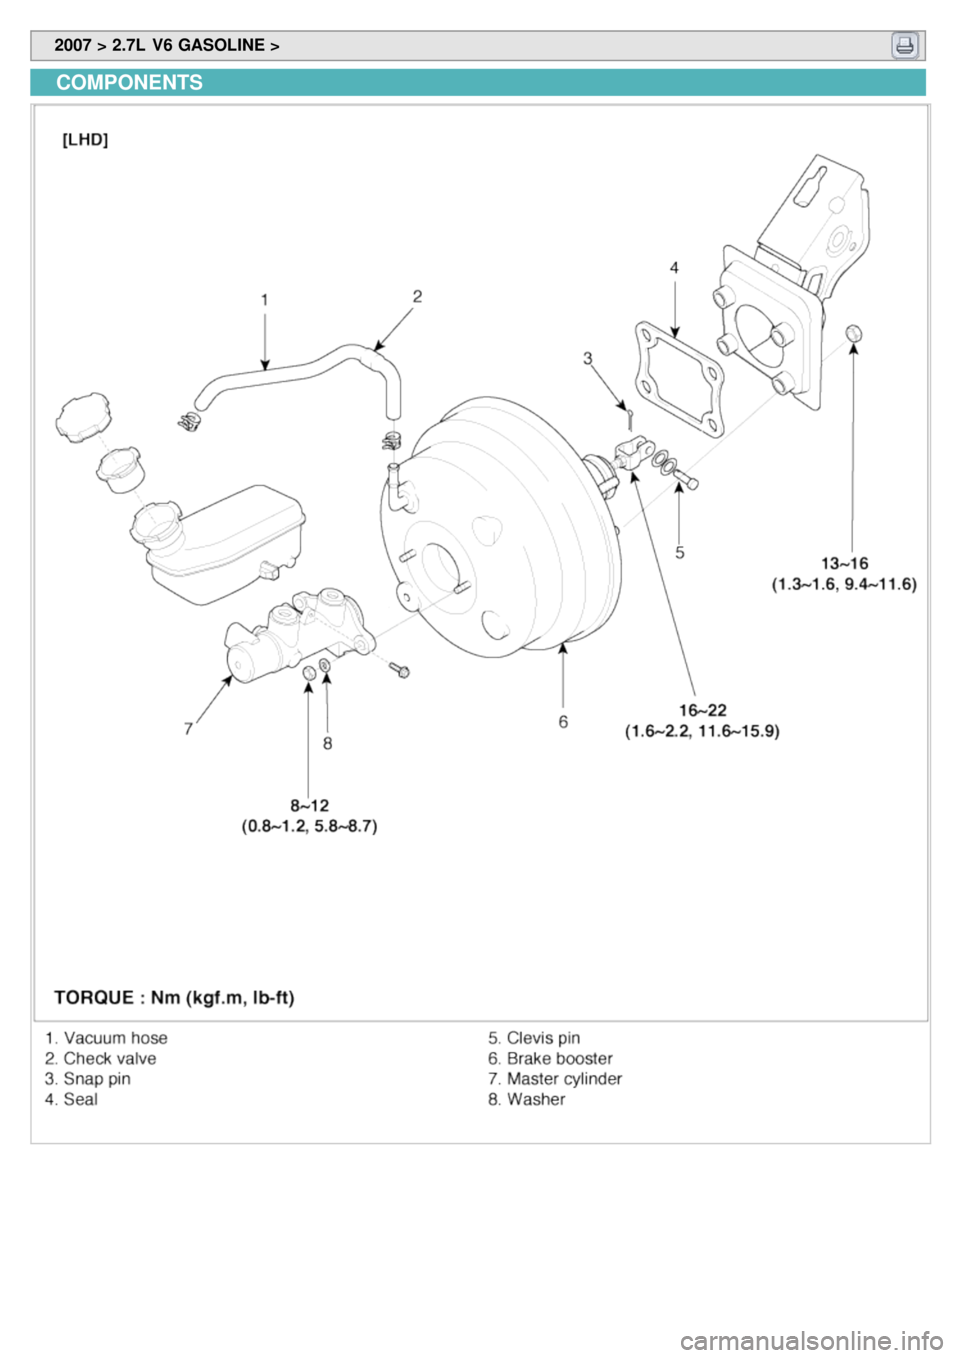
2007 > 2.7L V6 GASOLINE >
COMPONENTS
Page 876 of 1575
2007 > 2.7L V6 GASOLINE >
Removal
1.Disconnect the vacuum hose (A) from the brake booster (B).
[LHD]
[RHD]
2.Remove the master cylinder (Refer to 'Master cylinder removal').
3. Remove the snap pin (A) and clevis pin (B).
4.Remove the four booster mounting nuts (C).
5. Remove the brake booster (A).
Page 877 of 1575
INSTALLATION
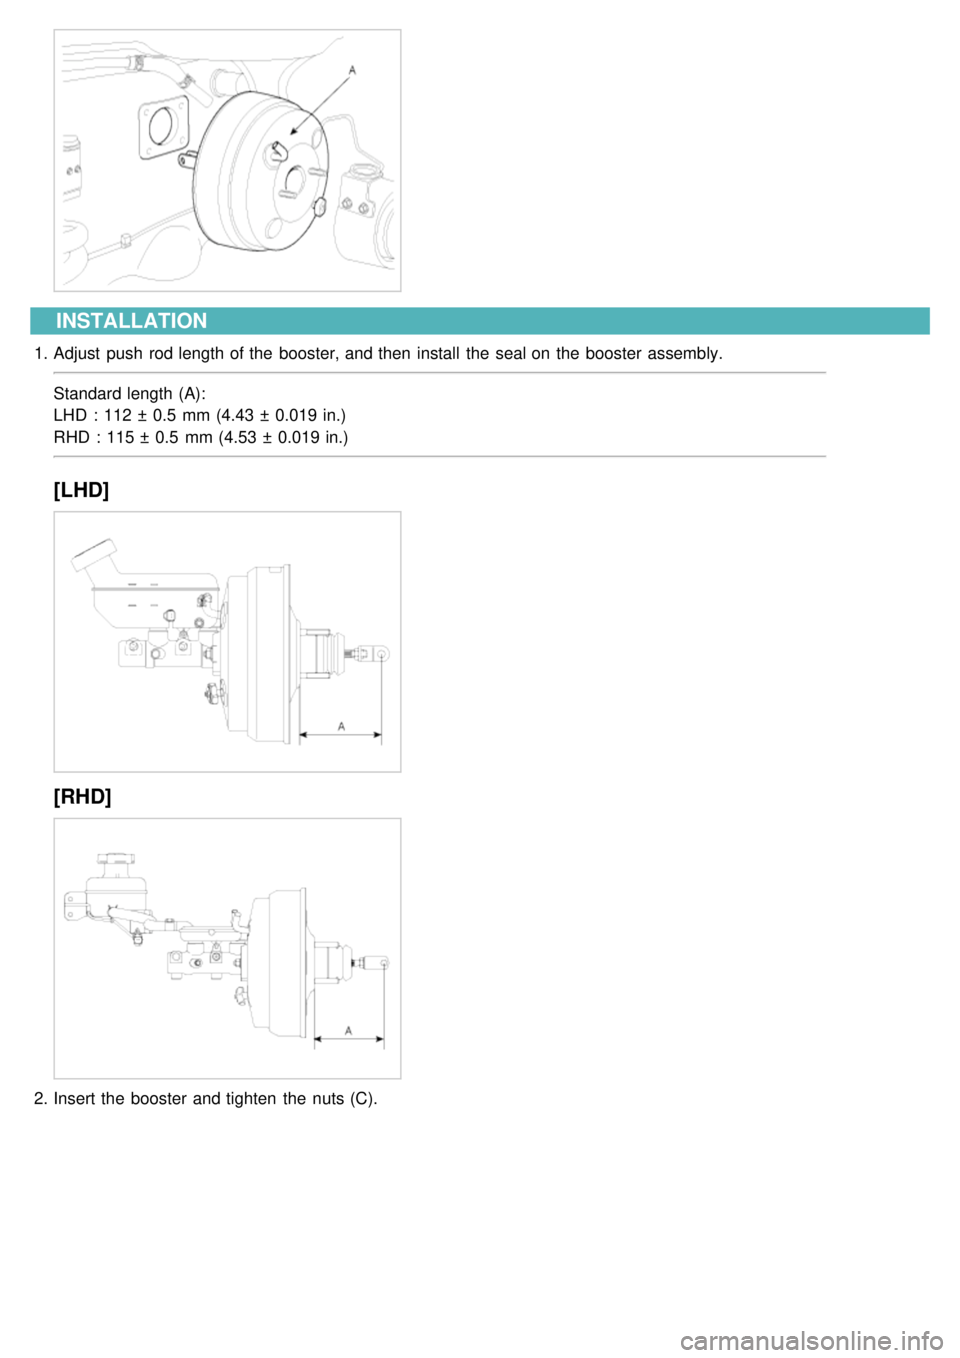
1.Adjust push rod length of the booster, and then install the seal on the booster assembly.
Standard length (A):
LHD : 112 ± 0.5 mm (4.43 ± 0.019 in.)
RHD : 115 ± 0.5 mm (4.53 ± 0.019 in.)
[LHD]
[RHD]
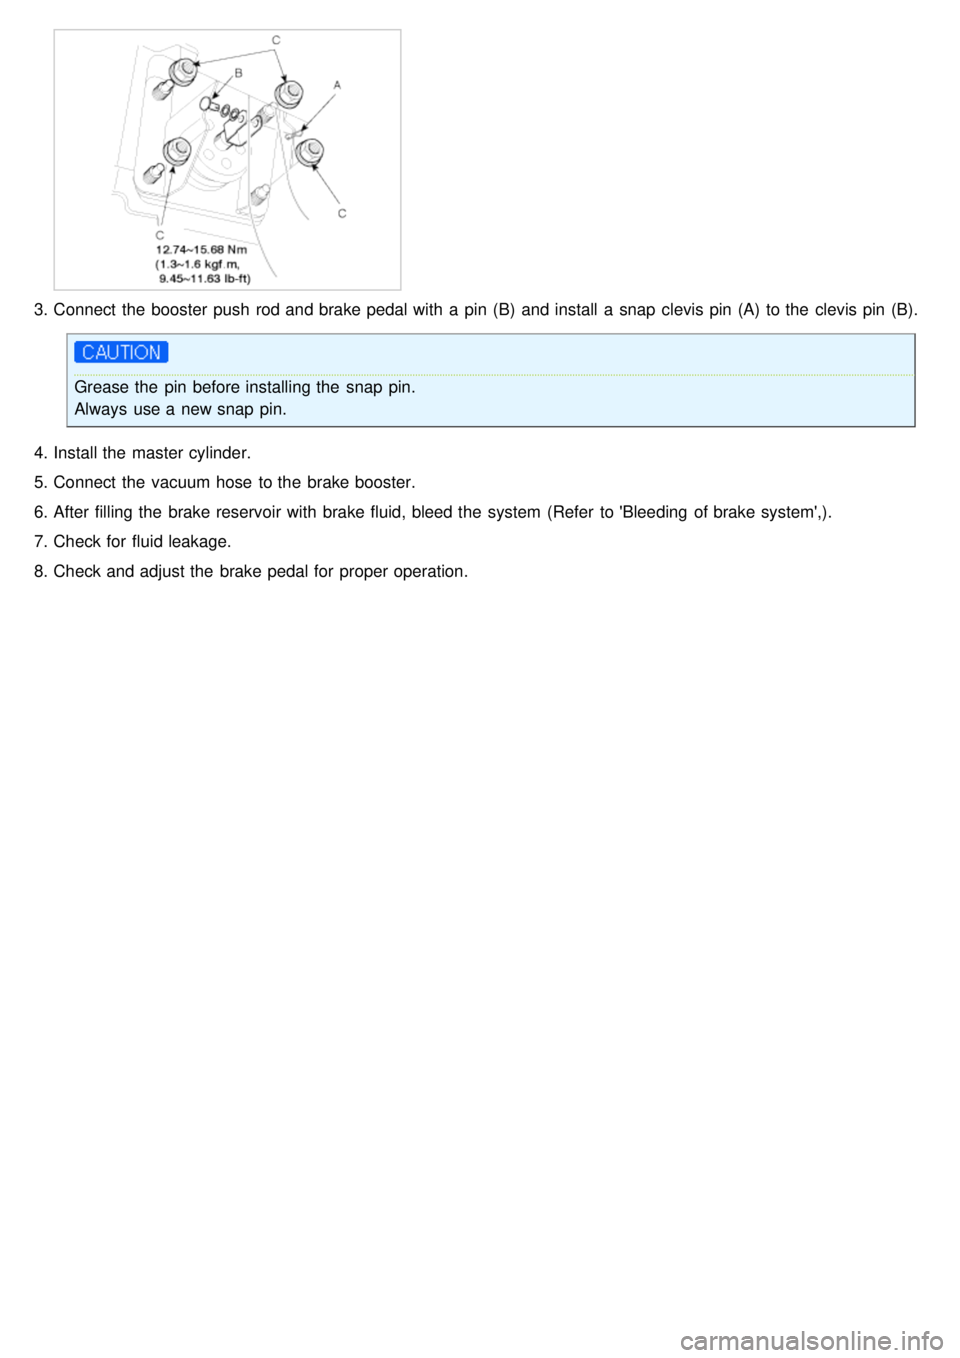
2.Insert the booster and tighten the nuts (C).
Page 878 of 1575
3.Connect the booster push rod and brake pedal with a pin (B) and install a snap clevis pin (A) to the clevis pin (B).
Grease the pin before installing the snap pin.
Always use a new snap pin.
4. Install the master cylinder.
5. Connect the vacuum hose to the brake booster.
6. After filling the brake reservoir with brake fluid, bleed the system (Refer to 'Bleeding of brake system',).
7. Check for fluid leakage.
8. Check and adjust the brake pedal for proper operation.
Page 879 of 1575
Page 880 of 1575
2007 > 2.7L V6 GASOLINE >
COMPONENTS
Trending: gas type, battery location, wipers, wheel torque, diesel, coolant reservoir, fault codes
![KIA CARNIVAL 2007 Workshop Manual [RHD]
BRAKE PEDAL BRAKE SWITCH ADJUSTMENT
PEDAL HEIGHT1. Disconnect the brake switch connector, loosen the brake switch locknut (A), and brake off the brake switch (B) until
it is no longer KIA CARNIVAL 2007 Workshop Manual [RHD]
BRAKE PEDAL BRAKE SWITCH ADJUSTMENT
PEDAL HEIGHT1. Disconnect the brake switch connector, loosen the brake switch locknut (A), and brake off the brake switch (B) until
it is no longer](/img/2/57045/w960_57045-870.png)


![KIA CARNIVAL 2007 Workshop Manual 2007 > 2.7L V6 GASOLINE >
Removal
1.Disconnect the vacuum hose (A) from the brake booster (B).
[LHD]
[RHD]
2.Remove the master cylinder (Refer to Master cylinder removal).
3. Remove the KIA CARNIVAL 2007 Workshop Manual 2007 > 2.7L V6 GASOLINE >
Removal
1.Disconnect the vacuum hose (A) from the brake booster (B).
[LHD]
[RHD]
2.Remove the master cylinder (Refer to Master cylinder removal).
3. Remove the](/img/2/57045/w960_57045-875.png)
