spare wheel Lancia Delta 2010 Owner handbook (in English)
[x] Cancel search | Manufacturer: LANCIA, Model Year: 2010, Model line: Delta, Model: Lancia Delta 2010Pages: 276, PDF Size: 5.31 MB
Page 192 of 276
IN AN EMERGENCY191
4
REFITTING THE STANDARD WHEEL
Following the procedure described previously, raise the
car and remove the small spare wheel.
Versions with steel rims
Proceed as follows:
❍make sure the contact surfaces between standard wheel
and hub are clean so that the retaining bolts will not
come loose;
❍fit the standard wheel inserting the 4 bolts into the
holes;
❍using the wrench provided, tighten the retaining bolts;
❍press-fit the hub cap, aligning the special groove (on
the cap) with the inflation valve;
❍lower the car and remove the jack;
❍using the wrench provided, fully tighten the bolts in
the sequence shown previously in the diagram.Versions with alloy wheels
❍insert the wheel on the hub and tighten the bolts us-
ing the wrench provided;
❍lower the car and remove the jack;
❍using the wrench provided, fully tighten the bolts in
the sequence shown in fig. 8;
❍reinstall the press-fitted hub cap, making sure that the
reference hole on the wheel is aligned with the refer-
ence pin on the cap.
IMPORTANT If it is not fitted properly, the hub cap may
detach itself when the vehicle is running.
175-214 Delta 4ed gb 24-02-2010 14:36 Pagina 191
Page 193 of 276
192IN AN EMERGENCY
After tyre replacement
❍stow the small spare wheel D-fig. 10 in the space pro-
vided in the luggage compartment;
❍fit the partially-opened jack in its box, forcing it light-
ly to prevent it from vibrating when travelling;
❍put the tools back into place in the container;
❍stow the container, complete with tools, into the spare
wheel and tighten the locking device B-fig. 10;
❍put back the luggage compartment mat into the prop-
er position.
IMPORTANT Do not use an inner tube with tubeless tyres.
Periodically check the inflation pressure of the tyres and
small spare wheel.CHANGING A BULB
GENERAL INSTRUCTIONS
❍Before changing a bulb check the contacts for oxida-
tion;
❍blown bulbs must be replaced with others of the same
type and power;
❍after replacing a headlight bulb, always check its align-
ment for safety reasons;
❍when a bulb is not working, check that the corre-
sponding fuse is intact before replacing it: refer to the
“Replacing fuses” paragraph in this chapter for fuse
location.
Modifications or repairs to the electrical sys-
tem that are not carried out properly or do
not take the system’s technical specifications
into account can cause malfunctions leading to the
risk of fire. If you choose to install wheels of a different
type (with alloy rims instead of the steel ones
or vice versa) you must change all the re-
taining bolts with others of a suitable size and use
a specific small spare wheel, with different speci-
fications. It is advisable to keep the replaced bolts
and small spare wheel, as they are necessary if in
future you decide to reinstall the original wheels.
175-214 Delta 4ed gb 24-02-2010 14:36 Pagina 192
Page 211 of 276
210IN AN EMERGENCY
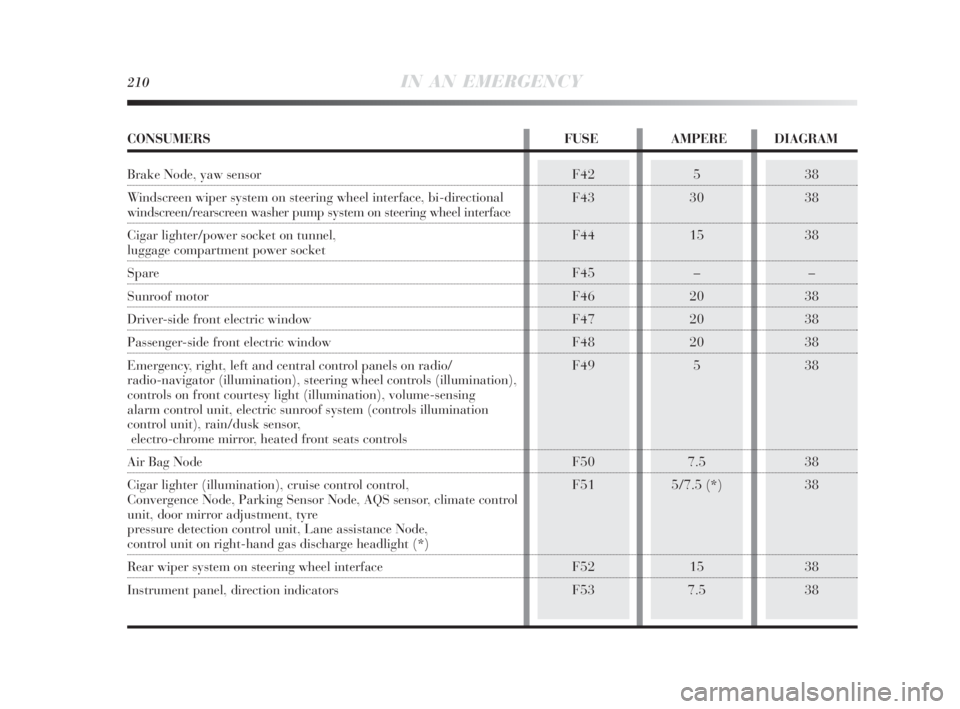
38
38
38
–
38
38
38
38
38
38
38
38F42
F43
F44
F45
F46
F47
F48
F49
F50
F51
F52
F535
30
15
–
20
20
20
5
7.5
5/7.5 (*)
15
7.5
CONSUMERS FUSE AMPERE DIAGRAM
Brake Node, yaw sensor
Windscreen wiper system on steering wheel interface, bi-directional
windscreen/rearscreen washer pump system on steering wheel interface
Cigar lighter/power socket on tunnel,
luggage compartment power socket
Spare
Sunroof motor
Driver-side front electric window
Passenger-side front electric window
Emergency, right, left and central control panels on radio/
radio-navigator (illumination), steering wheel controls (illumination),
controls on front courtesy light (illumination), volume-sensing
alarm control unit, electric sunroof system (controls illumination
control unit), rain/dusk sensor,
electro-chrome mirror, heated front seats controls
Air Bag Node
Cigar lighter (illumination), cruise control control,
Convergence Node, Parking Sensor Node, AQS sensor, climate control
unit, door mirror adjustment, tyre
pressure detection control unit, Lane assistance Node,
control unit on right-hand gas discharge headlight (*)
Rear wiper system on steering wheel interface
Instrument panel, direction indicators
175-214 Delta 4ed gb 24-02-2010 14:36 Pagina 210
Page 232 of 276
CARE AND MAINTENANCE231
5
BATTERY
The battery F-fig, 1-2-3 provided with this vehicle is a
“Reduced maintenance” battery: no top-ups with distilled
water are needed in normal conditions of use.
It should nevertheless be periodically checked by a Lan-
cia Dealership or specialised personnel to check its effi-
ciency.
The battery fluid is poisonous and corrosive.
Avoid contact with the skin and eyes. Keep
naked flames and sources of sparks away
from the battery: risk of explosion and fire.
Running the battery with an excessively low
liquid level will damage the battery beyond
repair and even cause an explosion.
CHANGING THE BATTERY
If required, replace the battery with a genuine spare part
with the same specifications.
If a battery with different specifications is fitted, the ser-
vice intervals given in the “Scheduled Service Plan” will
no longer be valid.
Refer therefore to the instructions provided by the battery
manufacturer.
If the battery is disconnected, the áwarning light will
come on (together with a message in the display) to indi-
cate that the system must be realigned. To switch the
warning light off, carry out the following initialization pro-
cedure:
❍turn the ignition key to the ON position;
❍turn the steering wheel fully both clockwise and anti-
clockwise (to move from the position with the wheels
straight);
❍turn the ignition key to the OFF position and then turn
it back ON.
If the áwarning light does not go out after a few seconds,
seek assistance from a Lancia Dealership.
215-242 Delta 3ed gb 11-11-2009 12:14 Pagina 231
Page 235 of 276

234CARE AND MAINTENANCE
WHEELS AND TYRES
Check the pressure of each tyre, including the spare wheel,
approximately once every two weeks and before starting
a long journey: this check must be performed with the tyre
rested and cold.
It is normal for the pressure to increase when the car is
used; for the correct tyre inflation pressure, see “Wheels”
in chapter “6”.
Incorrect tyre pressure causes abnormal tyre wear fig. 4:
A normal pressure: evenly worn tread;
B low pressure: tread particularly worn on the edges;
C excessive pressure: tread particularly worn in the mid-
dle.
fig. 4L0E0096m
The tyres must be replaced when the tread is less than 1.6
mm thick. In all cases, follow the laws in force in the coun-
try where you are driving.
IMPORTANT NOTES
❍Avoid braking suddenly, burning starts and violent
knocks against the curb, potholes or other obstacles
where possible. Long distances on rough roads may
damage the tyres;
❍check the tyres regularly for cuts on the sides, swelling
or irregular tread wear. Go to a Lancia Dealership if
required;
❍do not overload your car: this may cause serious dam-
age to wheels and tyres;
❍if a tyre is punctured, stop immediately and change it
to avoid damage to the tyre, wheel rim, suspension and
steering system;
215-242 Delta 3ed gb 11-11-2009 12:14 Pagina 234
Page 236 of 276

CARE AND MAINTENANCE235
5
❍the tyre ages even if rarely used. Cracks in the tread and
on the sidewalls are a sign of ageing. Have the tyres
checked by specialised personnel if they have been fit-
ted for longer than 6 years. Remember to check the spare
wheel very carefully;
❍when replacing the tyres, always fit new tyres, avoid-
ing those of dubious origin;
❍if a tyre is changed, also change the inflation valve;
❍to allow even wear between the front and rear tyres,
it is advisable to change them over every 10-15 thou-
sand kilometres, keeping them on the same side of the
car so as not to reverse the direction of rotation.
Remember that the road holding qualities of
your car also depend on the correct inflation
pressure of the tyres.
If the pressure is too low the tyre will get
overheated, with the risk of serious damage
to the tyre.
Avoid moving the tyres from the right side of
the vehicle to the left side and vice versa.
Do not repaint alloy wheel rims at temper-
atures higher than 150°C. The mechanical
characteristics of the wheels might be dis-
rupted.
215-242 Delta 3ed gb 11-11-2009 12:14 Pagina 235
Page 253 of 276
252TECHNICAL DATA
WHEELS
RIMS AND TYRES
Pressed steel or alloy rims. Tubeless radial carcass tyres.
All approved tyres are listed in the Log Book.
IMPORTANT In the event of discrepancies between the
information provided on this “Owner’s handbook” and
the “Log book”, consider the specifications shown in the
log book only.
Respect the prescribed size to ensure safety of the car in
movement. Fit tyres of the same make and type on all
wheels.
IMPORTANT Do not use inner tubes with Tubeless tyres.
SMALL SPARE WHEEL
Pressed steel rim Tubeless tyre.
WHEEL GEOMETRY
Front wheel toe-in: –1
±1 mm
Rear wheel toe-in: 2
± 2 mm
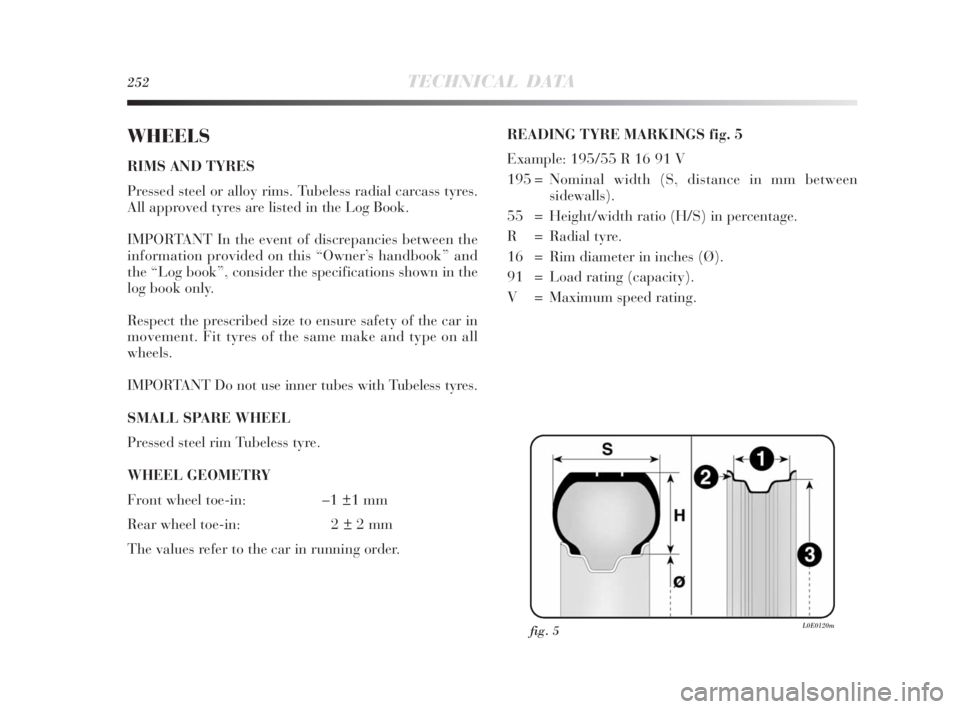
The values refer to the car in running order.READING TYRE MARKINGS fig. 5
Example: 195/55 R 16 91 V
195 = Nominal width (S, distance in mm between
sidewalls).
55 = Height/width ratio (H/S) in percentage.
R = Radial tyre.
16 = Rim diameter in inches (Ø).
91 = Load rating (capacity).
V = Maximum speed rating.
fig. 5L0E0120m
243-266 Delta 3ed gb 11-11-2009 12:16 Pagina 252
Page 255 of 276
254TECHNICAL DATA
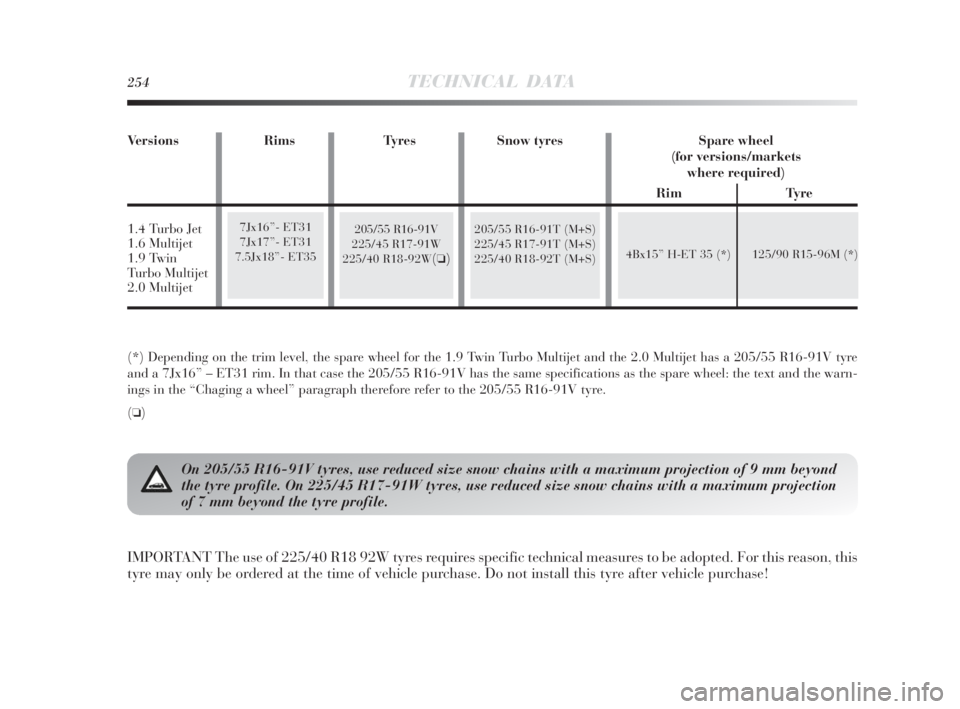
(*) Depending on the trim level, the spare wheel for the 1.9 Twin Turbo Multijet and the 2.0 Multijet has a 205/55 R16-91V tyre
and a 7Jx16” – ET31 rim. In that case the 205/55 R16-91V has the same specifications as the spare wheel: the text and the warn-
ings in the “Chaging a wheel” paragraph therefore refer to the 205/55 R16-91V tyre.
(
❏)
7Jx16”- ET31
7Jx17”- ET31
7.5Jx18”- ET35
4Bx15” H-ET 35 (*) 125/90 R15-96M (*)
205/55 R16-91V
225/45 R17-91W
225/40 R18-92W
(❏)
205/55 R16-91T (M+S)
225/45 R17-91T (M+S)
225/40 R18-92T (M+S)
Versions Rims Tyres Snow tyres Spare wheel
(for versions/markets
where required)
Rim Tyre
1.4 Turbo Jet
1.6 Multijet
1.9 Twin
Turbo Multijet
2.0 Multijet
On 205/55 R16-91V tyres, use reduced size snow chains with a maximum projection of 9 mm beyond
the tyre profile. On 225/45 R17-91W tyres, use reduced size snow chains with a maximum projection
of 7 mm beyond the tyre profile.
IMPORTANT The use of 225/40 R18 92W tyres requires specific technical measures to be adopted. For this reason, this
tyre may only be ordered at the time of vehicle purchase. Do not install this tyre after vehicle purchase!
243-266 Delta 3ed gb 11-11-2009 12:16 Pagina 254
Page 256 of 276

TECHNICAL DATA255
6
Add +0.3 bar to the prescribed inflation pressure when the tyres are warm. Recheck pressure value with cold tyres.
With snow tyres, add +0.2 bar to the inflation pressure value prescribed for standard tyres.
When running at speeds of higher than 160 km/h, inflate tyres at full load inflation values.
The T.P.M.S. system is not available for tyre 195/55 R16 91T.P.M.S. system not available for tyre 195/65 R15 91V
. COLD TYRE INFLATION PRESSURES (bar)
2.7 2.5
2.7 2.5
2.7/2.8 (*) 2.5
2.9/3.1 (*) 2.72.4 2.2
2.4 2.2
2.4 2.2
2.6 2.4195/55 R16-91VXL
205/55 R16-91V
225/45 R17-91W
225/40 R18-92W
205/55 R16-91V
125/90 R15-96M2.2
4.2
WHEEL/SPARE WHEEL (where required)
Size Tyre inflation pressures
Size PROVIDED TYRES
Medium load Full load
Front Rear Front Rear
(*) 1.9 Twin Turbo Multijet and 2.0 Multijet versions
243-266 Delta 3ed gb 11-11-2009 12:16 Pagina 255