technical specifications Lancia Musa 2007 Owner handbook (in English)
[x] Cancel search | Manufacturer: LANCIA, Model Year: 2007, Model line: Musa, Model: Lancia Musa 2007Pages: 346, PDF Size: 5.15 MB
Page 108 of 346

107
SAFETY
DEVICES
CORRECT
USE OF
THE CAR
WARNING
LIGHTS AND
MESSAGES
IN AN
EMERGENCY
CAR
MAINTENANCE
TECHNICALSPECIFICATIONS
INDEX
DASHBOARD
AND
CONTROLS
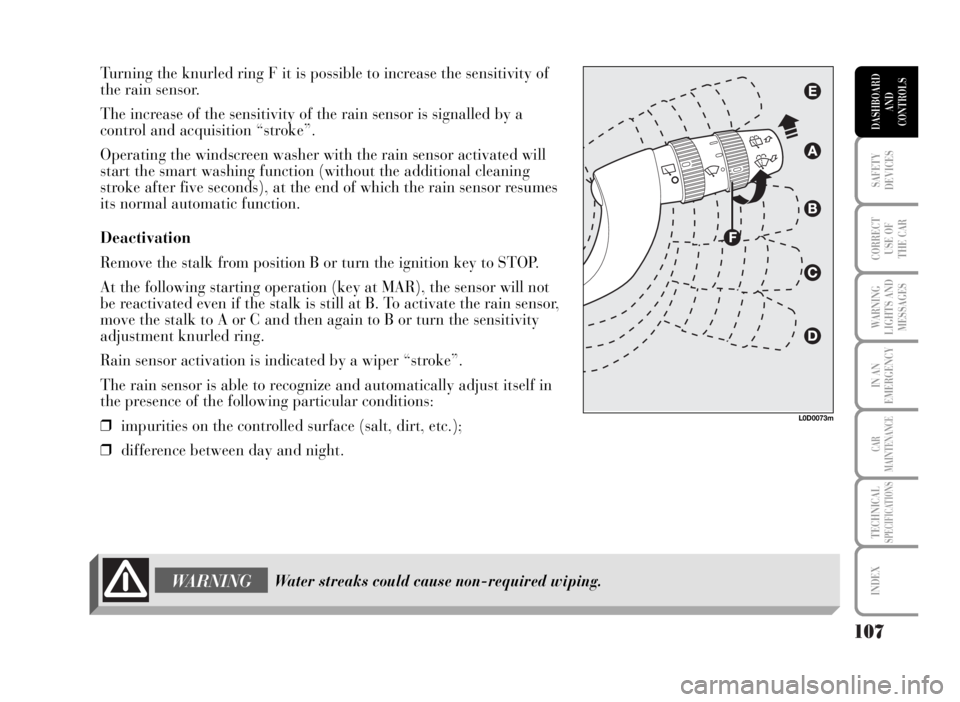
Turning the knurled ring F it is possible to increase the sensitivity of
the rain sensor.
The increase of the sensitivity of the rain sensor is signalled by a
control and acquisition “stroke”.
Operating the windscreen washer with the rain sensor activated will
start the smart washing function (without the additional cleaning
stroke after five seconds), at the end of which the rain sensor resumes
its normal automatic function.
Deactivation
Remove the stalk from position B or turn the ignition key to STOP.
At the following starting operation (key at MAR), the sensor will not
be reactivated even if the stalk is still at B. To activate the rain sensor,
move the stalk to A or C and then again to B or turn the sensitivity
adjustment knurled ring.
Rain sensor activation is indicated by a wiper “stroke”.
The rain sensor is able to recognize and automatically adjust itself in
the presence of the following particular conditions:
❒impurities on the controlled surface (salt, dirt, etc.);
❒difference between day and night.
Water streaks could cause non-required wiping.WARNING
L0D0073m
Page 109 of 346

108
SAFETY
DEVICES
CORRECT
USE OF
THE CAR
WARNING
LIGHTS AND
MESSAGES
IN AN
EMERGENCY
CAR
MAINTENANCE
TECHNICALSPECIFICATIONS
INDEX
DASHBOARD
AND
CONTROLS
REAR WINDOW WASH/WIPE FUNCTION
This device can only work when the ignition key is at MAR.
Turning the knurled ring A from åto
'the rear window wiper is
operated as follows:
❒intermittent operation if the windscreen wiper is off
❒synchronised with the windscreen wiper (but with half stroke
frequency).
With windscreen wiper on and reverse gear engaged, rear window
wiping will be continuous.
Pushing the stalk towards the dashboard (unstable position) will
activate the rear window washer.
Pushing the stalk for over half a second will activated also the rear
window wiper.
Releasing the stalk will activate the smart washing function as
described for the windscreen wiper.
L0D0075m
Page 110 of 346

109
SAFETY
DEVICES
CORRECT
USE OF
THE CAR
WARNING
LIGHTS AND
MESSAGES
IN AN
EMERGENCY
CAR
MAINTENANCE
TECHNICALSPECIFICATIONS
INDEX
DASHBOARD
AND
CONTROLS
CRUISE CONTROL (where provided)
It is a device able to support the driver, with electronic control, which
allows driving at speed over 30 km/h on long and straight dry roads
(e.g.: motorways), at a desired speed, without pressing the accelerator
pedal. Therefore it is not suggested to use this device on extra-urban
roads with traffic. Do not use it in town.
DEVICE ENGAGEMENT
Turn knurled ring A to ON.
The device may only be engaged in the 4th or 5th gear. Travelling
downhill with the device engaged, the car speed may increase more
than the memorised one.
When the device is activated, the warning light
Üon the instrument
cluster turns on together with the message (where provided) on the
multifunction display.
L0D0076m
Page 111 of 346

TO MEMORISE SPEED
Proceed as follows:
❒turn the knurled ring A to ON and press the
accelerator pedal to the required speed;
❒move the stalk upwards (+) for at least three
seconds, then release it. The car speed is
memorised and it is therefore possible to release
the accelerator pedal.
In the case of need (when overtaking for instance)
acceleration is possible simply pressing the
accelerator pedal: releasing the accelerator pedal,
the car will return to the speed memorised
previously.
TO RESET THE MEMORISED SPEED
If the device has been disengaged for example
pressing the brake or clutch pedal, the memorised
speed can be reset as follows:
❒accelerate gradually until reaching a speed
approaching the one memorised;
❒engage the gear selected at the time of speed
memorising (4th or 5th gear);
❒press the RES button B.TO INCREASE THE MEMORISED SPEED
The speed memorised can be increased in two ways:
❒pressing the accelerator and then memorising the
new speed reached;
or
❒moving the stalk upwards (+).
Each operation of the stalk will correspond to a
slight increase in speed (about 1 km/h), while
keeping the stalk upwards continuously will
correspond to a continuous speed increase.
110
SAFETY
DEVICES
CORRECT
USE OF
THE CAR
WARNING
LIGHTS AND
MESSAGES
IN AN
EMERGENCY
CAR
MAINTENANCE
TECHNICALSPECIFICATIONS
INDEX
DASHBOARD
AND
CONTROLS
Page 112 of 346

TO REDUCE MEMORISED SPEED
The speed memorised can be increased in two ways:
❒disengaging the device and then memorising the
new speed;
or
❒moving the stalk downwards (–) until reaching
the new speed which will be memorised
automatically.
Each operation of the stalk will correspond to a
slight reduction in speed (about 1 km/h), while
keeping the stalk downwards continuously will
correspond to a continuous speed reduction.DEVICE DISENGAGEMENT
Turn the ring A to OFF or the ignition key to STOP.
The device is automatically deactivated also in one
of the following cases:
❒pressing the brake or clutch pedal.
111
SAFETY
DEVICES
CORRECT
USE OF
THE CAR
WARNING
LIGHTS AND
MESSAGES
IN AN
EMERGENCY
CAR
MAINTENANCE
TECHNICALSPECIFICATIONS
INDEX
DASHBOARD
AND
CONTROLS
WARNING
WARNING
In the event of device malfunction or failure, turn the knurled ring A to OFF and
contact a Lancia Dealership after checking the protective fuse integrity. When travelling with the device on, do not put the gearbox lever in neutral.
Page 113 of 346

112
SAFETY
DEVICES
CORRECT
USE OF
THE CAR
WARNING
LIGHTS AND
MESSAGES
IN AN
EMERGENCY
CAR
MAINTENANCE
TECHNICALSPECIFICATIONS
INDEX
DASHBOARD
AND
CONTROLS
CEILING LIGHTS
FRONT CEILING LIGHT
Press switch A to switch the light on and off.
With switch A in the central position, lights C and D turn on/off when
the front doors are opened/closed.
Pressing switch A to the left, lights C and D stay off.
Pressing switch A to the right, lights C and D stay on.
Light switching on/off is progressive.
Switch B turns on the spot light; when the ceiling light is off, it turns
on singularly:
❒map reading light C if pressed to the left;
❒map reading light D if pressed to the right.
IMPORTANT Make sure that both switches are in central position
before getting out of the car. This will ensure that the ceiling lights go
out when the doors are closed preventing the battery from running
down.
Anyway, if the switch is left on, the ceiling light will automatically
switch off after 15 minutes from the engine turning off.
L0D0077m
Page 114 of 346

113
SAFETY
DEVICES
CORRECT
USE OF
THE CAR
WARNING
LIGHTS AND
MESSAGES
IN AN
EMERGENCY
CAR
MAINTENANCE
TECHNICALSPECIFICATIONS
INDEX
DASHBOARD
AND
CONTROLS
Ceiling light timing
Two timing strategies are available in order to
facilitate getting in and out of the car, especially at
night in dark areas:
T
IMING FOR GETTING INTO THE CAR
The ceiling lights will come on as follows:
❒for about 10 seconds when a door is unlocked;
❒for about 3 minutes when a door is opened;
❒for about 10 seconds when a door is closed
(within the 3 minutes).
Timing will be stopped when the ignition key is
turned to MAR.T
IMING FOR GETTING OUT OF THE CAR
The ceiling lights will come on as follows when the
key is removed from the ignition switch:
❒for about 10 seconds within 2 minutes after
stopping the engine;
❒for about 3 minutes when a door is opened;
❒for about 10 seconds when a door is closed
(within the three minutes).
The timeout will automatically end when the doors
are locked.
Page 115 of 346

114
SAFETY
DEVICES
CORRECT
USE OF
THE CAR
WARNING
LIGHTS AND
MESSAGES
IN AN
EMERGENCY
CAR
MAINTENANCE
TECHNICALSPECIFICATIONS
INDEX
DASHBOARD
AND
CONTROLS
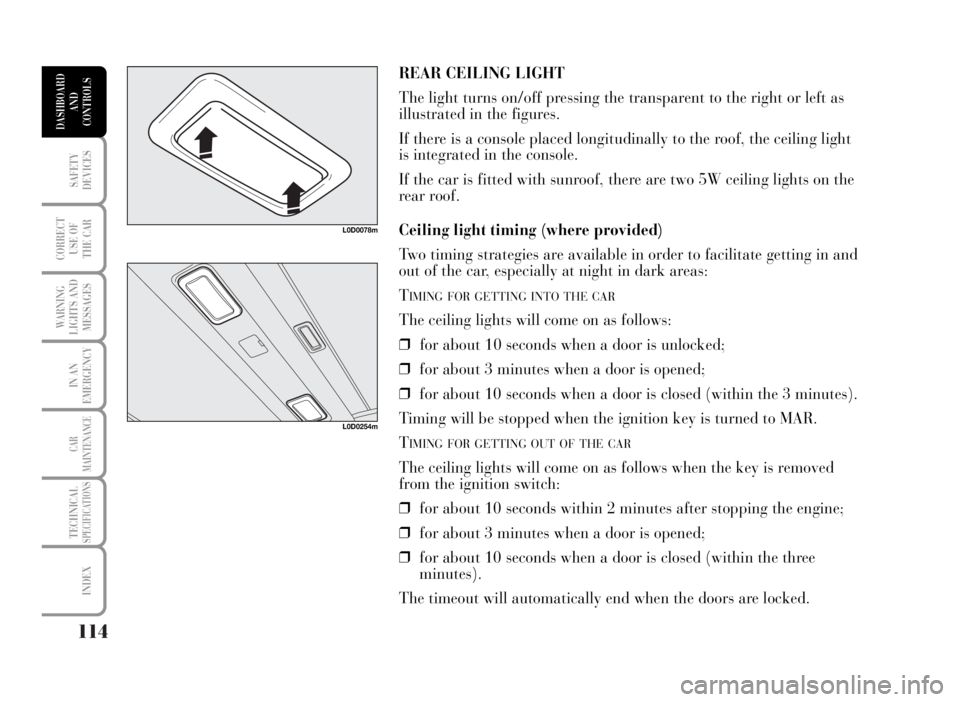
REAR CEILING LIGHT
The light turns on/off pressing the transparent to the right or left as
illustrated in the figures.
If there is a console placed longitudinally to the roof, the ceiling light
is integrated in the console.
If the car is fitted with sunroof, there are two 5W ceiling lights on the
rear roof.
Ceiling light timing (where provided)
Two timing strategies are available in order to facilitate getting in and
out of the car, especially at night in dark areas:
T
IMING FOR GETTING INTO THE CAR
The ceiling lights will come on as follows:
❒for about 10 seconds when a door is unlocked;
❒for about 3 minutes when a door is opened;
❒for about 10 seconds when a door is closed (within the 3 minutes).
Timing will be stopped when the ignition key is turned to MAR.
T
IMING FOR GETTING OUT OF THE CAR
The ceiling lights will come on as follows when the key is removed
from the ignition switch:
❒for about 10 seconds within 2 minutes after stopping the engine;
❒for about 3 minutes when a door is opened;
❒for about 10 seconds when a door is closed (within the three
minutes).
The timeout will automatically end when the doors are locked.
L0D0078m
L0D0254m
Page 116 of 346

115
SAFETY
DEVICES
CORRECT
USE OF
THE CAR
WARNING
LIGHTS AND
MESSAGES
IN AN
EMERGENCY
CAR
MAINTENANCE
TECHNICALSPECIFICATIONS
INDEX
DASHBOARD
AND
CONTROLS
CONTROLS
HAZARD LIGHTS
Press switch A regardless of the position of the ignition key.
The switch will flash with the instrument panel warning light
Î¥
when the device is on.
Press the switch again to switch the lights off.
FRONT FOG LIGHTS (where provided)
These are turned on pressing button 5.
They are turned off pressing the button again or turning the sidelights
off.
WARNINGUse the hazard warning lights in
compliance with local regulations.
L0D0080m
L0D0081m
L0D0082m
Page 117 of 346

116
SAFETY
DEVICES
CORRECT
USE OF
THE CAR
WARNING
LIGHTS AND
MESSAGES
IN AN
EMERGENCY
CAR
MAINTENANCE
TECHNICALSPECIFICATIONS
INDEX
DASHBOARD
AND
CONTROLS
REAR FOG LIGHTS
These are turned on, with the dipped beam headlights or front fog
lights on, pressing button 4.
They are turned off pressing the button again or turning off the
dipped beam headlights or front fog lights
PARKING LIGHTS/NUMBER PLATE LIGHTS
They turn on only with the ignition key at STOP or removed, keeping
buttonFpressed for about 1 second.
IT is possible to select the parking lights only on side of the car
moving the direction indicator stalk to the required side.
L0D0083m
L0D0084m