LAND ROVER FREELANDER 2001 Workshop Manual
Manufacturer: LAND ROVER, Model Year: 2001, Model line: FREELANDER, Model: LAND ROVER FREELANDER 2001Pages: 1007, PDF Size: 23.47 MB
Page 301 of 1007
EMISSION CONTROL
17-1-10 REPAIRS
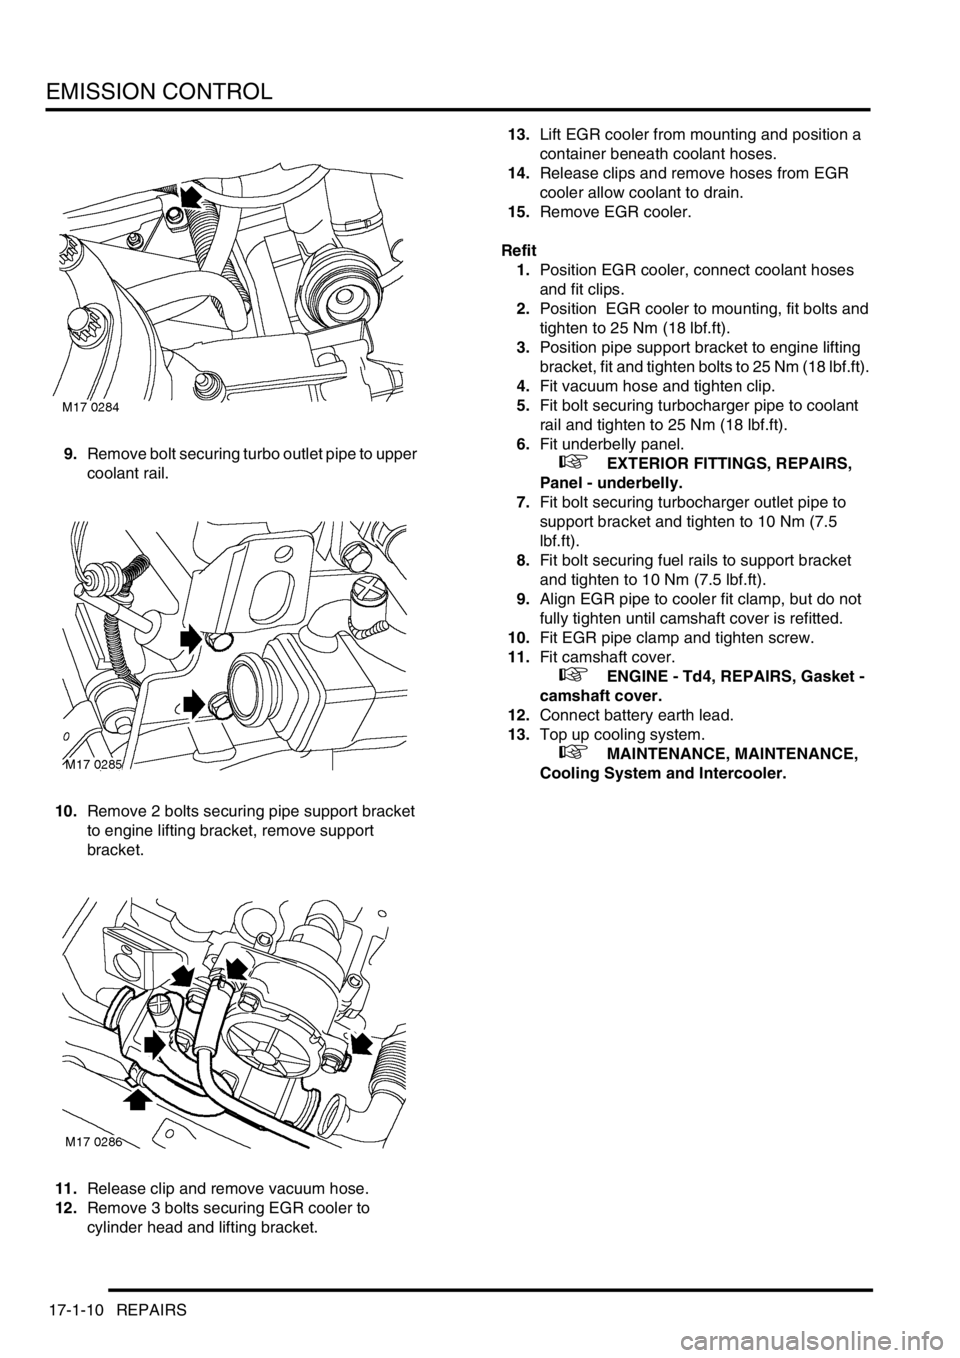
9.Remove bolt securing turbo outlet pipe to upper
coolant rail.
10.Remove 2 bolts securing pipe support bracket
to engine lifting bracket, remove support
bracket.
11.Release clip and remove vacuum hose.
12.Remove 3 bolts securing EGR cooler to
cylinder head and lifting bracket.13.Lift EGR cooler from mounting and position a
container beneath coolant hoses.
14.Release clips and remove hoses from EGR
cooler allow coolant to drain.
15.Remove EGR cooler.
Refit
1.Position EGR cooler, connect coolant hoses
and fit clips.
2.Position EGR cooler to mounting, fit bolts and
tighten to 25 Nm (18 lbf.ft).
3.Position pipe support bracket to engine lifting
bracket, fit and tighten bolts to 25 Nm (18 lbf.ft).
4.Fit vacuum hose and tighten clip.
5.Fit bolt securing turbocharger pipe to coolant
rail and tighten to 25 Nm (18 lbf.ft).
6.Fit underbelly panel.
+ EXTERIOR FITTINGS, REPAIRS,
Panel - underbelly.
7.Fit bolt securing turbocharger outlet pipe to
support bracket and tighten to 10 Nm (7.5
lbf.ft).
8.Fit bolt securing fuel rails to support bracket
and tighten to 10 Nm (7.5 lbf.ft).
9.Align EGR pipe to cooler fit clamp, but do not
fully tighten until camshaft cover is refitted.
10.Fit EGR pipe clamp and tighten screw.
11.Fit camshaft cover.
+ ENGINE - Td4, REPAIRS, Gasket -
camshaft cover.
12.Connect battery earth lead.
13.Top up cooling system.
+ MAINTENANCE, MAINTENANCE,
Cooling System and Intercooler.
Page 302 of 1007
EMISSION CONTROL
REPAIRS 17-1-11
Module - tank leakage diagnostic (DMTL)
$% 17.45.41
Remove
1.Disconnect battery earth lead.
2.Remove RH rear wheel arch liner.
+ EXTERIOR FITTINGS, REPAIRS,
Liner - rear wheel arch.
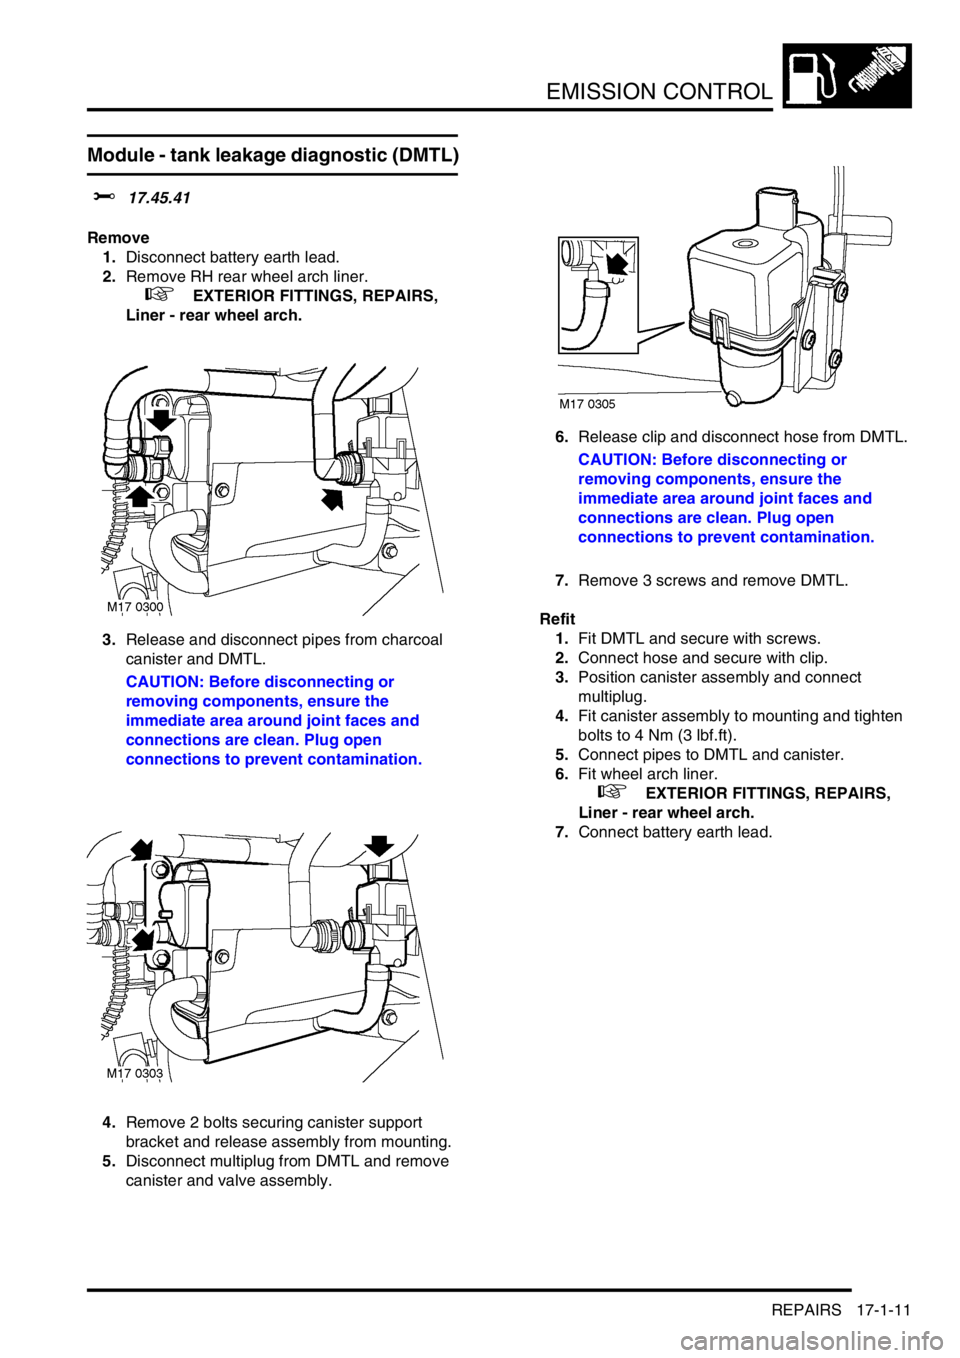
3.Release and disconnect pipes from charcoal
canister and DMTL.
CAUTION: Before disconnecting or
removing components, ensure the
immediate area around joint faces and
connections are clean. Plug open
connections to prevent contamination.
4.Remove 2 bolts securing canister support
bracket and release assembly from mounting.
5.Disconnect multiplug from DMTL and remove
canister and valve assembly.6.Release clip and disconnect hose from DMTL.
CAUTION: Before disconnecting or
removing components, ensure the
immediate area around joint faces and
connections are clean. Plug open
connections to prevent contamination.
7.Remove 3 screws and remove DMTL.
Refit
1.Fit DMTL and secure with screws.
2.Connect hose and secure with clip.
3.Position canister assembly and connect
multiplug.
4.Fit canister assembly to mounting and tighten
bolts to 4 Nm (3 lbf.ft).
5.Connect pipes to DMTL and canister.
6.Fit wheel arch liner.
+ EXTERIOR FITTINGS, REPAIRS,
Liner - rear wheel arch.
7.Connect battery earth lead.
Page 303 of 1007
EMISSION CONTROL
17-1-12 REPAIRS
Filter - fuel leak detection pump - KV6 -
NAS
$% 17.45.42
Remove
1.Disconnect battery earth lead.
2.Remove RH rear wheel arch liner.
+ EXTERIOR FITTINGS, REPAIRS,
Liner - rear wheel arch.
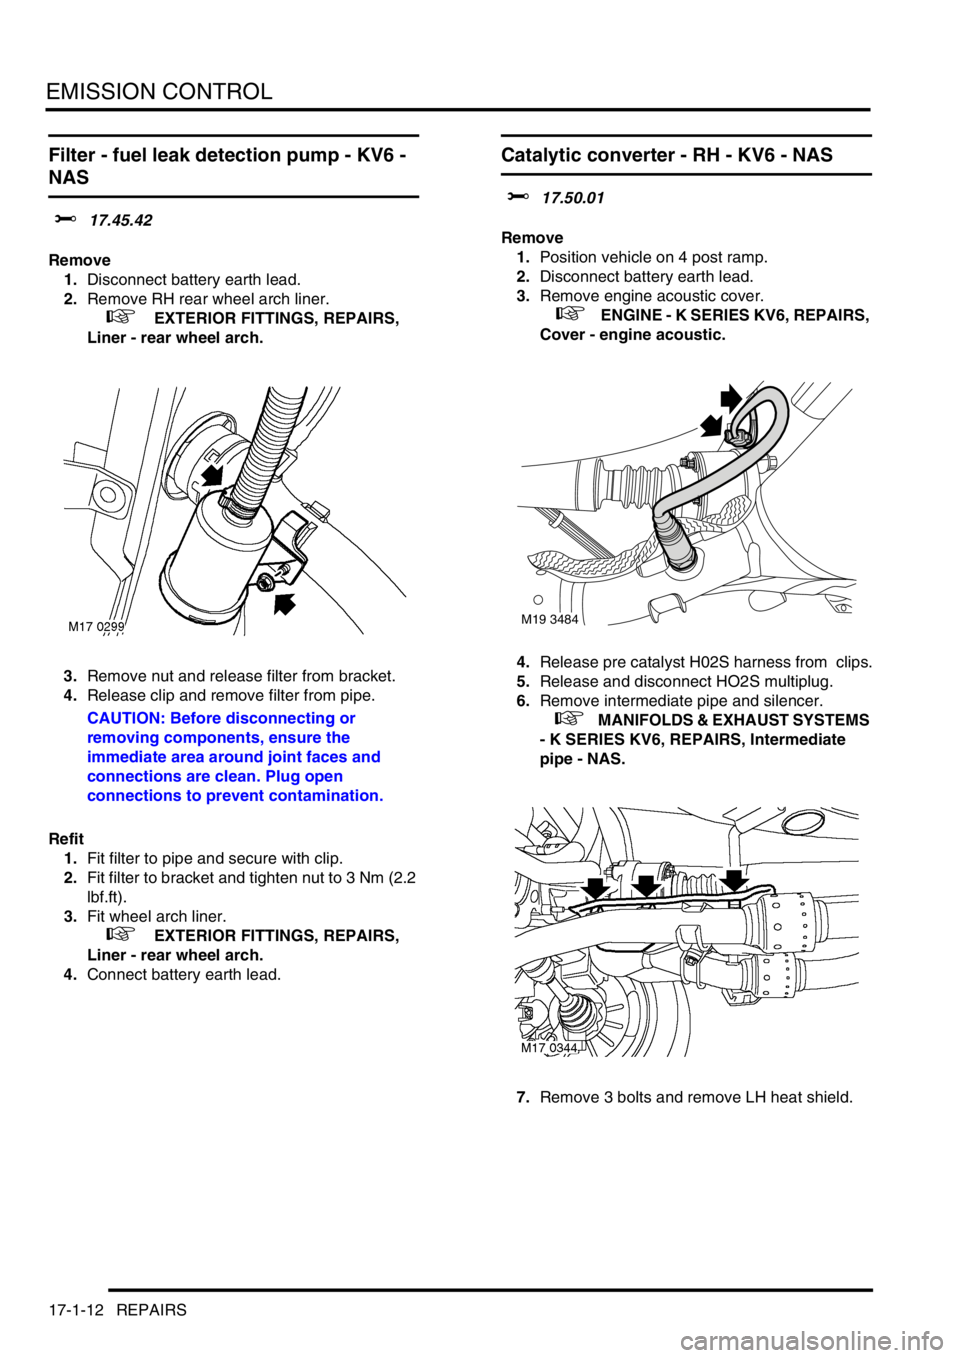
3.Remove nut and release filter from bracket.
4.Release clip and remove filter from pipe.
CAUTION: Before disconnecting or
removing components, ensure the
immediate area around joint faces and
connections are clean. Plug open
connections to prevent contamination.
Refit
1.Fit filter to pipe and secure with clip.
2.Fit filter to bracket and tighten nut to 3 Nm (2.2
lbf.ft).
3.Fit wheel arch liner.
+ EXTERIOR FITTINGS, REPAIRS,
Liner - rear wheel arch.
4.Connect battery earth lead.
Catalytic converter - RH - KV6 - NAS
$% 17.50.01
Remove
1.Position vehicle on 4 post ramp.
2.Disconnect battery earth lead.
3.Remove engine acoustic cover.
+ ENGINE - K SERIES KV6, REPAIRS,
Cover - engine acoustic.
4.Release pre catalyst H02S harness from clips.
5.Release and disconnect HO2S multiplug.
6.Remove intermediate pipe and silencer.
+ MANIFOLDS & EXHAUST SYSTEMS
- K SERIES KV6, REPAIRS, Intermediate
pipe - NAS.
7.Remove 3 bolts and remove LH heat shield.
M19 3484
Page 304 of 1007
EMISSION CONTROL
REPAIRS 17-1-13
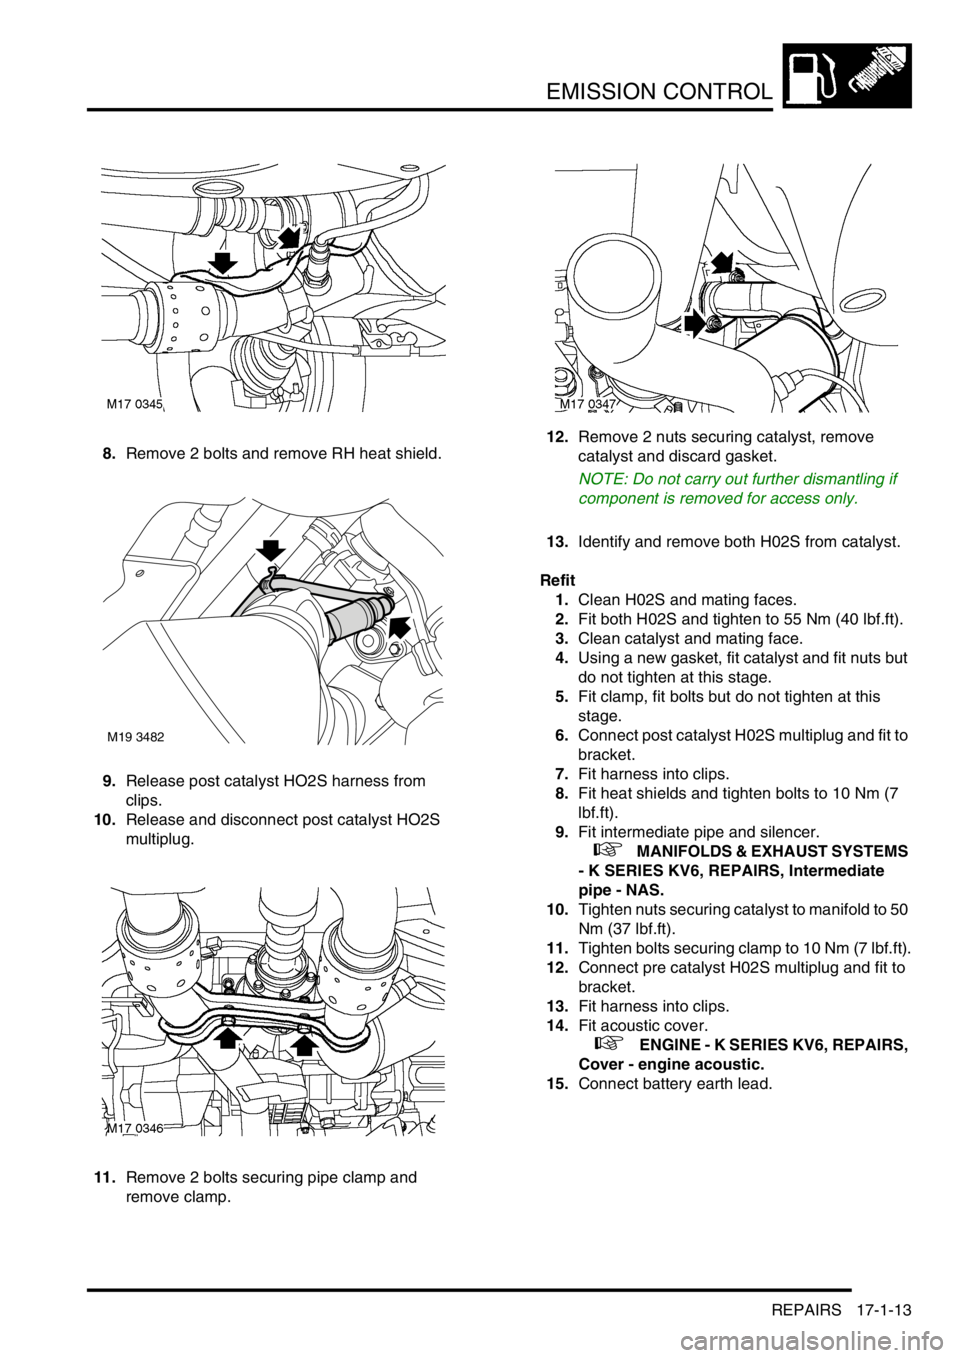
8.Remove 2 bolts and remove RH heat shield.
9.Release post catalyst HO2S harness from
clips.
10.Release and disconnect post catalyst HO2S
multiplug.
11.Remove 2 bolts securing pipe clamp and
remove clamp.12.Remove 2 nuts securing catalyst, remove
catalyst and discard gasket.
NOTE: Do not carry out further dismantling if
component is removed for access only.
13.Identify and remove both H02S from catalyst.
Refit
1.Clean H02S and mating faces.
2.Fit both H02S and tighten to 55 Nm (40 lbf.ft).
3.Clean catalyst and mating face.
4.Using a new gasket, fit catalyst and fit nuts but
do not tighten at this stage.
5.Fit clamp, fit bolts but do not tighten at this
stage.
6.Connect post catalyst H02S multiplug and fit to
bracket.
7.Fit harness into clips.
8.Fit heat shields and tighten bolts to 10 Nm (7
lbf.ft).
9.Fit intermediate pipe and silencer.
+ MANIFOLDS & EXHAUST SYSTEMS
- K SERIES KV6, REPAIRS, Intermediate
pipe - NAS.
10.Tighten nuts securing catalyst to manifold to 50
Nm (37 lbf.ft).
11.Tighten bolts securing clamp to 10 Nm (7 lbf.ft).
12.Connect pre catalyst H02S multiplug and fit to
bracket.
13.Fit harness into clips.
14.Fit acoustic cover.
+ ENGINE - K SERIES KV6, REPAIRS,
Cover - engine acoustic.
15.Connect battery earth lead.
M19 3482
Page 305 of 1007

Page 306 of 1007
ENGINE MANAGEMENT SYSTEM - SIEMENS
REPAIRS 18-3-1
ENGIN E MANAGEMENT SY STEM - SIEMENS REPAIRS
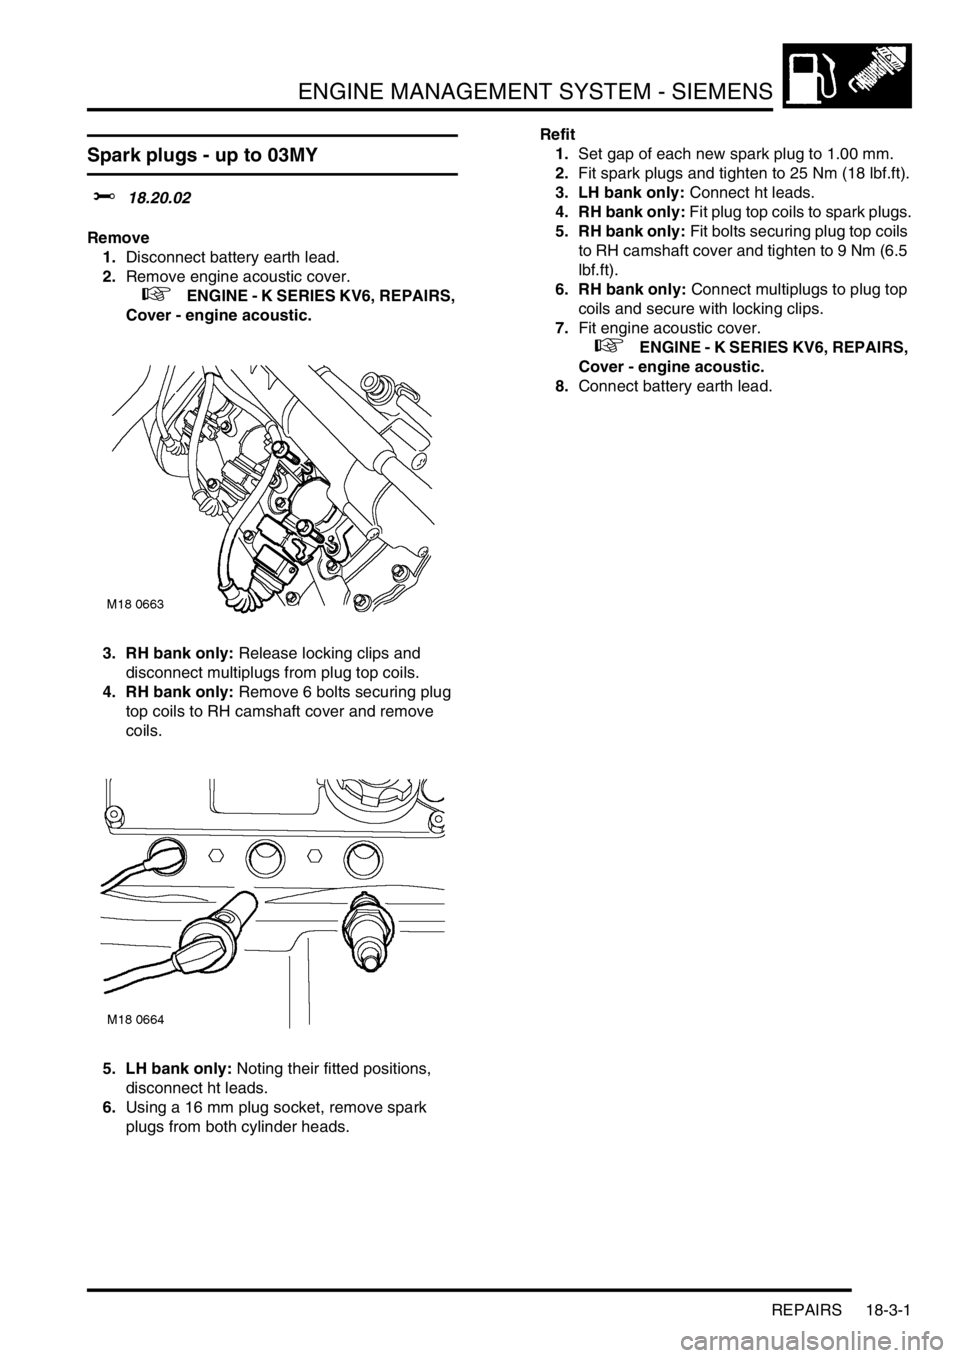
Spark plugs - up to 03MY
$% 18.20.02
Remove
1.Disconnect battery earth lead.
2.Remove engine acoustic cover.
+ ENGINE - K SERIES KV6, REPAIRS,
Cover - engine acoustic.
3. RH bank only: Release locking clips and
disconnect multiplugs from plug top coils.
4. RH bank only: Remove 6 bolts securing plug
top coils to RH camshaft cover and remove
coils.
5. LH bank only: Noting their fitted positions,
disconnect ht leads.
6.Using a 16 mm plug socket, remove spark
plugs from both cylinder heads.Refit
1.Set gap of each new spark plug to 1.00 mm.
2.Fit spark plugs and tighten to 25 Nm (18 lbf.ft).
3. LH bank only: Connect ht leads.
4. RH bank only: Fit plug top coils to spark plugs.
5. RH bank only: Fit bolts securing plug top coils
to RH camshaft cover and tighten to 9 Nm (6.5
lbf.ft).
6. RH bank only: Connect multiplugs to plug top
coils and secure with locking clips.
7.Fit engine acoustic cover.
+ ENGINE - K SERIES KV6, REPAIRS,
Cover - engine acoustic.
8.Connect battery earth lead.
Page 307 of 1007
ENGINE MANAGEMENT SYSTEM - SIEMENS
18-3-2 REPAIRS
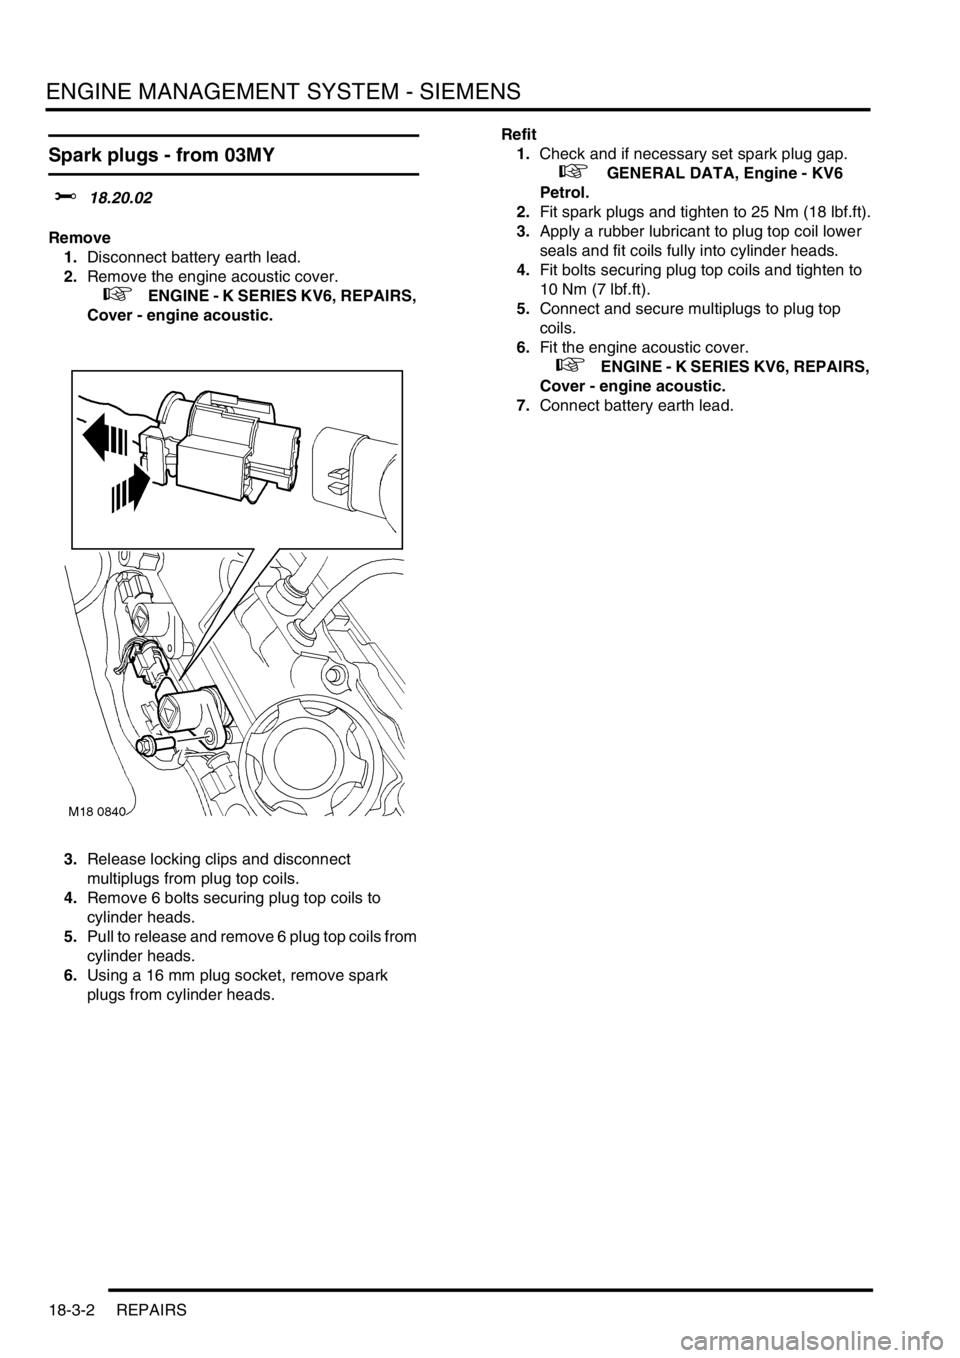
Spark plugs - from 03MY
$% 18.20.02
Remove
1.Disconnect battery earth lead.
2.Remove the engine acoustic cover.
+ ENGINE - K SERIES KV6, REPAIRS,
Cover - engine acoustic.
3.Release locking clips and disconnect
multiplugs from plug top coils.
4.Remove 6 bolts securing plug top coils to
cylinder heads.
5.Pull to release and remove 6 plug top coils from
cylinder heads.
6.Using a 16 mm plug socket, remove spark
plugs from cylinder heads.Refit
1.Check and if necessary set spark plug gap.
+ GENERAL DATA, Engine - KV6
Petrol.
2.Fit spark plugs and tighten to 25 Nm (18 lbf.ft).
3.Apply a rubber lubricant to plug top coil lower
seals and fit coils fully into cylinder heads.
4.Fit bolts securing plug top coils and tighten to
10 Nm (7 lbf.ft).
5.Connect and secure multiplugs to plug top
coils.
6.Fit the engine acoustic cover.
+ ENGINE - K SERIES KV6, REPAIRS,
Cover - engine acoustic.
7.Connect battery earth lead.
Page 308 of 1007
ENGINE MANAGEMENT SYSTEM - SIEMENS
REPAIRS 18-3-3
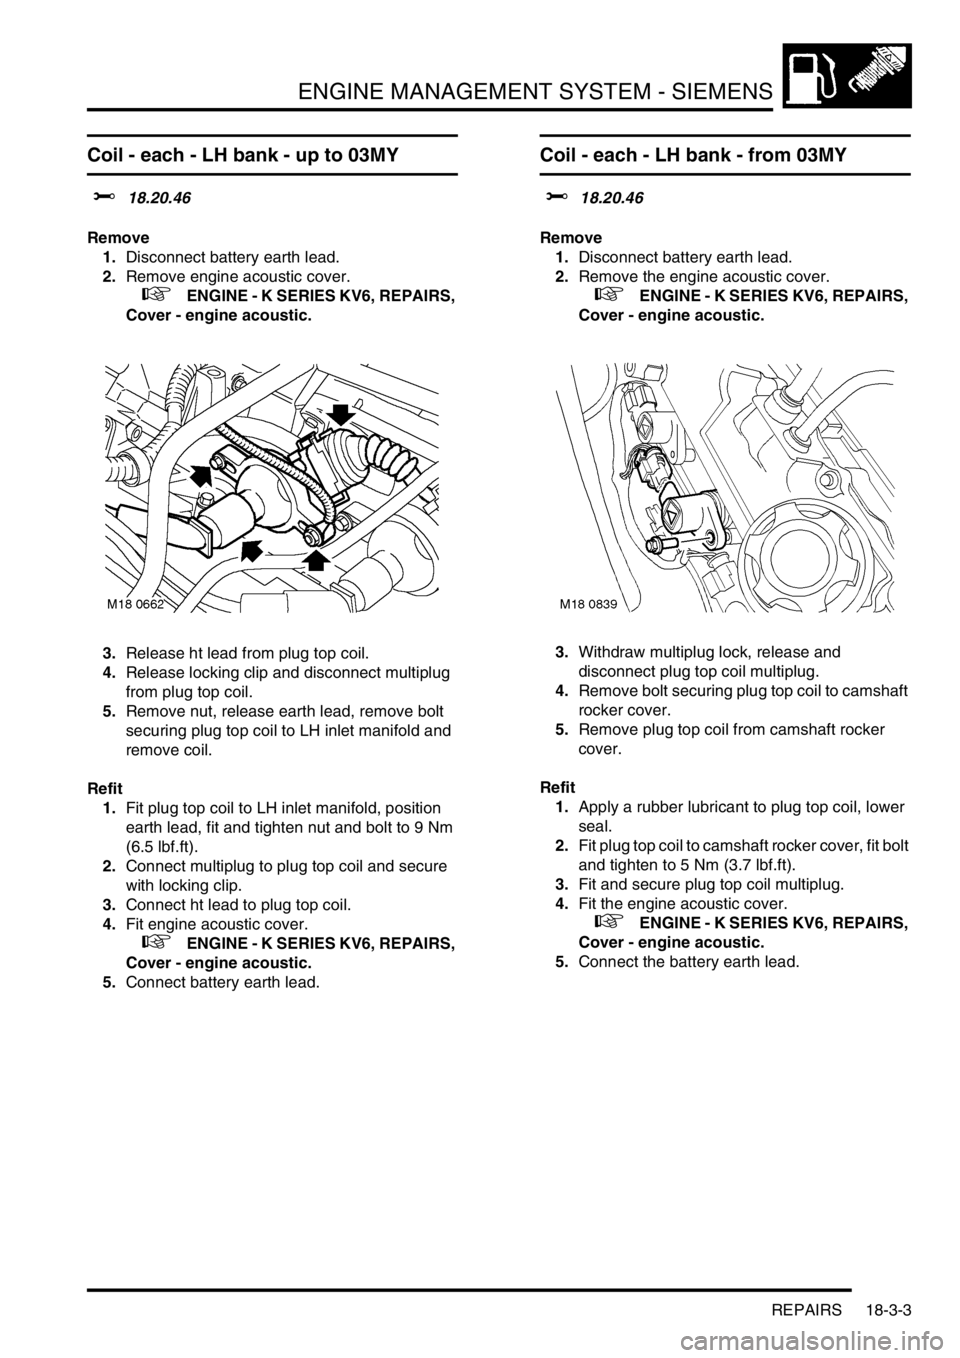
Coil - each - LH bank - up to 03MY
$% 18.20.46
Remove
1.Disconnect battery earth lead.
2.Remove engine acoustic cover.
+ ENGINE - K SERIES KV6, REPAIRS,
Cover - engine acoustic.
3.Release ht lead from plug top coil.
4.Release locking clip and disconnect multiplug
from plug top coil.
5.Remove nut, release earth lead, remove bolt
securing plug top coil to LH inlet manifold and
remove coil.
Refit
1.Fit plug top coil to LH inlet manifold, position
earth lead, fit and tighten nut and bolt to 9 Nm
(6.5 lbf.ft).
2.Connect multiplug to plug top coil and secure
with locking clip.
3.Connect ht lead to plug top coil.
4.Fit engine acoustic cover.
+ ENGINE - K SERIES KV6, REPAIRS,
Cover - engine acoustic.
5.Connect battery earth lead.
Coil - each - LH bank - from 03MY
$% 18.20.46
Remove
1.Disconnect battery earth lead.
2.Remove the engine acoustic cover.
+ ENGINE - K SERIES KV6, REPAIRS,
Cover - engine acoustic.
3.Withdraw multiplug lock, release and
disconnect plug top coil multiplug.
4.Remove bolt securing plug top coil to camshaft
rocker cover.
5.Remove plug top coil from camshaft rocker
cover.
Refit
1.Apply a rubber lubricant to plug top coil, lower
seal.
2.Fit plug top coil to camshaft rocker cover, fit bolt
and tighten to 5 Nm (3.7 lbf.ft).
3.Fit and secure plug top coil multiplug.
4.Fit the engine acoustic cover.
+ ENGINE - K SERIES KV6, REPAIRS,
Cover - engine acoustic.
5.Connect the battery earth lead.
Page 309 of 1007
ENGINE MANAGEMENT SYSTEM - SIEMENS
18-3-4 REPAIRS
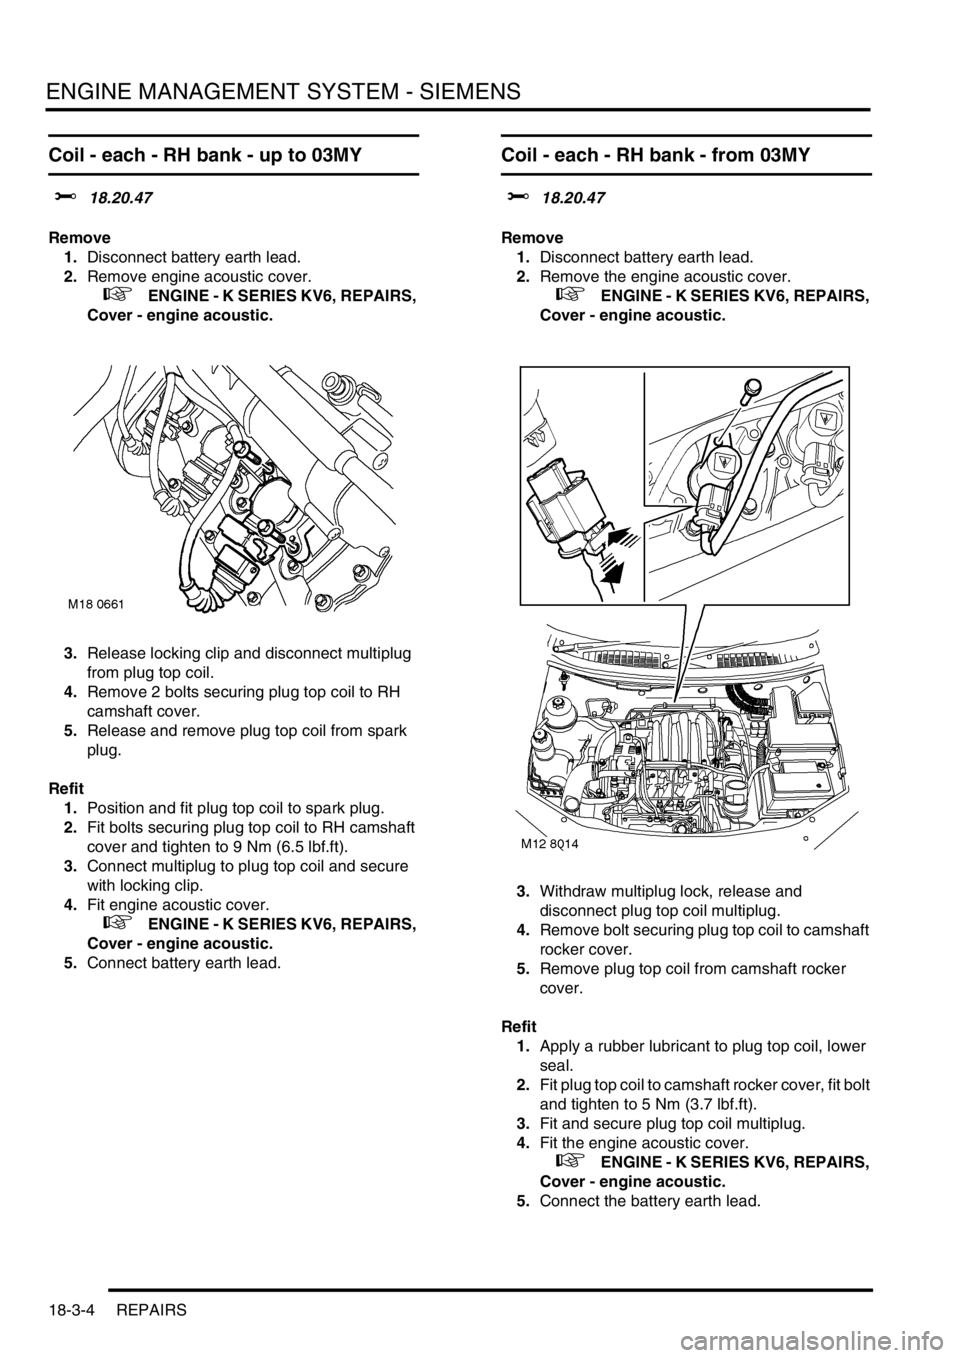
Coil - each - RH bank - up to 03MY
$% 18.20.47
Remove
1.Disconnect battery earth lead.
2.Remove engine acoustic cover.
+ ENGINE - K SERIES KV6, REPAIRS,
Cover - engine acoustic.
3.Release locking clip and disconnect multiplug
from plug top coil.
4.Remove 2 bolts securing plug top coil to RH
camshaft cover.
5.Release and remove plug top coil from spark
plug.
Refit
1.Position and fit plug top coil to spark plug.
2.Fit bolts securing plug top coil to RH camshaft
cover and tighten to 9 Nm (6.5 lbf.ft).
3.Connect multiplug to plug top coil and secure
with locking clip.
4.Fit engine acoustic cover.
+ ENGINE - K SERIES KV6, REPAIRS,
Cover - engine acoustic.
5.Connect battery earth lead.
Coil - each - RH bank - from 03MY
$% 18.20.47
Remove
1.Disconnect battery earth lead.
2.Remove the engine acoustic cover.
+ ENGINE - K SERIES KV6, REPAIRS,
Cover - engine acoustic.
3.Withdraw multiplug lock, release and
disconnect plug top coil multiplug.
4.Remove bolt securing plug top coil to camshaft
rocker cover.
5.Remove plug top coil from camshaft rocker
cover.
Refit
1.Apply a rubber lubricant to plug top coil, lower
seal.
2.Fit plug top coil to camshaft rocker cover, fit bolt
and tighten to 5 Nm (3.7 lbf.ft).
3.Fit and secure plug top coil multiplug.
4.Fit the engine acoustic cover.
+ ENGINE - K SERIES KV6, REPAIRS,
Cover - engine acoustic.
5.Connect the battery earth lead.
Page 310 of 1007
ENGINE MANAGEMENT SYSTEM - SIEMENS
REPAIRS 18-3-5
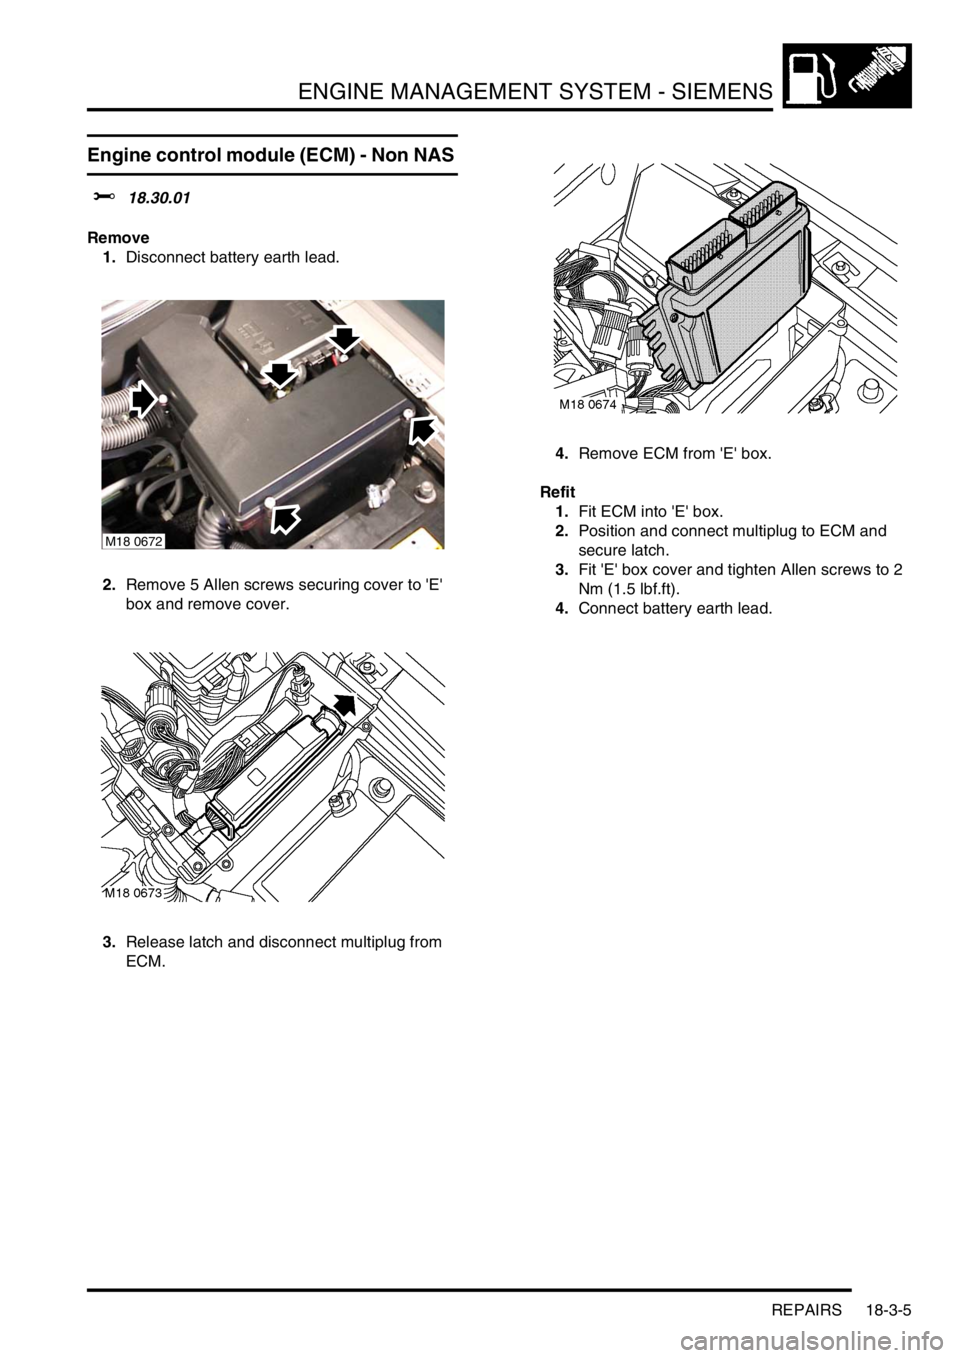
Engine control module (ECM) - Non NAS
$% 18.30.01
Remove
1.Disconnect battery earth lead.
2.Remove 5 Allen screws securing cover to 'E'
box and remove cover.
3.Release latch and disconnect multiplug from
ECM.4.Remove ECM from 'E' box.
Refit
1.Fit ECM into 'E' box.
2.Position and connect multiplug to ECM and
secure latch.
3.Fit 'E' box cover and tighten Allen screws to 2
Nm (1.5 lbf.ft).
4.Connect battery earth lead.
M18 0672