LAND ROVER FREELANDER 2001 Workshop Manual
Manufacturer: LAND ROVER, Model Year: 2001, Model line: FREELANDER, Model: LAND ROVER FREELANDER 2001Pages: 1007, PDF Size: 23.47 MB
Page 291 of 1007

ENGINE - K SERIES KV6
12-3-114 OVERHAUL
35.Position ancillary belt tensioner, fit bolts and
tighten to 25 Nm (18 lbf.ft).
36.Clean LH and RH front timing belt covers.
37.Position LH and RH front timing belt covers, fit
and tighten bolts to 4 Nm (3 lbf.ft).
38.Clean idler pulley, position pulley to engine
front mounting plate and tighten Torx bolt to 45
Nm (33 lbf.ft).
39.Position alternator to front mounting plate.
40.Fit bolt and nut and bolt securing alternator to
front mounting plate and tighten to 45 Nm (33
lbf.ft).
41.Connect alternator multiplug.
42.Connect battery lead to alternator, fit and
tighten nut to 8 Nm (6 lbf.ft), fit terminal cover.
43.Clean LH rear timing belt cover.
44.Position LH rear timing belt cover, fit and
tighten bolts to 4 Nm (3 lbf.ft).
45.Clean RH rear timing belt cover.
46.Position RH rear timing belt cover, fit bolts and
tighten to 4 Nm (3 lbf.ft).
47.Position heat shield, fit bolts and tighten M6 bolt
to 9 Nm (7 lbf.ft) and M8 bolt to 25 Nm (18 lbf.ft).
48.Fit inlet manifold chamber - if fitted.
+ MANIFOLDS & EXHAUST SYSTEMS
- K SERIES KV6, REPAIRS, Seals - inlet
manifold chamber - up to 03MY.
49.Position ancillary drive belt to crankshaft and
alternator pulleys.
50.Position engine mounting front bracket to
engine front plate and tighten bolts to 45 Nm
(33 lbf.ft).
Page 292 of 1007
EMISSION CONTROL
ADJUSTMENTS 17-1-1
EMISS ION CONTROL ADJUST ME NTS
Evaporative loss control system
(EVAPS) - leak test - NAS
$% 17.90.02.01
The following procedure allows a fuel leak, indicated
by the Malfunction Indicator Lamp (MIL), to be
accurately located. It must only be carried out once it
has been established that there are no obvious faults
with any of the system components.
Check
1.Check components in fuel and EVAP system
for obvious damage. Ensure all connections
are properly secured.
2.The system must be checked using a EVAPS
Diagnostic Testing Station LRA-19-004.
3.Disconnect vent pipe from purge valve and
connect adapter LRA-19-004/1.
NOTE: The reason for inserting the adapter into
the purge valve is that there is currently no
service port fitted to Freelander.
4.Remove RH rear wheel arch liner.
+ EXTERIOR FITTINGS, REPAIRS,
Liner - rear wheel arch.
5.Release clip and disconnect hose from
charcoal canister.
CAUTION: Before disconnecting any part of
the fuel system, it is imperative that all dust,
dirt and debris is removed from around
components to prevent ingress of foreign
matter into fuel system.
6.Block charcoal canister port with bung,
included in LRA-19-004.
7.Connect LRA-19-004 to service port fitted on
purge valve.
8.Carry out procedures given in the operating
instructions, these are supplied with LRA-19-
004.Adjust
1.If a leak has been detected, replace component
as necessary and repeat leak test to validate
repair.
2.Remove bung from charcoal canister.
3.Connect hose to charcoal canister and secure
with clip.
4.Fit rear wheel arch liner.
+ EXTERIOR FITTINGS, REPAIRS,
Liner - rear wheel arch.
5.Disconnect adaptor LRA-19-004/1 from purge
valve.
6.Connect hose to purge valve.
Page 293 of 1007

Page 294 of 1007
EMISSION CONTROL
REPAIRS 17-1-3
REPAIRS
Valve - depression limiter - Td4
$% 17.10.25
Remove
1.Disconnect battery earth lead.
2.Remove air cleaner element
+ FUEL DELIVERY SYSTEM - DIESEL,
REPAIRS, Element - air cleaner.
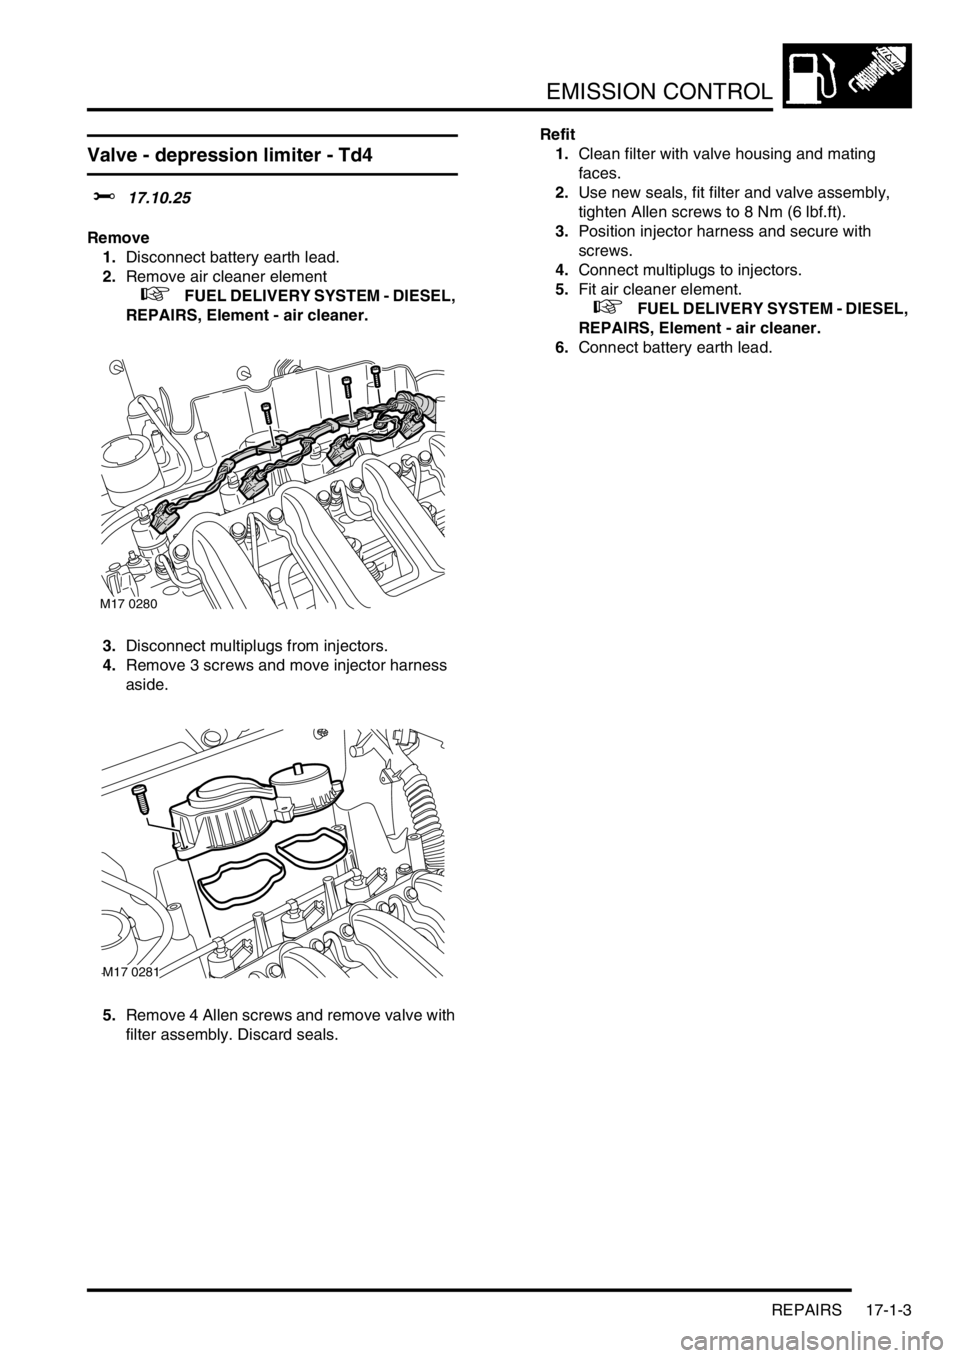
3.Disconnect multiplugs from injectors.
4.Remove 3 screws and move injector harness
aside.
5.Remove 4 Allen screws and remove valve with
filter assembly. Discard seals.Refit
1.Clean filter with valve housing and mating
faces.
2.Use new seals, fit filter and valve assembly,
tighten Allen screws to 8 Nm (6 lbf.ft).
3.Position injector harness and secure with
screws.
4.Connect multiplugs to injectors.
5.Fit air cleaner element.
+ FUEL DELIVERY SYSTEM - DIESEL,
REPAIRS, Element - air cleaner.
6.Connect battery earth lead.
M17 0280
M17 0281
Page 295 of 1007
EMISSION CONTROL
17-1-4 REPAIRS
Solenoid - canister purge - KV6
$% 17.15.06
Remove
1.Disconnect battery earth lead.
2.Disconnect multiplug from purge control valve.
3.Disconnect hose from purge control valve.
4.Remove screw and plain washer securing
purge control valve to manifold chamber.
5.Remove purge control valve, remove and
discard seal.
Refit
1.Clean purge control valve and mating face on
manifold chamber.
2.Fit new seal to purge control valve.
3.Position purge control valve to manifold
chamber, secure with plain washer and screw.
4.Connect multiplug and secure hose to purge
control valve.
5.Connect battery earth lead.
Charcoal canister - petrol - Non NAS
$% 17.15.13
Remove
1.Raise rear of vehicle, one side.
WARNING: Do not work on or under a
vehicle supported only by a jack. Always
support the vehicle on safety stands.
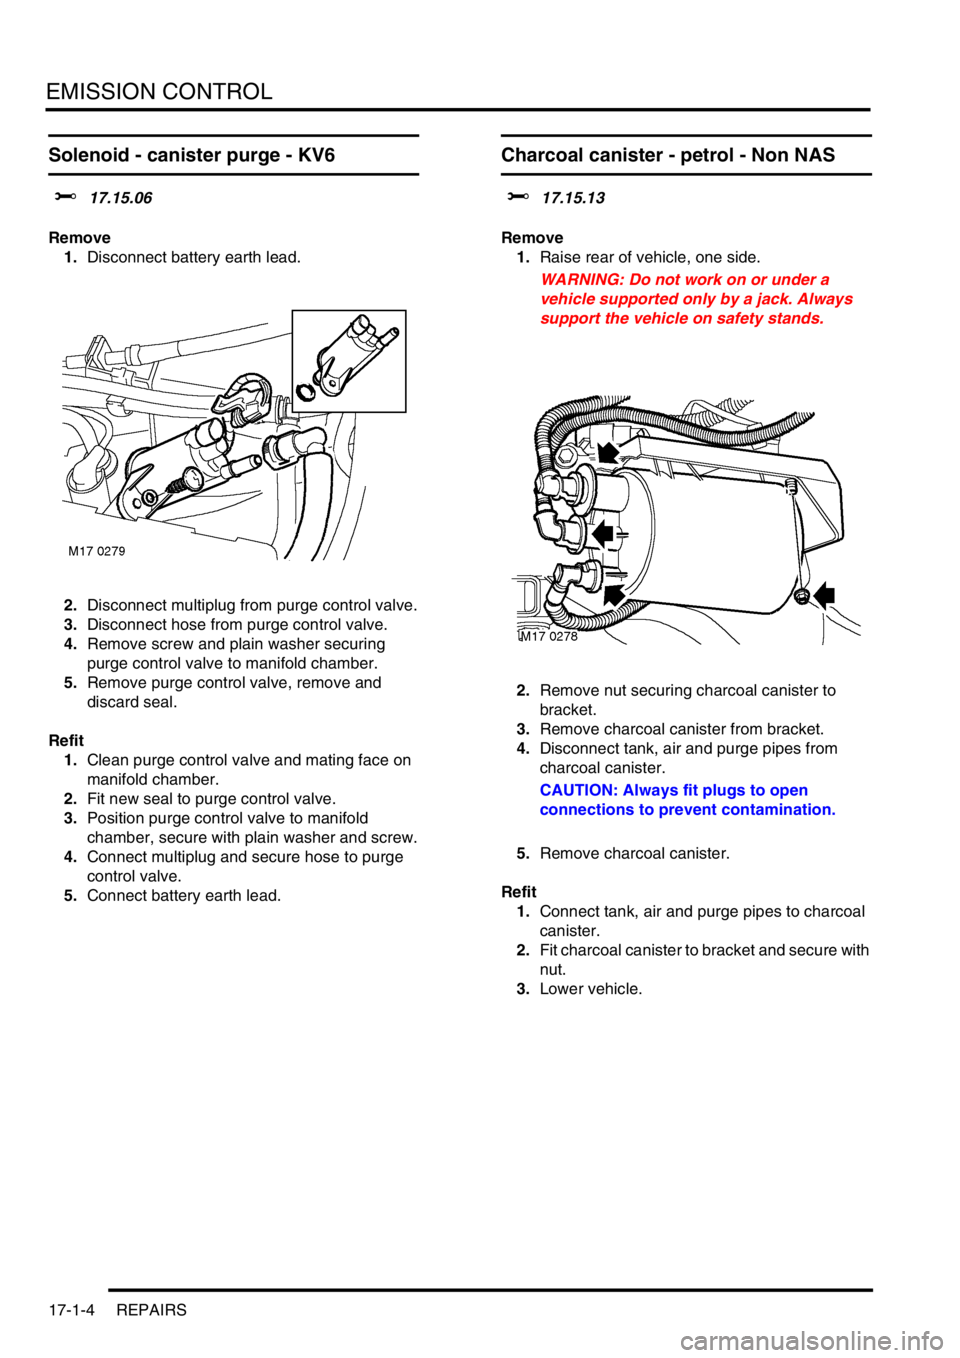
2.Remove nut securing charcoal canister to
bracket.
3.Remove charcoal canister from bracket.
4.Disconnect tank, air and purge pipes from
charcoal canister.
CAUTION: Always fit plugs to open
connections to prevent contamination.
5.Remove charcoal canister.
Refit
1.Connect tank, air and purge pipes to charcoal
canister.
2.Fit charcoal canister to bracket and secure with
nut.
3.Lower vehicle.
Page 296 of 1007
EMISSION CONTROL
REPAIRS 17-1-5
Charcoal canister - NAS
$% 17.15.13
Remove
1.Disconnect battery earth lead.
2.Remove RH rear wheel arch liner.
+ EXTERIOR FITTINGS, REPAIRS,
Liner - rear wheel arch.
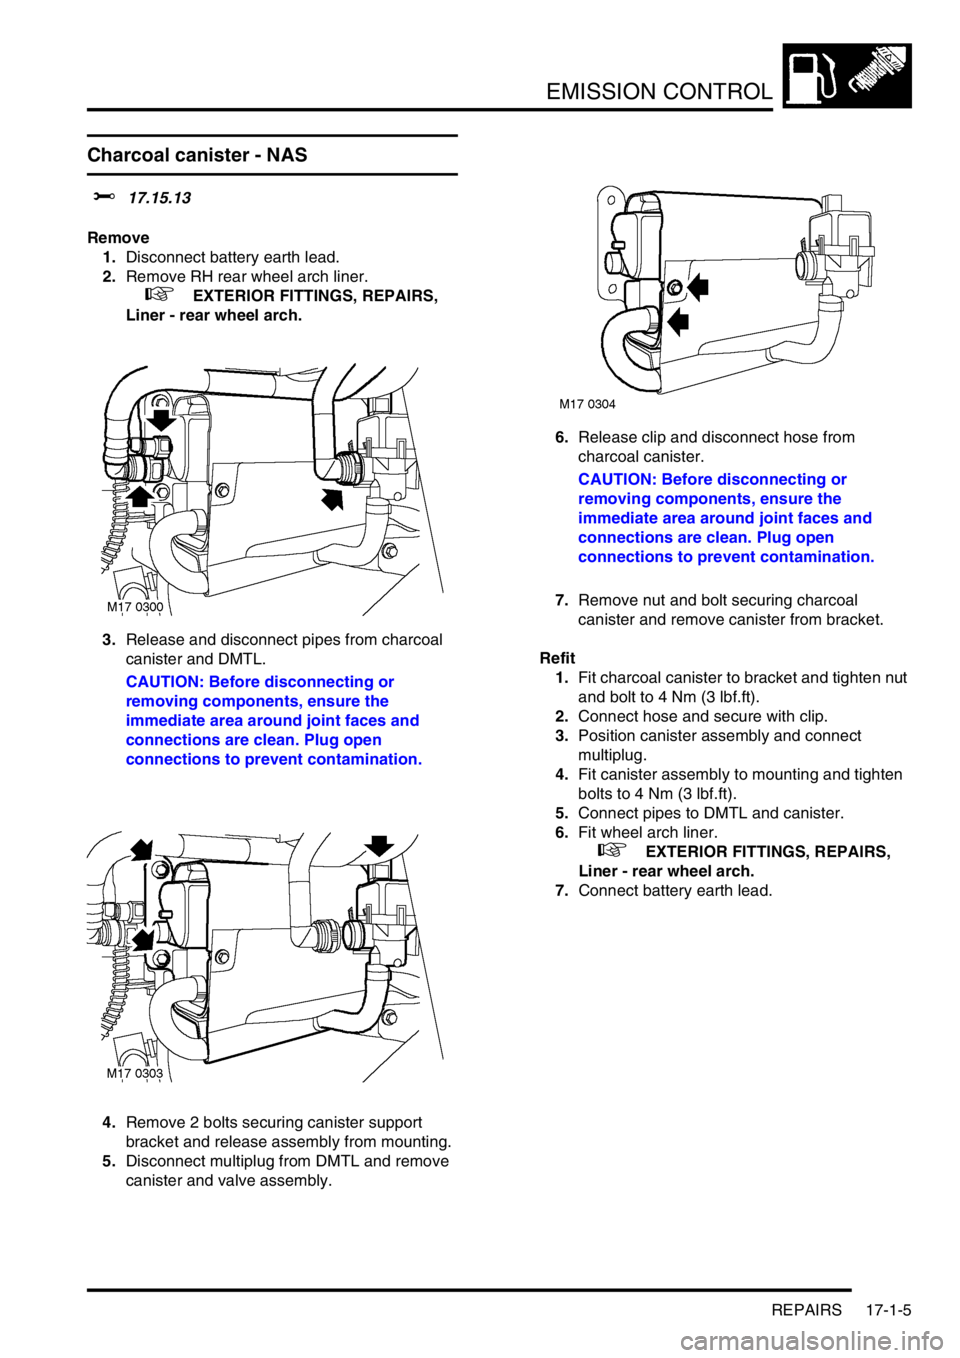
3.Release and disconnect pipes from charcoal
canister and DMTL.
CAUTION: Before disconnecting or
removing components, ensure the
immediate area around joint faces and
connections are clean. Plug open
connections to prevent contamination.
4.Remove 2 bolts securing canister support
bracket and release assembly from mounting.
5.Disconnect multiplug from DMTL and remove
canister and valve assembly.6.Release clip and disconnect hose from
charcoal canister.
CAUTION: Before disconnecting or
removing components, ensure the
immediate area around joint faces and
connections are clean. Plug open
connections to prevent contamination.
7.Remove nut and bolt securing charcoal
canister and remove canister from bracket.
Refit
1.Fit charcoal canister to bracket and tighten nut
and bolt to 4 Nm (3 lbf.ft).
2.Connect hose and secure with clip.
3.Position canister assembly and connect
multiplug.
4.Fit canister assembly to mounting and tighten
bolts to 4 Nm (3 lbf.ft).
5.Connect pipes to DMTL and canister.
6.Fit wheel arch liner.
+ EXTERIOR FITTINGS, REPAIRS,
Liner - rear wheel arch.
7.Connect battery earth lead.
Page 297 of 1007
EMISSION CONTROL
17-1-6 REPAIRS
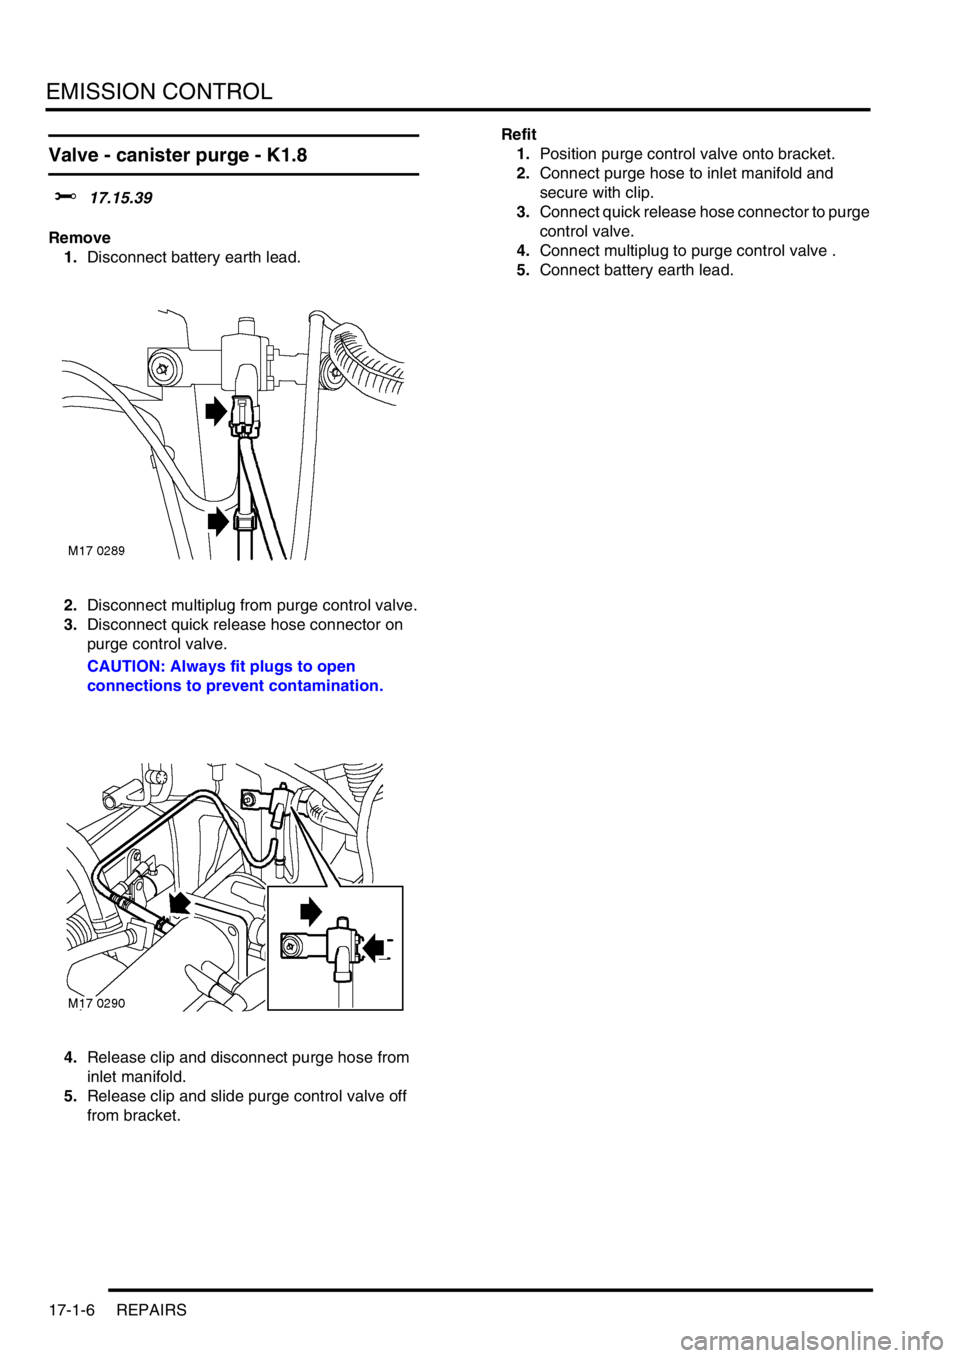
Valve - canister purge - K1.8
$% 17.15.39
Remove
1.Disconnect battery earth lead.
2.Disconnect multiplug from purge control valve.
3.Disconnect quick release hose connector on
purge control valve.
CAUTION: Always fit plugs to open
connections to prevent contamination.
4.Release clip and disconnect purge hose from
inlet manifold.
5.Release clip and slide purge control valve off
from bracket.Refit
1.Position purge control valve onto bracket.
2.Connect purge hose to inlet manifold and
secure with clip.
3.Connect quick release hose connector to purge
control valve.
4.Connect multiplug to purge control valve .
5.Connect battery earth lead.
Page 298 of 1007
EMISSION CONTROL
REPAIRS 17-1-7
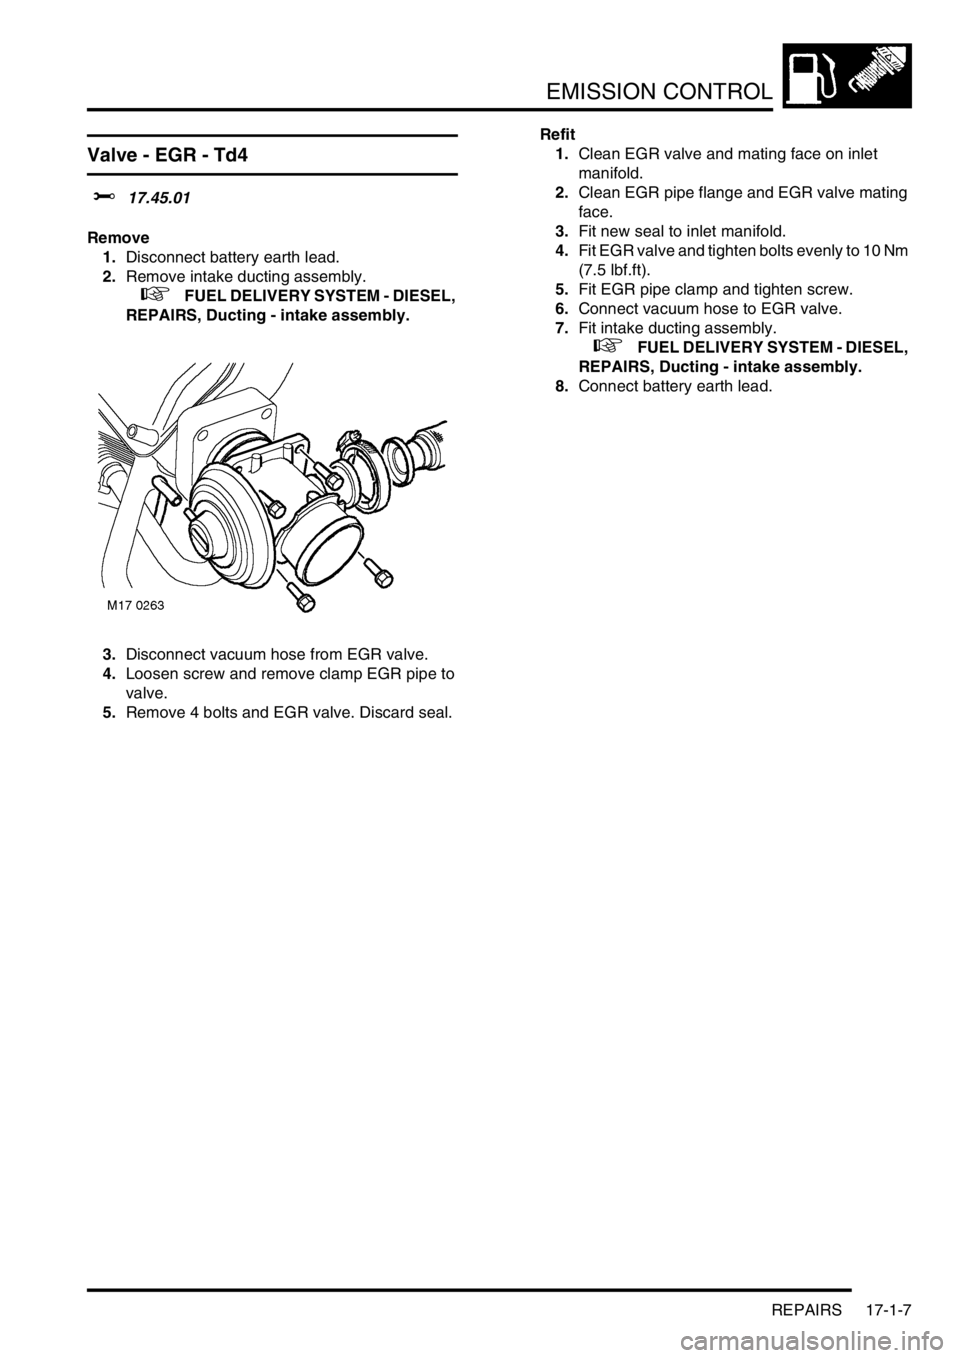
Valve - EGR - Td4
$% 17.45.01
Remove
1.Disconnect battery earth lead.
2.Remove intake ducting assembly.
+ FUEL DELIVERY SYSTEM - DIESEL,
REPAIRS, Ducting - intake assembly.
3.Disconnect vacuum hose from EGR valve.
4.Loosen screw and remove clamp EGR pipe to
valve.
5.Remove 4 bolts and EGR valve. Discard seal.Refit
1.Clean EGR valve and mating face on inlet
manifold.
2.Clean EGR pipe flange and EGR valve mating
face.
3.Fit new seal to inlet manifold.
4.Fit EGR valve and tighten bolts evenly to 10 Nm
(7.5 lbf.ft).
5.Fit EGR pipe clamp and tighten screw.
6.Connect vacuum hose to EGR valve.
7.Fit intake ducting assembly.
+ FUEL DELIVERY SYSTEM - DIESEL,
REPAIRS, Ducting - intake assembly.
8.Connect battery earth lead.
Page 299 of 1007
EMISSION CONTROL
17-1-8 REPAIRS
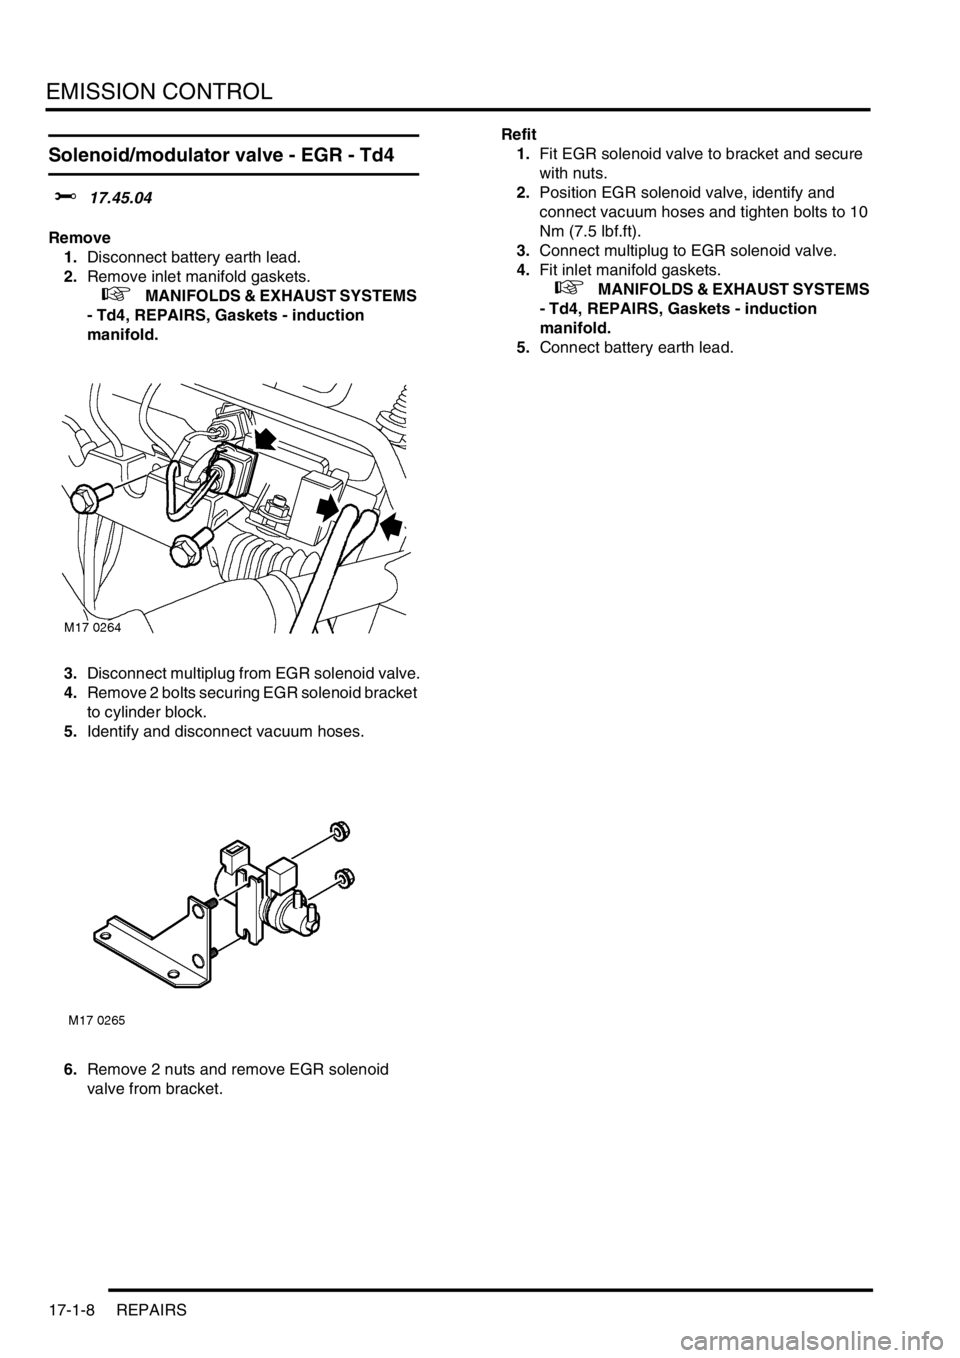
Solenoid/modulator valve - EGR - Td4
$% 17.45.04
Remove
1.Disconnect battery earth lead.
2.Remove inlet manifold gaskets.
+ MANIFOLDS & EXHAUST SYSTEMS
- Td4, REPAIRS, Gaskets - induction
manifold.
3.Disconnect multiplug from EGR solenoid valve.
4.Remove 2 bolts securing EGR solenoid bracket
to cylinder block.
5.Identify and disconnect vacuum hoses.
6.Remove 2 nuts and remove EGR solenoid
valve from bracket.Refit
1.Fit EGR solenoid valve to bracket and secure
with nuts.
2.Position EGR solenoid valve, identify and
connect vacuum hoses and tighten bolts to 10
Nm (7.5 lbf.ft).
3.Connect multiplug to EGR solenoid valve.
4.Fit inlet manifold gaskets.
+ MANIFOLDS & EXHAUST SYSTEMS
- Td4, REPAIRS, Gaskets - induction
manifold.
5.Connect battery earth lead.
Page 300 of 1007
EMISSION CONTROL
REPAIRS 17-1-9
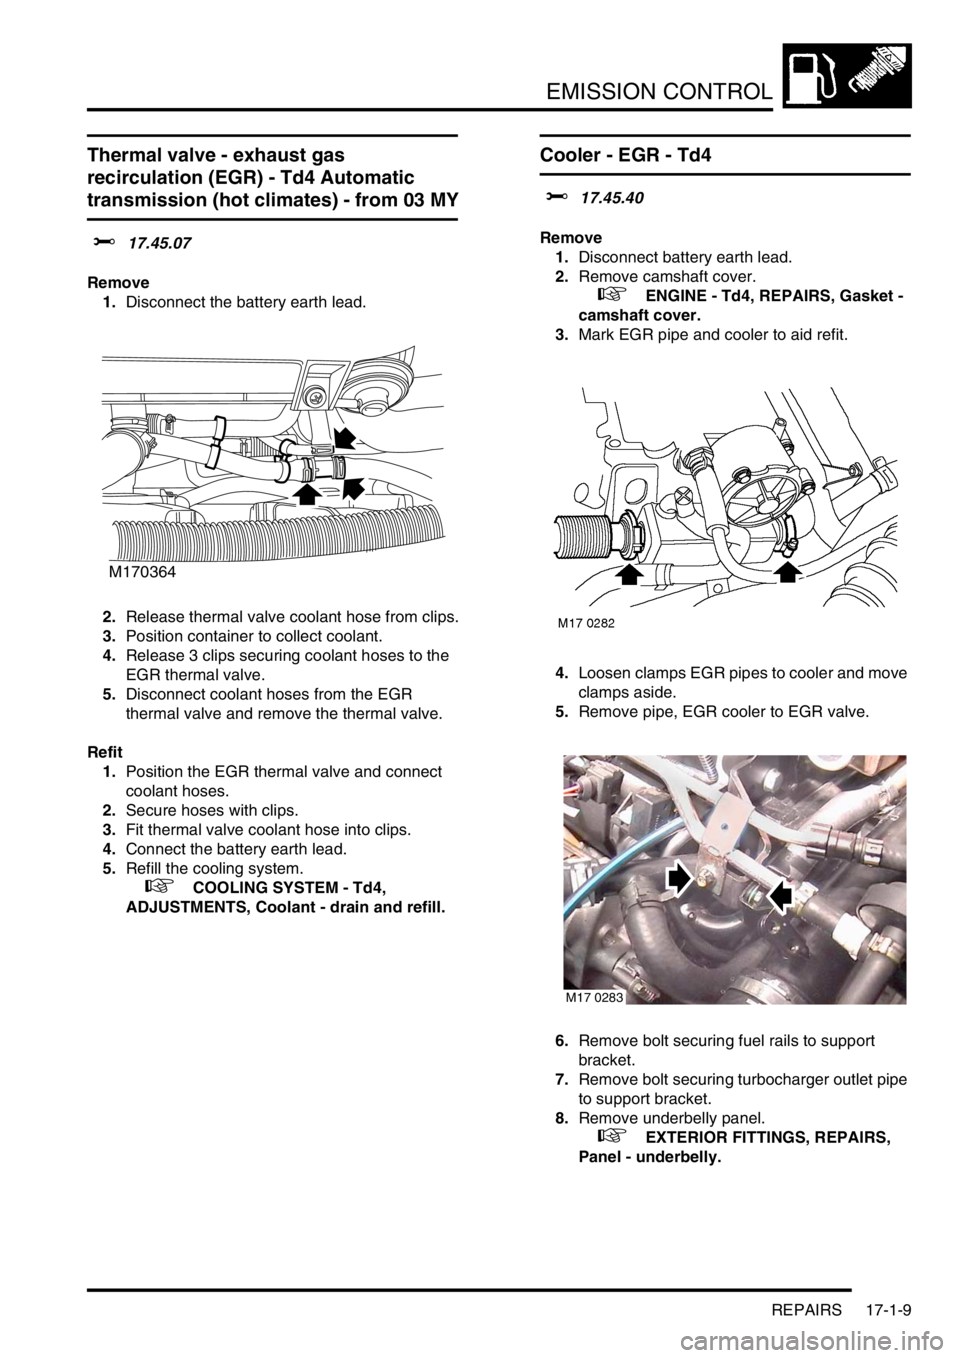
Thermal valve - exhaust gas
recirculation (EGR) - Td4 Automatic
transmission (hot climates) - from 03 MY
$% 17.45.07
Remove
1.Disconnect the battery earth lead.
2.Release thermal valve coolant hose from clips.
3.Position container to collect coolant.
4.Release 3 clips securing coolant hoses to the
EGR thermal valve.
5.Disconnect coolant hoses from the EGR
thermal valve and remove the thermal valve.
Refit
1.Position the EGR thermal valve and connect
coolant hoses.
2.Secure hoses with clips.
3.Fit thermal valve coolant hose into clips.
4.Connect the battery earth lead.
5.Refill the cooling system.
+ COOLING SYSTEM - Td4,
ADJUSTMENTS, Coolant - drain and refill.
Cooler - EGR - Td4
$% 17.45.40
Remove
1.Disconnect battery earth lead.
2.Remove camshaft cover.
+ ENGINE - Td4, REPAIRS, Gasket -
camshaft cover.
3.Mark EGR pipe and cooler to aid refit.
4.Loosen clamps EGR pipes to cooler and move
clamps aside.
5.Remove pipe, EGR cooler to EGR valve.
6.Remove bolt securing fuel rails to support
bracket.
7.Remove bolt securing turbocharger outlet pipe
to support bracket.
8.Remove underbelly panel.
+ EXTERIOR FITTINGS, REPAIRS,
Panel - underbelly.
M170364
M17 0283