LAND ROVER FREELANDER 2001 Workshop Manual
Manufacturer: LAND ROVER, Model Year: 2001, Model line: FREELANDER, Model: LAND ROVER FREELANDER 2001Pages: 1007, PDF Size: 23.47 MB
Page 261 of 1007
ENGINE - K SERIES KV6
12-3-84 OVERHAUL
13.Remove crankshaft, remove main bearing
shells and thrust washers from cylinder block.
Discard thrust washers.
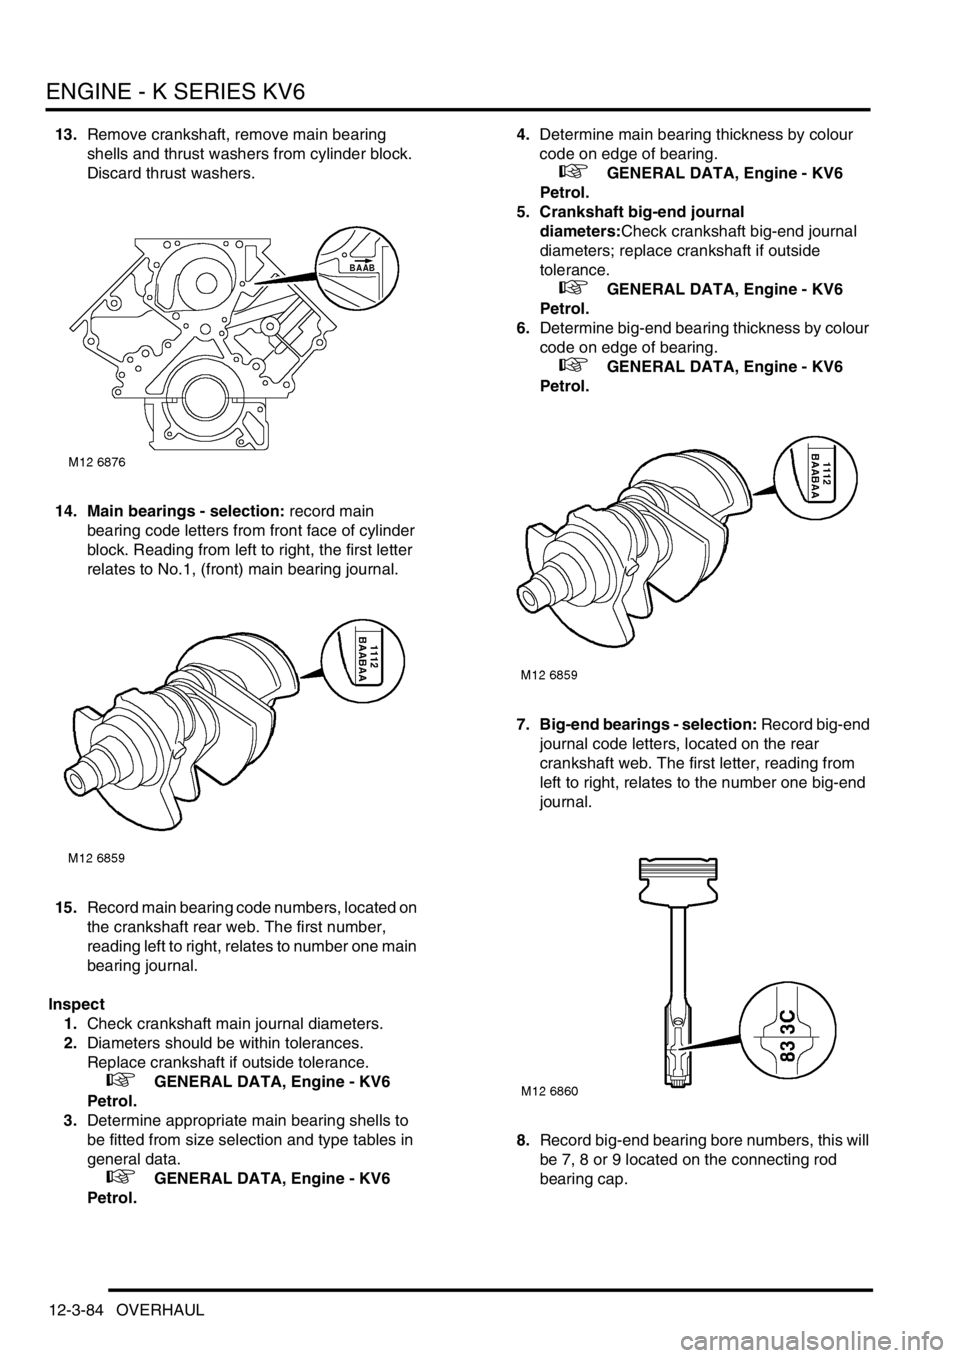
14. Main bearings - selection: record main
bearing code letters from front face of cylinder
block. Reading from left to right, the first letter
relates to No.1, (front) main bearing journal.
15.Record main bearing code numbers, located on
the crankshaft rear web. The first number,
reading left to right, relates to number one main
bearing journal.
Inspect
1.Check crankshaft main journal diameters.
2.Diameters should be within tolerances.
Replace crankshaft if outside tolerance.
+ GENERAL DATA, Engine - KV6
Petrol.
3.Determine appropriate main bearing shells to
be fitted from size selection and type tables in
general data.
+ GENERAL DATA, Engine - KV6
Petrol.4.Determine main bearing thickness by colour
code on edge of bearing.
+ GENERAL DATA, Engine - KV6
Petrol.
5. Crankshaft big-end journal
diameters:Check crankshaft big-end journal
diameters; replace crankshaft if outside
tolerance.
+ GENERAL DATA, Engine - KV6
Petrol.
6.Determine big-end bearing thickness by colour
code on edge of bearing.
+ GENERAL DATA, Engine - KV6
Petrol.
7. Big-end bearings - selection: Record big-end
journal code letters, located on the rear
crankshaft web. The first letter, reading from
left to right, relates to the number one big-end
journal.
8.Record big-end bearing bore numbers, this will
be 7, 8 or 9 located on the connecting rod
bearing cap.
Page 262 of 1007
ENGINE - K SERIES KV6
OVERHAUL 12-3-85
9. Big-end bearings selection: Select the
required bearing shells from general data.
+ GENERAL DATA, Engine - KV6
Petrol.
10.Ensure all bolt holes are clean and dry.
Remove all traces of thread locking material
from oil pick-up strainer bolt hole and threads of
retaining bolt.
CAUTION: Do not use a tap.
11.Ensure bearing ladder locating dowels are
fitted and dowel holes in bearing ladder are
clean and dry.
12.Check coolant stub pipe in cylinder block for
signs of leakage and corrosion, replace as
necessary. Apply sealant, Part No. STC 50554
to seal replacement pipe to cylinder block.
13.Clean main bearing shell recesses in cylinder
block.
14.Clean crankshaft main bearing and big end
bearing journals. Clean bearing shell locations
in connecting rods and caps.
15.Fit selected main bearing shells, grooved into
cylinder block and plain into bearing ladder.
16.Fit new thrust washers to cylinder block.
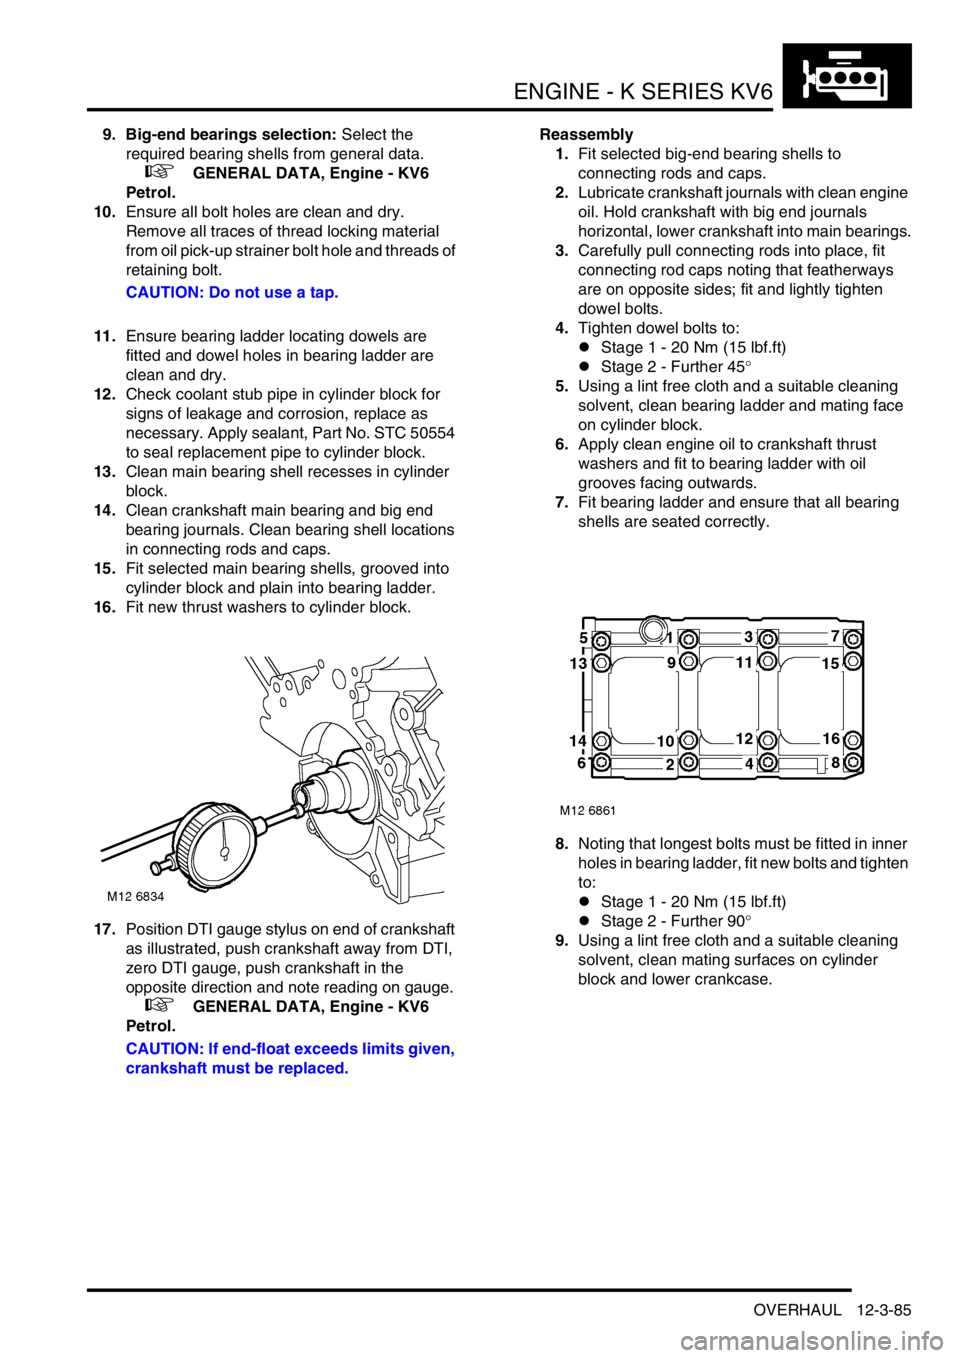
17.Position DTI gauge stylus on end of crankshaft
as illustrated, push crankshaft away from DTI,
zero DTI gauge, push crankshaft in the
opposite direction and note reading on gauge.
+ GENERAL DATA, Engine - KV6
Petrol.
CAUTION: If end-float exceeds limits given,
crankshaft must be replaced.Reassembly
1.Fit selected big-end bearing shells to
connecting rods and caps.
2.Lubricate crankshaft journals with clean engine
oil. Hold crankshaft with big end journals
horizontal, lower crankshaft into main bearings.
3.Carefully pull connecting rods into place, fit
connecting rod caps noting that featherways
are on opposite sides; fit and lightly tighten
dowel bolts.
4.Tighten dowel bolts to:
lStage 1 - 20 Nm (15 lbf.ft)
lStage 2 - Further 45°
5.Using a lint free cloth and a suitable cleaning
solvent, clean bearing ladder and mating face
on cylinder block.
6.Apply clean engine oil to crankshaft thrust
washers and fit to bearing ladder with oil
grooves facing outwards.
7.Fit bearing ladder and ensure that all bearing
shells are seated correctly.
8.Noting that longest bolts must be fitted in inner
holes in bearing ladder, fit new bolts and tighten
to:
lStage 1 - 20 Nm (15 lbf.ft)
lStage 2 - Further 90°
9.Using a lint free cloth and a suitable cleaning
solvent, clean mating surfaces on cylinder
block and lower crankcase.
Page 263 of 1007
ENGINE - K SERIES KV6
12-3-86 OVERHAUL
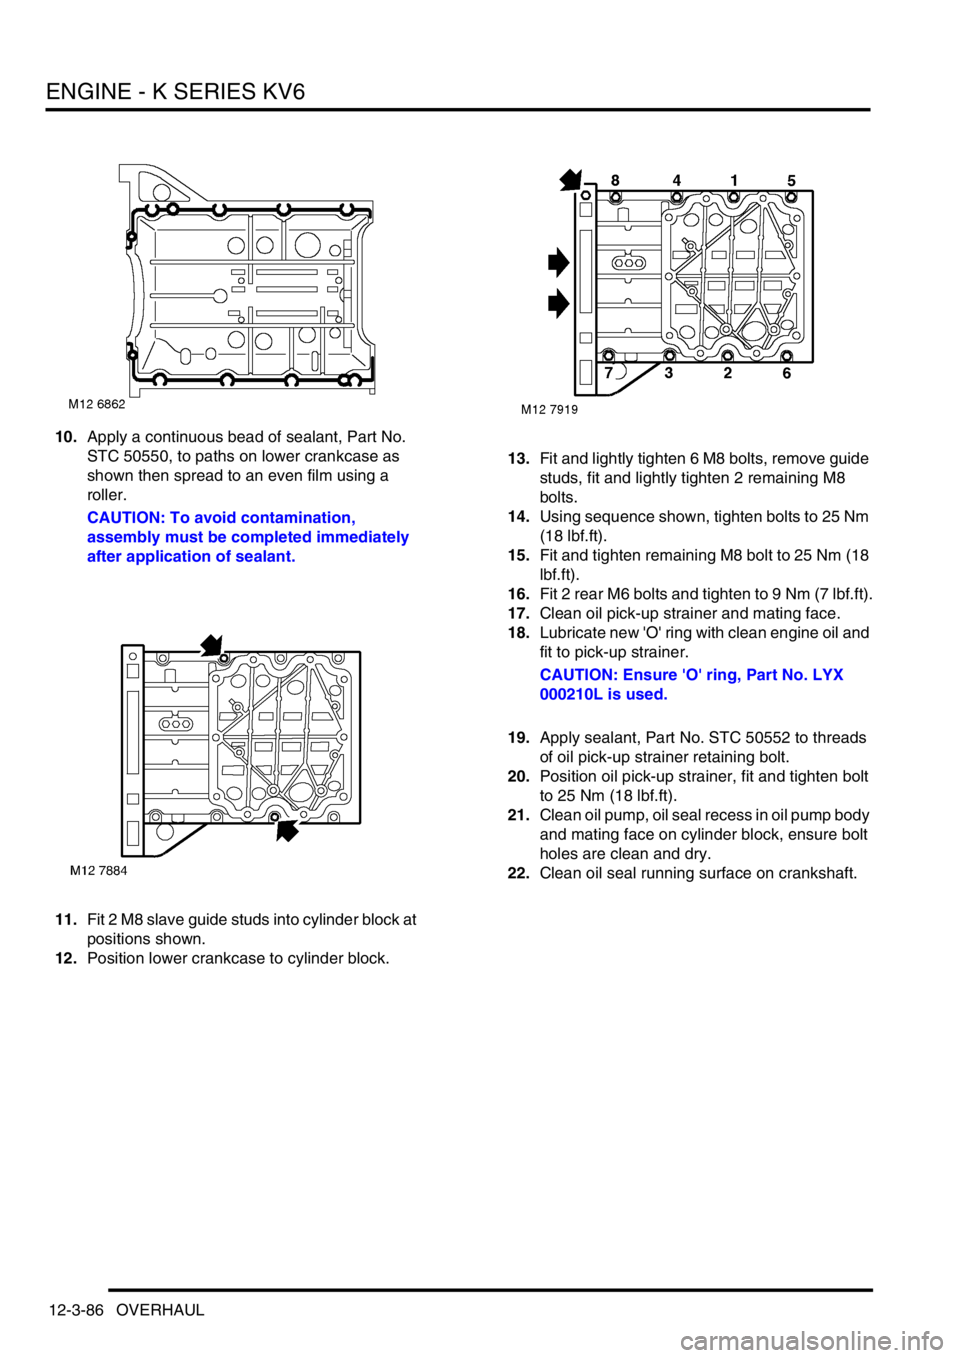
10.Apply a continuous bead of sealant, Part No.
STC 50550, to paths on lower crankcase as
shown then spread to an even film using a
roller.
CAUTION: To avoid contamination,
assembly must be completed immediately
after application of sealant.
11.Fit 2 M8 slave guide studs into cylinder block at
positions shown.
12.Position lower crankcase to cylinder block.13.Fit and lightly tighten 6 M8 bolts, remove guide
studs, fit and lightly tighten 2 remaining M8
bolts.
14.Using sequence shown, tighten bolts to 25 Nm
(18 lbf.ft).
15.Fit and tighten remaining M8 bolt to 25 Nm (18
lbf.ft).
16.Fit 2 rear M6 bolts and tighten to 9 Nm (7 lbf.ft).
17.Clean oil pick-up strainer and mating face.
18.Lubricate new 'O' ring with clean engine oil and
fit to pick-up strainer.
CAUTION: Ensure 'O' ring, Part No. LYX
000210L is used.
19.Apply sealant, Part No. STC 50552 to threads
of oil pick-up strainer retaining bolt.
20.Position oil pick-up strainer, fit and tighten bolt
to 25 Nm (18 lbf.ft).
21.Clean oil pump, oil seal recess in oil pump body
and mating face on cylinder block, ensure bolt
holes are clean and dry.
22.Clean oil seal running surface on crankshaft.
Page 264 of 1007
ENGINE - K SERIES KV6
OVERHAUL 12-3-87
Refit
1.Fit oil pump gasket.
+ ENGINE - K SERIES KV6,
OVERHAUL, Oil pump - Overhaul.
2.Fit engine sump.
+ ENGINE - K SERIES KV6,
OVERHAUL, Sump - engine oil.
3.Fit crankshaft rear oil seal.
+ ENGINE - K SERIES KV6,
OVERHAUL, Crankshaft rear oil seal.
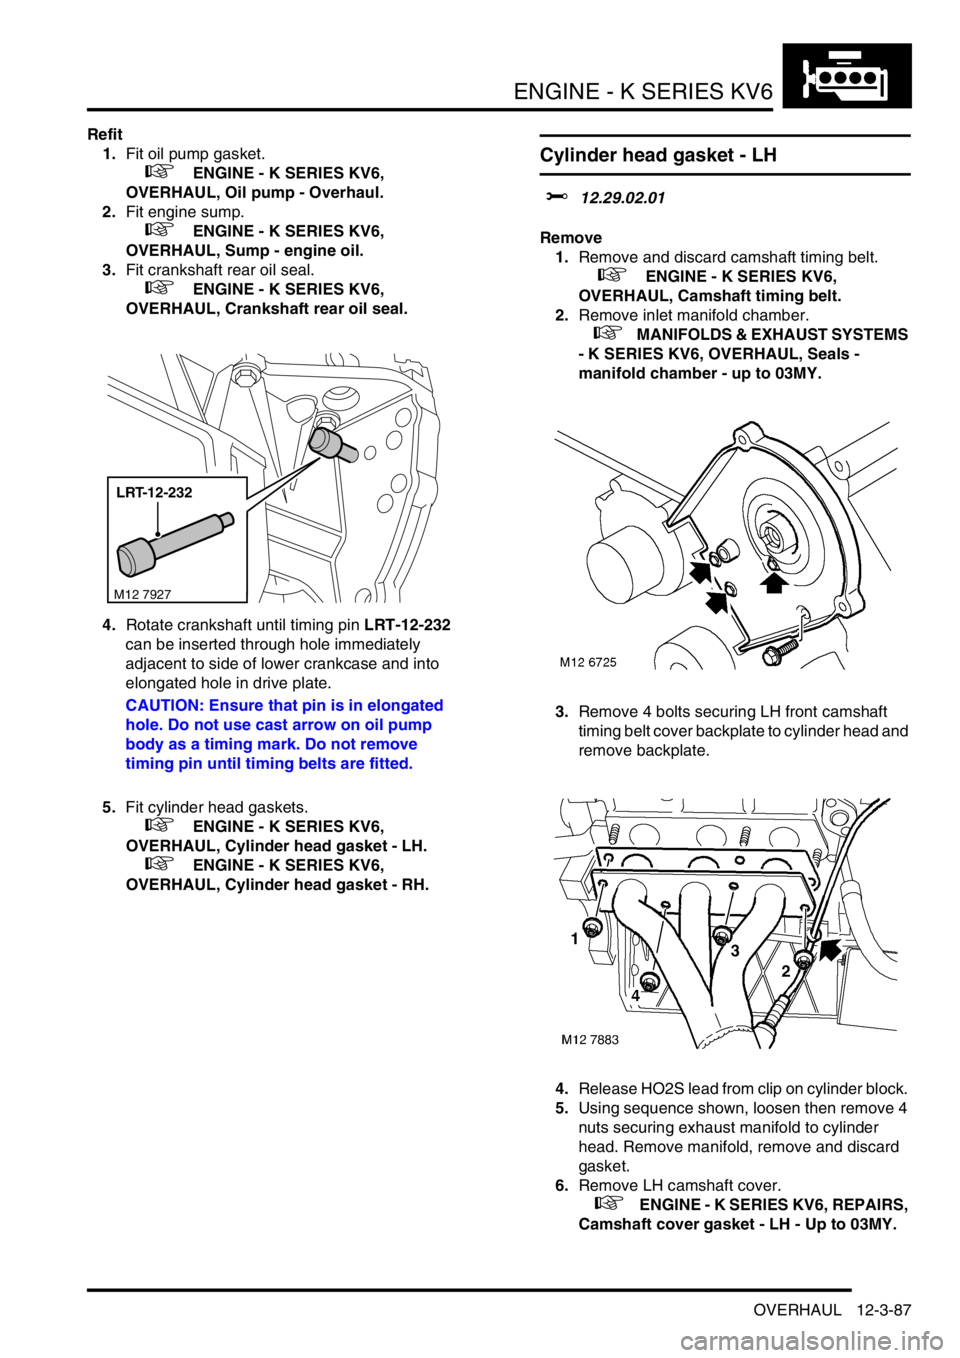
4.Rotate crankshaft until timing pin LRT-12-232
can be inserted through hole immediately
adjacent to side of lower crankcase and into
elongated hole in drive plate.
CAUTION: Ensure that pin is in elongated
hole. Do not use cast arrow on oil pump
body as a timing mark. Do not remove
timing pin until timing belts are fitted.
5.Fit cylinder head gaskets.
+ ENGINE - K SERIES KV6,
OVERHAUL, Cylinder head gasket - LH.
+ ENGINE - K SERIES KV6,
OVERHAUL, Cylinder head gasket - RH.
Cylinder head gasket - LH
$% 12.29.02.01
Remove
1.Remove and discard camshaft timing belt.
+ ENGINE - K SERIES KV6,
OVERHAUL, Camshaft timing belt.
2.Remove inlet manifold chamber.
+ MANIFOLDS & EXHAUST SYSTEMS
- K SERIES KV6, OVERHAUL, Seals -
manifold chamber - up to 03MY.
3.Remove 4 bolts securing LH front camshaft
timing belt cover backplate to cylinder head and
remove backplate.
4.Release HO2S lead from clip on cylinder block.
5.Using sequence shown, loosen then remove 4
nuts securing exhaust manifold to cylinder
head. Remove manifold, remove and discard
gasket.
6.Remove LH camshaft cover.
+ ENGINE - K SERIES KV6, REPAIRS,
Camshaft cover gasket - LH - Up to 03MY.
LRT-12-232
M12 7927
Page 265 of 1007
ENGINE - K SERIES KV6
12-3-88 OVERHAUL
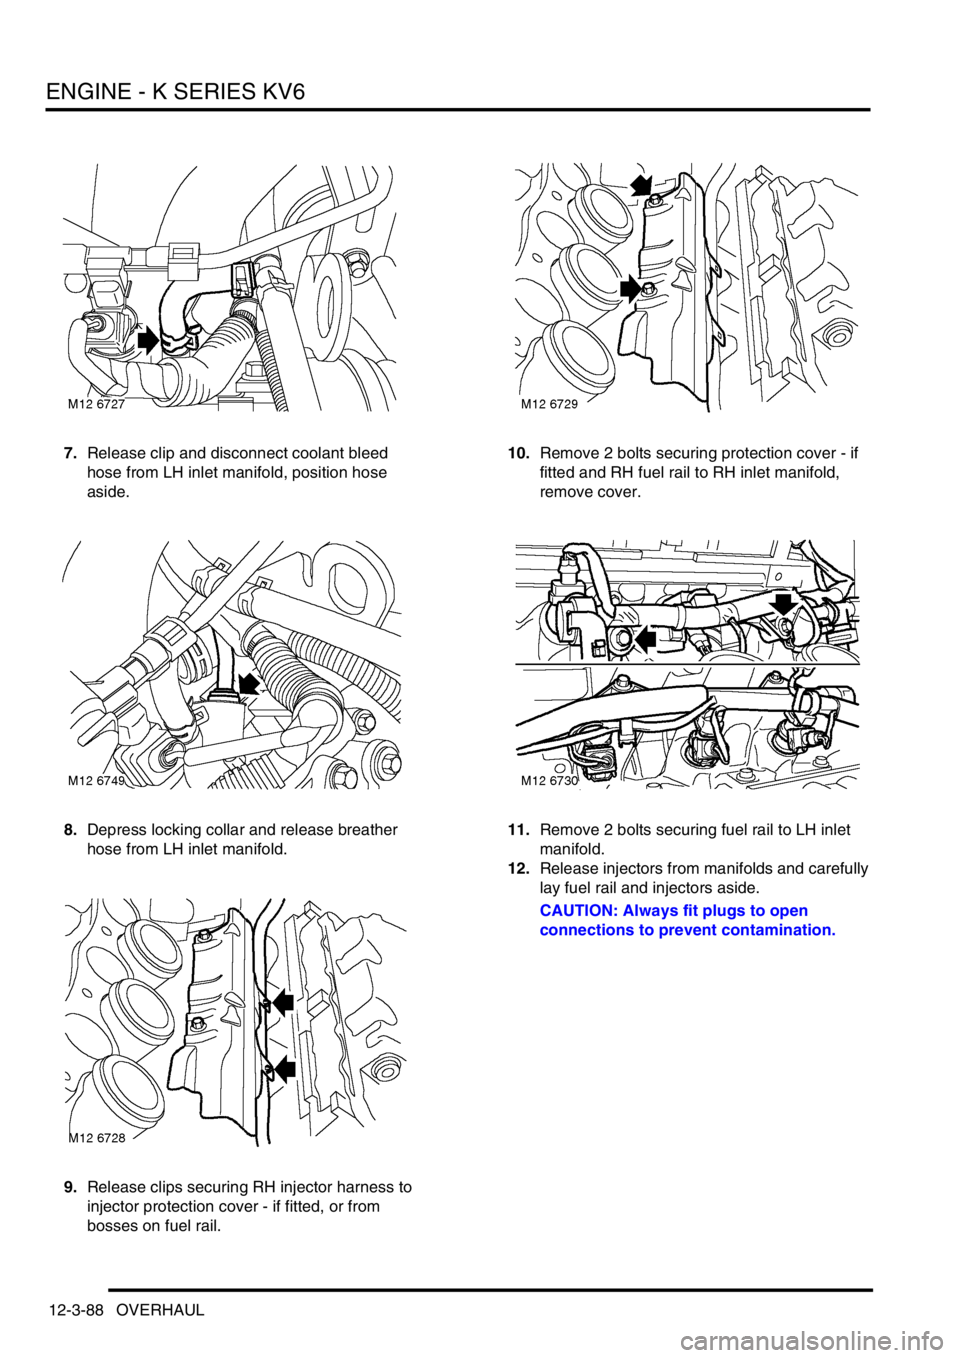
7.Release clip and disconnect coolant bleed
hose from LH inlet manifold, position hose
aside.
8.Depress locking collar and release breather
hose from LH inlet manifold.
9.Release clips securing RH injector harness to
injector protection cover - if fitted, or from
bosses on fuel rail.10.Remove 2 bolts securing protection cover - if
fitted and RH fuel rail to RH inlet manifold,
remove cover.
11.Remove 2 bolts securing fuel rail to LH inlet
manifold.
12.Release injectors from manifolds and carefully
lay fuel rail and injectors aside.
CAUTION: Always fit plugs to open
connections to prevent contamination.
Page 266 of 1007
ENGINE - K SERIES KV6
OVERHAUL 12-3-89
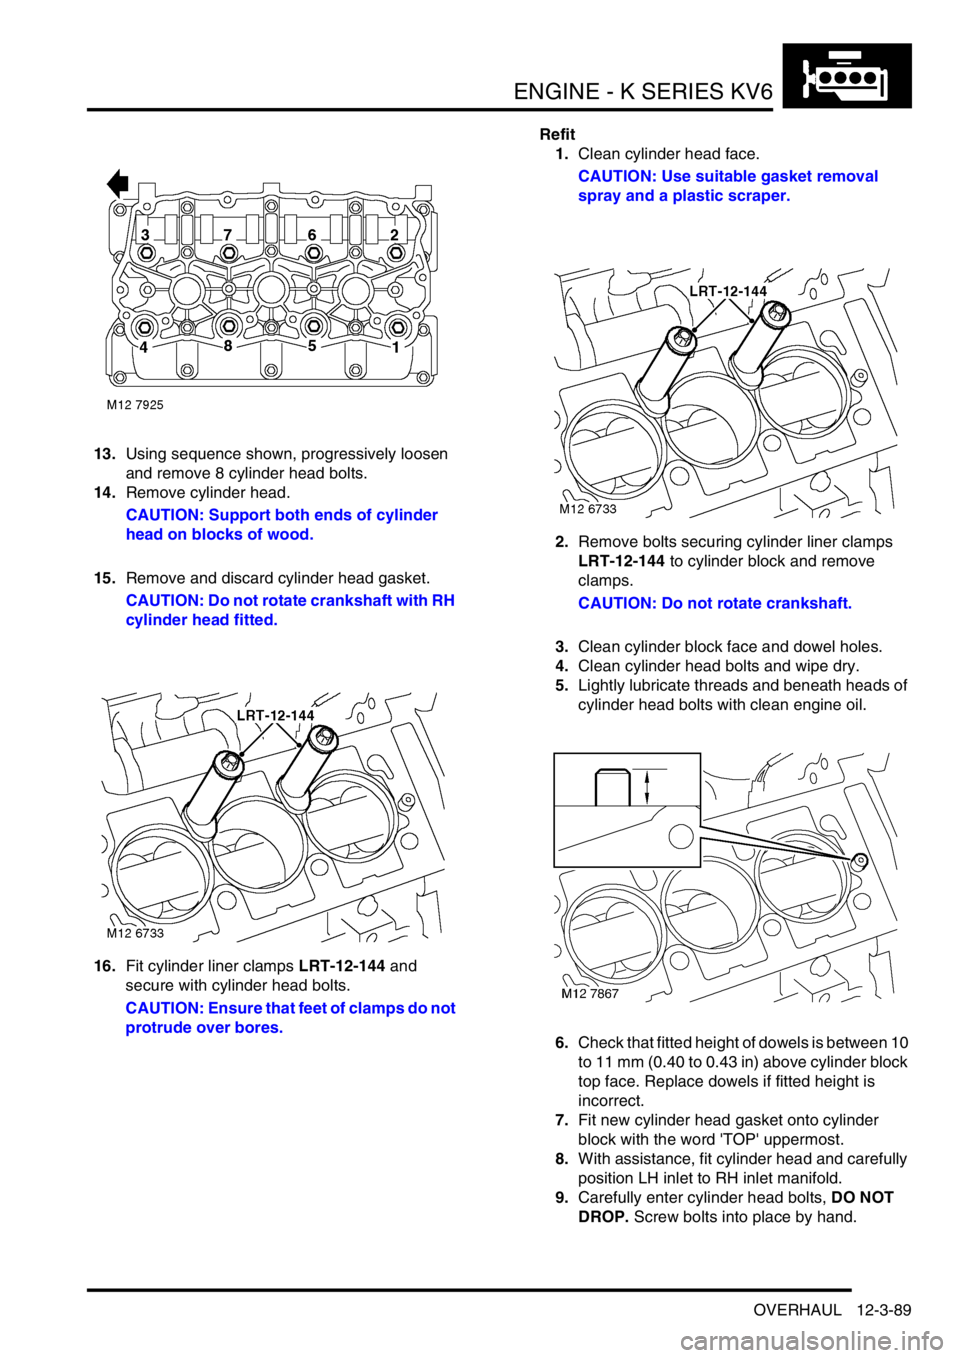
13.Using sequence shown, progressively loosen
and remove 8 cylinder head bolts.
14.Remove cylinder head.
CAUTION: Support both ends of cylinder
head on blocks of wood.
15.Remove and discard cylinder head gasket.
CAUTION: Do not rotate crankshaft with RH
cylinder head fitted.
16.Fit cylinder liner clamps LRT-12-144 and
secure with cylinder head bolts.
CAUTION: Ensure that feet of clamps do not
protrude over bores.Refit
1.Clean cylinder head face.
CAUTION: Use suitable gasket removal
spray and a plastic scraper.
2.Remove bolts securing cylinder liner clamps
LRT-12-144 to cylinder block and remove
clamps.
CAUTION: Do not rotate crankshaft.
3.Clean cylinder block face and dowel holes.
4.Clean cylinder head bolts and wipe dry.
5.Lightly lubricate threads and beneath heads of
cylinder head bolts with clean engine oil.
6.Check that fitted height of dowels is between 10
to 11 mm (0.40 to 0.43 in) above cylinder block
top face. Replace dowels if fitted height is
incorrect.
7.Fit new cylinder head gasket onto cylinder
block with the word 'TOP' uppermost.
8.With assistance, fit cylinder head and carefully
position LH inlet to RH inlet manifold.
9.Carefully enter cylinder head bolts, DO NOT
DROP. Screw bolts into place by hand.
Page 267 of 1007
ENGINE - K SERIES KV6
12-3-90 OVERHAUL
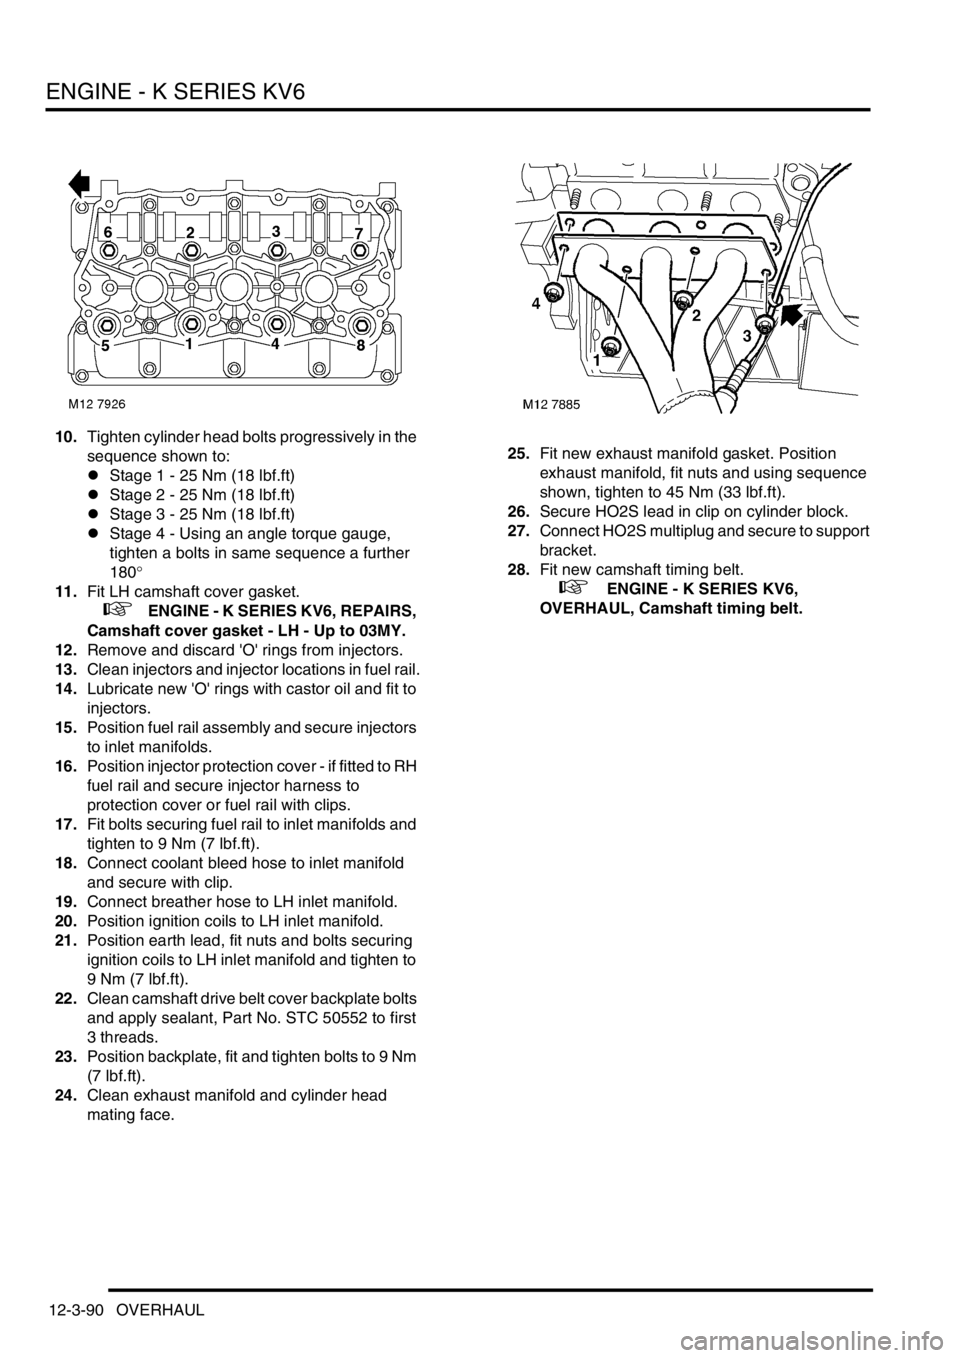
10.Tighten cylinder head bolts progressively in the
sequence shown to:
lStage 1 - 25 Nm (18 lbf.ft)
lStage 2 - 25 Nm (18 lbf.ft)
lStage 3 - 25 Nm (18 lbf.ft)
lStage 4 - Using an angle torque gauge,
tighten a bolts in same sequence a further
180°
11.Fit LH camshaft cover gasket.
+ ENGINE - K SERIES KV6, REPAIRS,
Camshaft cover gasket - LH - Up to 03MY.
12.Remove and discard 'O' rings from injectors.
13.Clean injectors and injector locations in fuel rail.
14.Lubricate new 'O' rings with castor oil and fit to
injectors.
15.Position fuel rail assembly and secure injectors
to inlet manifolds.
16.Position injector protection cover - if fitted to RH
fuel rail and secure injector harness to
protection cover or fuel rail with clips.
17.Fit bolts securing fuel rail to inlet manifolds and
tighten to 9 Nm (7 lbf.ft).
18.Connect coolant bleed hose to inlet manifold
and secure with clip.
19.Connect breather hose to LH inlet manifold.
20.Position ignition coils to LH inlet manifold.
21.Position earth lead, fit nuts and bolts securing
ignition coils to LH inlet manifold and tighten to
9 Nm (7 lbf.ft).
22.Clean camshaft drive belt cover backplate bolts
and apply sealant, Part No. STC 50552 to first
3 threads.
23.Position backplate, fit and tighten bolts to 9 Nm
(7 lbf.ft).
24.Clean exhaust manifold and cylinder head
mating face.25.Fit new exhaust manifold gasket. Position
exhaust manifold, fit nuts and using sequence
shown, tighten to 45 Nm (33 lbf.ft).
26.Secure HO2S lead in clip on cylinder block.
27.Connect HO2S multiplug and secure to support
bracket.
28.Fit new camshaft timing belt.
+ ENGINE - K SERIES KV6,
OVERHAUL, Camshaft timing belt.
Page 268 of 1007
ENGINE - K SERIES KV6
OVERHAUL 12-3-91
Cylinder head gasket - RH
$% 12.29.03.01
Remove
1.Remove inlet manifold chamber.
+ MANIFOLDS & EXHAUST SYSTEMS
- K SERIES KV6, OVERHAUL, Seals -
manifold chamber - up to 03MY.
2.Remove and discard camshaft timing belt.
+ ENGINE - K SERIES KV6,
OVERHAUL, Camshaft timing belt.
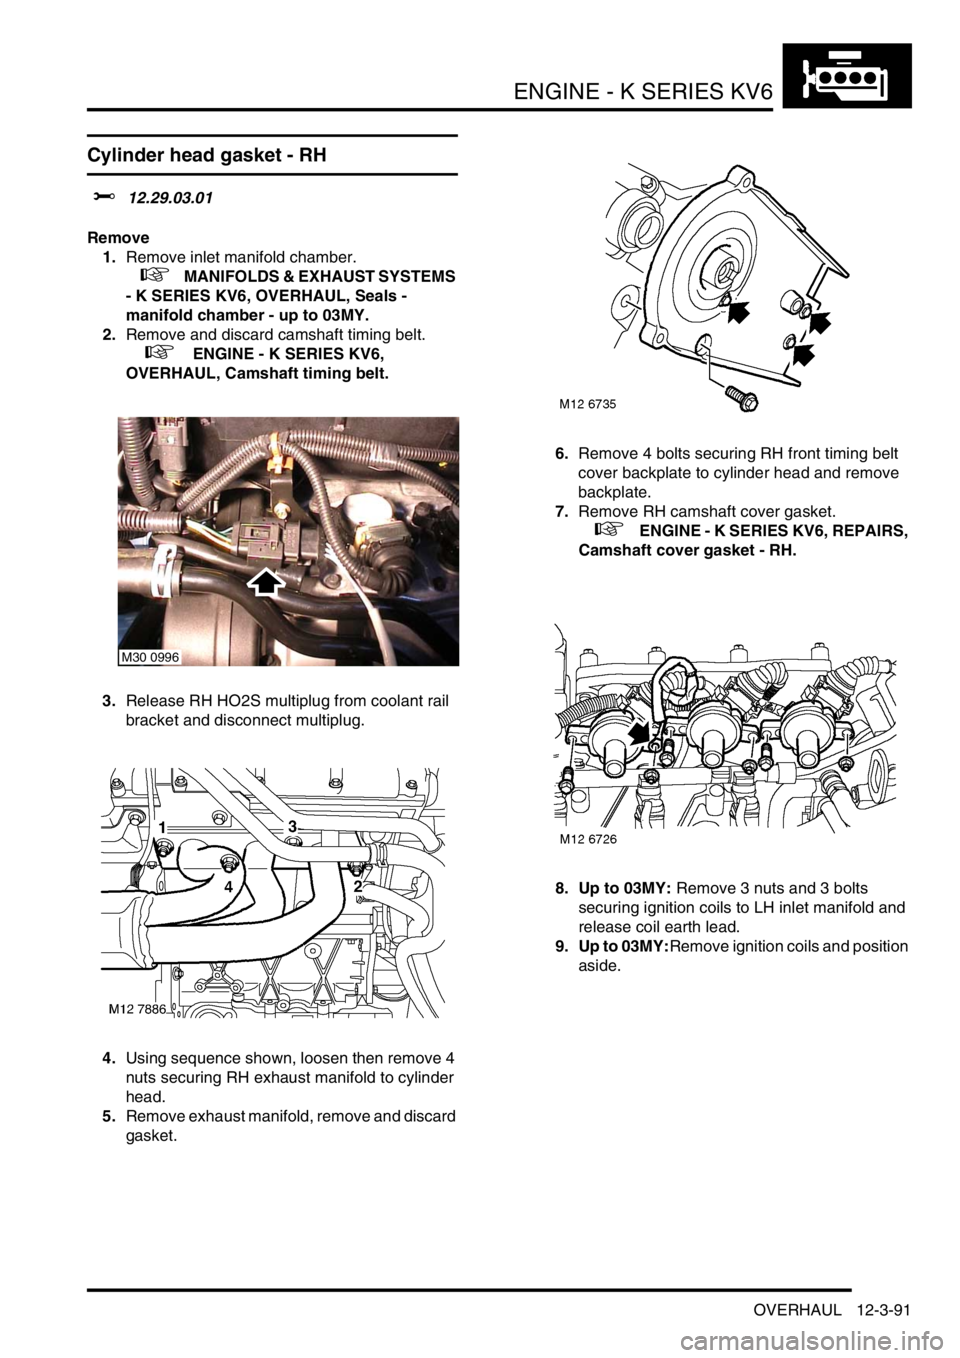
3.Release RH HO2S multiplug from coolant rail
bracket and disconnect multiplug.
4.Using sequence shown, loosen then remove 4
nuts securing RH exhaust manifold to cylinder
head.
5.Remove exhaust manifold, remove and discard
gasket.6.Remove 4 bolts securing RH front timing belt
cover backplate to cylinder head and remove
backplate.
7.Remove RH camshaft cover gasket.
+ ENGINE - K SERIES KV6, REPAIRS,
Camshaft cover gasket - RH.
8. Up to 03MY: Remove 3 nuts and 3 bolts
securing ignition coils to LH inlet manifold and
release coil earth lead.
9. Up to 03MY:Remove ignition coils and position
aside.
M30 0996
Page 269 of 1007
ENGINE - K SERIES KV6
12-3-92 OVERHAUL
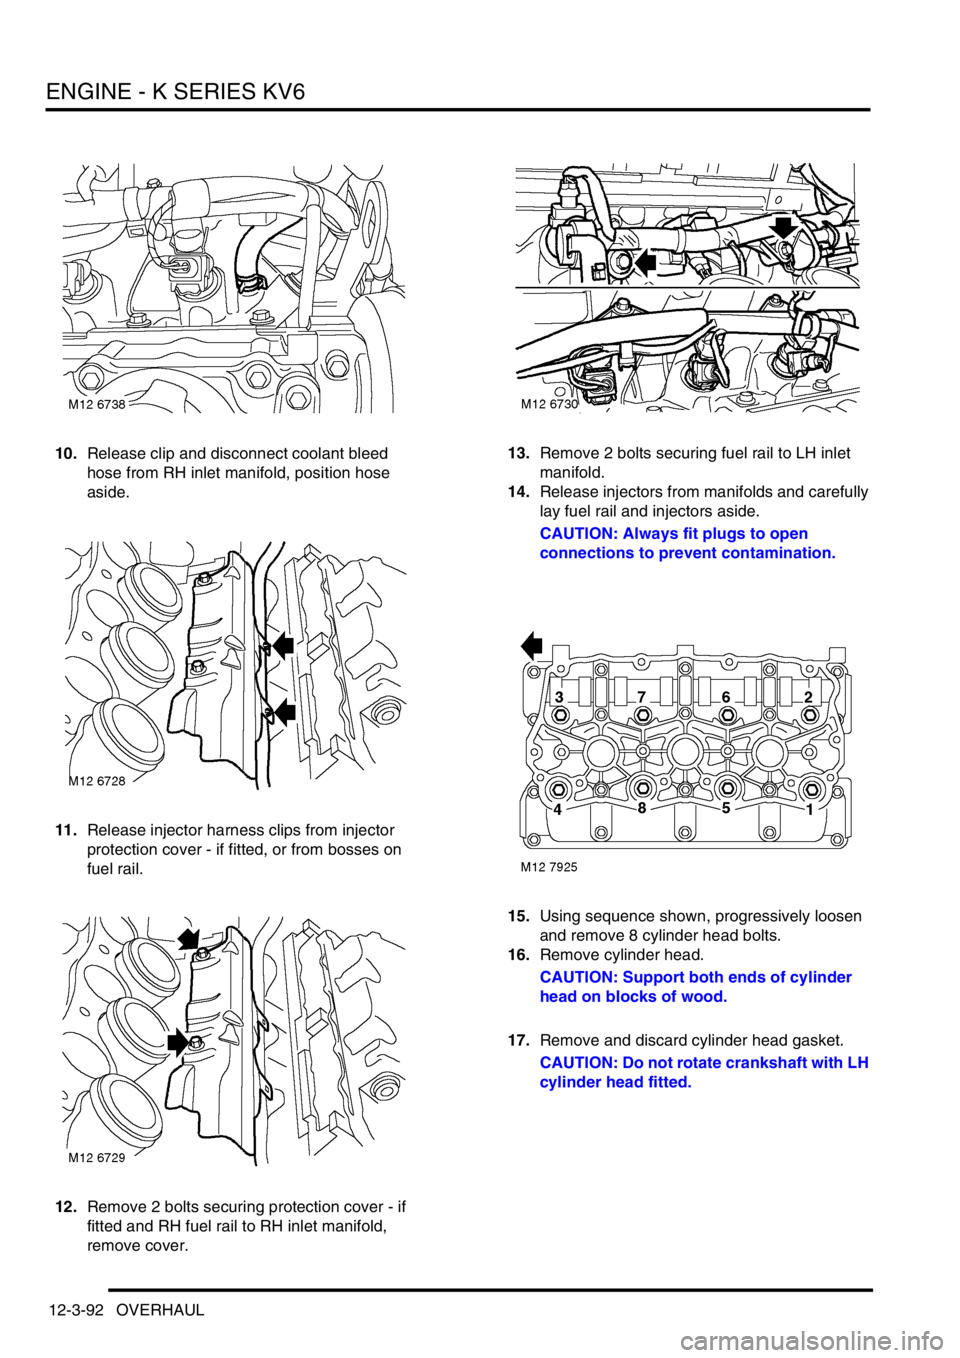
10.Release clip and disconnect coolant bleed
hose from RH inlet manifold, position hose
aside.
11.Release injector harness clips from injector
protection cover - if fitted, or from bosses on
fuel rail.
12.Remove 2 bolts securing protection cover - if
fitted and RH fuel rail to RH inlet manifold,
remove cover.13.Remove 2 bolts securing fuel rail to LH inlet
manifold.
14.Release injectors from manifolds and carefully
lay fuel rail and injectors aside.
CAUTION: Always fit plugs to open
connections to prevent contamination.
15.Using sequence shown, progressively loosen
and remove 8 cylinder head bolts.
16.Remove cylinder head.
CAUTION: Support both ends of cylinder
head on blocks of wood.
17.Remove and discard cylinder head gasket.
CAUTION: Do not rotate crankshaft with LH
cylinder head fitted.
Page 270 of 1007
ENGINE - K SERIES KV6
OVERHAUL 12-3-93
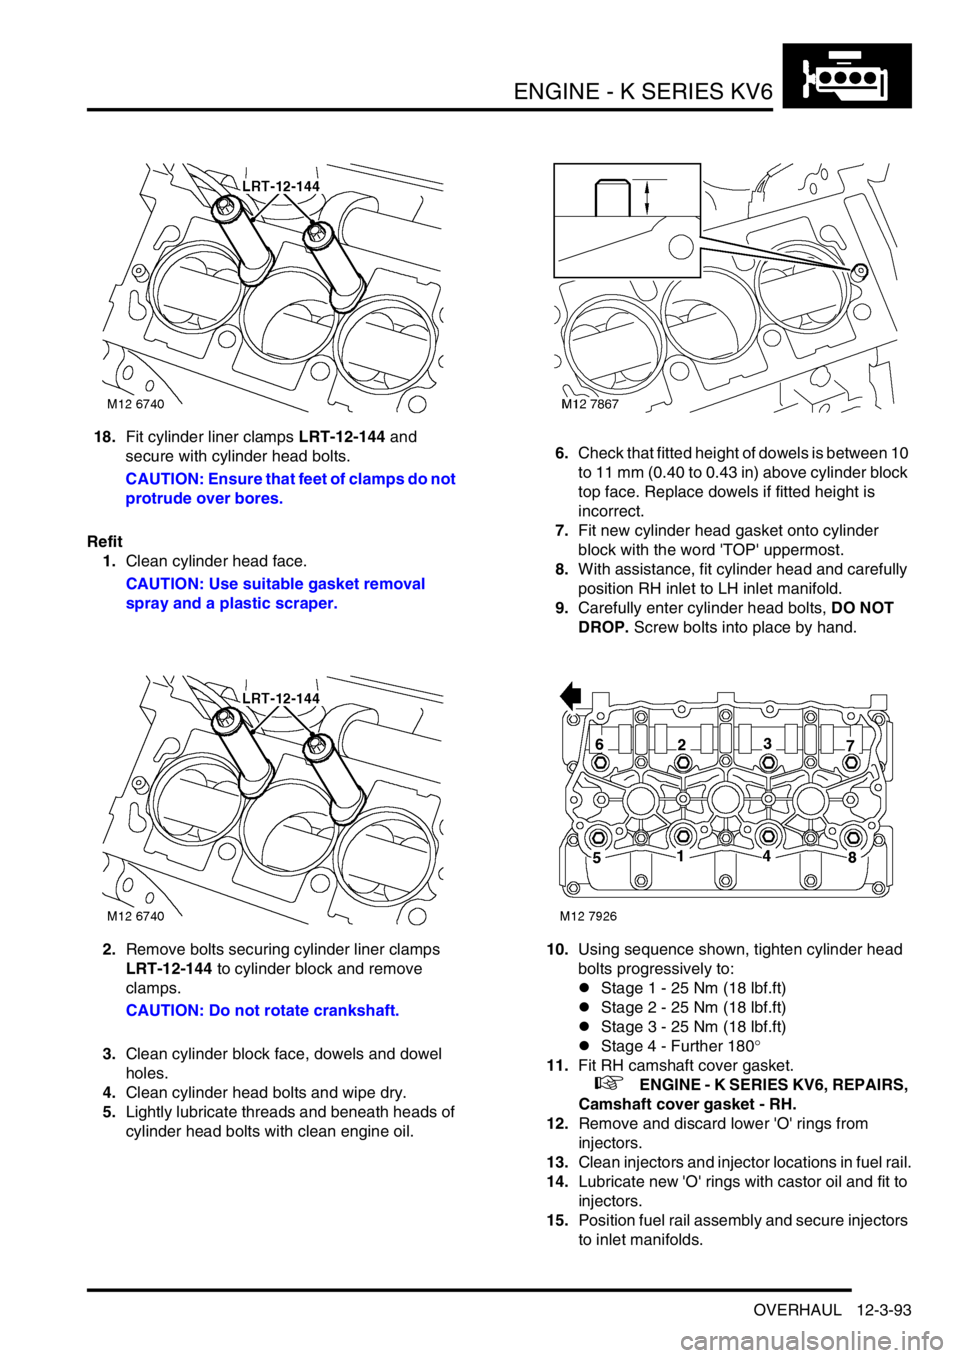
18.Fit cylinder liner clamps LRT-12-144 and
secure with cylinder head bolts.
CAUTION: Ensure that feet of clamps do not
protrude over bores.
Refit
1.Clean cylinder head face.
CAUTION: Use suitable gasket removal
spray and a plastic scraper.
2.Remove bolts securing cylinder liner clamps
LRT-12-144 to cylinder block and remove
clamps.
CAUTION: Do not rotate crankshaft.
3.Clean cylinder block face, dowels and dowel
holes.
4.Clean cylinder head bolts and wipe dry.
5.Lightly lubricate threads and beneath heads of
cylinder head bolts with clean engine oil.6.Check that fitted height of dowels is between 10
to 11 mm (0.40 to 0.43 in) above cylinder block
top face. Replace dowels if fitted height is
incorrect.
7.Fit new cylinder head gasket onto cylinder
block with the word 'TOP' uppermost.
8.With assistance, fit cylinder head and carefully
position RH inlet to LH inlet manifold.
9.Carefully enter cylinder head bolts, DO NOT
DROP. Screw bolts into place by hand.
10.Using sequence shown, tighten cylinder head
bolts progressively to:
lStage 1 - 25 Nm (18 lbf.ft)
lStage 2 - 25 Nm (18 lbf.ft)
lStage 3 - 25 Nm (18 lbf.ft)
lStage 4 - Further 180°
11.Fit RH camshaft cover gasket.
+ ENGINE - K SERIES KV6, REPAIRS,
Camshaft cover gasket - RH.
12.Remove and discard lower 'O' rings from
injectors.
13.Clean injectors and injector locations in fuel rail.
14.Lubricate new 'O' rings with castor oil and fit to
injectors.
15.Position fuel rail assembly and secure injectors
to inlet manifolds.