LAND ROVER FREELANDER 2001 Workshop Manual
Manufacturer: LAND ROVER, Model Year: 2001, Model line: FREELANDER, Model: LAND ROVER FREELANDER 2001Pages: 1007, PDF Size: 23.47 MB
Page 711 of 1007
SEATS
76-5-16 REPAIRS
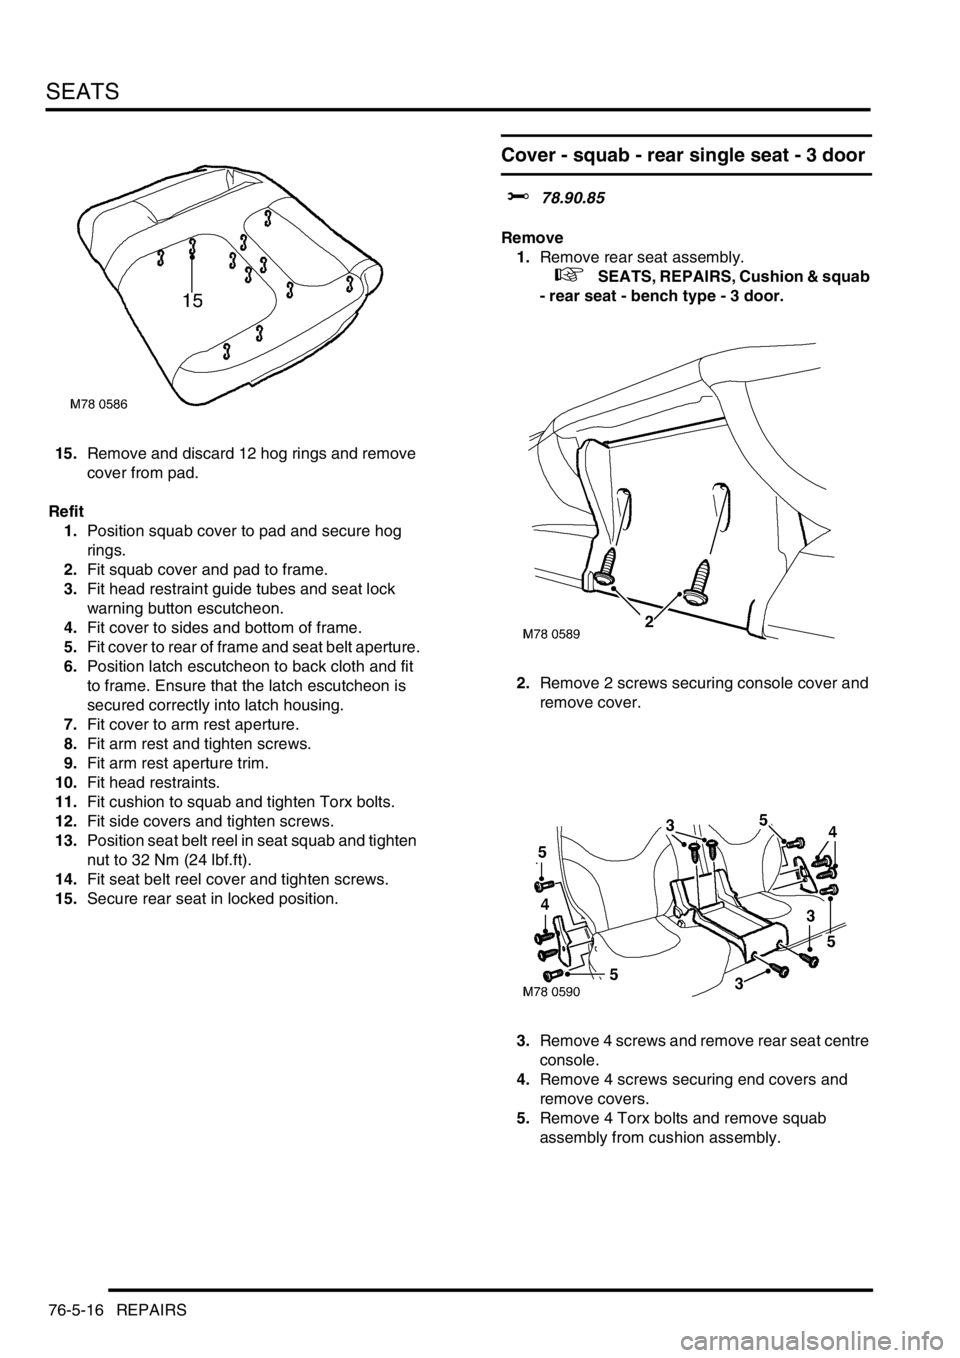
15.Remove and discard 12 hog rings and remove
cover from pad.
Refit
1.Position squab cover to pad and secure hog
rings.
2.Fit squab cover and pad to frame.
3.Fit head restraint guide tubes and seat lock
warning button escutcheon.
4.Fit cover to sides and bottom of frame.
5.Fit cover to rear of frame and seat belt aperture.
6.Position latch escutcheon to back cloth and fit
to frame. Ensure that the latch escutcheon is
secured correctly into latch housing.
7.Fit cover to arm rest aperture.
8.Fit arm rest and tighten screws.
9.Fit arm rest aperture trim.
10.Fit head restraints.
11.Fit cushion to squab and tighten Torx bolts.
12.Fit side covers and tighten screws.
13.Position seat belt reel in seat squab and tighten
nut to 32 Nm (24 lbf.ft).
14.Fit seat belt reel cover and tighten screws.
15.Secure rear seat in locked position.
Cover - squab - rear single seat - 3 door
$% 78.90.85
Remove
1.Remove rear seat assembly.
+ SEATS, REPAIRS, Cushion & squab
- rear seat - bench type - 3 door.
2.Remove 2 screws securing console cover and
remove cover.
3.Remove 4 screws and remove rear seat centre
console.
4.Remove 4 screws securing end covers and
remove covers.
5.Remove 4 Torx bolts and remove squab
assembly from cushion assembly.
Page 712 of 1007
SEATS
REPAIRS 76-5-17
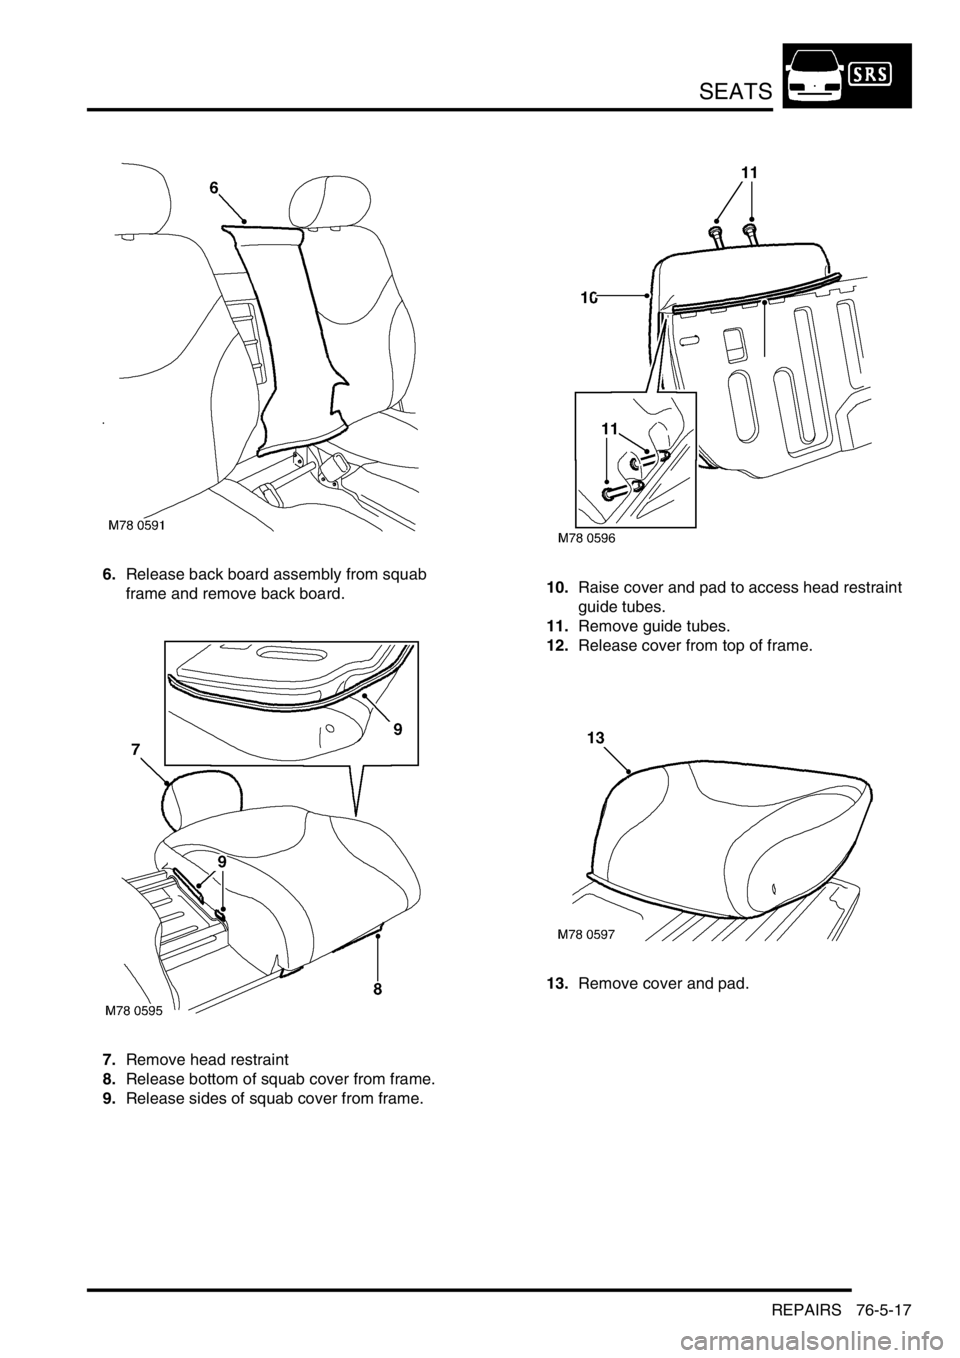
6.Release back board assembly from squab
frame and remove back board.
7.Remove head restraint
8.Release bottom of squab cover from frame.
9.Release sides of squab cover from frame.10.Raise cover and pad to access head restraint
guide tubes.
11.Remove guide tubes.
12.Release cover from top of frame.
13.Remove cover and pad.
Page 713 of 1007
SEATS
76-5-18 REPAIRS
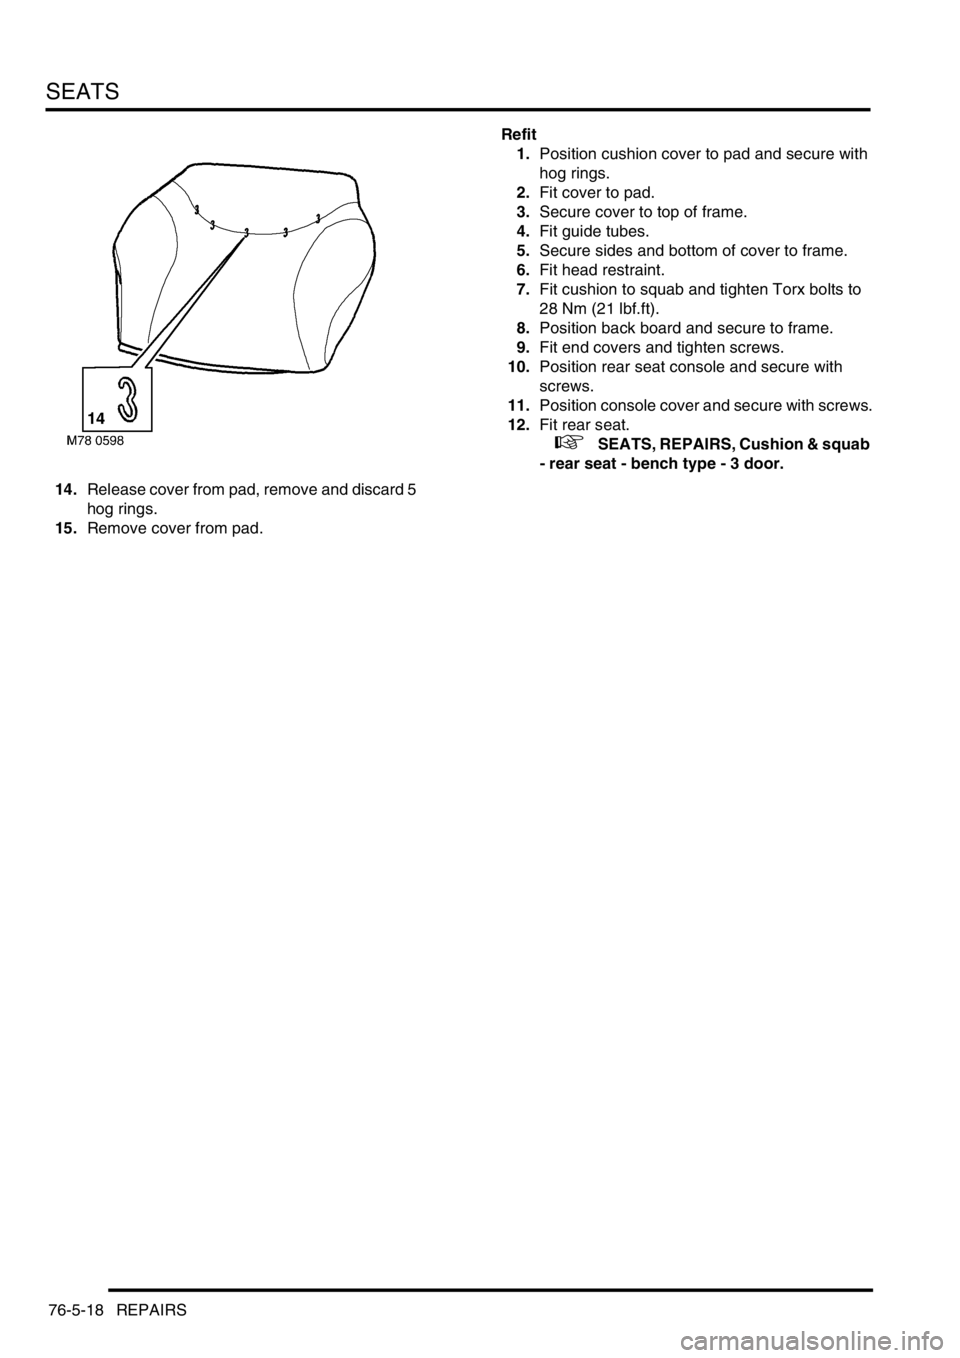
14.Release cover from pad, remove and discard 5
hog rings.
15.Remove cover from pad.Refit
1.Position cushion cover to pad and secure with
hog rings.
2.Fit cover to pad.
3.Secure cover to top of frame.
4.Fit guide tubes.
5.Secure sides and bottom of cover to frame.
6.Fit head restraint.
7.Fit cushion to squab and tighten Torx bolts to
28 Nm (21 lbf.ft).
8.Position back board and secure to frame.
9.Fit end covers and tighten screws.
10.Position rear seat console and secure with
screws.
11.Position console cover and secure with screws.
12.Fit rear seat.
+ SEATS, REPAIRS, Cushion & squab
- rear seat - bench type - 3 door.
Page 714 of 1007
SUNROOF
REPAIRS 76-6-1
SUNROOF REPAIRS
Sun/sliding roof - complete - front - 3
door
$% 76.83.01
Remove
1.Remove headlining.
+ INTERIOR TRIM COMPONENTS,
REPAIRS, Headlining - 3 door.
WARNING: Wear protective gloves when
handling glass, solvents and primers.
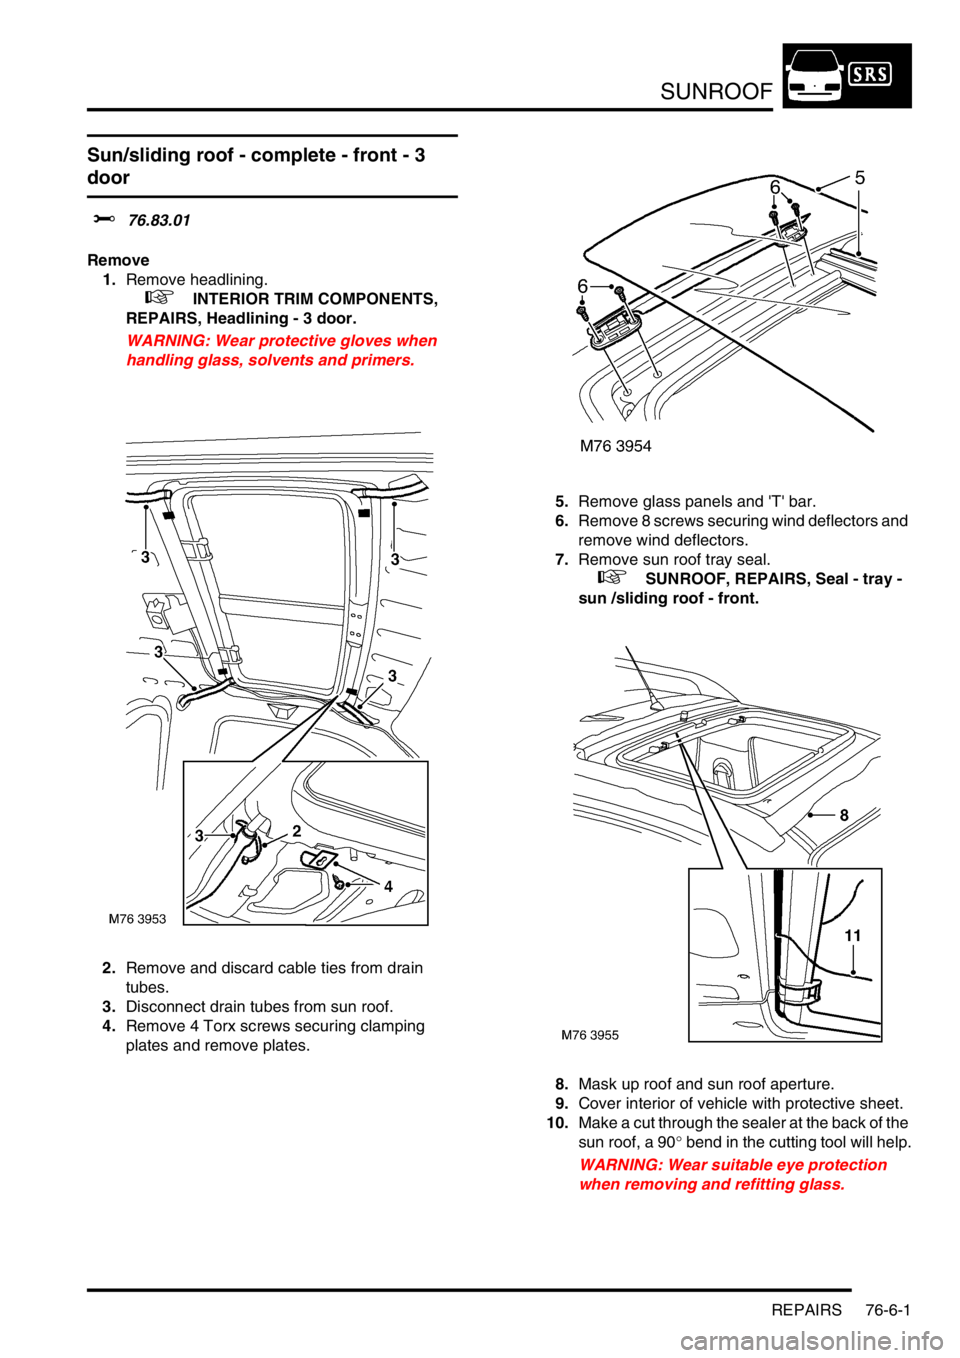
2.Remove and discard cable ties from drain
tubes.
3.Disconnect drain tubes from sun roof.
4.Remove 4 Torx screws securing clamping
plates and remove plates.5.Remove glass panels and 'T' bar.
6.Remove 8 screws securing wind deflectors and
remove wind deflectors.
7.Remove sun roof tray seal.
+ SUNROOF, REPAIRS, Seal - tray -
sun /sliding roof - front.
8.Mask up roof and sun roof aperture.
9.Cover interior of vehicle with protective sheet.
10.Make a cut through the sealer at the back of the
sun roof, a 90° bend in the cutting tool will help.
WARNING: Wear suitable eye protection
when removing and refitting glass.
Page 715 of 1007
SUNROOF
76-6-2 REPAIRS
11.Using suitable cutting wire, cut through PU
sealer securing sun roof to roof.
NOTE: If multi-strand cutting wire is used, a
sawing action can be used to cut through heavy
sealant deposits around corners.
12.Remove sun roof.
Refit
1.Clean surrounding area with solvent.
WARNING: Wear protective gloves when
handling glass, solvents and primers.
2.Use a vacuum cleaner to clear away any waste.
3.Cut sealer on roof flange down to a smooth
even finish.
4.Etch prime and paint any damaged areas.
5.Apply primer over etch primer on flange.
6.Apply activator over old sealer on flange.
7.Allow activator to cure.
8.Fit pre-cut nozzle to sealer cartridge, remove
lid, shake out crystals and fit cartridge to
applicator gun. If necessary modify the nozzle
to achieve required bead section.
9.Apply a continuous bead of sealer around roof
flange. Make bead slightly thicker at the
corners.
10.Check for breaks and air bubbles in sealer.
11.With assistance position sunroof and align to
roof aperture.
12.Fit sunroof tray seal.
+ SUNROOF, REPAIRS, Seal - tray -
sun /sliding roof - front.
13.Position sunroof clamping plates, fit and tighten
screws.
14.Connect drain tubes and secure with new cable
ties.
15.Remove body and trim protection.
16.Position wind deflectors, fit and tighten screws.
17.Fit 'T' bar and glass panels.
18.Fit headlining.
+ INTERIOR TRIM COMPONENTS,
REPAIRS, Headlining - 3 door.
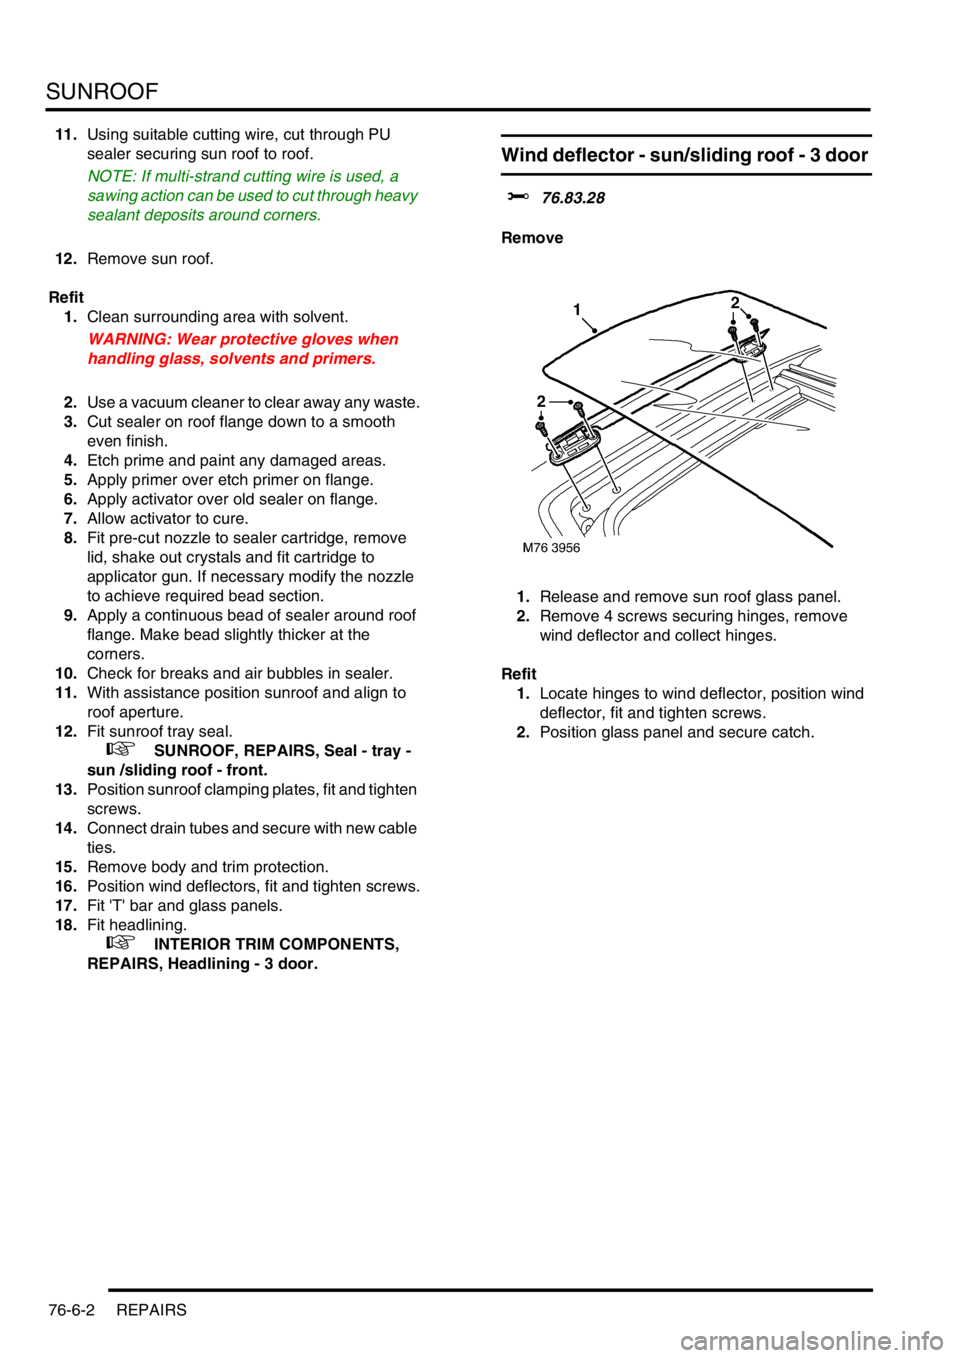
Wind deflector - sun/sliding roof - 3 door
$% 76.83.28
Remove
1.Release and remove sun roof glass panel.
2.Remove 4 screws securing hinges, remove
wind deflector and collect hinges.
Refit
1.Locate hinges to wind deflector, position wind
deflector, fit and tighten screws.
2.Position glass panel and secure catch.
Page 716 of 1007
SUNROOF
REPAIRS 76-6-3
Seal - tray - sun /sliding roof - front
$% 76.83.61
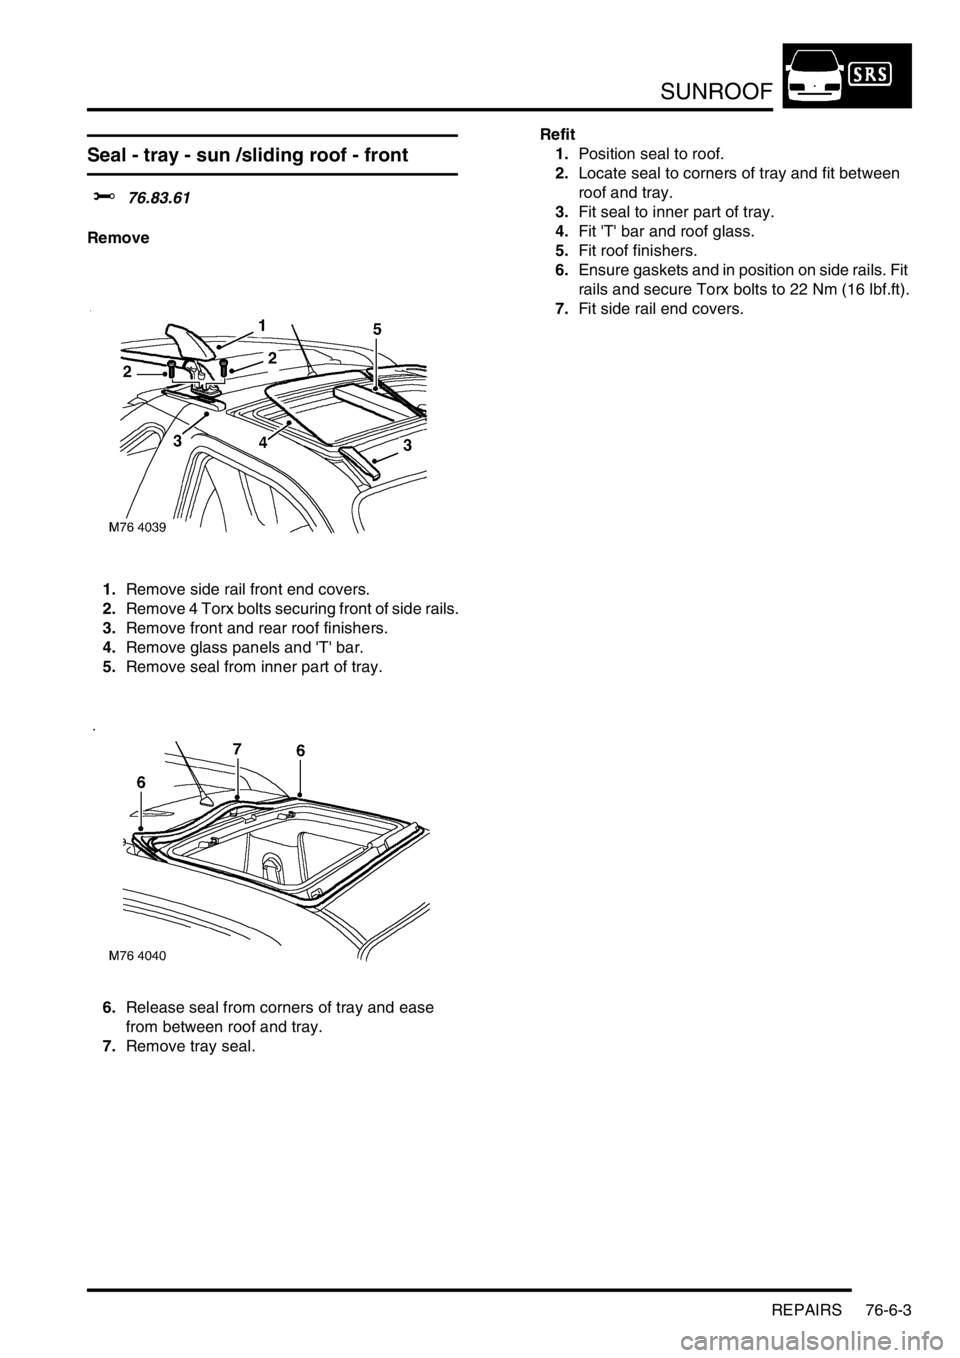
Remove
1.Remove side rail front end covers.
2.Remove 4 Torx bolts securing front of side rails.
3.Remove front and rear roof finishers.
4.Remove glass panels and 'T' bar.
5.Remove seal from inner part of tray.
6.Release seal from corners of tray and ease
from between roof and tray.
7.Remove tray seal.Refit
1.Position seal to roof.
2.Locate seal to corners of tray and fit between
roof and tray.
3.Fit seal to inner part of tray.
4.Fit 'T' bar and roof glass.
5.Fit roof finishers.
6.Ensure gaskets and in position on side rails. Fit
rails and secure Torx bolts to 22 Nm (16 lbf.ft).
7.Fit side rail end covers.
Page 717 of 1007
SUNROOF
76-6-4 REPAIRS
Sun/sliding roof - complete - front - 5
door
$% 76.84.01
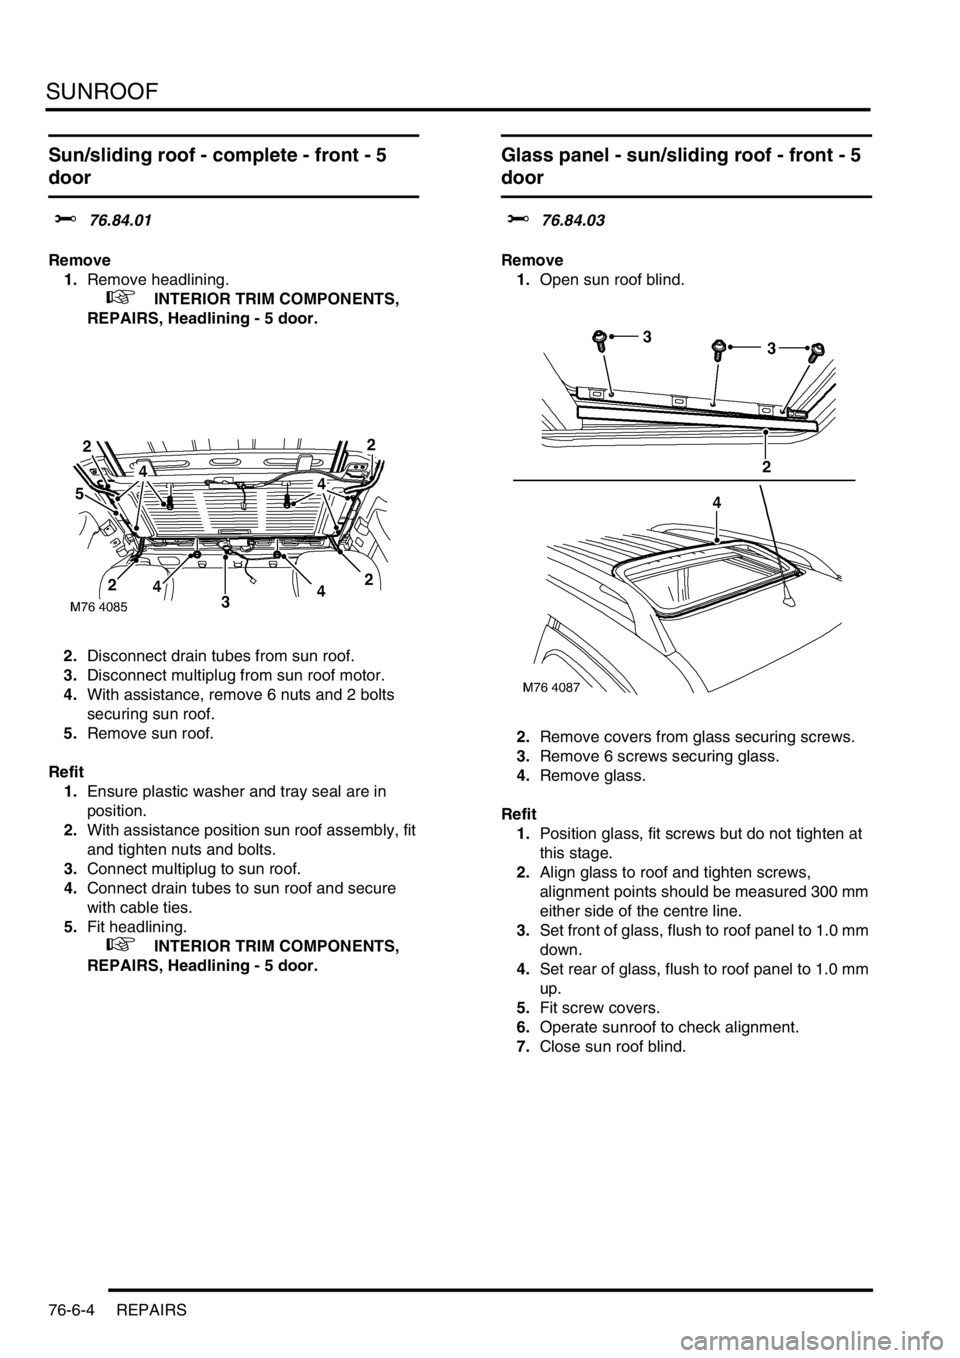
Remove
1.Remove headlining.
+ INTERIOR TRIM COMPONENTS,
REPAIRS, Headlining - 5 door.
2.Disconnect drain tubes from sun roof.
3.Disconnect multiplug from sun roof motor.
4.With assistance, remove 6 nuts and 2 bolts
securing sun roof.
5.Remove sun roof.
Refit
1.Ensure plastic washer and tray seal are in
position.
2.With assistance position sun roof assembly, fit
and tighten nuts and bolts.
3.Connect multiplug to sun roof.
4.Connect drain tubes to sun roof and secure
with cable ties.
5.Fit headlining.
+ INTERIOR TRIM COMPONENTS,
REPAIRS, Headlining - 5 door.
Glass panel - sun/sliding roof - front - 5
door
$% 76.84.03
Remove
1.Open sun roof blind.
2.Remove covers from glass securing screws.
3.Remove 6 screws securing glass.
4.Remove glass.
Refit
1.Position glass, fit screws but do not tighten at
this stage.
2.Align glass to roof and tighten screws,
alignment points should be measured 300 mm
either side of the centre line.
3.Set front of glass, flush to roof panel to 1.0 mm
down.
4.Set rear of glass, flush to roof panel to 1.0 mm
up.
5.Fit screw covers.
6.Operate sunroof to check alignment.
7.Close sun roof blind.
Page 718 of 1007
SUNROOF
REPAIRS 76-6-5
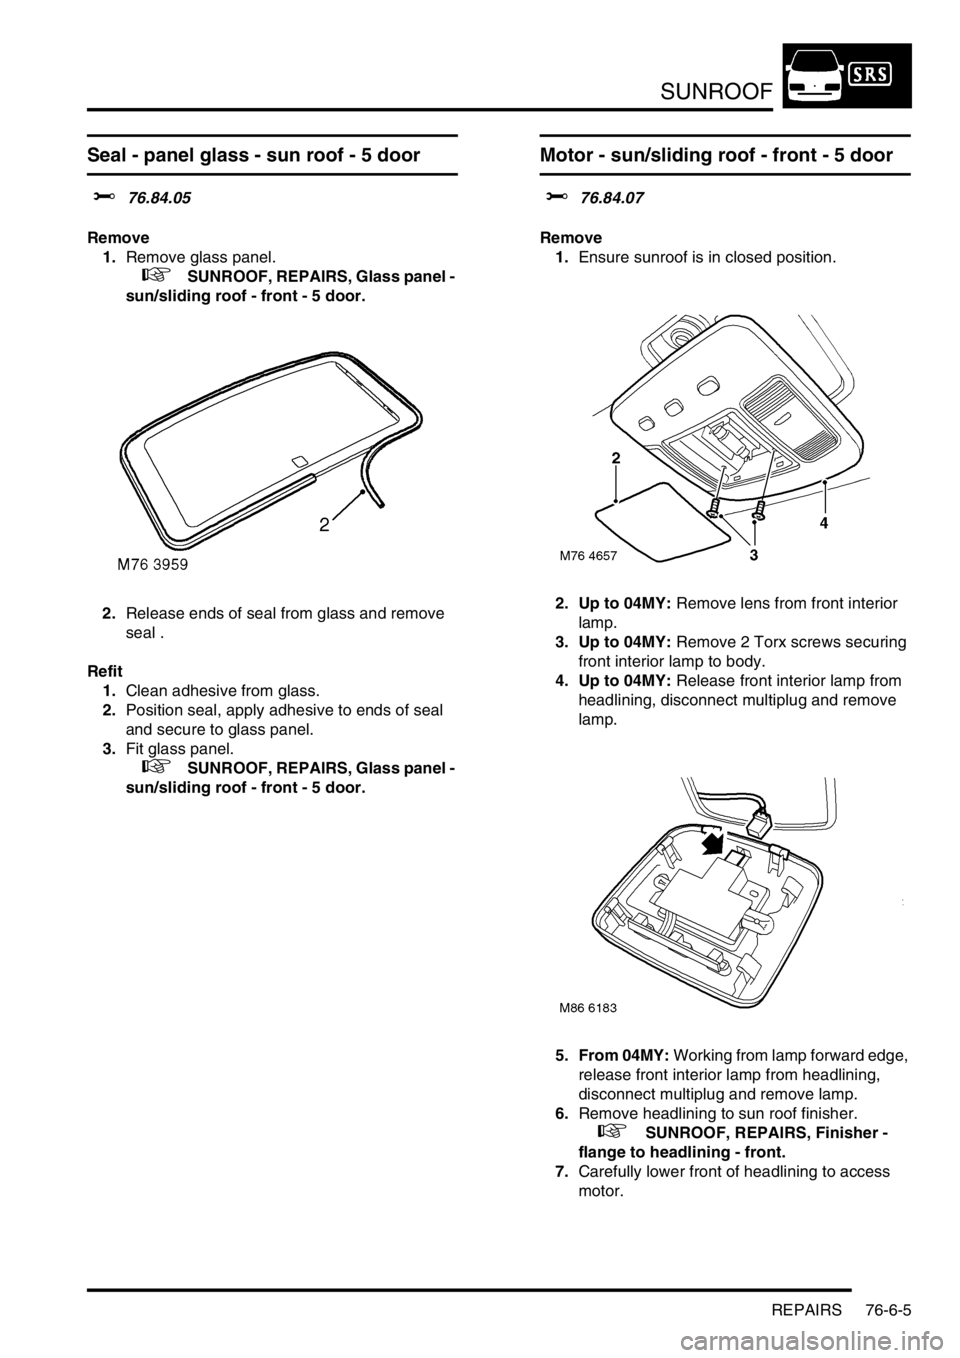
Seal - panel glass - sun roof - 5 door
$% 76.84.05
Remove
1.Remove glass panel.
+ SUNROOF, REPAIRS, Glass panel -
sun/sliding roof - front - 5 door.
2.Release ends of seal from glass and remove
seal .
Refit
1.Clean adhesive from glass.
2.Position seal, apply adhesive to ends of seal
and secure to glass panel.
3.Fit glass panel.
+ SUNROOF, REPAIRS, Glass panel -
sun/sliding roof - front - 5 door.
Motor - sun/sliding roof - front - 5 door
$% 76.84.07
Remove
1.Ensure sunroof is in closed position.
2. Up to 04MY: Remove lens from front interior
lamp.
3. Up to 04MY: Remove 2 Torx screws securing
front interior lamp to body.
4. Up to 04MY: Release front interior lamp from
headlining, disconnect multiplug and remove
lamp.
5. From 04MY: Working from lamp forward edge,
release front interior lamp from headlining,
disconnect multiplug and remove lamp.
6.Remove headlining to sun roof finisher.
+ SUNROOF, REPAIRS, Finisher -
flange to headlining - front.
7.Carefully lower front of headlining to access
motor.
Page 719 of 1007
SUNROOF
76-6-6 REPAIRS
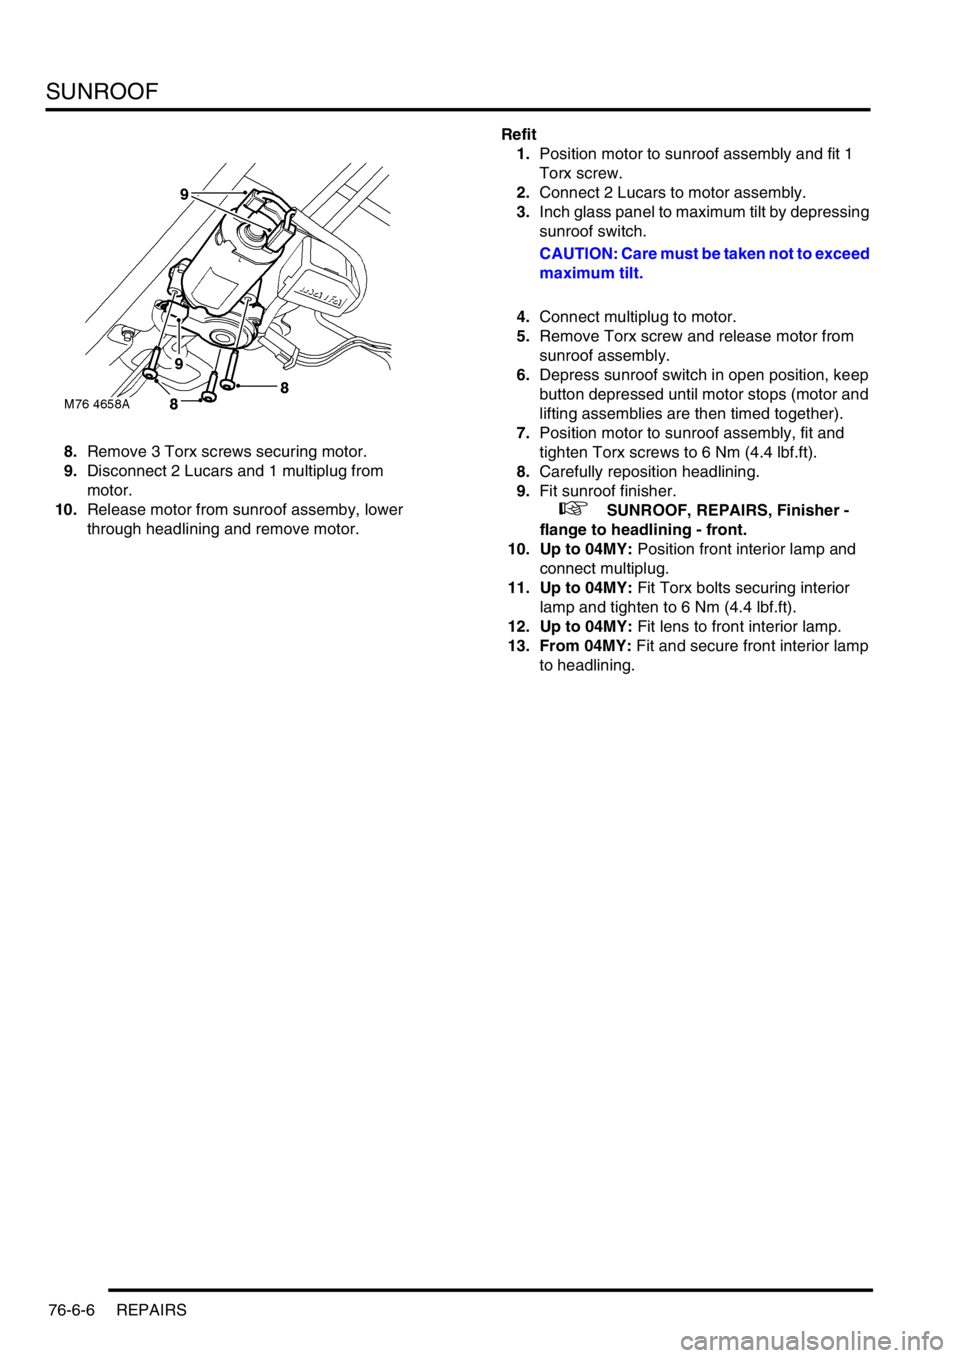
8.Remove 3 Torx screws securing motor.
9.Disconnect 2 Lucars and 1 multiplug from
motor.
10.Release motor from sunroof assemby, lower
through headlining and remove motor.Refit
1.Position motor to sunroof assembly and fit 1
Torx screw.
2.Connect 2 Lucars to motor assembly.
3.Inch glass panel to maximum tilt by depressing
sunroof switch.
CAUTION: Care must be taken not to exceed
maximum tilt.
4.Connect multiplug to motor.
5.Remove Torx screw and release motor from
sunroof assembly.
6.Depress sunroof switch in open position, keep
button depressed until motor stops (motor and
lifting assemblies are then timed together).
7.Position motor to sunroof assembly, fit and
tighten Torx screws to 6 Nm (4.4 lbf.ft).
8.Carefully reposition headlining.
9.Fit sunroof finisher.
+ SUNROOF, REPAIRS, Finisher -
flange to headlining - front.
10. Up to 04MY: Position front interior lamp and
connect multiplug.
11. Up to 04MY: Fit Torx bolts securing interior
lamp and tighten to 6 Nm (4.4 lbf.ft).
12. Up to 04MY: Fit lens to front interior lamp.
13. From 04MY: Fit and secure front interior lamp
to headlining.
Page 720 of 1007
SUNROOF
REPAIRS 76-6-7
Drive cables & slide assemblies - sun/
sliding roof - front - 5 door
$% 76.84.09
Remove
1.Remove glass panel.
+ SUNROOF, REPAIRS, Glass panel -
sun/sliding roof - front - 5 door.
2.Open sun roof.
3.Release and remove wind deflector.
4.Position sun roof in tilt mode.
If sun roof motor is inoperative, use a tool to
manually tilt sun roof.
5.Remove sun roof motor.
+ SUNROOF, REPAIRS, Motor - sun/
sliding roof - front - 5 door.
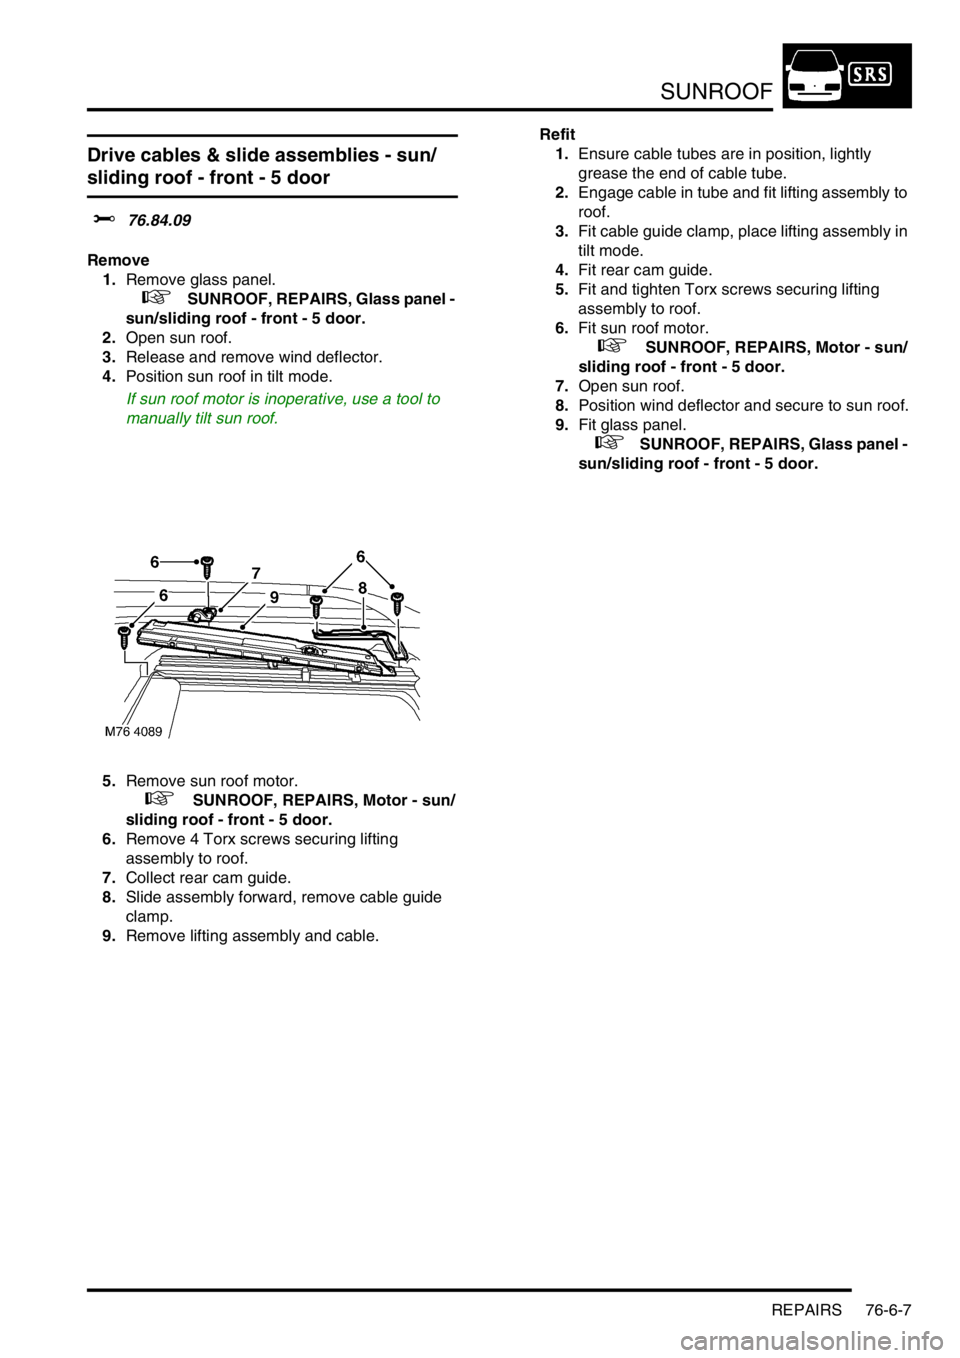
6.Remove 4 Torx screws securing lifting
assembly to roof.
7.Collect rear cam guide.
8.Slide assembly forward, remove cable guide
clamp.
9.Remove lifting assembly and cable.Refit
1.Ensure cable tubes are in position, lightly
grease the end of cable tube.
2.Engage cable in tube and fit lifting assembly to
roof.
3.Fit cable guide clamp, place lifting assembly in
tilt mode.
4.Fit rear cam guide.
5.Fit and tighten Torx screws securing lifting
assembly to roof.
6.Fit sun roof motor.
+ SUNROOF, REPAIRS, Motor - sun/
sliding roof - front - 5 door.
7.Open sun roof.
8.Position wind deflector and secure to sun roof.
9.Fit glass panel.
+ SUNROOF, REPAIRS, Glass panel -
sun/sliding roof - front - 5 door.