LAND ROVER FREELANDER 2001 Workshop Manual
Manufacturer: LAND ROVER, Model Year: 2001, Model line: FREELANDER, Model: LAND ROVER FREELANDER 2001Pages: 1007, PDF Size: 23.47 MB
Page 671 of 1007
INTERIOR TRIM COMPONENTS
76-3-10 REPAIRS
14.Remove centre console.
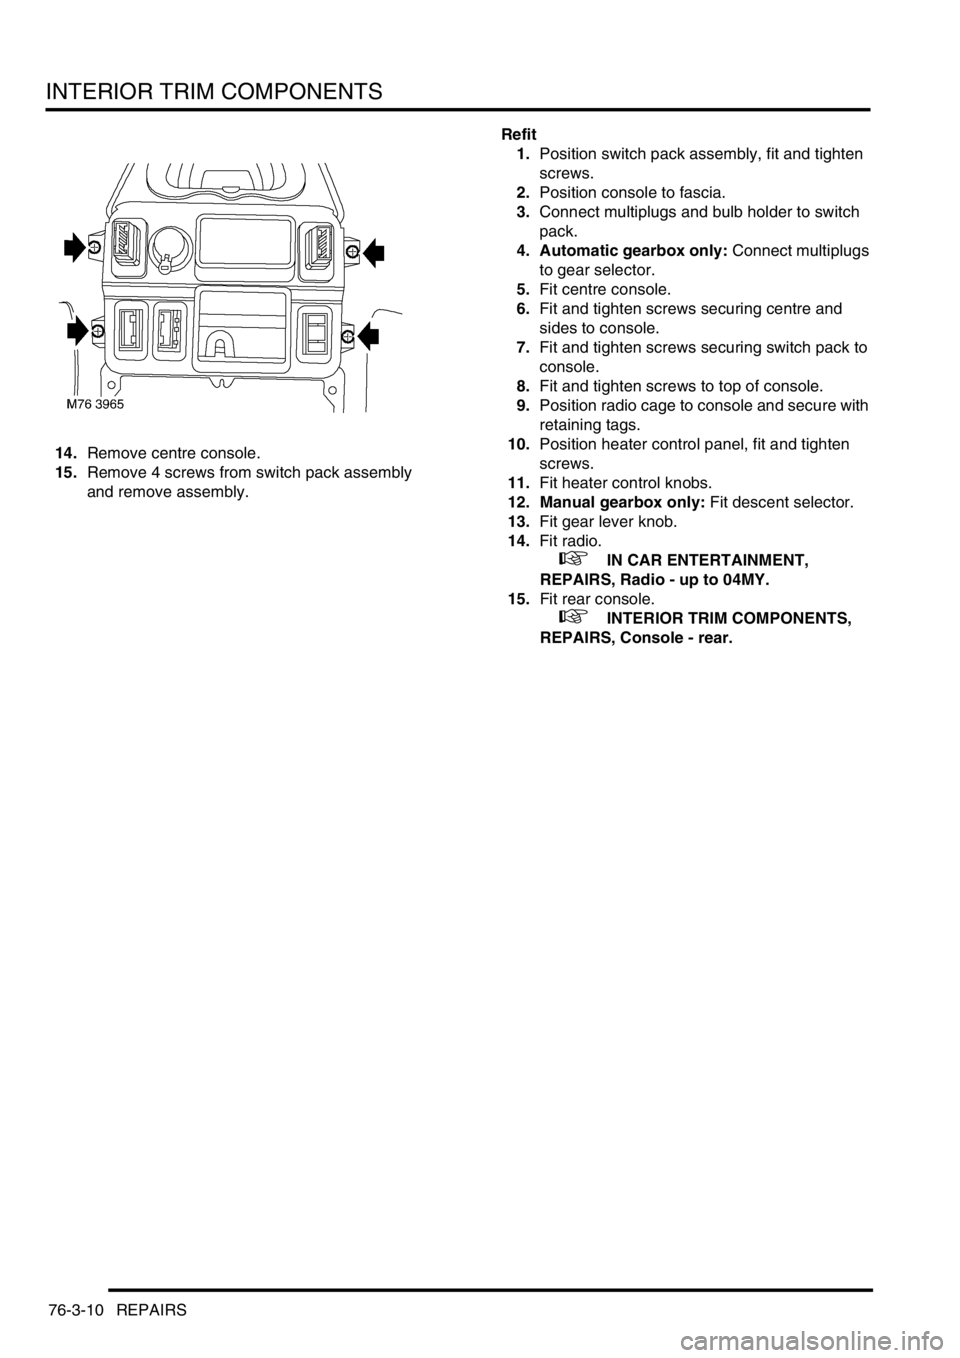
15.Remove 4 screws from switch pack assembly
and remove assembly.Refit
1.Position switch pack assembly, fit and tighten
screws.
2.Position console to fascia.
3.Connect multiplugs and bulb holder to switch
pack.
4. Automatic gearbox only: Connect multiplugs
to gear selector.
5.Fit centre console.
6.Fit and tighten screws securing centre and
sides to console.
7.Fit and tighten screws securing switch pack to
console.
8.Fit and tighten screws to top of console.
9.Position radio cage to console and secure with
retaining tags.
10.Position heater control panel, fit and tighten
screws.
11.Fit heater control knobs.
12. Manual gearbox only: Fit descent selector.
13.Fit gear lever knob.
14.Fit radio.
+ IN CAR ENTERTAINMENT,
REPAIRS, Radio - up to 04MY.
15.Fit rear console.
+ INTERIOR TRIM COMPONENTS,
REPAIRS, Console - rear.
Page 672 of 1007
INTERIOR TRIM COMPONENTS
REPAIRS 76-3-11
Console assembly - front - from 04MY
$% 76.25.01
Remove
1.Remove rear console.
+ INTERIOR TRIM COMPONENTS,
REPAIRS, Console - rear.
2.Remove gear selector indicator assembly.
+ AUTOMATIC GEARBOX - JATCO,
REPAIRS, Selector indicator - from 04MY.
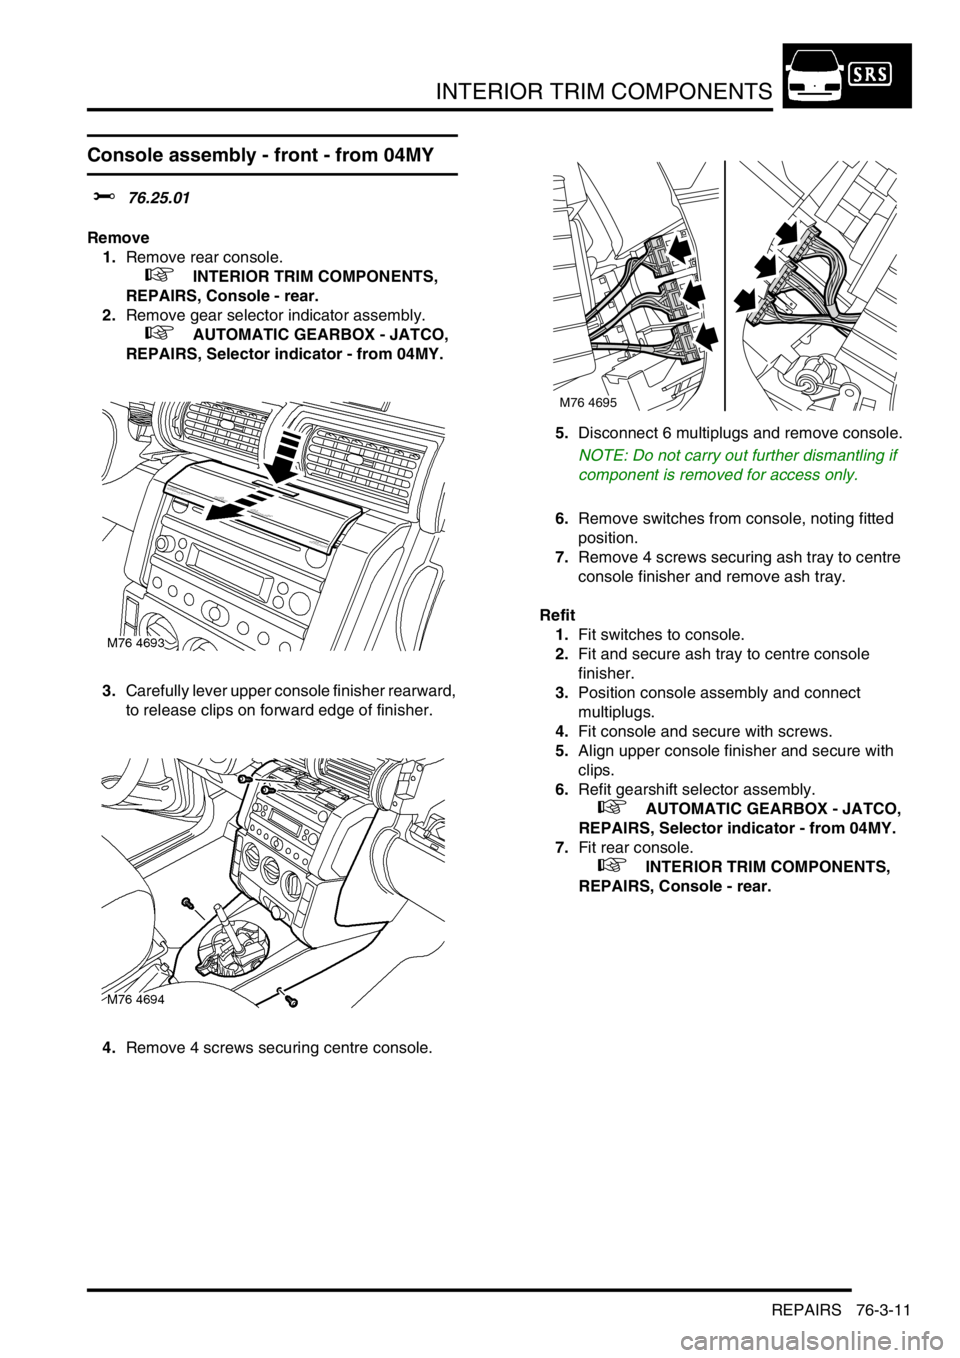
3.Carefully lever upper console finisher rearward,
to release clips on forward edge of finisher.
4.Remove 4 screws securing centre console.5.Disconnect 6 multiplugs and remove console.
NOTE: Do not carry out further dismantling if
component is removed for access only.
6.Remove switches from console, noting fitted
position.
7.Remove 4 screws securing ash tray to centre
console finisher and remove ash tray.
Refit
1.Fit switches to console.
2.Fit and secure ash tray to centre console
finisher.
3.Position console assembly and connect
multiplugs.
4.Fit console and secure with screws.
5.Align upper console finisher and secure with
clips.
6.Refit gearshift selector assembly.
+ AUTOMATIC GEARBOX - JATCO,
REPAIRS, Selector indicator - from 04MY.
7.Fit rear console.
+ INTERIOR TRIM COMPONENTS,
REPAIRS, Console - rear.
M76 4695
Page 673 of 1007
INTERIOR TRIM COMPONENTS
76-3-12 REPAIRS
Console - rear
$% 76.25.04
Remove
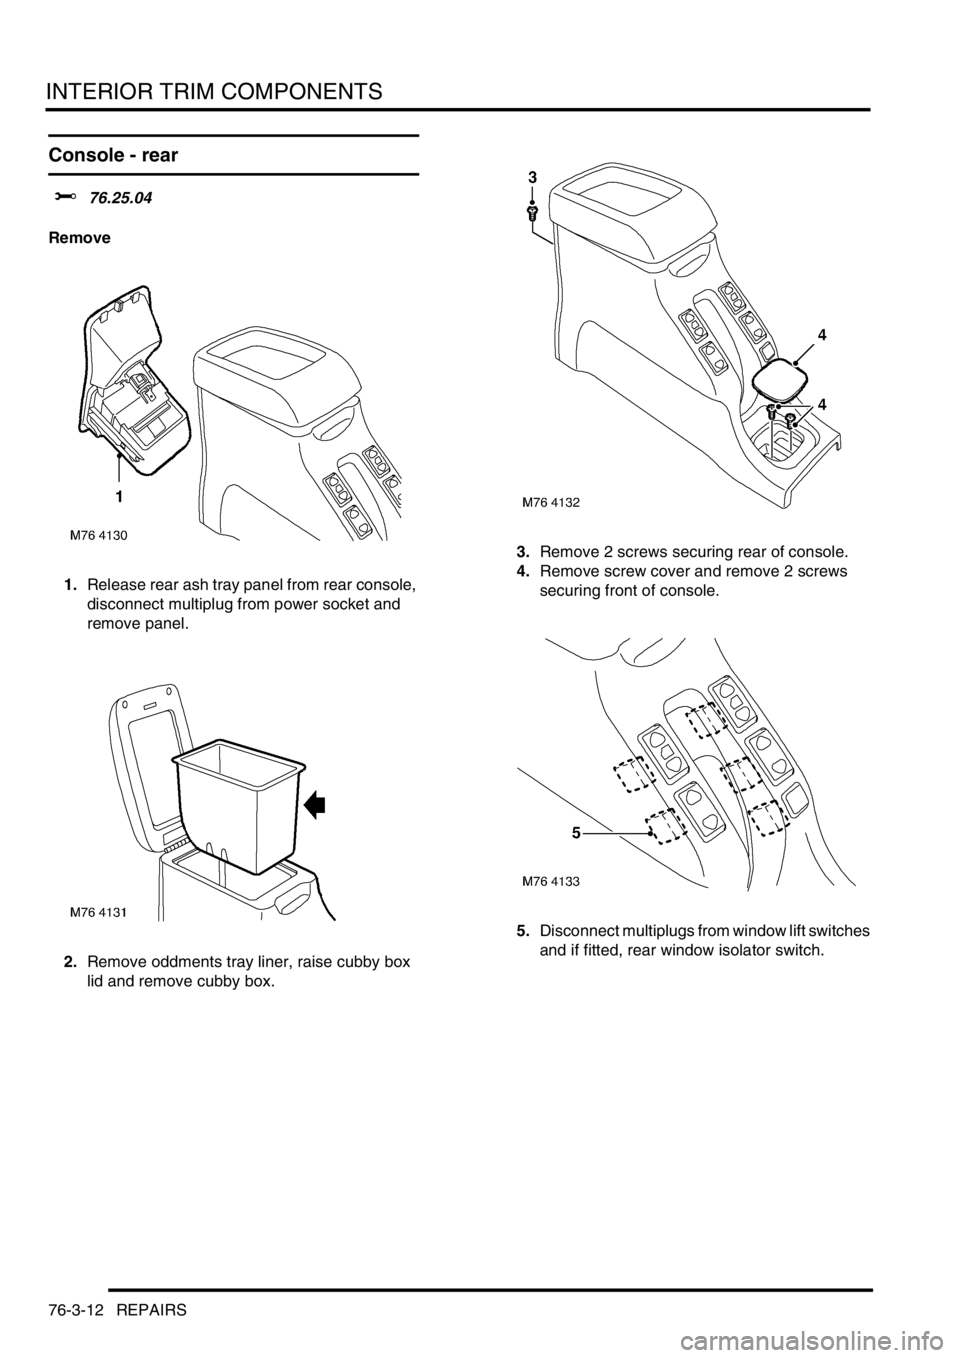
1.Release rear ash tray panel from rear console,
disconnect multiplug from power socket and
remove panel.
2.Remove oddments tray liner, raise cubby box
lid and remove cubby box.3.Remove 2 screws securing rear of console.
4.Remove screw cover and remove 2 screws
securing front of console.
5.Disconnect multiplugs from window lift switches
and if fitted, rear window isolator switch.
Page 674 of 1007
INTERIOR TRIM COMPONENTS
REPAIRS 76-3-13
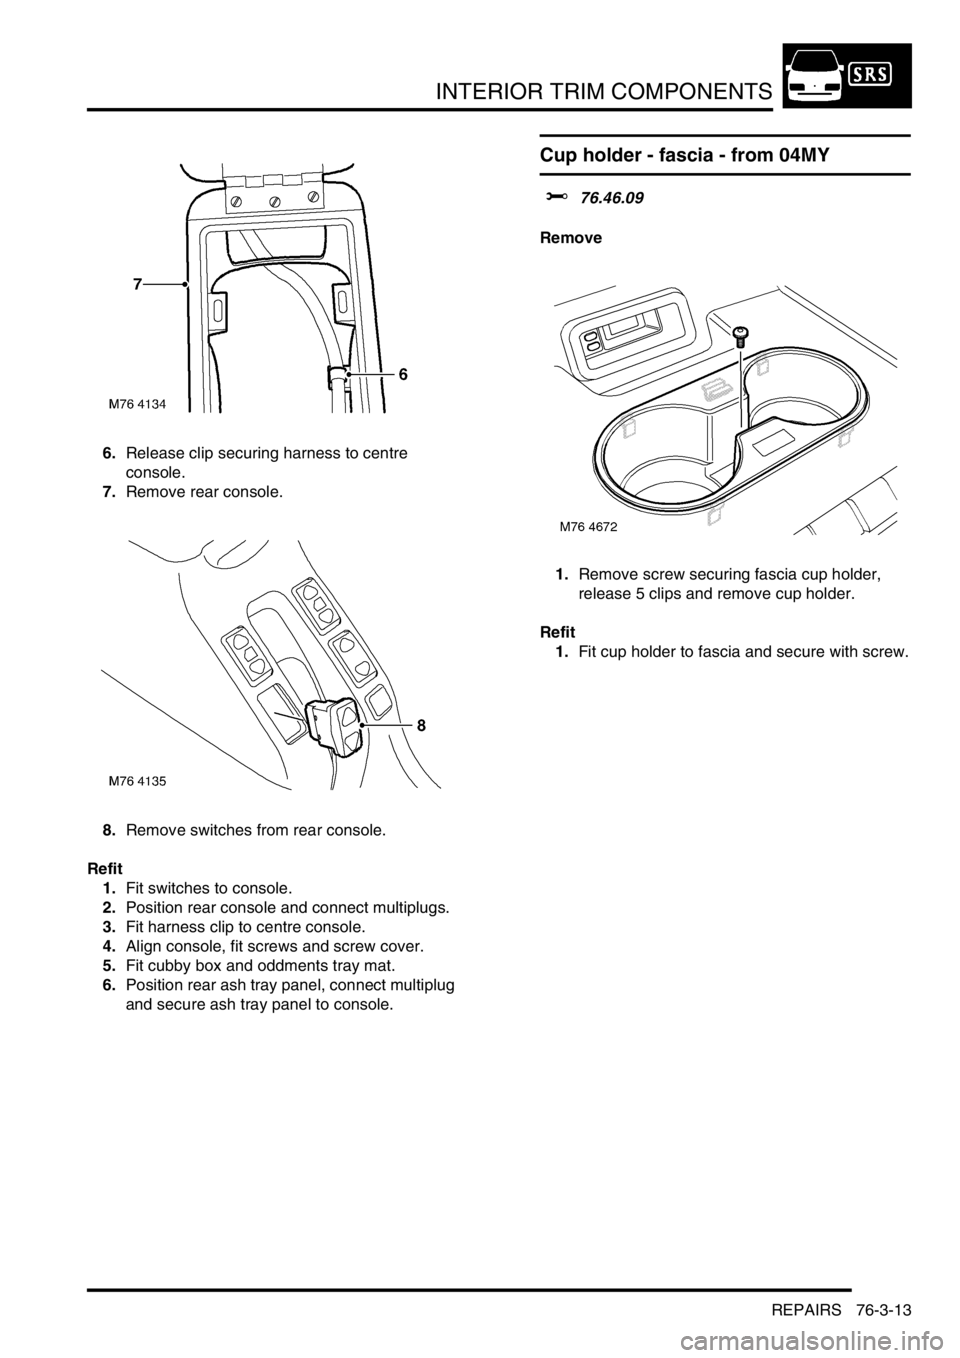
6.Release clip securing harness to centre
console.
7.Remove rear console.
8.Remove switches from rear console.
Refit
1.Fit switches to console.
2.Position rear console and connect multiplugs.
3.Fit harness clip to centre console.
4.Align console, fit screws and screw cover.
5.Fit cubby box and oddments tray mat.
6.Position rear ash tray panel, connect multiplug
and secure ash tray panel to console.
Cup holder - fascia - from 04MY
$% 76.46.09
Remove
1.Remove screw securing fascia cup holder,
release 5 clips and remove cup holder.
Refit
1.Fit cup holder to fascia and secure with screw.
Page 675 of 1007
INTERIOR TRIM COMPONENTS
76-3-14 REPAIRS
Fascia - up to 04MY
$% 76.46.23
Remove
1.Remove front console.
+ INTERIOR TRIM COMPONENTS,
REPAIRS, Console - front - up to 04MY.
2.Remove rotary coupler.
+ RESTRAINT SYSTEMS, REPAIRS,
Rotary coupler - (SRS) air bag system.
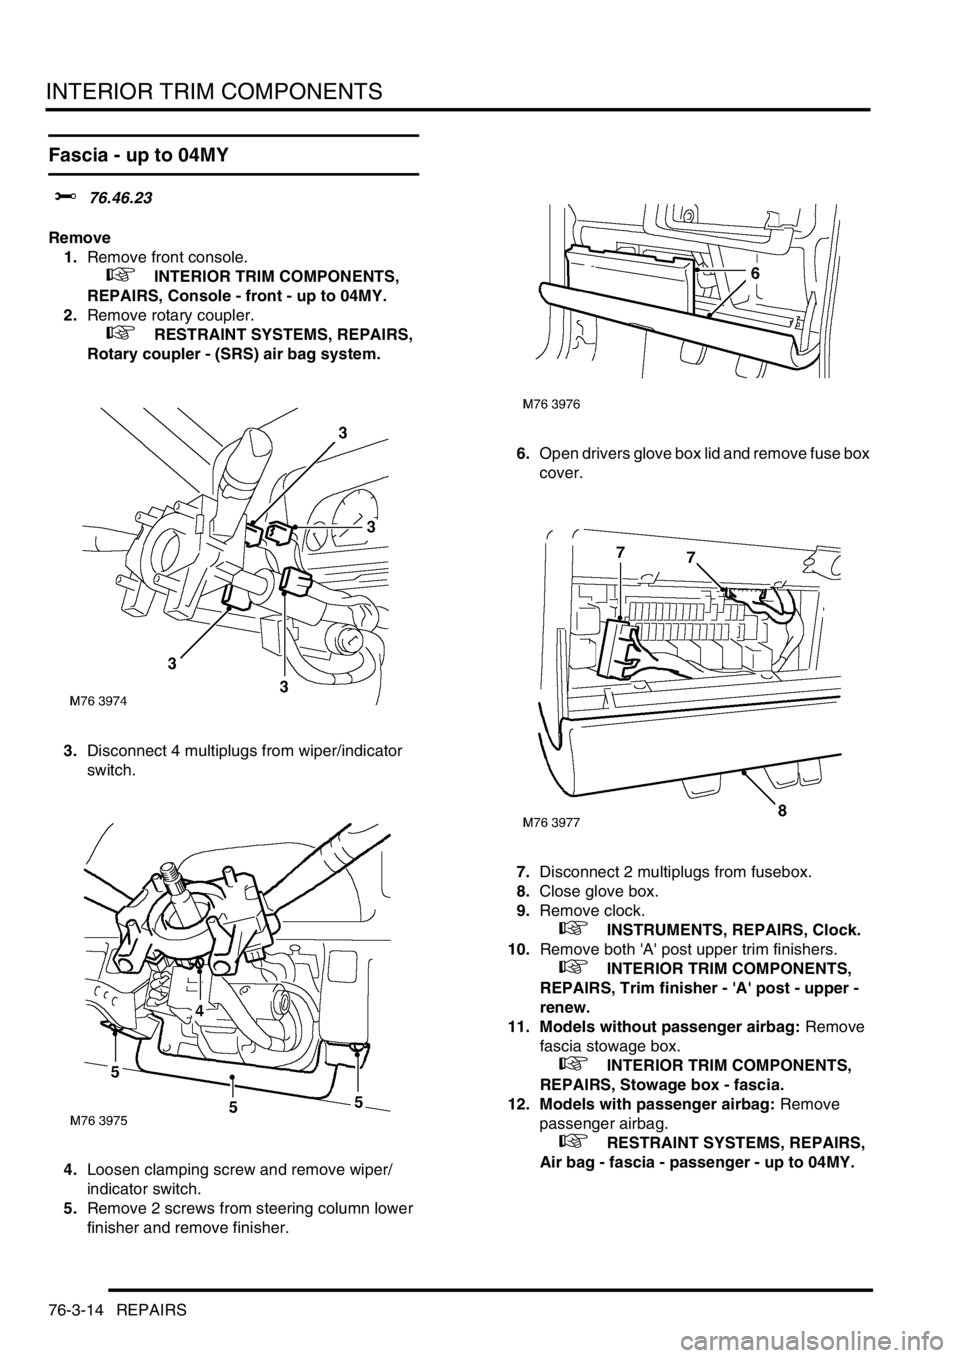
3.Disconnect 4 multiplugs from wiper/indicator
switch.
4.Loosen clamping screw and remove wiper/
indicator switch.
5.Remove 2 screws from steering column lower
finisher and remove finisher.6.Open drivers glove box lid and remove fuse box
cover.
7.Disconnect 2 multiplugs from fusebox.
8.Close glove box.
9.Remove clock.
+ INSTRUMENTS, REPAIRS, Clock.
10.Remove both 'A' post upper trim finishers.
+ INTERIOR TRIM COMPONENTS,
REPAIRS, Trim finisher - 'A' post - upper -
renew.
11. Models without passenger airbag: Remove
fascia stowage box.
+ INTERIOR TRIM COMPONENTS,
REPAIRS, Stowage box - fascia.
12. Models with passenger airbag: Remove
passenger airbag.
+ RESTRAINT SYSTEMS, REPAIRS,
Air bag - fascia - passenger - up to 04MY.
Page 676 of 1007
INTERIOR TRIM COMPONENTS
REPAIRS 76-3-15
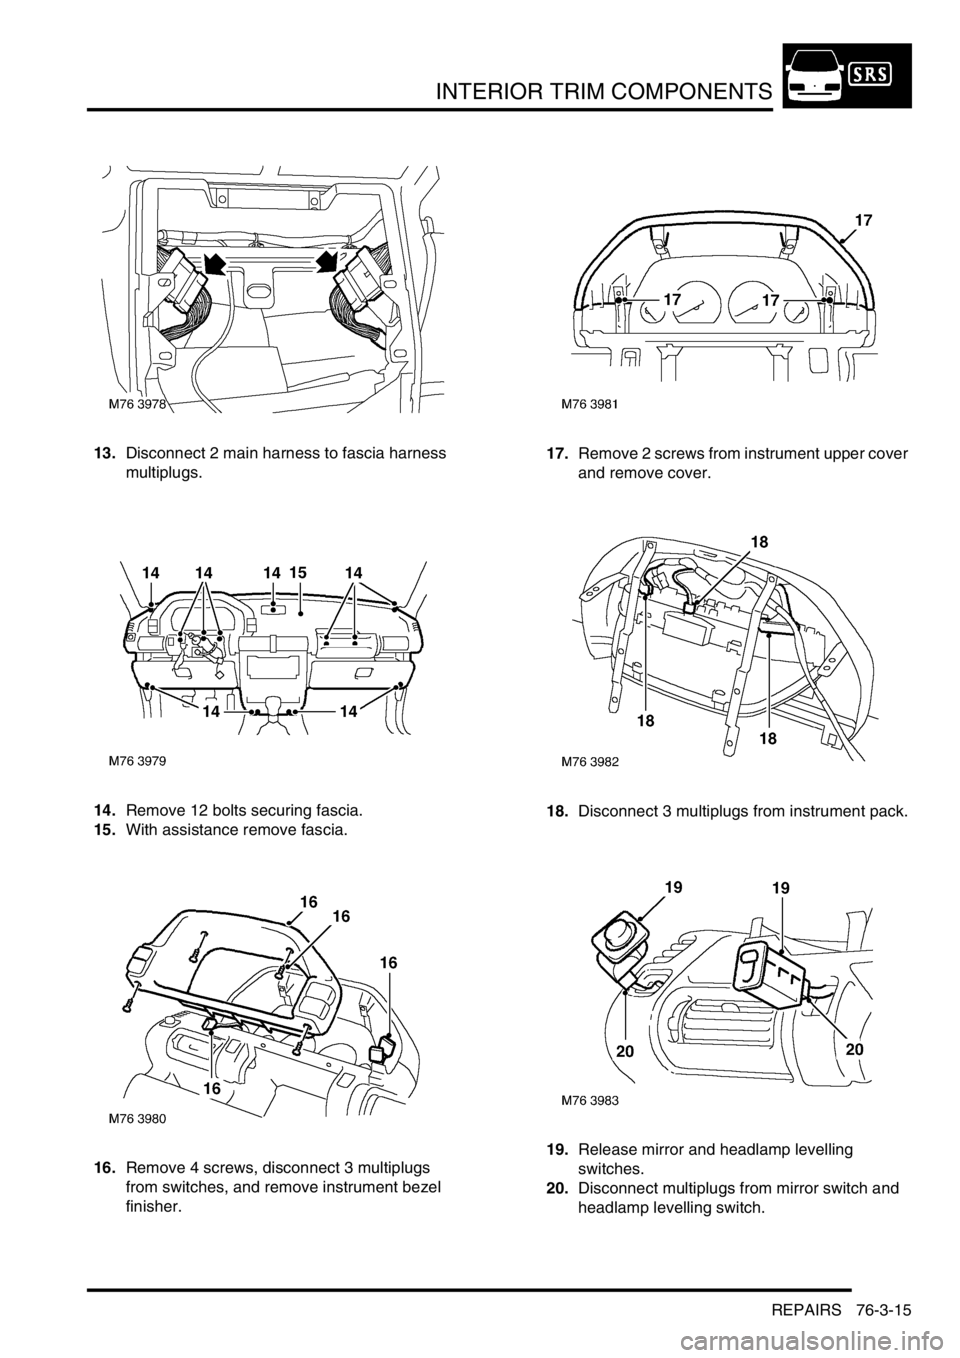
13.Disconnect 2 main harness to fascia harness
multiplugs.
14.Remove 12 bolts securing fascia.
15.With assistance remove fascia.
16.Remove 4 screws, disconnect 3 multiplugs
from switches, and remove instrument bezel
finisher.17.Remove 2 screws from instrument upper cover
and remove cover.
18.Disconnect 3 multiplugs from instrument pack.
19.Release mirror and headlamp levelling
switches.
20.Disconnect multiplugs from mirror switch and
headlamp levelling switch.
Page 677 of 1007
INTERIOR TRIM COMPONENTS
76-3-16 REPAIRS
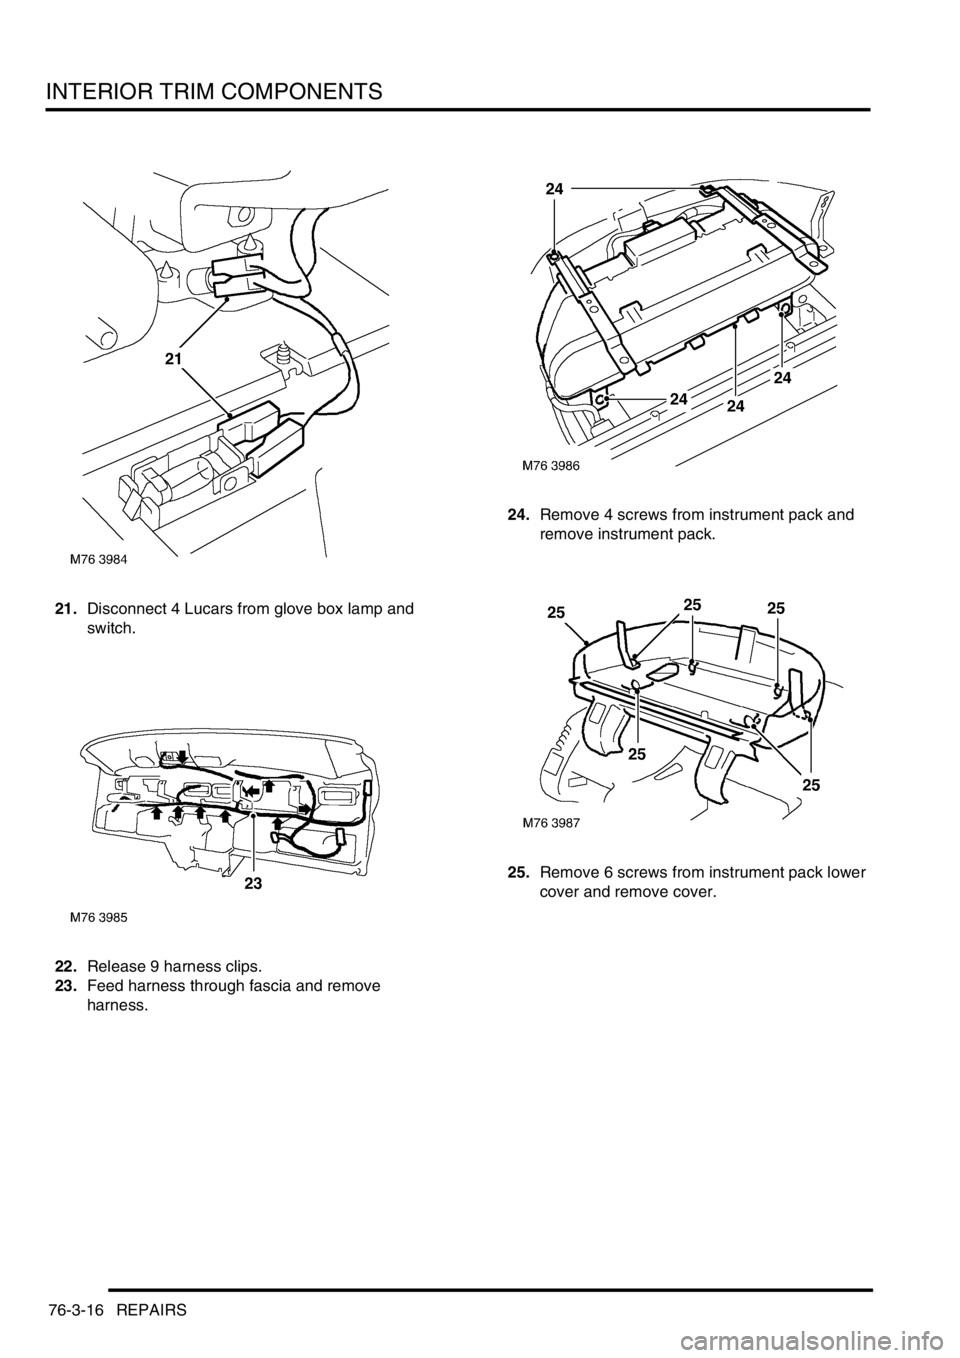
21.Disconnect 4 Lucars from glove box lamp and
switch.
22.Release 9 harness clips.
23.Feed harness through fascia and remove
harness.24.Remove 4 screws from instrument pack and
remove instrument pack.
25.Remove 6 screws from instrument pack lower
cover and remove cover.
Page 678 of 1007
INTERIOR TRIM COMPONENTS
REPAIRS 76-3-17
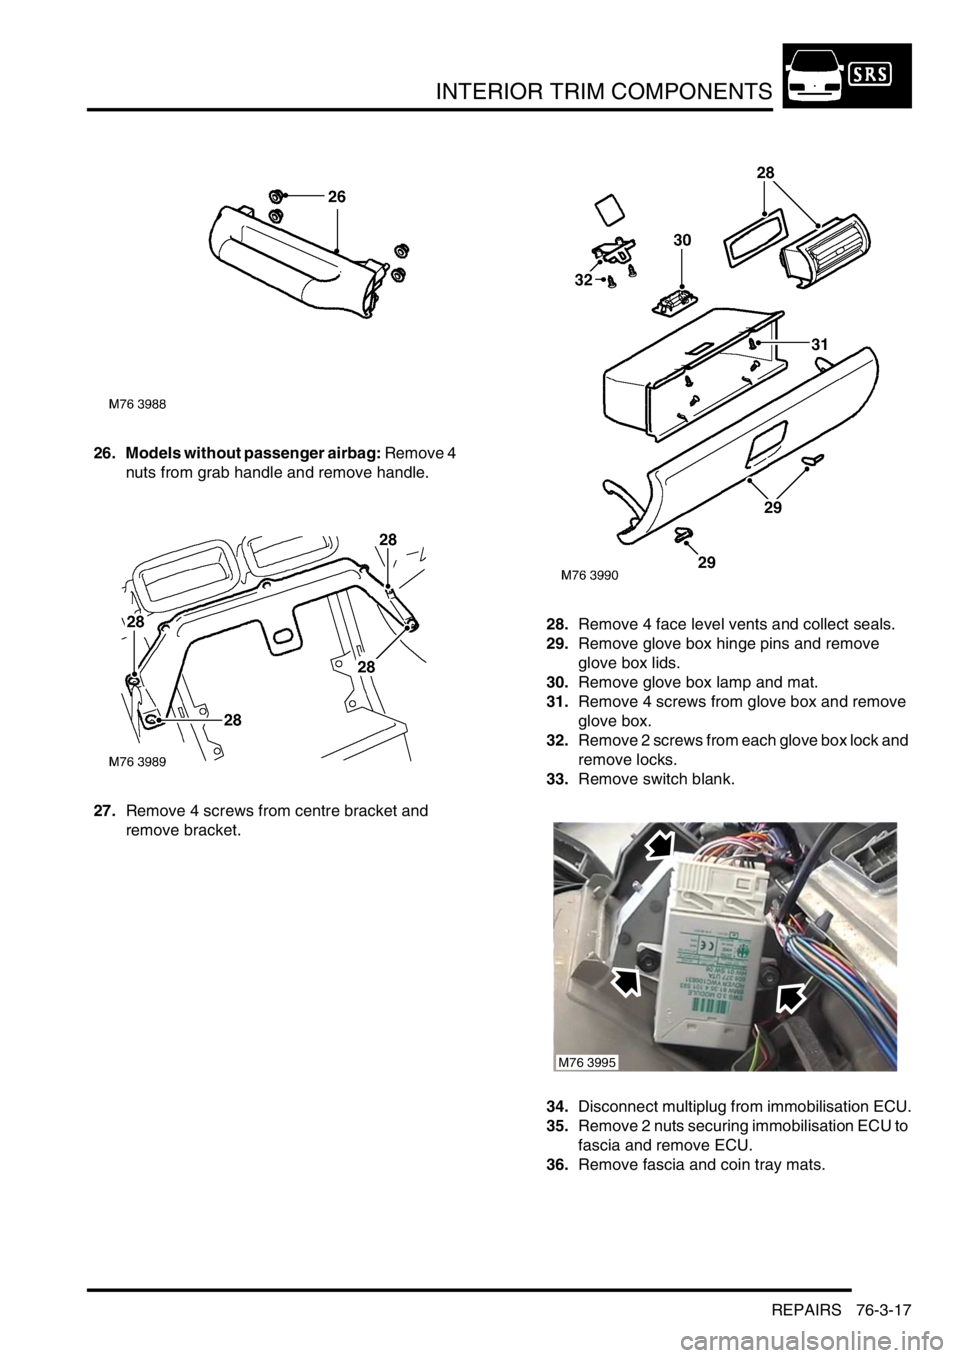
26. Models without passenger airbag: Remove 4
nuts from grab handle and remove handle.
27.Remove 4 screws from centre bracket and
remove bracket.28.Remove 4 face level vents and collect seals.
29.Remove glove box hinge pins and remove
glove box lids.
30.Remove glove box lamp and mat.
31.Remove 4 screws from glove box and remove
glove box.
32.Remove 2 screws from each glove box lock and
remove locks.
33.Remove switch blank.
34.Disconnect multiplug from immobilisation ECU.
35.Remove 2 nuts securing immobilisation ECU to
fascia and remove ECU.
36.Remove fascia and coin tray mats.
M76 3995
Page 679 of 1007

INTERIOR TRIM COMPONENTS
76-3-18 REPAIRS
Refit
1.Fit fascia and coin tray mats.
2.Fit immobilisation ECU to fascia and secure
with nuts.
3.Connect multiplug to immobilisation ECU.
4.Fit switch blank.
5.Fit glove box locks to fascia and secure with
screws.
6.Fit glove box and secure with screws.
7.Fit glove box lamp and mat.
8.Fit glove box lids and secure hinge pins.
9.Fit face level vents and seals to fascia.
10.Fit centre bracket and secure with screws.
11. Models without passenger airbag: Fit grab
handle and secure with nuts.
12.Fit instrument pack lower cover and secure with
screws.
13.Fit instrument pack to fascia and secure with
screws.
14.Fit fascia harness to fascia and secure with
clips.
15.Connect Lucars to glove box lamp and switch.
16.Connect multiplugs to mirror switch and
headlamp levelling switch.
17.Fit mirror switch and headlamp levelling switch.
18.Connect multiplugs to instrument pack.
19.Fit instrument pack upper cover and secure
with screws.
20.Connect multiplugs to switches on instrument
bezel finisher, fit bezel and secure with screws.
21.With assistance fit fascia to vehicle and secure
with bolts.22.Connect fascia harness multiplugs to main
harness.
23. Models with passenger airbag: Fit passenger
airbag.
+ RESTRAINT SYSTEMS, REPAIRS,
Air bag - fascia - passenger - up to 04MY.
24. Models without passenger airbag: Fit fascia
stowage box.
+ INTERIOR TRIM COMPONENTS,
REPAIRS, Stowage box - fascia.
25.Fit 'A' post upper trim finishers.
+ INTERIOR TRIM COMPONENTS,
REPAIRS, Trim finisher - 'A' post - upper -
renew.
26.Fit clock.
+ INSTRUMENTS, REPAIRS, Clock.
27.Open drivers glove box lid and remove fuse box
cover.
28.Connect multiplugs to fusebox.
29.Fit fusebox cover and close glove box lid.
30.Fit steering column lower cover and secure with
screws.
31.Fit wiper/indicator switch and tighten clamping
screw.
32.Connect multiplugs to wiper/indicator switch.
33.Fit rotary coupler.
+ RESTRAINT SYSTEMS, REPAIRS,
Rotary coupler - (SRS) air bag system.
34.Fit front console.
+ INTERIOR TRIM COMPONENTS,
REPAIRS, Console - front - up to 04MY.
Page 680 of 1007
INTERIOR TRIM COMPONENTS
REPAIRS 76-3-19
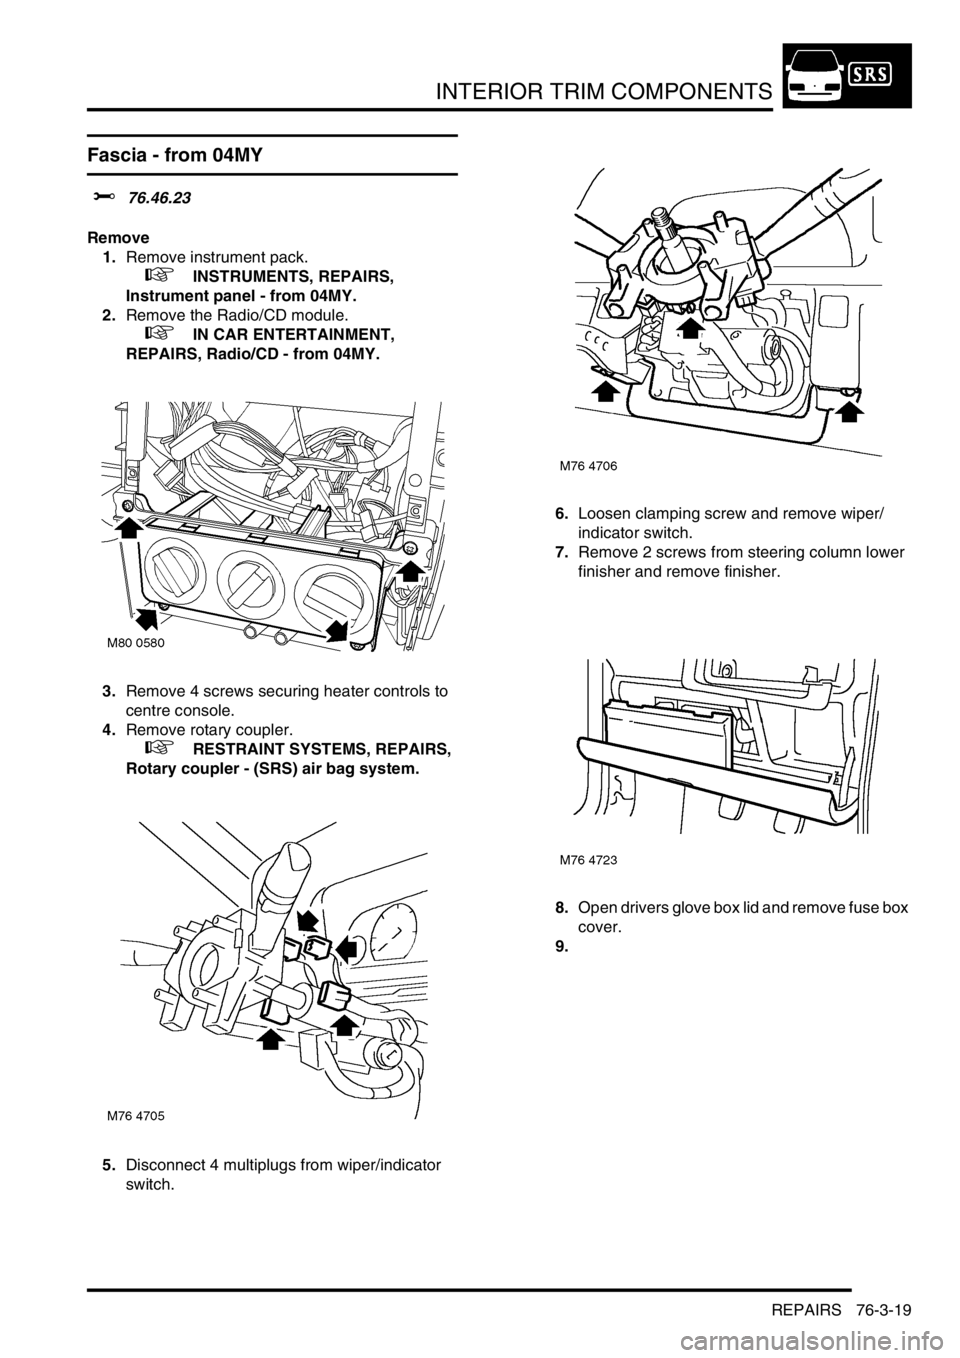
Fascia - from 04MY
$% 76.46.23
Remove
1.Remove instrument pack.
+ INSTRUMENTS, REPAIRS,
Instrument panel - from 04MY.
2.Remove the Radio/CD module.
+ IN CAR ENTERTAINMENT,
REPAIRS, Radio/CD - from 04MY.
3.Remove 4 screws securing heater controls to
centre console.
4.Remove rotary coupler.
+ RESTRAINT SYSTEMS, REPAIRS,
Rotary coupler - (SRS) air bag system.
5.Disconnect 4 multiplugs from wiper/indicator
switch.6.Loosen clamping screw and remove wiper/
indicator switch.
7.Remove 2 screws from steering column lower
finisher and remove finisher.
8.Open drivers glove box lid and remove fuse box
cover.
9.