LAND ROVER FREELANDER 2001 Workshop Manual
FREELANDER 2001
LAND ROVER
LAND ROVER
https://www.carmanualsonline.info/img/64/57250/w960_57250-0.png
LAND ROVER FREELANDER 2001 Workshop Manual
Trending: low beam, bulb, gas type, height, mirror controls, oil level, change time
Page 721 of 1007
SUNROOF
76-6-8 REPAIRS
Drain tube - sun/sliding roof - front - each
- 5 door
$% 76.84.20
Remove
1.Remove headlining.
+ INTERIOR TRIM COMPONENTS,
REPAIRS, Headlining - 5 door.
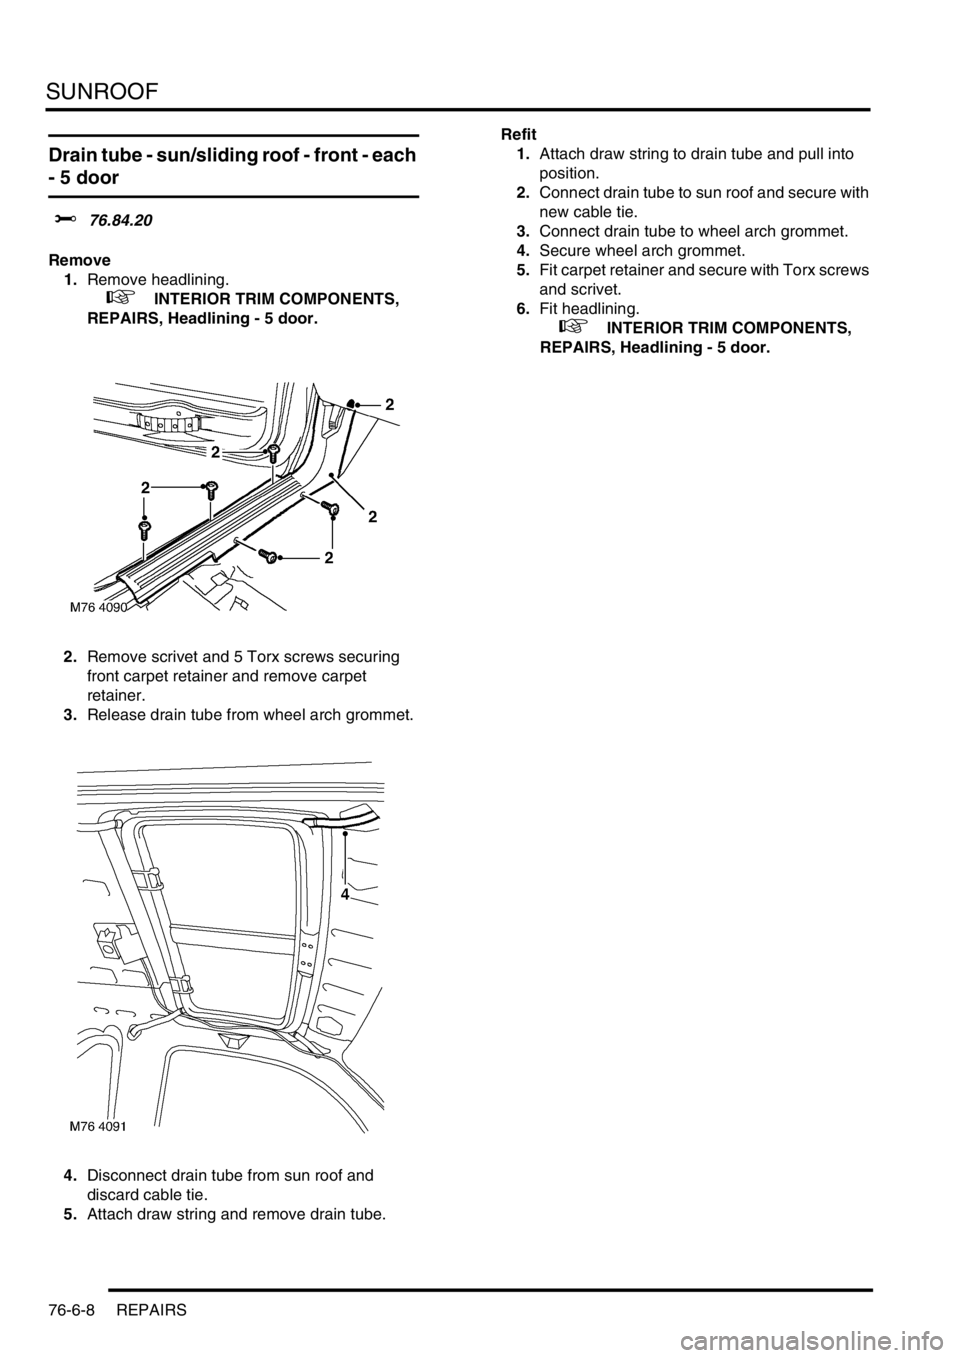
2.Remove scrivet and 5 Torx screws securing
front carpet retainer and remove carpet
retainer.
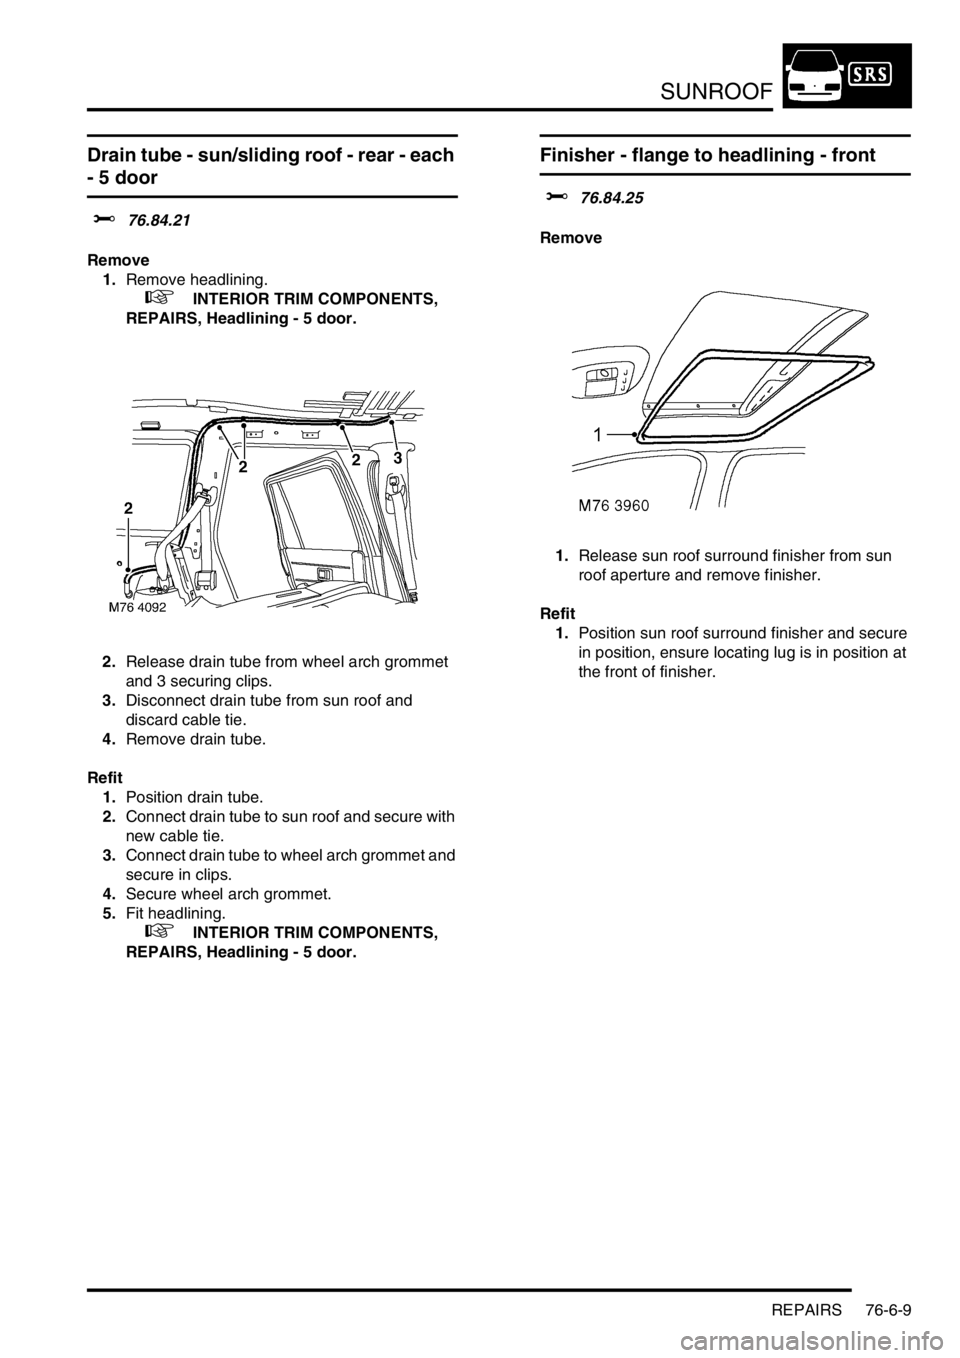
3.Release drain tube from wheel arch grommet.
4.Disconnect drain tube from sun roof and
discard cable tie.
5.Attach draw string and remove drain tube.Refit
1.Attach draw string to drain tube and pull into
position.
2.Connect drain tube to sun roof and secure with
new cable tie.
3.Connect drain tube to wheel arch grommet.
4.Secure wheel arch grommet.
5.Fit carpet retainer and secure with Torx screws
and scrivet.
6.Fit headlining.
+ INTERIOR TRIM COMPONENTS,
REPAIRS, Headlining - 5 door.
Page 722 of 1007
SUNROOF
REPAIRS 76-6-9
Drain tube - sun/sliding roof - rear - each
- 5 door
$% 76.84.21
Remove
1.Remove headlining.
+ INTERIOR TRIM COMPONENTS,
REPAIRS, Headlining - 5 door.
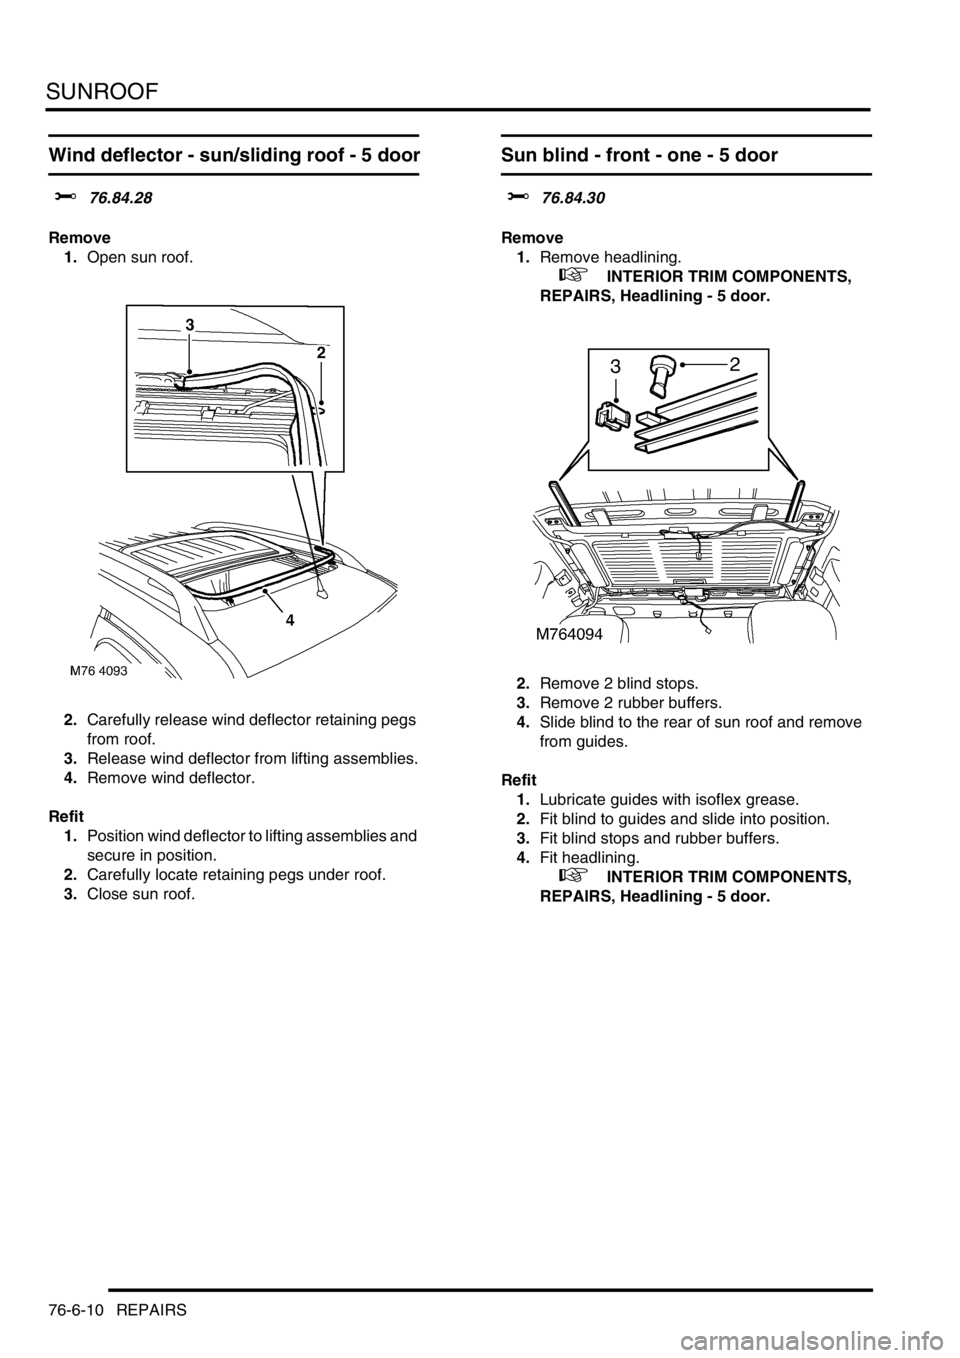
2.Release drain tube from wheel arch grommet
and 3 securing clips.
3.Disconnect drain tube from sun roof and
discard cable tie.
4.Remove drain tube.
Refit
1.Position drain tube.
2.Connect drain tube to sun roof and secure with
new cable tie.
3.Connect drain tube to wheel arch grommet and
secure in clips.
4.Secure wheel arch grommet.
5.Fit headlining.
+ INTERIOR TRIM COMPONENTS,
REPAIRS, Headlining - 5 door.
Finisher - flange to headlining - front
$% 76.84.25
Remove
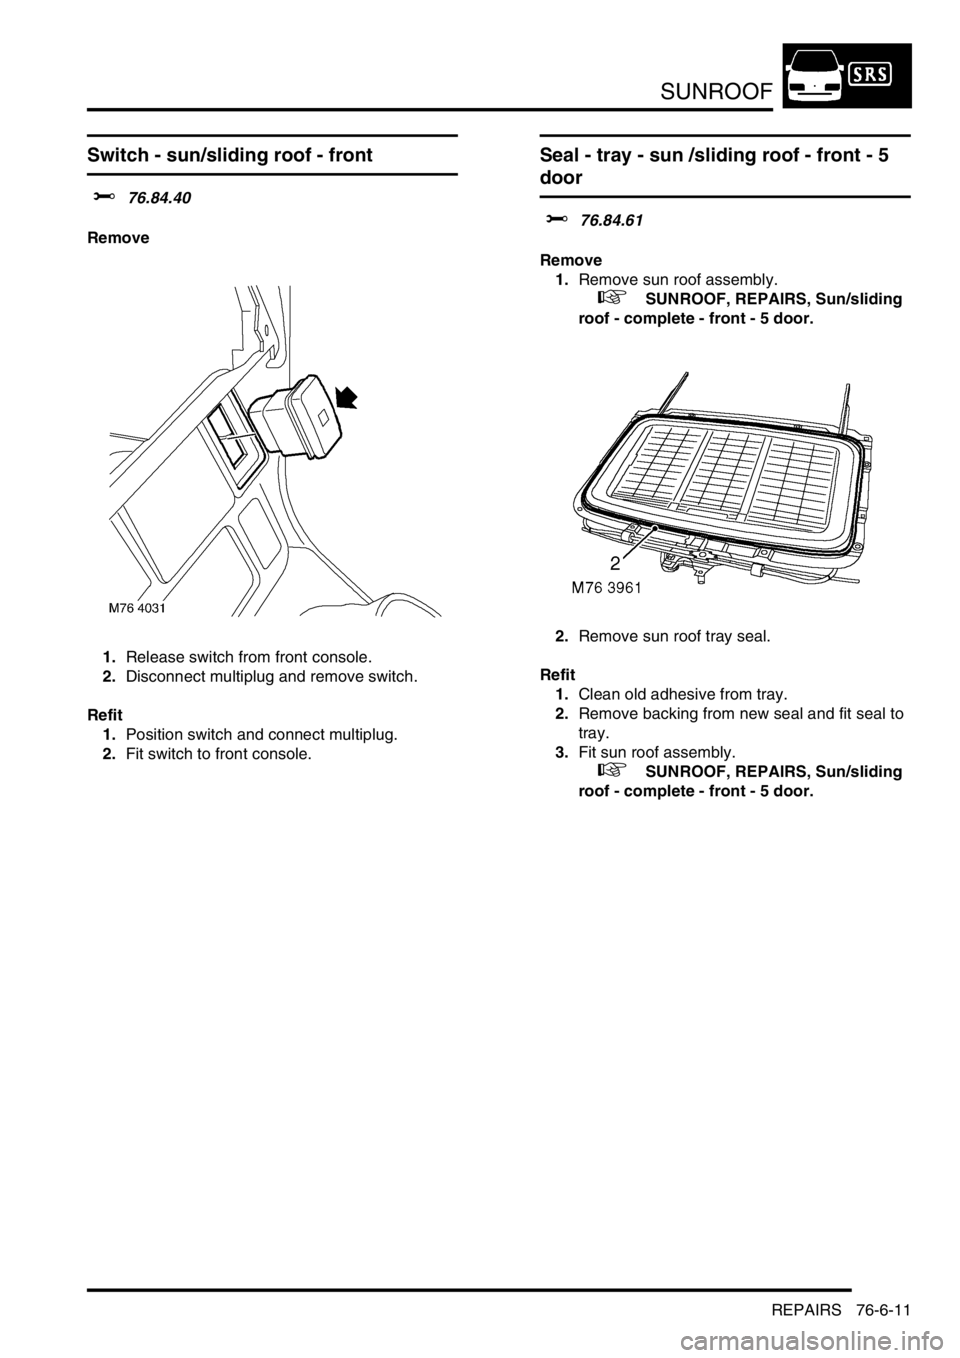
1.Release sun roof surround finisher from sun
roof aperture and remove finisher.
Refit
1.Position sun roof surround finisher and secure
in position, ensure locating lug is in position at
the front of finisher.
Page 723 of 1007
SUNROOF
76-6-10 REPAIRS
Wind deflector - sun/sliding roof - 5 door
$% 76.84.28
Remove
1.Open sun roof.
2.Carefully release wind deflector retaining pegs
from roof.
3.Release wind deflector from lifting assemblies.
4.Remove wind deflector.
Refit
1.Position wind deflector to lifting assemblies and
secure in position.
2.Carefully locate retaining pegs under roof.
3.Close sun roof.
Sun blind - front - one - 5 door
$% 76.84.30
Remove
1.Remove headlining.
+ INTERIOR TRIM COMPONENTS,
REPAIRS, Headlining - 5 door.
2.Remove 2 blind stops.
3.Remove 2 rubber buffers.
4.Slide blind to the rear of sun roof and remove
from guides.
Refit
1.Lubricate guides with isoflex grease.
2.Fit blind to guides and slide into position.
3.Fit blind stops and rubber buffers.
4.Fit headlining.
+ INTERIOR TRIM COMPONENTS,
REPAIRS, Headlining - 5 door.
Page 724 of 1007
SUNROOF
REPAIRS 76-6-11
Switch - sun/sliding roof - front
$% 76.84.40
Remove
1.Release switch from front console.
2.Disconnect multiplug and remove switch.
Refit
1.Position switch and connect multiplug.
2.Fit switch to front console.
Seal - tray - sun /sliding roof - front - 5
door
$% 76.84.61
Remove
1.Remove sun roof assembly.
+ SUNROOF, REPAIRS, Sun/sliding
roof - complete - front - 5 door.
2.Remove sun roof tray seal.
Refit
1.Clean old adhesive from tray.
2.Remove backing from new seal and fit seal to
tray.
3.Fit sun roof assembly.
+ SUNROOF, REPAIRS, Sun/sliding
roof - complete - front - 5 door.
Page 725 of 1007
Page 726 of 1007
HOOD
REPAIRS 76-7-1
HOOD REPAIRS
Hard top - remove for access & refit
$% 76.61.01.99
Remove
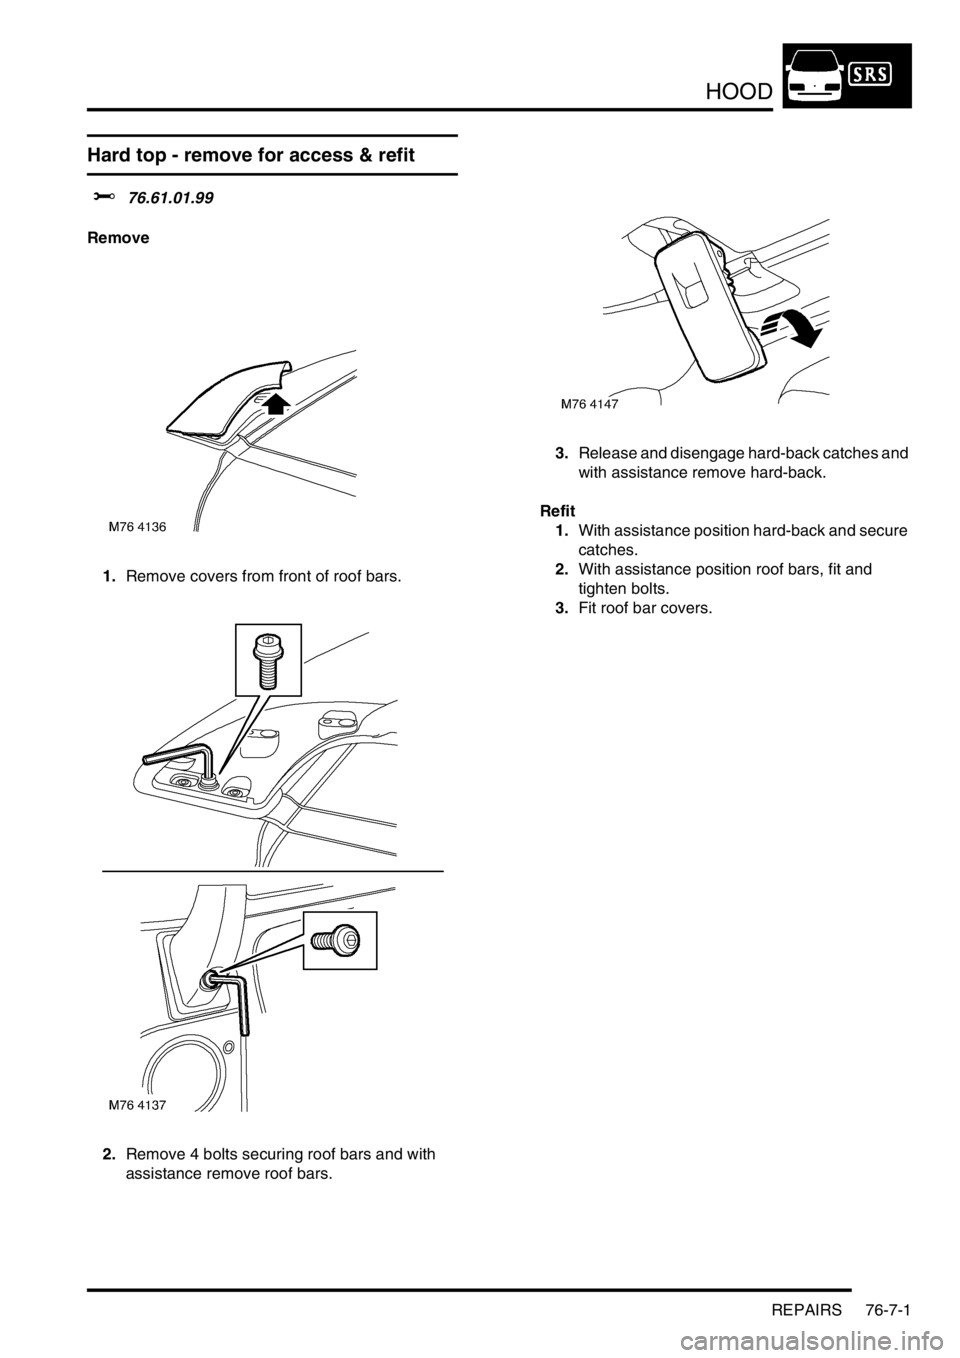
1.Remove covers from front of roof bars.
2.Remove 4 bolts securing roof bars and with
assistance remove roof bars.3.Release and disengage hard-back catches and
with assistance remove hard-back.
Refit
1.With assistance position hard-back and secure
catches.
2.With assistance position roof bars, fit and
tighten bolts.
3.Fit roof bar covers.
Page 727 of 1007
HOOD
76-7-2 REPAIRS
Frame & hood cover - assembly - remove
for access & refit
$% 76.61.10.99
Remove
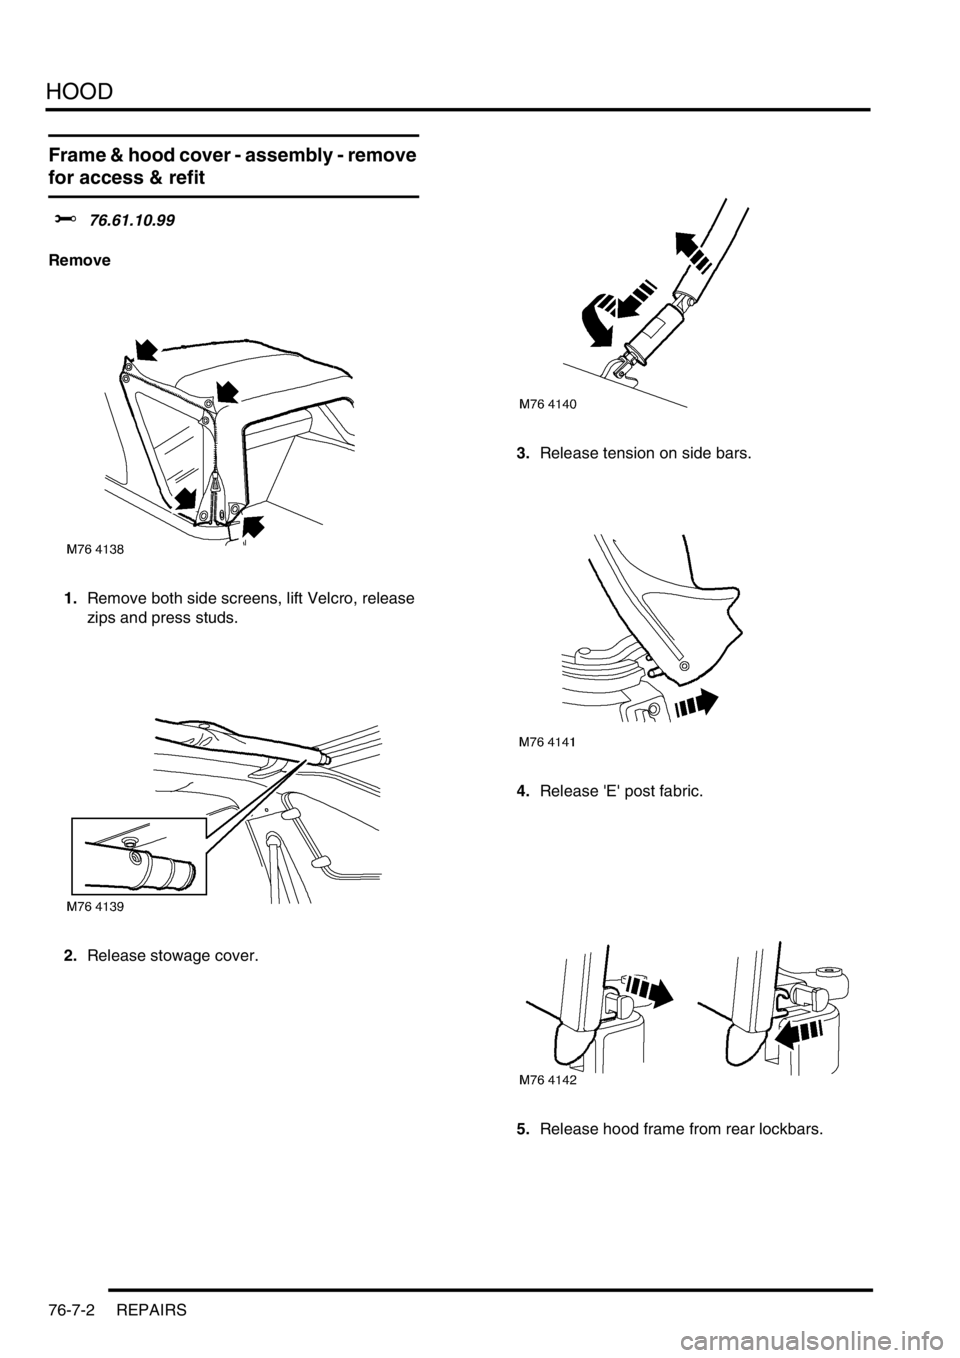
1.Remove both side screens, lift Velcro, release
zips and press studs.
2.Release stowage cover.3.Release tension on side bars.
4.Release 'E' post fabric.
5.Release hood frame from rear lockbars.
Page 728 of 1007
HOOD
REPAIRS 76-7-3
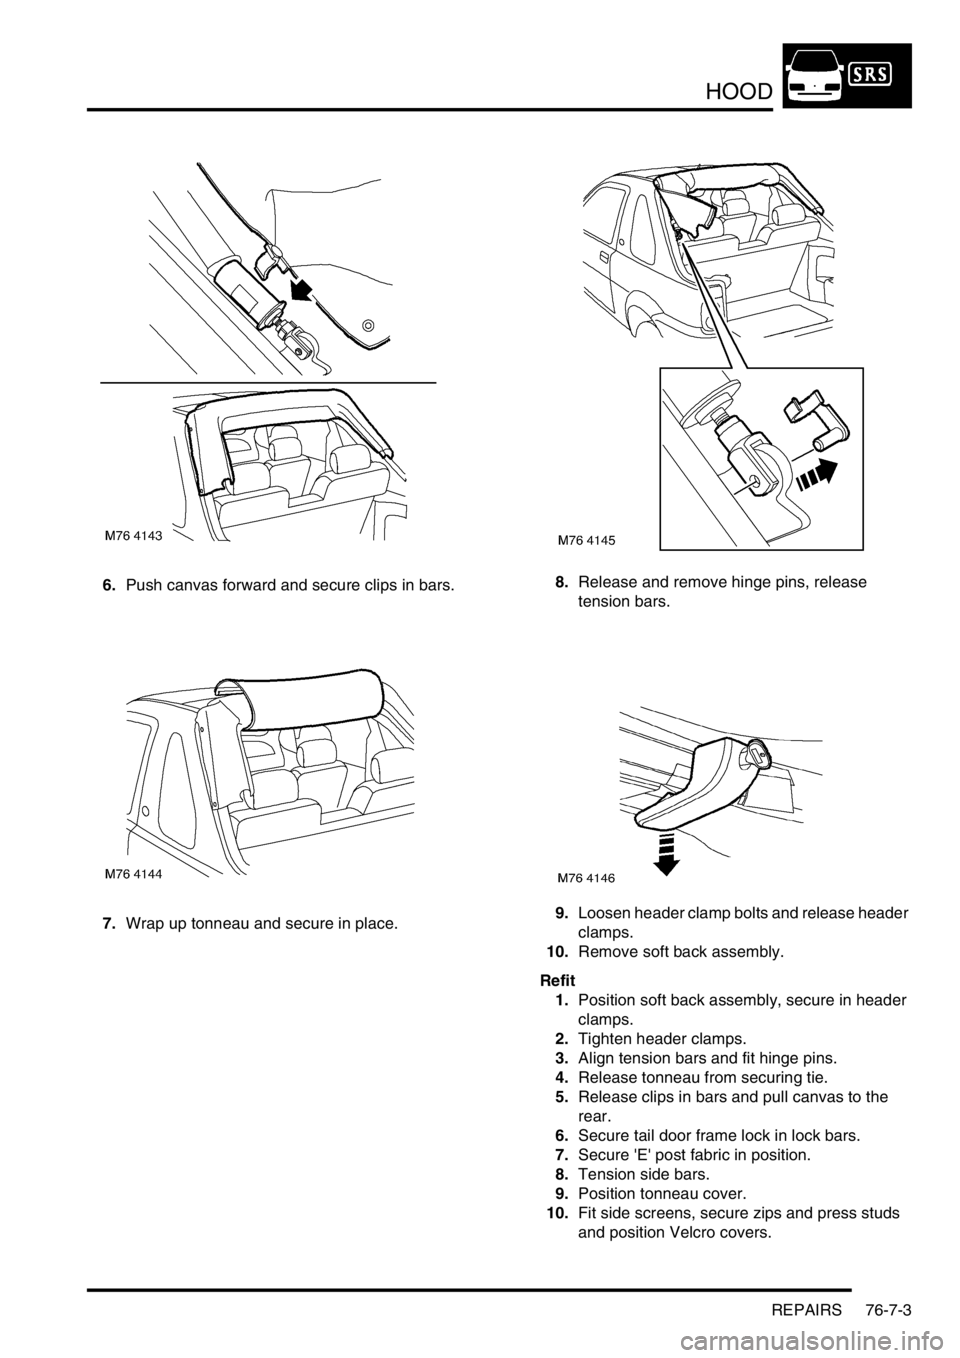
6.Push canvas forward and secure clips in bars.
7.Wrap up tonneau and secure in place.8.Release and remove hinge pins, release
tension bars.
9.Loosen header clamp bolts and release header
clamps.
10.Remove soft back assembly.
Refit
1.Position soft back assembly, secure in header
clamps.
2.Tighten header clamps.
3.Align tension bars and fit hinge pins.
4.Release tonneau from securing tie.
5.Release clips in bars and pull canvas to the
rear.
6.Secure tail door frame lock in lock bars.
7.Secure 'E' post fabric in position.
8.Tension side bars.
9.Position tonneau cover.
10.Fit side screens, secure zips and press studs
and position Velcro covers.
Page 729 of 1007
HOOD
76-7-4 REPAIRS
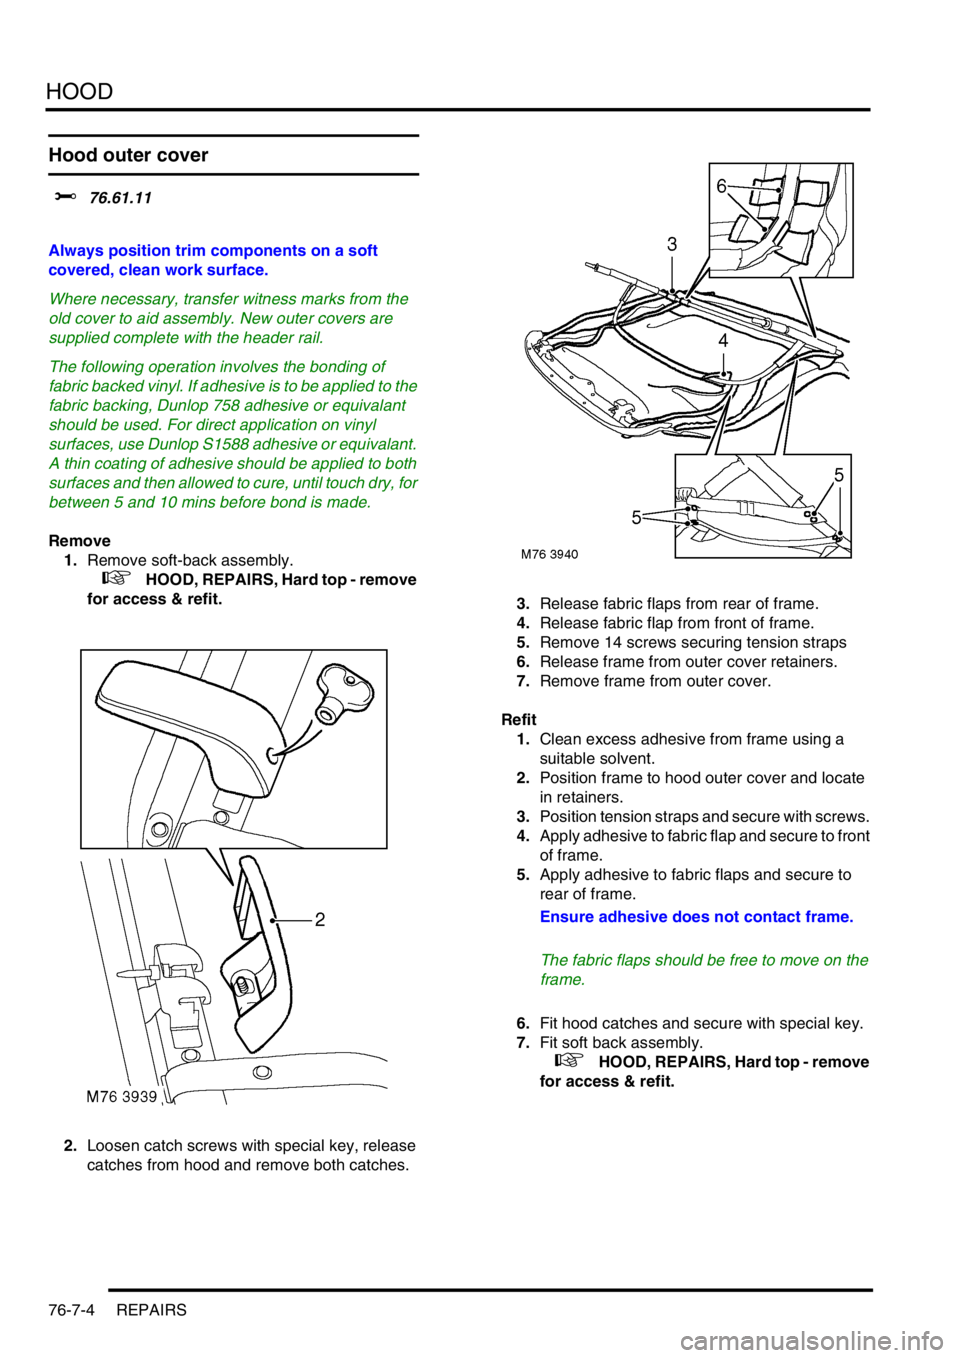
Hood outer cover
$% 76.61.11
Always position trim components on a soft
covered, clean work surface.
Where necessary, transfer witness marks from the
old cover to aid assembly. New outer covers are
supplied complete with the header rail.
The following operation involves the bonding of
fabric backed vinyl. If adhesive is to be applied to the
fabric backing, Dunlop 758 adhesive or equivalant
should be used. For direct application on vinyl
surfaces, use Dunlop S1588 adhesive or equivalant.
A thin coating of adhesive should be applied to both
surfaces and then allowed to cure, until touch dry, for
between 5 and 10 mins before bond is made.
Remove
1.Remove soft-back assembly.
+ HOOD, REPAIRS, Hard top - remove
for access & refit.
2.Loosen catch screws with special key, release
catches from hood and remove both catches. 3.Release fabric flaps from rear of frame.
4.Release fabric flap from front of frame.
5.Remove 14 screws securing tension straps
6.Release frame from outer cover retainers.
7.Remove frame from outer cover.
Refit
1.Clean excess adhesive from frame using a
suitable solvent.
2.Position frame to hood outer cover and locate
in retainers.
3.Position tension straps and secure with screws.
4.Apply adhesive to fabric flap and secure to front
of frame.
5.Apply adhesive to fabric flaps and secure to
rear of frame.
Ensure adhesive does not contact frame.
The fabric flaps should be free to move on the
frame.
6.Fit hood catches and secure with special key.
7.Fit soft back assembly.
+ HOOD, REPAIRS, Hard top - remove
for access & refit.
Page 730 of 1007
HOOD
REPAIRS 76-7-5
Glass - body side - hard back
$% 76.61.29
Always position trim components on a soft
covered, clean work surface.
Wear protective gloves when handling glass,
solvents and primers.
Wear suitable eye protection when removing and
refitting glass.
The following equipment is required: ```Cutting wire
and handles ```Sharp knife ```Windscreen repair kit
```Sealer applicator gun ```Suction cups
Remove
1.Remove hard-back.
+ HOOD, REPAIRS, Frame & hood
cover - assembly - remove for access & refit.
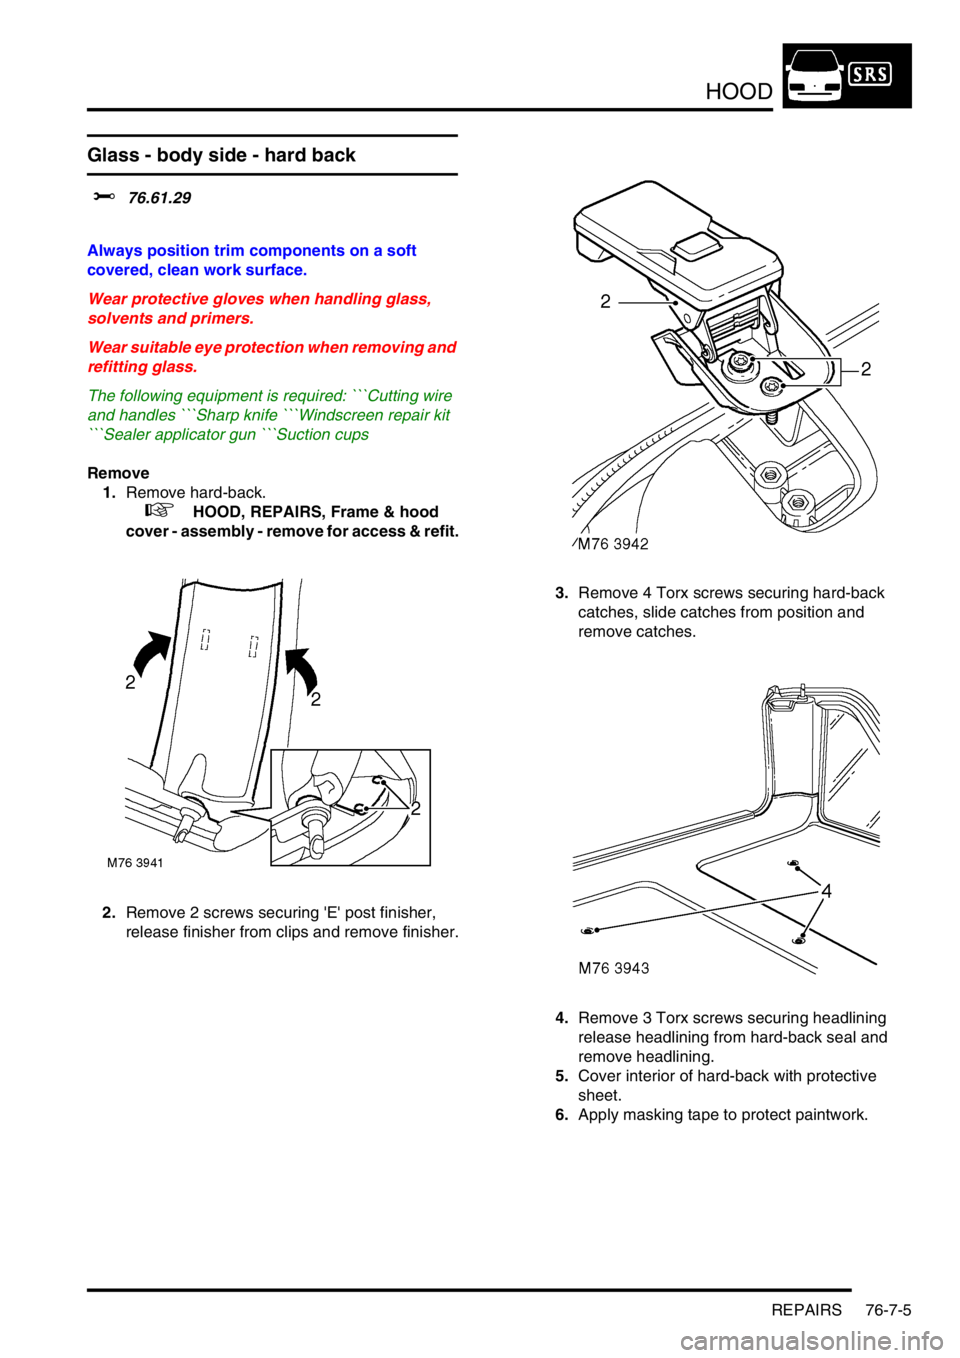
2.Remove 2 screws securing 'E' post finisher,
release finisher from clips and remove finisher.3.Remove 4 Torx screws securing hard-back
catches, slide catches from position and
remove catches.
4.Remove 3 Torx screws securing headlining
release headlining from hard-back seal and
remove headlining.
5.Cover interior of hard-back with protective
sheet.
6.Apply masking tape to protect paintwork.
Trending: coolant reservoir, fuel, bulb, wheel alignment, coolant temperature, check oil, ESP
