LAND ROVER FREELANDER 2001 Workshop Manual
Manufacturer: LAND ROVER, Model Year: 2001, Model line: FREELANDER, Model: LAND ROVER FREELANDER 2001Pages: 1007, PDF Size: 23.47 MB
Page 911 of 1007
WIPERS AND WASHERS
84-6 REPAIRS
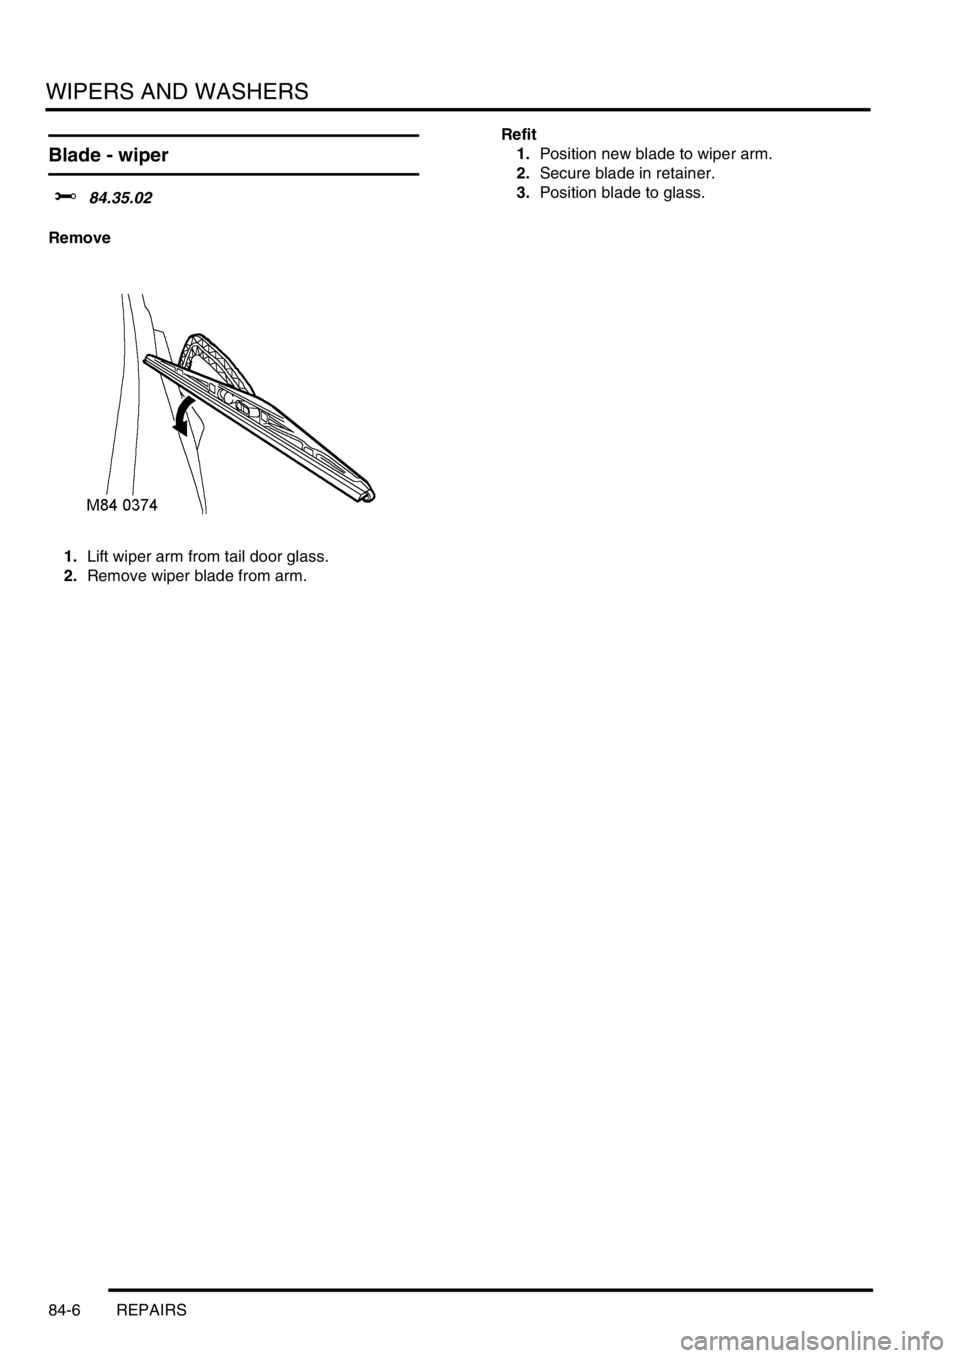
Blade - wiper
$% 84.35.02
Remove
1.Lift wiper arm from tail door glass.
2.Remove wiper blade from arm.Refit
1.Position new blade to wiper arm.
2.Secure blade in retainer.
3.Position blade to glass.
Page 912 of 1007
WIPERS AND WASHERS
REPAIRS 84-7
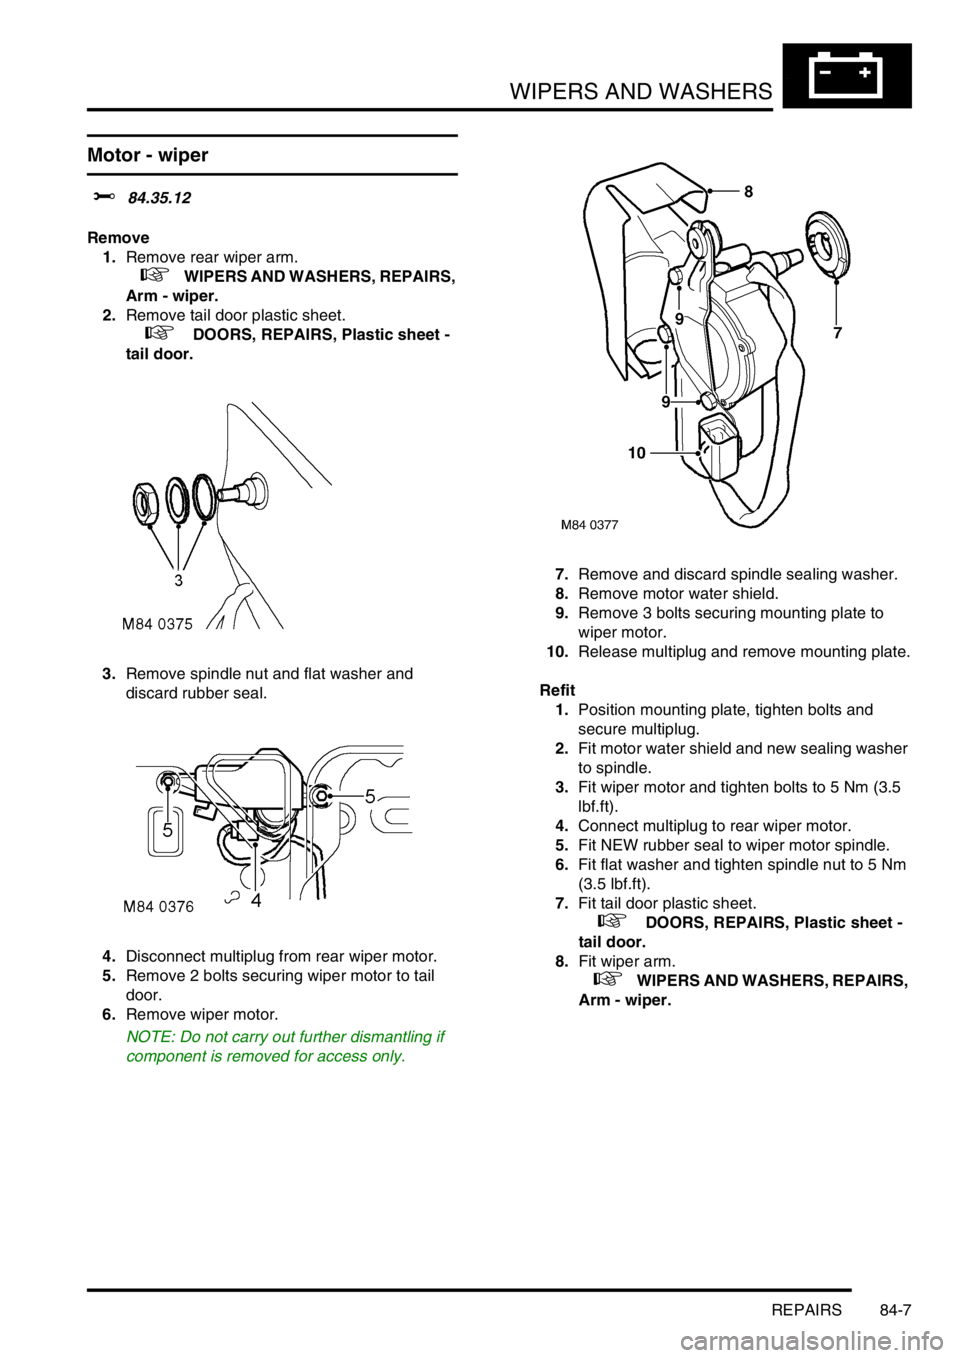
Motor - wiper
$% 84.35.12
Remove
1.Remove rear wiper arm.
+ WIPERS AND WASHERS, REPAIRS,
Arm - wiper.
2.Remove tail door plastic sheet.
+ DOORS, REPAIRS, Plastic sheet -
tail door.
3.Remove spindle nut and flat washer and
discard rubber seal.
4.Disconnect multiplug from rear wiper motor.
5.Remove 2 bolts securing wiper motor to tail
door.
6.Remove wiper motor.
NOTE: Do not carry out further dismantling if
component is removed for access only.7.Remove and discard spindle sealing washer.
8.Remove motor water shield.
9.Remove 3 bolts securing mounting plate to
wiper motor.
10.Release multiplug and remove mounting plate.
Refit
1.Position mounting plate, tighten bolts and
secure multiplug.
2.Fit motor water shield and new sealing washer
to spindle.
3.Fit wiper motor and tighten bolts to 5 Nm (3.5
lbf.ft).
4.Connect multiplug to rear wiper motor.
5.Fit NEW rubber seal to wiper motor spindle.
6.Fit flat washer and tighten spindle nut to 5 Nm
(3.5 lbf.ft).
7.Fit tail door plastic sheet.
+ DOORS, REPAIRS, Plastic sheet -
tail door.
8.Fit wiper arm.
+ WIPERS AND WASHERS, REPAIRS,
Arm - wiper.
Page 913 of 1007
WIPERS AND WASHERS
84-8 REPAIRS
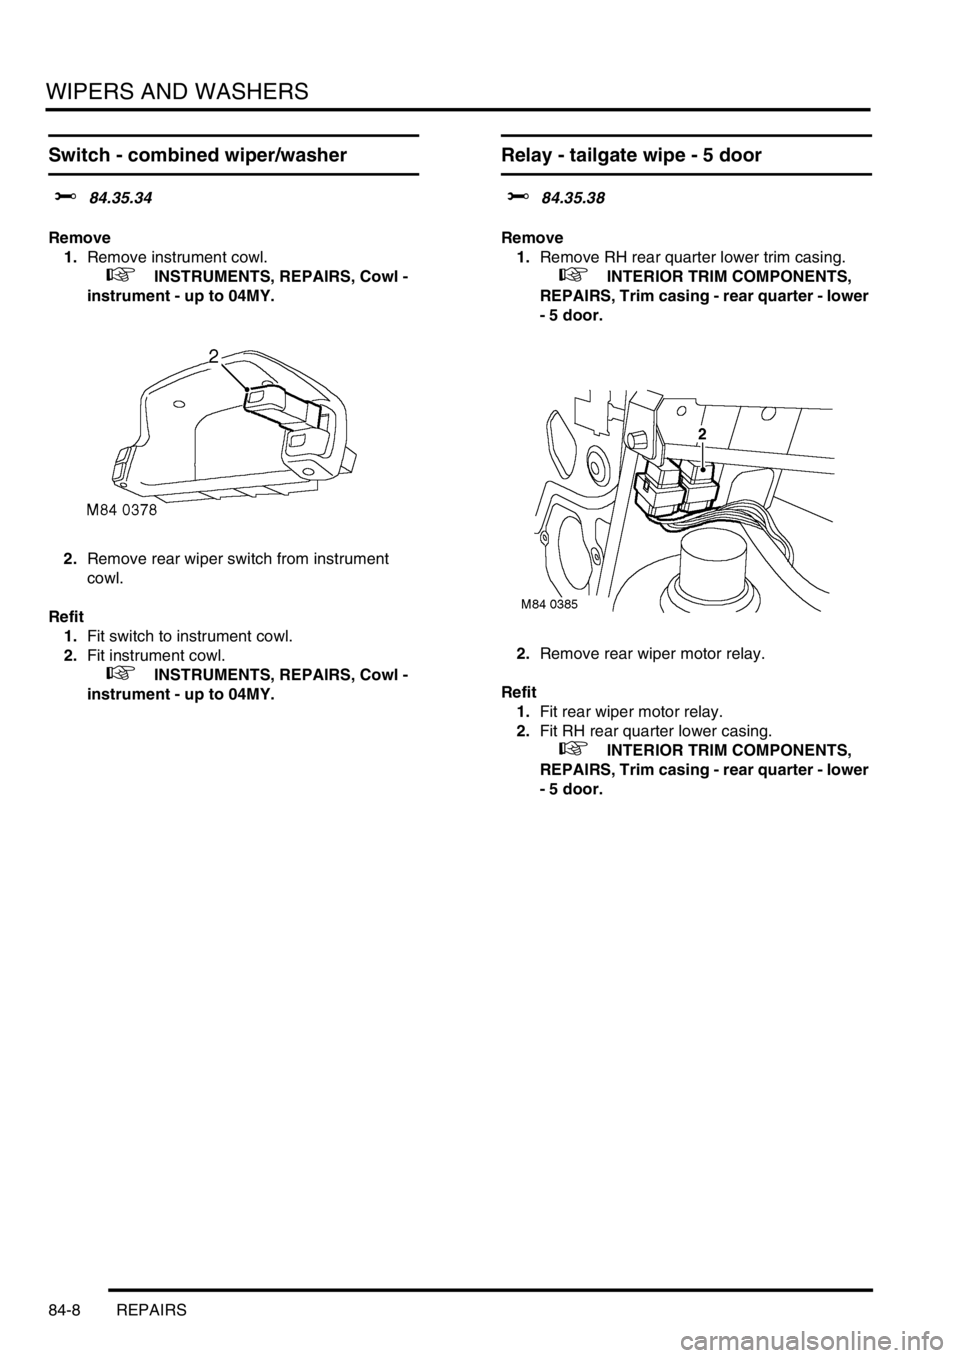
Switch - combined wiper/washer
$% 84.35.34
Remove
1.Remove instrument cowl.
+ INSTRUMENTS, REPAIRS, Cowl -
instrument - up to 04MY.
2.Remove rear wiper switch from instrument
cowl.
Refit
1.Fit switch to instrument cowl.
2.Fit instrument cowl.
+ INSTRUMENTS, REPAIRS, Cowl -
instrument - up to 04MY.
Relay - tailgate wipe - 5 door
$% 84.35.38
Remove
1.Remove RH rear quarter lower trim casing.
+ INTERIOR TRIM COMPONENTS,
REPAIRS, Trim casing - rear quarter - lower
- 5 door.
2.Remove rear wiper motor relay.
Refit
1.Fit rear wiper motor relay.
2.Fit RH rear quarter lower casing.
+ INTERIOR TRIM COMPONENTS,
REPAIRS, Trim casing - rear quarter - lower
- 5 door.
Page 914 of 1007
CHARGING AND STARTING
ADJUSTMENTS 86-1-1
CHARGING AND STARTING ADJUST ME NTS
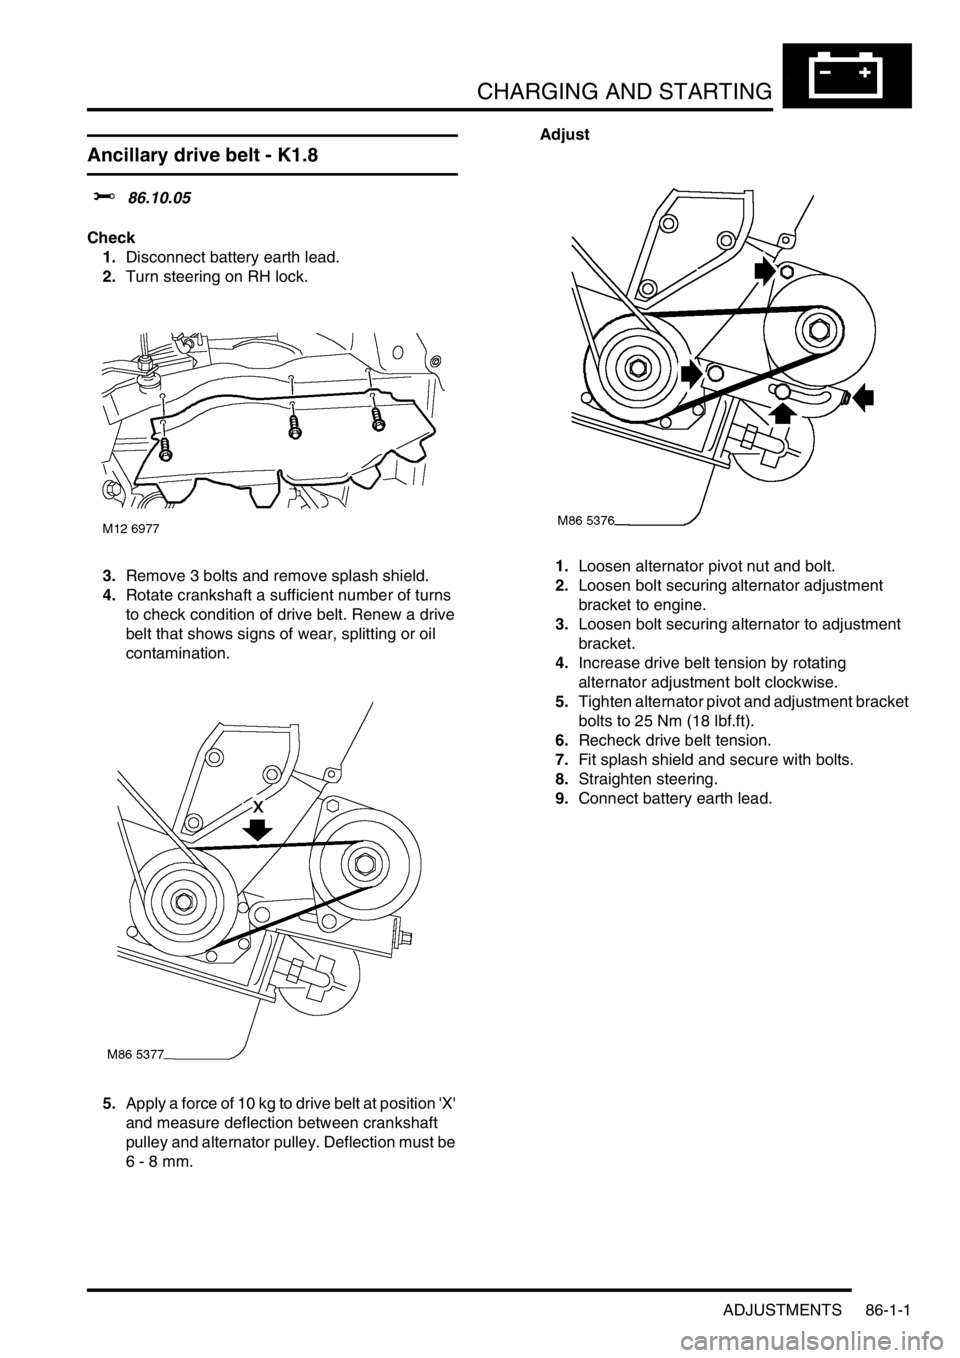
Ancillary drive belt - K1.8
$% 86.10.05
Check
1.Disconnect battery earth lead.
2.Turn steering on RH lock.
3.Remove 3 bolts and remove splash shield.
4.Rotate crankshaft a sufficient number of turns
to check condition of drive belt. Renew a drive
belt that shows signs of wear, splitting or oil
contamination.
5.Apply a force of 10 kg to drive belt at position 'X'
and measure deflection between crankshaft
pulley and alternator pulley. Deflection must be
6 - 8 mm.Adjust
1.Loosen alternator pivot nut and bolt.
2.Loosen bolt securing alternator adjustment
bracket to engine.
3.Loosen bolt securing alternator to adjustment
bracket.
4.Increase drive belt tension by rotating
alternator adjustment bolt clockwise.
5.Tighten alternator pivot and adjustment bracket
bolts to 25 Nm (18 lbf.ft).
6.Recheck drive belt tension.
7.Fit splash shield and secure with bolts.
8.Straighten steering.
9.Connect battery earth lead.
Page 915 of 1007
CHARGING AND STARTING
86-1-2 ADJUSTMENTS
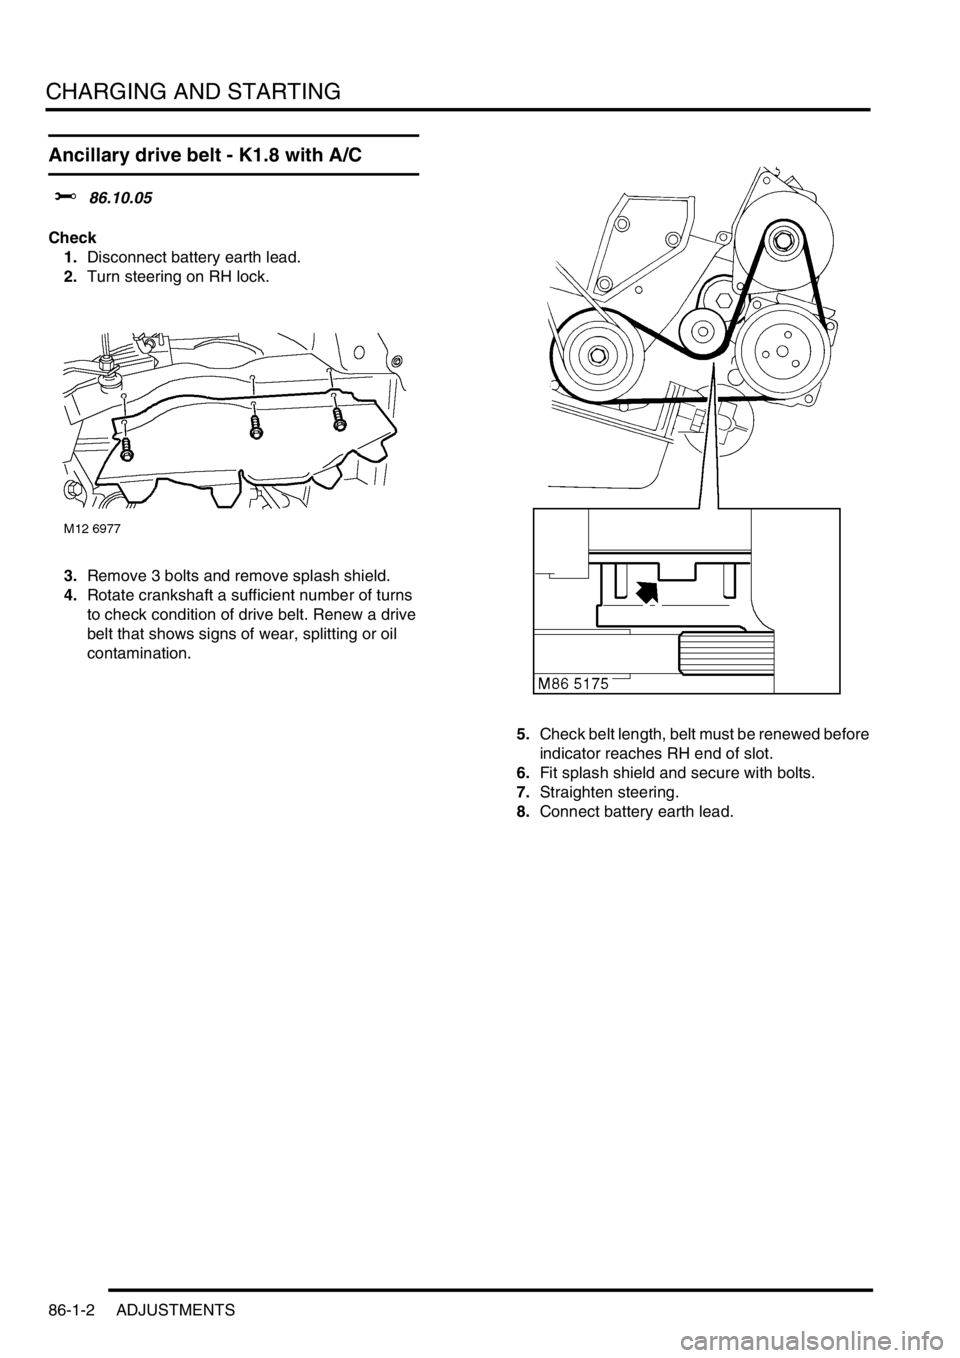
Ancillary drive belt - K1.8 with A/C
$% 86.10.05
Check
1.Disconnect battery earth lead.
2.Turn steering on RH lock.
3.Remove 3 bolts and remove splash shield.
4.Rotate crankshaft a sufficient number of turns
to check condition of drive belt. Renew a drive
belt that shows signs of wear, splitting or oil
contamination.
5.Check belt length, belt must be renewed before
indicator reaches RH end of slot.
6.Fit splash shield and secure with bolts.
7.Straighten steering.
8.Connect battery earth lead.
Page 916 of 1007
CHARGING AND STARTING
REPAIRS 86-1-3
REPAIRS
Alternator - Td4
$% 86.10.02
Remove
1.Disconnect battery earth lead.
2.Drain cooling system.
+ COOLING SYSTEM - Td4,
ADJUSTMENTS, Coolant - drain and refill.
3. Models with A/C: Remove compressor drive
belt.
+ AIR CONDITIONING, REPAIRS,
Drive belt - compressor - Td4.
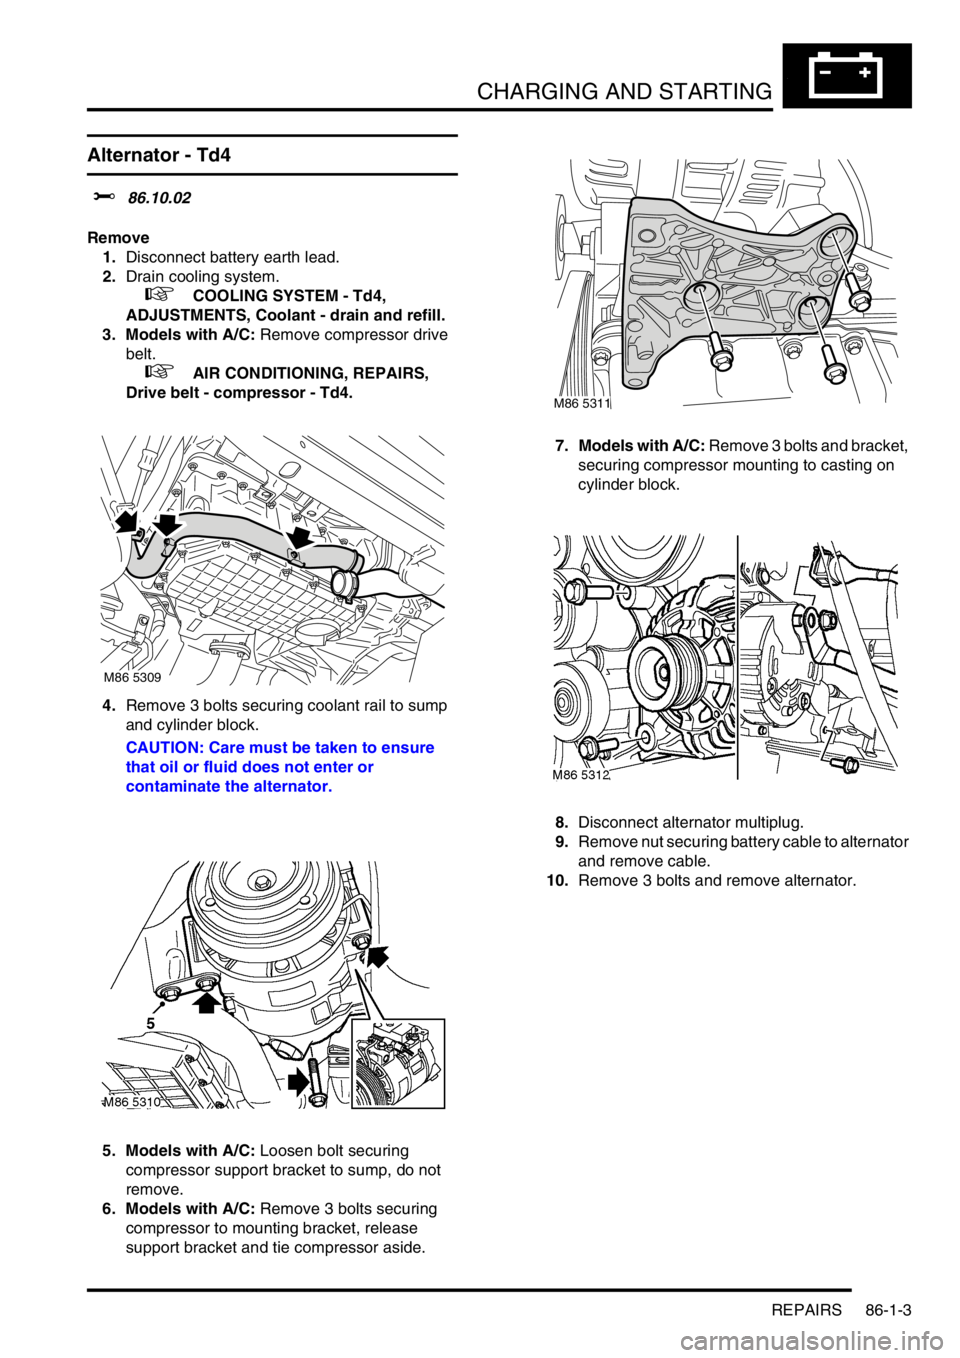
4.Remove 3 bolts securing coolant rail to sump
and cylinder block.
CAUTION: Care must be taken to ensure
that oil or fluid does not enter or
contaminate the alternator.
5. Models with A/C: Loosen bolt securing
compressor support bracket to sump, do not
remove.
6. Models with A/C: Remove 3 bolts securing
compressor to mounting bracket, release
support bracket and tie compressor aside.7. Models with A/C: Remove 3 bolts and bracket,
securing compressor mounting to casting on
cylinder block.
8.Disconnect alternator multiplug.
9.Remove nut securing battery cable to alternator
and remove cable.
10.Remove 3 bolts and remove alternator.
M86 5309
M86 5311
Page 917 of 1007
CHARGING AND STARTING
86-1-4 REPAIRS
Refit
1.Clean alternator mounting points.
2.Fit alternator to mounting bracket.Tighten M10
bolt to 45 Nm (33 lbf.ft) and M8 bolts to 25 Nm
(18 lbf.ft).
CAUTION: Ensure upper bolt is fitted prior
to assembly.
3.Connect alternator multiplug.
4.Fit battery cable to alternator terminal and
tighten to 10 Nm (7.5 lbf.ft).
5. Models with A/C: Clean A/C compressor and
housing mating faces, dowels and dowel holes.
6. Models with A/C: Fit bolts and compressor
mounting to casting, tighten to 25 Nm (18 lbf.ft).
7. Models with A/C: Position A/C compressor, fit
bolts and tighten to 25 Nm (18 lbf.ft).
8. Models with A/C: Align compressor support
bracket to sump and tighten bolt to 10 Nm (7.5
lbf.ft).
9.Fit lower coolant rail to sump and tighten bolts
to 10 Nm (7.5 lbf.ft).
10.Fit compressor drive belt.
+ AIR CONDITIONING, REPAIRS,
Drive belt - compressor - Td4.
11.Refill cooling system.
+ COOLING SYSTEM - Td4,
ADJUSTMENTS, Coolant - drain and refill.
12.Connect battery earth lead.
Page 918 of 1007
CHARGING AND STARTING
REPAIRS 86-1-5
Alternator - KV6
$% 86.10.02
Remove
1.Disconnect battery earth lead.
2.Remove top arm.
+ ENGINE - K SERIES KV6, REPAIRS,
Arm assembly - engine mounting RH.
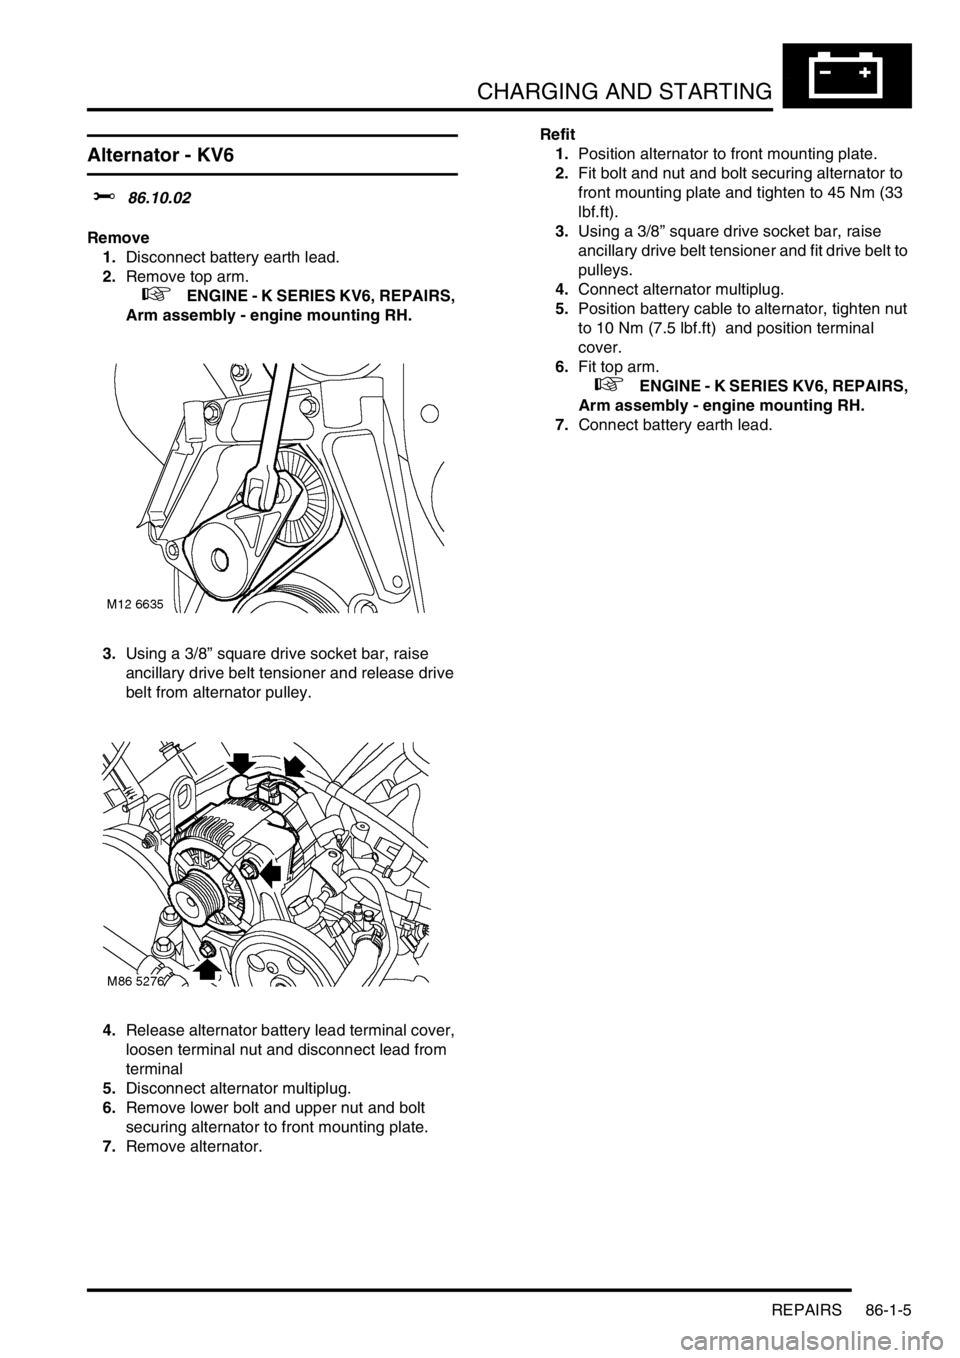
3.Using a 3/8” square drive socket bar, raise
ancillary drive belt tensioner and release drive
belt from alternator pulley.
4.Release alternator battery lead terminal cover,
loosen terminal nut and disconnect lead from
terminal
5.Disconnect alternator multiplug.
6.Remove lower bolt and upper nut and bolt
securing alternator to front mounting plate.
7.Remove alternator.Refit
1.Position alternator to front mounting plate.
2.Fit bolt and nut and bolt securing alternator to
front mounting plate and tighten to 45 Nm (33
lbf.ft).
3.Using a 3/8” square drive socket bar, raise
ancillary drive belt tensioner and fit drive belt to
pulleys.
4.Connect alternator multiplug.
5.Position battery cable to alternator, tighten nut
to 10 Nm (7.5 lbf.ft) and position terminal
cover.
6.Fit top arm.
+ ENGINE - K SERIES KV6, REPAIRS,
Arm assembly - engine mounting RH.
7.Connect battery earth lead.
Page 919 of 1007
CHARGING AND STARTING
86-1-6 REPAIRS
Alternator - K1.8
$% 86.10.02
Remove
1.Disconnect battery earth lead.
2.Remove exhaust manifold heat shield.
+ MANIFOLDS & EXHAUST SYSTEMS
- K SERIES 1.8, REPAIRS, Heat shield -
exhaust manifold - with A/C.
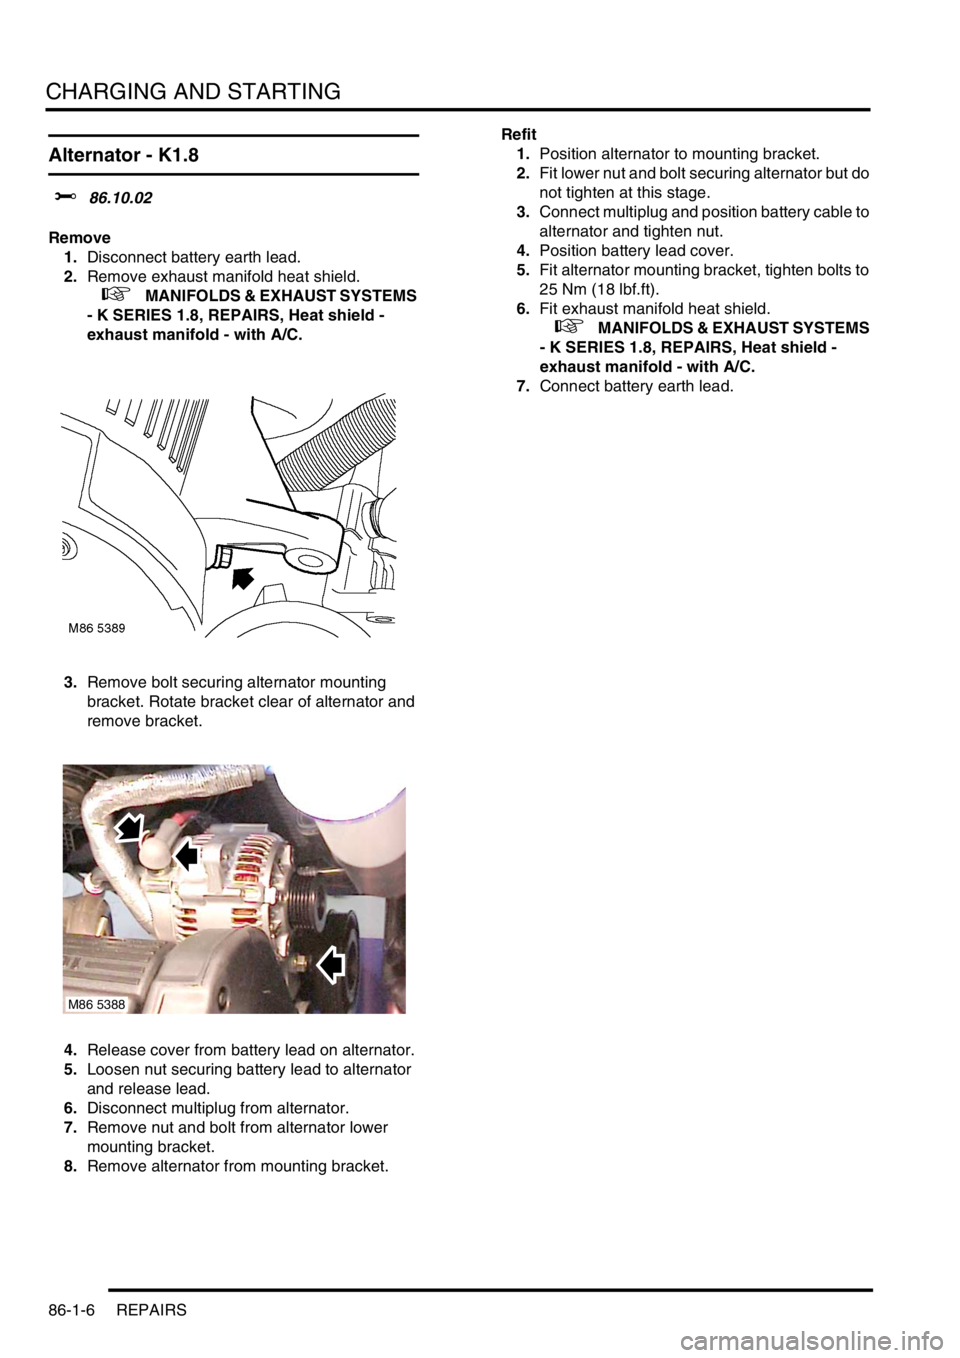
3.Remove bolt securing alternator mounting
bracket. Rotate bracket clear of alternator and
remove bracket.
4.Release cover from battery lead on alternator.
5.Loosen nut securing battery lead to alternator
and release lead.
6.Disconnect multiplug from alternator.
7.Remove nut and bolt from alternator lower
mounting bracket.
8.Remove alternator from mounting bracket.Refit
1.Position alternator to mounting bracket.
2.Fit lower nut and bolt securing alternator but do
not tighten at this stage.
3.Connect multiplug and position battery cable to
alternator and tighten nut.
4.Position battery lead cover.
5.Fit alternator mounting bracket, tighten bolts to
25 Nm (18 lbf.ft).
6.Fit exhaust manifold heat shield.
+ MANIFOLDS & EXHAUST SYSTEMS
- K SERIES 1.8, REPAIRS, Heat shield -
exhaust manifold - with A/C.
7.Connect battery earth lead.
M86 5388
Page 920 of 1007
CHARGING AND STARTING
REPAIRS 86-1-7
Ancillary drive belt - Td4
$% 86.10.03
Remove
1.Disconnect battery earth lead.
2.Remove engine acoustic cover if fitted.
+ ENGINE - Td4, REPAIRS, Cover -
engine acoustic - Up to 02.5 Model Year.
3.Remove underbelly panel.
+ EXTERIOR FITTINGS, REPAIRS,
Panel - underbelly.
4.Turn steering on RH lock.
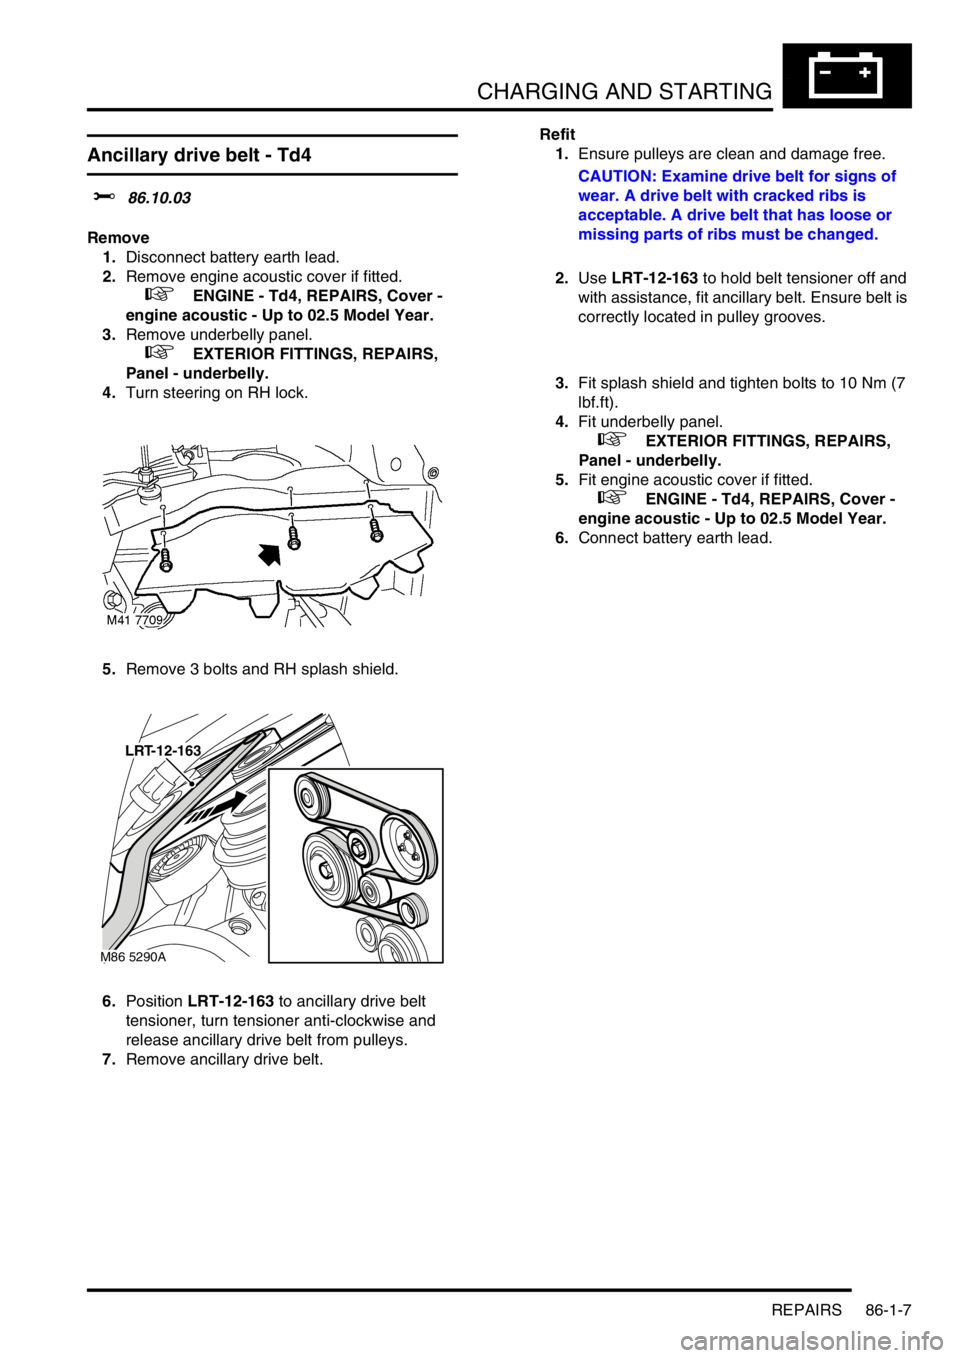
5.Remove 3 bolts and RH splash shield.
6.Position LRT-12-163 to ancillary drive belt
tensioner, turn tensioner anti-clockwise and
release ancillary drive belt from pulleys.
7.Remove ancillary drive belt.Refit
1.Ensure pulleys are clean and damage free.
CAUTION: Examine drive belt for signs of
wear. A drive belt with cracked ribs is
acceptable. A drive belt that has loose or
missing parts of ribs must be changed.
2.Use LRT-12-163 to hold belt tensioner off and
with assistance, fit ancillary belt. Ensure belt is
correctly located in pulley grooves.
3.Fit splash shield and tighten bolts to 10 Nm (7
lbf.ft).
4.Fit underbelly panel.
+ EXTERIOR FITTINGS, REPAIRS,
Panel - underbelly.
5.Fit engine acoustic cover if fitted.
+ ENGINE - Td4, REPAIRS, Cover -
engine acoustic - Up to 02.5 Model Year.
6.Connect battery earth lead.
M86 5290A
LRT-12-163