LAND ROVER FRELANDER 2 2006 Repair Manual
Manufacturer: LAND ROVER, Model Year: 2006, Model line: FRELANDER 2, Model: LAND ROVER FRELANDER 2 2006Pages: 3229, PDF Size: 78.5 MB
Page 1031 of 3229
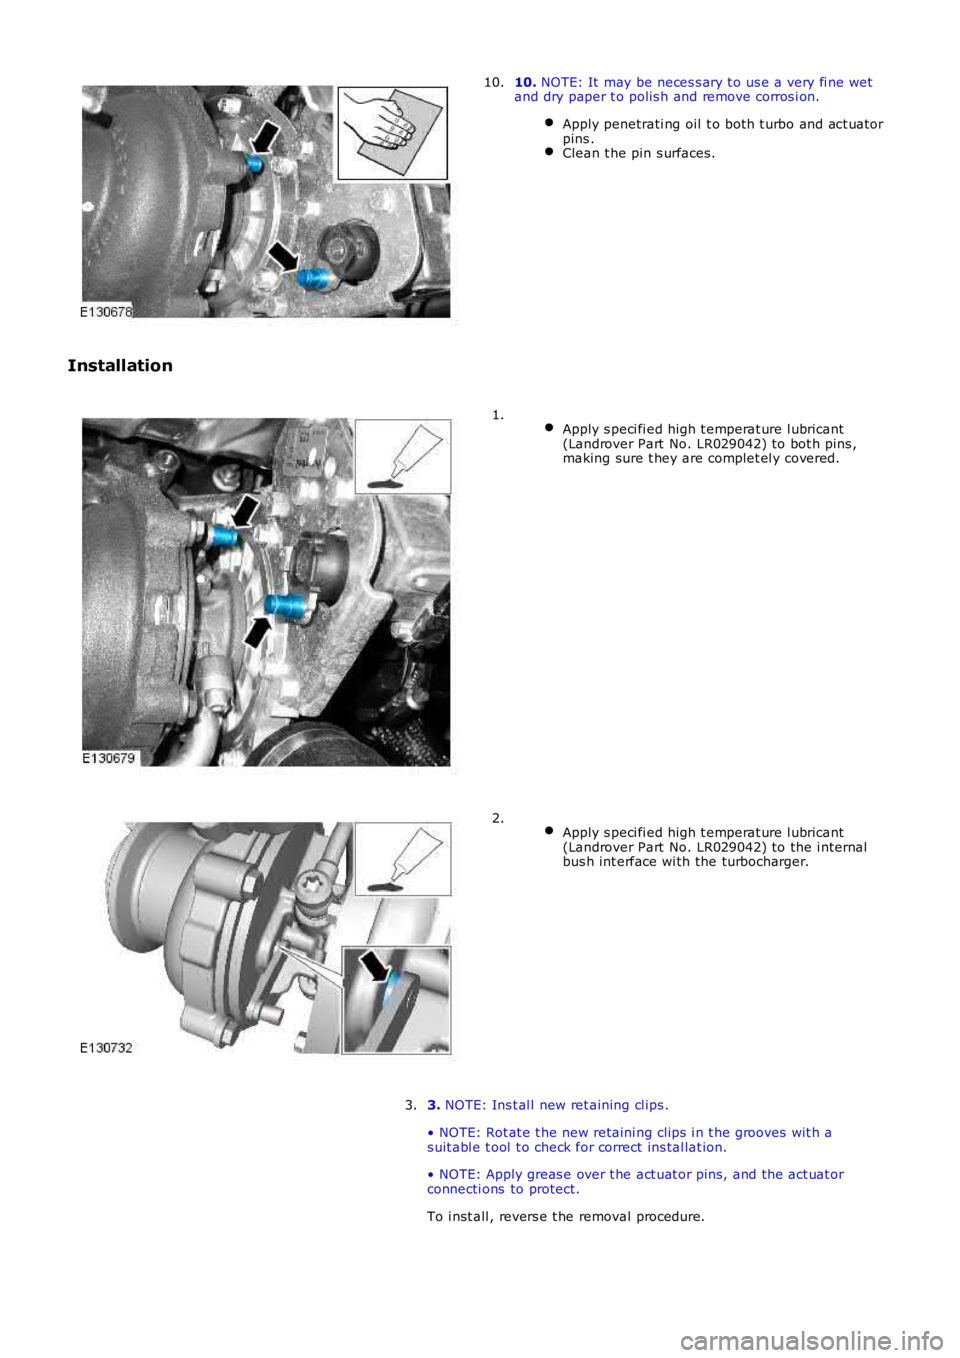
10. NOTE: It may be neces s ary t o us e a very fi ne wetand dry paper t o polis h and remove corros i on.
Apply penetrati ng oil t o both t urbo and act uat orpins .Clean t he pin s urfaces.
10.
Installation
Apply s peci fi ed high t emperat ure l ubricant(Landrover Part No. LR029042) to bot h pins ,making sure t hey are complet el y covered.
1.
Apply s peci fi ed high t emperat ure l ubricant(Landrover Part No. LR029042) to the i nternalbus h int erface wi th the turbocharger.
2.
3. NOTE: Ins t al l new ret aining cl ips .
• NOTE: Rot at e t he new retaini ng clips i n t he grooves wit h as uit abl e t ool t o check for correct ins tal lat ion.
• NOTE: Apply greas e over t he act uat or pins , and the act uat orconnecti ons to protect.
To i nst all , revers e t he removal procedure.
3.
Page 1032 of 3229
Publi s hed: 11-May-2011
Fuel Charging and Controls - Turbocharger - TD4 2.2L Diesel - Turbocharger
Removal and Inst all ati on
Removal W ARNING: Observe due care when worki ng near a hot exhaust s ys tem.
1. W ARNING: Make sure t o s upport the vehicle wit h axle
s tands .
Rais e and s upport t he vehi cl e.
1.
Remove t he exhaus t gas recirculat ion (EGR) cool er.
Refer t o: Exhaus t Gas Reci rculati on (EGR) Cooler (303-08B Engi ne
Emi ss i on Cont rol - TD4 2.2L Dies el, Removal and Ins tall ati on).
2.
Remove t he cat alyti c convert er.
Refer t o: Cat alyt ic Converter - Vehicles W it hout : Di es el Part iculate Fil ter (DPF) (309-00B Exhaus t Syst em - TD4 2.2L Di es el, Removal
and Inst all at ion).
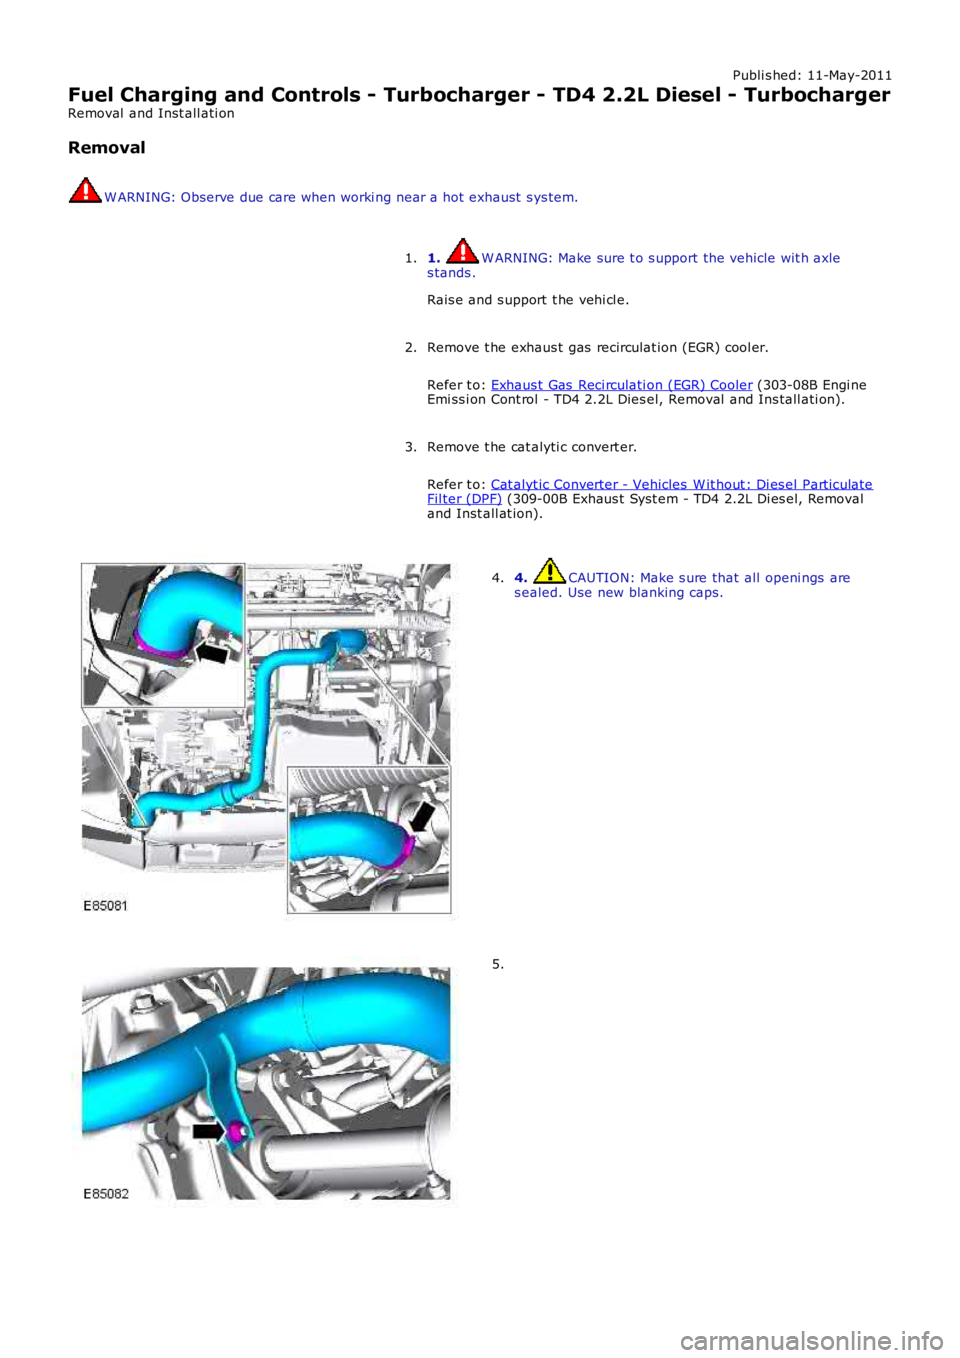
3. 4. CAUTION: Make s ure that all openi ngs are
s ealed. Use new blanking caps.
4. 5.
Page 1033 of 3229
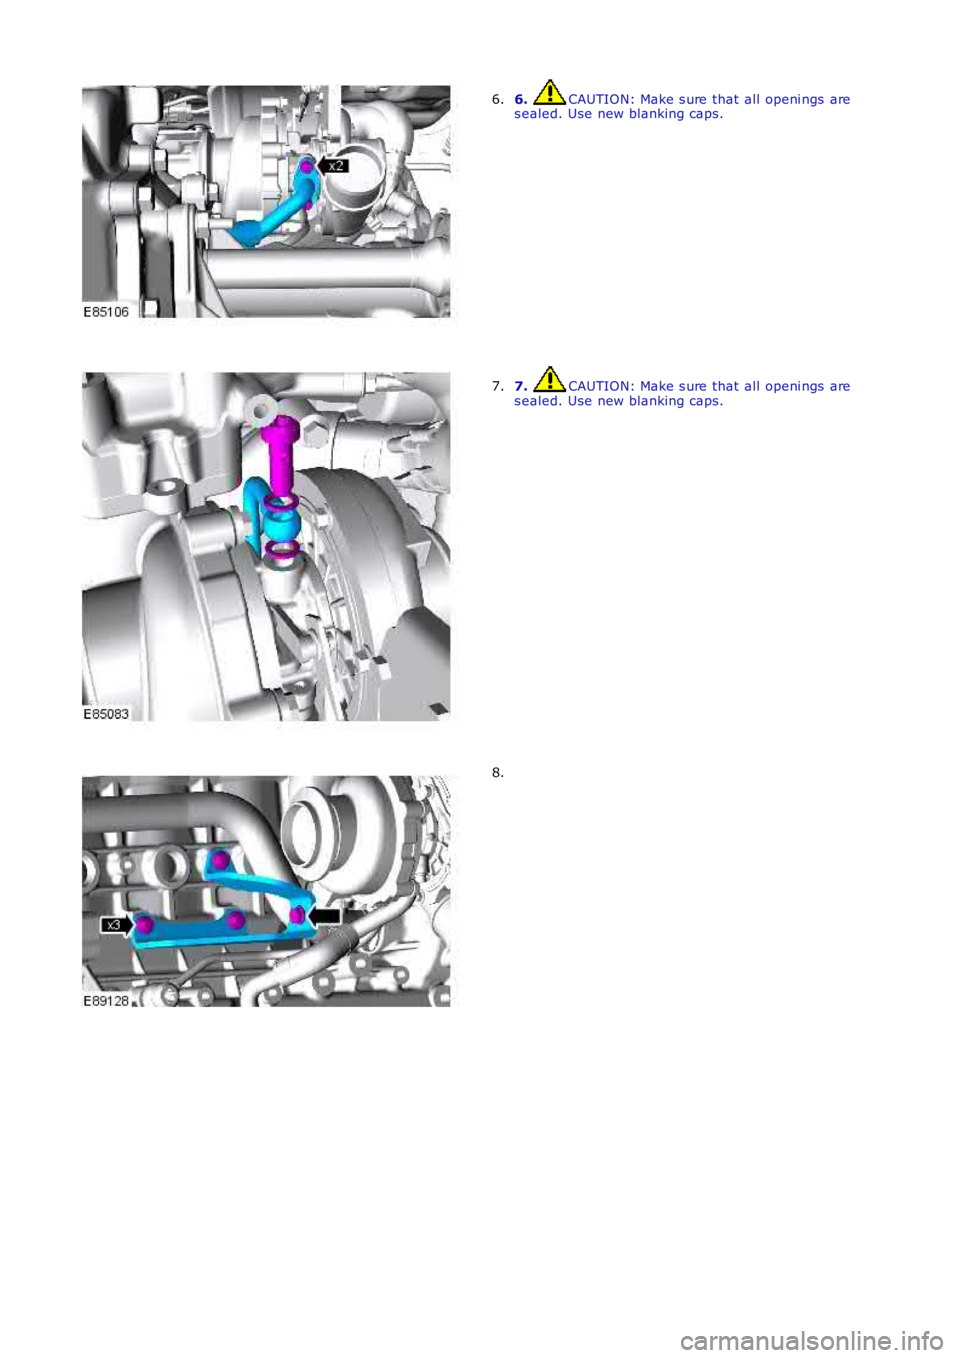
6. CAUTION: Make s ure that all openi ngs are
s ealed. Use new blanking caps.
6. 7. CAUTION: Make s ure that all openi ngs are
s ealed. Use new blanking caps.
7. 8.
Page 1034 of 3229
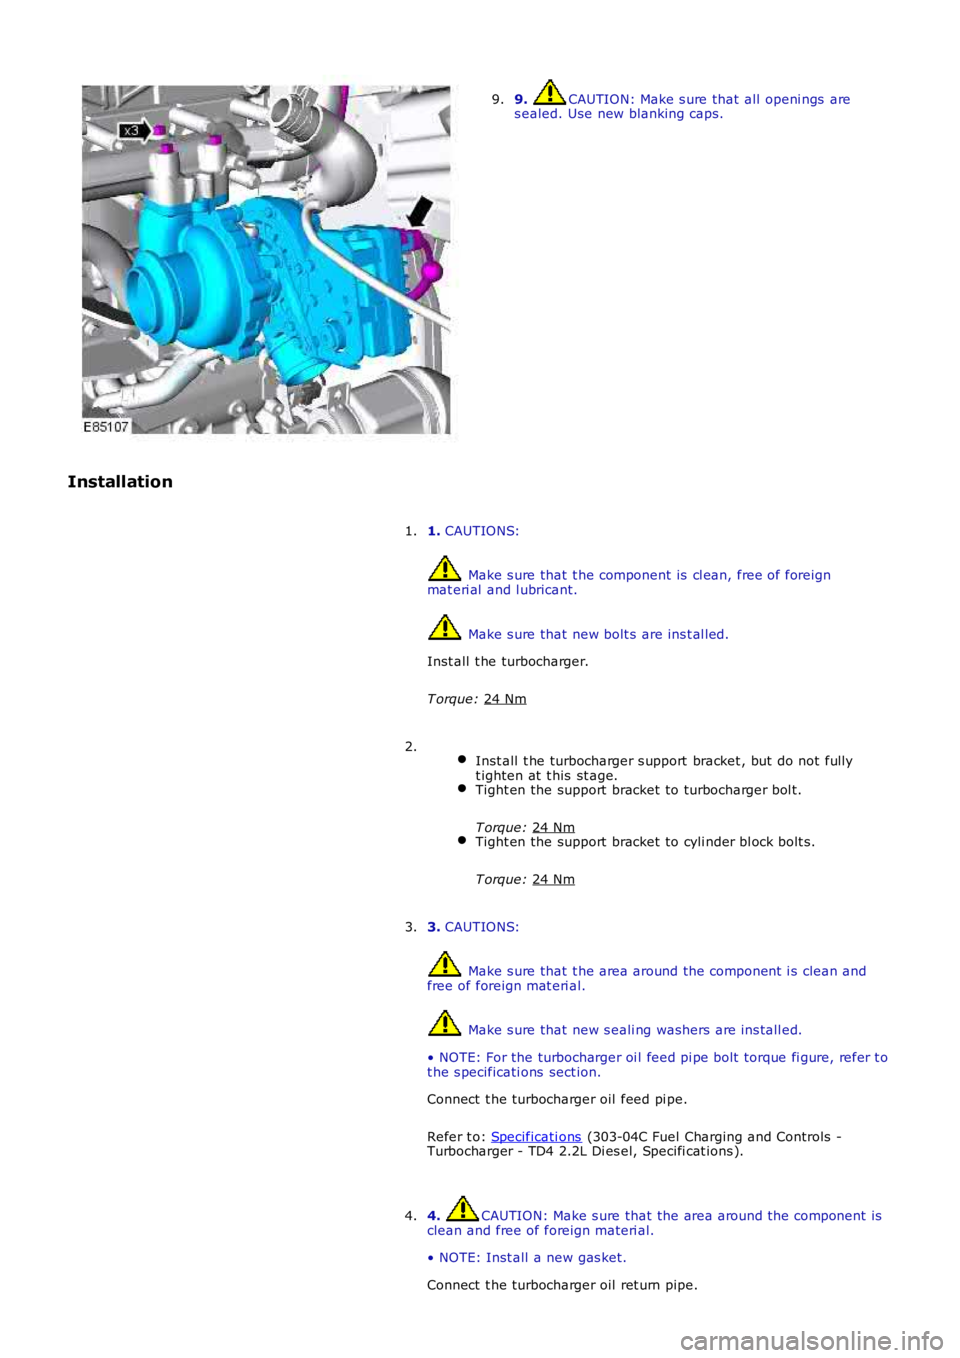
9. CAUTION: Make s ure that all openi ngs are
s ealed. Use new blanking caps.
9.
Installation 1. CAUTIONS: Make s ure that t he component is cl ean, free of foreign
mat eri al and l ubricant. Make s ure that new bolt s are ins t al led.
Inst all t he turbocharger.
T orque: 24 Nm 1.
Inst all t he turbocharger s upport bracket , but do not fully
t ighten at t his st age. Tight en the support bracket to turbocharger bol t.
T orque: 24 Nm Tight en the support bracket to cyli nder bl ock bolt s .
T orque: 24 Nm 2.
3. CAUTIONS: Make s ure that t he area around the component i s clean and
free of foreign mat eri al. Make s ure that new s eali ng washers are ins tall ed.
• NOTE: For the turbocharger oi l feed pi pe bol t torque fi gure, refer t o
t he s pecificati ons sect ion.
Connect t he turbocharger oil feed pi pe.
Refer t o: Specificati ons (303-04C Fuel Charging and Controls -
Turbocharger - TD4 2.2L Di es el, Specifi cat ions ).
3.
4. CAUTION: Make s ure that the area around t he component is
clean and free of foreign materi al.
• NOTE: Inst all a new gas ket.
Connect t he turbocharger oil ret urn pipe.
4.
Page 1035 of 3229

T orque:
10 Nm Inst all t he turbocharger outl et pi pe.
T orque: 25 Nm 5.
Inst all t he cat alyti c convert er.
Refer t o: Cat alyt ic Converter - Vehicles W it hout : Di es el Part iculate Fil ter (DPF) (309-00B Exhaus t Syst em - TD4 2.2L Di es el, Removal
and Inst all at ion).
6.
Inst all t he EGR cool er.
Refer t o: Exhaus t Gas Reci rculati on (EGR) Cooler (303-08B Engi ne
Emi ss i on Cont rol - TD4 2.2L Dies el, Removal and Ins tall ati on).
7.
Check and top-up the engine oi l.
8.
Page 1036 of 3229
Publi s hed: 11-May-2011
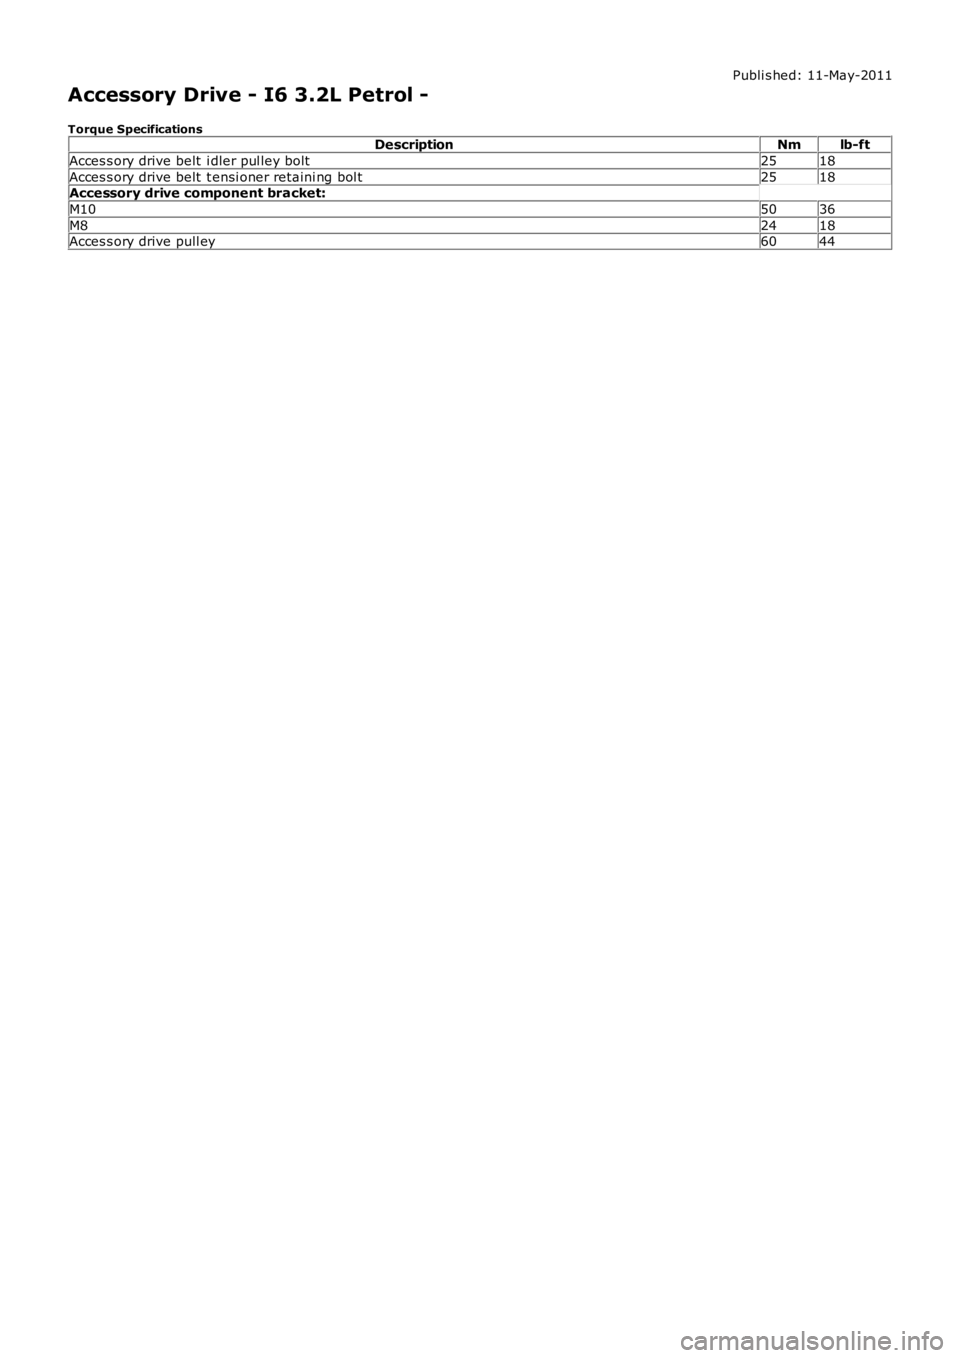
Accessory Drive - I6 3.2L Petrol -
Torque SpecificationsDescriptionNmlb-ft
Acces s ory drive belt i dler pul ley bolt2518
Acces s ory drive belt t ensi oner retaini ng bol t2518Accessory drive component bracket:
M105036
M82418Acces s ory drive pull ey6044
Page 1037 of 3229
Publi s hed: 11-May-2011
Accessory Drive - I6 3.2L Petrol - Accessory Drive
Des cript ion and Operat ion
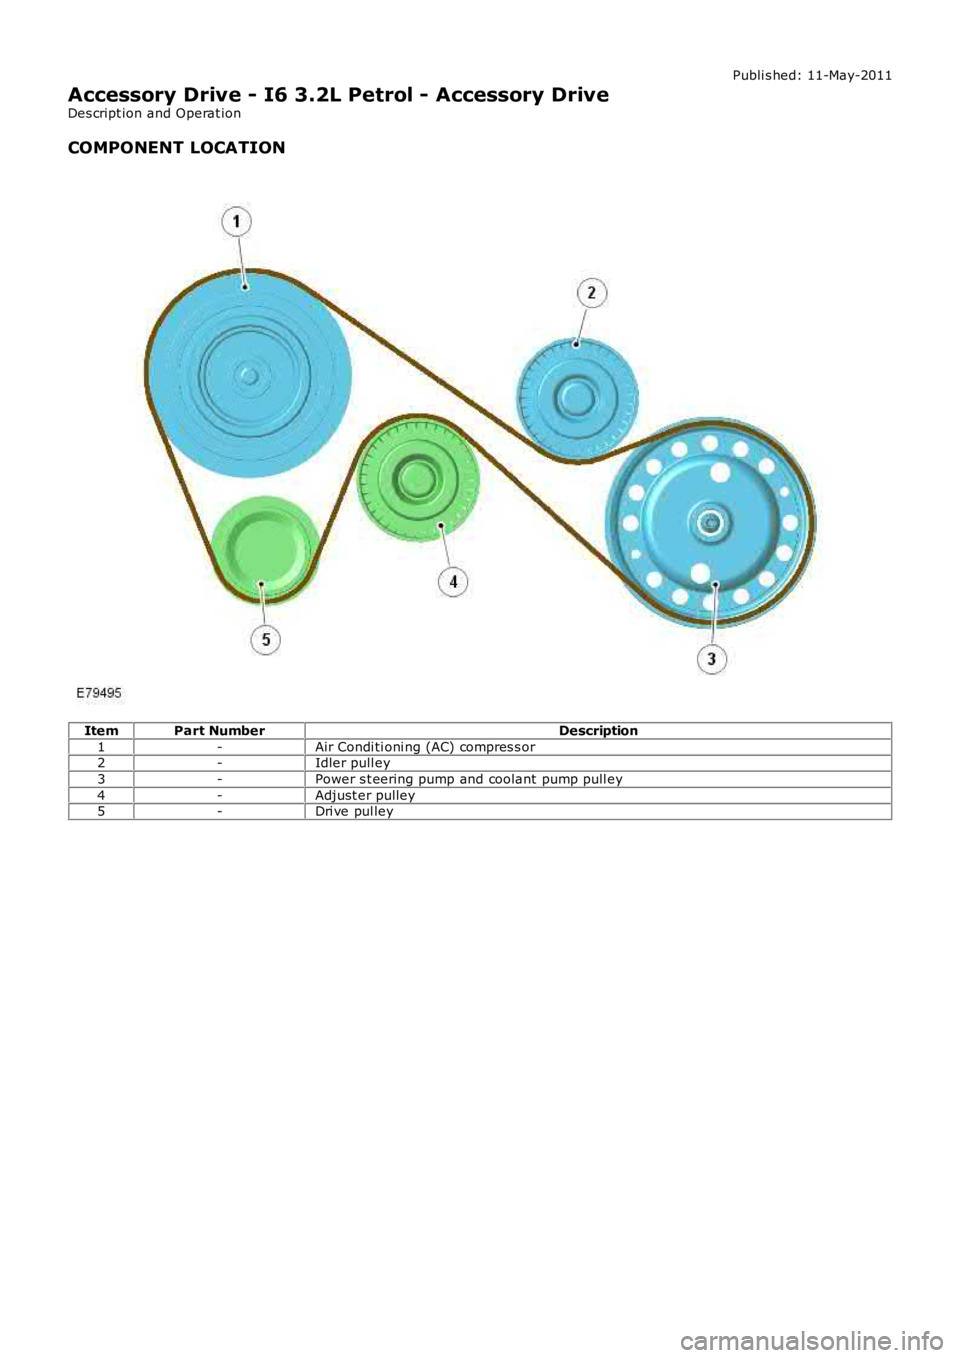
COMPONENT LOCATION
ItemPart NumberDescription
1-Air Condi ti oni ng (AC) compres s or2-Idler pull ey
3-Power s t eering pump and coolant pump pull ey
4-Adjust er pulley5-Dri ve pul ley
Page 1038 of 3229
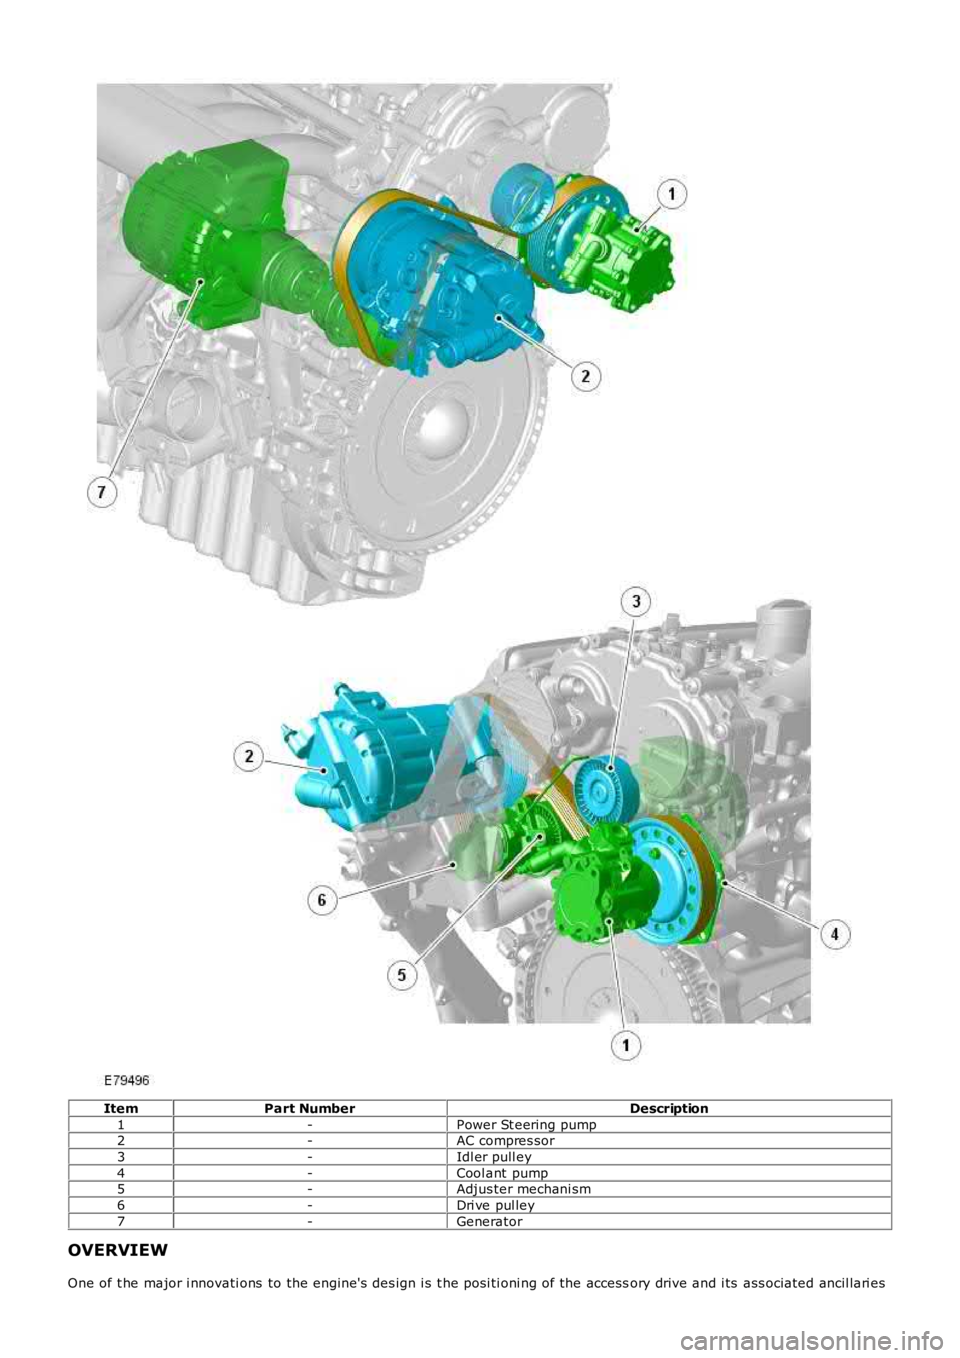
ItemPart NumberDescription
1-Power St eering pump2-AC compres sor
3-Idl er pull ey
4-Cool ant pump5-Adjus ter mechani sm
6-Dri ve pul ley
7-Generator
OVERVIEW
One of t he major i nnovati ons to the engine's des ign i s t he posi ti oni ng of the accessory drive and i ts ass ociated ancil lari es
Page 1039 of 3229

at the rear of the engine. The acces sory dri ve s ys t em overhangs the trans mi ss i on, allowing t he front of the engine to befree of prot rus ions . Thi s unique desi gn cont ri butes t o providi ng a compact and robust engine.
The polyvee access ory dri ve-bel t obtains i ts drive from a s haft , powered by t he crankshaft. The acces s ory drive-belt powerst he:
AC compres s or,engi ne cool ant pump, andpower st eering pump
The engi ne cool ant pump and the power-s t eering pump share a common coupl ing.
Belt t ens i on is maintai ned by an automat ic t ens i on s ys t em whi ch provi des a cons t ant tens ion wi thout bel t s li p.
The generator is direct ly at tached by a coupl ing t o t he rear of t he cranks haft driven s haft. Thi s direct dri ve arrangementimproves the generat or's durabi li ty by prevent ing s ide-loadings, caus ed by the tens ion of a drive belt , act ing on thegenerator's rot or bearing.
In addi ti on t o helping make the engine compact and robust , the novel arrangement of the access ory drive s ys tem als o aidsin reduci ng engi ne weight .
Page 1040 of 3229
Publi s hed: 11-May-2011
Accessory Drive - I6 3.2L Petrol - Accessory Drive
Diagnosi s and Tes ti ng
Principles of Operation
For a detail ed descripti on of the Rear End Acces s ory Drive (READ), refer to the relevant Des cri pti on and Operati on s ect ionof the workshop manual.REFER to: Acces s ory Drive (303-05A Acces s ory Drive - I6 3.2L Pet rol , Descri pti on and Operat ion).
Inspection and Verification
1. Verify t he cus t omer concern.1.
2. Vis ually ins pect for s ys tem int egrit y and obvi ous s igns of damage.2.
Visual Inspection
Mechanical
READ beltREAD belt t ensi onREAD belt t ensi onerREAD belt pul leysREAD belt pul ley s eal s
3. If an obvious cause for an obs erved or report ed concern is found, correct t he caus e (if pos s ible) beforeproceeding t o t he next s t ep3.
4. If t he caus e is not vis ually evi dent , verify t he sympt om and refer t o t he Sympt om Chart.4.
Symptom Chart
SymptomPossible CauseAction
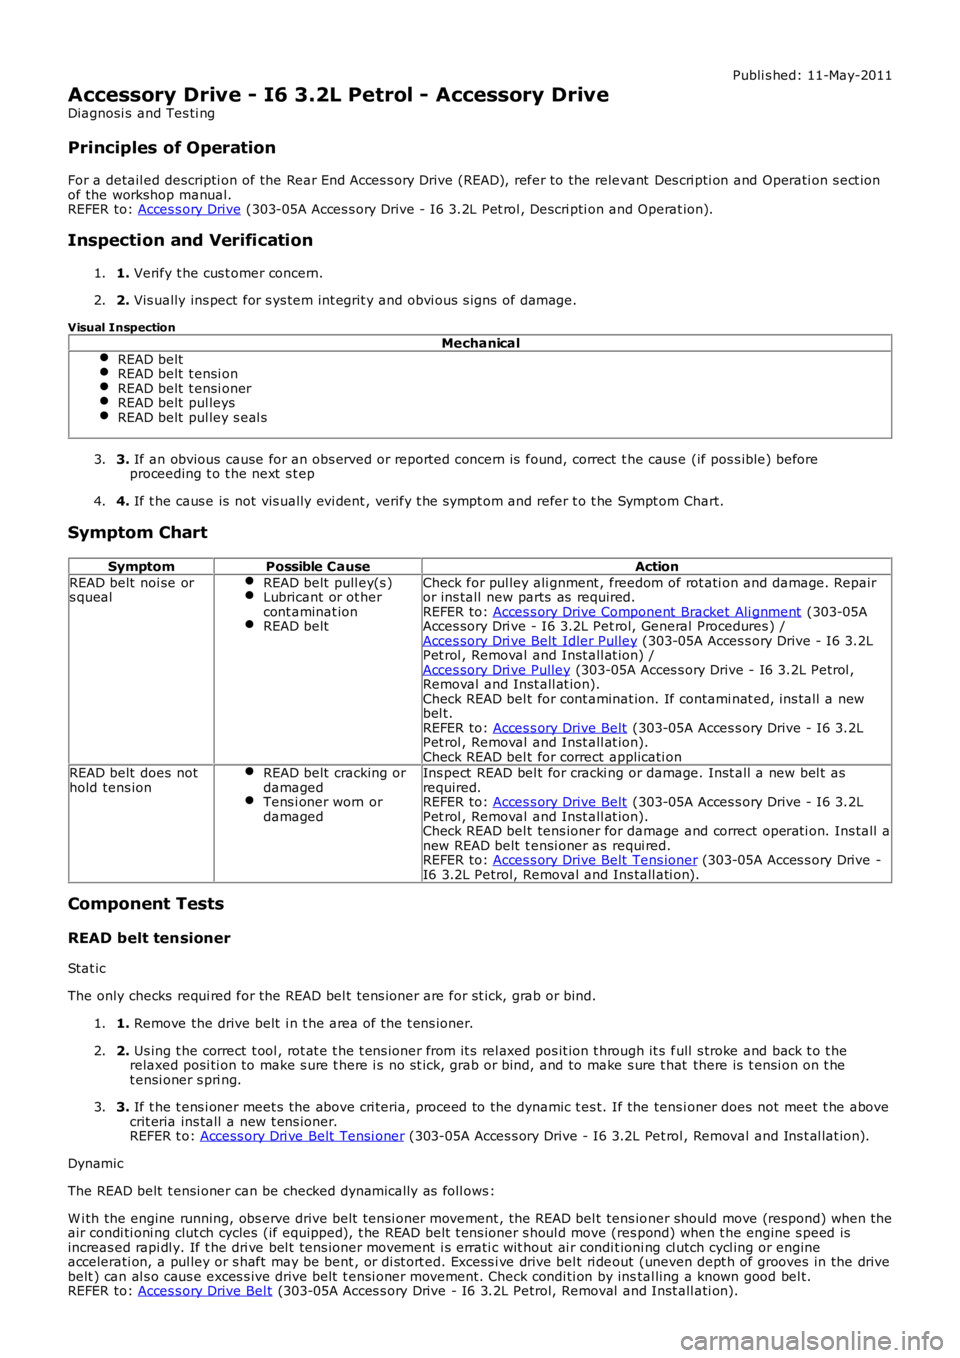
READ belt noi se ors quealREAD belt pull ey(s )Lubricant or ot hercont aminat ionREAD belt
Check for pul ley ali gnment , freedom of rot ati on and damage. Repairor ins tall new parts as required.REFER to: Acces s ory Drive Component Bracket Ali gnment (303-05AAcces sory Dri ve - I6 3.2L Pet rol, General Procedures ) /Acces sory Dri ve Belt Idler Pulley (303-05A Acces s ory Drive - I6 3.2LPet rol , Removal and Inst all at ion) /Acces sory Dri ve Pulley (303-05A Acces s ory Drive - I6 3.2L Petrol ,Removal and Inst all at ion).Check READ bel t for cont aminat ion. If contami nat ed, ins tall a newbel t.REFER to: Acces s ory Drive Belt (303-05A Acces s ory Drive - I6 3.2LPet rol , Removal and Inst all at ion).Check READ bel t for correct applicati onREAD belt does nothold tens ionREAD belt cracking ordamagedTens i oner worn ordamaged
Ins pect READ bel t for cracki ng or damage. Inst all a new bel t asrequired.REFER to: Acces s ory Drive Belt (303-05A Acces s ory Drive - I6 3.2LPet rol , Removal and Inst all at ion).Check READ bel t tens ioner for damage and correct operati on. Ins tall anew READ belt t ensi oner as requi red.REFER to: Acces s ory Drive Belt Tens ioner (303-05A Acces s ory Drive -I6 3.2L Petrol, Removal and Ins tall ati on).
Component Tests
READ belt tensioner
Stat ic
The only checks requi red for the READ bel t tens ioner are for st ick, grab or bind.
1. Remove the drive belt i n t he area of t he t ens ioner.1.
2. Us ing t he correct t ool , rot at e t he t ens ioner from it s rel axed pos it ion t hrough it s full s troke and back t o t herelaxed posi ti on to make s ure t here i s no s t ick, grab or bind, and to make s ure t hat there is t ensi on on t het ensi oner s pri ng.
2.
3. If t he t ens i oner meet s the above cri teria, proceed to the dynamic t es t. If the tens ioner does not meet t he abovecrit eria ins tall a new t ens ioner.REFER t o: Access ory Dri ve Belt Tensi oner (303-05A Acces s ory Drive - I6 3.2L Pet rol , Removal and Ins t al lat ion).
3.
Dynamic
The READ belt t ensi oner can be checked dynamically as foll ows :
W i th the engine running, obs erve drive belt t ensi oner movement , the READ bel t tens ioner should move (respond) when theair condi ti oni ng clut ch cycles (if equipped), t he READ belt t ens ioner s houl d move (res pond) when t he engine s peed isincreas ed rapi dl y. If t he dri ve bel t tens ioner movement i s errati c wit hout ai r condit ioni ng cl utch cycl ing or engineaccelerati on, a pul ley or s haft may be bent , or di st ort ed. Excess i ve drive bel t ri deout (uneven dept h of grooves in the drivebelt ) can al s o caus e exces s ive drive belt t ensi oner movement. Check condi ti on by instal ling a known good bel t.REFER to: Acces s ory Drive Bel t (303-05A Acces s ory Drive - I6 3.2L Petrol, Removal and Inst all ati on).