LAND ROVER FRELANDER 2 2006 Repair Manual
FRELANDER 2 2006
LAND ROVER
LAND ROVER
https://www.carmanualsonline.info/img/64/57251/w960_57251-0.png
LAND ROVER FRELANDER 2 2006 Repair Manual
Trending: jacking points, air condition, tow bar, sunroof, open gas tank, fuse box diagram, display
Page 1041 of 3229
READ belt
1. W i th the engine off, check routi ng of the drive belt .REFER t o: Access ory Dri ve (303-05A Access ory Dri ve - I6 3.2L Petrol, Des cript ion and Operat ion).1.
2. Ins pect t he dri ve belt t ens i oner wear indicator t o confirm the drive belt i s wi thin operati ng range. Ins tal l a newdrive belt as necess ary .REFER t o: Access ory Dri ve Belt (303-05A Acces sory Dri ve - I6 3.2L Pet rol, Removal and Ins tal lat ion).
2.
Page 1042 of 3229
Publi s hed: 11-May-2011
Accessory Drive - I6 3.2L Petrol - Accessory Drive Component Bracket
Alignment
General Procedures
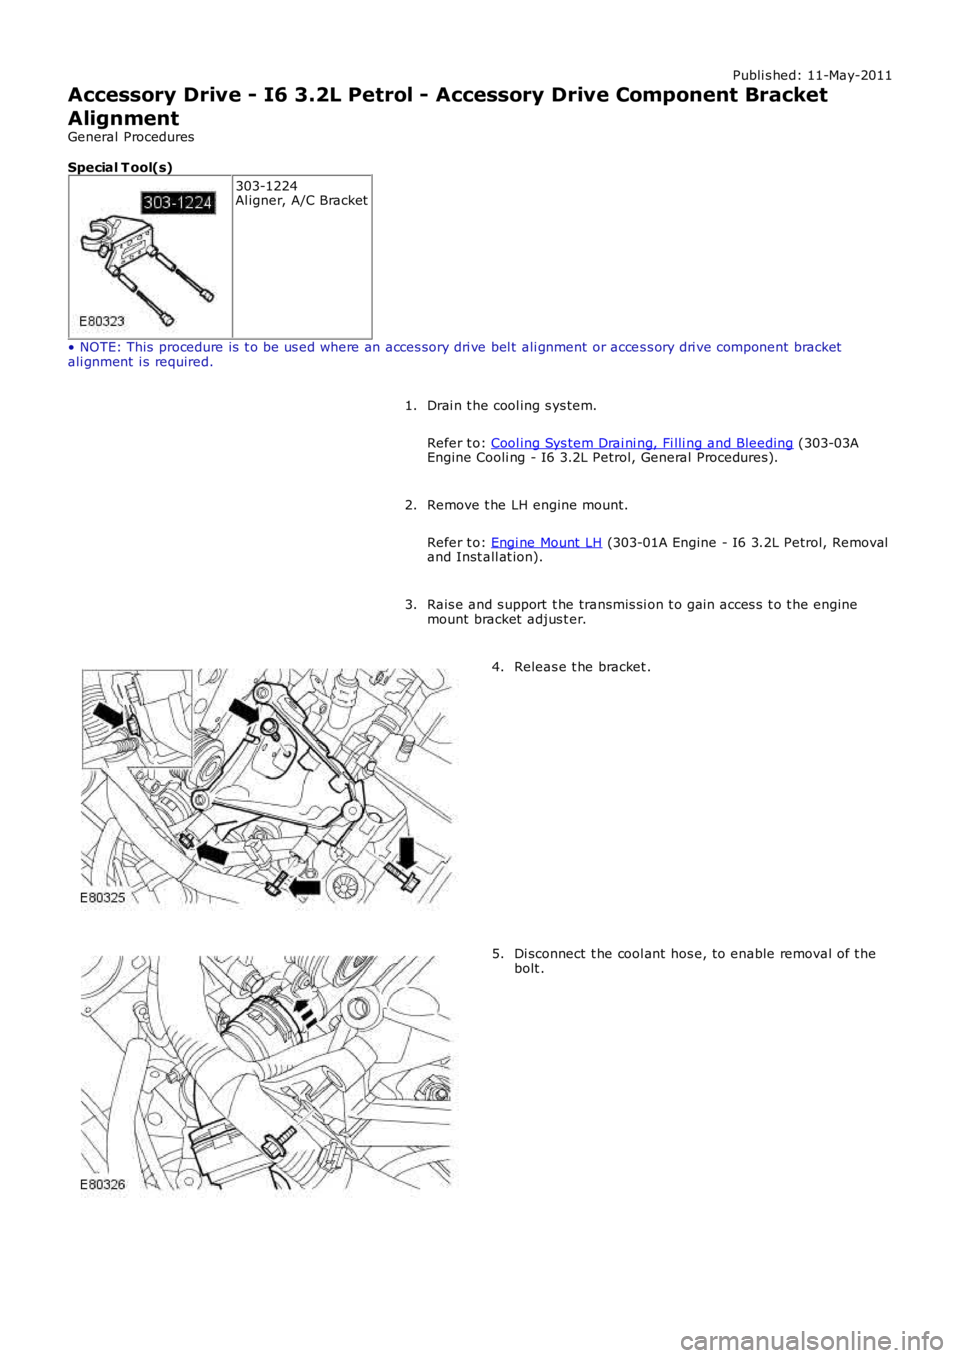
Special T ool(s)
303-1224Al igner, A/C Bracket
• NOTE: This procedure is t o be us ed where an acces sory dri ve bel t ali gnment or acces s ory dri ve component bracketali gnment i s required.
Drai n t he cool ing s ys tem.
Refer t o: Cool ing Sys tem Drai ni ng, Fi lli ng and Bleeding (303-03AEngine Cooli ng - I6 3.2L Petrol, General Procedures).
1.
Remove t he LH engine mount.
Refer t o: Engi ne Mount LH (303-01A Engine - I6 3.2L Petrol, Removaland Inst all at ion).
2.
Rais e and s upport t he transmis si on t o gain acces s t o t he enginemount bracket adjus t er.3.
Releas e t he bracket .4.
Di sconnect t he cool ant hos e, to enable removal of t hebolt .5.
Page 1043 of 3229
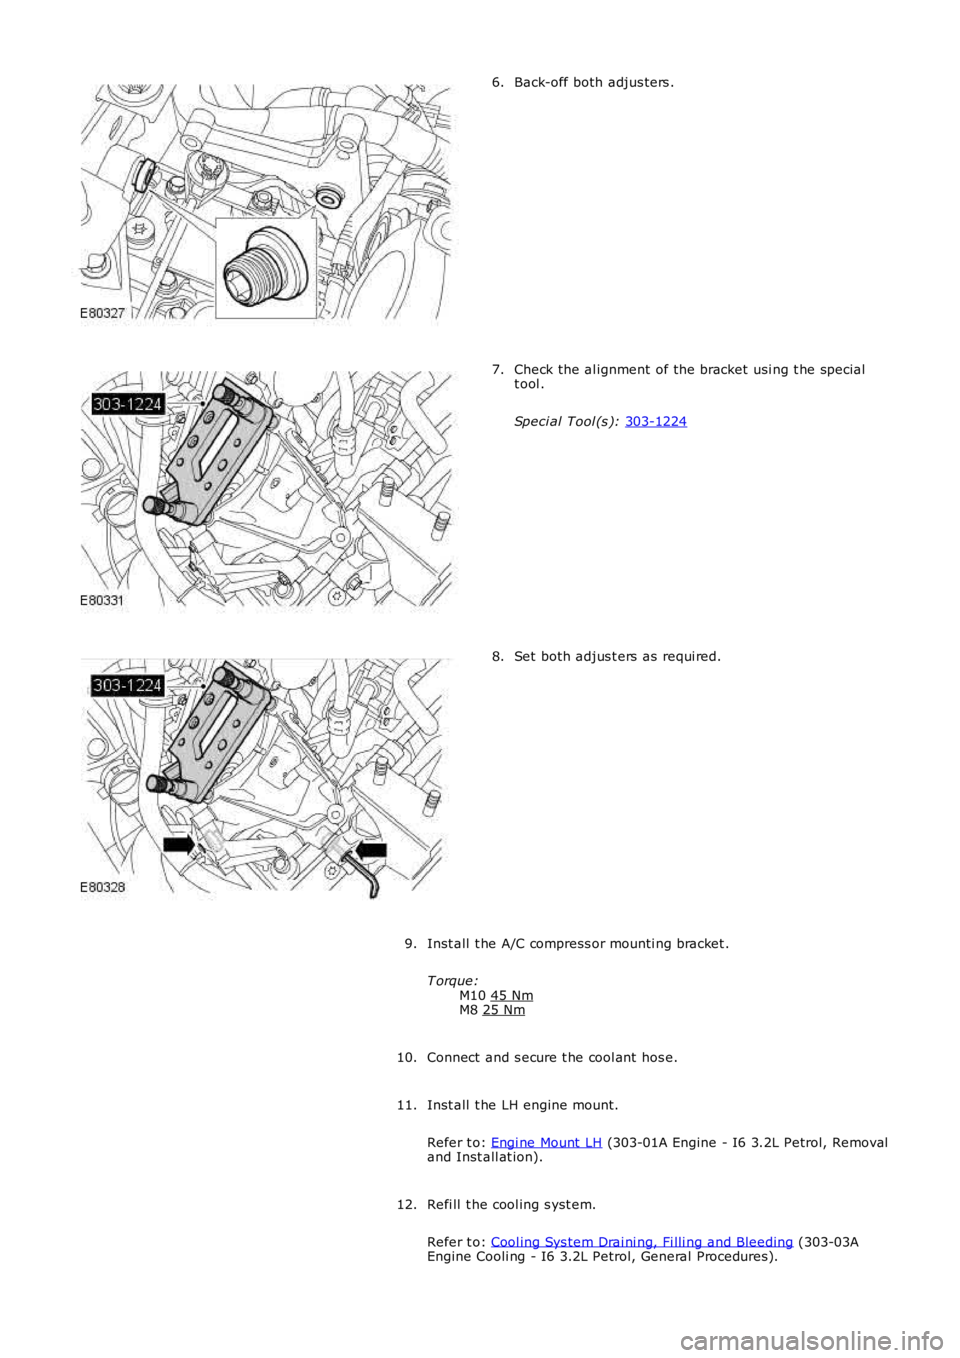
Back-off both adjus ters .
6. Check the al ignment of the bracket usi ng t he special
t ool .
Speci al Tool (s ): 303-1224 7.
Set both adjus t ers as requi red.
8.
Inst all t he A/C compress or mounti ng bracket .
T orque: M10 45 Nm M8
25 Nm 9.
Connect and s ecure t he cool ant hos e.
10.
Inst all t he LH engine mount.
Refer t o: Engi ne Mount LH (303-01A Engine - I6 3.2L Petrol, Removal
and Inst all at ion).
11.
Refi ll t he cool ing s yst em.
Refer t o: Cool ing Sys tem Drai ni ng, Fi lli ng and Bleeding (303-03A
Engine Cooli ng - I6 3.2L Petrol, General Procedures).
12.
Page 1044 of 3229
Publi s hed: 11-May-2011
Accessory Drive - I6 3.2L Petrol - Accessory Drive Belt
Removal and Inst all ati on
Removal
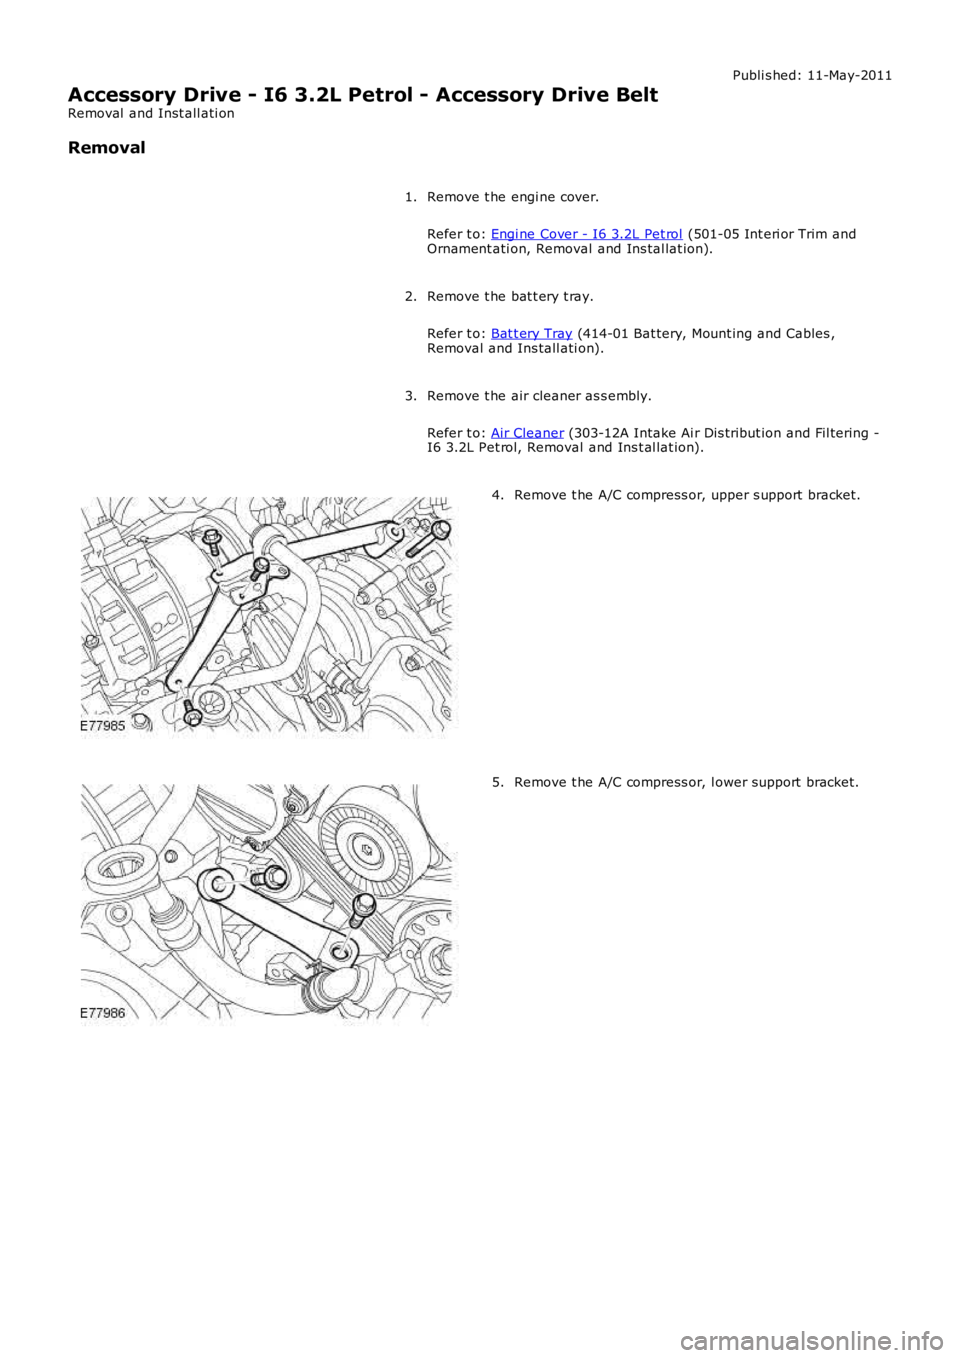
Remove t he engi ne cover.
Refer t o: Engi ne Cover - I6 3.2L Pet rol (501-05 Int eri or Trim andOrnament ati on, Removal and Ins tal lat ion).
1.
Remove t he bat t ery t ray.
Refer t o: Bat t ery Tray (414-01 Bat tery, Mount ing and Cables ,Removal and Ins tall ati on).
2.
Remove t he air cleaner as s embly.
Refer t o: Air Cleaner (303-12A Intake Ai r Dis tribut ion and Fil tering -I6 3.2L Pet rol, Removal and Ins t al lat ion).
3.
Remove t he A/C compress or, upper s upport bracket.4.
Remove t he A/C compress or, l ower support bracket.5.
Page 1045 of 3229
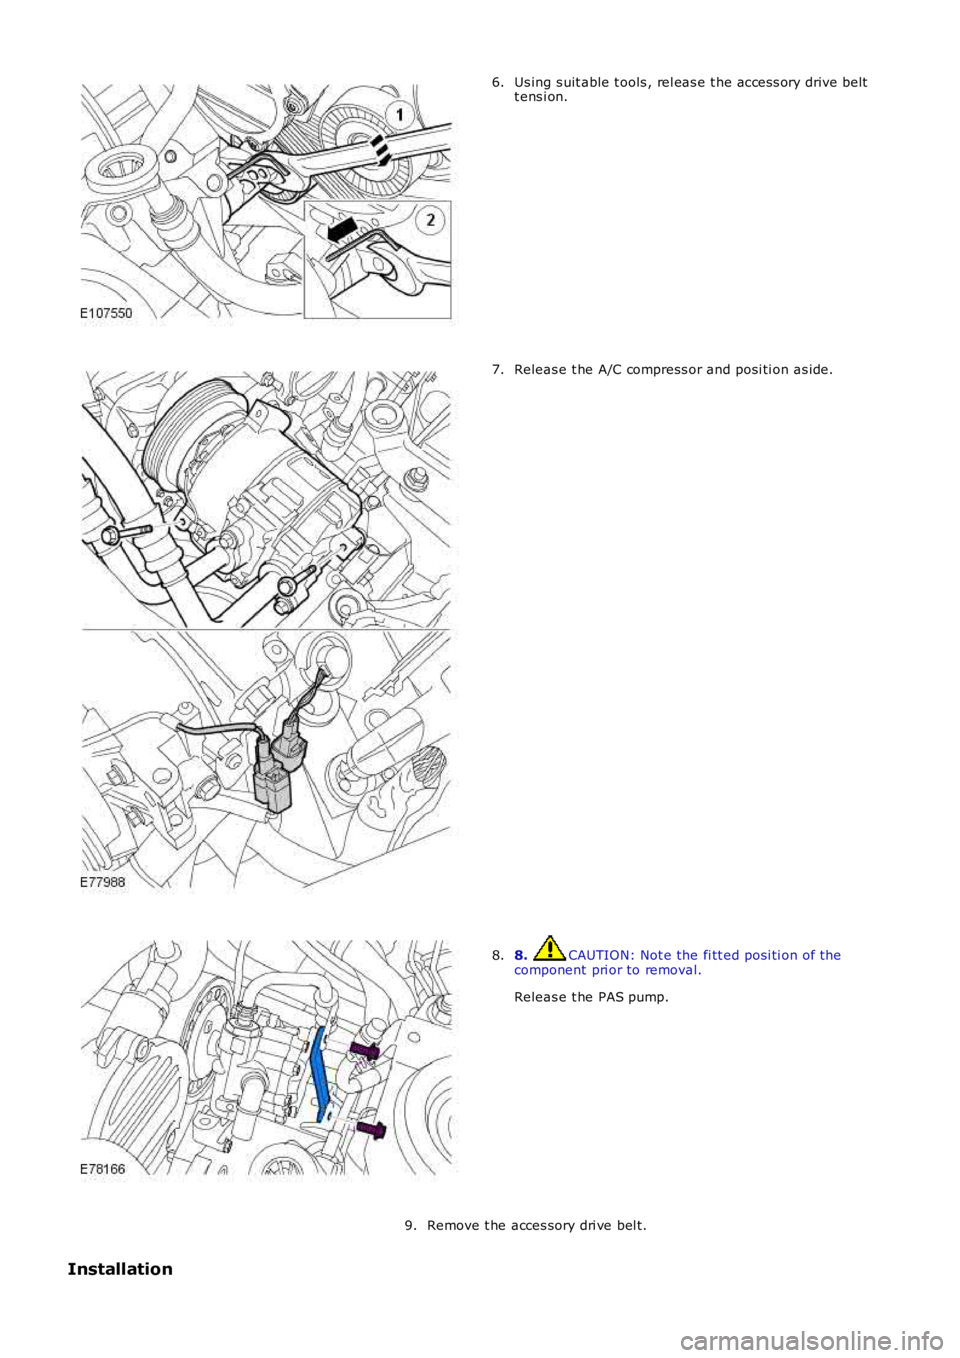
Us ing s uit able t ools , rel eas e t he acces s ory drive beltt ens i on.6.
Releas e t he A/C compress or and posi ti on as ide.7.
8. CAUTION: Not e the fi tt ed posi ti on of thecomponent pri or to removal.
Releas e t he PAS pump.
8.
Remove t he acces sory dri ve bel t.9.
Installation
Page 1046 of 3229
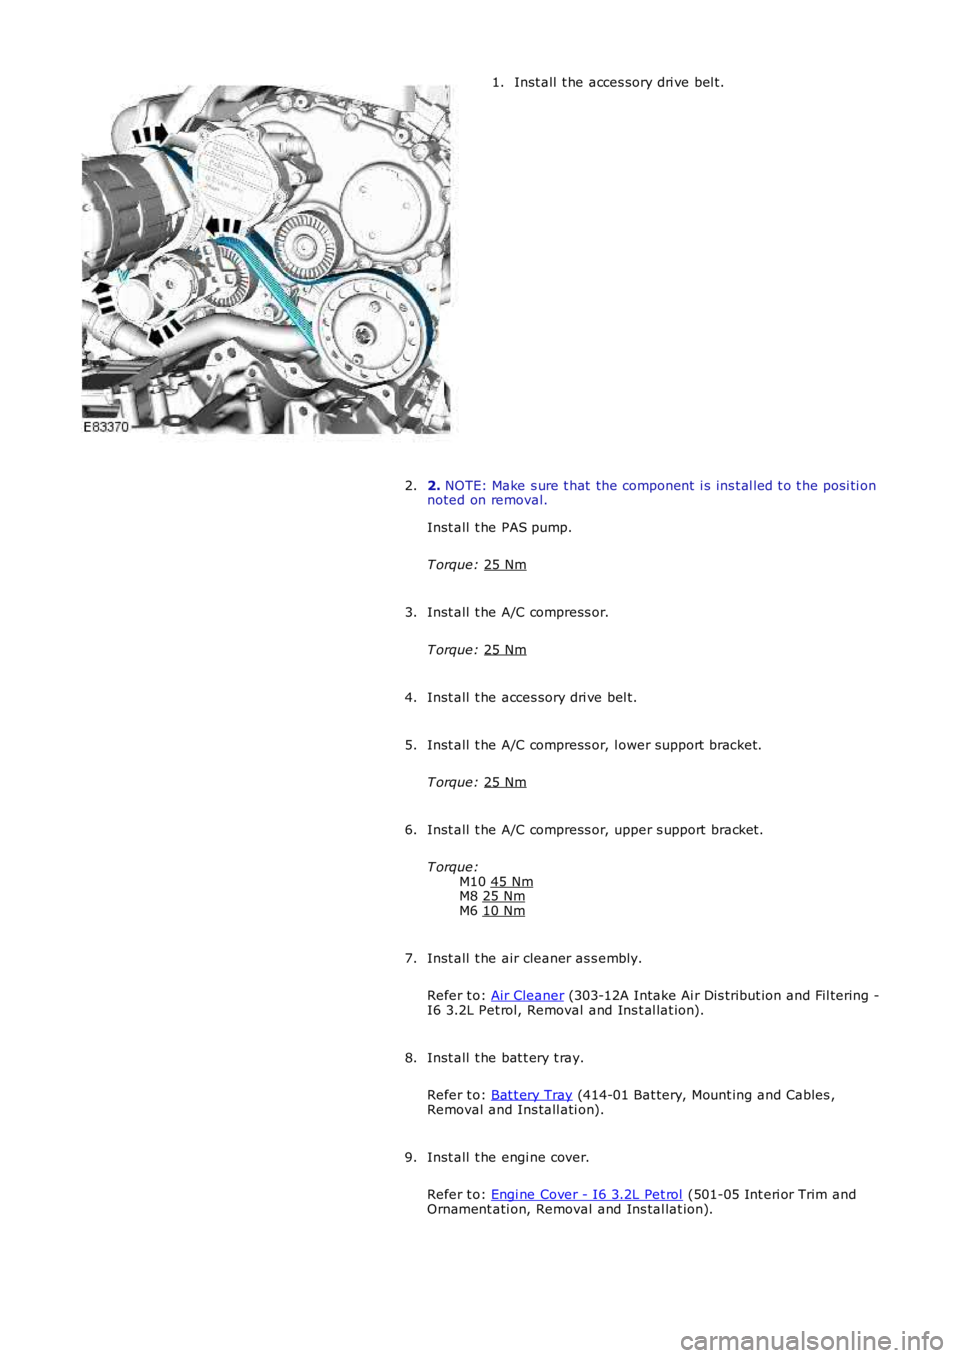
Inst all t he acces sory dri ve bel t.
1.
2. NOTE: Make s ure t hat the component i s ins t al led t o t he posi ti on
noted on removal.
Inst all t he PAS pump.
T orque: 25 Nm 2.
Inst all t he A/C compress or.
T orque: 25 Nm 3.
Inst all t he acces sory dri ve bel t.
4.
Inst all t he A/C compress or, l ower support bracket.
T orque: 25 Nm 5.
Inst all t he A/C compress or, upper s upport bracket.
T orque: M10 45 Nm M8
25 Nm M6
10 Nm 6.
Inst all t he air cleaner as s embly.
Refer t o: Air Cleaner (303-12A Intake Ai r Dis tribut ion and Fil tering -
I6 3.2L Pet rol, Removal and Ins t al lat ion).
7.
Inst all t he bat t ery t ray.
Refer t o: Bat t ery Tray (414-01 Bat tery, Mount ing and Cables ,
Removal and Ins tall ati on).
8.
Inst all t he engi ne cover.
Refer t o: Engi ne Cover - I6 3.2L Pet rol (501-05 Int eri or Trim and
Ornament ati on, Removal and Ins tal lat ion).
9.
Page 1047 of 3229
Publi s hed: 11-May-2011
Accessory Drive - I6 3.2L Petrol - Accessory Drive Belt Tensioner
Removal and Inst all ati on
Removal
Remove t he cover and dis connect the bat tery ground cabl e.
Refer t o: Specificati ons (414-00 Bat tery and Charging Sys tem -
General Informat ion, Specificati ons).
1.
Remove t he engi ne cover.
Refer t o: Engi ne Cover - I6 3.2L Pet rol (501-05 Int eri or Trim and
Ornament ati on, Removal and Ins tal lat ion).
2.
Remove t he bat t ery t ray.
Refer t o: Bat t ery Tray (414-01 Bat tery, Mount ing and Cables ,
Removal and Ins tall ati on).
3.
Remove t he air cleaner as s embly.
Refer t o: Air Cleaner (303-12A Intake Ai r Dis tribut ion and Fil tering -
I6 3.2L Pet rol, Removal and Ins t al lat ion).
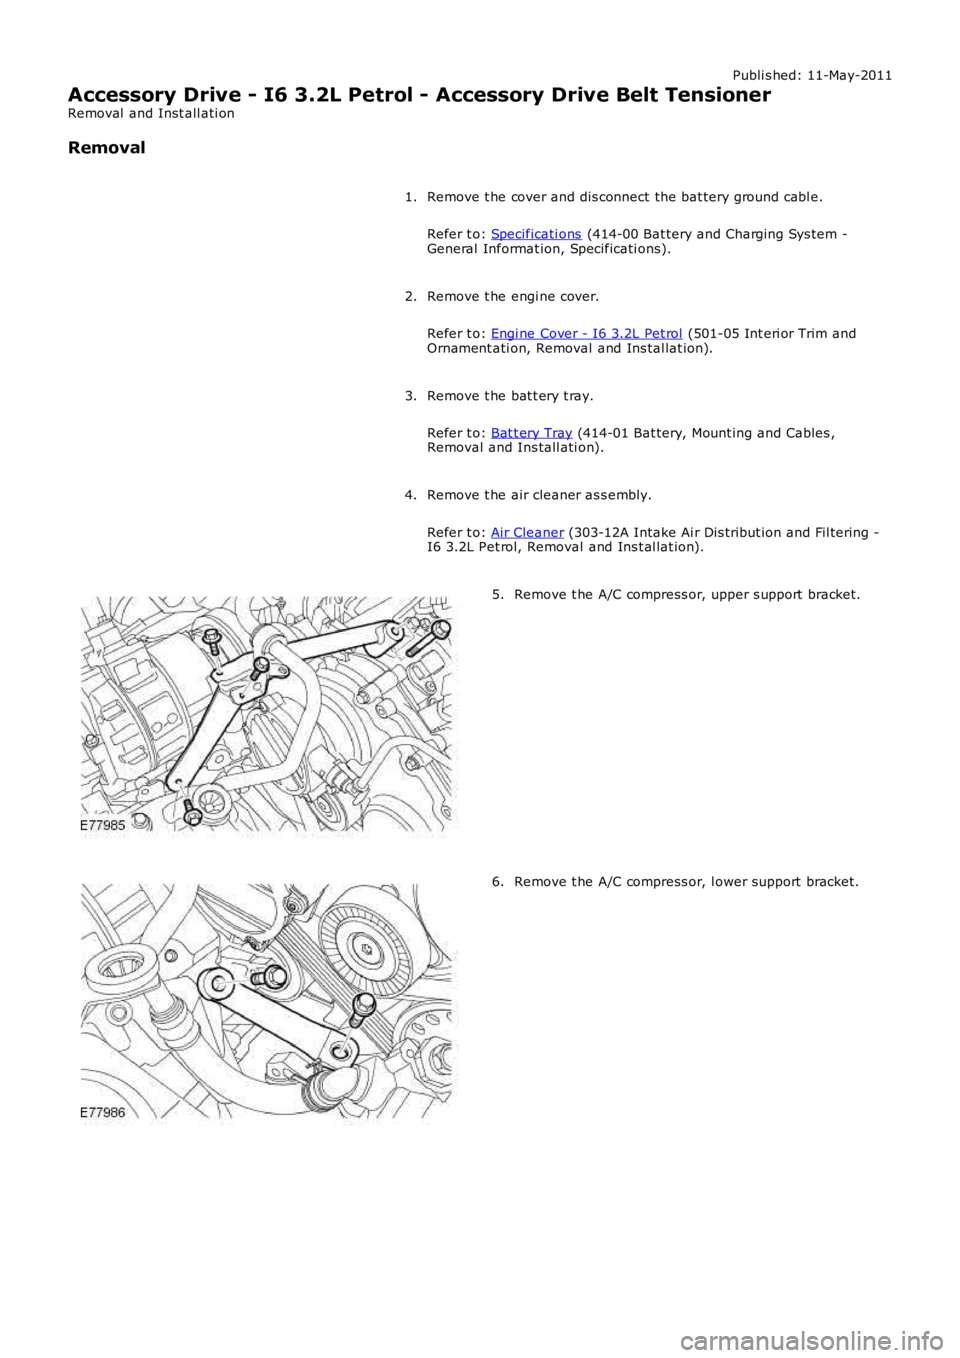
4. Remove t he A/C compress or, upper s upport bracket.
5. Remove t he A/C compress or, l ower support bracket.
6.
Page 1048 of 3229
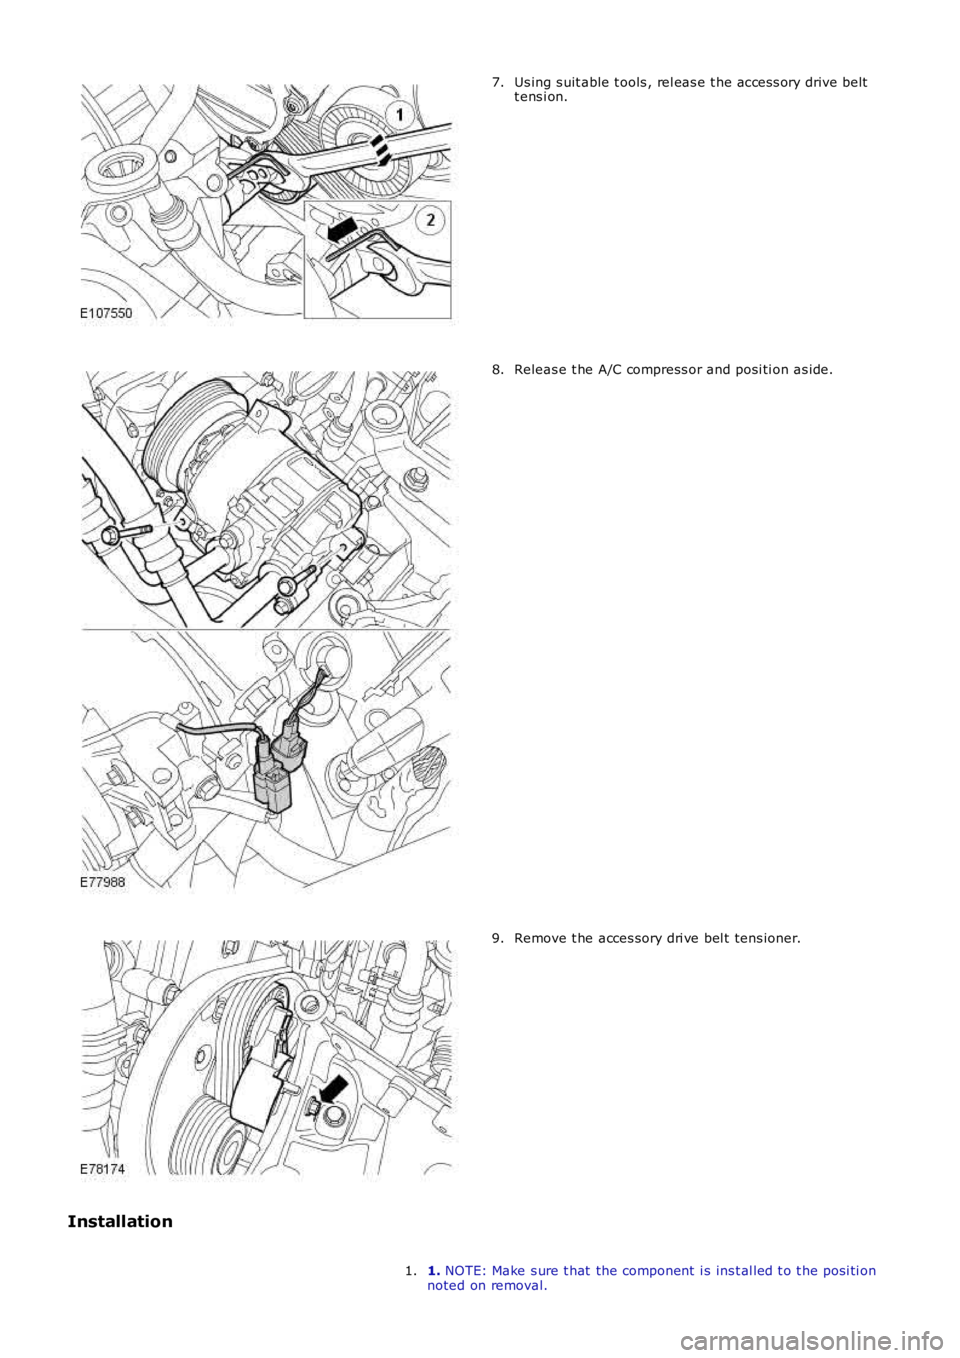
Us ing s uit able t ools , rel eas e t he acces s ory drive belt
t ens i on.
7. Releas e t he A/C compress or and posi ti on as ide.
8. Remove t he acces sory dri ve bel t tens ioner.
9.
Installation 1. NOTE: Make s ure t hat the component i s ins t al led t o t he posi ti on
noted on removal.
1.
Page 1049 of 3229
Inst all t he acces sory dri ve bel t tens ioner.
T orque: 25 Nm Inst all t he A/C compress or.
T orque: 25 Nm 2.
Inst all t he acces sory dri ve bel t.
3.
Inst all t he A/C compress or, l ower support bracket.
T orque: 25 Nm 4.
Inst all t he A/C compress or, upper s upport bracket.
T orque: M10 45 Nm M8
25 Nm M6
10 Nm 5.
Inst all t he air cleaner as s embly.
Refer t o: Air Cleaner (303-12A Intake Ai r Dis tribut ion and Fil tering -
I6 3.2L Pet rol, Removal and Ins t al lat ion).
6.
Inst all t he bat t ery t ray.
Refer t o: Bat t ery Tray (414-01 Bat tery, Mount ing and Cables ,
Removal and Ins tall ati on).
7.
Inst all t he engi ne cover.
Refer t o: Engi ne Cover - I6 3.2L Pet rol (501-05 Int eri or Trim and
Ornament ati on, Removal and Ins tal lat ion).
8.
Connect t he batt ery ground cable and ins tall t he cover.
Refer t o: Specificati ons (414-00 Bat tery and Charging Sys tem -
General Informat ion, Specificati ons).
9.
Page 1050 of 3229
Publi s hed: 11-May-2011
Accessory Drive - I6 3.2L Petrol - Accessory Drive Belt Idler Pulley
Removal and Inst all ati on
Removal
Remove t he cover and dis connect the bat tery ground cabl e.
Refer t o: Specificati ons (414-00 Bat tery and Charging Sys tem -General Informat ion, Specificati ons).
1.
Remove t he engi ne cover.
Refer t o: Engi ne Cover - I6 3.2L Pet rol (501-05 Int eri or Trim andOrnament ati on, Removal and Ins tal lat ion).
2.
Remove t he bat t ery t ray.
Refer t o: Bat t ery Tray (414-01 Bat tery, Mount ing and Cables ,Removal and Ins tall ati on).
3.
Remove t he air cleaner as s embly.
Refer t o: Air Cleaner (303-12A Intake Ai r Dis tribut ion and Fil tering -I6 3.2L Pet rol, Removal and Ins t al lat ion).
4.
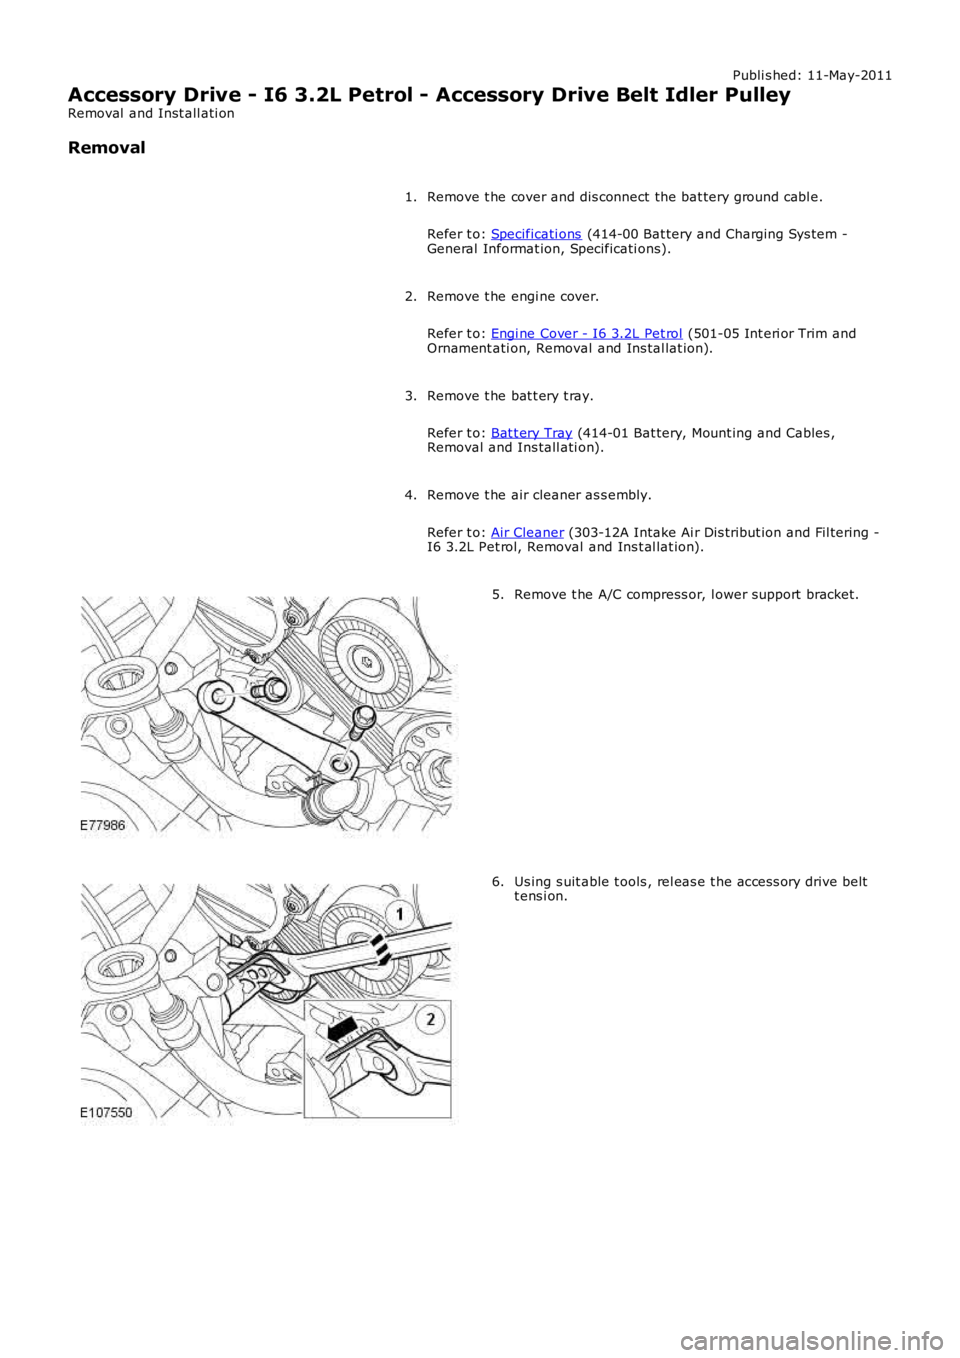
Remove t he A/C compress or, l ower support bracket.5.
Us ing s uit able t ools , rel eas e t he acces s ory drive beltt ens i on.6.
Trending: sat nav, weight, refrigerant type, wiper fluid, lights, seat adjustment, infotainment
