LAND ROVER FRELANDER 2 2006 Repair Manual
Manufacturer: LAND ROVER, Model Year: 2006, Model line: FRELANDER 2, Model: LAND ROVER FRELANDER 2 2006Pages: 3229, PDF Size: 78.5 MB
Page 2501 of 3229
Publi s hed: 11-May-2011
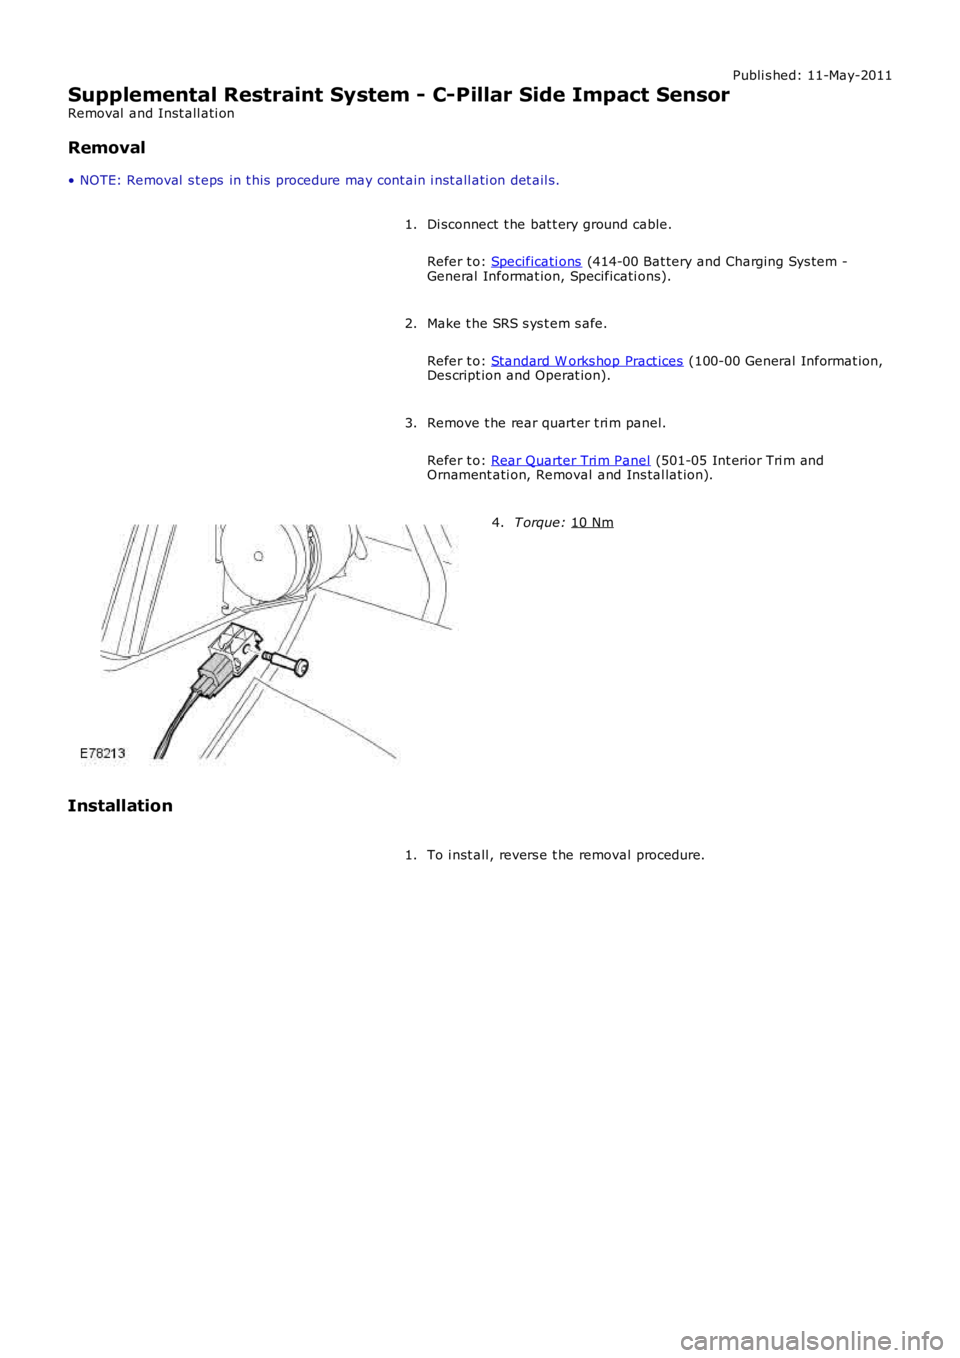
Supplemental Restraint System - C-Pillar Side Impact Sensor
Removal and Inst all ati on
Removal
• NOTE: Removal s t eps in t his procedure may cont ain i nst all ati on det ail s.
Di sconnect t he bat t ery ground cable.
Refer t o: Specificati ons (414-00 Bat tery and Charging Sys tem -
General Informat ion, Specificati ons).
1.
Make t he SRS s ys t em s afe.
Refer t o: Standard W orks hop Pract ices (100-00 General Informat ion,
Des cript ion and Operat ion).
2.
Remove t he rear quart er t ri m panel.
Refer t o: Rear Quarter Tri m Panel (501-05 Int erior Tri m and
Ornament ati on, Removal and Ins tal lat ion).
3. T orque:
10 Nm 4.
Installation To i nst all , revers e t he removal procedure.
1.
Page 2502 of 3229
Publi s hed: 11-May-2011
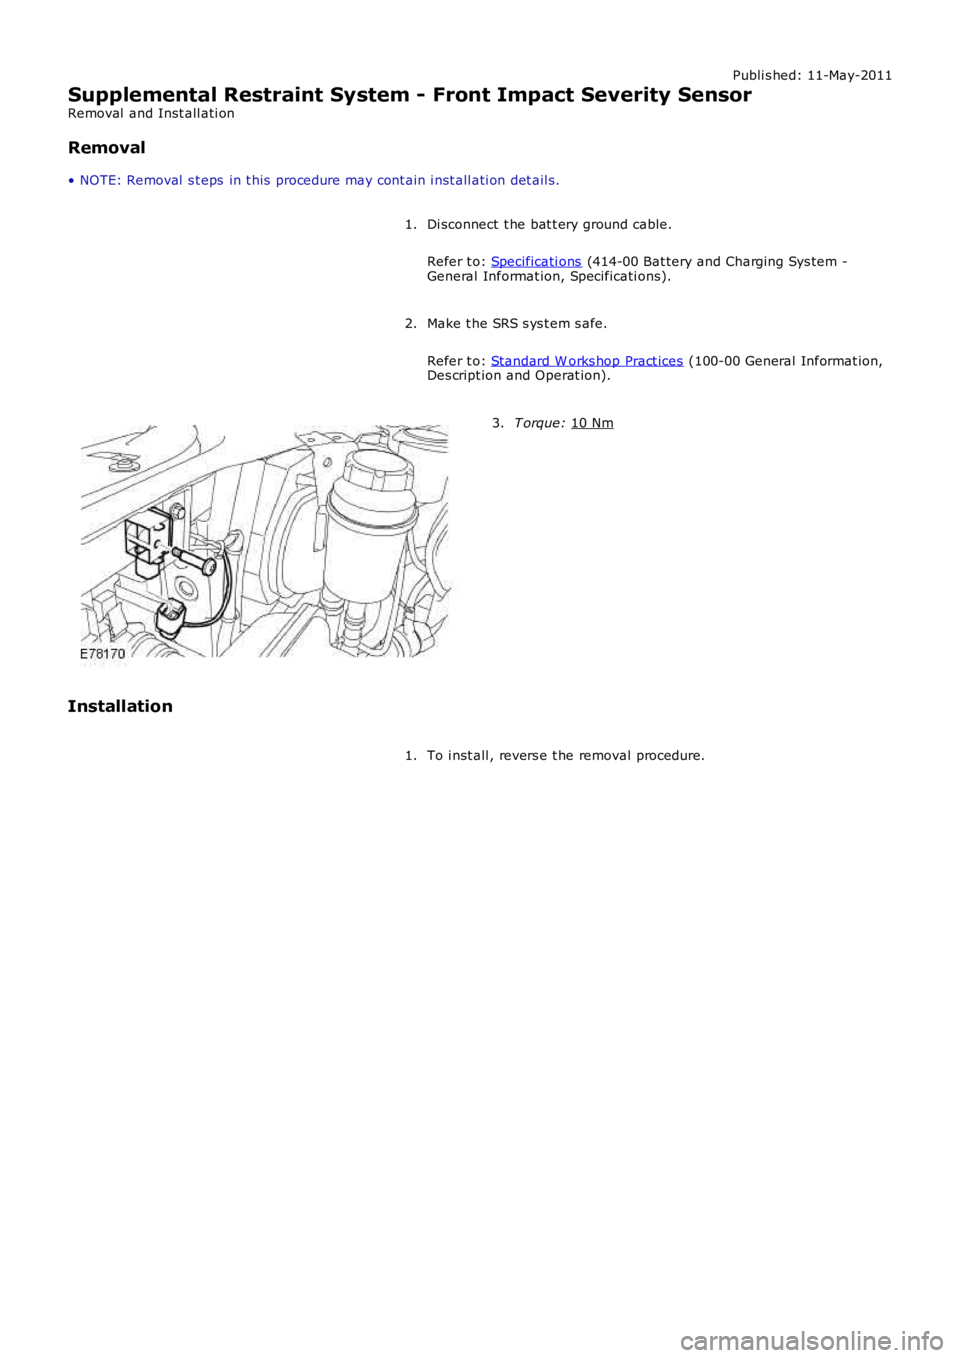
Supplemental Restraint System - Front Impact Severity Sensor
Removal and Inst all ati on
Removal
• NOTE: Removal s t eps in t his procedure may cont ain i nst all ati on det ail s.
Di sconnect t he bat t ery ground cable.
Refer t o: Specificati ons (414-00 Bat tery and Charging Sys tem -
General Informat ion, Specificati ons).
1.
Make t he SRS s ys t em s afe.
Refer t o: Standard W orks hop Pract ices (100-00 General Informat ion,
Des cript ion and Operat ion).
2. T orque:
10 Nm 3.
Installation To i nst all , revers e t he removal procedure.
1.
Page 2503 of 3229
Publi s hed: 11-May-2011
Body Repairs - General Information - Body Repairs
Des cript ion and Operat ion
General Information
Introduction
The body plays a s ignificant role in the i ncreas i ng trend of ever more rapi dl y changing model vari ant s . The differentcus t omer groups are s t rongly i nfl uenced by t he des i gn and s hape of t he body. At t he s ame t ime the s t abi li ty of t he bodyplays t he mos t important part i n ensuring pas senger and driver s afet y. Light weight cons truct ion, alt ernat ive mat erial s,compos i te materi als , plas ti cs and appropriat e joi ning proces ses are all des ign feat ures t hat charact eris e modern LandRover vehicle bodies .
In terms of manufacturing t echnology, modern s afet y cell bodi es can be produced al mos t wit hout any probl ems . LandRover guarant ee high qualit y s t andards by ens uri ng t hat mechanical s t rength propert ies are tried and t es ted i n numerouscomput er s imulat ions , crash tes t s, by t es ti ng materials and by employing s ophi s ti cated manufacturing t echnologies . In theevent of repai rs i t is vi tal t hat t he producti on qual it y s tandards are uphel d. This requires a well -equipped works hop, andplaces part icul ar emphas is on the qual ifi cat ions of t he works hop technicians. Up-to-date knowledge of currentmanufacturing t echnologies and conti nuous t rai ni ng on new repai r met hods and t echniques are vit al for high-quali ty bodyrepairs . The model -s peci fi c repair manuals and the general repair t echni ques provi de val uabl e s upport when undertakingbody repairs.
Always follow the repair ins t ructi ons publi s hed in t his manual. Fail ure t o obs erve this i nst ructi on can res ult i n s eri ousimpai rment of vehi cle s afet y. Al l s pecified s afet y requi rements must be met aft er the work has been carri ed out.
Vehicle design
T he body
The Freelander 2 body is manufact ured l ike a convent ional monocoque. Two monos i des are welded t o t he floor, roof andbulkheads , creati ng a s t rong, si ngl e s truct ure. Dual Phas e (DP), and Bake Hardened (BH), s t eel s are us ed i n t he s ide panelrei nforcements . DP s t eel i s als o us ed for t he rear of t he front si de member, for added st rength in front and s ide impacts .The roof s truct ure can accommodate a roof openi ng panel . W hen a s unroof is not fit ted, t he outer roof panel i s a s i ngl elarge s teel pres si ng wi th s t yled s wages to add st rengt h and prevent boomi ng.
The s afety of the driver and the pas s engers is paramount for every body des ign. There are two key safety as pect sin the body:
Safet y pas s enger cellCrumpl e zones
Safet y pas s enger cell
Stable pill ars , rocker panel and door profil es.Side i mpact protecti on in the doors .Doors are desi gned to open even i n t he event of ext reme deformati on.
Crumpl e zone
Dynamic abs orpti on of deforming forces .Prot ect ion of t he pass enger cell .
Vehicle Design
Page 2504 of 3229
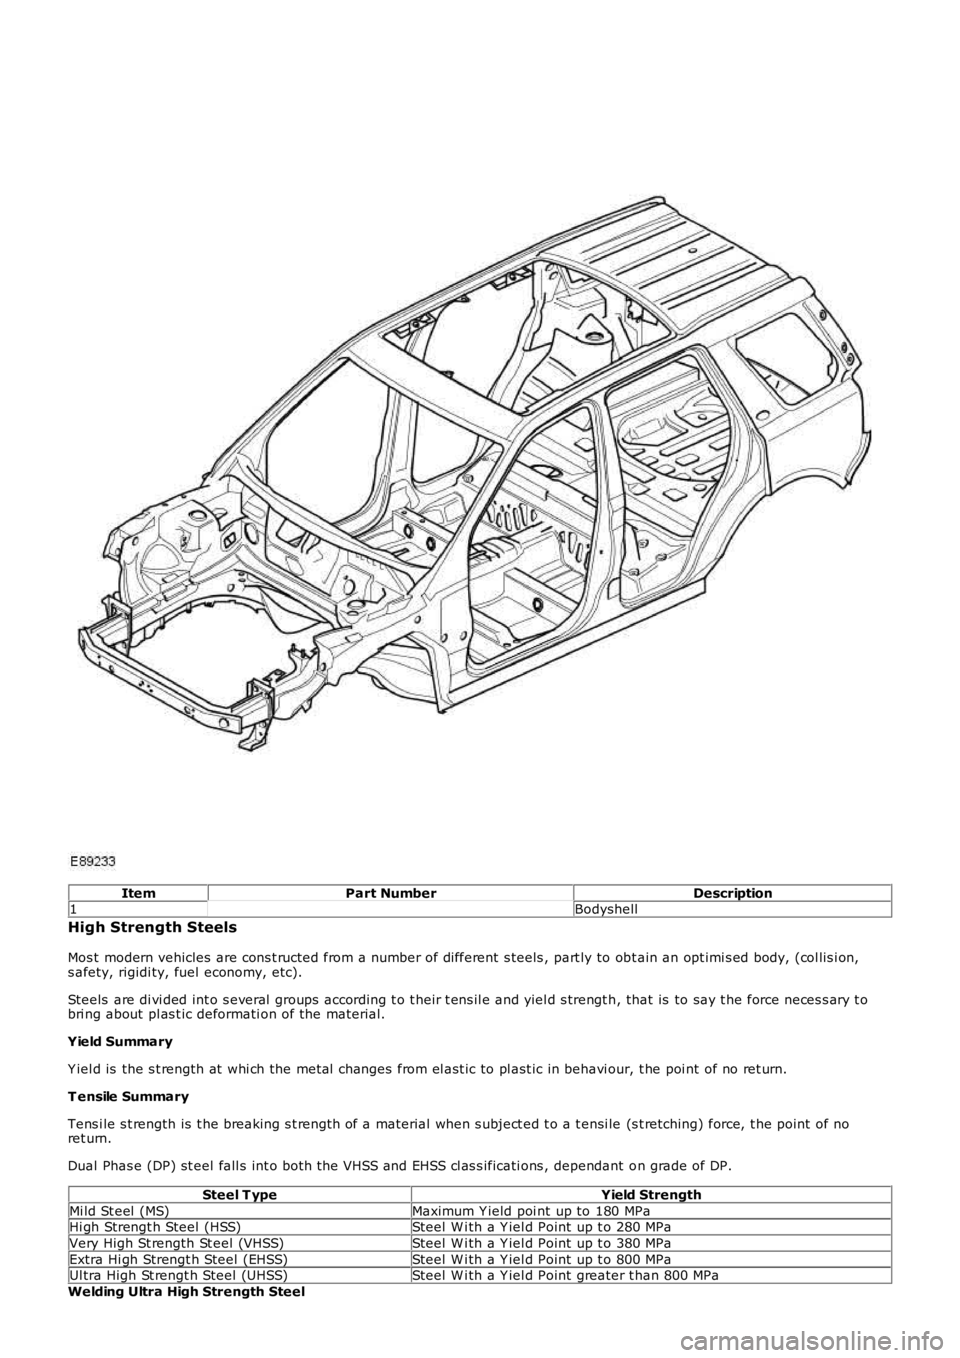
ItemPart NumberDescription1Bodyshell
High Strength Steels
Mos t modern vehicles are cons t ructed from a number of different s teels , part ly to obt ain an opt imi s ed body, (col lis i on,s afety, rigidi ty, fuel economy, etc).
Steels are di vi ded int o s everal groups according t o t heir t ens il e and yiel d s trengt h, that is to say t he force neces s ary t obri ng about pl as t ic deformati on of the material.
Yield Summary
Y iel d is the s t rength at whi ch the metal changes from el ast ic to pl ast ic in behavi our, t he poi nt of no ret urn.
T ensile Summary
Tens i le s t rength is t he breaking s t rength of a material when s ubject ed t o a t ensi le (s t retching) force, t he point of noret urn.
Dual Phas e (DP) st eel fall s int o both the VHSS and EHSS cl as s ificati ons , dependant on grade of DP.
Steel T ypeYield Strength
Mi ld St eel (MS)Maximum Y ield poi nt up to 180 MPaHi gh Strengt h Steel (HSS)Steel W i th a Y iel d Point up t o 280 MPa
Very High St rength St eel (VHSS)Steel W i th a Y iel d Point up t o 380 MPa
Extra Hi gh Strengt h Steel (EHSS)Steel W i th a Y iel d Point up t o 800 MPaUl tra High St rengt h Steel (UHSS)Steel W i th a Y iel d Point greater t han 800 MPa
Welding Ultra High Strength Steel
Page 2505 of 3229
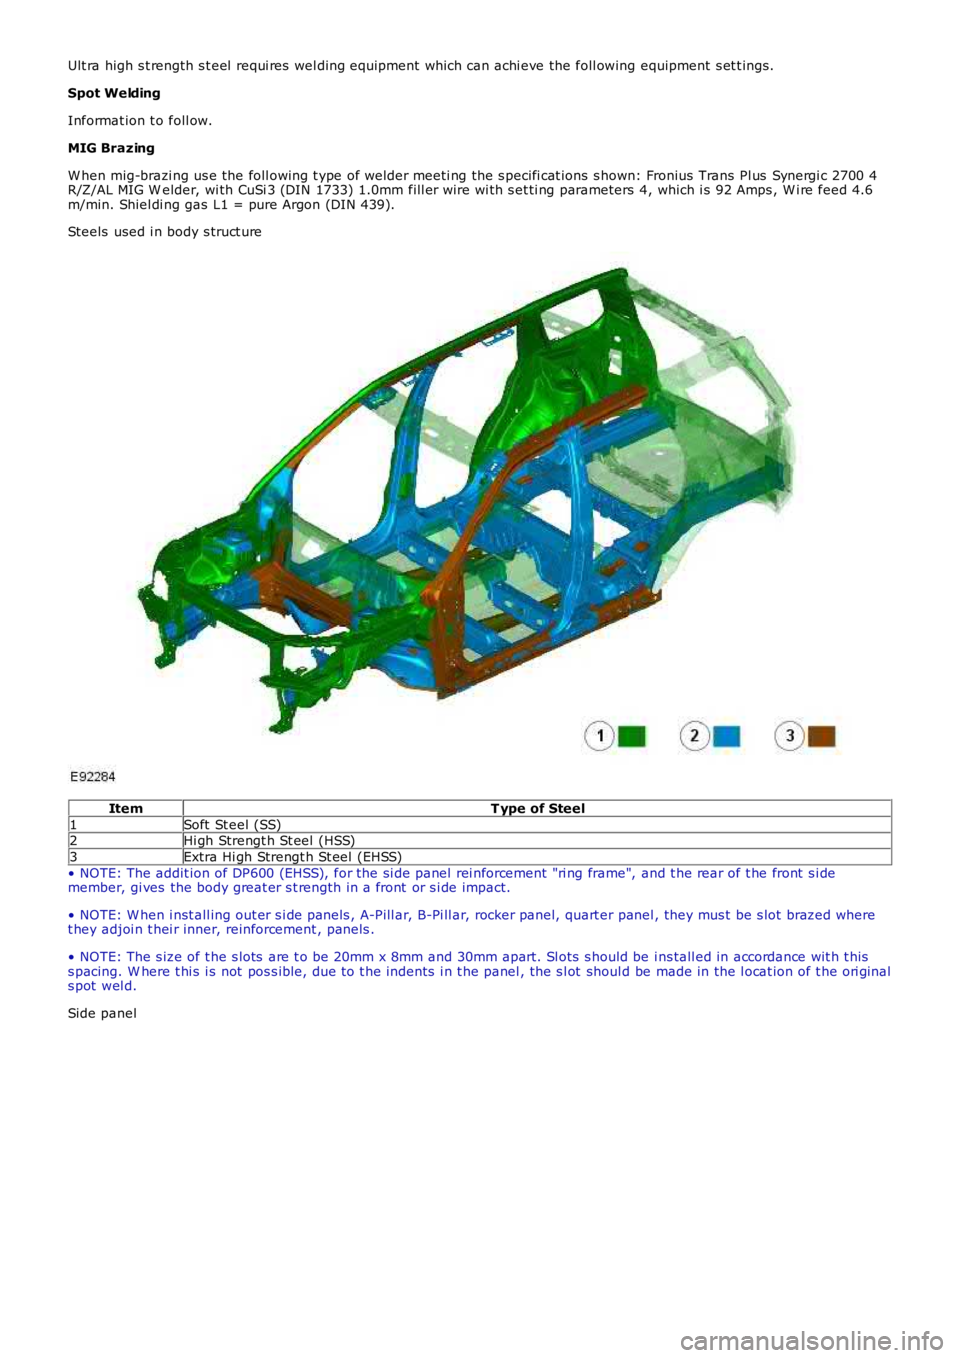
Ult ra high s t rength s t eel requi res wel ding equipment which can achi eve the foll owing equipment s et t ings.
Spot Welding
Informat ion t o foll ow.
MIG Brazing
W hen mig-brazi ng us e the foll owing t ype of welder meeti ng the s pecifi cat ions s hown: Fronius Trans Pl us Synergi c 2700 4R/Z/AL MIG W elder, wi th CuSi 3 (DIN 1733) 1.0mm fill er wire wi th s et ti ng parameters 4, which i s 92 Amps , W i re feed 4.6m/min. Shiel di ng gas L1 = pure Argon (DIN 439).
Steels used i n body s truct ure
ItemT ype of Steel
1Soft St eel (SS)2Hi gh Strengt h St eel (HSS)
3Extra Hi gh Strengt h St eel (EHSS)
• NOTE: The addit ion of DP600 (EHSS), for the si de panel rei nforcement "ri ng frame", and t he rear of t he front s i demember, gi ves the body great er s t rength in a front or s i de impact.
• NOTE: W hen i nst all ing out er s i de panels , A-Pill ar, B-Pi ll ar, rocker panel, quart er panel , they mus t be s lot brazed wheret hey adjoi n t hei r inner, reinforcement , panels .
• NOTE: The s ize of t he s lots are t o be 20mm x 8mm and 30mm apart. Sl ots s hould be ins tall ed in accordance wit h t hiss pacing. W here t hi s i s not pos s ible, due t o t he indents i n t he panel , the s l ot should be made in the l ocat ion of t he ori ginals pot wel d.
Side panel
Page 2506 of 3229
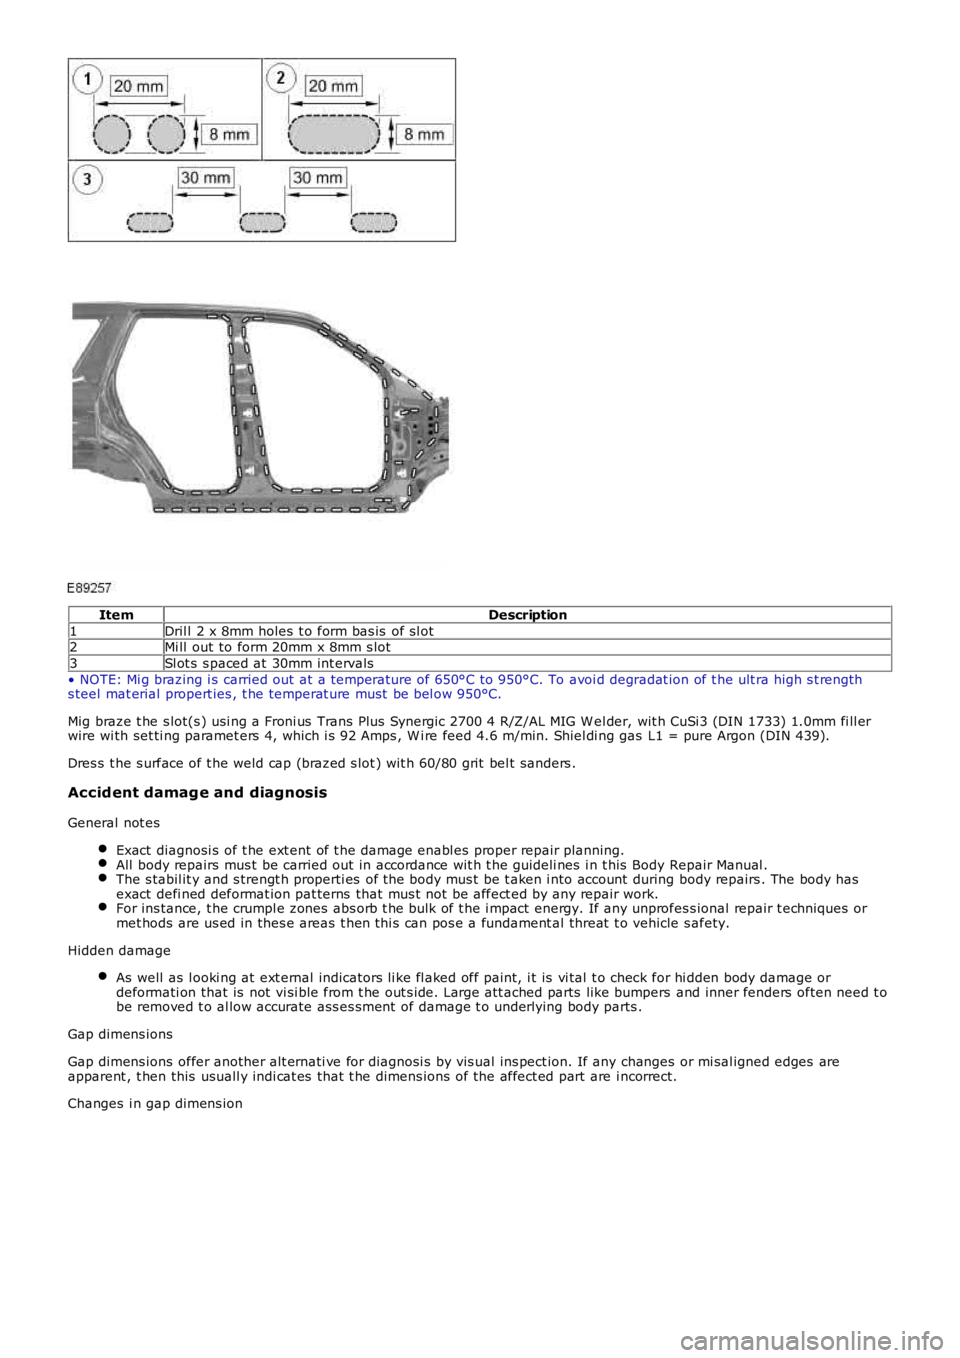
ItemDescription
1Dril l 2 x 8mm holes t o form bas is of sl ot2Mi ll out to form 20mm x 8mm s lot
3Sl ot s s paced at 30mm int ervals
• NOTE: Mi g brazing i s carried out at a t emperature of 650°C to 950°C. To avoi d degradat ion of t he ult ra high s t rengths teel mat erial propert ies , t he temperat ure must be bel ow 950°C.
Mig braze t he s lot(s ) usi ng a Froni us Trans Plus Synergic 2700 4 R/Z/AL MIG W el der, wit h CuSi3 (DIN 1733) 1.0mm fi ll erwire wi th set ti ng paramet ers 4, which i s 92 Amps , W i re feed 4.6 m/min. Shiel di ng gas L1 = pure Argon (DIN 439).
Dres s t he s urface of t he weld cap (brazed s lot ) wit h 60/80 grit bel t sanders .
Accid ent damag e and diagnosis
General not es
Exact diagnosi s of t he ext ent of t he damage enabl es proper repair planning.All body repairs mus t be carried out in accordance wit h t he guideli nes i n t his Body Repair Manual .The s tabil it y and s trengt h properti es of the body mus t be t aken i nto account during body repairs . The body hasexact defi ned deformat ion pat terns that mus t not be affect ed by any repair work.For ins tance, t he crumpl e zones abs orb t he bulk of t he i mpact energy. If any unprofes s ional repair t echniques ormet hods are us ed in thes e areas t hen thi s can pos e a fundament al threat t o vehicle safety.
Hidden damage
As well as l ooki ng at ext ernal indicators li ke fl aked off paint, i t is vi tal t o check for hi dden body damage ordeformati on that is not vi si ble from t he out s ide. Large att ached parts like bumpers and inner fenders often need t obe removed t o al low accurate ass es sment of damage t o underlying body parts .
Gap dimens ions
Gap dimens ions offer another alt ernati ve for diagnosi s by vis ual ins pect ion. If any changes or mi sal igned edges areapparent , t hen this usuall y indi cat es that t he dimens ions of the affect ed part are incorrect.
Changes i n gap dimens ion
Page 2507 of 3229
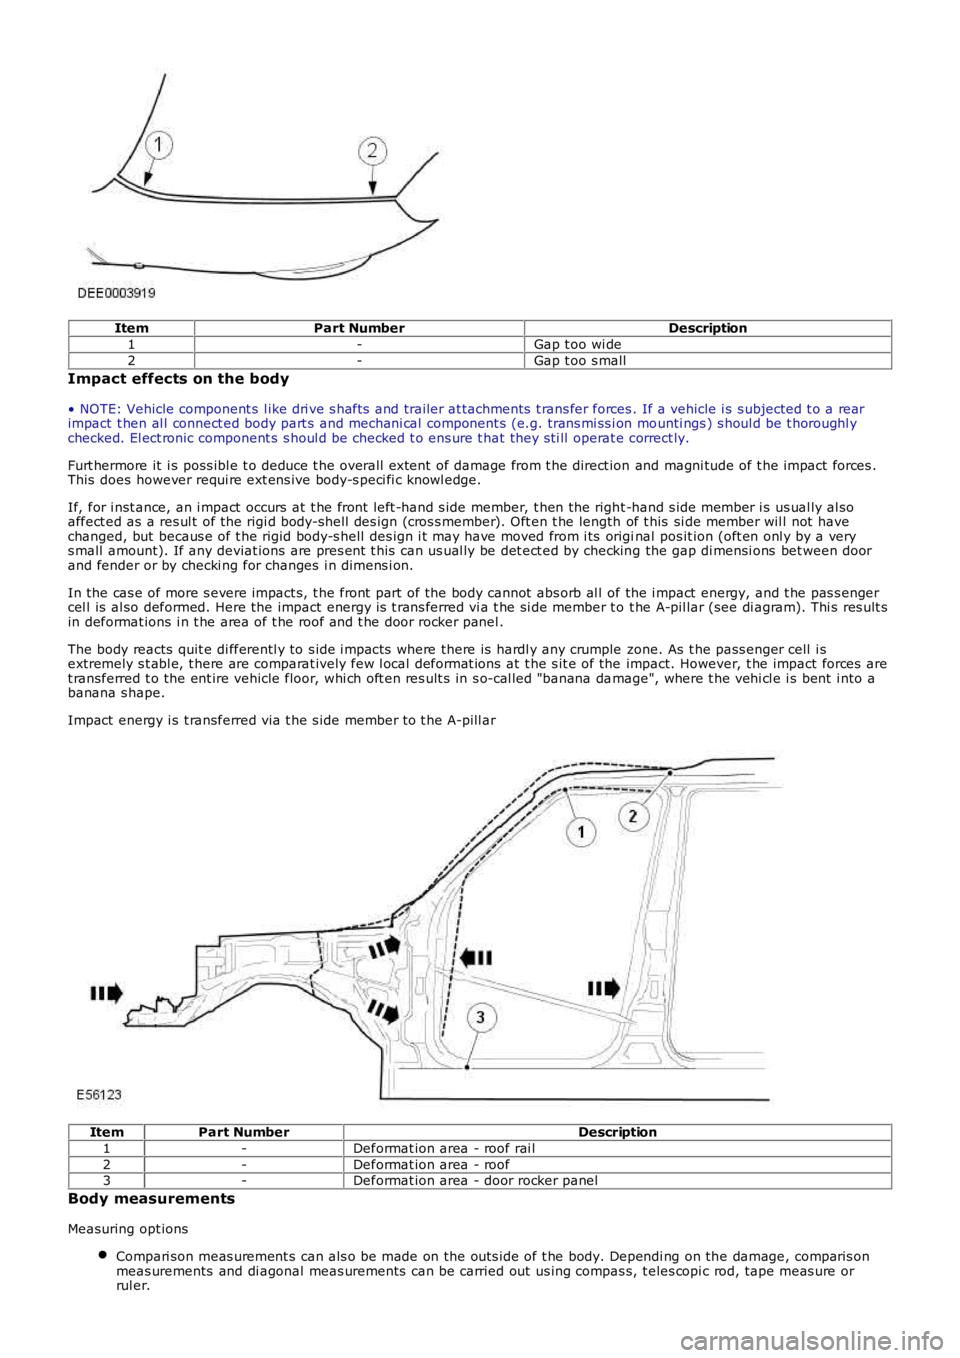
ItemPart NumberDescription
1-Gap t oo wi de
2-Gap t oo s mall
Impact effects on the body
• NOTE: Vehicle component s l ike dri ve s hafts and trailer at tachments t rans fer forces. If a vehicle i s s ubjected t o a rearimpact t hen al l connect ed body part s and mechani cal component s (e.g. trans mi ss i on mounti ngs ) s houl d be t horoughl ychecked. El ect ronic component s s houl d be checked t o ens ure t hat they s ti ll operat e correct ly.
Furt hermore it i s poss ibl e t o deduce t he overall extent of damage from t he direct ion and magni tude of t he impact forces .This does however requi re ext ens ive body-s peci fi c knowl edge.
If, for i nst ance, an i mpact occurs at t he front left -hand s ide member, t hen the right -hand s ide member i s us ual ly al soaffect ed as a res ul t of the rigi d body-s hel l des ign (cros s member). Oft en t he length of t his si de member wil l not havechanged, but becaus e of t he rigid body-s hell des ign i t may have moved from i ts original pos it ion (oft en onl y by a verys mall amount). If any deviat ions are pres ent t his can us ual ly be det ect ed by checking the gap di mensi ons bet ween doorand fender or by checki ng for changes i n dimens i on.
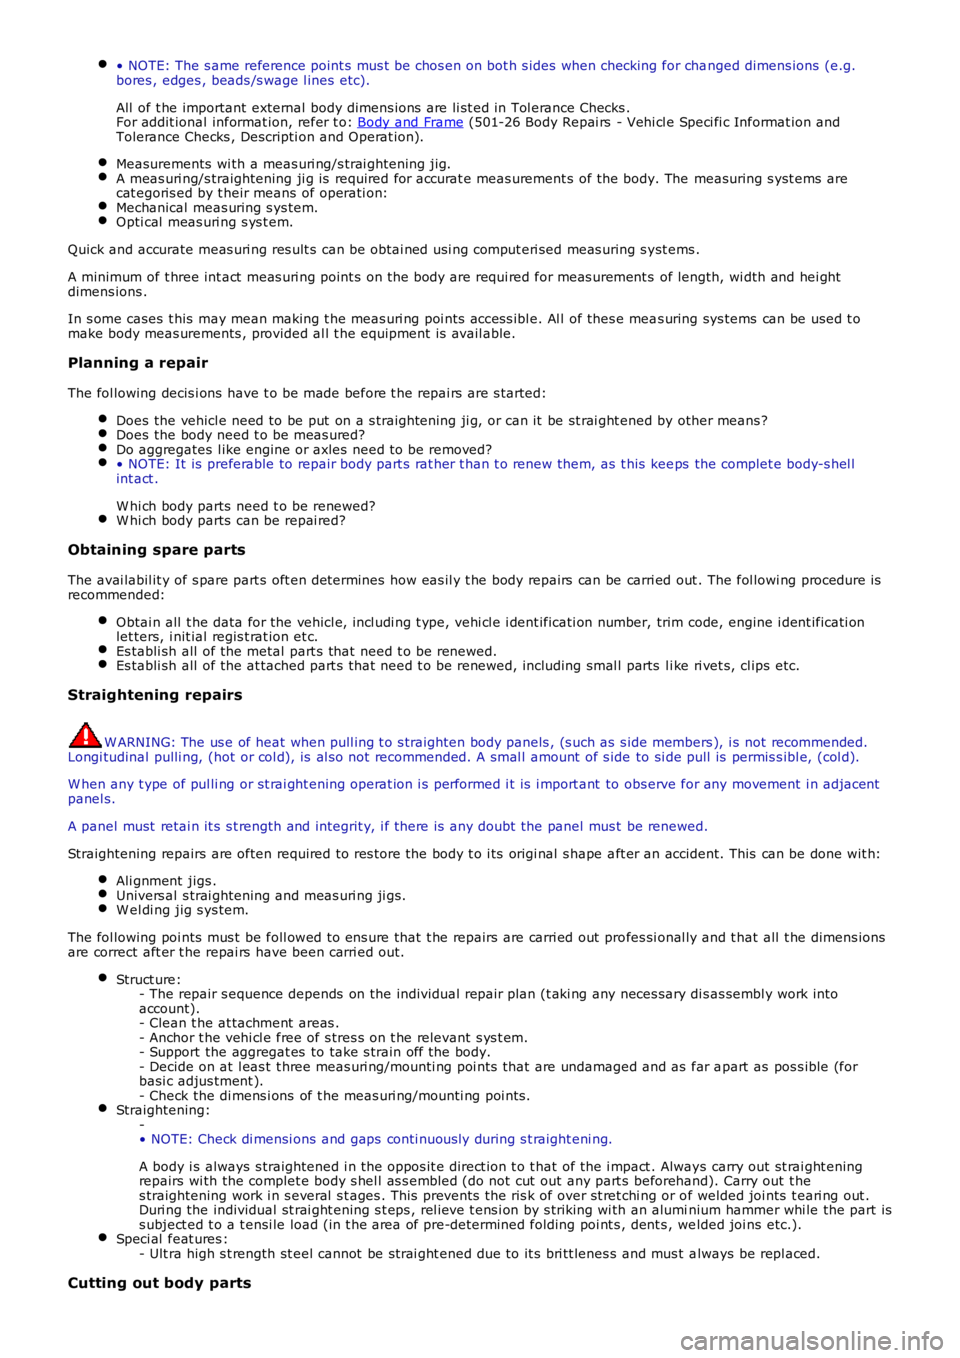
In the cas e of more s evere impact s, t he front part of the body cannot abs orb al l of the i mpact energy, and t he pas s engercel l is al so deformed. Here the impact energy is t rans ferred vi a t he si de member t o t he A-pil lar (see di agram). Thi s res ult sin deformat ions i n t he area of t he roof and t he door rocker panel .
The body reacts quit e di fferentl y to s ide i mpact s where there is hardl y any crumple zone. As t he pass enger cell i sextremely s t abl e, t here are comparat ively few l ocal deformat ions at t he s it e of the impact. However, t he impact forces aret ransferred t o the ent ire vehicle floor, whi ch oft en res ult s in s o-cal led "banana damage", where t he vehi cl e i s bent i nto abanana s hape.
Impact energy i s t ransferred via t he s ide member to t he A-pill ar
ItemPart NumberDescription
1-Deformat ion area - roof rai l
2-Deformat ion area - roof3-Deformat ion area - door rocker panel
Body measurements
Measuring opt ions
Compari son meas urement s can als o be made on the out s ide of t he body. Dependi ng on the damage, comparis onmeas urements and di agonal meas urements can be carried out us ing compas s, t eles copi c rod, tape meas ure orrul er.
Page 2508 of 3229
• NOTE: The s ame reference point s mus t be chos en on bot h s ides when checking for changed dimens ions (e.g.bores , edges , beads /s wage l ines etc).
All of t he important external body dimens ions are li st ed in Tol erance Checks .For addit ional informat ion, refer t o: Body and Frame (501-26 Body Repai rs - Vehi cl e Speci fi c Informat ion andTolerance Checks , Descripti on and Operat ion).
Measurements wi th a meas uri ng/s trai ghtening jig.A meas uri ng/s traightening ji g is required for accurat e meas urement s of the body. The measuring s yst ems arecat egoris ed by t heir means of operati on:Mechanical meas uring s ys tem.Opti cal meas uri ng s ys t em.
Quick and accurate meas uri ng res ult s can be obtai ned usi ng comput eri sed meas uring s yst ems .
A minimum of t hree int act meas uri ng point s on t he body are requi red for meas urement s of length, wi dth and hei ghtdimens ions .
In s ome cases t his may mean making t he meas uri ng poi nts access ibl e. Al l of thes e meas uring sys tems can be used t omake body meas urements , provided al l t he equipment is avail able.
Planning a repair
The fol lowing decis i ons have t o be made before t he repai rs are s tarted:
Does the vehicl e need to be put on a s traightening ji g, or can it be st rai ght ened by other means ?Does the body need t o be meas ured?Do aggregates l ike engine or axles need t o be removed?• NOTE: It is preferable to repair body part s rat her t han t o renew them, as t his keeps the complet e body-s hel lint act .
W hi ch body parts need t o be renewed?W hi ch body parts can be repai red?
Obtaining spare parts
The avai labil it y of s pare part s oft en determines how eas il y t he body repairs can be carri ed out . The fol lowi ng procedure isrecommended:
Obtai n all t he data for the vehicl e, i ncl udi ng t ype, vehi cl e i dent ificati on number, trim code, engine i dent ificati onlet ters, i nit ial regis t rat ion et c.Es tabli sh all of the metal part s that need t o be renewed.Es tabli sh all of the at tached part s t hat need t o be renewed, including smal l parts li ke ri vet s, cl ips etc.
Straightening repairs
W ARNING: The us e of heat when pull ing t o s traighten body panels , (s uch as s ide members ), i s not recommended.Longi tudinal pulli ng, (hot or col d), is al s o not recommended. A smal l amount of s ide to si de pull is permis s ibl e, (col d).
W hen any t ype of pul li ng or st rai ght ening operat ion i s performed i t is i mport ant to obs erve for any movement i n adjacentpanel s.
A panel must retai n it s s t rength and integrit y, i f there is any doubt the panel mus t be renewed.
Straightening repairs are often required to res tore the body t o i ts origi nal s hape aft er an accident. This can be done wit h:
Ali gnment jigs .Univers al s trai ghtening and meas uri ng ji gs.W el di ng jig s ys tem.
The fol lowing poi nts mus t be foll owed to ens ure that t he repairs are carri ed out profes si onal ly and t hat all t he dimens ionsare correct aft er t he repai rs have been carri ed out.
Struct ure:- The repair s equence depends on the individual repair plan (t aki ng any neces sary dis as sembl y work intoaccount).- Clean t he at tachment areas .- Anchor t he vehi cl e free of s tres s on t he relevant s ys t em.- Support the aggregat es to take s train off the body.- Decide on at l eas t t hree meas uri ng/mounti ng poi nts that are undamaged and as far apart as pos s ible (forbasi c adjus tment ).- Check the di mens i ons of t he meas uri ng/mounti ng poi nts .Straightening:-• NOTE: Check di mensi ons and gaps conti nuous ly during s t raight eni ng.
A body i s always s traightened i n the oppos it e direct ion t o t hat of the i mpact . Always carry out st rai ght eningrepairs wi th the complet e body s hel l as s embled (do not cut out any part s beforehand). Carry out t hes traightening work i n s everal s t ages . This prevents the ris k of over st ret chi ng or of welded joi nts t eari ng out .Duri ng the individual st rai ght ening s t eps , rel ieve t ens i on by s triking wi th an aluminium hammer whi le the part iss ubject ed t o a t ensi le load (in t he area of pre-determined folding poi nt s , dent s , welded joi ns etc.).Speci al feat ures :- Ult ra high s t rength st eel cannot be st rai ght ened due to it s bri tt lenes s and mus t always be repl aced.
Cutting out body parts
Page 2509 of 3229
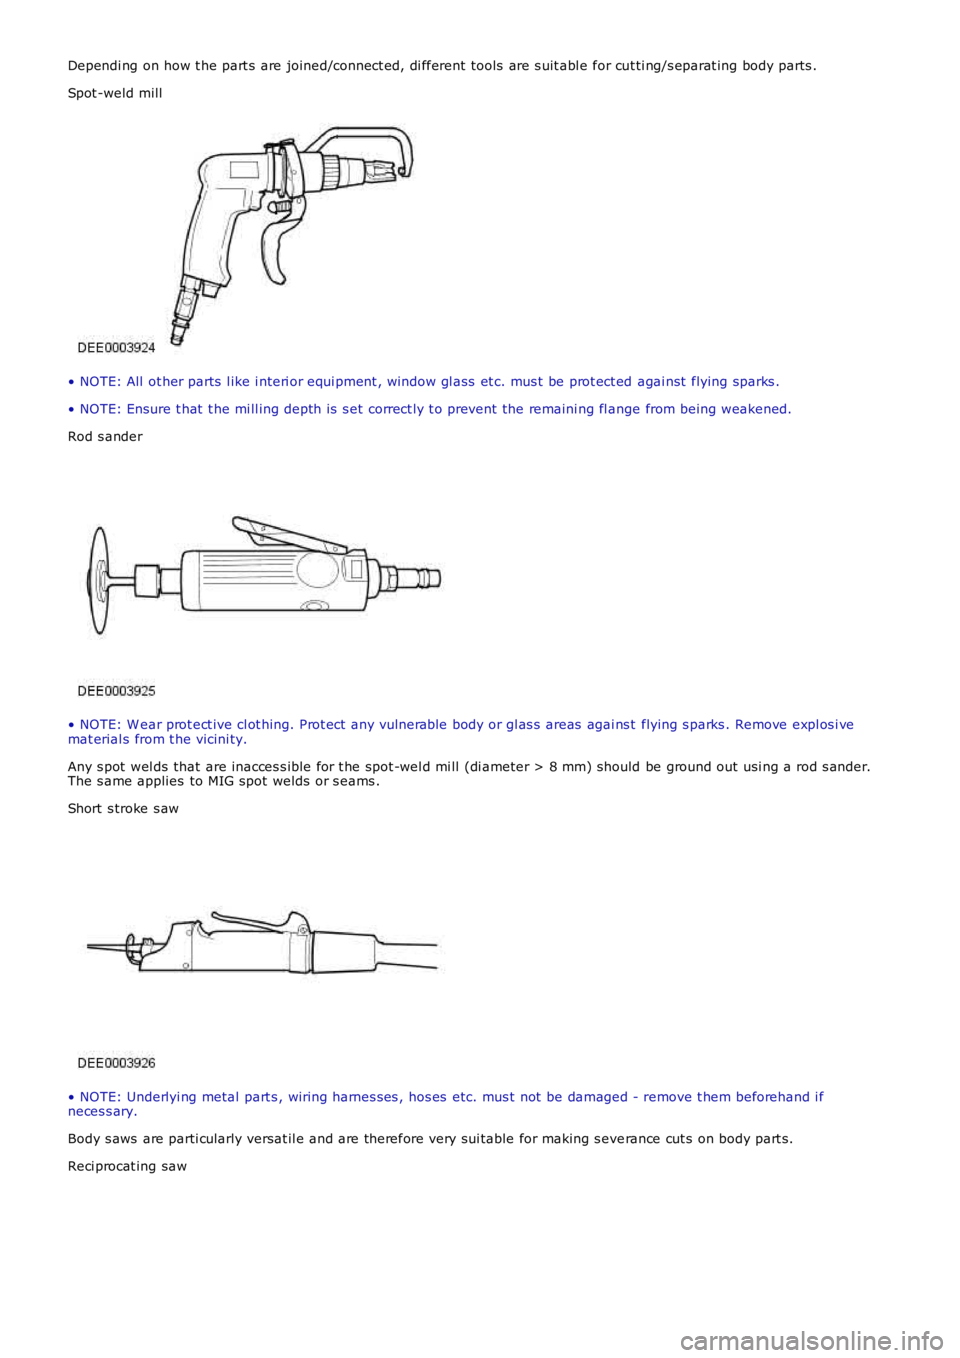
Dependi ng on how t he part s are joined/connect ed, di fferent tools are s uit abl e for cut ti ng/s eparat ing body parts .
Spot -weld mill
• NOTE: All ot her parts l ike i nteri or equi pment , window gl ass et c. mus t be prot ect ed agai nst flying sparks .
• NOTE: Ensure t hat t he mi ll ing depth is s et correct ly t o prevent the remaini ng fl ange from being weakened.
Rod s ander
• NOTE: W ear prot ect ive cl ot hing. Prot ect any vulnerable body or gl as s areas agai ns t flying s parks . Remove expl os i vemat erial s from t he vicini ty.
Any s pot wel ds that are inacces s ible for t he spot -wel d mi ll (di ameter > 8 mm) should be ground out usi ng a rod s ander.The s ame applies to MIG spot welds or s eams .
Short s troke s aw
• NOTE: Underlyi ng metal part s , wiring harnes s es , hos es etc. mus t not be damaged - remove t hem beforehand i fneces s ary.
Body s aws are parti cularly versat il e and are therefore very sui table for making s everance cut s on body part s.
Reci procat ing saw
Page 2510 of 3229
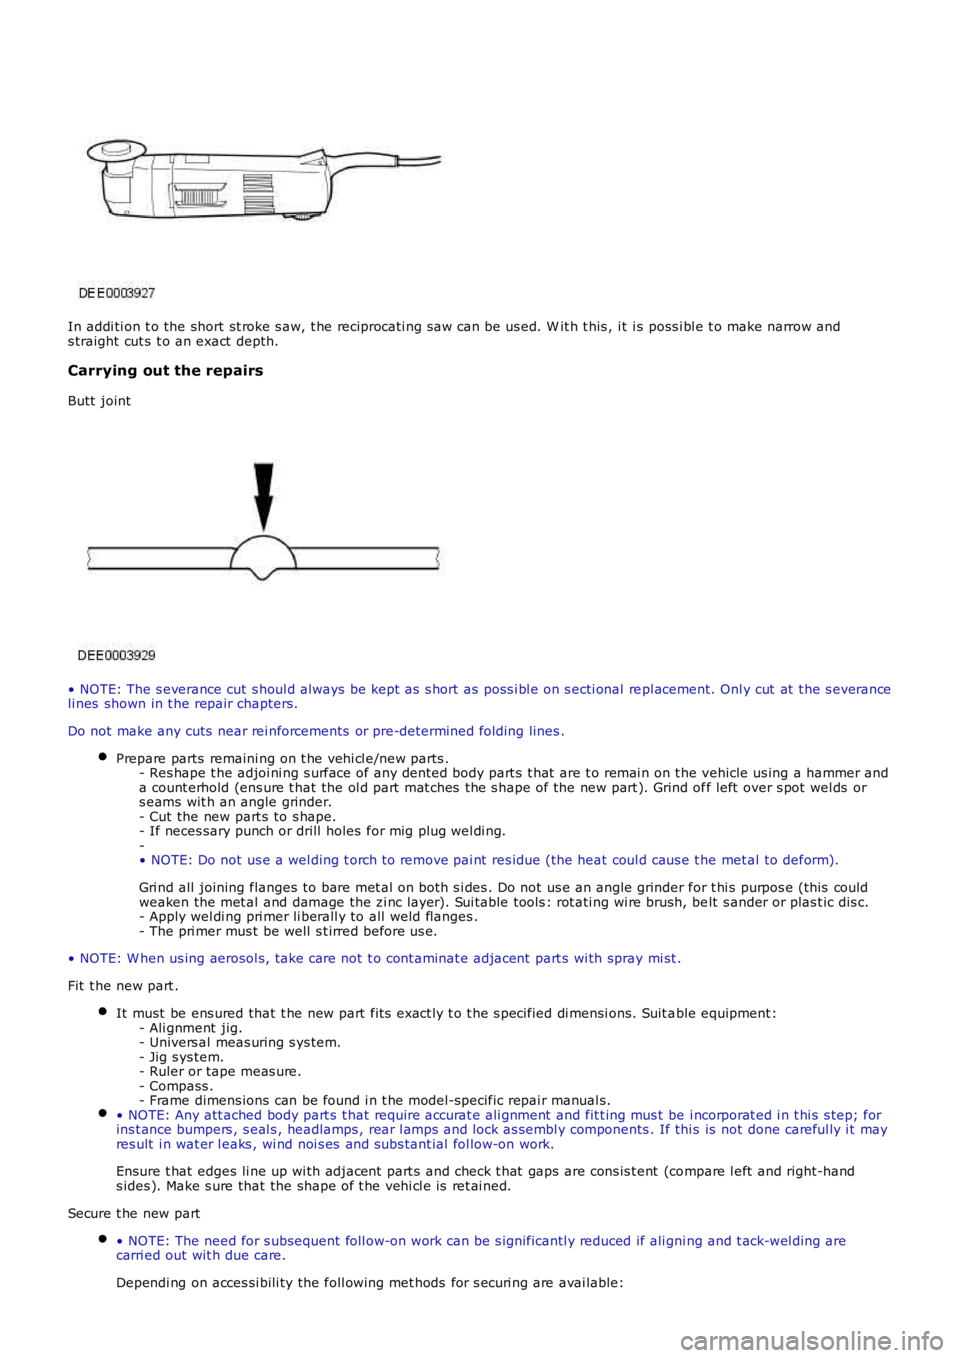
In addi ti on t o the short st roke s aw, t he reciprocati ng s aw can be us ed. W it h t his , it i s poss i bl e t o make narrow ands traight cut s t o an exact depth.
Carrying out the repairs
Butt joint
• NOTE: The s everance cut s houl d always be kept as s hort as poss i bl e on s ecti onal repl acement. Onl y cut at t he s everanceli nes shown in t he repair chapters.
Do not make any cuts near rei nforcements or pre-determined folding lines .
Prepare parts remaini ng on t he vehi cl e/new parts .- Res hape t he adjoi ni ng s urface of any dented body part s t hat are t o remai n on t he vehicle us ing a hammer anda count erhold (ens ure t hat the ol d part mat ches the s hape of the new part ). Grind off left over s pot wel ds ors eams wit h an angle grinder.- Cut the new part s to s hape.- If neces sary punch or drill holes for mig plug wel di ng.-• NOTE: Do not us e a wel ding t orch t o remove pai nt res idue (the heat coul d caus e t he met al to deform).
Gri nd all joining flanges to bare met al on both s i des . Do not us e an angle grinder for t hi s purpos e (this couldweaken the met al and damage the zi nc layer). Sui table tools : rot ati ng wi re brush, belt s ander or plas t ic dis c.- Apply wel di ng pri mer li berall y to all weld flanges .- The pri mer mus t be well s t irred before us e.
• NOTE: W hen us ing aerosol s, t ake care not t o cont aminat e adjacent part s wi th spray mi st .
Fit t he new part .
It must be ens ured that t he new part fit s exact ly t o t he s pecified di mensi ons. Suit able equipment :- Ali gnment jig.- Univers al meas uring s ys tem.- Jig s ys tem.- Ruler or tape meas ure.- Compass .- Frame dimens ions can be found i n t he model-specific repai r manual s.• NOTE: Any att ached body part s t hat require accurat e ali gnment and fit t ing mus t be i ncorporat ed i n t hi s s tep; forins t ance bumpers , s eal s , headlamps , rear l amps and lock as sembl y components . If thi s is not done careful ly i t mayres ult i n wat er l eaks , wi nd noi s es and subs tant ial fol low-on work.
Ensure t hat edges li ne up wi th adjacent part s and check t hat gaps are cons is t ent (compare l eft and right-hands ides ). Make s ure that the shape of t he vehi cl e is ret ai ned.
Secure t he new part
• NOTE: The need for s ubsequent foll ow-on work can be s ignificantl y reduced if ali gni ng and t ack-wel ding arecarri ed out wit h due care.
Dependi ng on acces si bili ty the foll owing met hods for s ecuri ng are avai lable: