LAND ROVER FRELANDER 2 2006 Owner's Manual
Manufacturer: LAND ROVER, Model Year: 2006, Model line: FRELANDER 2, Model: LAND ROVER FRELANDER 2 2006Pages: 3229, PDF Size: 78.5 MB
Page 21 of 3229
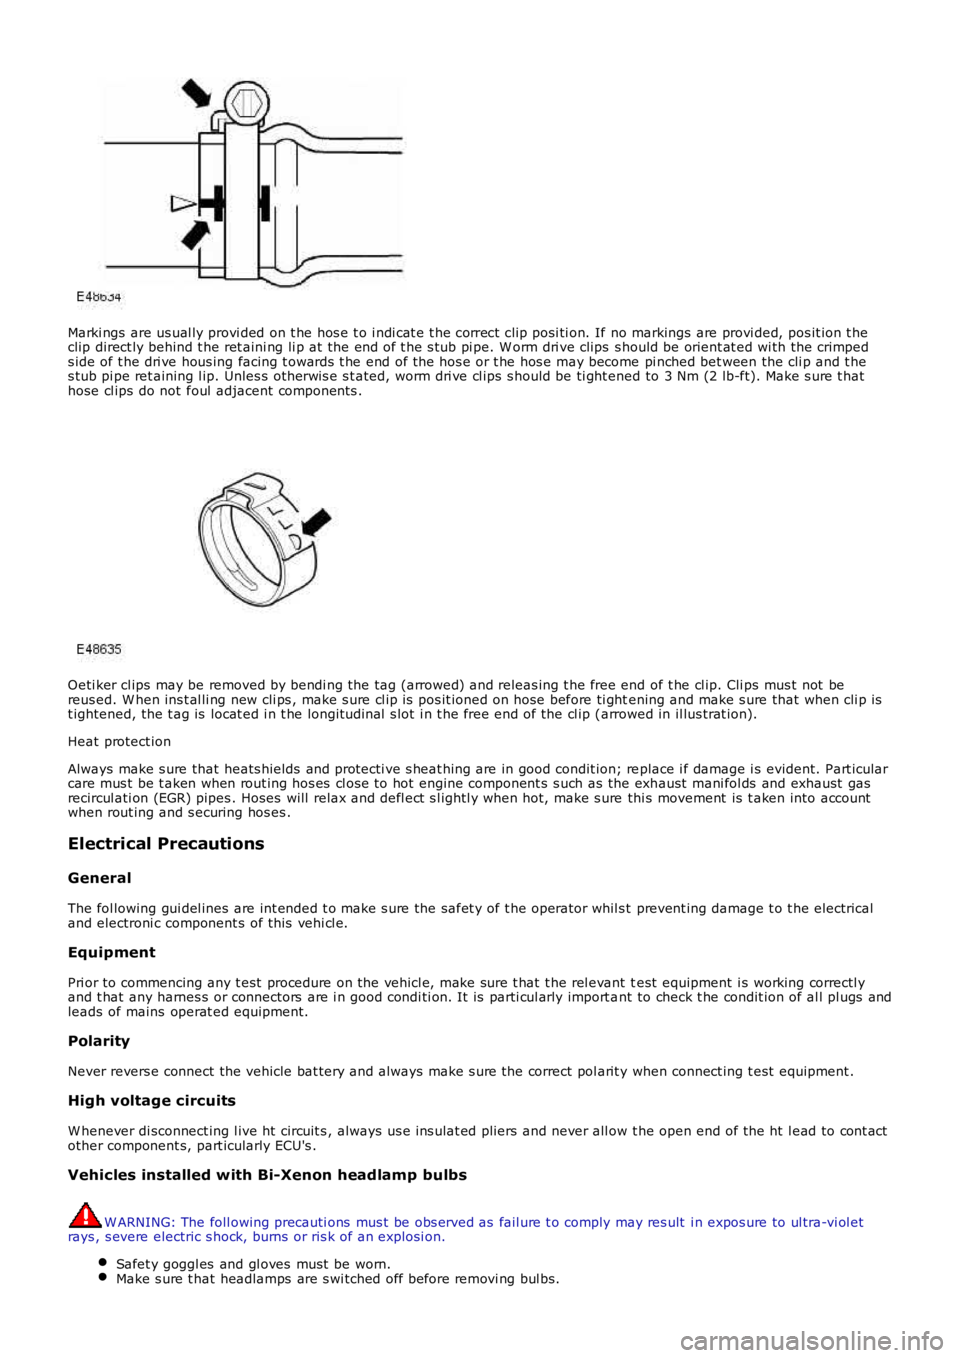
Marki ngs are us ual ly provi ded on t he hos e t o i ndi cat e t he correct cli p posi ti on. If no markings are provi ded, pos it ion t heclip direct ly behind t he ret aini ng li p at the end of t he s tub pi pe. W orm dri ve clips s hould be orient at ed wi th the crimpeds ide of t he dri ve hous ing facing t owards t he end of the hos e or t he hos e may become pi nched bet ween the cli p and t hes tub pi pe ret aining l ip. Unles s ot herwis e s t ated, worm dri ve cl ips s hould be ti ght ened to 3 Nm (2 lb-ft). Make s ure t hathose cl ips do not foul adjacent components .
Oeti ker cl ips may be removed by bendi ng the tag (arrowed) and releas ing t he free end of t he cl ip. Cli ps mus t not bereus ed. W hen ins t al li ng new cli ps , make s ure cl ip is pos it ioned on hose before ti ghtening and make s ure that when cli p ist ightened, the t ag is locat ed i n t he longit udi nal s lot i n t he free end of the cl ip (arrowed in il lus trat ion).
Heat protect ion
Always make s ure that heats hields and protecti ve s heat hing are in good condit ion; replace i f damage i s evident. Part icularcare mus t be t aken when rout ing hos es cl ose to hot engine component s s uch as the exhaust mani fol ds and exhaust gasrecircul ati on (EGR) pipes . Hoses will relax and defl ect s l ightl y when hot, make s ure thi s movement is t aken into accountwhen rout ing and s ecuring hos es .
Electrical Precautions
General
The fol lowing gui del ines are int ended t o make s ure the safet y of t he operator whil s t prevent ing damage t o t he electricaland electroni c component s of this vehi cl e.
Equipment
Pri or to commencing any t est procedure on the vehicl e, make sure t hat t he rel evant test equipment i s working correctl yand t hat any harnes s or connectors are i n good condi ti on. It is parti cul arly import ant to check t he condit ion of al l pl ugs andleads of mains operat ed equipment.
Polarity
Never revers e connect the vehicle bat tery and always make s ure the correct pol arit y when connect ing t est equipment .
High voltage circuits
W henever di sconnect ing l ive ht circuit s , always us e ins ulat ed pliers and never all ow t he open end of the ht l ead to cont actother component s, part icularly ECU's .
Vehicles installed with Bi-Xenon headlamp bulbs
W ARNING: The foll owing precauti ons mus t be obs erved as fail ure t o comply may res ult i n expos ure to ul tra-vi ol etrays , s evere electric s hock, burns or ris k of an expl osi on.
Safet y goggl es and gl oves must be worn.Make s ure t hat headlamps are s wi tched off before removi ng bul bs.
Page 22 of 3229
Do not t ouch t he glas s port ion of t he bulb.On no account s hould headlamps be s wi tched on wi th t he bulb removed from the headlamp.Bulb t es ti ng may only be carri ed out wit h the bul b ins t al led i n t he headl amp.Bulbs mus t be di spos ed of in accordance wit h the local aut horit y bye-laws .
Connectors and harnesses
The engi ne compart ment of a vehi cl e is a part icularl y host il e environment for el ect ri cal component s and connectors. Al waysobserve the foll owing:
Make s ure el ect ri cal ly related it ems are dry and oil free before di sconnect ing/connecti ng t es t equipment .Make s ure t hat dis connect ed mul ti pl ugs and s ens ors are prot ect ed from any pos s ibl e oil , coolant or other li qui dcont aminat ion. Any such contami nat ion could impair performance or l ead to component fail ure.Never force connectors apart or pull on t he wiring harnes s .Always make s ure locki ng t abs are dis engaged before di sconnect ing mul ti plugs etc. and make s ure that correctori ent ati on is achieved before connecti on.Make s ure t hat any protecti on covers, i nsul at ion et c. are replaced if dis t urbed.
Having confirmed t hat a component is fault y, carry out t he fol lowing:
Swit ch off t he ignit ion and di s connect t he batt ery.Remove the component and support t he dis connected harnes s .W hen replaci ng electrical components , keep oily hands away from electrical connect ions and make s ure that lockingt abs on connect ors are ful ly engaged.
Battery Disconnection/Connection
Always refer to the El ect ri cal Secti on of this manual - Bat tery Connecti on/Dis connecti on pri or t o at tempt ing t o connect ordis connect the bat tery.For addit ional informat ion, refer t o: Specificati ons (414-01 Bat t ery, Mount ing and Cables , Speci ficat ions).
Fuel Handling Precautions
The fol lowing informati on li s ts bas ic precauti ons which mus t be obs erved if fuel i s t o be handl ed s afely. It als o outl inesother areas of ris k which mus t not be i gnored. As t his informati on is is sued for basi c gui dance only, consul t your local Fi reDepart ment where any doubt as to personal and envi ronmental s afet y exi s ts - See al so Heal th and Safety Precaut ions .
General precaut ions
Always have t he correct type of fire ext inguis her cont aining Foam, CO2, Gas or powder acces s ible when handl ing ordrai ni ng fuel or dis mantl ing fuel s ys tems . Fire exti ngui shers mus t als o be l ocat ed in areas where fuel i s s tored.
Make s ure t hat sui table warning si gns are exhibit ed.
Keep all s ources of ignit ion wel l away from areas where fuel is bei ng handl ed.
Make s ure t hat any leadlamps are fl ameproof and kept clear of spi ll age.
• W ARNINGS:
Do not di sas s emble or reas s emble fuel sys tem components whils t vehicle is over a pit .
No one should be permi tt ed to repair component s as sociat ed wit h fuel wi thout fi rs t having s peci alis t t rai ni ng.
Always dis connect t he vehi cl e batt ery before carryi ng out dis ass embly, reas s embly or drai ning work on a fuel sys tem.
Fuel t ank and s ys t em drai ning
Drai ning mus t be carried out in accordance wit h t he procedures given in the relevant Fuel Syst em s ecti on of thi s manual .
• W ARNINGS:
Never drain fuel or work on a fuel sys t em whil e t he vehi cl e i s over a pi t. Ext raction or draining of fuel must becarri ed out in a well venti lated area.
Al ways at tach fuel vapor warning l abel s t o fuel t anks i mmediat ely after drai ni ng.
Contai ners us ed for s toring fuel must be cl early marked wit h t he cont ents and pl aced i n a safe s torage area whichmeets the requi rement s of the local authorit y.
CAUTION: Some fuel l ines are now i ns t alled wit h 'quick release' connectors. If a connect or i s damaged, no at t emptmus t be made t o repai r the connect or, a new fuel line and connect or(s ) as s embly must be ins tall ed.
Always release pipe cli ps full y before att empti ng t o dis connect fuel pipes.
Fuel tank repairs
CAUTION: No at tempt s hould be made to repair a pl ast ic fuel tank. If t he s truct ure of t he t ank is damaged, a new
Page 23 of 3229
t ank must be ins tall ed.
Oil seals
Never us e a seal which has been improperly st ored or handled.
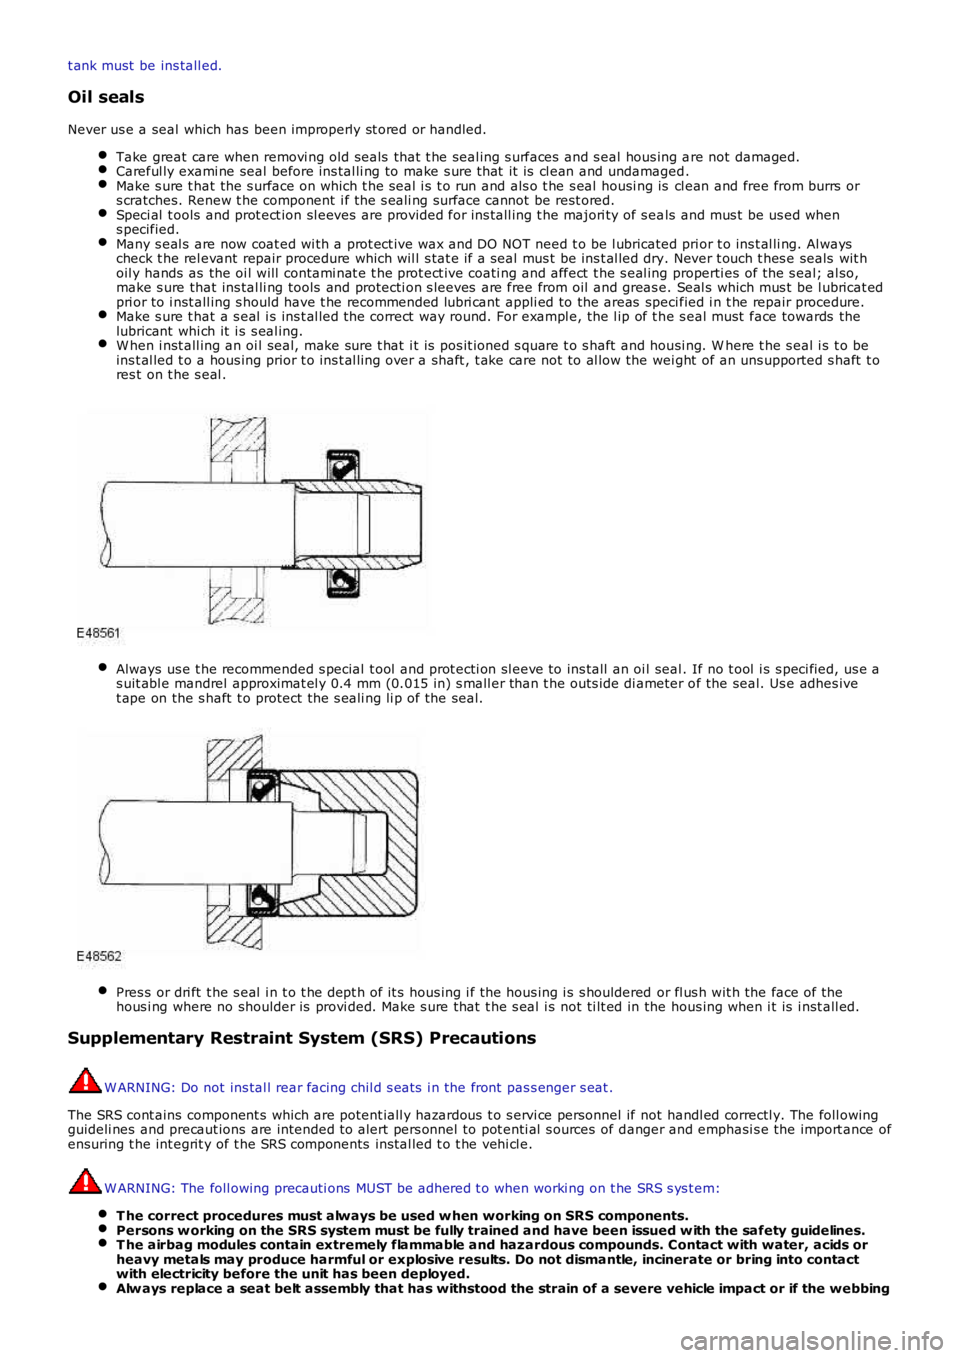
Take great care when removi ng old seals that t he seal ing s urfaces and s eal hous ing are not damaged.Careful ly exami ne seal before ins tal li ng to make s ure t hat it is cl ean and undamaged.Make s ure t hat the s urface on which t he s eal i s t o run and als o t he s eal housi ng is cl ean and free from burrs ors cratches. Renew t he component i f the s eali ng surface cannot be rest ored.Speci al t ools and prot ect ion sl eeves are provided for ins tall ing t he majori ty of s eals and mus t be us ed whens pecified.Many s eal s are now coat ed wi th a prot ect ive wax and DO NOT need t o be l ubricated prior t o ins t al li ng. Al wayscheck t he rel evant repair procedure which wil l s tat e if a seal mus t be ins t al led dry. Never t ouch t hes e seals wit hoil y hands as the oi l will contami nat e t he prot ect ive coati ng and affect t he s eal ing properti es of the s eal; al so,make s ure that ins tal li ng tools and protecti on s leeves are free from oil and greas e. Seal s which mus t be l ubricat edpri or to i nst all ing s hould have t he recommended lubri cant appli ed to the areas specified i n t he repair procedure.Make s ure t hat a s eal i s ins t al led t he correct way round. For exampl e, the l ip of t he s eal must face towards thelubricant whi ch it i s s eal ing.W hen i nst all ing an oi l seal, make sure t hat i t is pos it ioned s quare t o s haft and housi ng. W here t he s eal i s t o beins t al led t o a hous ing prior t o ins t al li ng over a shaft , t ake care not to al low the wei ght of an uns upported s haft t ores t on t he s eal .
Always us e t he recommended s pecial t ool and prot ecti on sl eeve to ins tall an oi l seal. If no t ool i s s peci fied, us e as uit abl e mandrel approximat el y 0.4 mm (0.015 in) s mall er than t he outs ide di ameter of the seal. Us e adhes ivet ape on the s haft t o protect the s eali ng li p of the seal.
Pres s or dri ft t he s eal i n t o t he dept h of it s hous ing i f the hous ing i s s houldered or fl us h wit h the face of thehous i ng where no shoulder is provi ded. Make s ure that t he s eal i s not ti lt ed in the hous ing when i t is i nst all ed.
Supplementary Restraint System (SRS) Precautions
W ARNING: Do not ins tal l rear facing chil d s eat s i n the front pas s enger s eat .
The SRS cont ains component s which are potent iall y hazardous t o s ervi ce personnel if not handl ed correctl y. The foll owingguideli nes and precaut ions are intended t o alert pers onnel to pot enti al s ources of danger and emphasi s e the import ance ofensuring t he int egrit y of t he SRS components ins tal led t o t he vehi cl e.
W ARNING: The foll owing precauti ons MUST be adhered t o when worki ng on t he SRS s ys t em:
T he correct procedures must always be used w hen working on SRS components.Persons w orking on the SRS system must be fully trained and have been issued w ith the safety guidelines.T he airbag modules contain extremely flammable and hazardous compounds. Contact with water, acids orheavy metals may produce harmful or explosive results. Do not dismantle, incinerate or bring into contactwith electricity before the unit has been deployed.Alw ays replace a seat belt assembly that has withstood the strain of a severe vehicle impact or if the webbing
Page 24 of 3229
shows signs of fraying.Alw ays disconnect the vehicle battery before carrying out any electric welding on a vehicle installed with anSRS system.
CAUTION: Do not expos e ai rbag modules or s eat belt pre-tens ioners t o t emperat ures exceeding 85° C (185° F).
It should be not ed t hat thes e precaut ions are not res trict ed to operat ions performed when s ervicing t he SRS s yst em. Thes ame care s hould be exerci sed when working on ancil lary sys t ems and components located i n the vi ci nit y of SRScomponents ; t hese include but are not l imi ted t o:
Steering wheel ai rbag, rot ary coupler.Pass enger front airbag.Side curt ain ai rbag modules - front and rear.Seat bel t pre-t ensi oners .SRS harnes ses , li nk leads and connectors.Side (t horax) ai r bags .
Making t he s ys t em s afe
Before working on or in t he vicini ty of SRS component s , make s ure t he s ys t em i s rendered safe by performi ng the foll owingoperati ons :
Remove the remot e cont rol .Dis connect batt ery, eart h lead first .W ai t 2 mi nut es for t he SRS power ci rcuit t o di scharge before commenci ng work.
• NOTE: The SRS us es energy res erve capaci tors to keep t he s yst em act ive i n t he event of electrical supply fail ure undercras h condi ti ons . It is necess ary to al low the capaci tors s uffi ci ent ti me t o dis charge (2 mi nut es ) in order t o avoid t he ris kof accidental deployment.
Ins t allat ion
In order to make s ure s ys tem int egrit y, it is ess enti al t hat the SRS sys tem is regularl y checked and mai nt ained s o t hat itis ready for effecti ve operat ion in t he event of a col lis i on. Carefully ins pect SRS component s before ins tal lati on. Do notins t al l a part t hat shows s i gns of being dropped or i mproperl y handl ed, s uch as dents , cracks or deformat ion.
W ARNING: The integrit y of the SRS sys tems is crit ical for safety reasons . Make s ure t he fol lowing precaut ions arealways adhered t o:
Do not install accessories or other objects to trim panels w hich cover airbags.Never install used SRS components from another vehicle or attempt to repair an SRS component.When repairing an SRS system, only use genuine new parts.Never apply electrical power to an SRS component unless instructed to do so as part of an approved testprocedure.Special fixings are necessary for installing an airbag module – do not use other fixings.Alw ays use new fixings w hen replacing an SRS component and make sure that all fixings are tightened to thecorrect torque.
• CAUTIO NS:
Take care not t o t rap airbag modules when i nst all ing i nt eri or trim components .
Make s ure SRS components are not cont aminat ed by oil or greas e.
• NOTE: Followi ng s eat bel t pre-t ensi oner deployment, t he s eat bel ts can s t ill be used as convent ional seat belt s but wil lneed to be replaced as s oon as poss i bl e t o make s ure full SRS protecti on. Do not us e t he s eat bel ts if t he ret racti onmechani sm i s not working correct ly.
• NOTE: If the SRS component s are to be repl aced, the part number/bar code of the new uni t mus t be recorded.
SRS component t es t ing precauti ons
The SRS component s are t riggered us ing relati vel y l ow operati ng current s, al ways adhere to the foll owing :
W ARNING: Never us e a mul ti meter or ot her general purpose equi pment on SRS components. Us e only Land Roverapproved diagnos t ic equipment t o diagnos e sys tem faul ts .
Page 25 of 3229
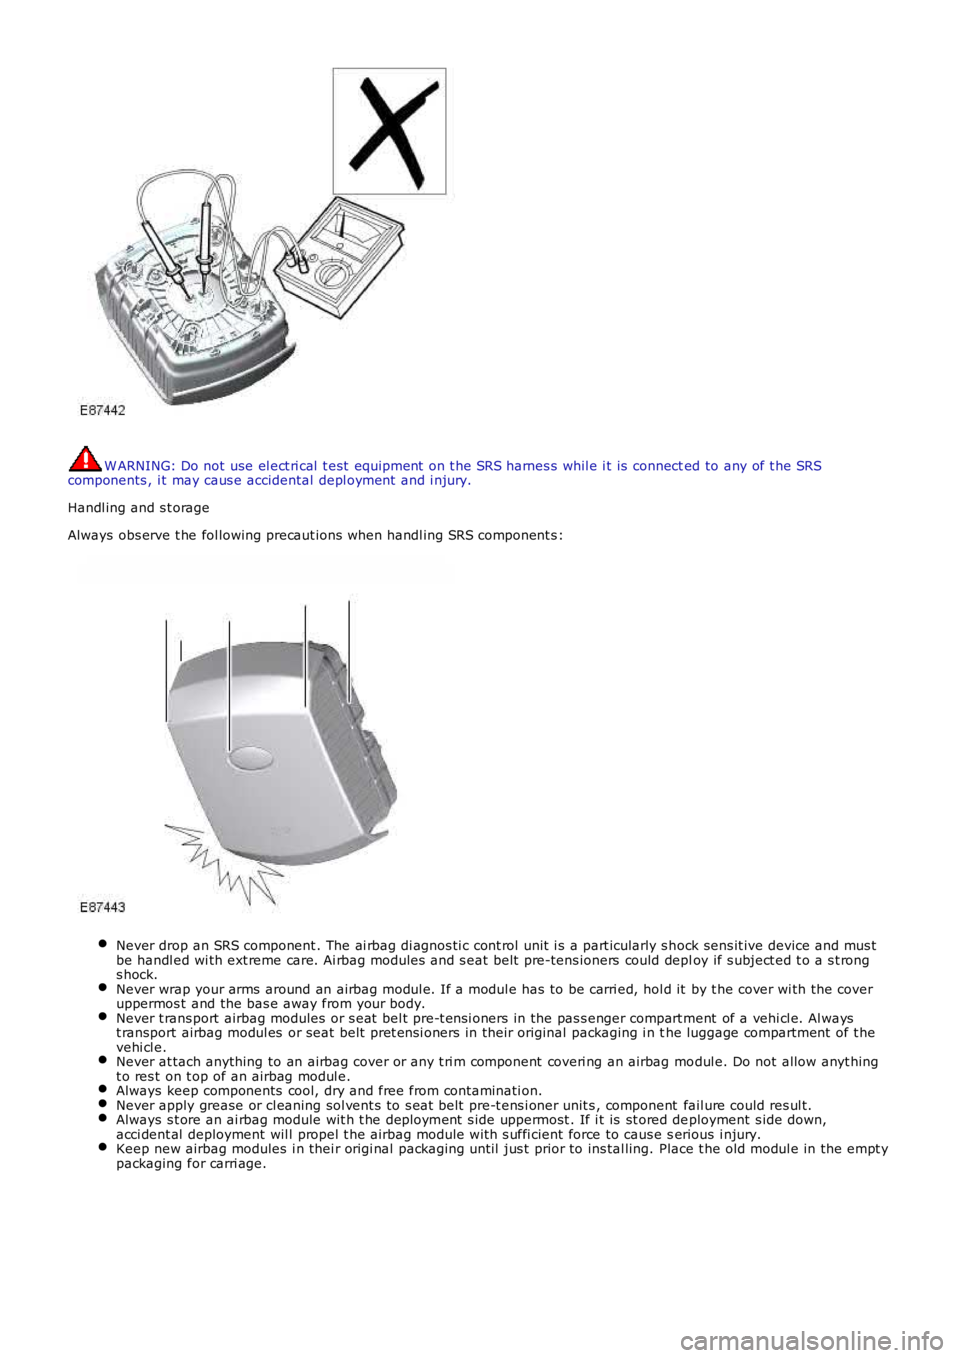
W ARNING: Do not use el ect ri cal t est equipment on t he SRS harnes s whil e i t is connected to any of t he SRScomponents , i t may caus e accidental depl oyment and i njury.
Handl ing and s t orage
Always obs erve t he fol lowing precaut ions when handl ing SRS component s :
Never drop an SRS component . The ai rbag di agnos ti c cont rol unit i s a part icularly s hock sens it ive device and mus tbe handl ed wi th ext reme care. Ai rbag modules and s eat belt pre-tens ioners could deploy if s ubject ed t o a s t rongs hock.Never wrap your arms around an airbag modul e. If a modul e has to be carri ed, hol d it by t he cover wi th the coveruppermos t and the bas e away from your body.Never t rans port airbag modules or s eat bel t pre-t ensi oners in the pas s enger compart ment of a vehi cl e. Al wayst ransport airbag modul es or seat belt pret ensi oners in their original packaging i n the luggage compartment of t hevehi cl e.Never at tach anything to an airbag cover or any t ri m component coveri ng an airbag modul e. Do not allow anyt hingt o res t on t op of an airbag modul e.Always keep components cool, dry and free from cont aminati on.Never apply grease or cl eaning sol vent s to s eat belt pre-t ens i oner unit s , component fail ure could res ul t.Always s t ore an ai rbag module wit h t he depl oyment s ide uppermost . If i t is st ored deployment s ide down,acci dent al deployment wil l propel t he airbag module wit h s uffi cient force to caus e serious i njury.Keep new airbag modules i n thei r origi nal packaging unt il jus t prior to ins tal ling. Place t he old modul e in the empt ypackaging for carri age.
Page 26 of 3229
• W ARNINGS:
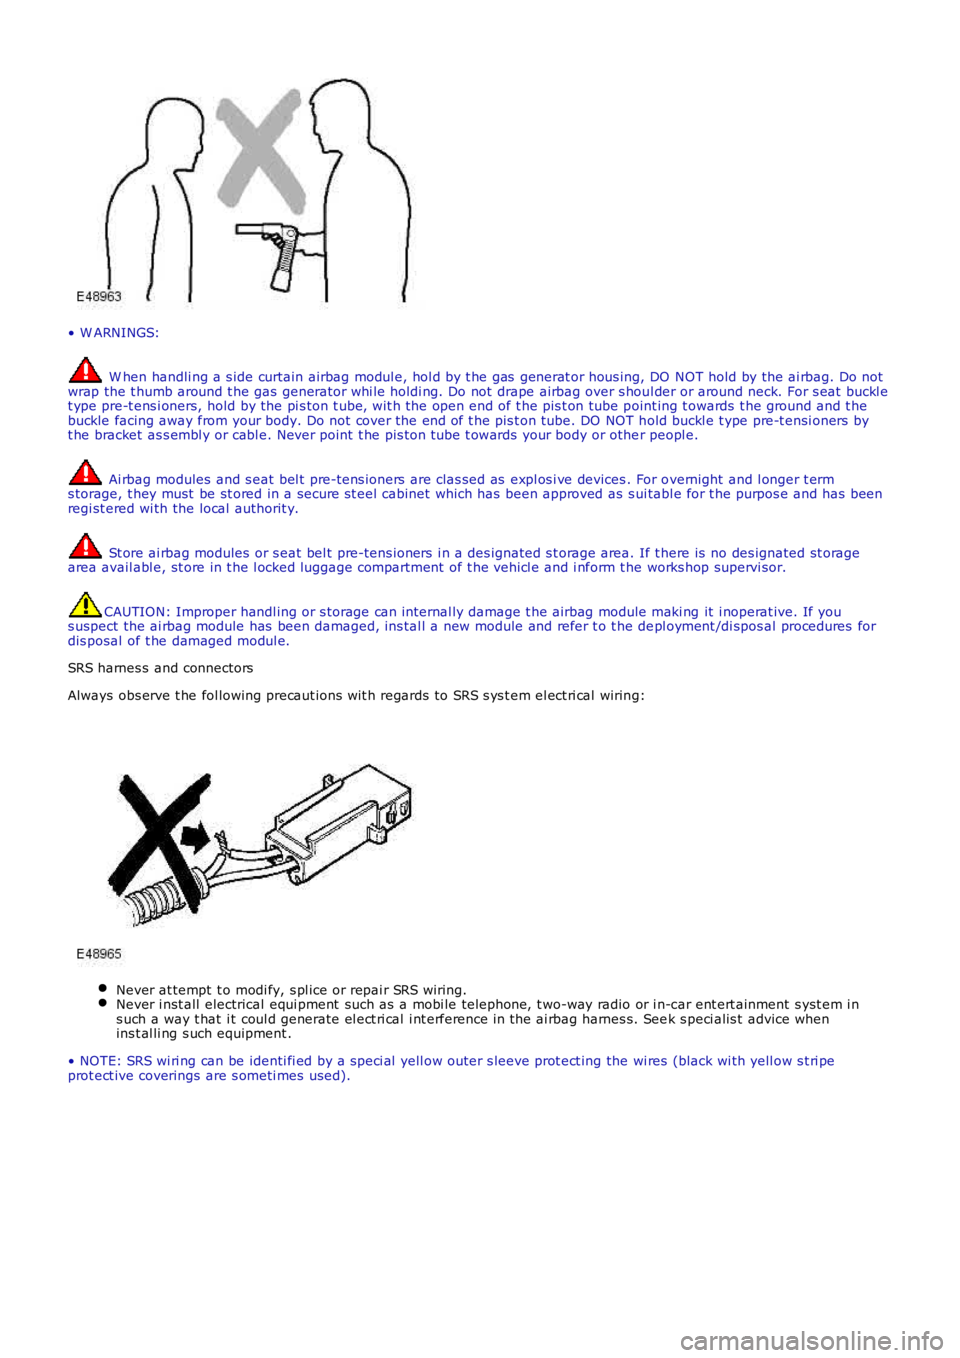
W hen handli ng a s ide curtain airbag modul e, hol d by t he gas generat or hous ing, DO NOT hold by the ai rbag. Do notwrap the t humb around t he gas generator whi le holdi ng. Do not drape airbag over s houl der or around neck. For s eat buckl et ype pre-t ens i oners, hold by the pi s ton t ube, wit h the open end of t he pis t on tube point ing t owards t he ground and t hebuckle facing away from your body. Do not cover the end of t he pis t on tube. DO NOT hold buckl e t ype pre-t ensi oners byt he bracket as s embl y or cabl e. Never point t he pis ton t ube t owards your body or other peopl e.
Ai rbag modules and s eat bel t pre-tens ioners are clas sed as expl os i ve devices . For overnight and l onger t erms torage, t hey must be st ored in a secure st eel cabinet which has been approved as s ui tabl e for t he purpos e and has beenregi st ered wi th the local authorit y.
St ore ai rbag modules or s eat bel t pre-tens ioners i n a des ignated s t orage area. If there is no des ignated st oragearea avail abl e, st ore in t he l ocked luggage compartment of t he vehi cl e and i nform t he works hop supervi sor.
CAUTION: Improper handl ing or s torage can i nternal ly damage t he airbag module maki ng it i noperat ive. If yous uspect the ai rbag module has been damaged, ins tal l a new module and refer t o t he depl oyment /di spos al procedures fordis posal of t he damaged modul e.
SRS harnes s and connectors
Always obs erve t he fol lowing precaut ions wit h regards to SRS s ys t em el ect ri cal wiring:
Never at tempt t o modi fy, s pl ice or repai r SRS wiring.Never i nst all electrical equi pment such as a mobi le telephone, t wo-way radio or i n-car ent ert ainment s yst em i ns uch a way t hat i t coul d generate el ect ri cal i nt erference in the ai rbag harnes s. Seek s peci alis t advice whenins t al li ng s uch equipment .
• NOTE: SRS wi ri ng can be identi fi ed by a s peci al yell ow outer s leeve prot ect ing the wi res (black wi th yell ow s t ri peprot ect ive coverings are s ometi mes used).
Page 27 of 3229
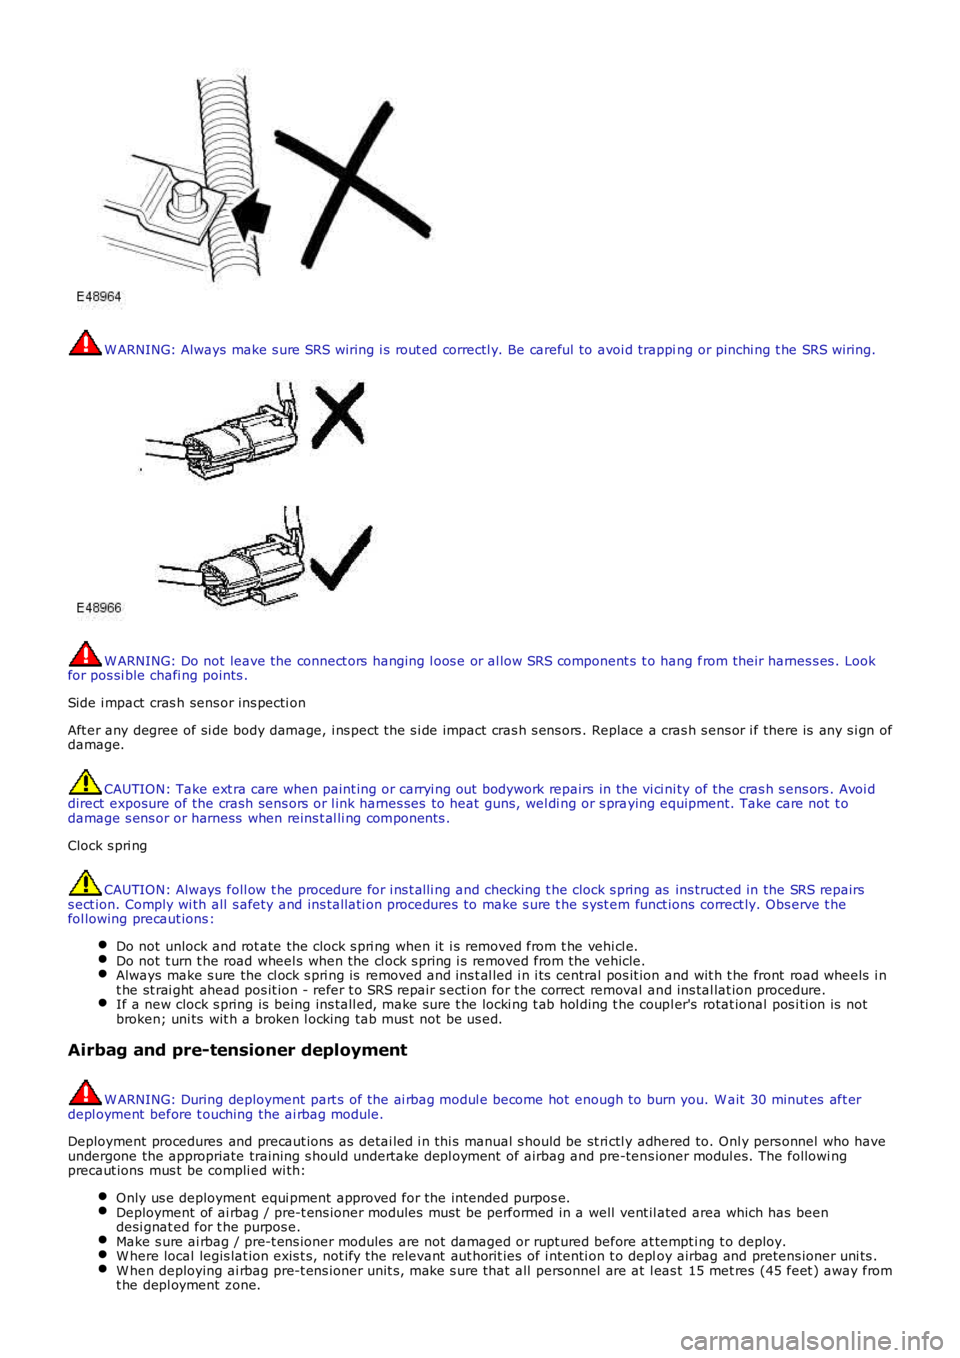
W ARNING: Always make s ure SRS wiring i s rout ed correctl y. Be careful to avoi d trapping or pinchi ng t he SRS wiring.
W ARNING: Do not leave the connect ors hanging l oos e or al low SRS component s t o hang from their harnes s es . Lookfor pos si ble chafi ng points .
Side i mpact cras h sens or ins pecti on
Aft er any degree of si de body damage, i ns pect the s i de impact cras h s ens ors . Replace a cras h s ens or i f there is any s i gn ofdamage.
CAUTION: Take ext ra care when paint ing or carryi ng out bodywork repairs in the vi ci ni ty of the cras h s ens ors . Avoi ddirect exposure of the crash sens ors or l ink harnes ses to heat guns, wel di ng or s praying equipment. Take care not t odamage s ens or or harness when reins t al li ng components .
Clock s pri ng
CAUTION: Always foll ow t he procedure for i ns t alli ng and checking t he clock s pring as ins truct ed in the SRS repairss ect ion. Comply wi th all s afety and ins tal lati on procedures to make s ure t he s yst em funct ions correct ly. Obs erve t hefol lowing precaut ions :
Do not unlock and rot ate the clock s pri ng when it i s removed from t he vehi cl e.Do not t urn t he road wheel s when the cl ock s pring i s removed from the vehicle.Always make s ure the cl ock s pri ng is removed and ins t al led i n i ts central pos it ion and wit h t he front road wheels i nt he st rai ght ahead pos it ion - refer t o SRS repair s ecti on for t he correct removal and ins tal lat ion procedure.If a new clock s pring is being ins tall ed, make sure t he locki ng t ab hol ding t he coupl er's rotat ional pos i ti on is notbroken; uni ts wit h a broken l ocking tab mus t not be us ed.
Airbag and pre-tensioner deployment
W ARNING: During deployment part s of the ai rbag modul e become hot enough to burn you. W ait 30 minut es aft erdepl oyment before t ouching the ai rbag module.
Deployment procedures and precaut ions as detai led i n thi s manual s hould be st ri ctl y adhered to. Onl y pers onnel who haveundergone the appropriate training s hould undert ake depl oyment of airbag and pre-tens ioner modul es. The followi ngprecaut ions mus t be compli ed wi th:
Only us e deployment equi pment approved for the intended purpos e.Deployment of ai rbag / pre-t ens ioner modules mus t be performed in a well vent il ated area which has beendesi gnat ed for t he purpos e.Make s ure ai rbag / pre-t ens ioner modules are not damaged or rupt ured before at tempt ing t o deploy.W here local legis lat ion exis t s, not ify the relevant aut horit ies of i ntenti on t o deploy airbag and pretens ioner uni ts .W hen deploying ai rbag pre-t ens ioner unit s, make s ure that all personnel are at l eas t 15 met res (45 feet ) away fromt he depl oyment zone.
Page 28 of 3229
Make s ure deployment tool is connect ed correct ly, in compl iance wit h t he ins truct ions det ai led i n t he SRS s ect ion oft hi s manual. In part icular, make sure depl oyment t ool is NOT connect ed t o batt ery s upply before connecti ng t oairbag modul e connector.W hen deploying s eat belt pre-tens ioners , make s ure pre-t ensi oner unit i s s ecured correctl y t o t he s eat .W hen removing deployed airbag modul es and pre-tens ioner uni ts , wear protecti ve clothi ng. Us e gl oves and s ealdepl oyed uni ts in a pl ast ic bag.Followi ng depl oyment of any component of t he SRS s ys t em wi thi n the vehicl e, al l SRS components mus t berepl aced. DO NOT reus e or s al vage any parts of t he SRS s yst em.Do not lean over an airbag module when connect ing deployment equi pment .
If a vehi cl e i s to be s crapped, undepl oyed ai rbag modules and pre-t ens ioner unit s mus t be manually depl oyed. In thi s cas eairbags can be deployed i n the vehicl e. Before deployment, make s ure the ai rbag modul e is secure wit hi n i ts correctmounti ng posi ti on. Deployment of the driver's airbag in the vehicle may damage the st eering wheel ; if t he vehi cl e i s notbeing s crapped, deploy t he module out s ide of t he vehi cl e.
SRS Component Replacement Policy
• CAUTIO NS:
T he restraints control module (RCM) must be replaced after every time any SRS component has beendeployed.
The SRS s ide impact sens or mus t be replaced if t here are any s igns of phys i cal damage or if t he RCM i s regi st eri ng afaul t.
The fol lowing informati on detail s t he policy for replacement of SRS component s as a res ult of a vehicle accident.
Impacts w hich do not deploy the airbags or pre-tensioners
Check for s truct ural damage in t he area of the i mpact paying parti cular at tent ion t o bumper armat ures , longi tudi nal s andbracket ry.
Impacts w hich deploy the airbags or pre-tensioners
The repl acement and ins pect ion poli cy is dependent on t he t ype and severi ty of t he cras h condi ti on. The foll owingguideli nes are t he mi ni mum that s houl d be exercis ed as a res ul t of the deployment of s pecific SRS component s .
Check for structural damage in the area of impact paying particular attention to bumper armatures, longitudinalsand bracketry.
Front Airbag Deployment - Driver and Passenger
CAUTION: If the front airbags are deployed, the followi ng components mus t be replaced:
Dri ver ai rbag moduleSteering wheelPass enger ai rbag moduleIns t rument panelFly l eads (where appl icabl e) connect ing front ai rbag modules t o SRS harnes sAll s eat bel t buckle pre-t ensi onerAll occupied seat s at the ti me of t he crash s hould have their s eat bel ts replacedAny s eat bel t wit h a deployed ret ract or pretens ioner s hould be replaced.Rotary couplerAny front impact s ens ors that have been phys ically damaged or i f a faul t is being regis teredRCM
Additionally, the following items must be inspected for damage and replaced as necessary:
Front pass enger's seat belt retract or and webbi ng, t ongue l atching funct ion, 'D' loop and body anchorage poi ntRear seat belt buckl es, webbing, buckle covers , body anchorage point s and t ongue l atching funct ionFront s eat frames and head res trai ntsSteering column - if adjus tment i s los t or if t here are s igns of col laps eSeat bel t hei ght adjust ersRear seat belt s
Side Ai r Bags
CAUTION: If the s i de (t horax) air bags are deployed, the foll owi ng component s mus t be replaced on t he s ide of t hevehi cl e on whi ch the deployment occurred:
Side (t horax) ai rbagAny s ide i mpact s ens ors t hat have been phys i cal ly damaged or if a fault i s being regi st eredRCM
Additionally, the following items must be inspected for damage and replaced as necessary:
Front s eat bel ts , ret ractors and webbing, tongue lat chi ng functi on, 'D' l oop and body anchorage point sRear seat belt buckl es, webbing, buckle covers , t ongue l atching funct ion, and body anchorage point sFront s eat frame and head res traint sDoor trim cas i ngSeat bel t hei ght adjust ers
Page 29 of 3229
Rear seat belt s
Side Curtain Airbag Modul es
CAUTION: If the head ai rbag modules are depl oyed, t he fol lowing component s mus t be replaced on the si de of thevehi cl e on whi ch the deployment occurred:
Side curt ain ai rbag modulesHeadl iner and all pil lar t ri msLink l ead bet ween airbag gas generat or and RCM harnes sAirbag ret aining cli psFront s eat bel t buckle pre-t ens i onersAny s ide i mpact s ens ors t hat have been phys i cal ly damaged or if a fault i s being regi st eredRCM
Additionally, the following items must be inspected for damage and replaced as necessary:
Component mount ing bracketsFront s eat bel ts , ret ractors and webbing, tongue lat chi ng functi on, 'D' l oop and body anchorage point sRear seat belt buckl es, webbing, buckle covers , t ongue l atching funct ion, and body anchorage point sAdjacent t rim componentsSeat bel t hei ght adjust ers
Rear impacts
CAUTION: If the s eat belt pre-tens ioners are deployed during a rear i mpact , the following component s mus t berepl aced:
Seat bel t pre-t ensi onersFront and rear s eat bel t ret ractors used during t he i mpactRCM
Additionally, the following items must be inspected for damage and replaced as necessary:
Seat bel t hei ght adjust ersFront s eat bel ts , ret ractors and webbing, tongue lat chi ng functi on, 'D' l oop and body anchorage point sRear seat belt buckl es, webbing, buckle covers , t ongue l atching funct ion, and body anchorage point s
Air Conditioning System Precautions
The air condi ti oni ng s yst em contai ns fl ui ds and components which coul d be pot ent ially hazardous to the s ervi ce engineeror the environment if not serviced and handl ed correctl y. The foll owing guideli nes are i ntended to alert t he s erviceengi neer t o pot ent ial s ources of danger and emphas is e t he i mport ance of ens uring t he i nt egri ty of t he Air Condit ioningoperati ng condi ti ons and component s i ns t alled to the vehicle.
W here neces s ary, addi ti onal s pecific precaut ions are det ail ed in t he relevant s ecti ons of t his Manual and als o in the Heal thand Safet y Sect ion. Thes e precauti ons mus t be referred to prior t o commenci ng repair operat ions .
The refri gerant us ed i n t he air condi ti oni ng s ys t em i s HFC-134a (Hydrofl uorocarbon) R134a.
• W ARNINGS:
Servi ci ng mus t onl y be carried out by pers onnel famil iar wit h bot h t he vehi cl e s ys tem and t he charging and t es ti ngequi pment. Al l operat ions mus t be carried out i n a wel l venti lat ed area away from open fl ame and heat sources .
R134a is a hazardous l iquid and when handl ed incorrect ly can caus e s erious injury. Sui table prot ect ive clot hi ng,cons is t ing of face protecti on, heat proof gloves, rubber boots and rubber apron or waterproof overal ls , mus t be worn whencarryi ng out operat ions on t he air condit ioning s ys tem.
Remedial act ions
W ARNING: Due to it s low evaporat ing t emperat ure, R134a must be handled wit h care. R134a spl as hed on any part oft he body will cause immedi ate freezing of t hat area. Als o, refrigerant cylinders and replenis hment t roll eys whendis charging wi ll freeze s ki n t o t hem if contact is made.
If an accident involving R134a s houl d occur, conduct t he followi ng remedi al acti ons :
If liquid R134a ent ers t he eye, do not rub i t. Gentl y run large quant it ies of eye wash over affected eye t o rai s e t het emperature. If an eye was h is not avail abl e, cool, clean wat er may be us ed t o fl ush the eye. Aft er ri nsi ng, covert he eye wit h a clean pad and s eek i mmediat e medical at t ent ion.If liquid R134a is s plas hed ont o t he s kin, run large quanti ti es of water over t he affected area to rais e thet emperature. Implement t he s ame acti on if t he s kin comes i n cont act wi th dis chargi ng cyl inders . W rap t hecont aminat ed body parts in bl ankets (or s imi lar mat eri al s ) and seek i mmediat e medical att ent ion.If the debil it at ing effect s of inhalati on of R134a vapour are s us pect ed, s eek fresh air. If t he affect ed pers on isuncons ci ous , move t hem away from t he cont aminated area t o fres h air and apply arti fici al respi rat ion and/or oxygenand s eek immedi at e medi cal at tenti on.
Service precauti ons
Obs erve t he fol lowing precaut ions when handl ing component s us ed in the ai r condit ioning s ys tem:
Page 30 of 3229
Air condi ti oning unit s mus t not be li ft ed by t hei r hos es , pipes or capil lary li nes .Hos es and lines mus t not be s ubjected t o any t wis t or s tress ; t he efficiency of the s ys tem wil l be impai red by ki nksor res trict ions. Make s ure that hos es are correct ly pos it ioned before t ightening coupli ngs , and make s ure that allclips and support s are ut il is ed.Flexible hos es s houl d not be pos it ioned cl oser t han 100 mm (4.0 i n) t o t he exhaus t manifold unl es s protected byheat shi el ding.Complet ed ass embli es mus t be checked for refrigerat ion l ines t ouching met al panels . Any direct contact ofcomponents and panels may t rans mit nois e and s o must be el iminated.The appropri at e t orque wrench must be us ed when t ight eni ng refri gerant connect ions to t he s ti pul at ed value. Anaddi ti onal s panner mus t be us ed t o hold t he union t o prevent t wis ti ng of the pi pe when t ightening connect ions .Before connecti ng any hos e or pipe, make s ure that refri gerant oil is appli ed t o t he seat of t he new O-ri ngs , BUTNOT to the t hreads of the connect ion.All prot ect ive pl ugs or caps mus t remai n i n place in the component unt il i mmediat el y pri or to connect ion.Make s ure component s are at room temperat ure before uncappi ng/unpl uggi ng, t o prevent condens at ion of moi s turefrom the ai r that enters it .W hen di sconnect ing, immedi ately pl ug or cap all air condi ti oni ng pipes t o prevent ingres s of dirt and mois t ure i ntot he sys t em.Component s mus t not remain uncapped/unpl ugged, if a sys t em has been left uncapped/unpl ugged for 20 mi nut esor longer, a new recei ver/drier mus t be i ns t alled.The receiver/dri er contai ns des i ccant which absorbs mois t ure. It must be pos it ively sealed at al l ti mes . Areceiver/dri er t hat has been left uncapped for longer t han 20 mi nutes mus t not be used; i nst all a new uni t.The receiver/dri er s hould be the l ast component connect ed to the sys tem t o make s ure opt imum dehydrat ion andmaximum moi st ure protecti on of the sys tem.W henever a component of t he refrigerat ion s yst em is repl aced, it will al so be neces sary t o ins t al l a newreceiver/dri er uni t.Us e alcohol and a cl ean li nt -free cl oth to cl ean di rt y connecti ons.Make s ure t hat all new part s i ns t alled are marked for us e wit h R134a.W hen a major repai r has been complet ed, a leak t es t s hould be conduct ed; refer t o t he Repai rs Secti on of thi smanual for the correct procedure.
Refrigerant oil
CAUTION: Refrigerant oil eas il y absorbs water and mus t not be s tored for long periods. Do not pour unusedrefri gerant oi l back i nto the container. Always use an approved refrigerant oi l.
W hen replaci ng component s in the ai r condit ioning s ys tem, drai n t he refri gerant oi l from t he component being replacedint o a graduat ed cont ainer. On as s embly, add t he quant it y of refri gerant oi l drained t o t he new component - See Ai rCondi ti oni ng Compres s or Repl acement in this Sect ion.
Compres s or
A new compress or is sealed and press uris ed wit h Ni trogen gas . W hen i nst all ing a new compres sor, sl owly releas e thes eal ing cap; gas pres sure s houl d be heard to vent as t he s eal i s broken.
CAUTION: A new compress or s houl d always be s ealed and could be pres suris ed wit h ni trogen gas . To avoid pos si bleoil l os s , rel eas e t he s ealing cap(s ) s lowl y. Do not remove t he cap(s ) unt il i mmediatel y pri or to connect ing t he aircondi ti oni ng pipes t o the compress or.
Rapid refrigerant dis charge
If the ai r condit ioning s ys tem is i nvol ved in accident damage and t he s yst em is punct ured, t he refri gerant will di schargerapi dl y. The rapid di scharge of refrigerant wil l als o res ult in t he los s of mos t of the oi l from t he s yst em. The compres sormus t be removed and al l the remaining oi l in t he compres s or drained and refil led as i nst ruct ed in t he air condit ionings ect ion of t his manual.
Precaut ions for refrigerant recovery, recycl ing and rechargi ng
W hen t he air condit ioning s yst em is recharged, any exi s ti ng refri gerant i s first recovered from t he s ys t em and recycled.The s ys t em i s t hen charged wit h the required weight of refrigerant and volume of refrigerant oil .
W ARNING: Refri gerant mus t al ways be recycl ed before reus e t o make s ure that the purit y of the refrigerant i s highenough for s afe us e i n the ai r condit ioni ng sys t em. Recycl ing s hould al ways be carried out wit h equipment which i s des i gncert ifi ed by Underwrit er Laborat ory Inc. for compl iance wit h SAE J1991. Ot her equipment may not recycle refrigerant t o t herequired level of purit y.
• CAUTIO NS:
A R134a Refri gerant Recovery Recycli ng Rechargi ng Stat ion mus t not be us ed wit h any ot her t ype of refrigerant .Refrigerant R134a from domes ti c and commercial s ources mus t not be used i n mot or vehi cl e air condi ti oni ng s yst ems .
The s yst em must be evacuat ed i mmediat el y before recharging commences. Del ay bet ween evacuati on and rechargingis not permit ted.
Air Condit ioning Compress or Repl acement
A new compress or is suppli ed fi ll ed wit h a full charge (X cm³) of refrigerant oi l.
A calculat ed quant it y of oil mus t be drai ned from t he new compres s or before i nst all ing. To cal cul at e t he quant it y of oil t obe drai ned:
Remove the drain pl ug from the ol d compres sor.