Lexus CT200h 2013 Owner's Manual (in English)
CT200h 2013
Lexus
Lexus
https://www.carmanualsonline.info/img/36/12739/w960_12739-0.png
Lexus CT200h 2013 Owner's Manual (in English)
Trending: start stop button, oil capacity, remote control, cruise control, phone, wheel size, fog lights
Page 611 of 688
6078-2. Steps to take in an emergency
CT200h_OM_OM76102E_(EE)
8
When trouble arises
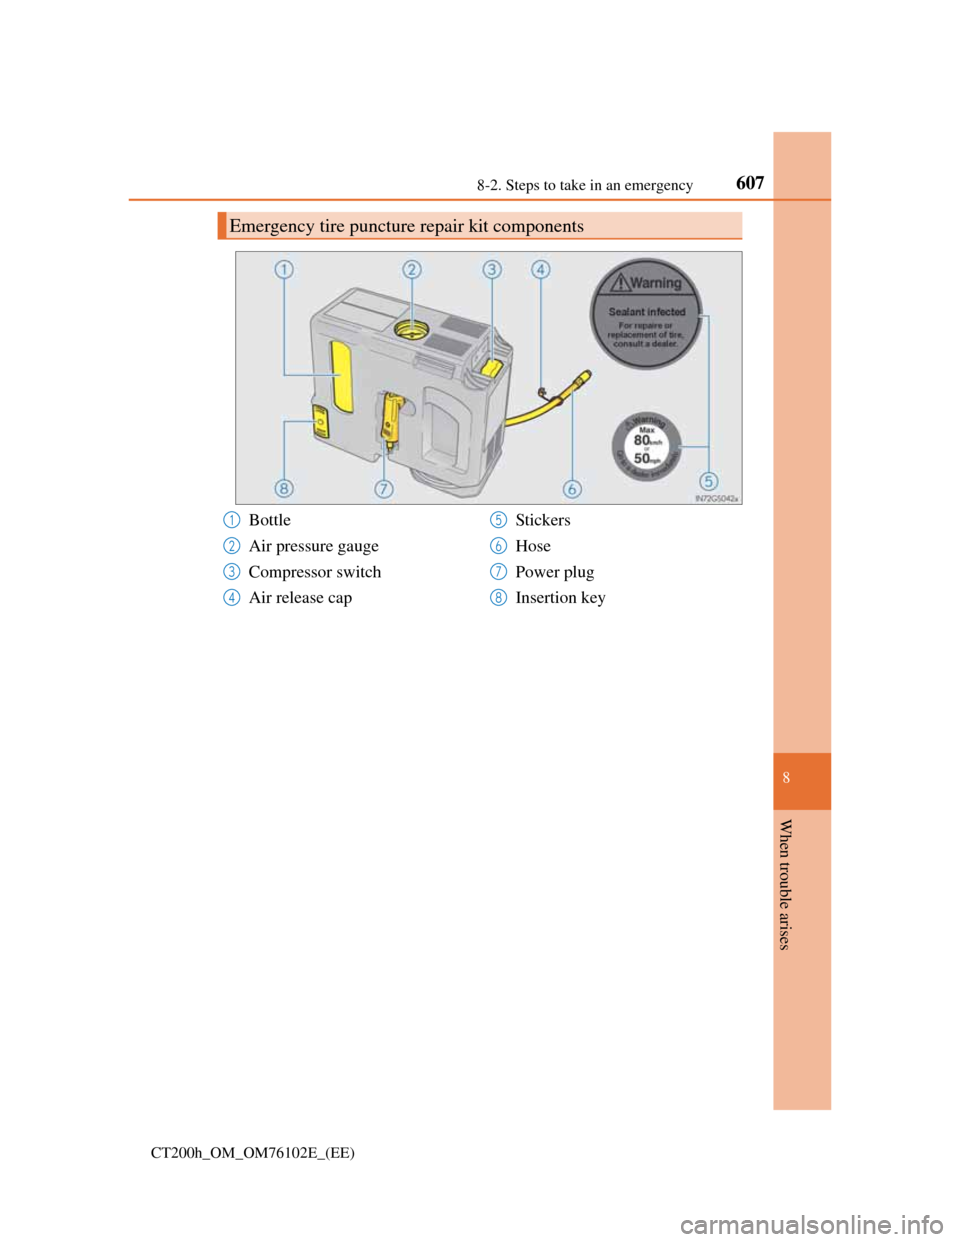
Emergency tire puncture repair kit components
Bottle
Air pressure gauge
Compressor switch
Air release capStickers
Hose
Power plug
Insertion key1
2
3
4
5
6
7
8
Page 612 of 688
6088-2. Steps to take in an emergency
CT200h_OM_OM76102E_(EE)
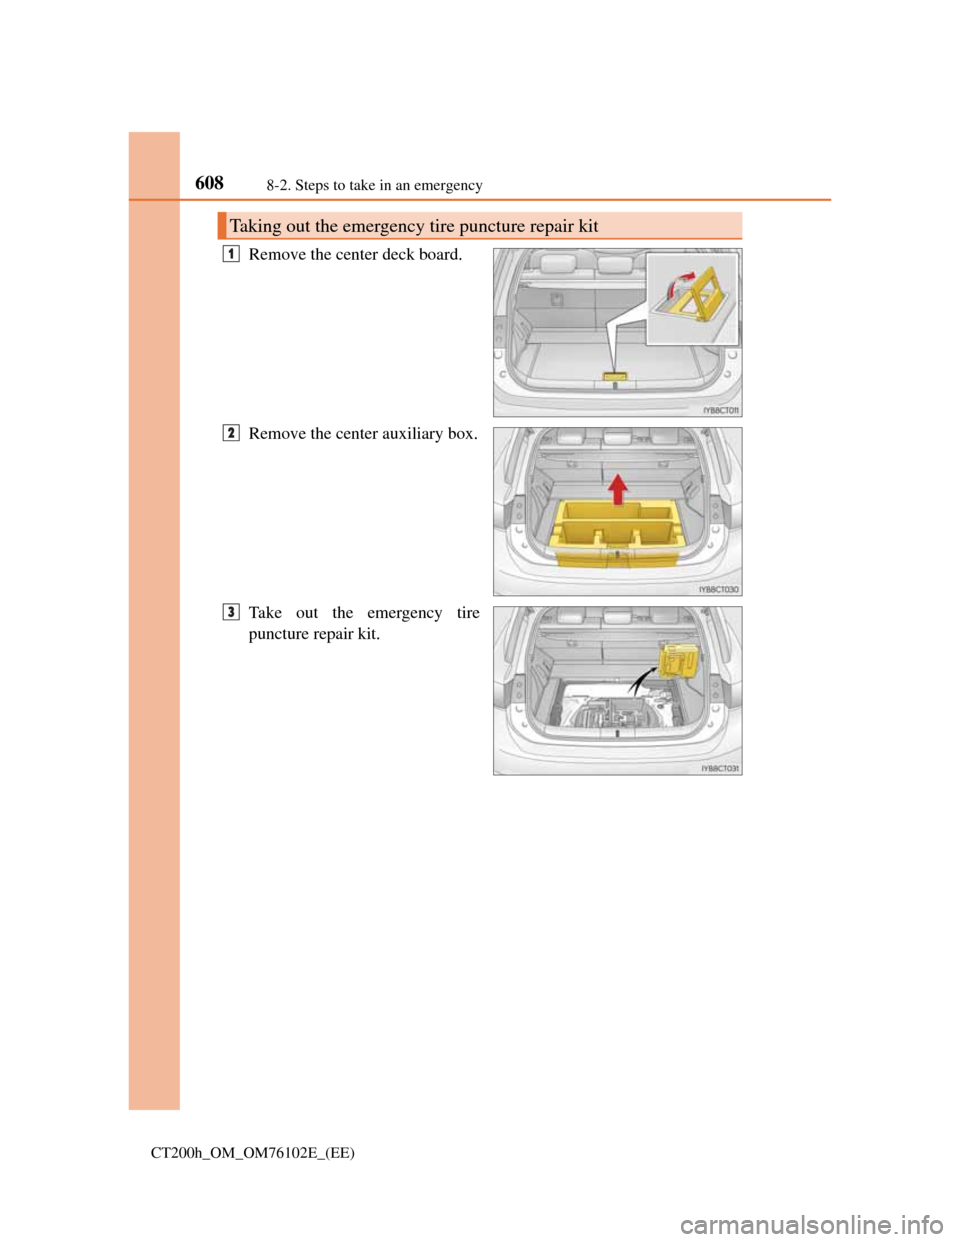
Remove the center deck board.
Remove the center auxiliary box.
Take out the emergency tire
puncture repair kit.
Taking out the emergency tire puncture repair kit
1
2
3
Page 613 of 688
6098-2. Steps to take in an emergency
CT200h_OM_OM76102E_(EE)
8
When trouble arises
Remove the center deck board and center auxiliary box. (P. 608)
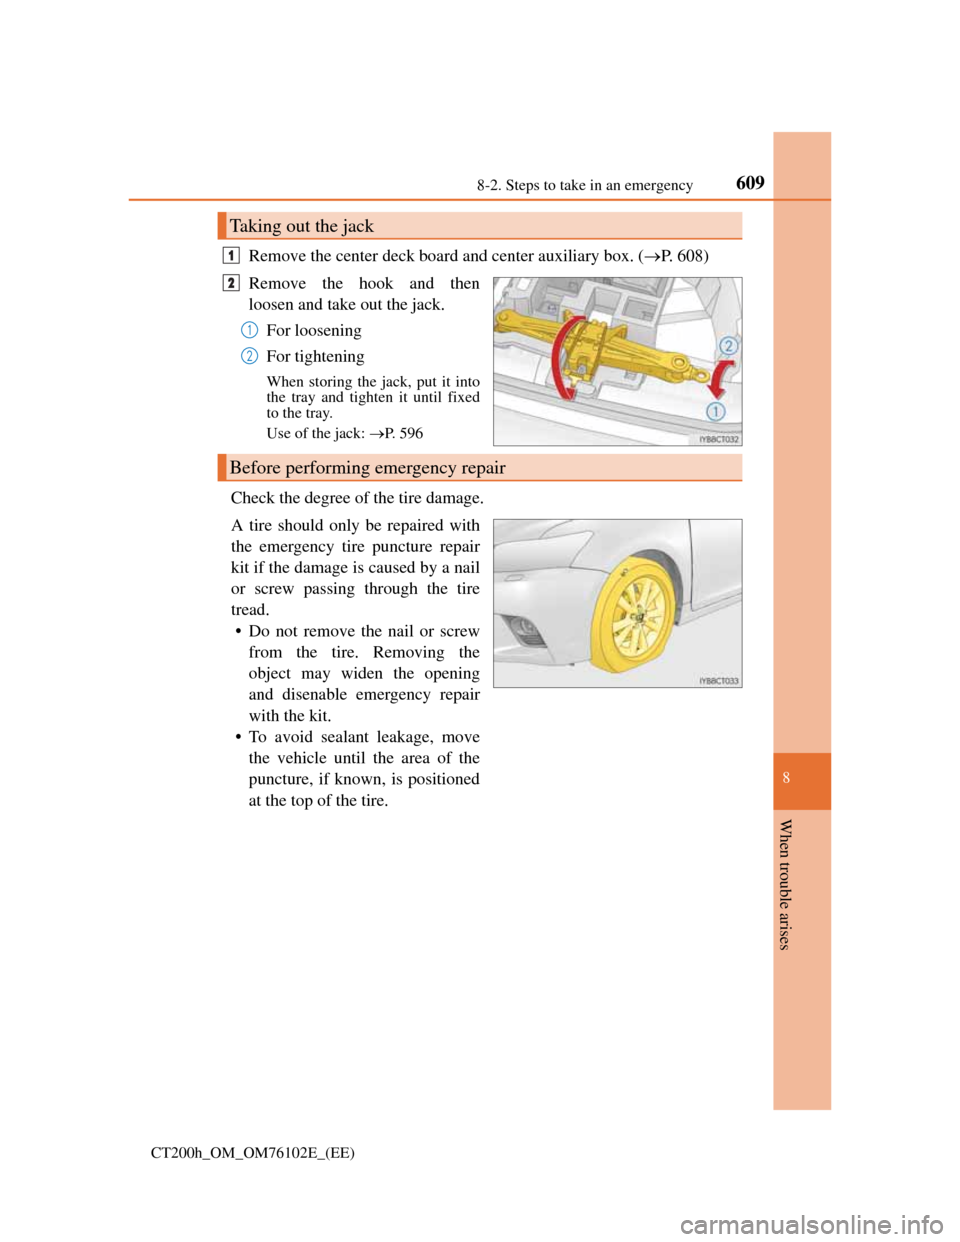
Remove the hook and then
loosen and take out the jack.
For loosening
For tightening
When storing the jack, put it into
the tray and tighten it until fixed
to the tray.
Use of the jack: P. 596
Check the degree of the tire damage.
A tire should only be repaired with
the emergency tire puncture repair
kit if the damage is caused by a nail
or screw passing through the tire
tread.
• Do not remove the nail or screw
from the tire. Removing the
object may widen the opening
and disenable emergency repair
with the kit.
• To avoid sealant leakage, move
the vehicle until the area of the
puncture, if known, is positioned
at the top of the tire.
Taking out the jack
1
2
1
2
Before performing emergency repair
Page 614 of 688
6108-2. Steps to take in an emergency
CT200h_OM_OM76102E_(EE)
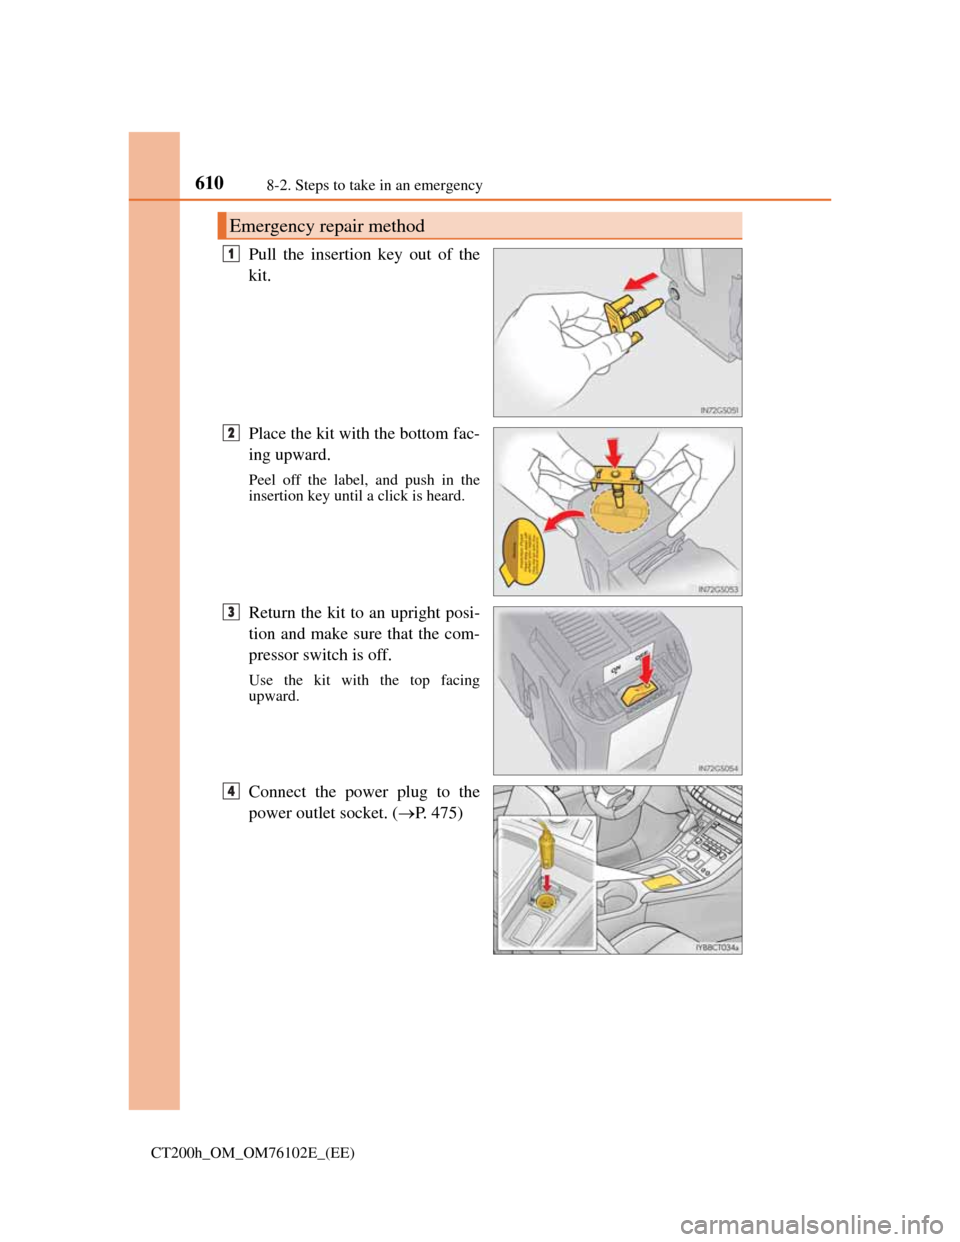
Pull the insertion key out of the
kit.
Place the kit with the bottom fac-
ing upward.
Peel off the label, and push in the
insertion key until a click is heard.
Return the kit to an upright posi-
tion and make sure that the com-
pressor switch is off.
Use the kit with the top facing
upward.
Connect the power plug to the
power outlet socket. (P. 475)
Emergency repair method
1
2
3
4
Page 615 of 688
6118-2. Steps to take in an emergency
CT200h_OM_OM76102E_(EE)
8
When trouble arises
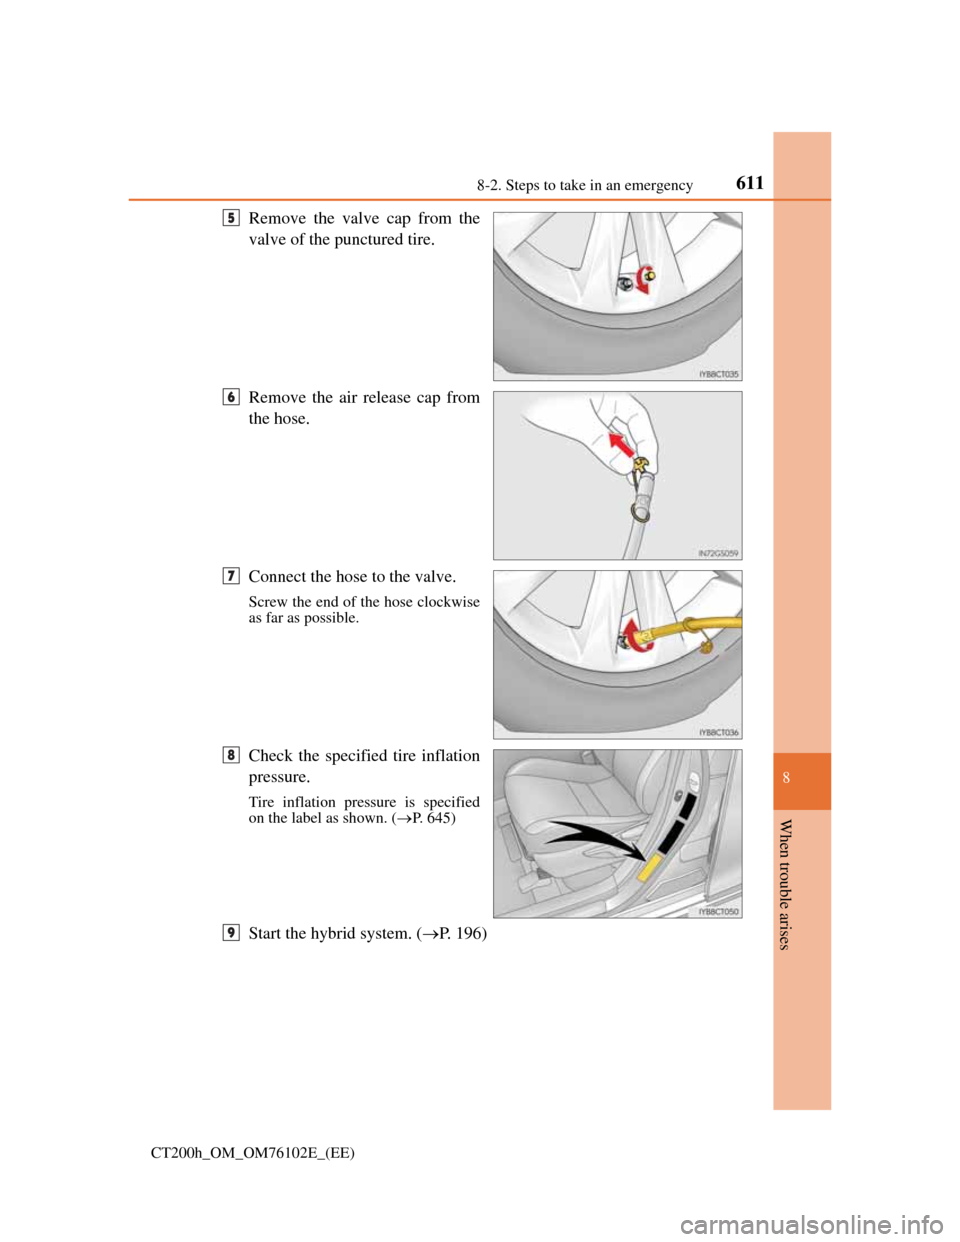
Remove the valve cap from the
valve of the punctured tire.
Remove the air release cap from
the hose.
Connect the hose to the valve.
Screw the end of the hose clockwise
as far as possible.
Check the specified tire inflation
pressure.
Tire inflation pressure is specified
on the label as shown. (P. 645)
Start the hybrid system. (P. 196)
5
6
7
8
9
Page 616 of 688
6128-2. Steps to take in an emergency
CT200h_OM_OM76102E_(EE)
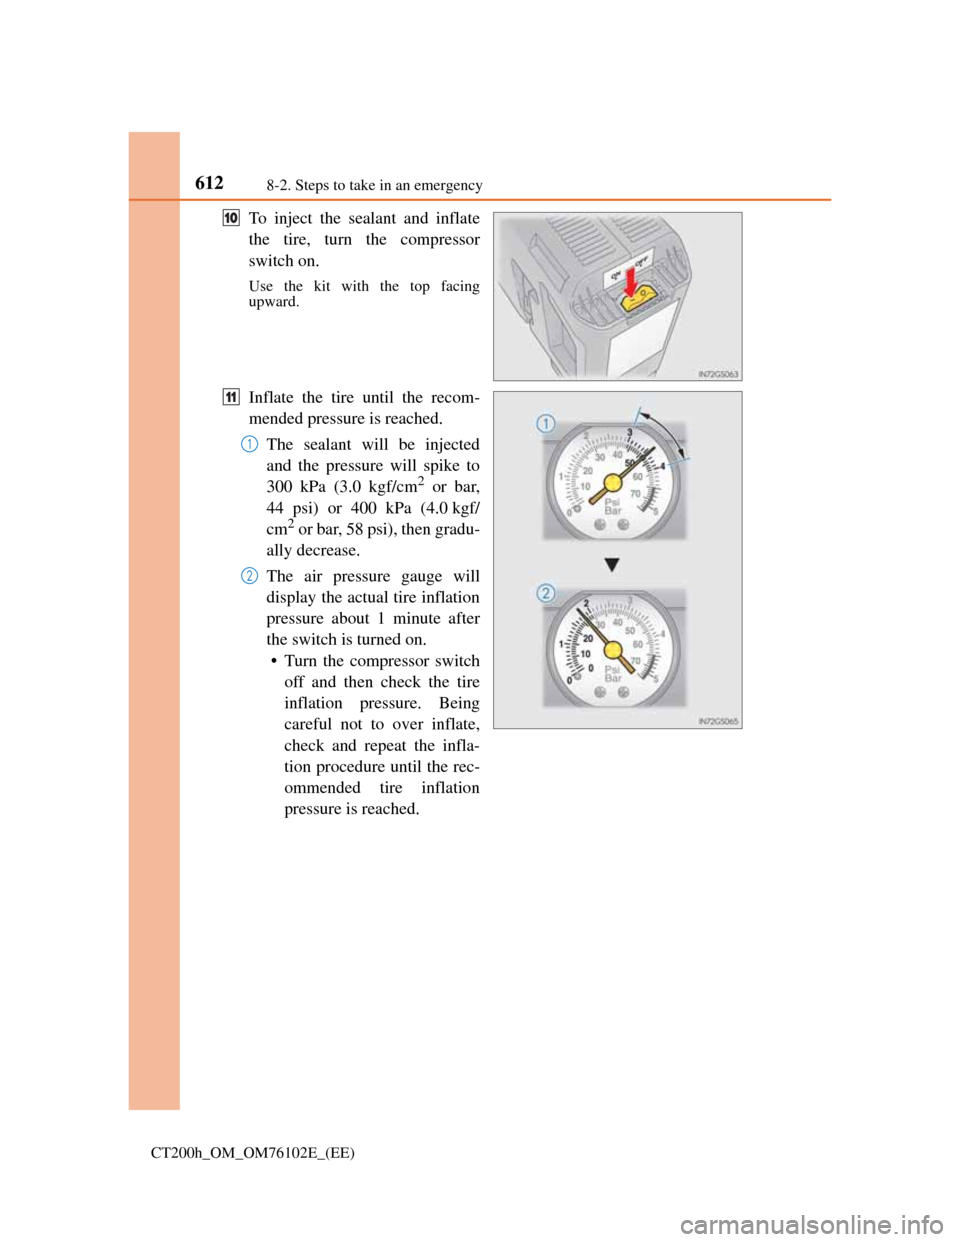
To inject the sealant and inflate
the tire, turn the compressor
switch on.
Use the kit with the top facing
upward.
Inflate the tire until the recom-
mended pressure is reached.
The sealant will be injected
and the pressure will spike to
300 kPa (3.0 kgf/cm
2 or bar,
44 psi) or 400 kPa (4.0 kgf/
cm
2 or bar, 58 psi), then gradu-
ally decrease.
The air pressure gauge will
display the actual tire inflation
pressure about 1 minute after
the switch is turned on.
• Turn the compressor switch
off and then check the tire
inflation pressure. Being
careful not to over inflate,
check and repeat the infla-
tion procedure until the rec-
ommended tire inflation
pressure is reached.
10
11
1
2
Page 617 of 688
6138-2. Steps to take in an emergency
CT200h_OM_OM76102E_(EE)
8
When trouble arises
• If the needle of the air pressure gauge reaches the red zone (450
kPa [4.5 kgf/cm2 or bar, 65 psi] or more), there may be a malfunc-
tion in the tire or in the kit itself. Stop operation immediately.
• If the tire inflation pressure is still lower than the recommended
level after inflation for 10 minutes with the switch on, the tire is
too damaged to be repaired. Turn the compressor switch off and
contact any authorized Lexus dealer or repairer, or another duly
qualified and equipped professional.
• If the tire inflation pressure exceeds the recommended level, let
out some air to adjust the tire inflation pressure. (P. 617)
Disconnect the hose from the valve on the tire and then pull out the
power plug from the power outlet socket.
To spread the liquid sealant evenly within the tire, immediately drive
for about 5 km (3 miles).
12
13
Page 618 of 688
6148-2. Steps to take in an emergency
CT200h_OM_OM76102E_(EE)
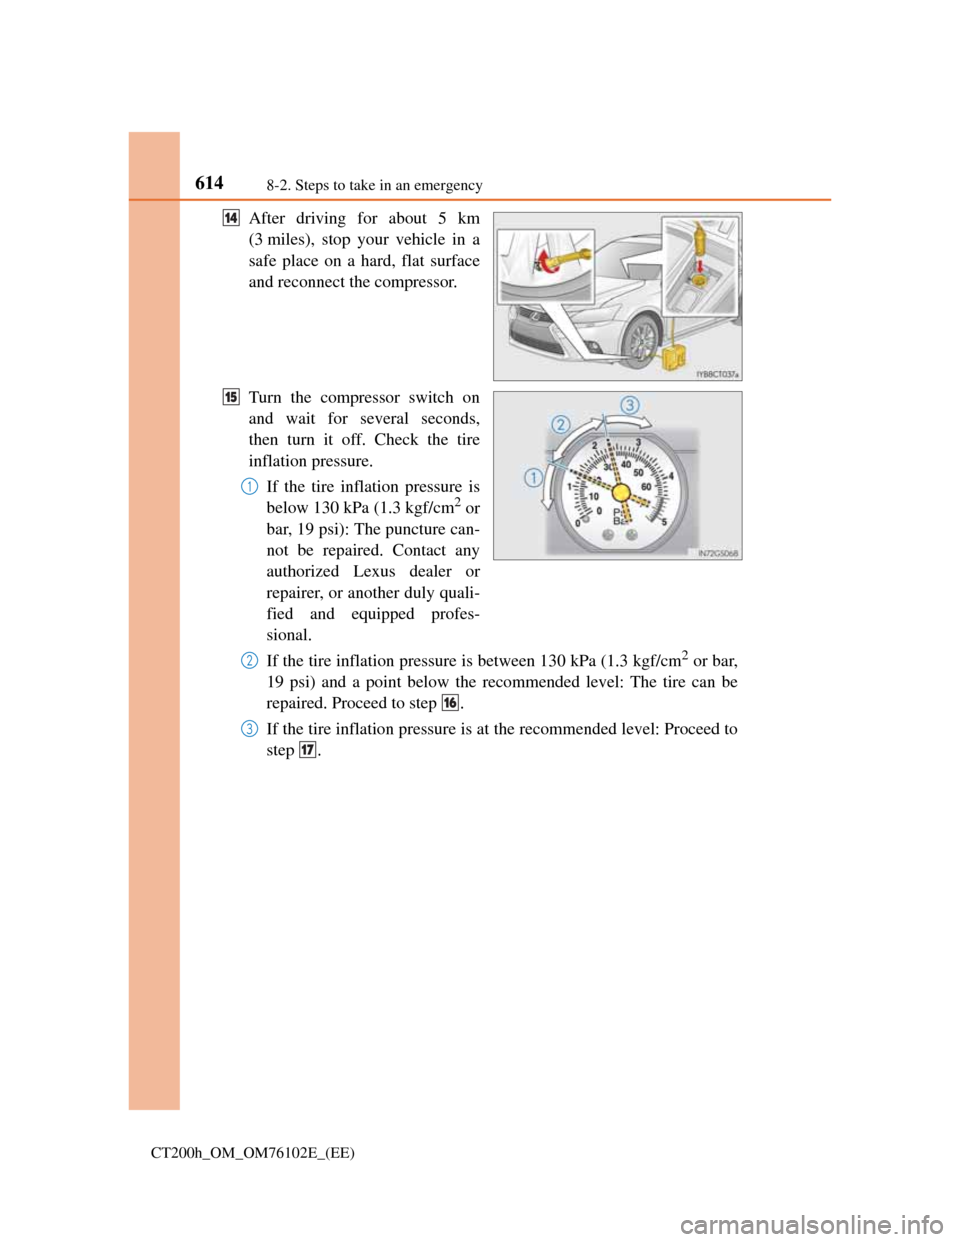
After driving for about 5 km
(3 miles), stop your vehicle in a
safe place on a hard, flat surface
and reconnect the compressor.
Turn the compressor switch on
and wait for several seconds,
then turn it off. Check the tire
inflation pressure.
If the tire inflation pressure is
below 130 kPa (1.3 kgf/cm
2 or
bar, 19 psi): The puncture can-
not be repaired. Contact any
authorized Lexus dealer or
repairer, or another duly quali-
fied and equipped profes-
sional.
If the tire inflation pressure is between 130 kPa (1.3 kgf/cm
2 or bar,
19 psi) and a point below the recommended level: The tire can be
repaired. Proceed to step .
If the tire inflation pressure is at the recommended level: Proceed to
step .
14
15
1
2
16
3
17
Page 619 of 688
6158-2. Steps to take in an emergency
CT200h_OM_OM76102E_(EE)
8
When trouble arises
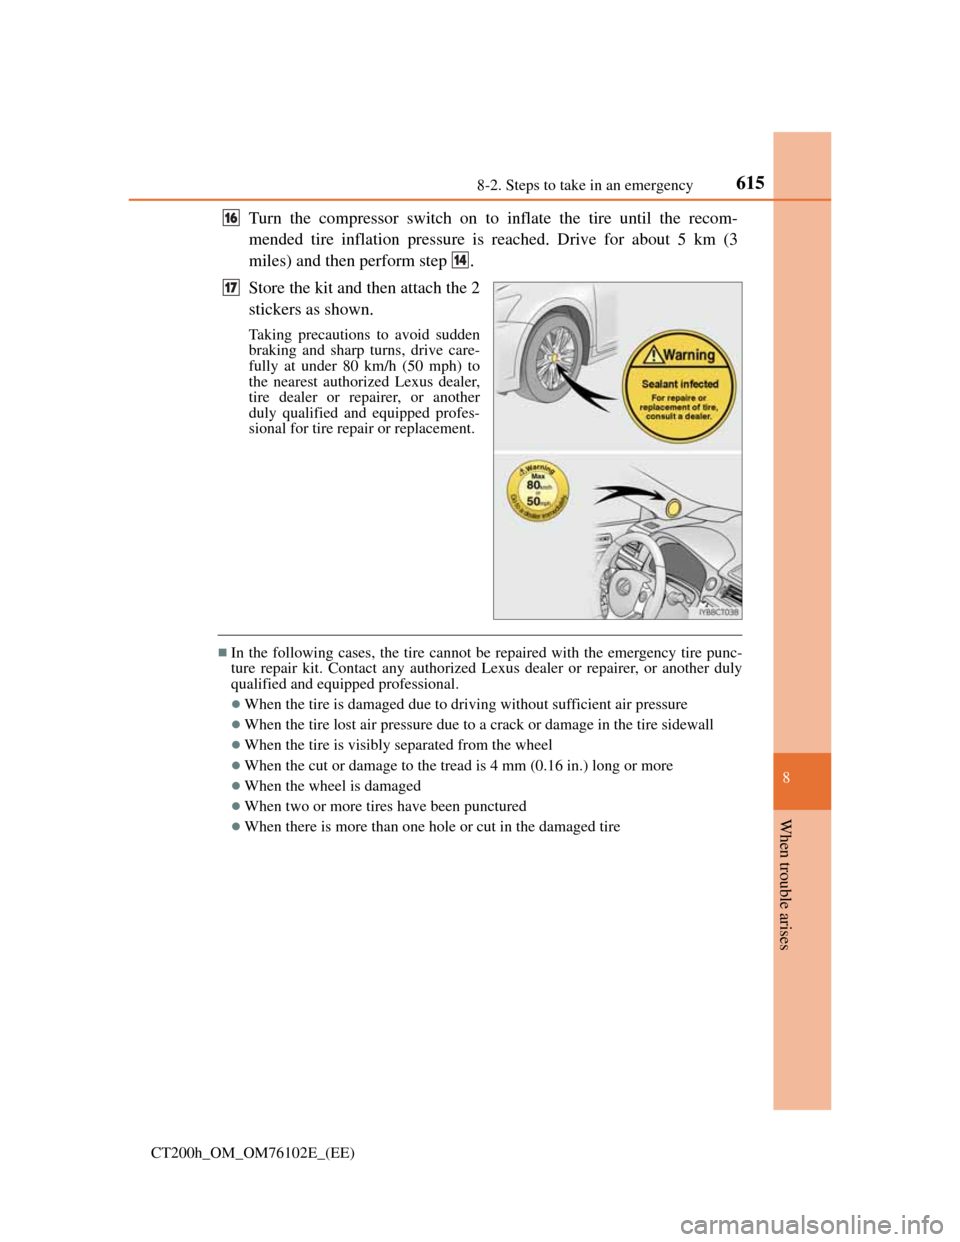
Turn the compressor switch on to inflate the tire until the recom-
mended tire inflation pressure is reached. Drive for about 5 km (3
miles) and then perform step .
Store the kit and then attach the 2
stickers as shown.
Taking precautions to avoid sudden
braking and sharp turns, drive care-
fully at under 80 km/h (50 mph) to
the nearest authorized Lexus dealer,
tire dealer or repairer, or another
duly qualified and equipped profes-
sional for tire repair or replacement.
In the following cases, the tire cannot be repaired with the emergency tire punc-
ture repair kit. Contact any authorized Lexus dealer or repairer, or another duly
qualified and equipped professional.
When the tire is damaged due to driving without sufficient air pressure
When the tire lost air pressure due to a crack or damage in the tire sidewall
When the tire is visibly separated from the wheel
When the cut or damage to the tread is 4 mm (0.16 in.) long or more
When the wheel is damaged
When two or more tires have been punctured
When there is more than one hole or cut in the damaged tire
16
14
17
Page 620 of 688

6168-2. Steps to take in an emergency
CT200h_OM_OM76102E_(EE)
Emergency tire puncture repair kit
The sealant has a limited lifespan. The expiry date is marked on the bottle. The
sealant should be replaced before the expiry date. Contact any authorized Lexus
dealer or repairer, or another duly qualified and equipped professional for
replacement.
The sealant stored in the emergency tire puncture repair kit can be used only
once to temporarily repair a single tire. If the sealant in the bottle and other
parts of the kit have been used and need to be replaced, contact any authorized
Lexus dealer or repairer, or another duly qualified and equipped professional.
The sealant can be used when the outside temperature is from -30C (-22F) to
60C (140F).
The kit is exclusively designed for size and type of tires originally installed on
your vehicle. Do not use it for tires that a different size than the original ones, or
for any other purposes.
If the sealant gets on your clothes, it may stain.
If the sealant adheres to a wheel or the surface of the vehicle body, the stain
may not be removable if it is not cleaned at once. Immediately wipe away the
sealant with a wet cloth.
During operation of the kit, a loud operation noise is produced. This does not
indicate a malfunction.
Trending: oil type, Spare tire, key battery, lights, open hood, wheel, high beam
![Lexus CT200h 2013 Owners Manual (in English) 6138-2. Steps to take in an emergency
CT200h_OM_OM76102E_(EE)
8
When trouble arises
• If the needle of the air pressure gauge reaches the red zone (450
kPa [4.5 kgf/cm2 or bar, 65 psi] or more), the Lexus CT200h 2013 Owners Manual (in English) 6138-2. Steps to take in an emergency
CT200h_OM_OM76102E_(EE)
8
When trouble arises
• If the needle of the air pressure gauge reaches the red zone (450
kPa [4.5 kgf/cm2 or bar, 65 psi] or more), the](/img/36/12739/w960_12739-616.png)
