MAZDA 6 2002 Suplement Service Manual
Manufacturer: MAZDA, Model Year: 2002, Model line: 6, Model: MAZDA 6 2002Pages: 909, PDF Size: 17.16 MB
Page 41 of 909
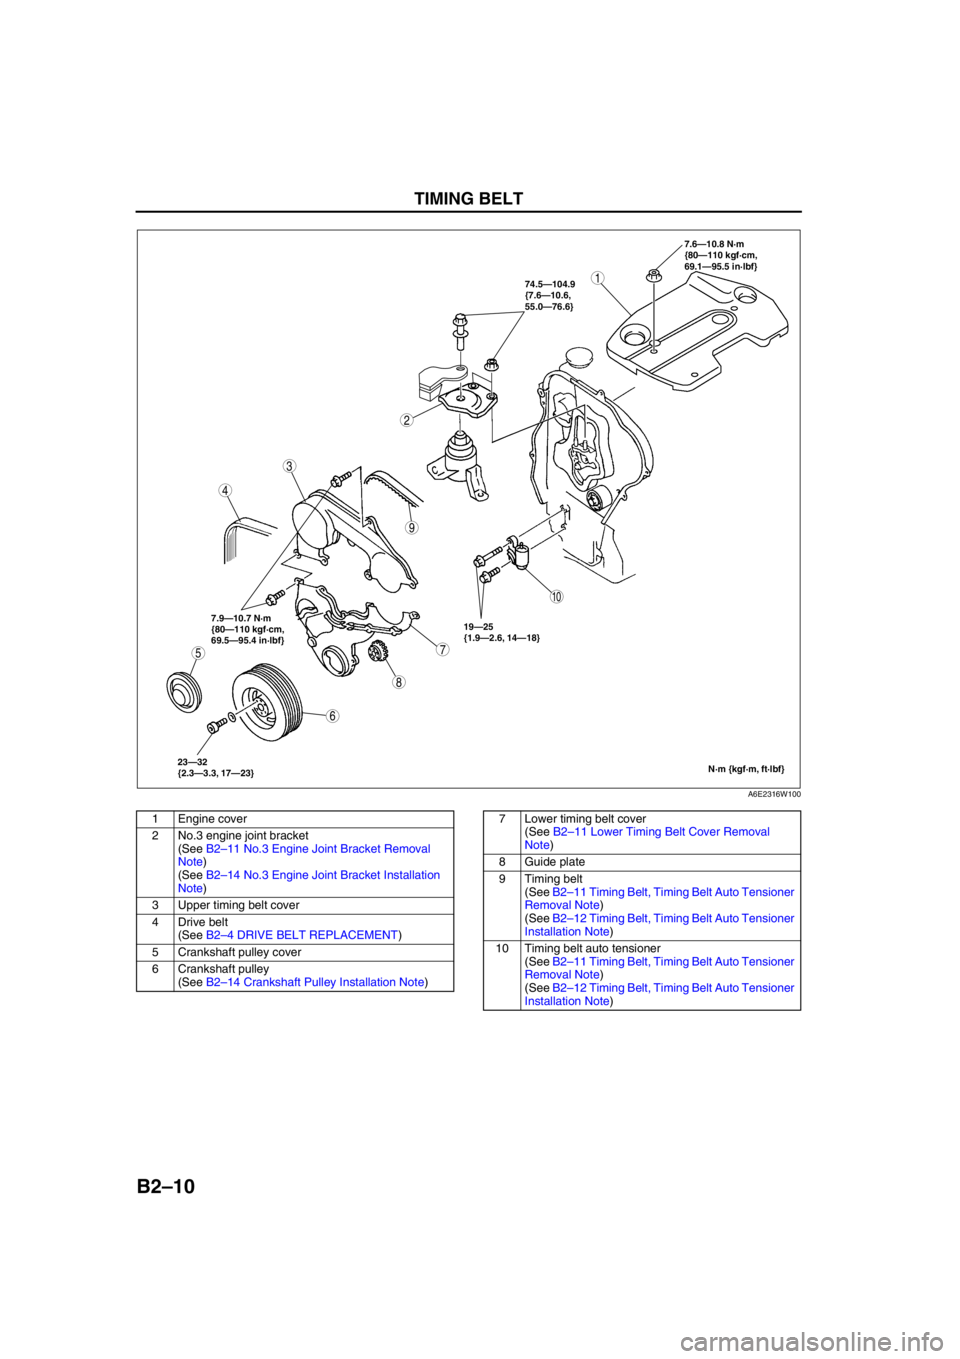
B2–10
TIMING BELT
.
N·m {kgf·m, ft·lbf} 7.6—10.8 N·m
{80—110 kgf·cm,
69.1—95.5 in·lbf}
7.9—10.7 N·m
{80—110 kgf·cm,
69.5—95.4 in·lbf}
23—32
{2.3—3.3, 17—23}19—25
{1.9—2.6, 14—18} 74.5—104.9
{7.6—10.6,
55.0—76.6}
9
8
75
4
3
1
2
10
6
A6E2316W100
1 Engine cover
2 No.3 engine joint bracket
(See B2–11 No.3 Engine Joint Bracket Removal
Note)
(See B2–14 No.3 Engine Joint Bracket Installation
Note)
3 Upper timing belt cover
4Drive belt
(See B2–4 DRIVE BELT REPLACEMENT)
5 Crankshaft pulley cover
6 Crankshaft pulley
(See B2–14 Crankshaft Pulley Installation Note)7 Lower timing belt cover
(See B2–11 Lower Timing Belt Cover Removal
Note)
8 Guide plate
9 Timing belt
(See B2–11 Timing Belt, Timing Belt Auto Tensioner
Removal Note)
(See B2–12 Timing Belt, Timing Belt Auto Tensioner
Installation Note)
10 Timing belt auto tensioner
(See B2–11 Timing Belt, Timing Belt Auto Tensioner
Removal Note)
(See B2–12 Timing Belt, Timing Belt Auto Tensioner
Installation Note)
Page 42 of 909
TIMING BELT
B2–11
B2
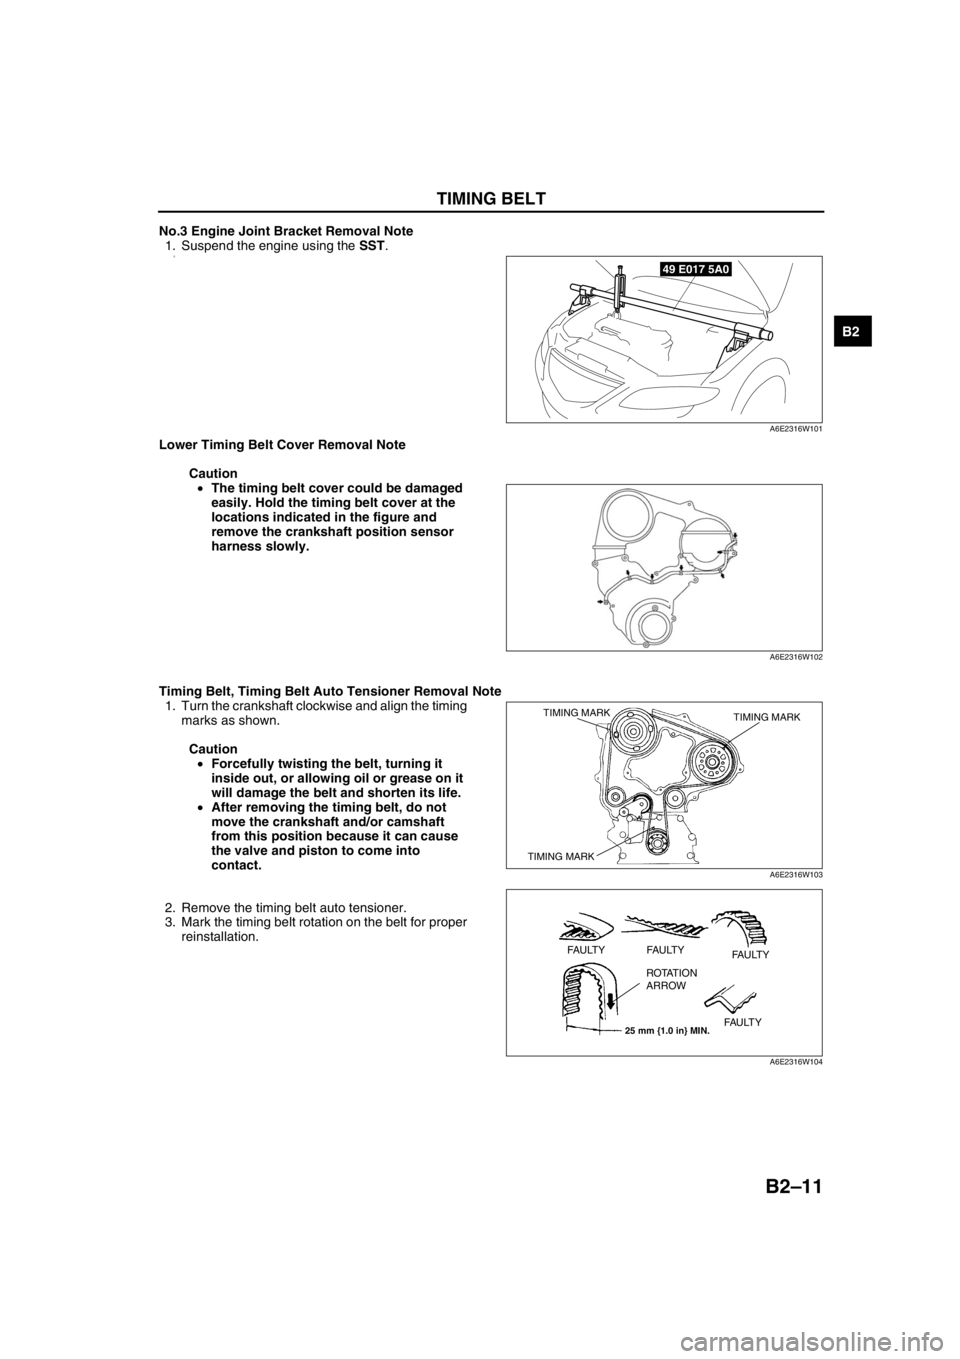
No.3 Engine Joint Bracket Removal Note
1. Suspend the engine using the SST.
2.
Lower Timing Belt Cover Removal Note
Caution
•The timing belt cover could be damaged
easily. Hold the timing belt cover at the
locations indicated in the figure and
remove the crankshaft position sensor
harness slowly.
Timing Belt, Timing Belt Auto Tensioner Removal Note
1. Turn the crankshaft clockwise and align the timing
marks as shown.
Caution
•Forcefully twisting the belt, turning it
inside out, or allowing oil or grease on it
will damage the belt and shorten its life.
•After removing the timing belt, do not
move the crankshaft and/or camshaft
from this position because it can cause
the valve and piston to come into
contact.
2. Remove the timing belt auto tensioner.
3. Mark the timing belt rotation on the belt for proper
reinstallation.
49 E017 5A0
A6E2316W101
A6E2316W102
TIMING MARK TIMING MARK
TIMING MARK
A6E2316W103
25 mm {1.0 in} MIN.
FAULTY FAULTY
FAULTY
FAULTY ROTATION
ARROW
A6E2316W104
Page 43 of 909

B2–12
TIMING BELT
Timing Belt, Timing Belt Auto Tensioner Installation Note
1. Measure the tensioned rod projection length.
•If not as specified, replace the timing belt auto
tensioner.
2. Inspect the timing belt auto tensioner for oil
leakage.
•If not as specified, replace the timing belt auto
tensioner.
Projection (free length)
12.9—14.6 mm {0.508—0.574 in}
Caution
•Placing the timing belt auto tensioner
horizontally can cause oil leakage and
damage the timing belt auto tensioner. Place the timing belt auto tensioner vertically when using a
vise.
3. Verify the thrust of the timing belt auto tensioner
rod in the following order:
•If the timing belt auto tensioner rod is rigid
when it is pushed with a force of
approximately 235 N {24 kgf, 53 Ibf}, push it
down slowly and fix the pin in the hole.
•If there is no resistance on the timing belt auto
tensioner rod and it moves slightly when it is
pushed with a force of approximately 235 N
{24 kgf, 53 Ibf};
(1) Push it down slowly two or three times to the
bottom end of the rod.
(2) If the rod protrudes approximately 8.1 mm
{0.32 in}, verify that there is resistance on the
timing belt auto tensioner rod.
Caution
•To prevent damage to the inside of the
timing belt auto tensioner, do not press
down the timing belt auto tensioner rod
with a force greater than the specified
235 N {24 kgf, 53 lbf}.
Be careful that the rod does not touch the
bottom.
•If the timing belt auto tensioner rod
projection is restored, push it down slowly and fix the pin in the hole.
—If the resistance is not restored, replace the timing belt auto tensoner.
A6E2316W105
PIN
A6E2316W106
Page 44 of 909
TIMING BELT
B2–13
B2
Caution
•To prevent the bolts (M8 x 1.25) from damaging the fuel injection pump and pulley, do not fully
tighten the fixing bolts. If it contacts the pulley surface, it will damage the pulley.
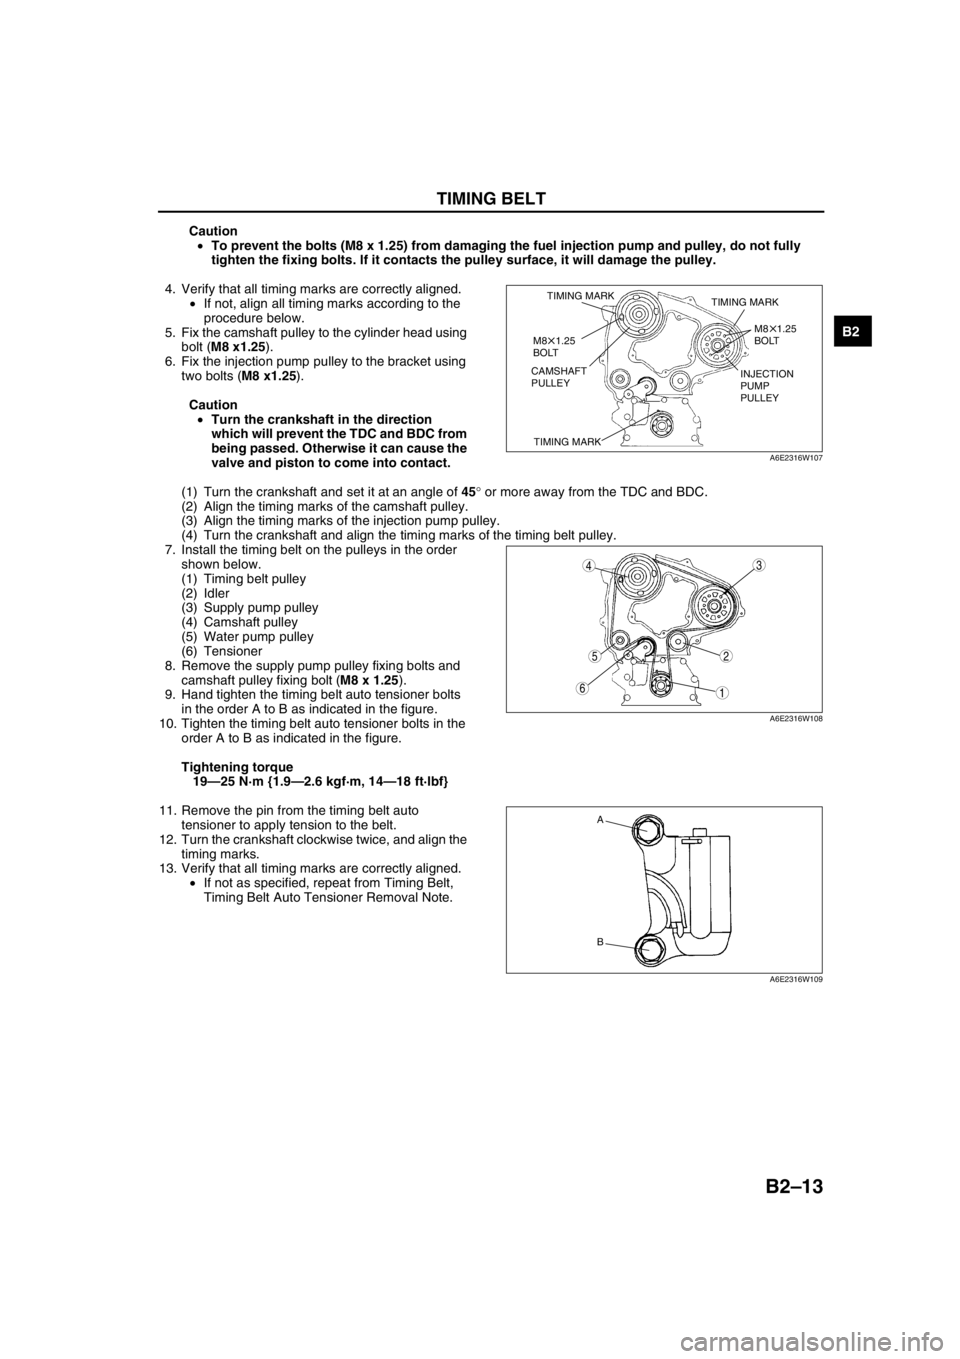
4. Verify that all timing marks are correctly aligned.
•If not, align all timing marks according to the
procedure below.
5. Fix the camshaft pulley to the cylinder head using
bolt (M8 x1.25).
6. Fix the injection pump pulley to the bracket using
two bolts (M8 x1.25).
Caution
•Turn the crankshaft in the direction
which will prevent the TDC and BDC from
being passed. Otherwise it can cause the
valve and piston to come into contact.
(1) Turn the crankshaft and set it at an angle of 45° or more away from the TDC and BDC.
(2) Align the timing marks of the camshaft pulley.
(3) Align the timing marks of the injection pump pulley.
(4) Turn the crankshaft and align the timing marks of the timing belt pulley.
7. Install the timing belt on the pulleys in the order
shown below.
(1) Timing belt pulley
(2) Idler
(3) Supply pump pulley
(4) Camshaft pulley
(5) Water pump pulley
(6) Tensioner
8. Remove the supply pump pulley fixing bolts and
camshaft pulley fixing bolt (M8 x 1.25).
9. Hand tighten the timing belt auto tensioner bolts
in the order A to B as indicated in the figure.
10. Tighten the timing belt auto tensioner bolts in the
order A to B as indicated in the figure.
Tightening torque
19—25 N·m {1.9—2.6 kgf·m, 14—18 ft·lbf}
11. Remove the pin from the timing belt auto
tensioner to apply tension to the belt.
12. Turn the crankshaft clockwise twice, and align the
timing marks.
13. Verify that all timing marks are correctly aligned.
•If not as specified, repeat from Timing Belt,
Timing Belt Auto Tensioner Removal Note.
TIMING MARK
TIMING MARKTIMING MARK
M8 1.25
BOLT
M8 1.25
BOLT
CAMSHAFT
PULLEYINJECTION
PUMP
PULLEY
A6E2316W107
5
43
1
2
6
A6E2316W108
A
B
A6E2316W109
Page 45 of 909
B2–14
TIMING BELT
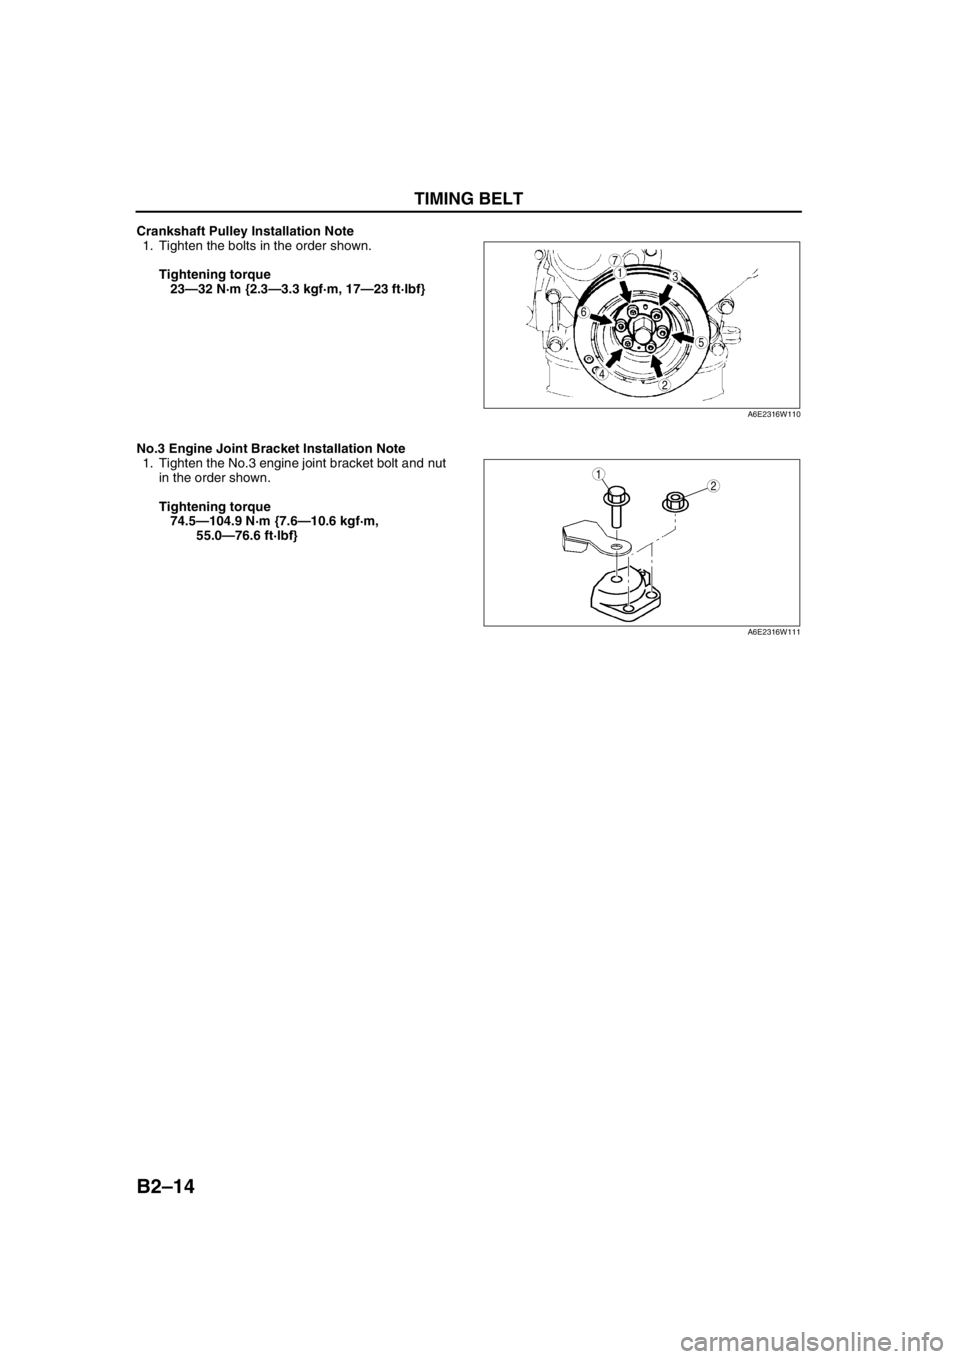
Crankshaft Pulley Installation Note
1. Tighten the bolts in the order shown.
Tightening torque
23—32 N·m {2.3—3.3 kgf·m, 17—23 ft·lbf}
No.3 Engine Joint Bracket Installation Note
1. Tighten the No.3 engine joint bracket bolt and nut
in the order shown.
Tightening torque
74.5—104.9 N·m {7.6—10.6 kgf·m,
55.0—76.6 ft·lbf}
7
5
4
3
6
1
2
A6E2316W110
12
A6E2316W111
Page 46 of 909
CYLINDER HEAD GASKET
B2–15
B2
End Of Sie
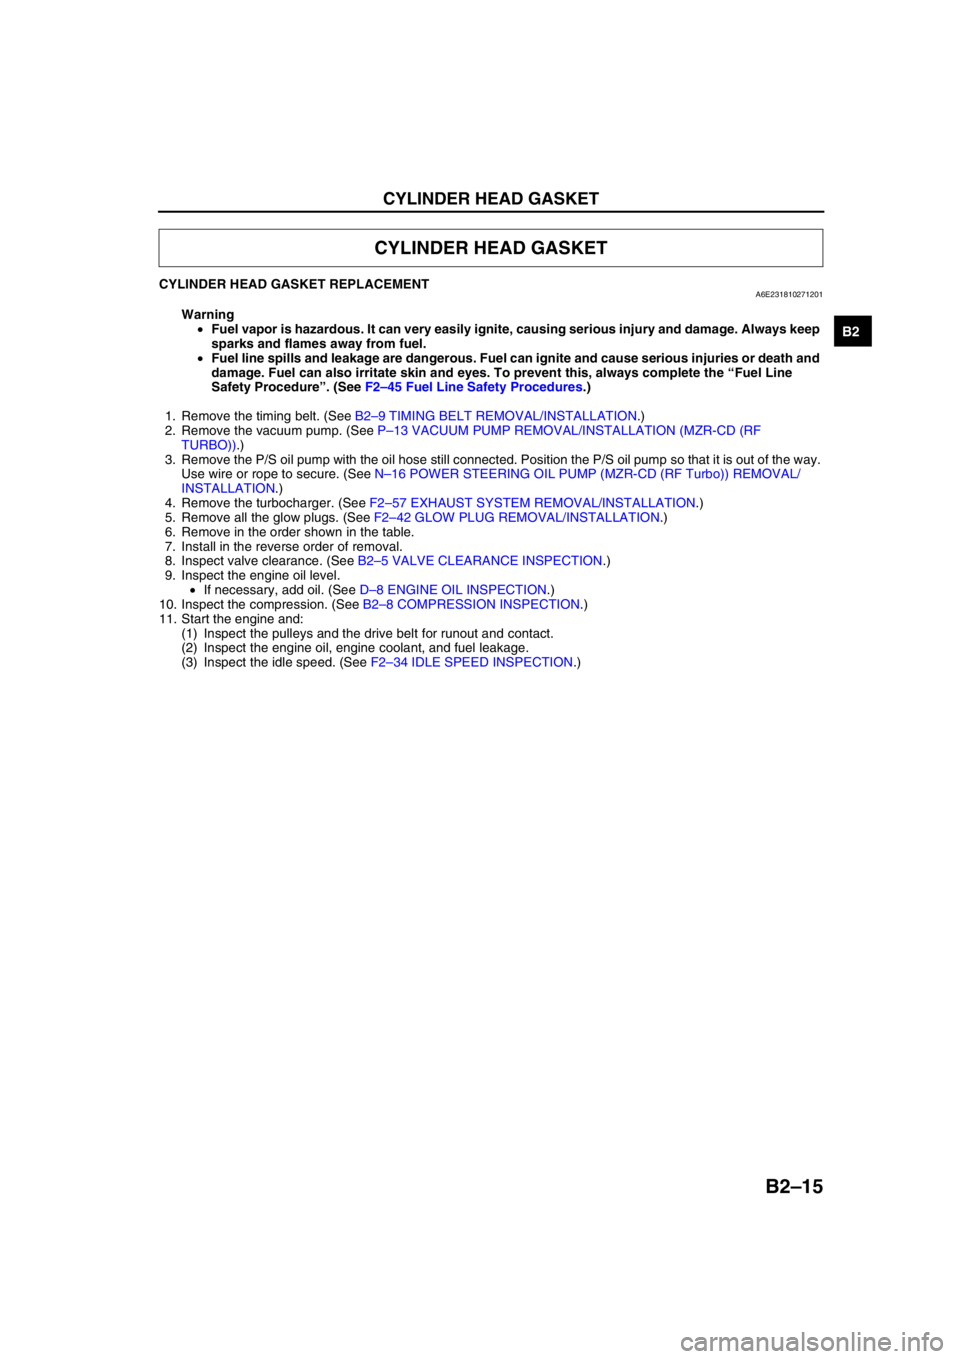
CYLINDER HEAD GASKET REPLACEMENTA6E231810271201
Warning
•Fuel vapor is hazardous. It can very easily ignite, causing serious injury and damage. Always keep
sparks and flames away from fuel.
•Fuel line spills and leakage are dangerous. Fuel can ignite and cause serious injuries or death and
damage. Fuel can also irritate skin and eyes. To prevent this, always complete the “Fuel Line
Safety Procedure”. (See F2–45 Fuel Line Safety Procedures.)
1. Remove the timing belt. (See B2–9 TIMING BELT REMOVAL/INSTALLATION.)
2. Remove the vacuum pump. (See P–13 VACUUM PUMP REMOVAL/INSTALLATION (MZR-CD (RF
TURBO)).)
3. Remove the P/S oil pump with the oil hose still connected. Position the P/S oil pump so that it is out of the way.
Use wire or rope to secure. (See N–16 POWER STEERING OIL PUMP (MZR-CD (RF Turbo)) REMOVAL/
INSTALLATION.)
4. Remove the turbocharger. (See F2–57 EXHAUST SYSTEM REMOVAL/INSTALLATION.)
5. Remove all the glow plugs. (See F2–42 GLOW PLUG REMOVAL/INSTALLATION.)
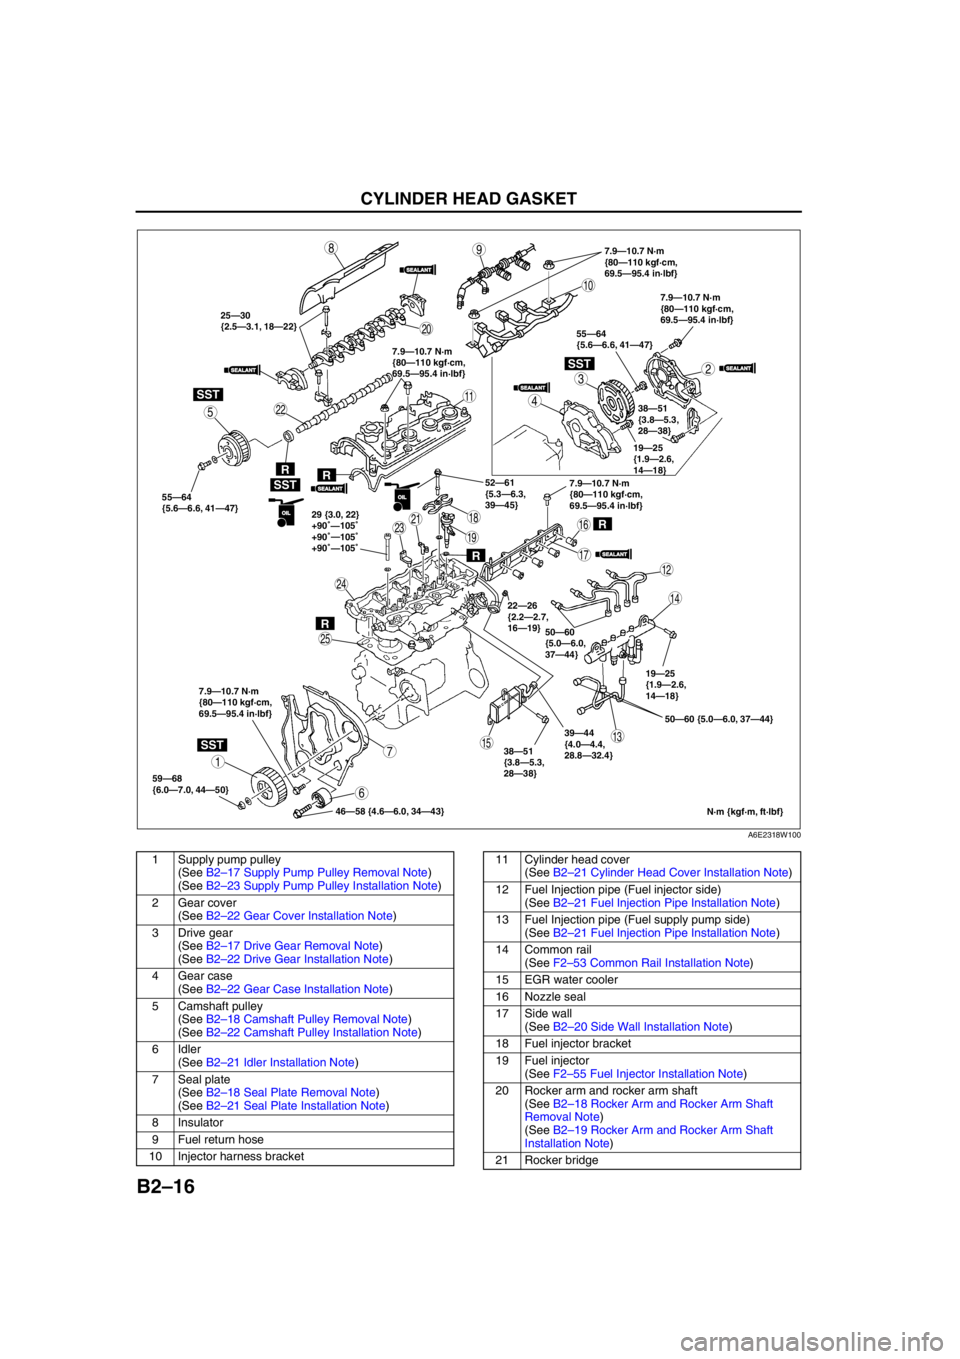
6. Remove in the order shown in the table.
7. Install in the reverse order of removal.
8. Inspect valve clearance. (See B2–5 VALVE CLEARANCE INSPECTION.)
9. Inspect the engine oil level.
•If necessary, add oil. (See D–8 ENGINE OIL INSPECTION.)
10. Inspect the compression. (See B2–8 COMPRESSION INSPECTION.)
11. Start the engine and:
(1) Inspect the pulleys and the drive belt for runout and contact.
(2) Inspect the engine oil, engine coolant, and fuel leakage.
(3) Inspect the idle speed. (See F2–34 IDLE SPEED INSPECTION.)
CYLINDER HEAD GASKET
Page 47 of 909
B2–16
CYLINDER HEAD GASKET
.
SST
SST
SSTR
R
R
R
R
SEALANTSEALANT
SEALANTSEALANT
SEALANTSEALANT
SEALANTSEALANT
SEALANTSEALANT
OILOIL
OILOIL
7.9—10.7 N·m
{80—110 kgf·cm,
69.5—95.4 in·lbf}
7.9—10.7 N·m
{80—110 kgf·cm,
69.5—95.4 in·lbf}
7.9—10.7 N·m
{80—110 kgf·cm,
69.5—95.4 in·lbf} 7.9—10.7 N·m
{80—110 kgf·cm,
69.5—95.4 in·lbf}
7.9—10.7 N·m
{80—110 kgf·cm,
69.5—95.4 in·lbf}55—64
{5.6—6.6, 41—47}
38—51
{3.8—5.3,
28—38}
52—61
{5.3—6.3,
39—45}
29 {3.0, 22}
+90 105
+90 105
+90 105
50—60
{5.0—6.0,
37—44}
19—25
{1.9—2.6,
14—18}
50—60 {5.0—6.0, 37—44}
46—58 {4.6—6.0, 34—43} 59—68
{6.0—7.0, 44—50}25—30
{2.5—3.1, 18—22}
38—51
{3.8—5.3,
28—38}19—25
{1.9—2.6,
14—18}
N·m {kgf·m, ft·lbf}
98
7
54
3
1
2
10
19
18
17
15
16
14
13
11
12
20
25
24
2321
22
6
SST
55—64
{5.6—6.6, 41—47}
—
— —
39—44
{4.0—4.4,
28.8—32.4}
22—26
{2.2—2.7,
16—19}
SEALANTSEALANT
A6E2318W100
1 Supply pump pulley
(See B2–17 Supply Pump Pulley Removal Note)
(See B2–23 Supply Pump Pulley Installation Note)
2 Gear cover
(See B2–22 Gear Cover Installation Note)
3 Drive gear
(See B2–17 Drive Gear Removal Note)
(See B2–22 Drive Gear Installation Note)
4 Gear case
(See B2–22 Gear Case Installation Note)
5 Camshaft pulley
(See B2–18 Camshaft Pulley Removal Note)
(See B2–22 Camshaft Pulley Installation Note)
6 Idler
(See B2–21 Idler Installation Note)
7 Seal plate
(See B2–18 Seal Plate Removal Note)
(See B2–21 Seal Plate Installation Note)
8 Insulator
9 Fuel return hose
10 Injector harness bracket11 Cylinder head cover
(See B2–21 Cylinder Head Cover Installation Note)
12 Fuel Injection pipe (Fuel injector side)
(See B2–21 Fuel Injection Pipe Installation Note)
13 Fuel Injection pipe (Fuel supply pump side)
(See B2–21 Fuel Injection Pipe Installation Note)
14 Common rail
(See F2–53 Common Rail Installation Note)
15 EGR water cooler
16 Nozzle seal
17 Side wall
(See B2–20 Side Wall Installation Note)
18 Fuel injector bracket
19 Fuel injector
(See F2–55 Fuel Injector Installation Note)
20 Rocker arm and rocker arm shaft
(See B2–18 Rocker Arm and Rocker Arm Shaft
Removal Note)
(See B2–19 Rocker Arm and Rocker Arm Shaft
Installation Note)
21 Rocker bridge
Page 48 of 909

CYLINDER HEAD GASKET
B2–17
B2
Supply Pump Pulley Removal Note
1. Verify that timing marks are correctly aligned.
Caution
•To prevent the bolts (M8 x 1.25) from damaging the supply pump and pulley, do not fully tighten
the fixing bolts. If it contacts the pulley surface, it will damage the pulley.
2. Fix the supply pump pulley to the bracket using
two bolts (M8 x 1.25).
3. Loosen the supply pump pulley lock nut.
4. Separate the supply pump pulley from the supply
pump shaft using the SST.
5. Remove the supply pump pulley fixed bolts
(M8 x 1.25).
Drive Gear Removal Note
1. Hold the camshaft using the SST.
2. Remove the drive gear lock bolt.
22 Camshaft
23 Breather pipe24 Cylinder head
(See B2–18 Cylinder Head Removal Note)
(See B2–19 Cylinder Head Installation Note)
25 Cylinder head gasket
M8 1.25
BOLT
A6E2318W101
49 S120 215B
A6E2318W102
49 S120 710
A6E2318W103
Page 49 of 909
B2–18
CYLINDER HEAD GASKET
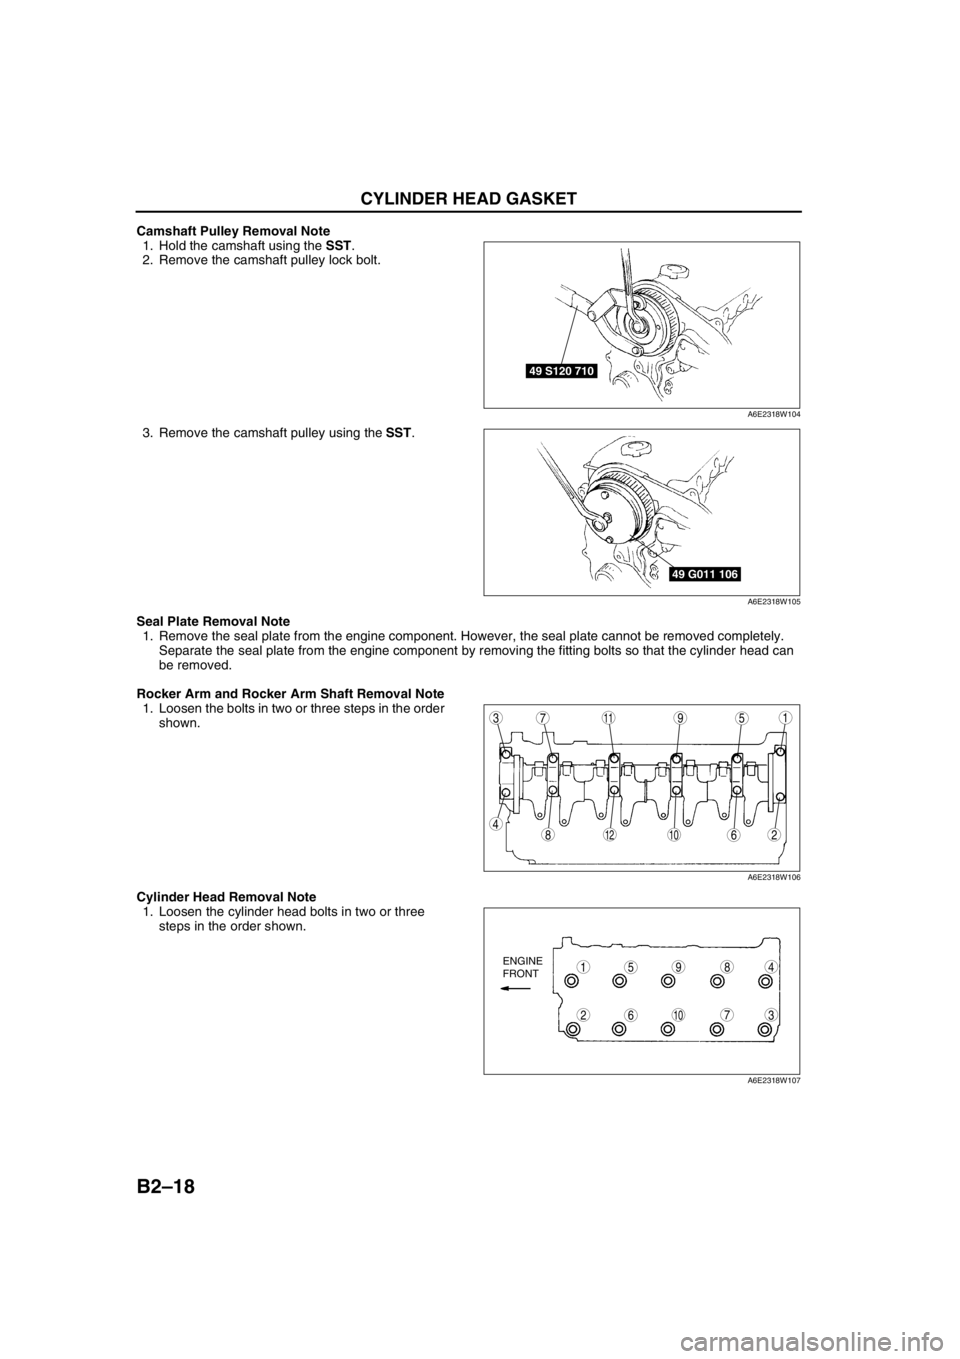
Camshaft Pulley Removal Note
1. Hold the camshaft using the SST.
2. Remove the camshaft pulley lock bolt.
3. Remove the camshaft pulley using the SST.
Seal Plate Removal Note
1. Remove the seal plate from the engine component. However, the seal plate cannot be removed completely.
Separate the seal plate from the engine component by removing the fitting bolts so that the cylinder head can
be removed.
Rocker Arm and Rocker Arm Shaft Removal Note
1. Loosen the bolts in two or three steps in the order
shown.
Cylinder Head Removal Note
1. Loosen the cylinder head bolts in two or three
steps in the order shown.
49 S120 710
A6E2318W104
49 G011 106
A6E2318W105
9
8
75
4
3
10
11
1262
1
A6E2318W106
98
7
54
3106
1
2
ENGINE
FRONT
A6E2318W107
Page 50 of 909
CYLINDER HEAD GASKET
B2–19
B2
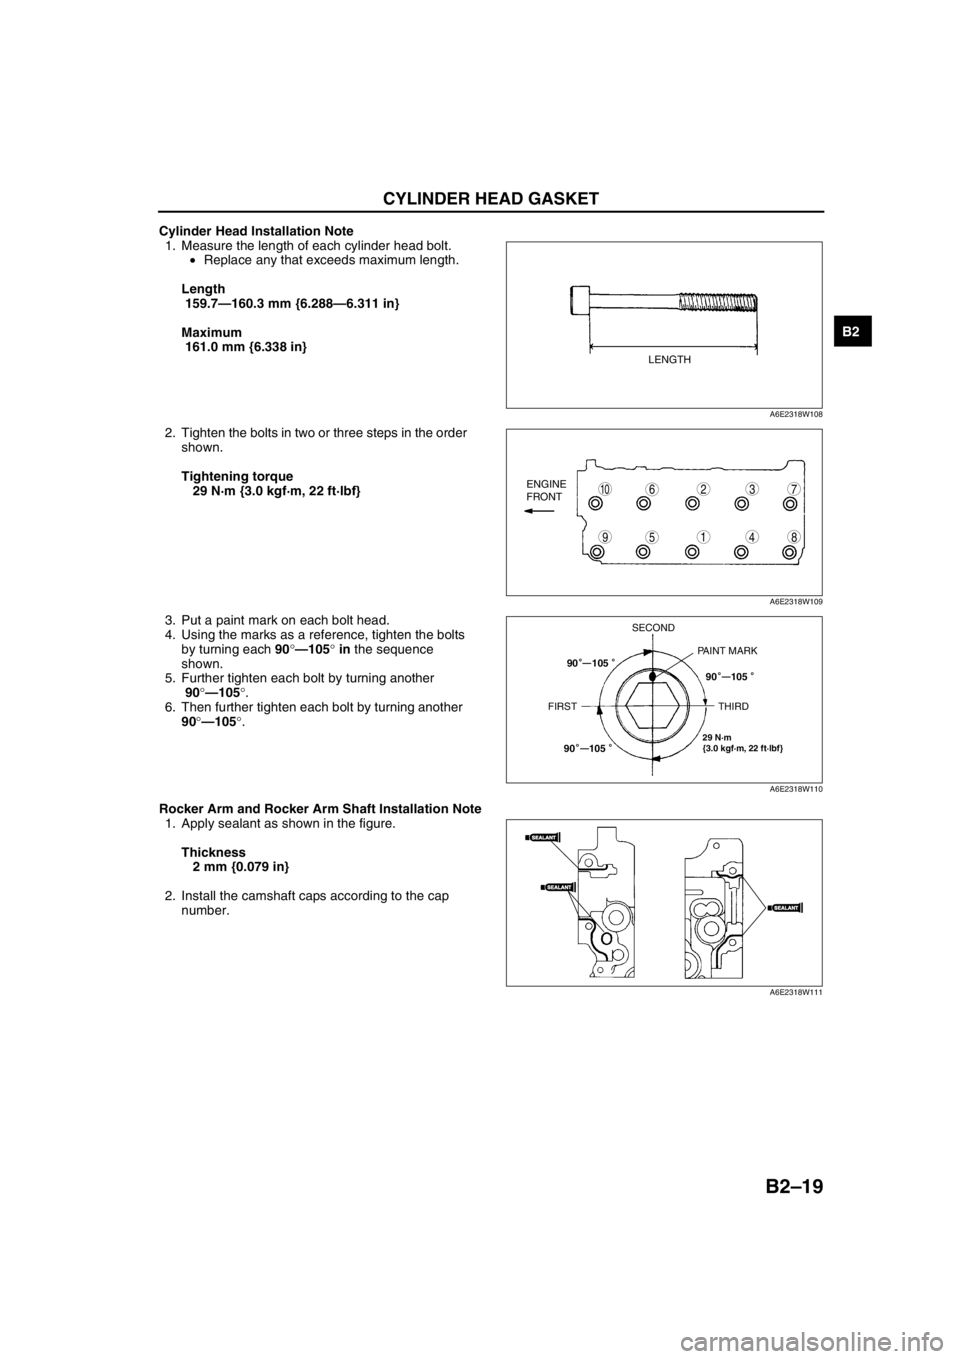
Cylinder Head Installation Note
1. Measure the length of each cylinder head bolt.
•Replace any that exceeds maximum length.
Length
159.7—160.3 mm {6.288—6.311 in}
Maximum
161.0 mm {6.338 in}
2. Tighten the bolts in two or three steps in the order
shown.
Tightening torque
29 N·m {3.0 kgf·m, 22 ft·lbf}
3. Put a paint mark on each bolt head.
4. Using the marks as a reference, tighten the bolts
by turning each 90°—105° in the sequence
shown.
5. Further tighten each bolt by turning another
90°—105°.
6. Then further tighten each bolt by turning another
90°—105°.
Rocker Arm and Rocker Arm Shaft Installation Note
1. Apply sealant as shown in the figure.
Thickness
2 mm {0.079 in}
2. Install the camshaft caps according to the cap
number.
LENGTH
A6E2318W108
98
7
54
3106
1
2ENGINE
FRONT
A6E2318W109
29 N·m
{3.0 kgf·m, 22 ft·lbf}
SECOND
PAINT MARK
FIRST THIRD90 105
90 105
90 105
—
——
A6E2318W110
SEALANTSEALANT
SEALANTSEALANT
SEALANTSEALANT
A6E2318W111