MAZDA MX-5 1994 Workshop Manual
Manufacturer: MAZDA, Model Year: 1994,
Model line: MX-5,
Model: MAZDA MX-5 1994
Pages: 1708, PDF Size: 82.34 MB
MAZDA MX-5 1994 Workshop Manual
MX-5 1994
MAZDA
MAZDA
https://www.carmanualsonline.info/img/28/57072/w960_57072-0.png
MAZDA MX-5 1994 Workshop Manual
Trending: fold seats, charging, oil type, radio antenna, wipers, instrument panel, spare tire
Page 1331 of 1708
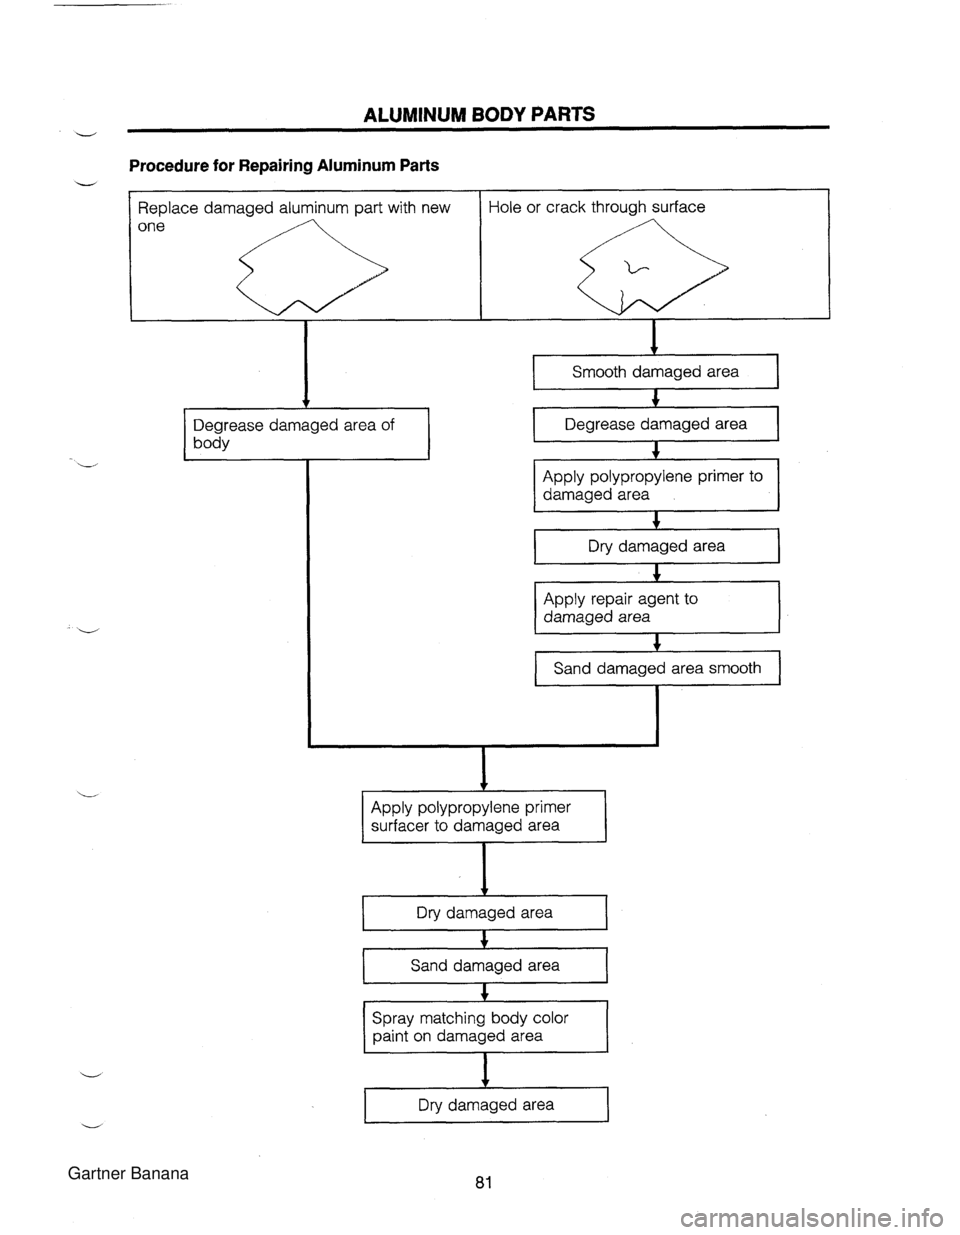
ALUMINUM BODY PARTS V Procedure for Repairing Aluminum Parts Apply polypropylene primer surfacer to damaged area Replace damaged aluminum part with new one Dry damaged area I Hole or crack through surface + Sand damaged area Spray matching body color paint on damaged area I 0 .;. + Dry damaged area v Degrease damaged area of body Smooth damaged area C Degrease damaged area C Apply polypropylene primer to damaged area C Dry damaged area C Apply repair agent to damaged area C I Sand damaged area smooth r Gartner Banana
Page 1332 of 1708

ALUMINUM BODY PARTS Although repair of aluminum components is done by the same procedures as repair of steel com- ponents, certain points should be noted, as described below. 1. Because aluminum has a greater characteristic of expansion/elongation than steel, a lesser strik- ing force should be used for hammering so that the aluminum component does not become excessively distorted. 2. When heat is used as a method of repair of an aluminum component, the temperature should be kept as low as possible, and the heated area restricted as much as possible. This is to prevent a loss of rigidity due to overheating. 3. When removing old paint from aluminum, a fine-grain sandpaper (#I20 - #180) should be used, because aluminum is a relatively soft material. 4. A special aluminum primer must be used before attempting application of putty or paint, be- cause such materials do not adhere well to aluminum. 5. Determine the type of putty to be used (sheet-metal putty or polyethylene putty) according to the condition of the damage. 6. If bare aluminum is exposed as a result of grinding, sanding, etc., apply special primer for aluminum. 7. Such steps as primer surfacer drying, primer surfacer sanding, top-coat application and drying are done in the same way as for steel painting. - Gartner Banana
Page 1333 of 1708
PLASTIC BODY PARTS HANDLING PRECAUTIONS ......................................... 84 LOCATION OF PLASTIC BODY PARTS .................... 85 REPAIRING URETHANE FASCIA ............................... 86 REPAIRING POLYPROPYLENE FASCIA ................... 94 Gartner Banana
Page 1334 of 1708
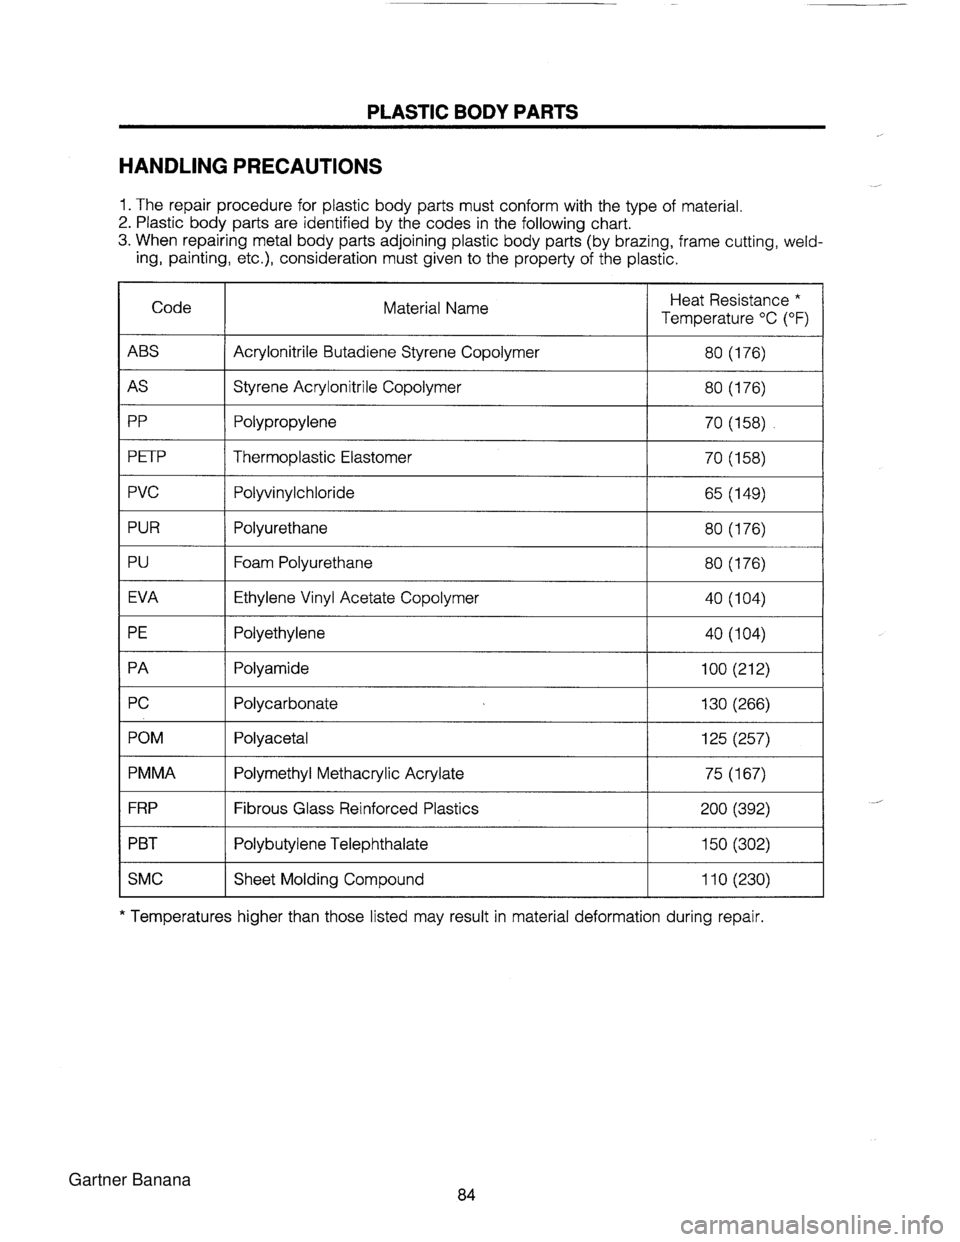
PLASTIC BODY PARTS HANDLING PRECAUTIONS 1. The repair procedure for plastic body parts must conform with the type of material. 2. Plastic body parts are identified by the codes in the following chart. 3. When repairing metal body parts adjoining plastic body parts (by brazing, frame cutting, weld- ing, painting, etc.), consideration must given to the property of the plastic. Code Material Name Heat Resistance * Temperature OC (OF) ABS PP P ETP Acrylonitrile Butadiene Styrene Copolymer Styrene Acrylonitrile Copolymer 80 (176) 80 (176) PVC Polypropylene Thermoplastic Elastomer Polyvinylchloride PUR 70 (158) 70 (158) 65 (149) Polyurethane EVA Foam Polyurethane Ethylene Vinyl Acetate Copolymer Polyethylene 80 (176) 40 (104) POM PMMA Polyamide Polycarbonate 100 (212) 130 (266) FRP Polyacetal Polymethyl Methacrylic Acrylate Fibrous Glass Reinforced Plastics 125 (257) 75 (167) PBT Polybutylene Telephthalate SMC Sheet Molding Compound * Temperatures higher than those listed may result in material deformation during repair Gartner Banana
Page 1335 of 1708
PLASTIC BODY PARTS L LOCATION OF PLASTIC BODY PARTS Windshield molding (PVC) Light bezel (PP) Door mirror Front side marker light Rear window (PVC) High-mount stoplight - _ .. .. .- License plate light / I Rear side marker light Rear combination light Gartner Banana
Page 1336 of 1708
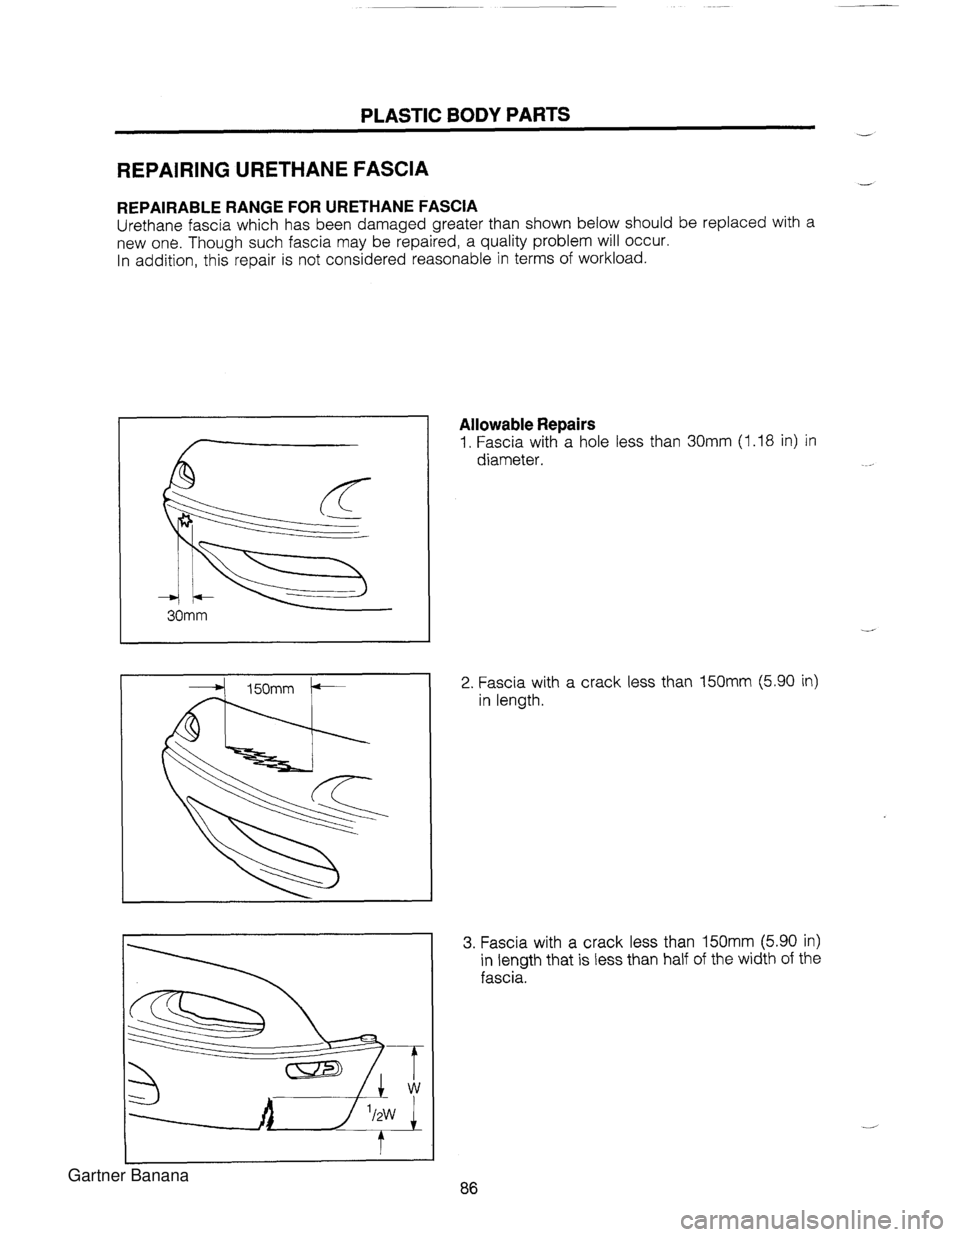
PLASTIC BODY PARTS - REPAIRING URETHANE FASCIA - REPAIRABLE RANGE FOR URETHANE FASCIA Urethane fascia which has been damaged greater than shown below should be replaced with a new one. Though such fascia may be repaired, a quality problem will occur. In addition, this repair is not considered reasonable in terms of workload. Allowable Repairs 1. Fascia with a hole less than 30mm (1.18 in) in diameter. .-- 2. Fascia with a crack less than 150mm (5.90 in) in length. 3. Fascia with a crack less than 150mm (5.90 in) in length that is less than half of the width of the fascia. Gartner Banana
Page 1337 of 1708
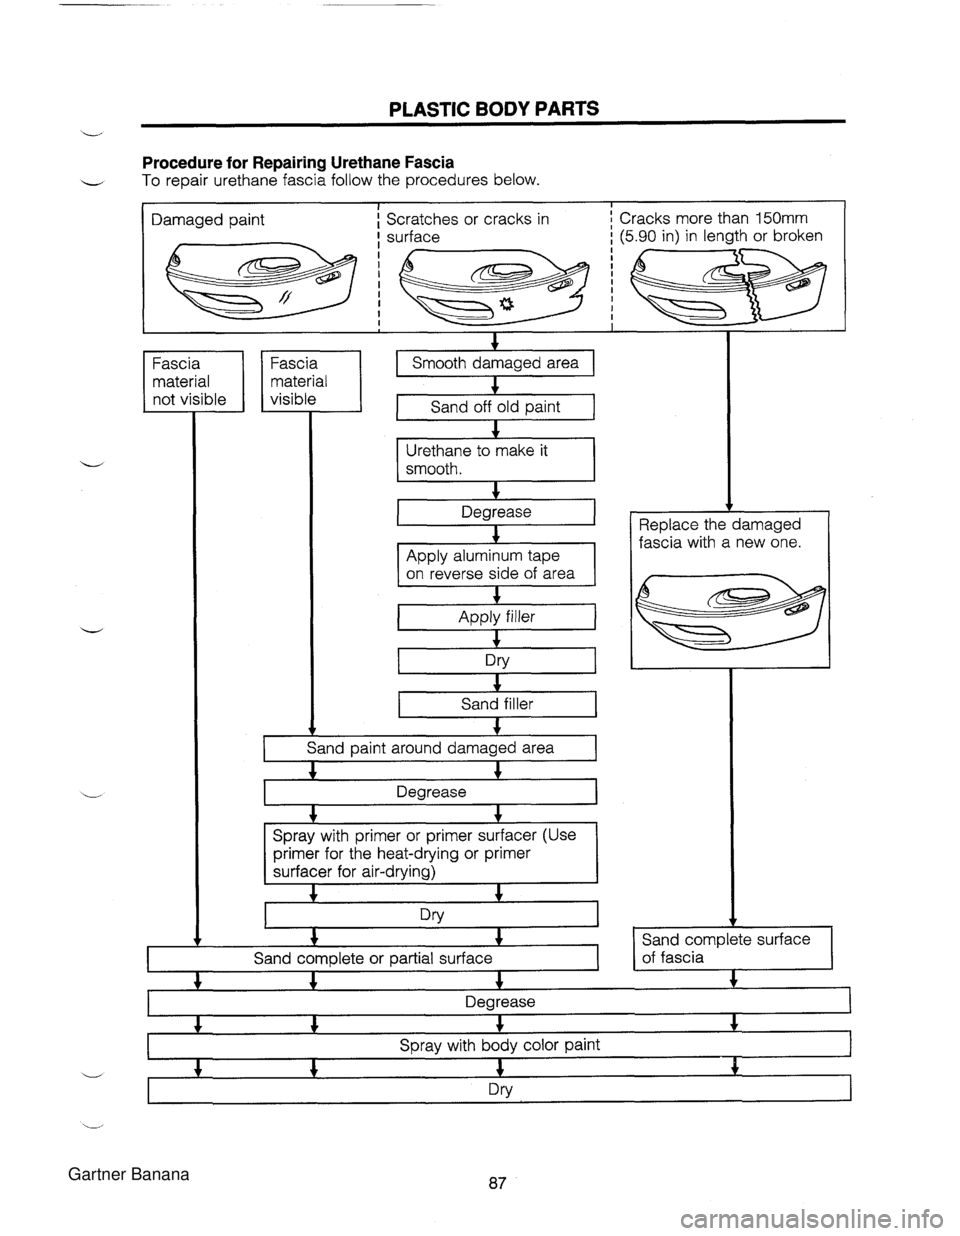
PLASTIC BODY PARTS Procedure for Repairing Urethane Fascia - To repair urethane fascia follow the procedures below. I Damaged paint Scratches or cracks in Fascia material not visible + Smooth damaged area material visible 1 Fa"ia I 1 4 Sand off old paint Urethane to make it Sand filler I hand paint around damaged area I Spray with primer or primer surfacer (Use primer for the heat-drying or primer surfacer for air-drying) Sand complete or partial surface I Replace the damaged fascia with a new one. I I v Sand complete surface of fascia + + + + Degrease 4 4 4 4 Spray with body color paint 4 4 4 4 Dry Gartner Banana
Page 1338 of 1708
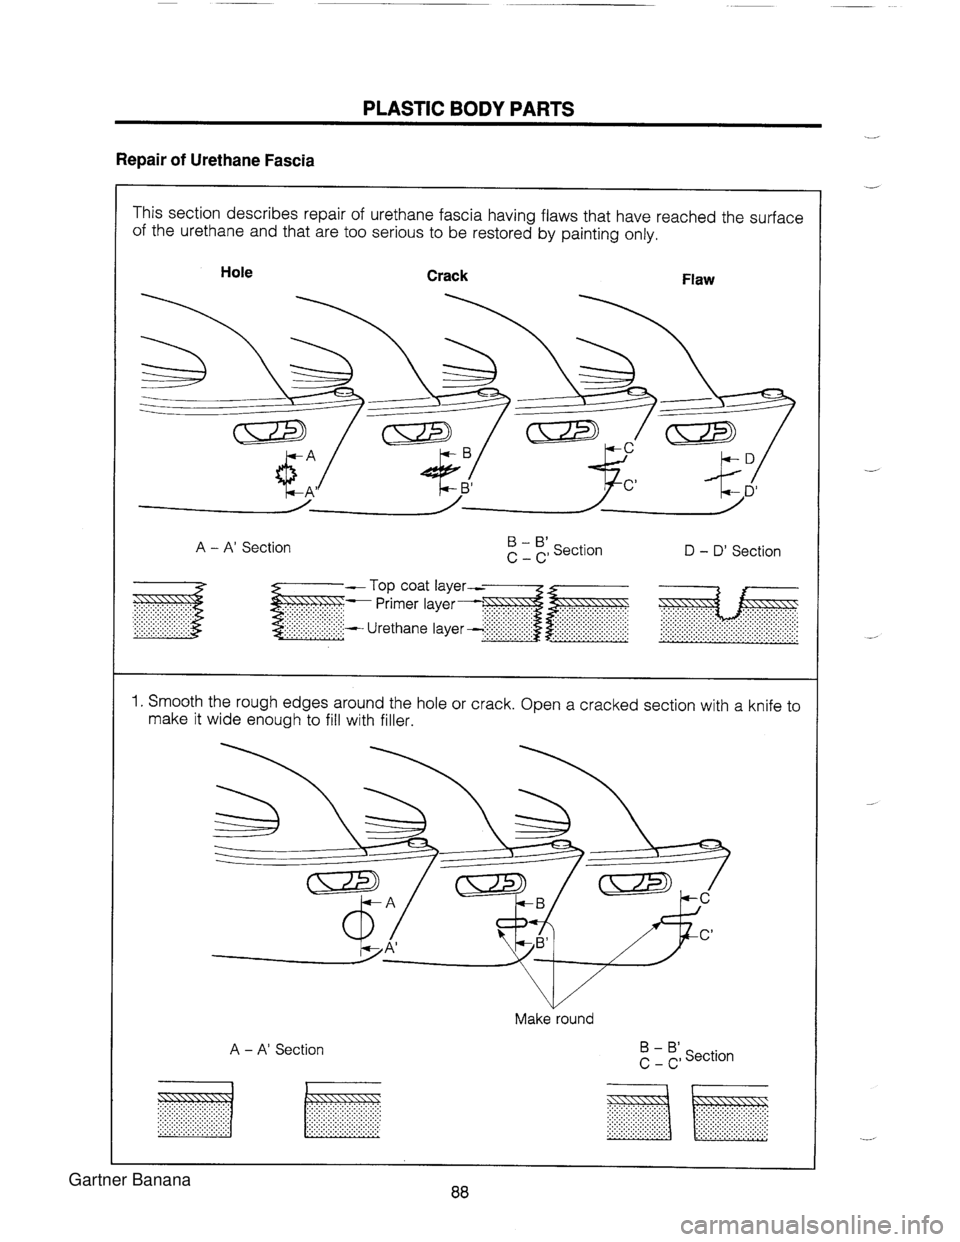
PLASTIC BODY PARTS Repair of Urethane Fascia This section describes repair of urethane fascia having flaws that have reached the surface of the urethane and that are too serious to be restored by painting only. Hole Crack Flaw A - A' Section - B' section C - C' D - D' Section - Top coat ............. 1. Smooth the rough edges around the hole or crack. Open a cracked section with a knife to make it wide enough to fill with filler. I Make round I A - A' Section - B' Section C - C' Gartner Banana
Page 1339 of 1708
L PLASTIC BODY PARTS 2. Sand away the old paint around the damaged area [in the range of 30-35mm (1.18-1.38 in)] with #40-#80 sandpaper. 30-35mti-l A - *' Section 30-35mm (1.18-1.38 in) (1.18-1.38 in) - '' Section C - C' 30-35mm 30-35mm (1.18-1.38 in) (1.18-1.38 in) i D - D' Section 30-35rnm 30-35mrn (1.18-1.38 in) (1.18-1.38 in) Gartner Banana
Page 1340 of 1708
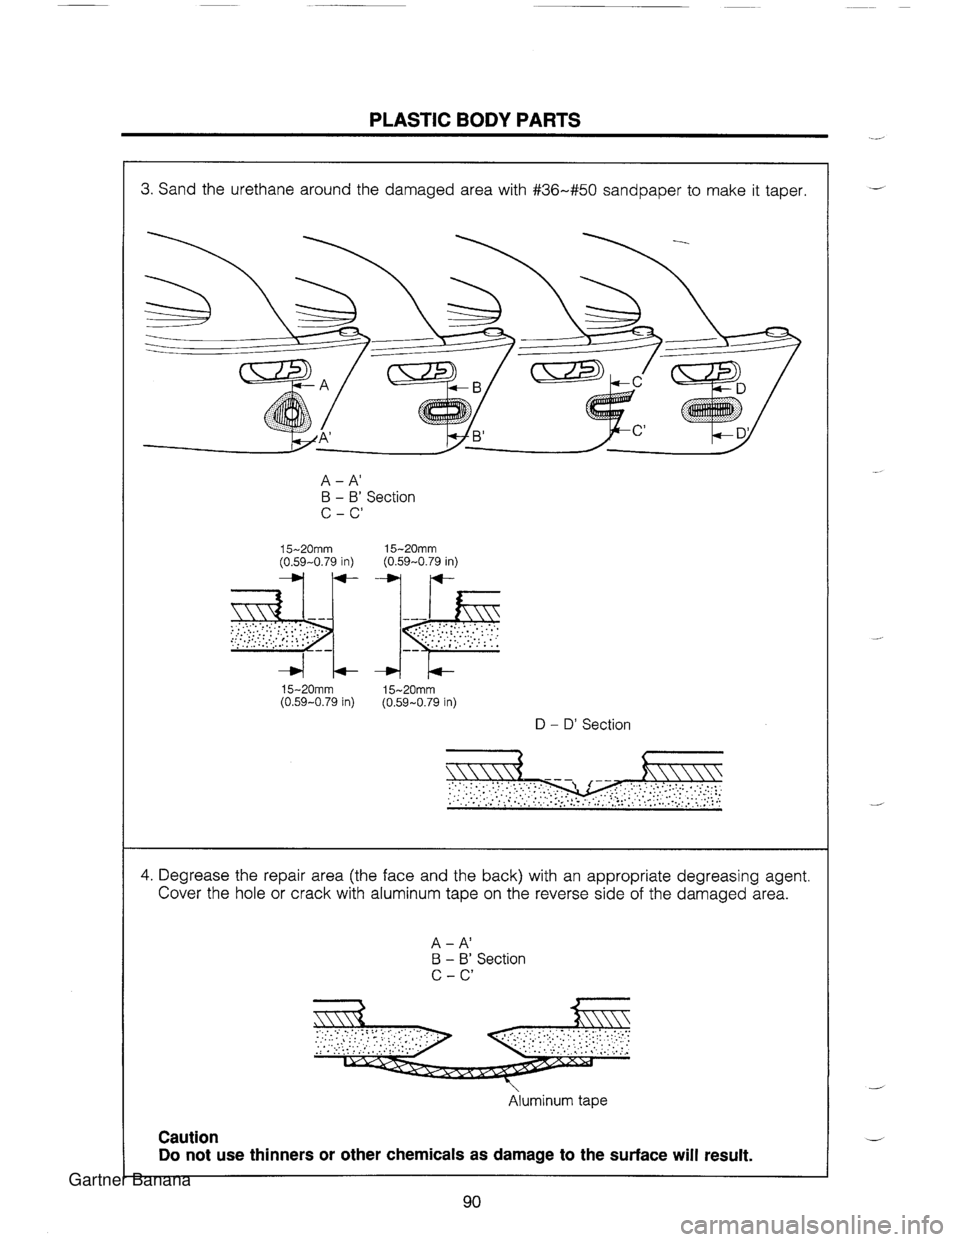
PLASTIC BODY PARTS 3. Sand the urethane around the damaged area with #36-#50 sandpaper to make it taper. A - A' B - B' Section C - C' 15-20mm (0.59-0.79 in) ............... 15-20mm (0.59-0.79 in) 15-20mm (0.59-0.79 in) 7 w 4 t+- 15-20mm (0.59-0.79 in) D - D' Section 4. Degrease the repair area (the face and the back) with an appropriate degreasing agent. Cover the hole or crack with aluminum tape on the reverse side of the damaged area. A - A' B - 8' Section C - C' I Aluminum tape Do not use thinners or other chemicals as damage to the surface will result. I Gartner Banana
Trending: headlight aiming, engine, fuel cap release, steering wheel adjustment, dead battery, headlights, fuel



![MAZDA MX-5 1994 Workshop Manual L PLASTIC BODY PARTS 2. Sand away the old paint around the damaged area [in the range of 30-35mm (1.18-1.38 in)] with #40-#80 sandpaper. 30-35mti-l A - * Section 30-35mm (1.18-1.38 in) (1.18-1.38 in MAZDA MX-5 1994 Workshop Manual L PLASTIC BODY PARTS 2. Sand away the old paint around the damaged area [in the range of 30-35mm (1.18-1.38 in)] with #40-#80 sandpaper. 30-35mti-l A - * Section 30-35mm (1.18-1.38 in) (1.18-1.38 in](/img/28/57072/w960_57072-1338.png)
