MAZDA MX-5 1994 Workshop Manual
Manufacturer: MAZDA, Model Year: 1994, Model line: MX-5, Model: MAZDA MX-5 1994Pages: 1708, PDF Size: 82.34 MB
Page 1341 of 1708

PLASTIC BODY PARTS L 5. Apply repairing filler A - A' B - B' Section Repair filler 7 C-C' / D - D' Section The repair filler is a two-part type filler composed of a main agent and a stiffening agent, and has the same flexibility as the urethane when hardened. In the case of air drying [18"C (65"F)], the part may be sanded after approx. 2 hrs. In the case of heat drying [50°C (122"F)], the part may be sanded after approx. 40 min. 6. Air dry or heat dry. Dry the applied repair filler completely. Drying time 7. After the repair filler has completely dried, and the repaired part with #I 20, #I80 and #240 sandpaper, respectively, to make it smooth. The effected part must not exceed 80°C (1 76"F), 120 or it may be deformed. ; go .- 3 - C 60 0 .- C h 3 0 30 0 A - A' B - B' Section , * n, --- - - : - - -- I I I ----- 1 -- - I I I --- --: --- I I I , - - - - - - - - - - -----; ----- L ----I I I I I I I I , I I I I - I 8 I I D - D' Section , 10 20 30 40 50 (50) (68) (86) (104) (122) Temperature "C (OF) Note If the repaired part is made concave, apply extra repair filler. Gartner Banana
Page 1342 of 1708

PLASTIC BODY PARTS - 8. Sand the paint around the damaged area with #240 sandpaper to make it smooth. Degrease with appropriate A - A' degreasing agent I3 - 6' Section ,/ ,.. -. Caution Do not use thinners or other chemicals as damage to the surface will result. 9. Spray primer (heat drying) or primer surfacer (air drying) only on the effected area of the part. (Spot spraying) A - A' I3 - 6' Section C - C' D - D' Section 10. Dry the part. 1) Primer (Forced drying) Uniformly heat the repaired part. Heating condition: 80°C (176OF) (The temperature of the part) x 20 minutes Gartner Banana
Page 1343 of 1708
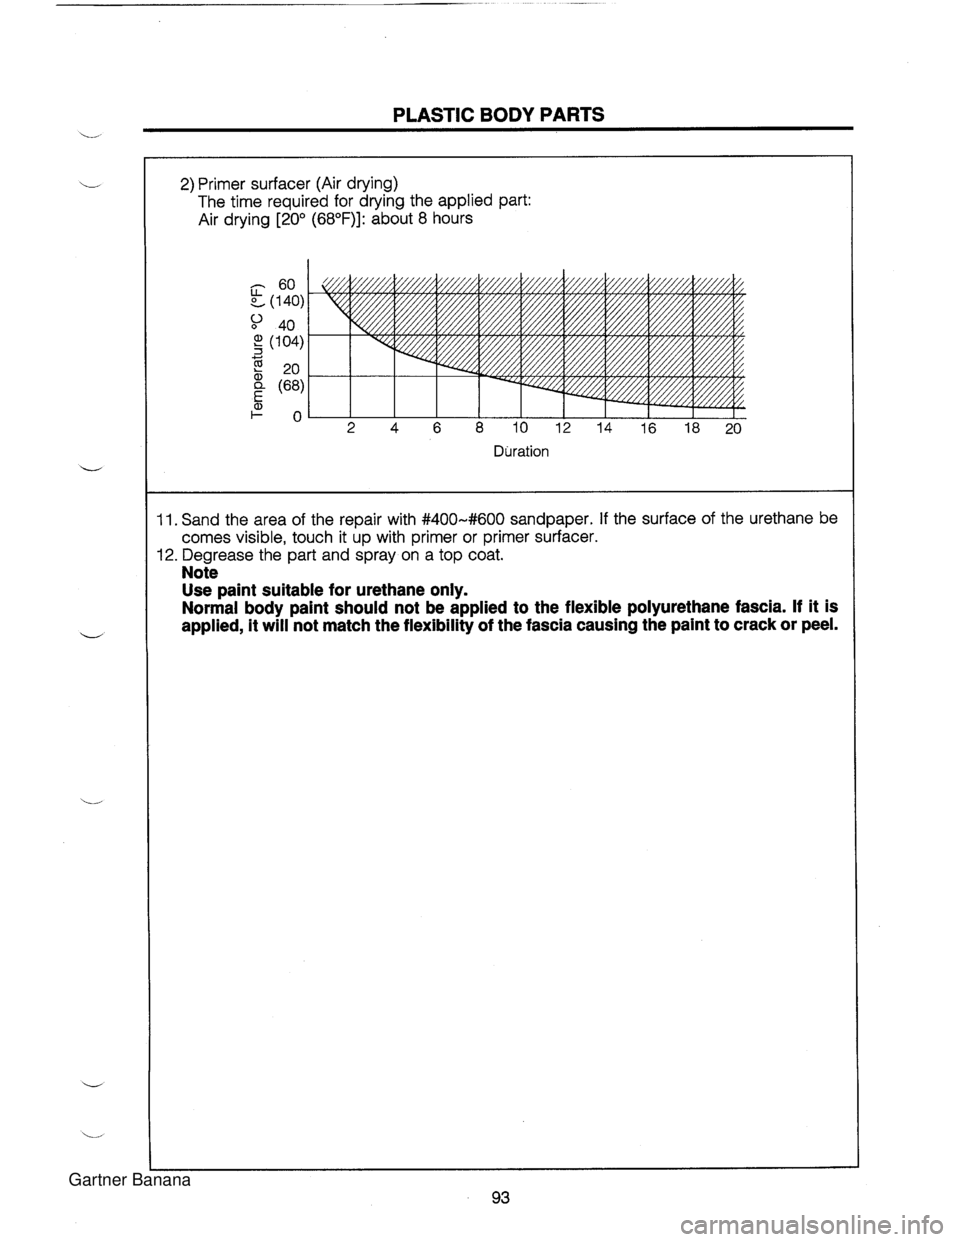
PLASTIC BODY PARTS i- 2) Primer surfacer (Air drying) The time required for drying the applied part: Air drying [20° (68OF)l: about 8 hours Duration 11. Sand the area of the repair with #400-#600 sandpaper. If the surface of the urethane be comes visible, touch it up with primer or primer surfacer. 12. Degrease the part and spray on a top coat. Note Use paint suitable for urethane only. Normal body paint should not be applied to the flexible polyurethane fascia. If it is applied, it will not match the flexibility of the fascia causing the paint to crack or peel. Gartner Banana
Page 1344 of 1708
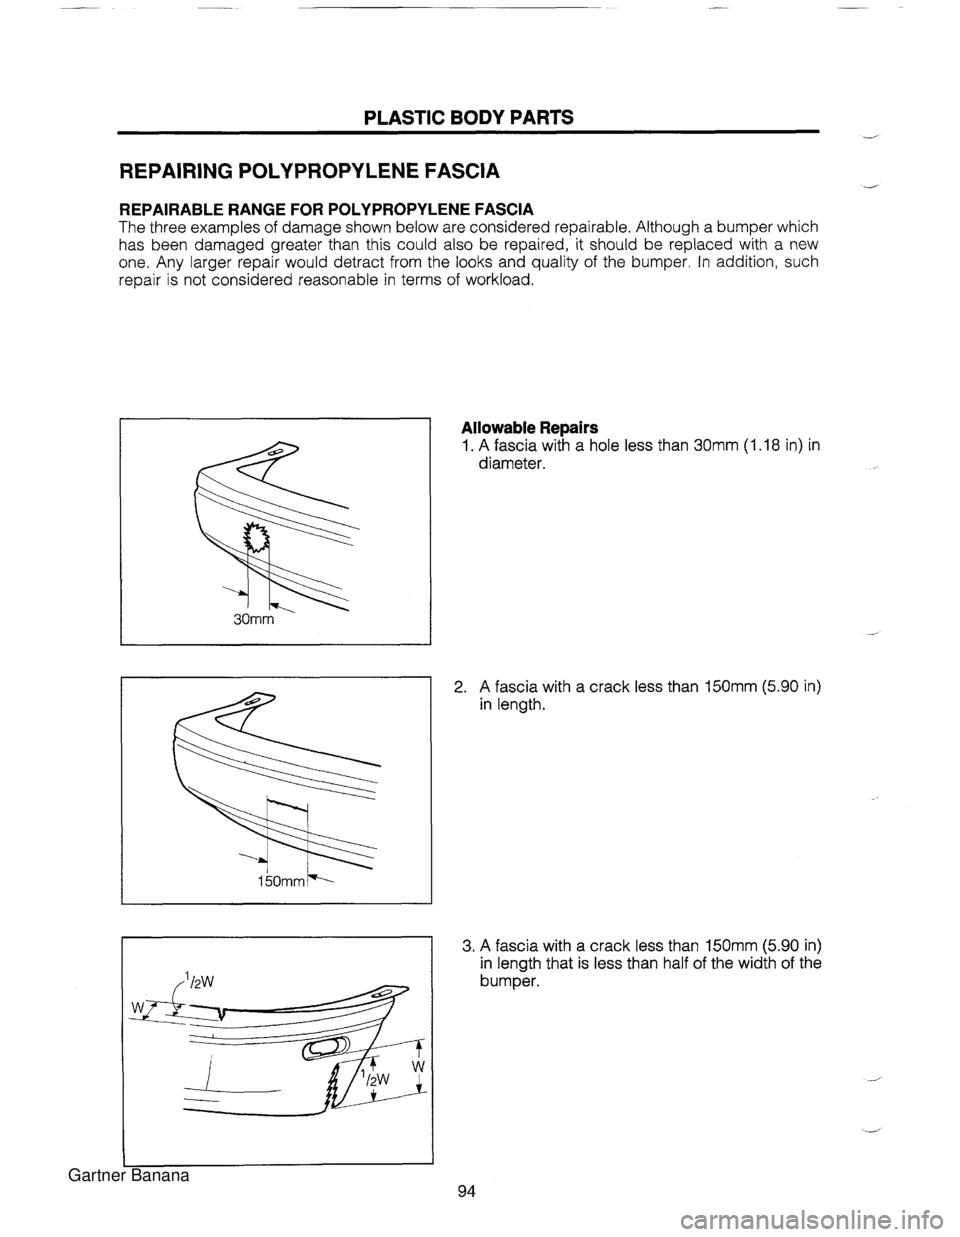
PLASTIC BODY PARTS REPAIRING POLYPROPYLENE FASCIA d REPAIRABLE RANGE FOR POLYPROPYLENE FASCIA The three examples of damage shown below are considered repairable. Although a bumper which has been damaged greater than this could also be repaired, it should be replaced with a new one. Any larger repair would detract from the looks and quality of the bumper. In addition, such repair is not considered reasonable in terms of workload. Allowable Repairs 1. A fascia with a hole less than 30mm (1.18 in) in diameter. 2. A fascia with a crack less than 150mm (5.90 in) in length. 3. A fascia with a crack less than 150mm (5.90 in) in length that is less than half of the width of the bumper. Gartner Banana
Page 1345 of 1708
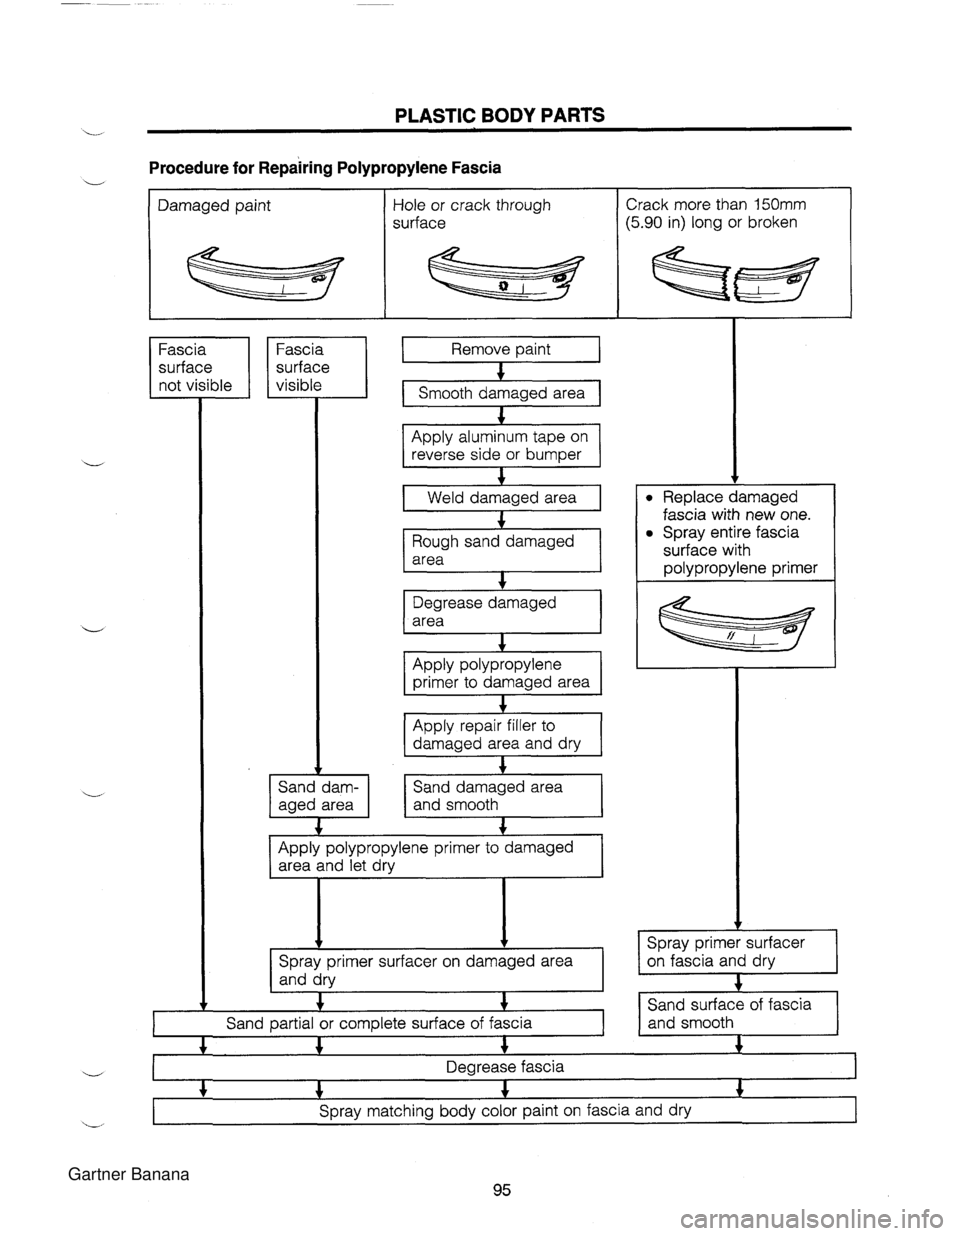
PLASTIC BODY PARTS Procedure for Repairing Polypropylene Fascia Damaged paint Hole or crack through surface Crack more than 150mm (5.90 in) long or broken I I surface I I surface I I 1 I Fascia I 1 Fascia I not visible I I visible I 1 Smooth dakaged area I Remove paint Apply aluminum tape on reverse side or bum~er Weld damaged area I Rough sand damaged m Degrease damaged 1 area , 1 + Apply polypropylene primer to damaged area Apply repair filler to damaged area and dry , Sand damaged area and smooth I Apply polypropylene primer to damaged area and let dry 1 Spray primer surfacer on damaged area and dry I + + t Sand partial or complete surface of fascia I 1 1 1 Spray entire fascia surface with I polypropylene primer ( Spray primer surfacer on fascia and dry -- 4 1 Sand surface of fascia I I and smooth I -- - -- Degrease fascia I .) 4 4 4 Spray matching body color paint on fascia and dry Gartner Banana
Page 1346 of 1708
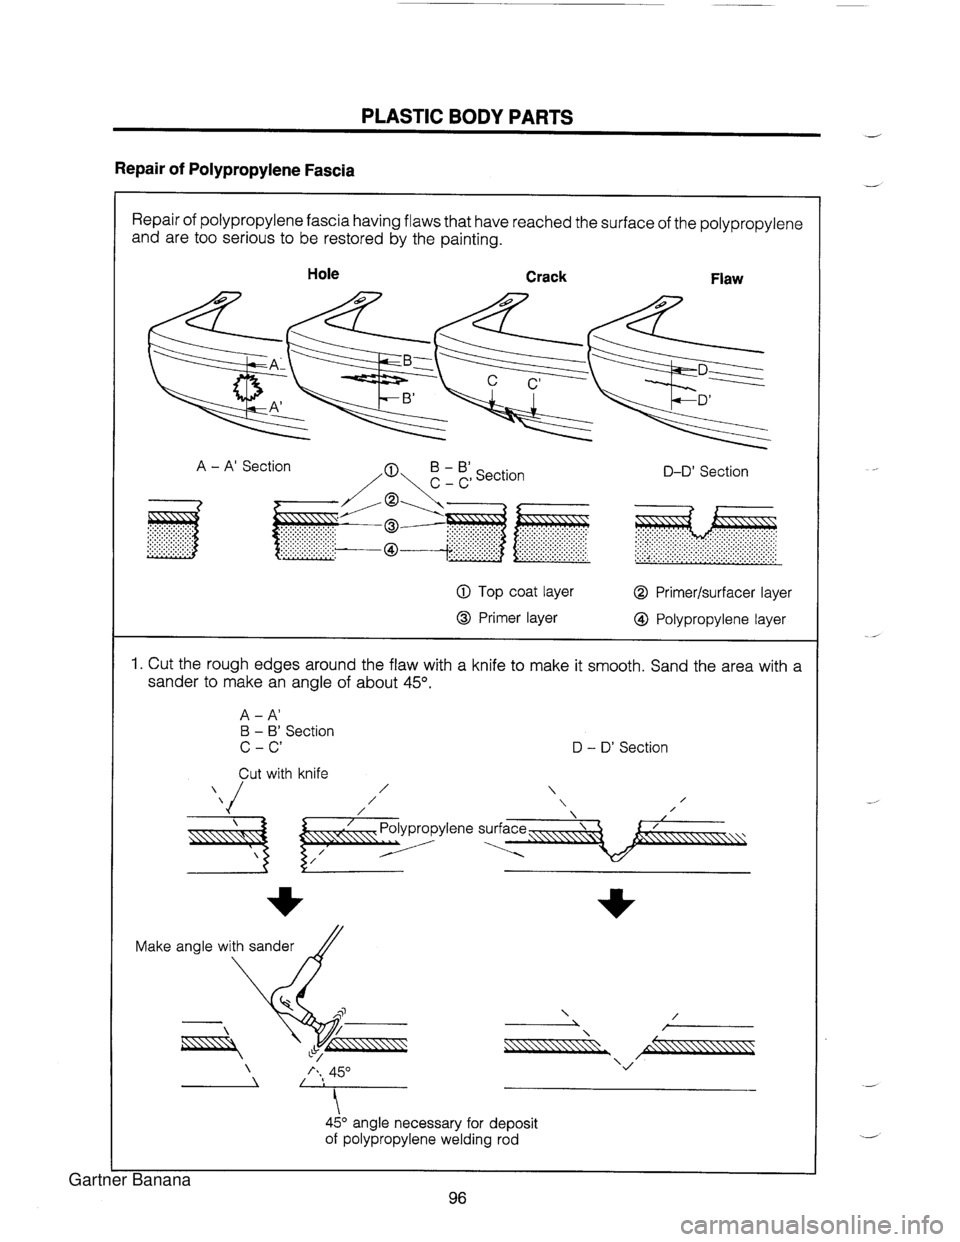
PLASTIC BODY PARTS d Repair of Polypropylene Fascia Repair of polypropylene fascia having flaws that have reached the surface of the polypropylene and are too serious to be restored by the painting. I Hole Crack Flaw A - A' Section B - B' /a - c, Section D-D' Section @ Top coat layer O Primerlsurfacer layer @ Primer layer @ Polypropylene layer I 1. Cut the rough edges around the flaw with a knife to make it smooth. Sand the area with a sander to make an angle of about 45". A - A' B - B' Section D - D' Section ,,/Cut with knife / / / / Make angle with sander - / I L h, 45" - 45" angle necessary for deposit of polypropylene welding rod Gartner Banana
Page 1347 of 1708
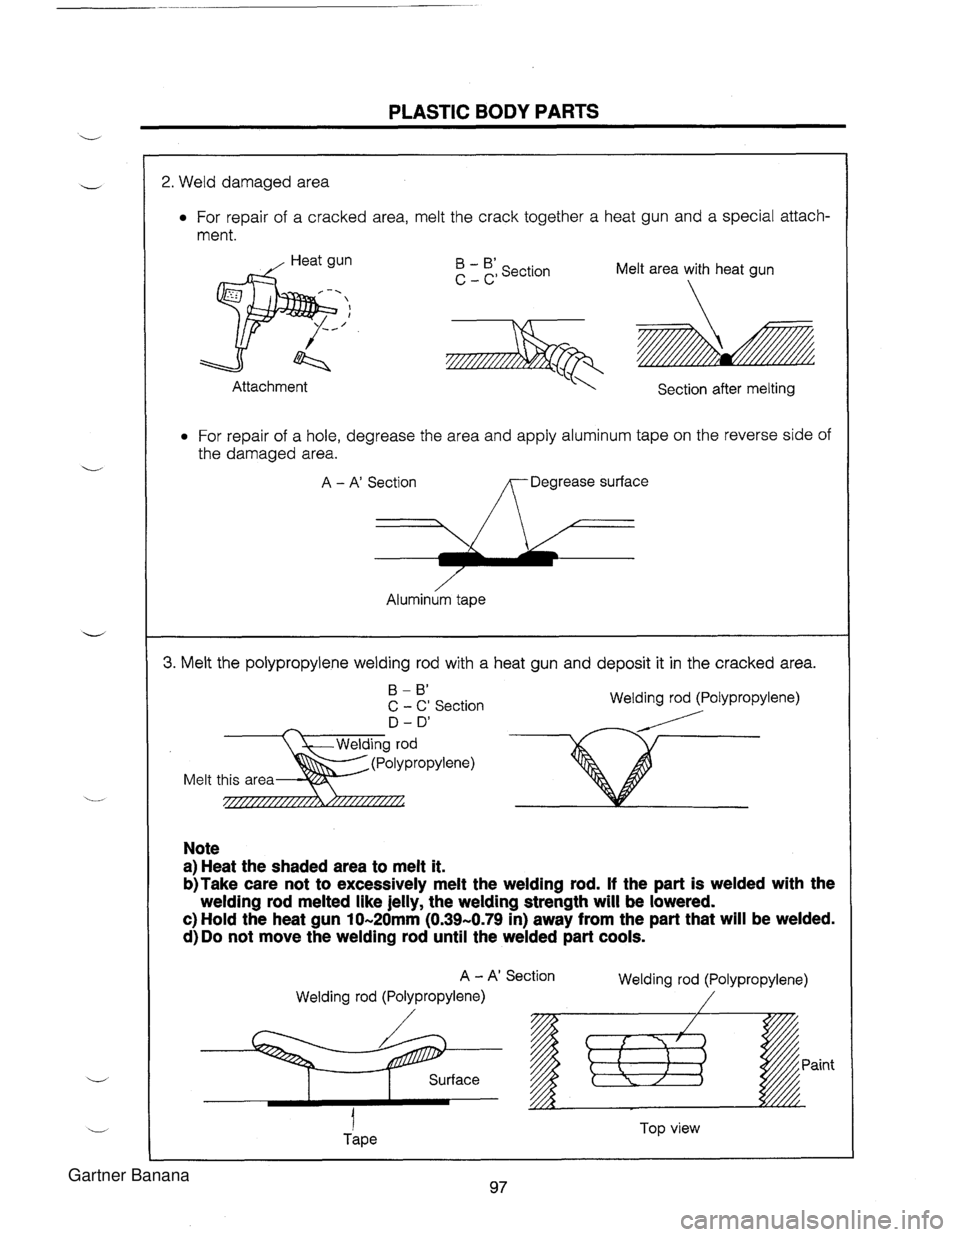
PLASTIC BODY PARTS 2. Weld damaged area For repair of a cracked area, melt the crack together a heat gun and a special attach- ment. - B' section Melt area with heat gun C - C' Attachment Section after melting For repair of a hole, degrease the area and apply aluminum tape on the reverse side of the damaged area. A - A' Section Degrease surface ~lumin;m tape 3. Melt the polypropylene welding rod with a heat gun and deposit it in the cracked area. B - B' C - C' Section Welding rod (Polypropylene) / - - (Polypropylene) Melt this area Note a) Heat the shaded area to melt it. b)Take care not to excessively melt the welding rod. If the part is welded with the welding rod melted like jelly, the welding strength will be lowered. c) Hold the heat gun 10-20mm (0.39-0.79 in) away from the part that will be welded. d)Do not move the welding rod until the welded part cools. A - A' Section Welding rod (Polypropylene) Welding rod (Polypropylene) / I TOP view Tape Gartner Banana
Page 1348 of 1708
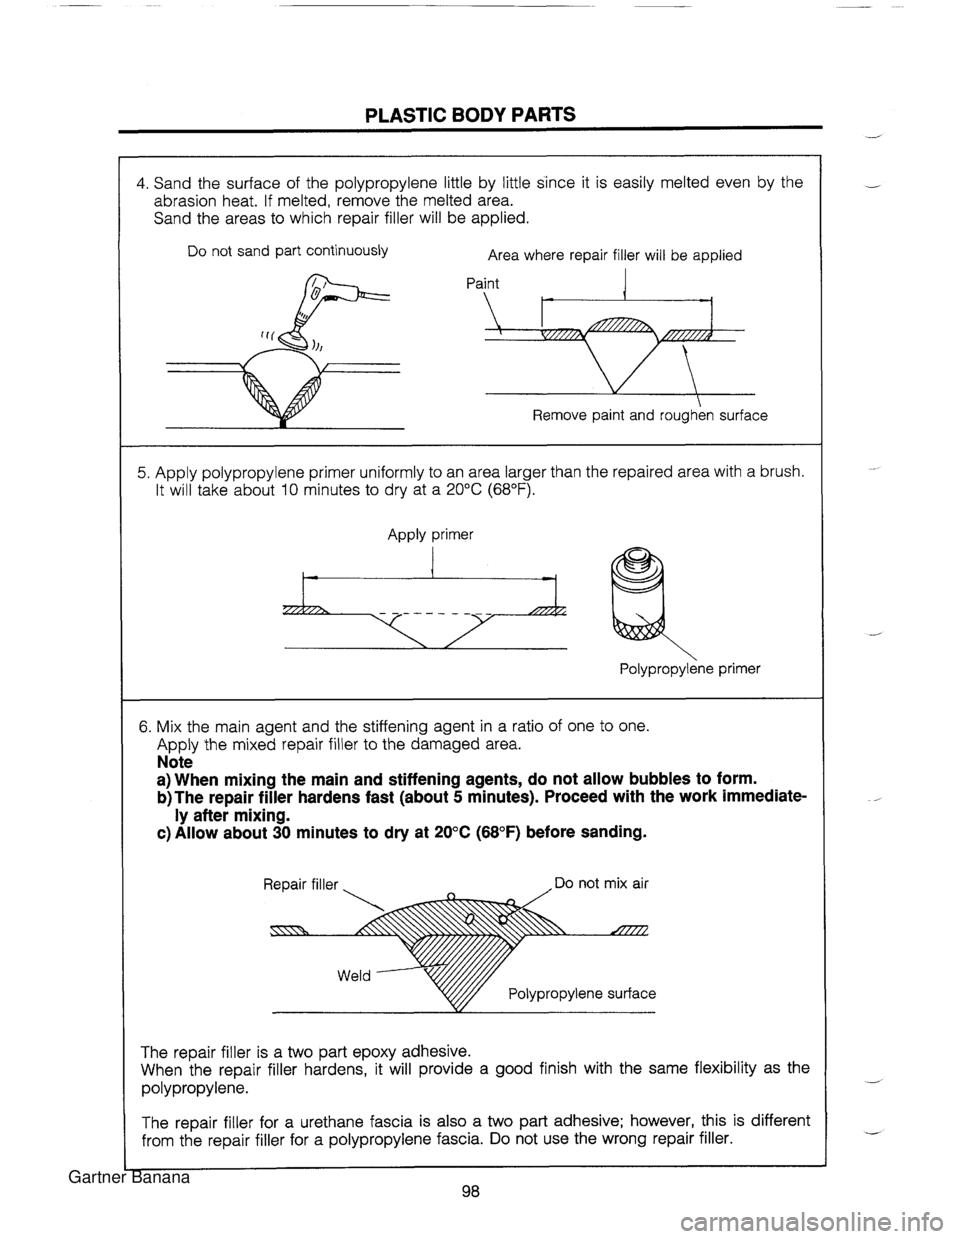
PLASTIC BODY PARTS 4. Sand the surface of the polypropylene little by little since it is easily melted even by the abrasion heat. If melted, remove the melted area. Sand the areas to which repair filler will be applied. I Do not sand part continuously Area where repair filler will be applied Paint Remove paint and roughen surface 5. Apply polypropylene primer uniformly to an area larger than the repaired area with a brush. It will take about 10 minutes to dry at a 20°C (68°F). Apply primer ~ol~~ro~~lene primer 6. Mix the main agent and the stiffening agent in a ratio of one to one. Apply the mixed repair filler to the damaged area. Note a) When mixing the main and stiffening agents, do not allow bubbles to form. b)The repair filler hardens fast (about 5 minutes). Proceed with the work immediate- ly after mixing. c) Allow about 30 minutes to dry at 20°C (68°F) before sanding. Repair filler . ,Do not mix air V@// Polypropylene surface The repair filler is a two part epoxy adhesive. When the repair filler hardens, it will provide a good finish with the same flexibility as the polypropylene. The repair filler for a urethane fascia is also a two part adhesive; however, this is different from the repair filler for a polypropylene fascia. Do not use the wrong repair filler. Gartner Banana
Page 1349 of 1708
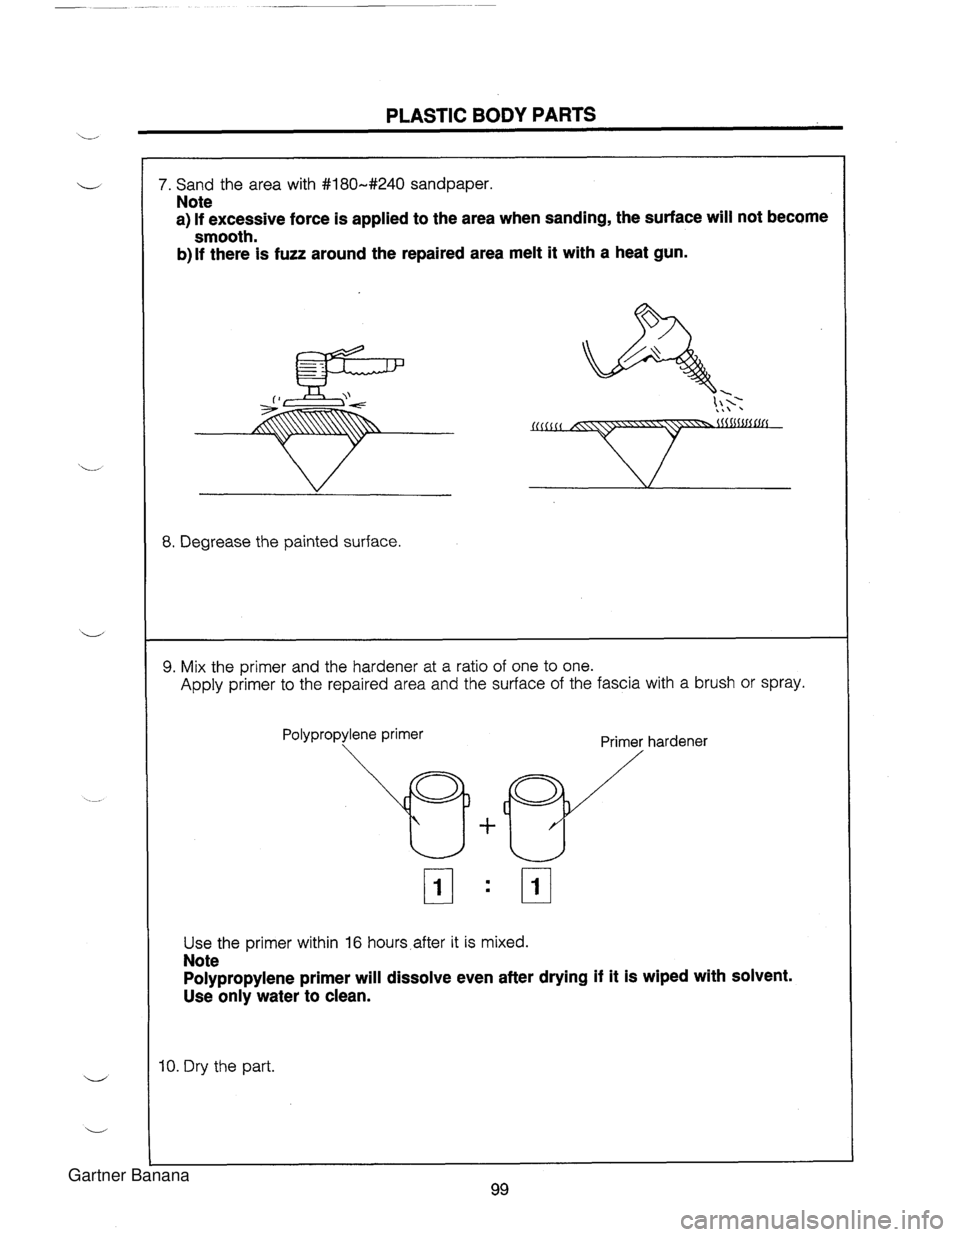
PLASTIC BODY PARTS 7. Sand the area with #180-#240 sandpaper. . . Note a) If excessive force is applied to the area when sanding, the surface will not become smooth. b)lf there is fuzz around the repaired area melt it with a heat gun. 8. Degrease the painted surface. 9. Mix the primer and the hardener at a ratio of one to one. Apply primer to the repaired area and the surface of the fascia with a brush or spray. Polypropylene primer Primer hardener Use the primer within 16 hours after it is mixed. Note Polypropylene primer will dissolve even after drying if it is wiped with solvent. Use only water to clean. 10. Dry the part. Gartner Banana
Page 1350 of 1708
Gartner Banana