MAZDA MX-5 1994 User Guide
Manufacturer: MAZDA, Model Year: 1994, Model line: MX-5, Model: MAZDA MX-5 1994Pages: 1708, PDF Size: 82.34 MB
Page 11 of 1708
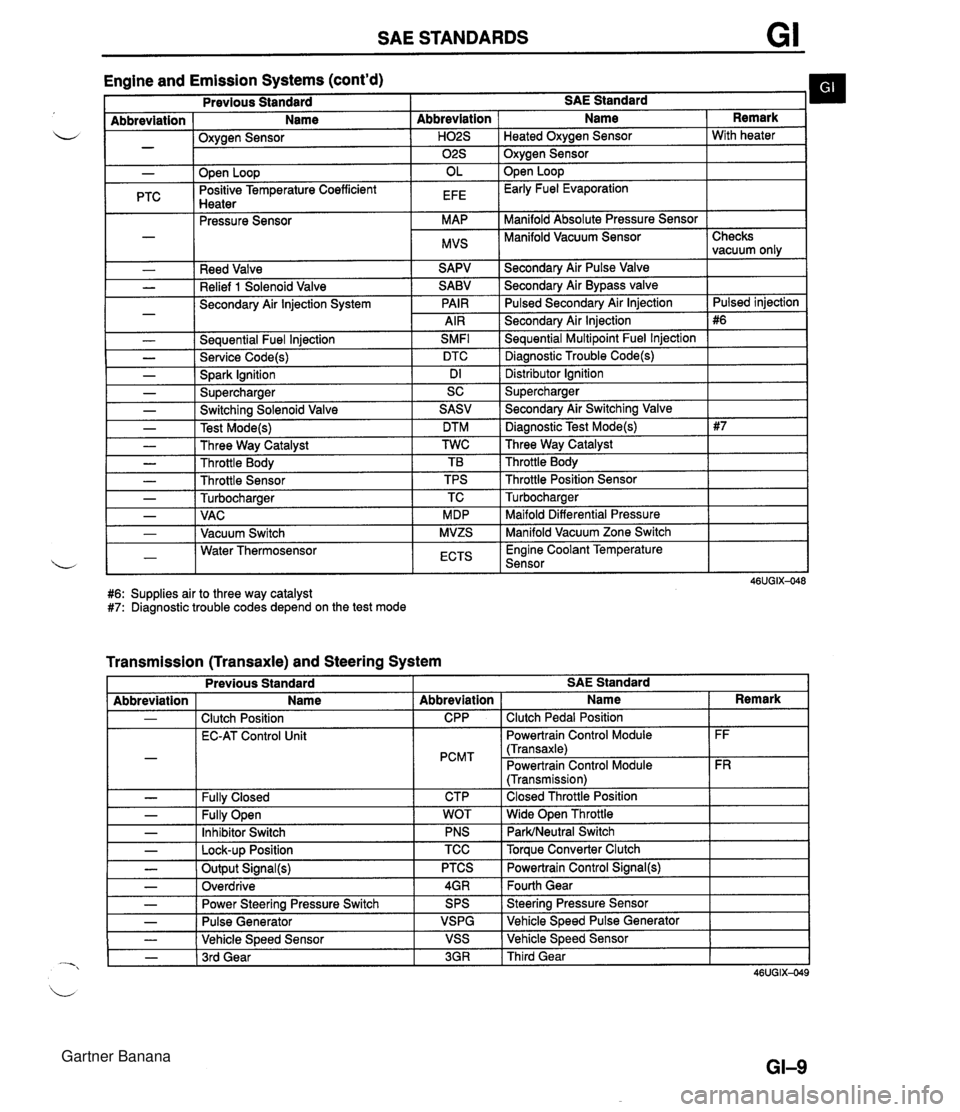
SAE STANDARDS Engine and Emission Systems (cont'd) I Previous Standard I SAE Standard b I - Abbreviation ( Name I Oxvaen Sensor - .w- - I I ." I 02s I Oxygen Sensor I - PTC Reed Valve Relief 1 Solenoid Valve Secondary Air lnjection System - Seauential Fuel lniection SMFl L - Service Code(s) DTC - Spark Ignition Dl - Supercharger SC Abbreviation I Name Open Loop Positive Temperature Coefficient Hnatar Secondarv Air Pulse Valve Remark . .--.-. Pressure Sensor Secondary Air Bypass valve Pulsed Secondarv Air lniection H02S I Heated Oxvaen Sensor I With heater OL EFE Secondary Air lnjection Sequential Multipoint Fuel lnjection Diagnostic Trouble Code(s) Open Loop Early Fuel Evaporation MAP MVS Distributor lgnition Supercharger Manifold Absolute Pressure Sensor Manifold Vacuum Sensor I - - - - - - Checks vacuum only Pulsed iniection - Switching Solenoid Valve Test Mode(s) Three Way Catalyst Throttle Body Throttle Sensor Turbocharaer .. Maifold Differential Pressure Manifold Vacuum Zone Switch , - I - 1 VAC I MDP 1-1 Water Thermosensor L - I Vacuum Switch I ECTS I Engine Coolant Temperature Sensor I SASV DTM TWC TB TPS TC MVZS #6: Supplies air to three way catalyst #7: Diagnostic trouble codes depend on the test mode - Secondary Air Switching Valve Diagnostic Test Mode(s) Three Way Catalyst Throttle Body Throttle Position Sensor Turbocharaer Transmission (Transaxle) and Steering System L - - Previous Standard I I I I Abbreviation - - - SAE Standard Fully Open Inhibitor Switch - I Lock-up Position - - Name Clutch Position EC-AT Control Unit Fullv Closed Abbreviation CPP PCMT CTP TCC I Torque Converter Clutch - - - WOT PNS Output Signal(s) Overdrive I Name Clutch Pedal Position Powertrain Control Module (Transaxle) Powertrain Control Module (Transmission) Closed Throttle Position Wide Open Throttle ParWNeutral Switch Power Steering Pressure Switch Pulse Generator Vehicle Speed Sensor - 1 3rd Gear Remark FF FR PTCS 4GR 3GR I Third Gear Powertrain Control Signal(@ Fourth Gear SPS VSPG VSS Steering Pressure Sensor Vehicle Speed Pulse Generator Vehicle Speed Sensor Gartner Banana
Page 12 of 1708

GI SAE STANDARDS Body Electrical System and Heater and Air Conditioner Systems Previous Standard SAE Standard - - Abbreviation I Name I Abbreviation 1 Name Remark 1 VB - - - AIC Switch Air Conditioner 46UGIX-050 #8: System name. Other related names are unchanged. Battery Voltage Coolant Level Sensor Ground Self-Diagnosis System ACS A/C B+ COLS GND OBD Air Conditioning Sensor Air Conditioner d Battery Positive Voltage Coolant Level Sensor Ground On-Board Diagnosis System #8 Gartner Banana
Page 13 of 1708

FUNDAMENTAL PROCEDURES GI FUNDAMENTAL PROCEDURES PROTECTION OF THE VEHICLE Always be sure to cover fenders, seats, and floor areas before starting work. PREPARATION OF TOOLS AND MEASURING EQUIPMENT Be sure that all necessary tools and measuring equip- ment are available before starting any work. SPECIAL TOOLS Use special tools when they are required. REMOVAL OF PARTS While correcting a problem, try also to determine its cause. Begin work only after first learning which parts and subassemblies must be removed and disassembled for replacement or repair. After removing the part, plug all holes and ports to prevent foreign material from enter- ing. DISASSEMBLY If the disassembly procedure is complex, requiring many parts to be disassembled, all parts should be disas- sembled in a way that will not affect their performance or external appearance and identified so that reassembly can be performed easily and efficiently. Gartner Banana
Page 14 of 1708
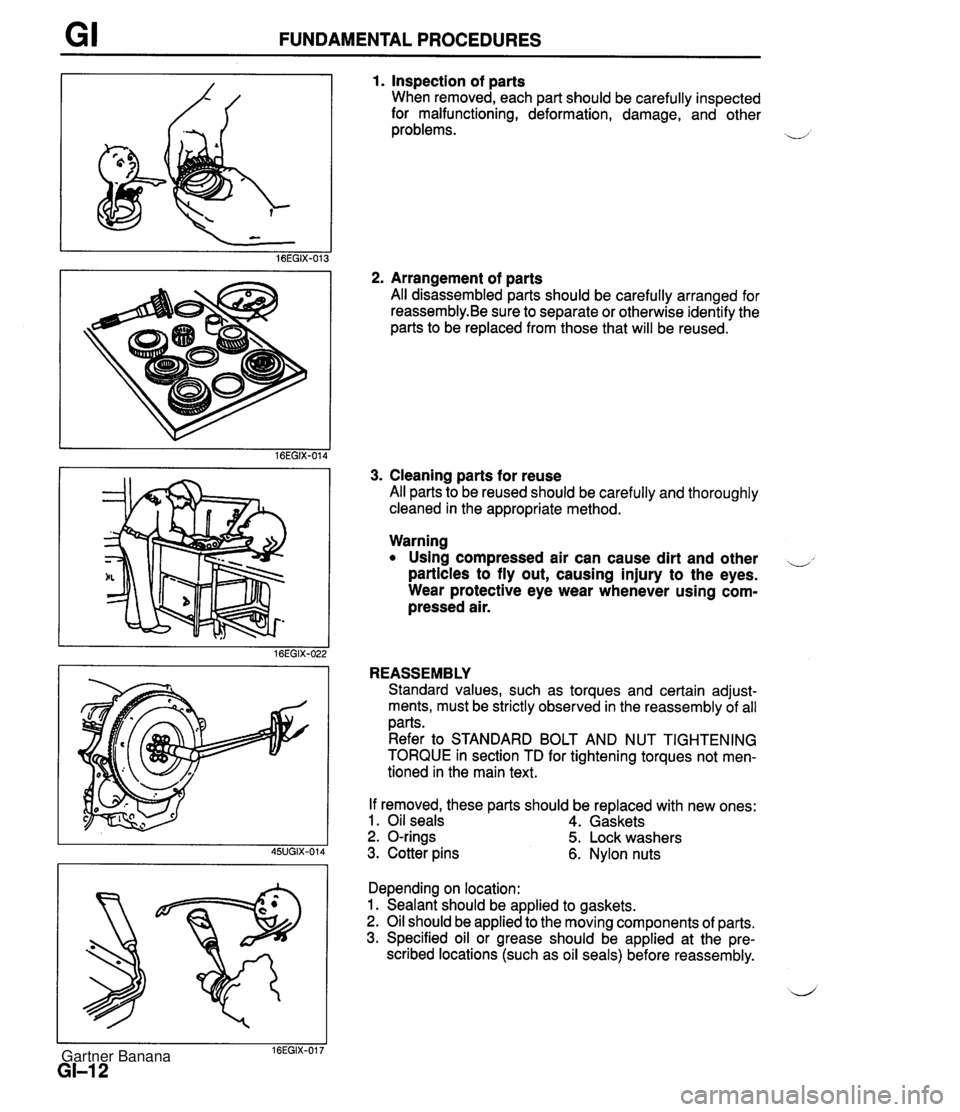
FUNDAMENTAL PROCEDURES 1. Inspection of parts When removed, each part should be carefully inspected for malfunctioning, deformation, damage, and other problems. 2. Arrangement of parts All disassembled parts should be carefully arranged for reassembly.Be sure to separate or otherwise identify the parts to be replaced from those that will be reused. 3. Cleaning parts for reuse All parts to be reused should be carefully and thoroughly cleaned in the appropriate method. Warning Using compressed air can cause dirt and other ,, particles to fly out, causing injury to the eyes. Wear protective eye wear whenever using com- pressed air. REASSEMBLY Standard values, such as torques and certain adjust- ments, must be strictly observed in the reassembly of all parts. Refer to STANDARD BOLT AND NUT TIGHTENING TORQUE in section TD for tightening torques not men- tioned in the main text. If removed, these parts should be replaced with new ones: 1. Oil seals 4. Gaskets 2. O-rings 5. Lock washers 3. Cotter pins 6. Nylon nuts Depending on location: 1. Sealant should be applied to gaskets. 2. Oil should be applied to the moving components of parts. 3. Specified oil or grease should be applied at the pre- scribed locations (such as oil seals) before reassembly. Gartner Banana
Page 15 of 1708
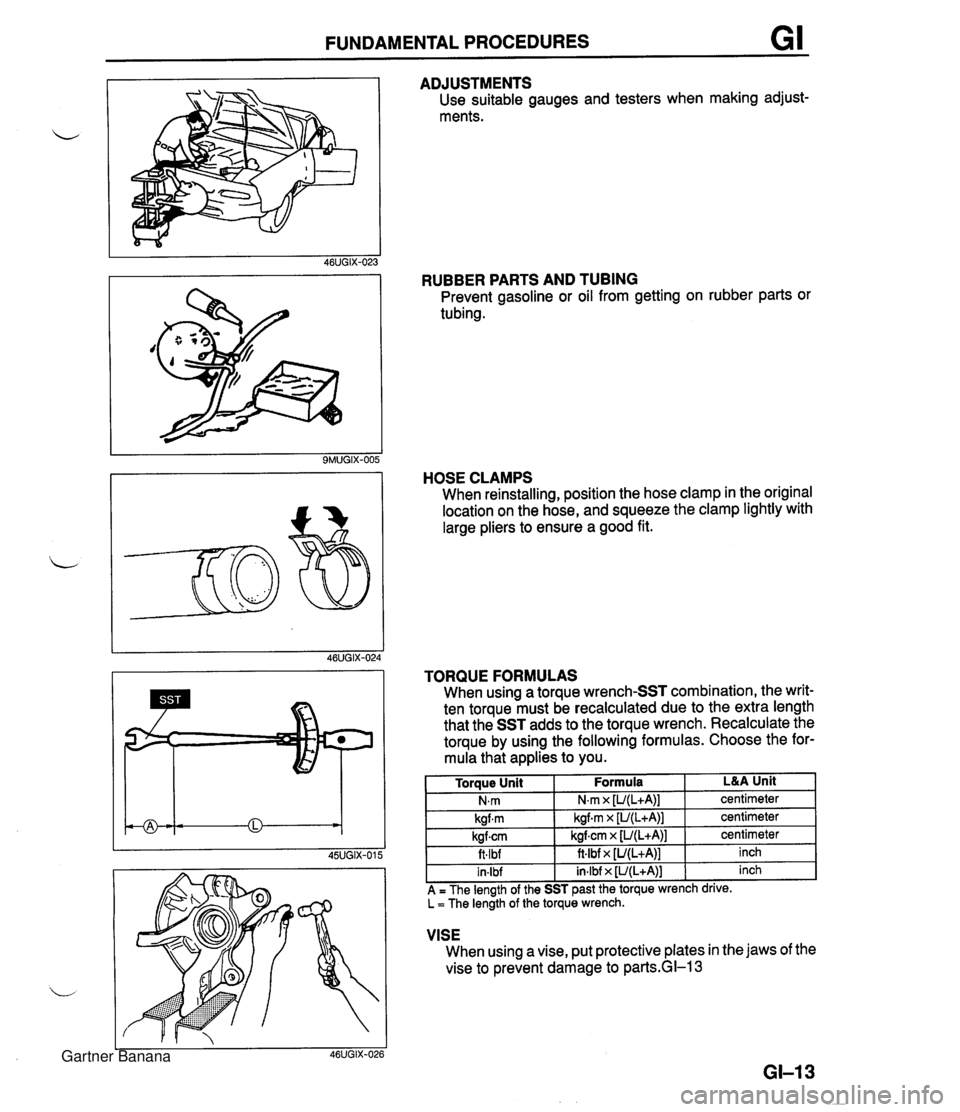
FUNDAMENTAL PROCEDURES GI ADJUSTMENTS Use suitable gauges and testers when making adjust- ments. RUBBER PARTS AND TUBING Prevent gasoline or oil from getting on rubber parts or tubing. HOSE CLAMPS When reinstalling, position the hose clamp in the original location on the hose, and squeeze the clamp lightly with large pliers to ensure a good fit. VISE When using a vise, put protective plates in the jaws of the vise to prevent damage to parkGI-1 3 TORQUE FORMULAS When using a torque wrench-SST combination, the writ- ten torque must be recalculated due to the extra length that the SST adds to the torque wrench. Recalculate the torque by using the following formulas. Choose the for- mula that applies to you. GI-I 3 L&A Unit centimeter centimeter centimeter inch inch Torque Unit N.m kgfm kgfcm ft.lbf in-lbf A = The length of the SST past the torque wrench drive. L = The length of the torque wrench. Formula N,m x [U(L+A)] kgf.m x [U(L+A)] kgfcrn x [U(L+A)] ft4bf x [U(L+A)] in.lbf x [U(L+A)] Gartner Banana
Page 16 of 1708
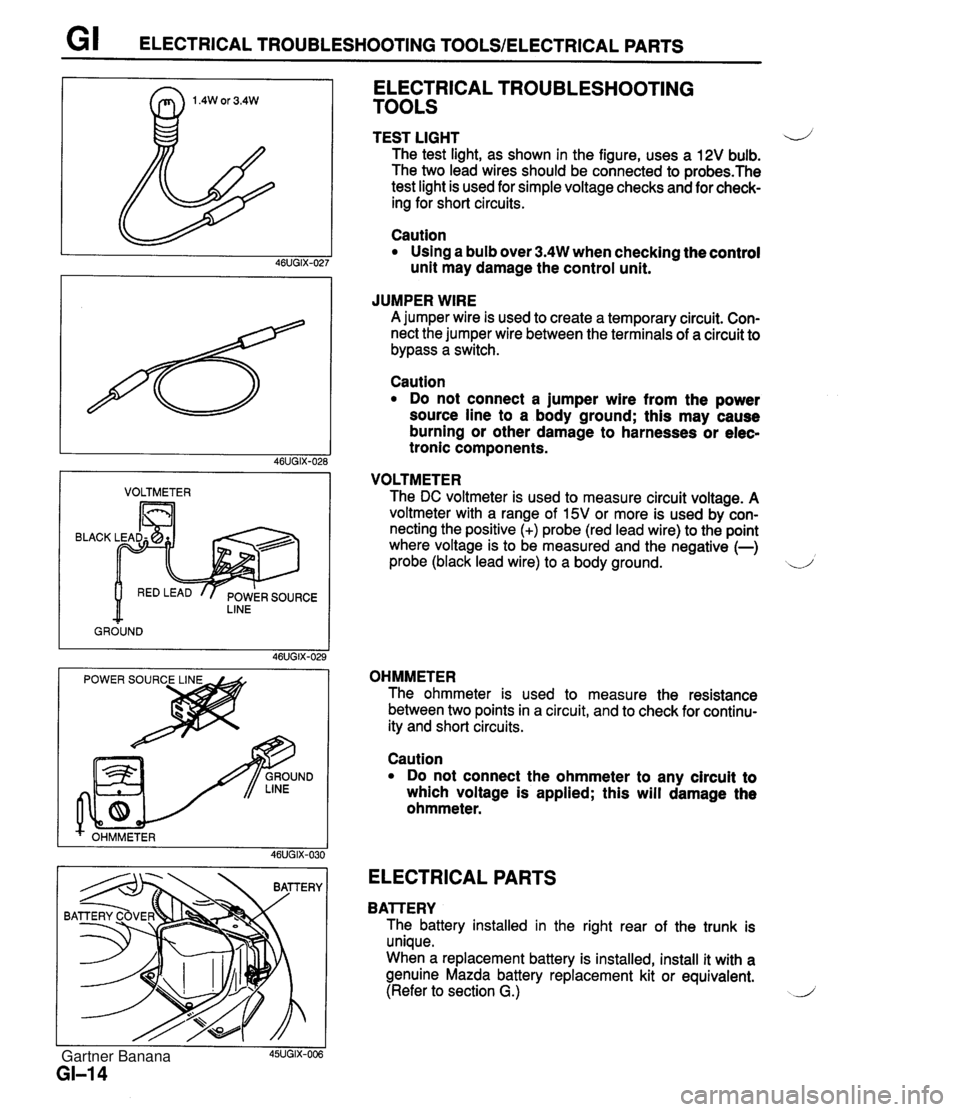
G I ELECTRICAL TROUBLESHOOTING TOOLSIELECTRICAL PARTS I VOLTMETER I BLACK LINE GROUND ELECTRICAL TROUBLESHOOTING TOOLS TEST LIGHT 4) The test light, as shown in the figure, uses a 12V bulb. The two lead wires should be connected to probes.The test light is used for simple voltage checks and for check- ing for short circuits. Caution Using a bulb over 3.4W when checking the control unit may damage the control unit. JUMPER WIRE A jumper wire is used to create a temporary circuit. Con- nect the jumper wire between the terminals of a circuit to bypass a switch. Caution Do not connect a jumper wire from the power source line to a body ground; this may cause burning or other damage to harnesses or elec- tronic components. VOLTMETER The DC voltmeter is used to measure circuit voltage. A voltmeter with a range of 15V or more is used by con- necting the positive (+) probe (red lead wire) to the point where voltage is to be measured and the negative (-) probe (black lead wire) to a body ground. d OHMMETER The ohmmeter is used to measure the resistance between two points in a circuit, and to check for continu- ity and short circuits. I I 45UGIX-006 GI-I 4 Caution Do not connect the ohmmeter to any circuit to which voltage is applied; this will damage the ohmmeter. ELECTRICAL PARTS BAlTERY The battery installed in the right rear of the trunk is unique. When a replacement battery is installed, install it with a genuine Mazda battery replacement kit or equivalent. (Refer to section G.) J Gartner Banana
Page 17 of 1708
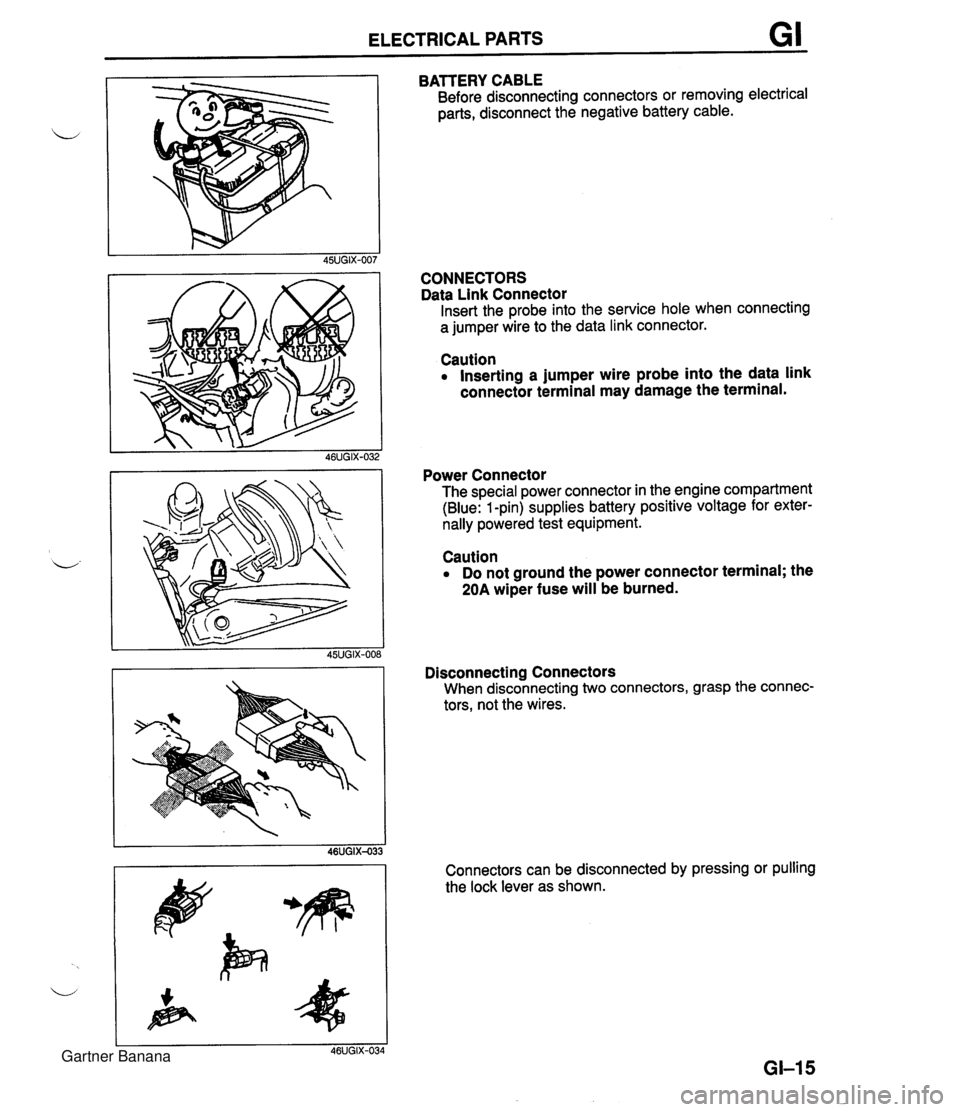
ELECTRICAL PARTS GI BATTERY CABLE Before disconnecting connectors or removing electrical parts, disconnect the negative battery cable. CONNECTORS Data Link Connector Insert the probe into the service hole when connecting a jumper wire to the data link connector. Caution Inserting a jumper wire probe into the data link connector terminal may damage the terminal. Power Connector The special power connector in the engine compartment (Blue: 1 -pin) supplies battery positive voltage for exter- nally powered test equipment. Caution Do not ground the power connector terminal; the 20A wiper fuse will be burned. Disconnecting Connectors When disconnecting two connectors, grasp the connec- tors, not the wires. Connectors can be disconnected by pressing or pulling the lock lever as shown. Gartner Banana
Page 18 of 1708
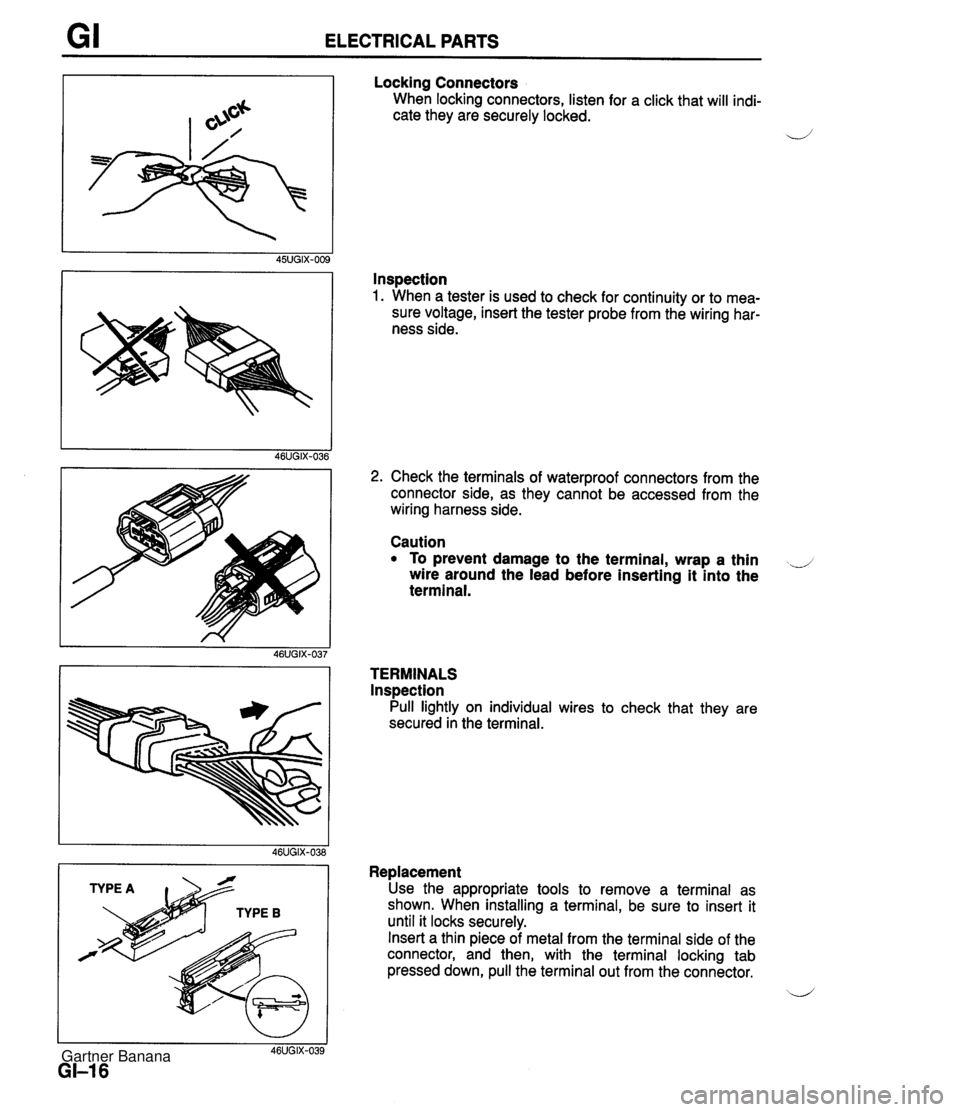
GI ELECTRICAL PARTS Locking Connectors When locking connectors, listen for a click that will indi- cate they are securely locked. 4' Inspection 1. When a tester is used to check for continuity or to mea- sure voltage, insert the tester probe from the wiring har- ness side. I I 46UGIX-039 GI-I 6 2. Check the terminals of waterproof connectors from the connector side, as they cannot be accessed from the wiring harness side. Caution To prevent damage to the terminal, wrap a thin ..J wire around the lead before inserting it into the terminal. TERMINALS lnspection Pull lightly on individual wires to check that they are secured in the terminal. Replacement Use the appropriate tools to remove a terminal as shown. When installing a terminal, be sure to insert it until it locks securely. Insert a thin piece of metal from the terminal side of the connector, and then, with the terminal locking tab pressed down, pull the terminal out from the connector. b' Gartner Banana
Page 19 of 1708
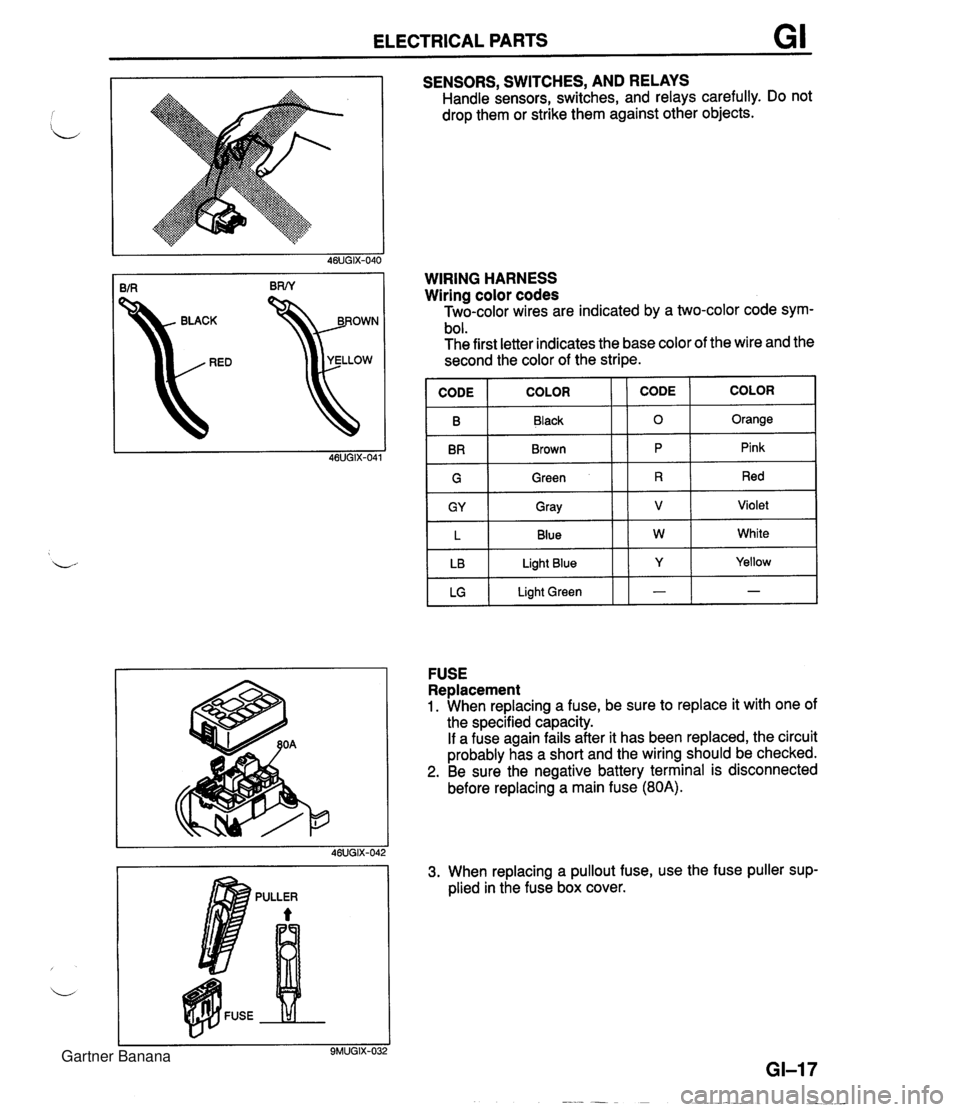
ELECTRICAL PARTS GI SENSORS, SWITCHES, AND RELAYS Handle sensors, switches, and relays carefully. Do not drop them or strike them against other objects. kD YELLOW WIRING HARNESS Wiring color codes Two-color wires are indicated by a two-color code sym- bol. The first letter indicates the base color of the wire and the second the color of the stripe. IGI Green 11 R 1 Red I B BR COLOR FUSE Replacement 1. When replacing a fuse, be sure to replace it with one of the specified capacity. If a fuse again fails after it has been replaced, the circuit probably has a short and the wiring should be checked. 2. Be sure the negative battery terminal is disconnected before replacing a main fuse (80A). CODE CODE Black Brown GY L LB LG 3. When replacing a pullout fuse, use the fuse puller sup- plied in the fuse box cover. COLOR 0 P Gray Blue Light Blue Light Green Orange Pink V W Y - Violet White Yellow - Gartner Banana
Page 20 of 1708

G I INSTALLATION OF MOBILE TWO-WAY RADIO SYSTEMIAUDIO ANTITHEFT SYSTEM INSTALLATION OF MOBILE TWO-WAY RADIO SYSTEM If a mobile two-way radio system is installed improperly or if a high-powered type is used, the CIS and other systems may be affected. L-.) When the vehicle is to be equipped with a mobile two-way radio, observe the following precautions: 1. lnstall the antenna at the farthest point from control units. 2. Install the antenna feeder as far as possible from the control unit harnesses (at least 30 cm (11.8 in)). 3. Ensure that the antenna and feeder are properly adjusted. 4. Do not install a hiah-h owe red mobile two-wav radio svstem. FEEDER W!RE CONTROL UNIT HARNESS AT LEAST 30 cm (11.8 in) 46UGIX-043 AUDIO ANTITHEFT SYSTEM An audio with an antitheft function is optionally available. Before removing the negative battery terminal or discon- necting the audio power source, obtain the code number and deactivate the audio antitheft system. (Refer to section T.) Gartner Banana