MITSUBISHI CARISMA 2000 1.G Owners Manual
Manufacturer: MITSUBISHI, Model Year: 2000, Model line: CARISMA, Model: MITSUBISHI CARISMA 2000 1.GPages: 280, PDF Size: 2.32 MB
Page 201 of 280
For emergencies
If the vehicle breaks down 8–2. . . . . . . . . . . . . . . . .
Operation under adverse driving conditions 8–2. .
Tools and jack 8–3. . . . . . . . . . . . . . . . . . . . . . . . . . . .
Jacking up the vehicle 8–4. . . . . . . . . . . . . . . . . . . . .
Spare wheel 8–6. . . . . . . . . . . . . . . . . . . . . . . . . . . . . .
Wheel covers* 8–8. . . . . . . . . . . . . . . . . . . . . . . . . . . .
If a tyre is punctured 8–9. . . . . . . . . . . . . . . . . . . . . .
Towing 8–12. . . . . . . . . . . . . . . . . . . . . . . . . . . . . . . . . .
Engine overheating 8–15. . . . . . . . . . . . . . . . . . . . . . .
Emergency starting 8–17. . . . . . . . . . . . . . . . . . . . . .
Bleeding the fuel system
(diesel-powered vehicles only) 8–21. . . . . . . . . . . . .
Removal of water from the fuel filter
(diesel-powered vehicles only) 8–21. . . . . . . . . . . . .
What to do if the engine speed becomes
unstable after the battery is replaced: 8–22. . . . . .
Fuses 8–22. . . . . . . . . . . . . . . . . . . . . . . . . . . . . . . . . . .
Changing a fuse 8–25. . . . . . . . . . . . . . . . . . . . . . . . .
Replacement of lamp bulbs 8–26. . . . . . . . . . . . . . .
Page 202 of 280
FOR EMERGENCIES
8–2
If the vehicle breaks downEN40B-Bc
If the vehicle breaks down on the road, move
it to the shoulder and use the hazard warning
flashers.
If the engine stops/fails
Vehicle operation and control are affected if
the engine stops. Before moving the vehicle
to a safe area be aware of the following:
1. The brake booster becomes inoperat-
ive and the pedal effort will increase.
Press down the brake pedal harder
than usual.
2. Since the power steering pump is no
longer operative, the steering wheel
feels heavy when turning it. Turn the
wheel with more effort than usual.
Operation under adverse
driving conditions
EI43ABAa
If your vehicle is stuck: in sand,
mud or snow
If the vehicle becomes stuck in snow, sand,
or mud, it can often be moved by a rocking
motion. Move the gearshift lever or selector
lever alternately between the 1st and Re-
verse position (with manual transmission),
the “L” (LOW) and “R” (REVERSE) position
(with INVECS–II 4A/T), and the Sport mode
and “R” (REVERSE) position (with INVECS–
II Sport Mode 4A/T) while applying slight
pressure to the accelerator pedal.
Avoid racing the engine or spinning the
wheels. Prolonged efforts to free a stuck ve-
hicle may result in overheating and trans-
mission failure. Allow the engine to idle for a
few minutes to let the transmission cool be-
tween rocking attempts.
If the vehicle remains stuck after several
rocking attempts, seek other assistance.
WARNING
When attempting to rock your vehicle
out of a stuck position, be sure that
the area around the vehicle is clear of
people and physical objects. The
rocking motion may cause the ve-
hicle to suddenly launch forward or
backward causing injury or damage
to nearby people or objects.
On a flooded road
(1) Avoid flooded roads. Water could enter
the brake discs, resulting in temporarily
ineffective brakes. In such cases, lightly
depress the brake pedal to see if the
brakes operate properly. If they do not,
lightly depress the pedal several times
while driving in order to dry the brake
pads.
(2) When driving in rain or on a road with
many puddles a layer of water may form
between the tyres and the road surface.
This reduces a tyre’s frictional resis-
tance on the road, resulting in loss of
steering stability and braking capability.
To cope with this, observe the following
items:
(a) Drive your vehicle at a slow speed.
(b) Do not drive on worn tyres. Always
maintain the specified tyre inflation
pressures.
Page 203 of 280
FOR EMERGENCIES
8–3
On a snow-covered or frozen road
(1) When driving on a snow–covered or
frozen road, it is recommended that you
use snow tyres or tyre chains.
Refer to the “Snow tyres” and “Tyre
chains” sections.
(2) Avoid high–speed operation, sudden
acceleration, abrupt brake application
and sharp cornering.
(3) Depressing the brake pedal during
travel on such a road may cause tyre
slippage and skidding. When traction
between the tyres and the road is re-
duced, the wheels may skid, and the ve-
hicle cannot readily be brought to a stop
by conventional braking techniques.
Braking will differ, depending upon
whether you have anti–lock brakes
(ABS). If you do have ABS, brake by
pressing the brake pedal hard, and
keeping it pressed. If you do not have
ABS, pump the brake pedal with short
rapid jabs, each time fully applying and
fully releasing for greatest effect.
(4) Allow extra distance between your ve-
hicle and the vehicle in front of you, and
avoid sudden braking.
N01A026a
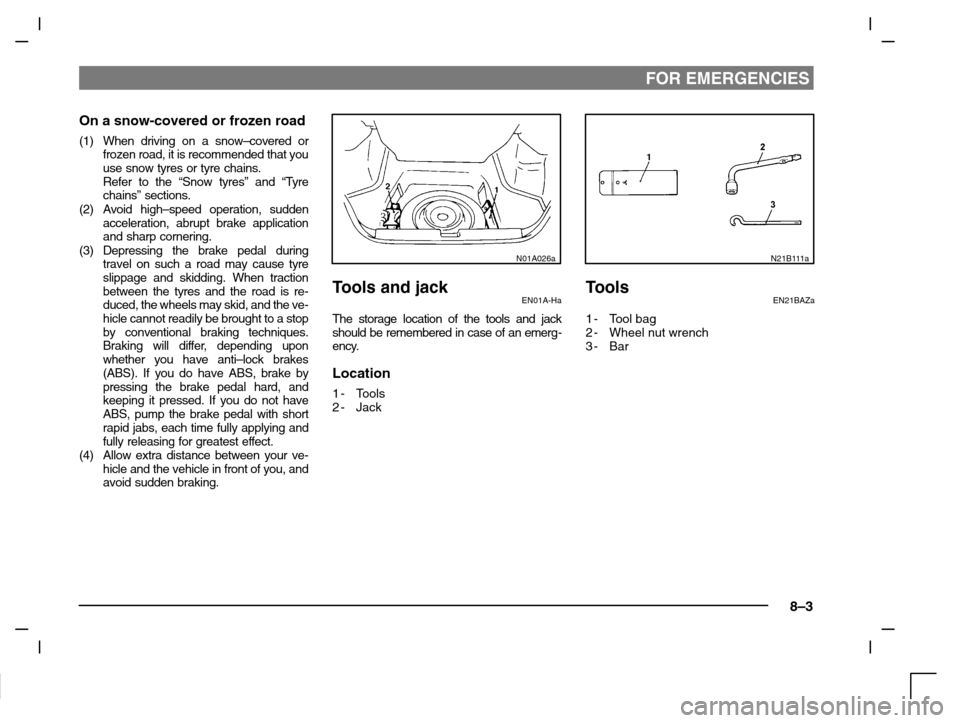
Tools and jackEN01A-Ha
The storage location of the tools and jack
should be remembered in case of an emerg-
ency.
Location
1-Tools
2-Jack
N21B111a
ToolsEN21BAZa
1- Tool bag
2-Wheel nut wrench
3-Bar
Page 204 of 280
FOR EMERGENCIES
8–4
N21C026a
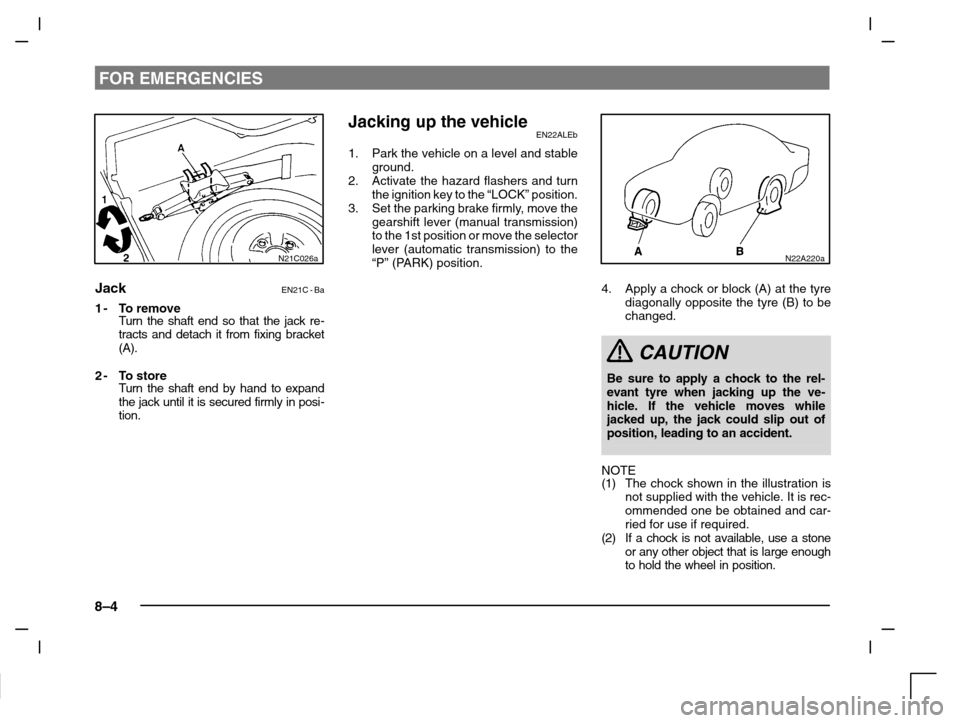
JackEN21C - Ba
1-To remove
Turn the shaft end so that the jack re-
tracts and detach it from fixing bracket
(A).
2-To store
Turn the shaft end by hand to expand
the jack until it is secured firmly in posi-
tion.
Jacking up the vehicleEN22ALEb
1. Park the vehicle on a level and stable
ground.
2. Activate the hazard flashers and turn
the ignition key to the “LOCK” position.
3. Set the parking brake firmly, move the
gearshift lever (manual transmission)
to the 1st position or move the selector
lever (automatic transmission) to the
“P” (PARK) position.
N22A220a
4. Apply a chock or block (A) at the tyre
diagonally opposite the tyre (B) to be
changed.
CAUTION
Be sure to apply a chock to the rel-
evant tyre when jacking up the ve-
hicle. If the vehicle moves while
jacked up, the jack could slip out of
position, leading to an accident.
NOTE
(1)The chock shown in the illustration is
not supplied with the vehicle. It is rec-
ommended one be obtained and car-
ried for use if required.
(2) If a chock is not available, use a stone
or any other object that is large enough
to hold the wheel in position.
Page 205 of 280
FOR EMERGENCIES
8–5
N22A181a
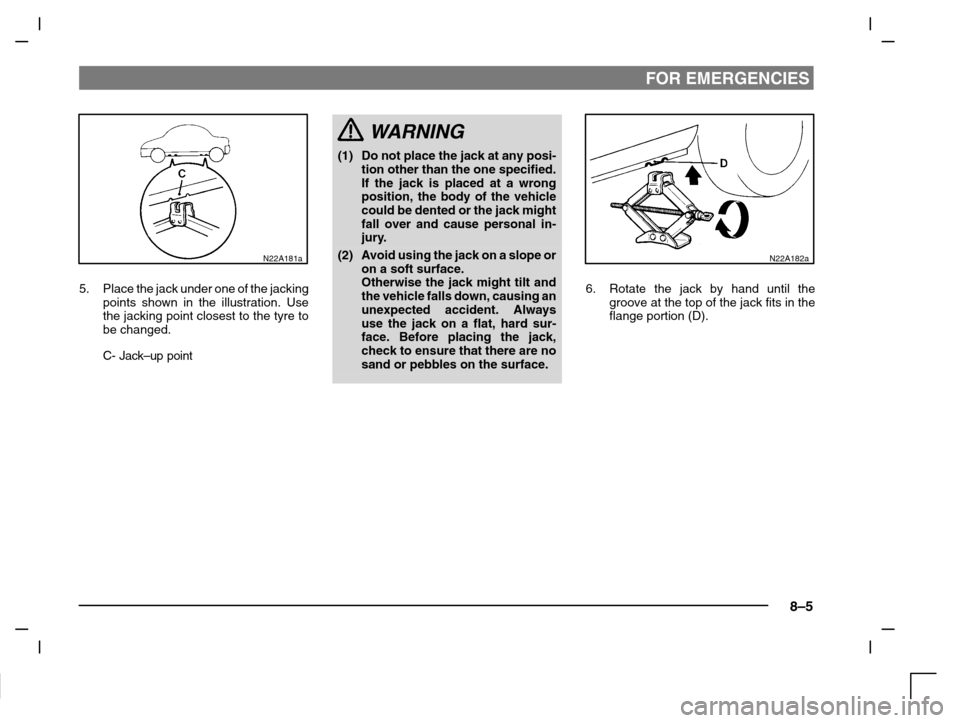
5. Place the jack under one of the jacking
points shown in the illustration. Use
the jacking point closest to the tyre to
be changed.
C- Jack–up point
WARNING
(1) Do not place the jack at any posi-
tion other than the one specified.
If the jack is placed at a wrong
position, the body of the vehicle
could be dented or the jack might
fall over and cause personal in-
jury.
(2) Avoid using the jack on a slope or
on a soft surface.
Otherwise the jack might tilt and
the vehicle falls down, causing an
unexpected accident. Always
use the jack on a flat, hard sur-
face. Before placing the jack,
check to ensure that there are no
sand or pebbles on the surface.N22A182a
6. Rotate the jack by hand until the
groove at the top of the jack fits in the
flange portion (D).
Page 206 of 280
FOR EMERGENCIES
8–6
N22A086a
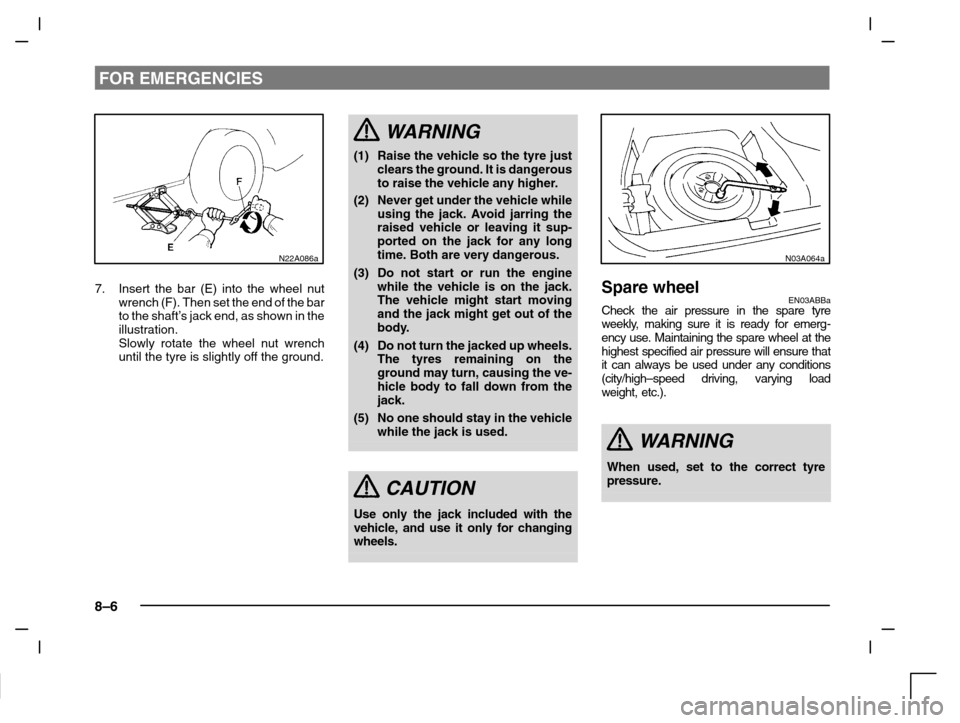
7. Insert the bar (E) into the wheel nut
wrench (F). Then set the end of the bar
to the shaft’s jack end, as shown in the
illustration.
Slowly rotate the wheel nut wrench
until the tyre is slightly off the ground.
WARNING
(1) Raise the vehicle so the tyre just
clears the ground. It is dangerous
to raise the vehicle any higher.
(2) Never get under the vehicle while
using the jack. Avoid jarring the
raised vehicle or leaving it sup-
ported on the jack for any long
time. Both are very dangerous.
(3) Do not start or run the engine
while the vehicle is on the jack.
The vehicle might start moving
and the jack might get out of the
body.
(4) Do not turn the jacked up wheels.
The tyres remaining on the
ground may turn, causing the ve-
hicle body to fall down from the
jack.
(5) No one should stay in the vehicle
while the jack is used.
CAUTION
Use only the jack included with the
vehicle, and use it only for changing
wheels.
N03A064a
Spare wheelEN03ABBaCheck the air pressure in the spare tyre
weekly, making sure it is ready for emerg-
ency use. Maintaining the spare wheel at the
highest specified air pressure will ensure that
it can always be used under any conditions
(city/high–speed driving, varying load
weight, etc.).
WARNING
When used, set to the correct tyre
pressure.
Page 207 of 280
FOR EMERGENCIES
8–7
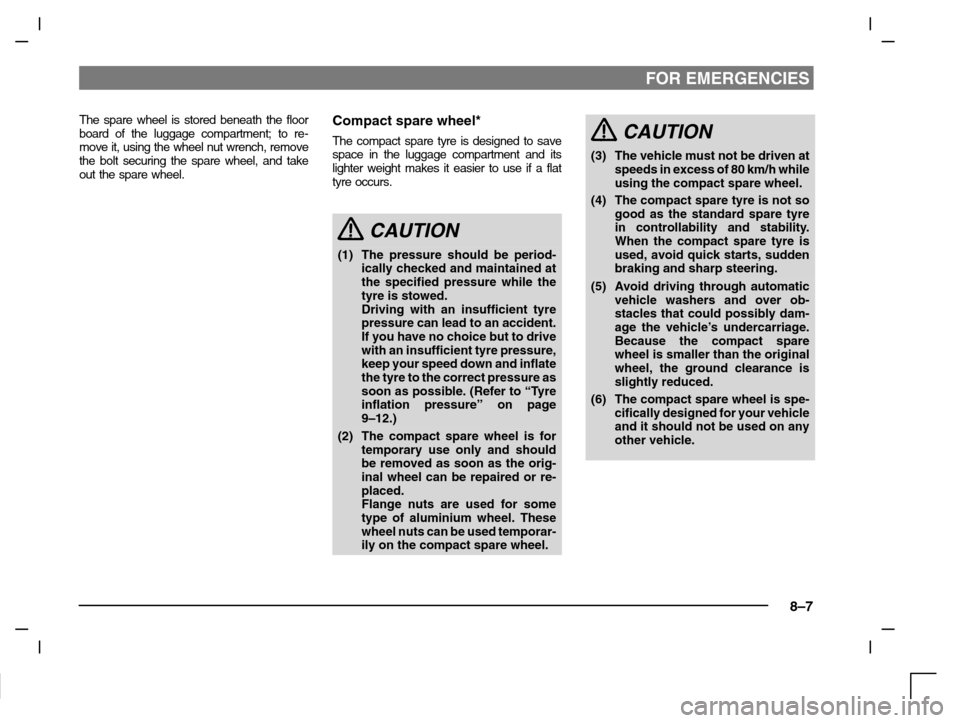
The spare wheel is stored beneath the floor
board of the luggage compartment; to re-
move it, using the wheel nut wrench, remove
the bolt securing the spare wheel, and take
out the spare wheel.Compact spare wheel*
The compact spare tyre is designed to save
space in the luggage compartment and its
lighter weight makes it easier to use if a flat
tyre occurs.
CAUTION
(1) The pressure should be period-
ically checked and maintained at
the specified pressure while the
tyre is stowed.
Driving with an insufficient tyre
pressure can lead to an accident.
If you have no choice but to drive
with an insufficient tyre pressure,
keep your speed down and inflate
the tyre to the correct pressure as
soon as possible. (Refer to “Tyre
inflation pressure” on page
9–12.)
(2) The compact spare wheel is for
temporary use only and should
be removed as soon as the orig-
inal wheel can be repaired or re-
placed.
Flange nuts are used for some
type of aluminium wheel. These
wheel nuts can be used temporar-
ily on the compact spare wheel.
CAUTION
(3) The vehicle must not be driven at
speeds in excess of 80 km/h while
using the compact spare wheel.
(4) The compact spare tyre is not so
good as the standard spare tyre
in controllability and stability.
When the compact spare tyre is
used, avoid quick starts, sudden
braking and sharp steering.
(5) Avoid driving through automatic
vehicle washers and over ob-
stacles that could possibly dam-
age the vehicle’s undercarriage.
Because the compact spare
wheel is smaller than the original
wheel, the ground clearance is
slightly reduced.
(6) The compact spare wheel is spe-
cifically designed for your vehicle
and it should not be used on any
other vehicle.
Page 208 of 280
FOR EMERGENCIES
8–8
N03A084a
CAUTION
(7) Do not use tyre chains with your
compact spare wheel. Because of
the smaller tyre size, a tyre chain
will not fit properly. This could
cause damage to the wheel and
result in loss of the chain.
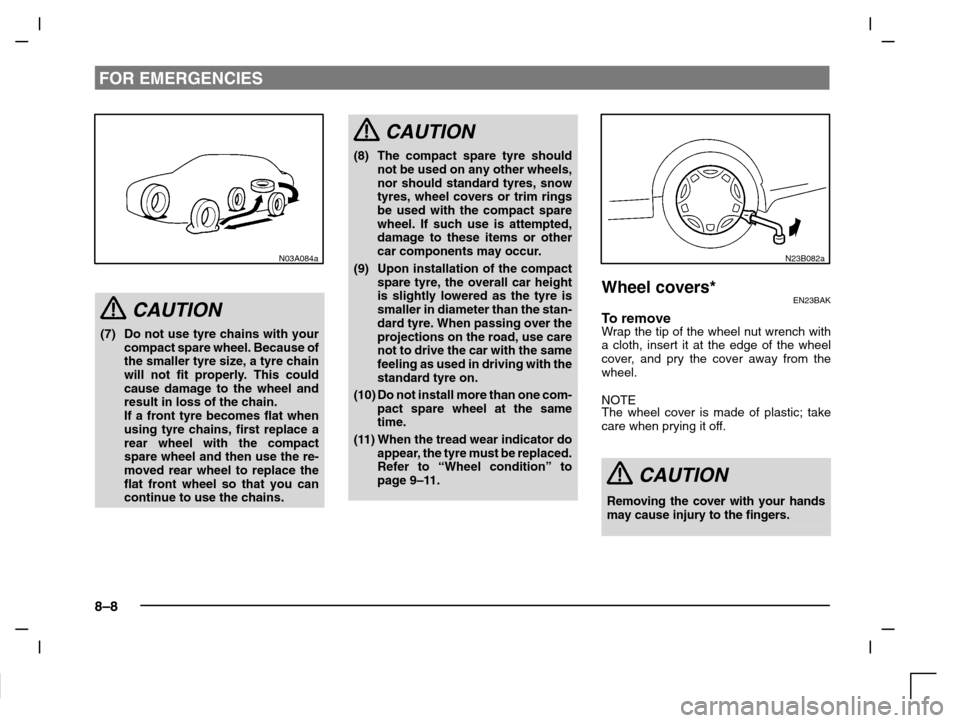
If a front tyre becomes flat when
using tyre chains, first replace a
rear wheel with the compact
spare wheel and then use the re-
moved rear wheel to replace the
flat front wheel so that you can
continue to use the chains.
CAUTION
(8) The compact spare tyre should
not be used on any other wheels,
nor should standard tyres, snow
tyres, wheel covers or trim rings
be used with the compact spare
wheel. If such use is attempted,
damage to these items or other
car components may occur.
(9) Upon installation of the compact
spare tyre, the overall car height
is slightly lowered as the tyre is
smaller in diameter than the stan-
dard tyre. When passing over the
projections on the road, use care
not to drive the car with the same
feeling as used in driving with the
standard tyre on.
(10) Do not install more than one com-
pact spare wheel at the same
time.
(11) When the tread wear indicator do
appear, the tyre must be replaced.
Refer to “Wheel condition” to
page 9–11.
N23B082a
Wheel covers*EN23BAK
To removeWrap the tip of the wheel nut wrench with
a cloth, insert it at the edge of the wheel
cover, and pry the cover away from the
wheel.
NOTE
The wheel cover is made of plastic; take
care when prying it off.
CAUTION
Removing the cover with your hands
may cause injury to the fingers.
Page 209 of 280
FOR EMERGENCIES
8–9
N23B083a
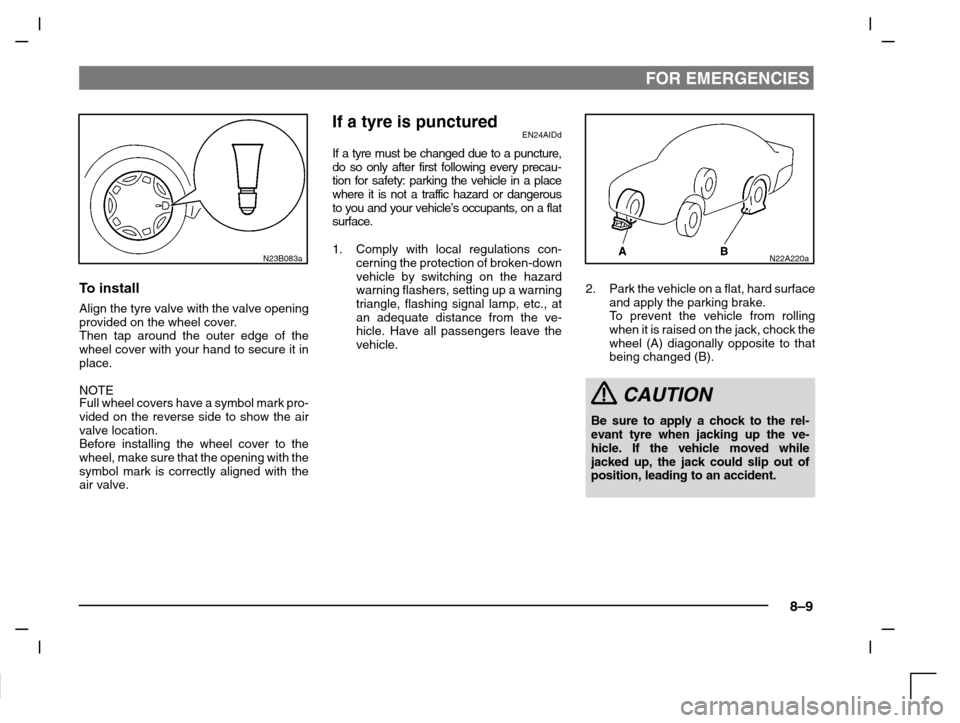
To install
Align the tyre valve with the valve opening
provided on the wheel cover.
Then tap around the outer edge of the
wheel cover with your hand to secure it in
place.
NOTE
Full wheel covers have a symbol mark pro-
vided on the reverse side to show the air
valve location.
Before installing the wheel cover to the
wheel, make sure that the opening with the
symbol mark is correctly aligned with the
air valve.
If a tyre is puncturedEN24AIDd
If a tyre must be changed due to a puncture,
do so only after first following every precau-
tion for safety: parking the vehicle in a place
where it is not a traffic hazard or dangerous
to you and your vehicle’s occupants, on a flat
surface.
1. Comply with local regulations con-
cerning the protection of broken-down
vehicle by switching on the hazard
warning flashers, setting up a warning
triangle, flashing signal lamp, etc., at
an adequate distance from the ve-
hicle. Have all passengers leave the
vehicle.
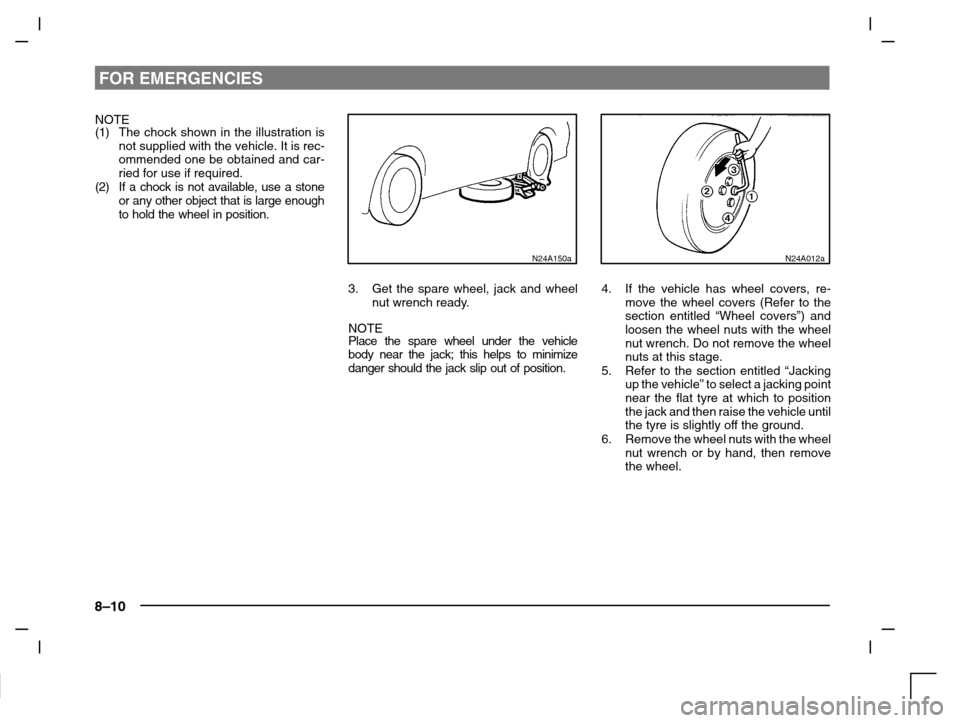
N22A220a
2. Park the vehicle on a flat, hard surface
and apply the parking brake.
To prevent the vehicle from rolling
when it is raised on the jack, chock the
wheel (A) diagonally opposite to that
being changed (B).
CAUTION
Be sure to apply a chock to the rel-
evant tyre when jacking up the ve-
hicle. If the vehicle moved while
jacked up, the jack could slip out of
position, leading to an accident.
Page 210 of 280
FOR EMERGENCIES
8–10
NOTE
(1)The chock shown in the illustration is
not supplied with the vehicle. It is rec-
ommended one be obtained and car-
ried for use if required.
(2) If a chock is not available, use a stone
or any other object that is large enough
to hold the wheel in position.
N24A150a
3. Get the spare wheel, jack and wheel
nut wrench ready.
NOTE
Place the spare wheel under the vehicle
body near the jack; this helps to minimize
danger should the jack slip out of position.
N24A012a
4. If the vehicle has wheel covers, re-
move the wheel covers (Refer to the
section entitled “Wheel covers”) and
loosen the wheel nuts with the wheel
nut wrench. Do not remove the wheel
nuts at this stage.
5. Refer to the section entitled “Jacking
up the vehicle” to select a jacking point
near the flat tyre at which to position
the jack and then raise the vehicle until
the tyre is slightly off the ground.
6. Remove the wheel nuts with the wheel
nut wrench or by hand, then remove
the wheel.