MITSUBISHI ENDEAVOR 2004 Service Repair Manual
ENDEAVOR 2004
MITSUBISHI
MITSUBISHI
https://www.carmanualsonline.info/img/19/57105/w960_57105-0.png
MITSUBISHI ENDEAVOR 2004 Service Repair Manual
Trending: camshaft position sensor, wheel alignment, rims, TPMS, phone, radiator, transmission control
Page 3041 of 3870
YES: Replace the faulty part, then go to Step 4.
NO: Go to Step 4.
STEP 4. Retest the system.
Q: Is the malfunction eliminated?
YES: The procedure is complete.
NO: Return to Step 1 .
INSPECTION PROCEDURE 3: Body Tilting DIAGNOSIS
STEP 1. Check for weak or deteriorated bushings.
Q: Are the bushings in good condition?
YES: Go to Step 2.
NO: Replace the faulty part, then go to Step 5 .
STEP 2. Check for weak or broken springs.
Q: Are the springs in good condition?
YES: Go to Step 3.
NO: Replace the faulty part, then go to Step 5 .
STEP 3. Check the u
pp
er arms and/or lower arms and/or toe control arms
for deformity or damage.
Q: Are the upper arms and/or lower arms and/or toe control arms
deformed or damaged?
YES: Replace the faulty part, then go to Step 5 .
NO: Go to Step 4.
STEP 4. Check the trailing arms for deformity or damage.
Q: Are the trailing arms deformed or damaged?
2004 Mitsubishi Endeavor LS 2004 SUSPENSION Rear - Endeavor
Page 3042 of 3870
YES: Replace the faulty part, then go to Step 5.
NO: Go to Step 5.
STEP 5. Retest the system.
Q: Is the malfunction eliminated?
YES: The procedure is complete.
NO: Return to Step 1 .
SPECIAL TOOLS
2004 Mitsubishi Endeavor LS 2004 SUSPENSION Rear - Endeavor
Page 3043 of 3870
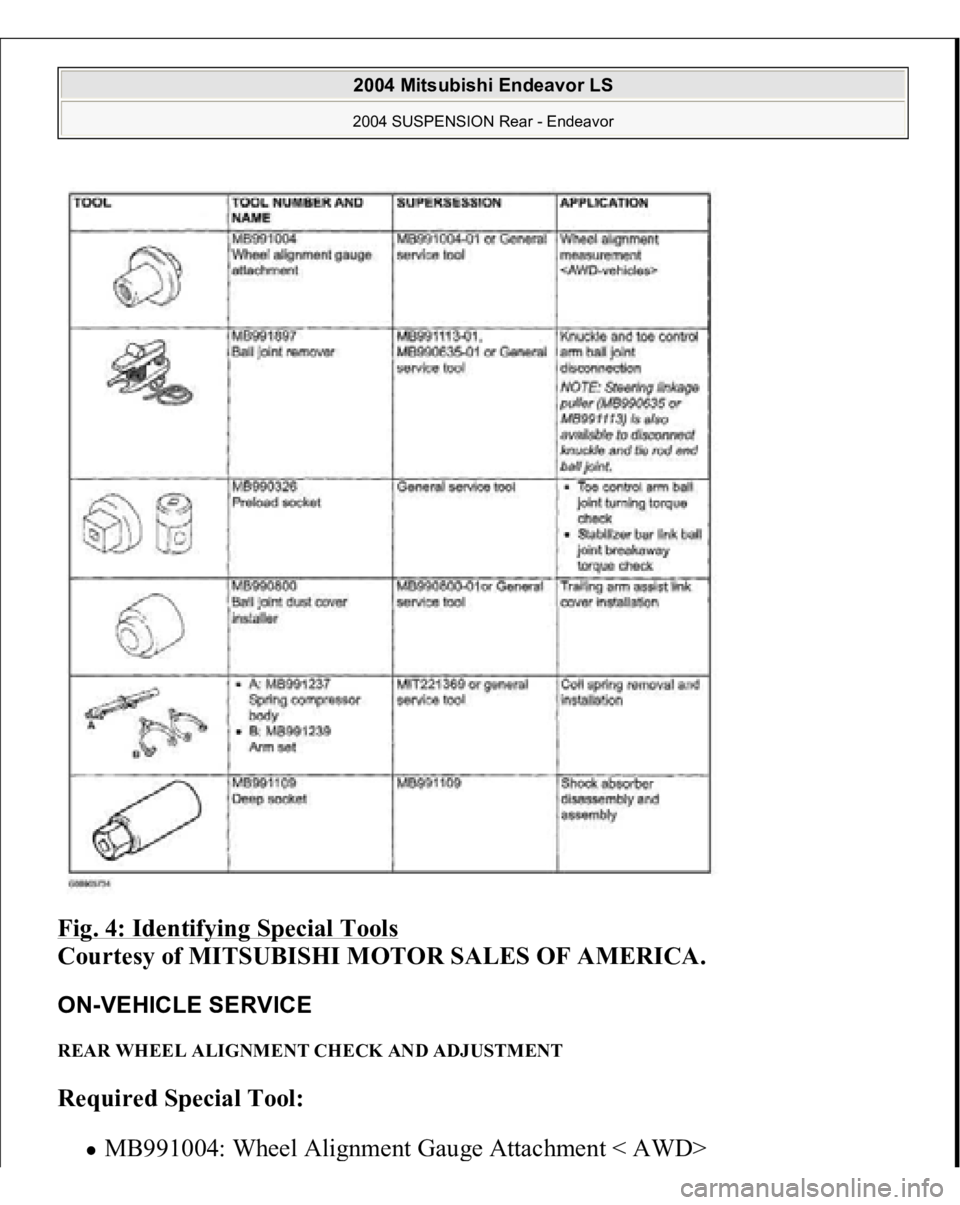
Fig. 4: Identifying Special Tools
Courtesy of MITSUBISHI MOTOR SALES OF AMERICA.
ON-VEHICLE SERVICE REAR WHEEL ALIGNMENT CHECK AND ADJUSTMENT Required Special Tool:
MB991004: Wheel Ali
gnment Gau
ge Attachment < AWD>
2004 Mitsubishi Endeavor LS 2004 SUSPENSION Rear - Endeavor
Page 3044 of 3870
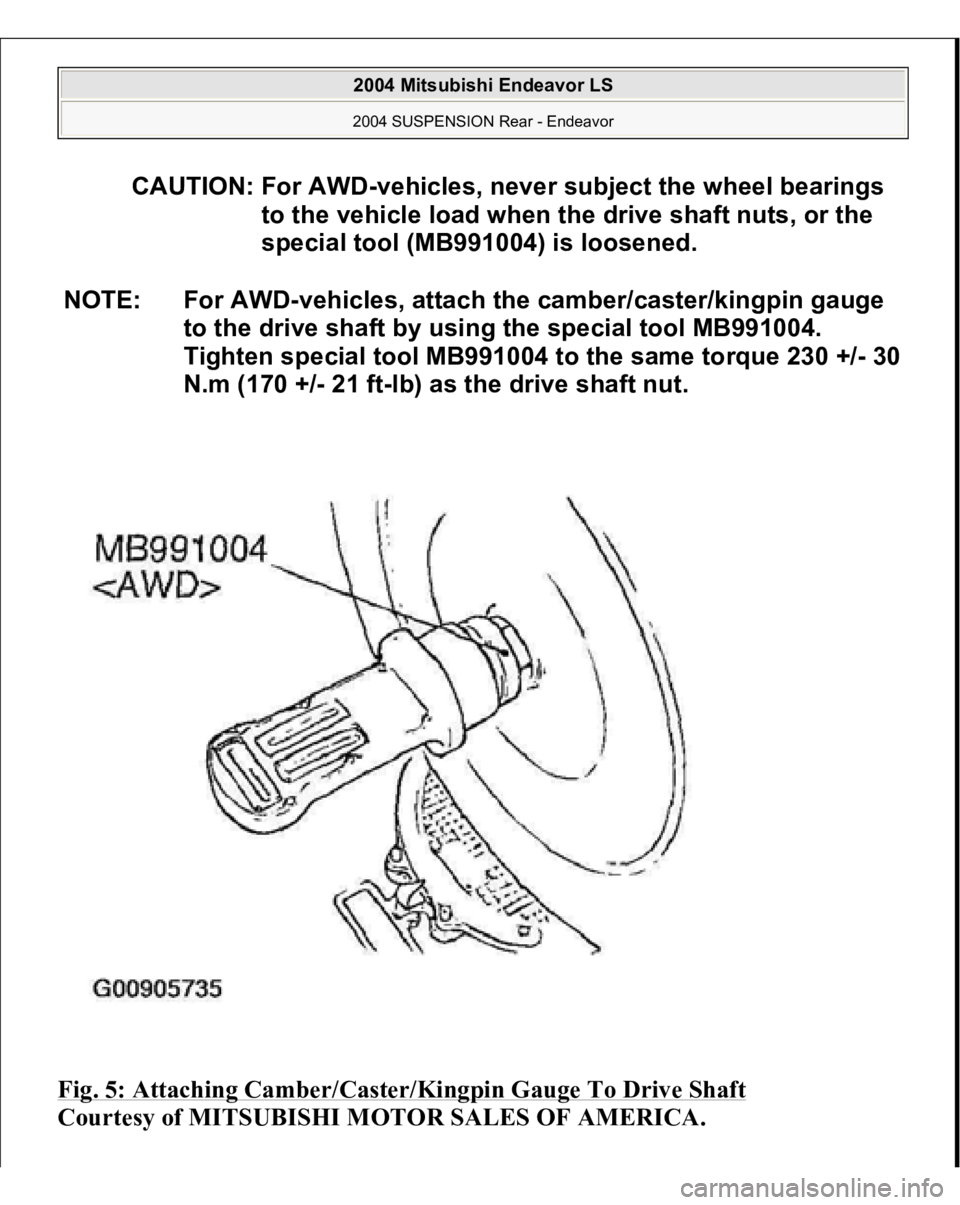
Fig. 5: Attaching Camber/Caster/Kingpin Gauge To Drive Shaft
Courtesy of MITSUBISHI MOTOR SALES OF AMERICA.
CAUTION: For AWD-vehicles, never subject the wheel bearings
to the vehicle load when the drive shaft nuts, or the
special tool (MB991004) is loosened.
NOTE: For AWD-vehicles, attach the camber/caster/kingpin gauge
to the drive shaft by using the special tool MB991004.
Tighten special tool MB991004 to the same torque 230 +/- 30
N.m (170 +/- 21 ft-lb) as the drive shaft nut.
2004 Mitsubishi Endeavor LS 2004 SUSPENSION Rear - Endeavor
Page 3045 of 3870
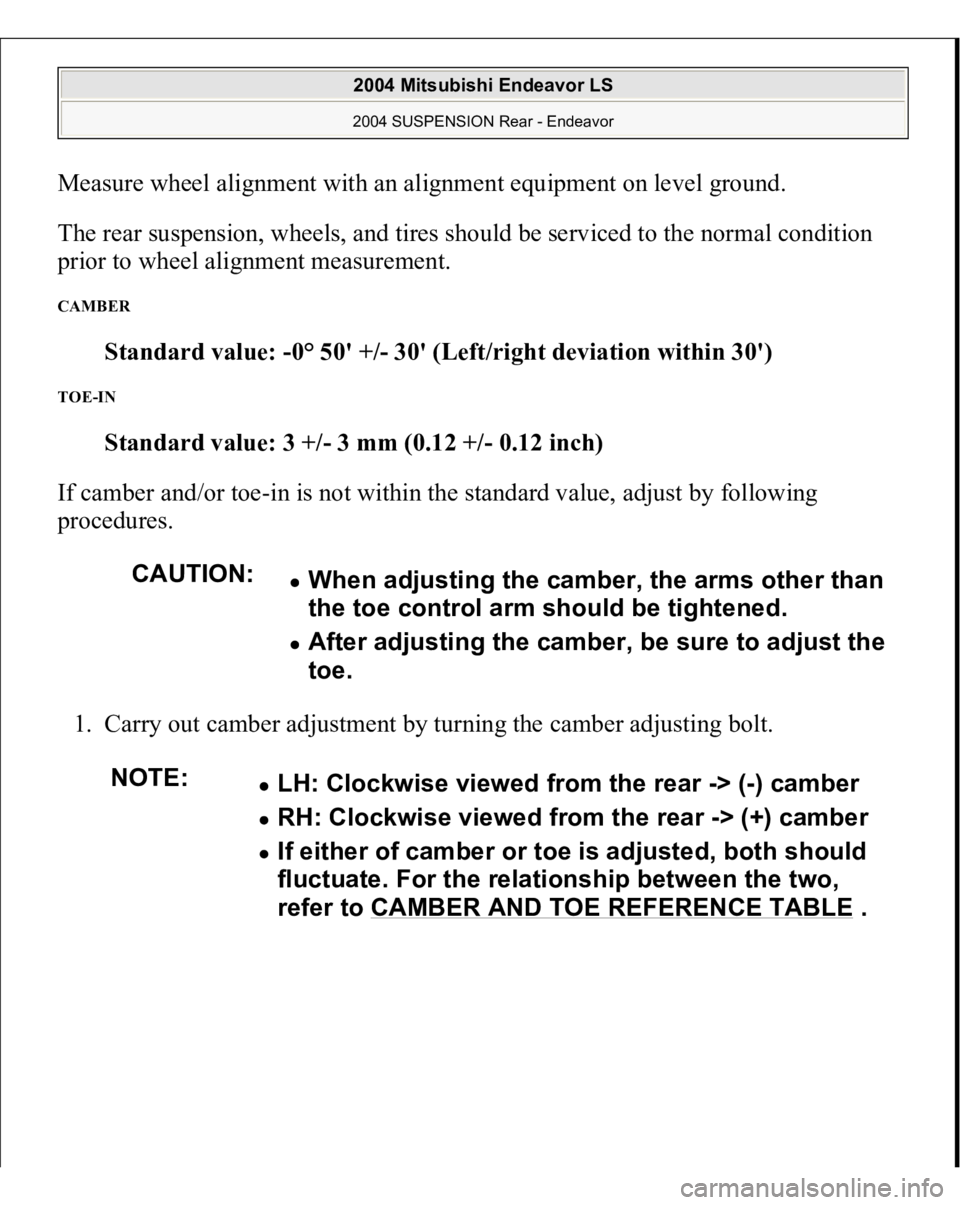
Measure wheel alignment with an alignment equipment on level ground.
The rear suspension, wheels, and tires should be serviced to the normal condition
prior to wheel alignment measurement. CAMBER
Standard value: -0° 50' +/- 30' (Left/right deviation within 30')
TOE-IN
Standard value: 3 +/- 3 mm (0.12 +/- 0.12 inch)
If camber and/or toe-in is not within the standard value, adjust by following
procedures.
1. Carry out camber adjustment by turning the camber adjusting bolt.
CAUTION:
When adjusting the camber, the arms other than
the toe control arm should be tightened. After adjusting the camber, be sure to adjust the
toe.
NOTE:
LH: Clockwise viewed from the rear -> (-) camber RH: Clockwise viewed from the rear -> (+) camber If either of camber or toe is adjusted, both should
fluctuate. For the relationship between the two,
refer to CAMBER AND TOE REFERENCE TABLE
.
2004 Mitsubishi Endeavor LS 2004 SUSPENSION Rear - Endeavor
Page 3046 of 3870
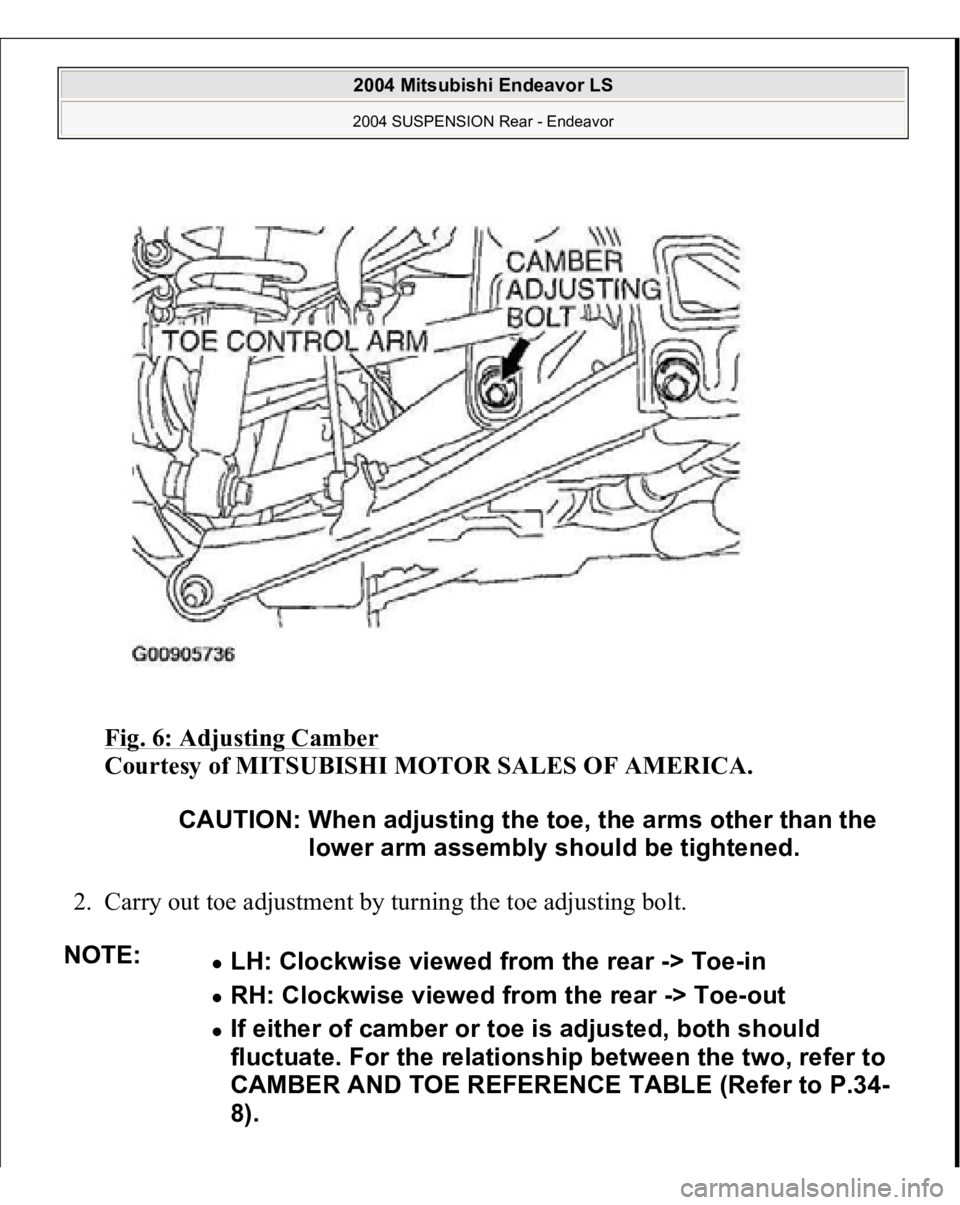
Fig. 6: Adjusting Camber
Courtesy of MITSUBISHI MOTOR SALES OF AMERICA.
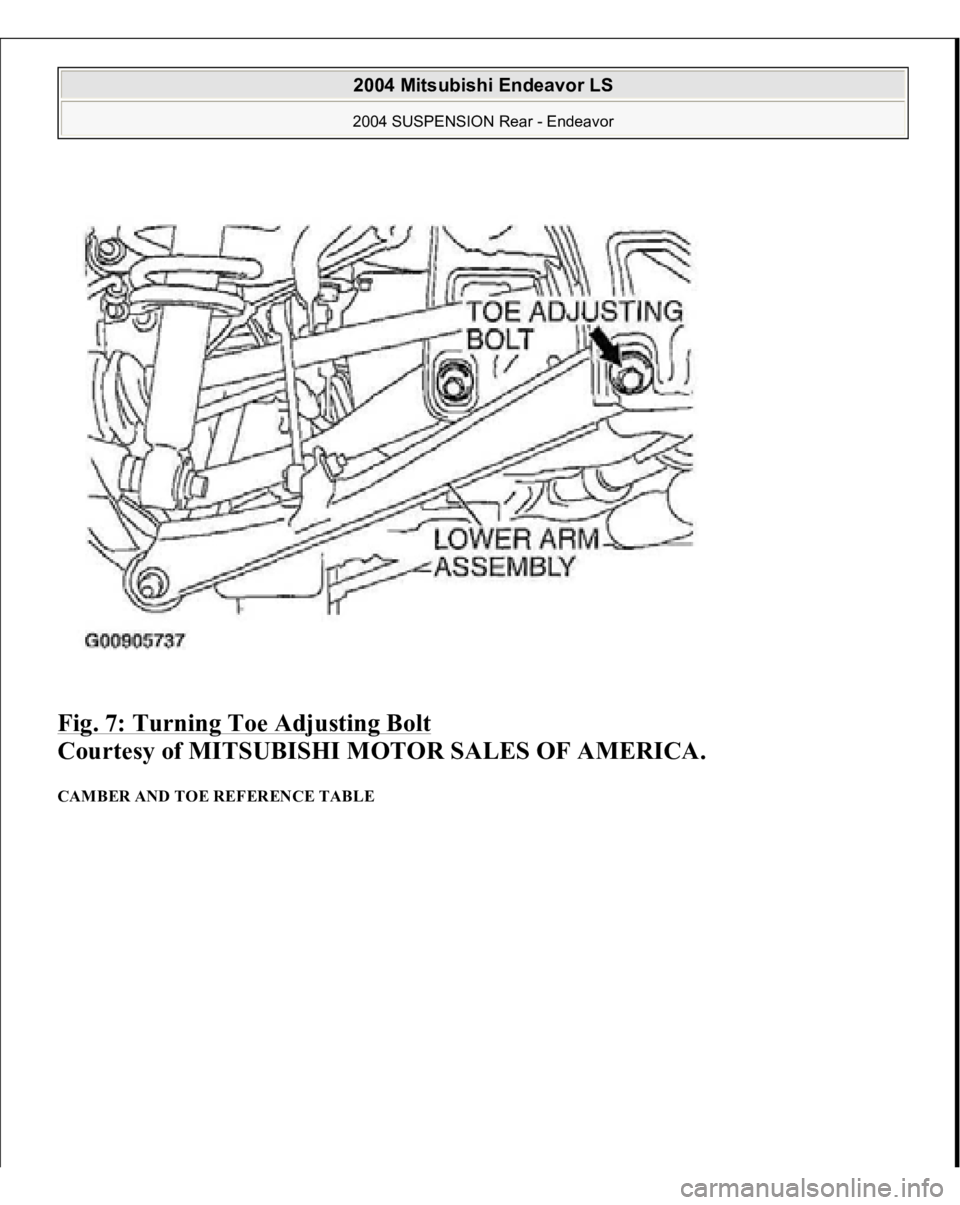
2. Carry out toe adjustment by turning the toe adjusting bolt.
CAUTION: When adjusting the toe, the arms other than the
lower arm assembly should be tightened.
NOTE:
LH: Clockwise viewed from the rear -> Toe-in RH: Clockwise viewed from the rear -> Toe-out If either of camber or toe is adjusted, both should
fluctuate. For the relationship between the two, refer to
CAMBER AND TOE REFERENCE TABLE (Refer to P.34-
8).
2004 Mitsubishi Endeavor LS 2004 SUSPENSION Rear - Endeavor
Page 3047 of 3870
Fig. 7: Turning Toe Adjusting Bolt
Courtesy of MITSUBISHI MOTOR SALES OF AMERICA.
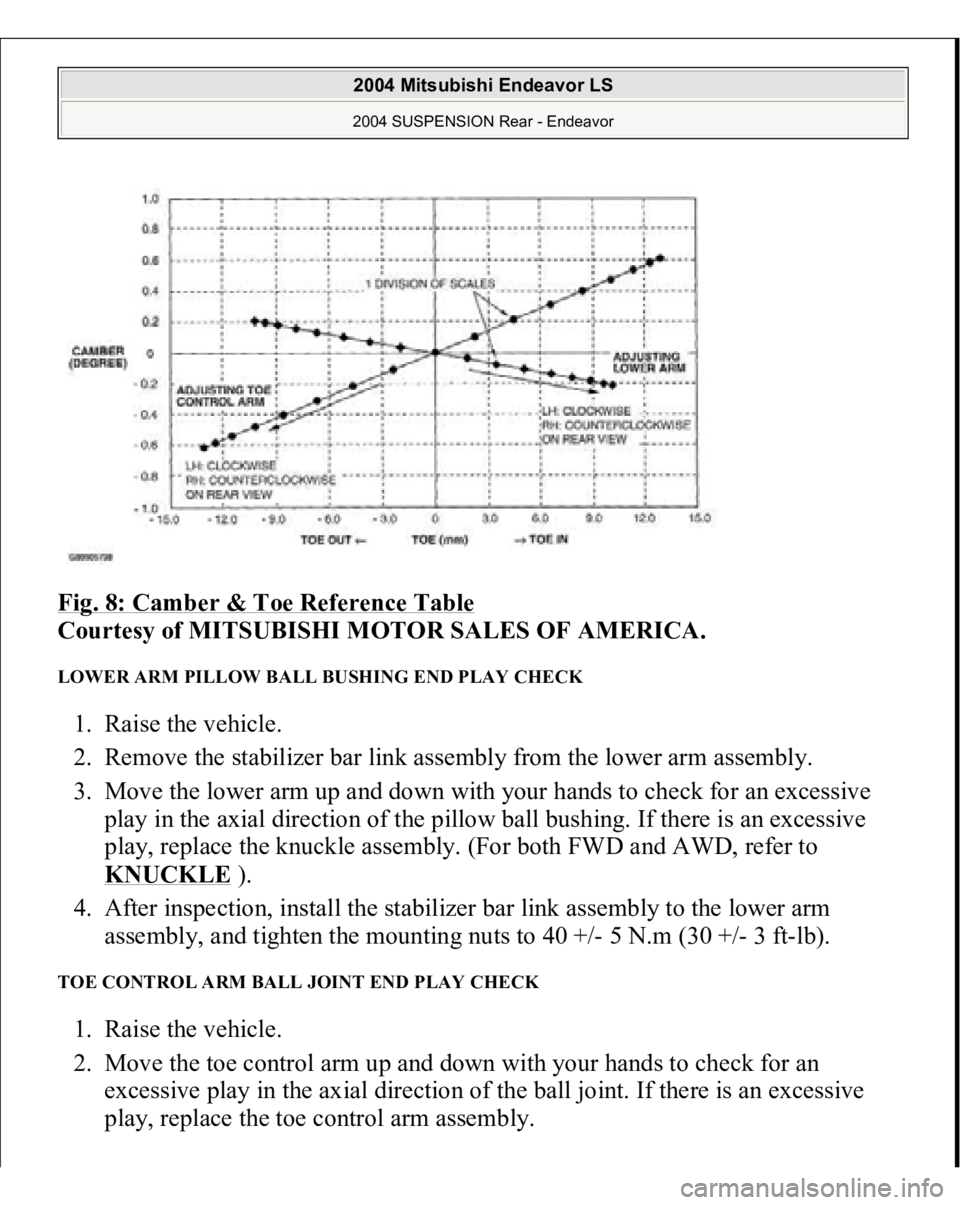
CAMBER AND TOE REFERENCE TABLE
2004 Mitsubishi Endeavor LS 2004 SUSPENSION Rear - Endeavor
Page 3048 of 3870
Fig. 8: Camber & Toe Reference Table
Courtesy of MITSUBISHI MOTOR SALES OF AMERICA.
LOWER ARM PILLOW BALL BUSHING END PLAY CHECK 1. Raise the vehicle.
2. Remove the stabilizer bar link assembly from the lower arm assembly.
3. Move the lower arm up and down with your hands to check for an excessive
play in the axial direction of the pillow ball bushing. If there is an excessive
play, replace the knuckle assembly. (For both FWD and AWD, refer to
KNUCKLE
).
4. After inspection, install the stabilizer bar link assembly to the lower arm
assembly, and tighten the mounting nuts to 40 +/- 5 N.m (30 +/- 3 ft-lb).
TOE CONTROL ARM BALL JOINT END PLAY CHECK 1. Raise the vehicle.
2. Move the toe control arm up and down with your hands to check for an
excessive play in the axial direction of the ball joint. If there is an excessive
play, replace the toe control arm assembly.
2004 Mitsubishi Endeavor LS 2004 SUSPENSION Rear - Endeavor
Page 3049 of 3870
BALL JOINT DUST COVER INSPECTIONCheck the toe control arm assembly and the stabilizer bar link assembly ball joint
dust cover as follows.
1. Check dust covers for cracks or damage by pushing it with your finger.
2. If a dust cover is cracked or damaged, replace the toe control arm assembly or
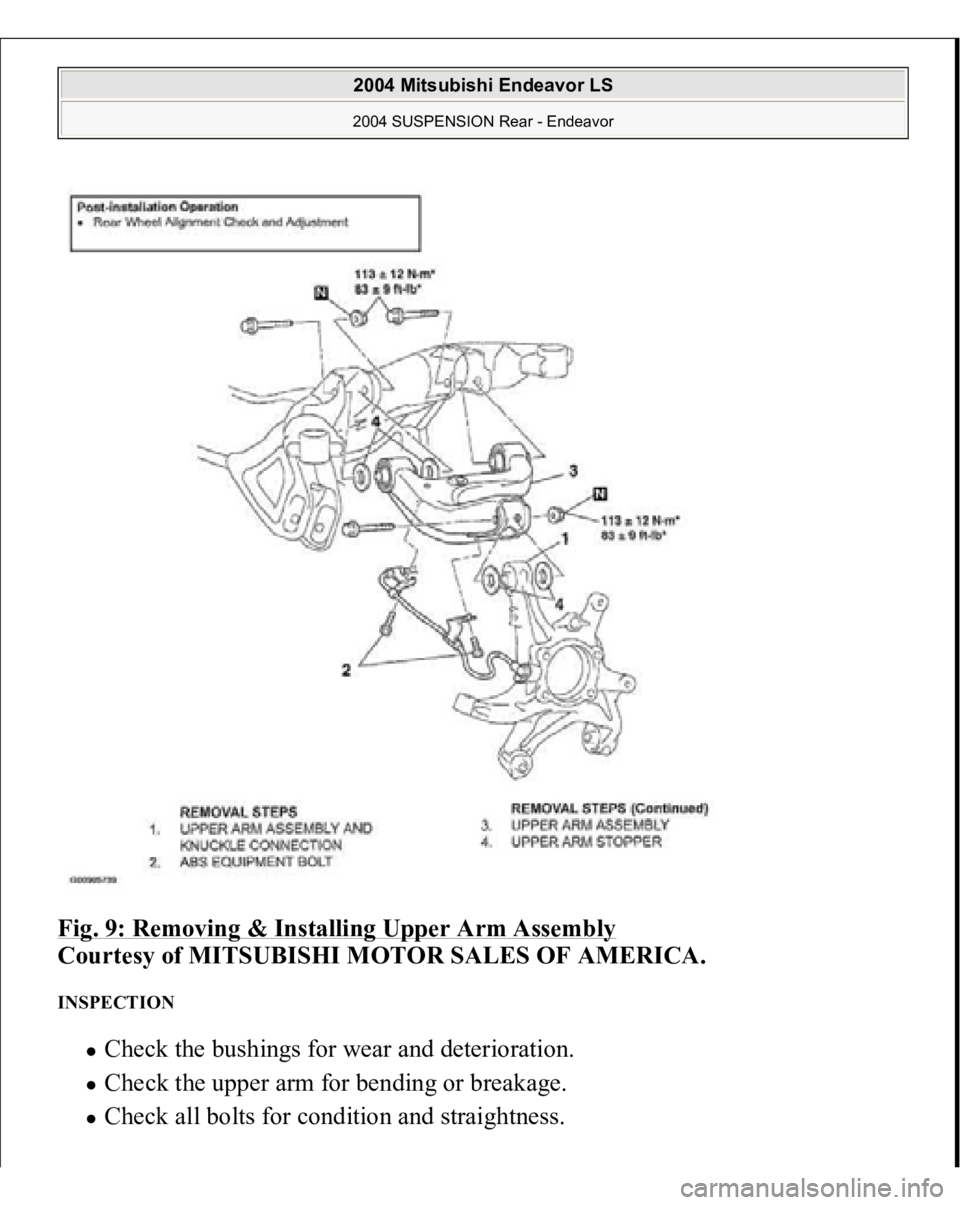
the stabilizer bar link assembly. UPPER ARM ASSEMBLY REMOVAL AND INSTALLATION
NOTE: Cracks or damage to the dust cover may cause damage
to the ball joint.
CAUTION: *: Indicates parts which should be temporarily
tightened, and then fully tightened with the vehicle
on the ground in an unladen condition.
2004 Mitsubishi Endeavor LS 2004 SUSPENSION Rear - Endeavor
Page 3050 of 3870
Fig. 9: Removing & Installing Upper Arm Assembly
Courtesy of MITSUBISHI MOTOR SALES OF AMERICA.
INSPECTION
Check the bushings for wear and deterioration. Check the upper arm for bending or breakage. Check all bolts for condition and straightness.
2004 Mitsubishi Endeavor LS 2004 SUSPENSION Rear - Endeavor
Trending: cover, TROUBLESHOOTING - COMMUNICATION ERROR ON DISPLAY, Anchor, battery output, warning, Hub, coolant
