MITSUBISHI GALANT 1989 Service Repair Manual
Manufacturer: MITSUBISHI, Model Year: 1989, Model line: GALANT, Model: MITSUBISHI GALANT 1989Pages: 1273, PDF Size: 37.62 MB
Page 251 of 1273
FUEL SYSTEM
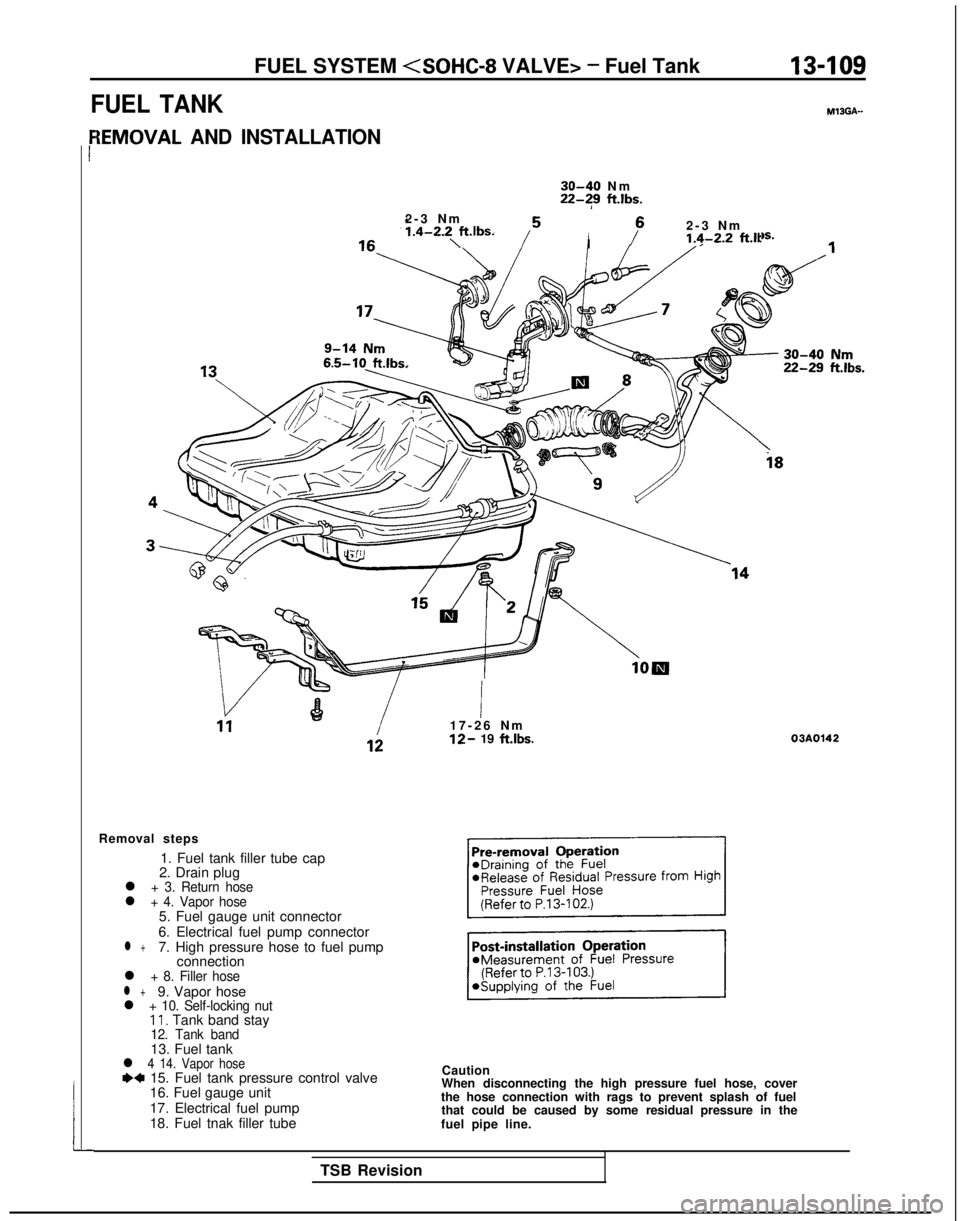
FUEL TANK MlSGA-
{EMOVAL AND INSTALLATION
r
30-40 N
m
22-?9
ft.lbs.
2-3 Nm
1.4-2.2,ft.lbs.IP
2-3 N
m
1.4-2.2 f-Lit
6.5-10
ft.lbs.
!I17-26 N
m
12- 19
ft.lbs.
Removal steps 1. Fuel tank filler tube cap
2. Drain plug
l + 3. Return hosel + 4. Vapor hose5. Fuel gauge unit connector
6. Electrical fuel pump connector
l +7. High pressure hose to fuel pump connection
l + 8. Filler hosel +9. Vapor hosel + 10. Self-locking nut11, Tank band stay12. Tank band13. Fuel tankl 4 14. Vapor hosee+ 15. Fuel tank pressure control valve
16. Fuel gauge unit
17. Electrical fuel pump
18. Fuel tnak filler tube
i8
03A0142
Caution
When disconnecting the high pressure fuel hose, cover
the hose connection with rags to prevent splash of fuel that could be caused by some residual pressure in the
fuel pipe line.
TSB Revision
Page 252 of 1273
Fuel tank pressurecontrol valve
Rubber hose
n-110FUEL SYSTEM
INSPECTIONMl3GCAI
l Check the hoses and the pipes for crack or damage.
lCheck the fuel tank filler tube cap for malfunction.
lCheck the fuel tank for deformation, corrosion or crack.
l Check the fuel tank for dust or foreign material.
NOTE
If the inside of the fuel tank is to be cleaned, use any one
of the following:
(1) Kerosene
(2) Trichloroethylene
(3) A neutral emulsion type detergent
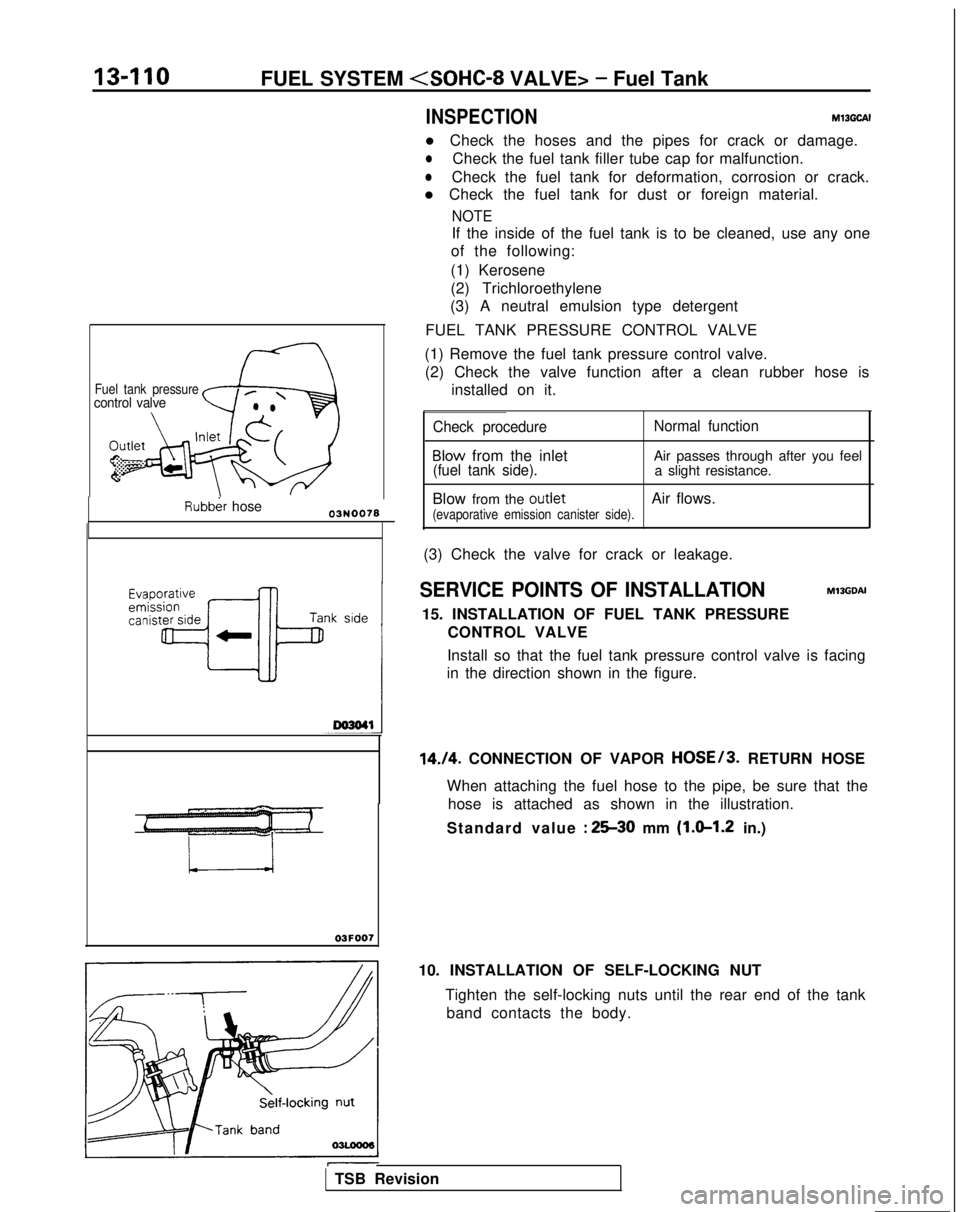
FUEL TANK PRESSURE CONTROL VALVE
(1) Remove the fuel tank pressure control valve. (2) Check the valve function after a clean rubber hose is installed on it.
Check procedure Normal function
Blow from the inlet
Air passes through after you feel(fuel tank side).a slight resistance.
Blow from the
outletAir flows.(evaporative emission canister side).
(3) Check the valve for crack or leakage.
SERVICE POINTS OF INSTALLATIONM13GDAI
15. INSTALLATION OF FUEL TANK PRESSURE CONTROL VALVE
Install so that the fuel tank pressure control valve is facing
in the direction shown in the figure.
14./4. CONNECTION OF VAPOR HOSE/3. RETURN HOSE
When attaching the fuel hose to the pipe, be sure that the hose is attached as shown in the illustration.
Standard value
: 2530 mm (l.sl.2 in.)
03F007
10. INSTALLATION OF SELF-LOCKING NUT
Tighten the self-locking nuts until the rear end of the tankband contacts the body.
TSB Revision
Page 253 of 1273
FUEL SYSTEM
03R0297
Vapor hose
mmin.)Fillerhose
i2.l
B
3FOO7
A
1
Flare nut
Skure side
03Yo43
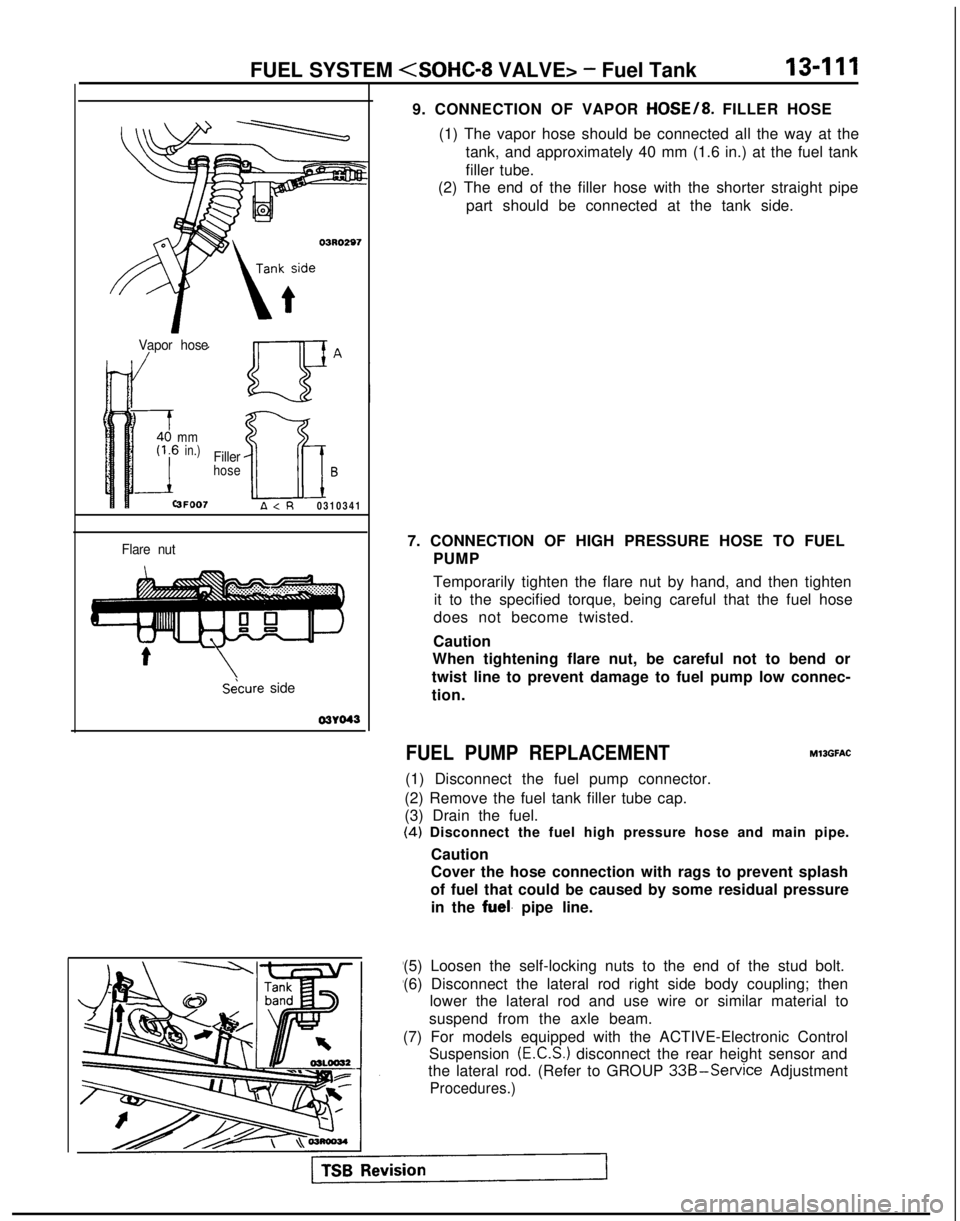
9. CONNECTION OF VAPOR HOSE/8. FILLER HOSE
(1) The vapor hose should be connected all the way at the tank, and approximately 40 mm (1.6 in.) at the fuel tank
filler tube.
(2) The end of the filler hose with the shorter straight pipe
part should be connected at the tank side.
7. CONNECTION OF HIGH PRESSURE HOSE TO FUEL PUMP
Temporarily tighten the flare nut by hand, and then tightenit to the specified torque, being careful that the fuel hose
does not become twisted.
Caution
When tightening flare nut, be careful not to bend or
twist line to prevent damage to fuel pump low connec-
tion.
FUEL PUMP REPLACEMENT
(1) Disconnect the fuel pump connector.
(2) Remove the fuel tank filler tube cap.
(3) Drain the fuel. MllGFAC
(4)
Disconnect the fuel high pressure hose and main pipe.
Caution
Cover the hose connection with rags to prevent splash
of fuel that could be caused by some residual pressure in the
fuel. pipe line.
(5) Loosen the self-locking nuts to the end of the stud bolt.
(6) Disconnect the lateral rod right side body coupling; then lower the lateral rod and use wire or similar material to
suspend from the axle beam.
(7) For models equipped with the ACTIVE-Electronic Control Suspension
(E.C.S.) disconnect the rear height sensor and
the lateral rod. (Refer to GROUP
33B-Service Adjustment
Procedures.)
Page 254 of 1273
13-112FUEL SYSTEM
03L0018
QcD ua .
CFa
cc
0c aa0u0aa
Positioning projection
03L0009
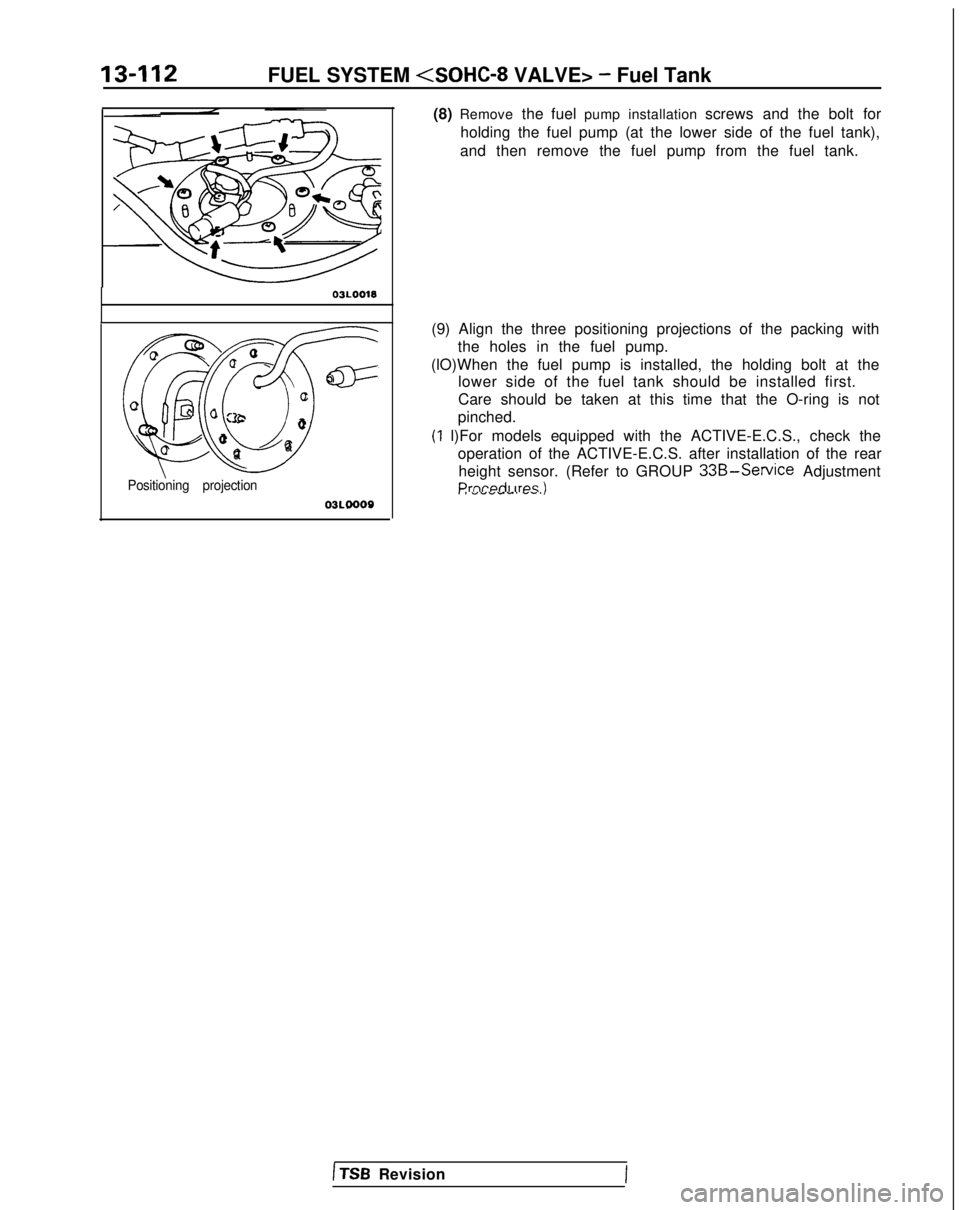
(8) Remove
the fuel pump installation screws and the bolt for
holding the fuel pump (at the lower side of the fuel tank),
and then remove the fuel pump from the fuel tank.
(9) Align the three positioning projections of the packing with the holes in the fuel pump.
(lO)When the fuel pump is installed, the holding bolt at the lower side of the fuel tank should be installed first.
Care should be taken at this time that the O-ring is not
pinched.
(1 l)For models equipped with the ACTIVE-E.C.S., check the operation of the ACTIVE-E.C.S. after installation of the rearheight sensor. (Refer to GROUP
33B-Service AdjustmentPrnrwiI irps II I ““VW-. W.S.,
1 TSB Revision
Page 255 of 1273
FUEL SYSTEM (SOHC-8 VALVE> - Fuel Line and VaDor Line13-l 13
FUEL LINE
AND
VAPOR LINE
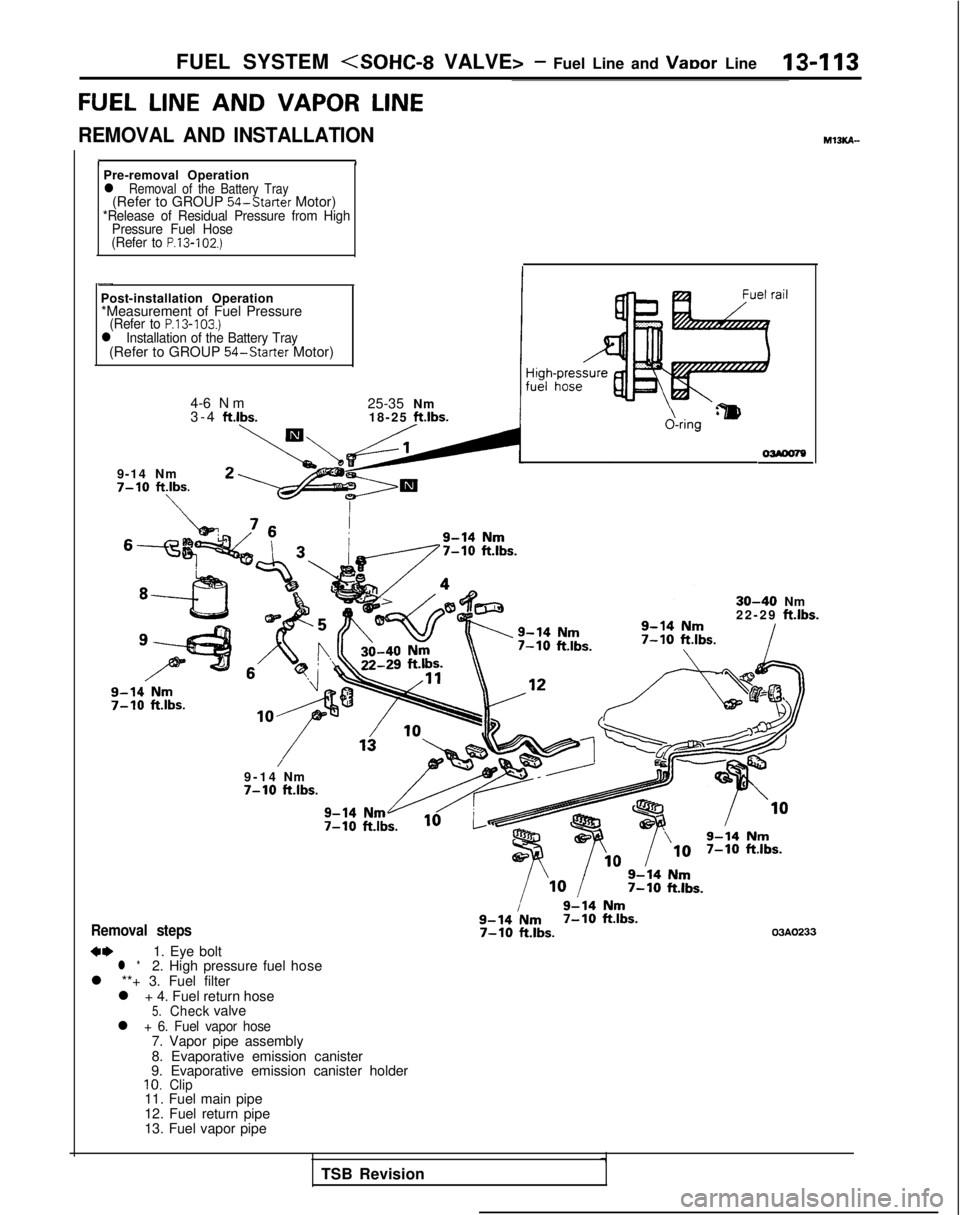
REMOVAL AND INSTALLATION M13KA-
IIPre-removal Operationl Removal of the Battery Tray(Refer to GROUP
54-Starter
Motor)*Release of Residual Pressure from High
Pressure Fuel Hose
(Refer to
P.13-102.)
-
Post-installation Operation *Measurement of Fuel Pressure
(Refer to P.13-103.)l Installation of the Battery Tray(Refer to GROUP 54-Starter
Motor)
4-6 Nm
3-4 ft.lbs.
25-35 Nm
18-25
ftlbs.
9-14 Nm7-10 ftlbs.
\
&ring‘lm
30-40Nm
22-2
9
ft.lbs.
9-1
4
Nm
7-10klbs.
Removal steps
**1. Eye boltl *2. High pressure fuel hose
l **+ 3. Fuel filter l + 4. Fuel return hose
5.Checkvalvel + 6. Fuel vapor hose7. Vapor pipe assembly
8. Evaporative emission canister
9. Evaporative emission canister holder
10.Clip11. Fuel main pipe
12. Fuel return pipe
13. Fuel vapor pipe
7-10 ft.lbs.03AO233
TSB Revision
Page 256 of 1273
13-114FUEL SYSTEM
SERVICE POINTS OF REMOVAL
MlIKBAM
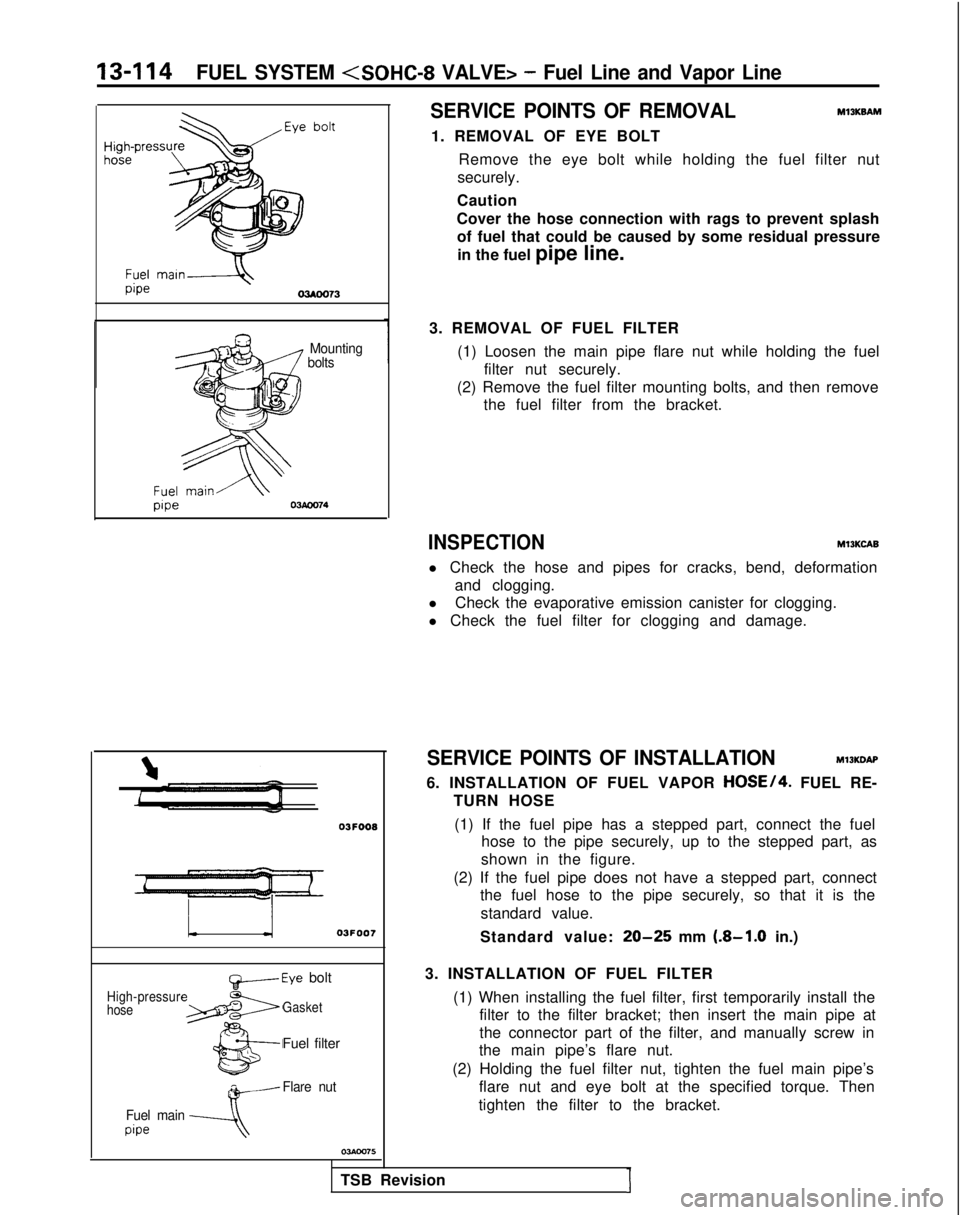
1. REMOVAL OF EYE BOLT Remove the eye bolt while holding the fuel filter nut
securely.
Caution
Cover the hose connection with rags to prevent splash of fuel that could be caused by some residual pressure
in the fuel pipe line.
I Mounting bolts
1
OJFOOB
L03FOO7
High-pressur
hose
~-Eye bolt
Gasket
Fuel filter
w-Flare nut
Fuel main
pipe---A
3. REMOVAL OF FUEL FILTER (1) Loosen the main pipe flare nut while holding the fuelfilter nut securely.
(2) Remove the fuel filter mounting bolts, and then remove the fuel filter from the bracket.
INSPECTIONM13KCAB
l Check the hose and pipes for cracks, bend, deformation
and clogging.
l Check the evaporative emission canister for clogging.
l Check the fuel filter for clogging and damage.
TSB Revision
I
SERVICE POINTS OF INSTALLATION Ml3KDAP
6. INSTALLATION OF FUEL VAPOR
HOSE/4. FUEL RE-
TURN HOSE
(1) If the fuel pipe has a stepped part, connect the fuel hose to the pipe securely, up to the stepped part, as
shown in the figure.
(2) If the fuel pipe does not have a stepped part, connect the fuel hose to the pipe securely, so that it is the
standard value.
Standard value:
20-25 mm (.8-1.0 in.)
3. INSTALLATION OF FUEL FILTER (1) When installing the fuel filter, first temporarily install thefilter to the filter bracket; then insert the main pipe at
the connector part of the filter, and manually screw in
the main pipe’s flare nut.
(2) Holding the fuel filter nut, tighten the fuel main pipe’s flare nut and eye bolt at the specified torque. Then
tighten the filter to the bracket.
Page 257 of 1273
FUEL SYSTEM
Higt
fuel
&ring Oi’
FUEL FILTER
REMOVAL AND INSTALLATION
~zgz&i&r” 1@Release of Residual Pressure from High
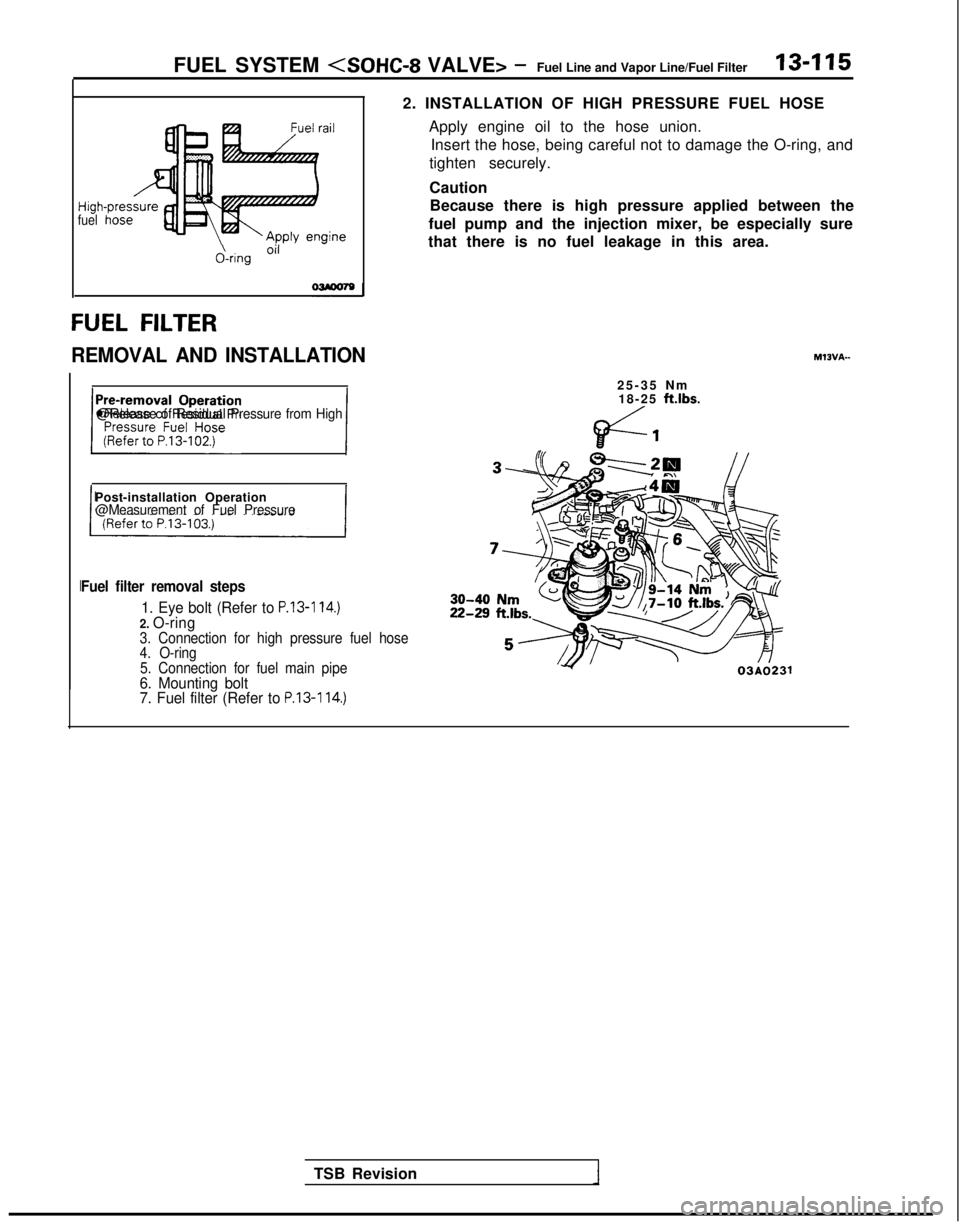
2. INSTALLATION OF HIGH PRESSURE FUEL HOSE
Apply engine oil to the hose union.Insert the hose, being careful not to damage the O-ring, and
tighten securely.
Caution Because there is high pressure applied between the
fuel pump and the injection mixer, be especially sure
that there is no fuel leakage in this area.
25-35 N
m
18-25
ft.lbs.
Post-installation Operation@Measurement of Fuel Pressure
Fuel filter removal steps
1. Eye bolt (Refer to P.13-114.)2. O-ring3. Connection for high pressure fuel hose
4. O-ring
5. Connection for fuel main pipe
6. Mounting bolt
7. Fuel filter (Refer to P.13-114.)
TSB Revision 03AO231
Page 258 of 1273
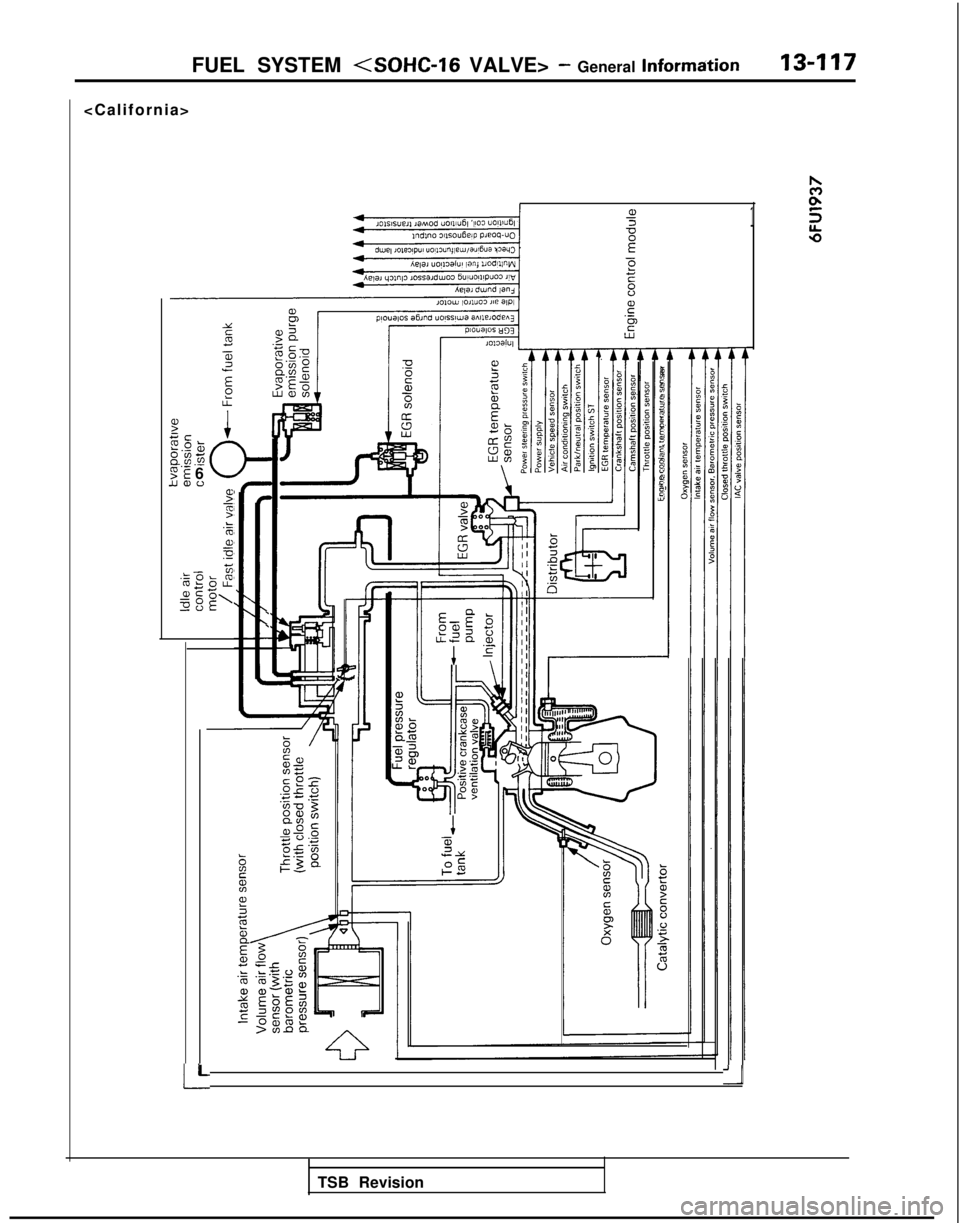
13-116FUEL SYSTEM (SOHC-16 VALVE> - General Information
FUEL SYSTEM
GENERAL INFORMATION
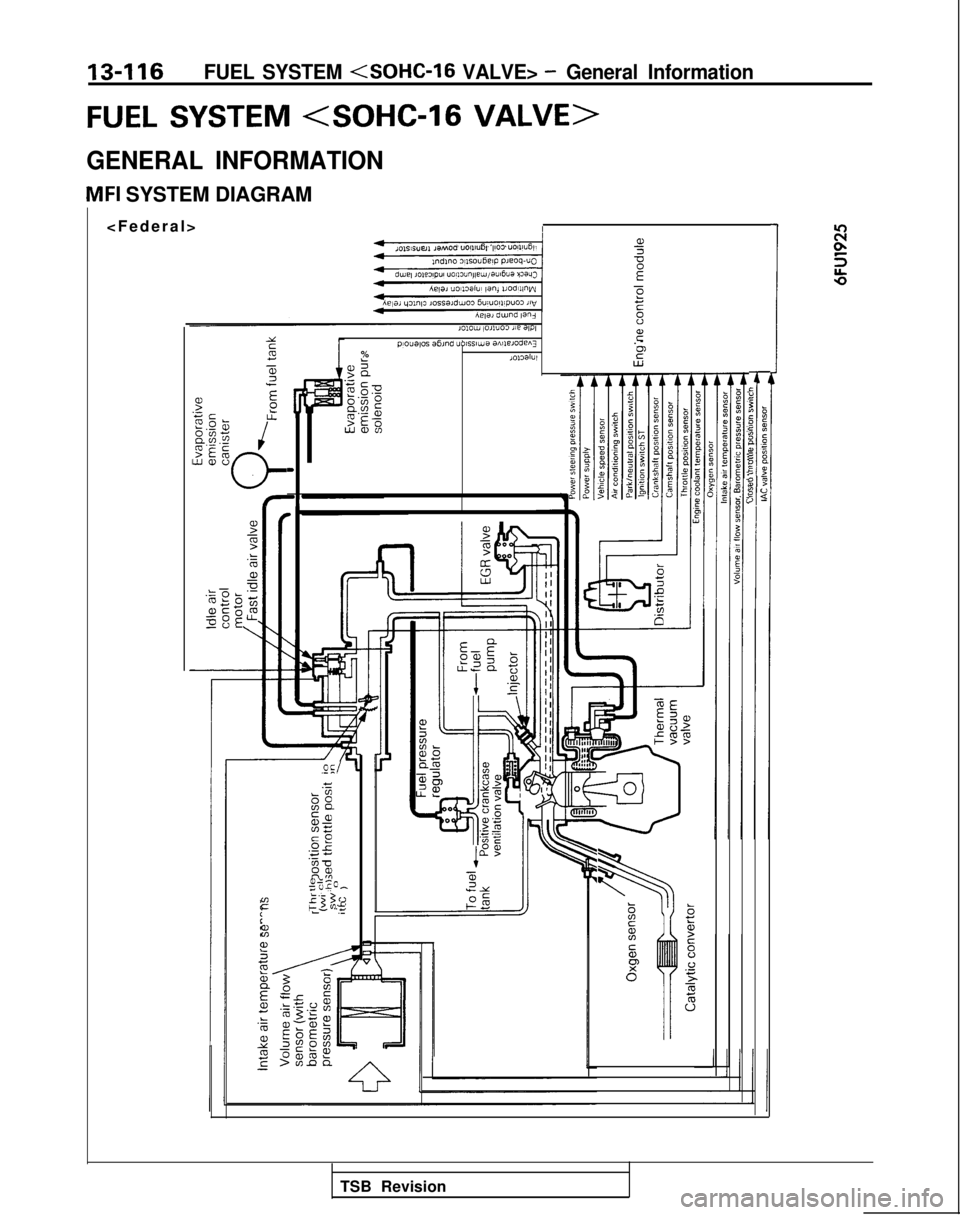
MFI SYSTEM DIAGRAM
I
101s1s”ell ,aMo* uolllu6l ‘,I03 UOll~U6l
Awli duJ”d
la”,lOlOW ,muo3 lie WI
PE
‘3 c2
F.G?25LL
Ei$.-5
?E &/wwv
LUWLO
m
I7’
PIOUB,OS a6md UOISSIW~ awaoden3E
%
.
-
w%1013alUIPw>Q
.e c/1C88conss
gE0;‘3 4-‘5 m83zz_t 0,
5
z5 .s
2 E22
2+‘0tL?
;i
5r
8$
cE%0
8 5
to60
1gx 86 :g 8:s
;
Y I: 0? a5 J21: 0,5
$1
TSB Revision
Page 259 of 1273
FUEL SYSTEM
F=c2.0GEt 2.297 6UWO2
T
.:w5
L-- t;.-OL cc
Iob_oLL
s?=o\oEE
I-L
..
aEI;?sF?5
ze65
1
‘1
TSB Revision
Page 260 of 1273
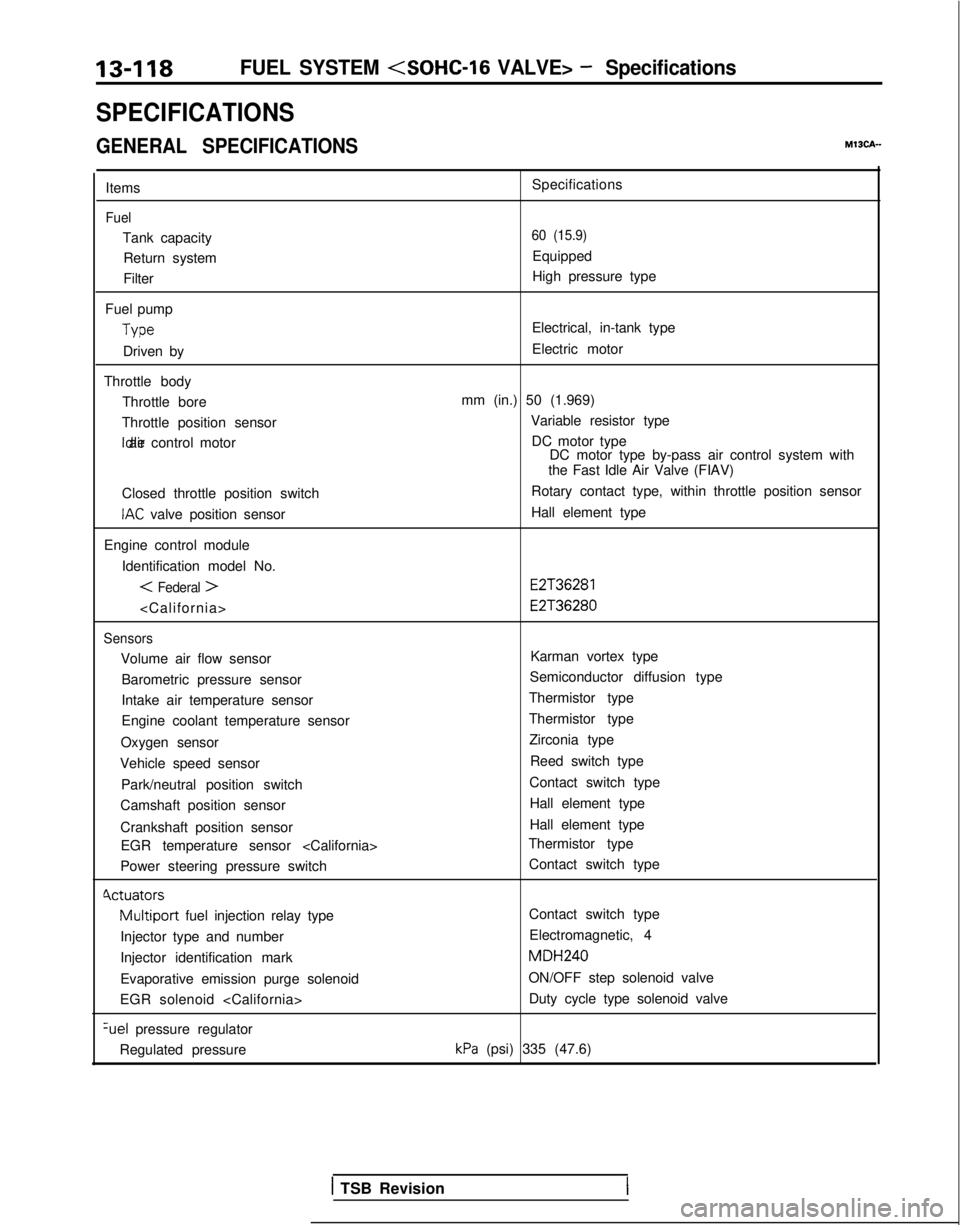
13418FUEL SYSTEM (SOHC-16 VALVE> - Specifications
SPECIFICATIONS
GENERAL SPECIFICATIONSMISCA-
Items
Fuel
Tank capacityReturn system
Filter
Fuel pump Type
Driven by
Throttle body Throttle bore
Throttle position sensor Idle air control motor
Closed throttle position switch
IAC valve position sensor
Engine control module Identification model No.
< Federal >
Sensors
Volume air flow sensorBarometric pressure sensor
Intake air temperature sensor
Engine coolant temperature sensor
Oxygen sensor
Vehicle speed sensor
Park/neutral position switch
Camshaft position sensor
Crankshaft position sensor EGR temperature sensor
Power steering pressure switch
Cvctuators
Multiport fuel injection relay type
Injector type and number
Injector identification mark
Evaporative emission purge solenoid
EGR solenoid
pressure regulator
Regulated pressure Specifications
60 (15.9)
Equipped
High pressure type
Electrical, in-tank type
Electric motor
mm (in.) 50 (1.969) Variable resistor typeDC motor type DC motor type by-pass air control system with
the Fast Idle Air Valve (FIAV)
Rotary contact type, within throttle position sensor
Hall element type
E2T36281 E2T36280
Karman vortex type
Semiconductor diffusion type
Thermistor type
Thermistor type Zirconia type
Reed switch type
Contact switch type Hall element type
Hall element type
Thermistor type
Contact switch type
Contact switch type
Electromagnetic, 4 MDH240
ON/OFF step solenoid valve Duty cycle type solenoid valve
kPa (psi) 335 (47.6)
1 TSB Revision