MITSUBISHI SPYDER 1990 Service Repair Manual
SPYDER 1990
MITSUBISHI
MITSUBISHI
https://www.carmanualsonline.info/img/19/57345/w960_57345-0.png
MITSUBISHI SPYDER 1990 Service Repair Manual
Trending: check engine light, ABS, transmission fluid, engine oil, wiper fluid, ignition, wheel torque
Page 291 of 2103
ENGINECamshaft
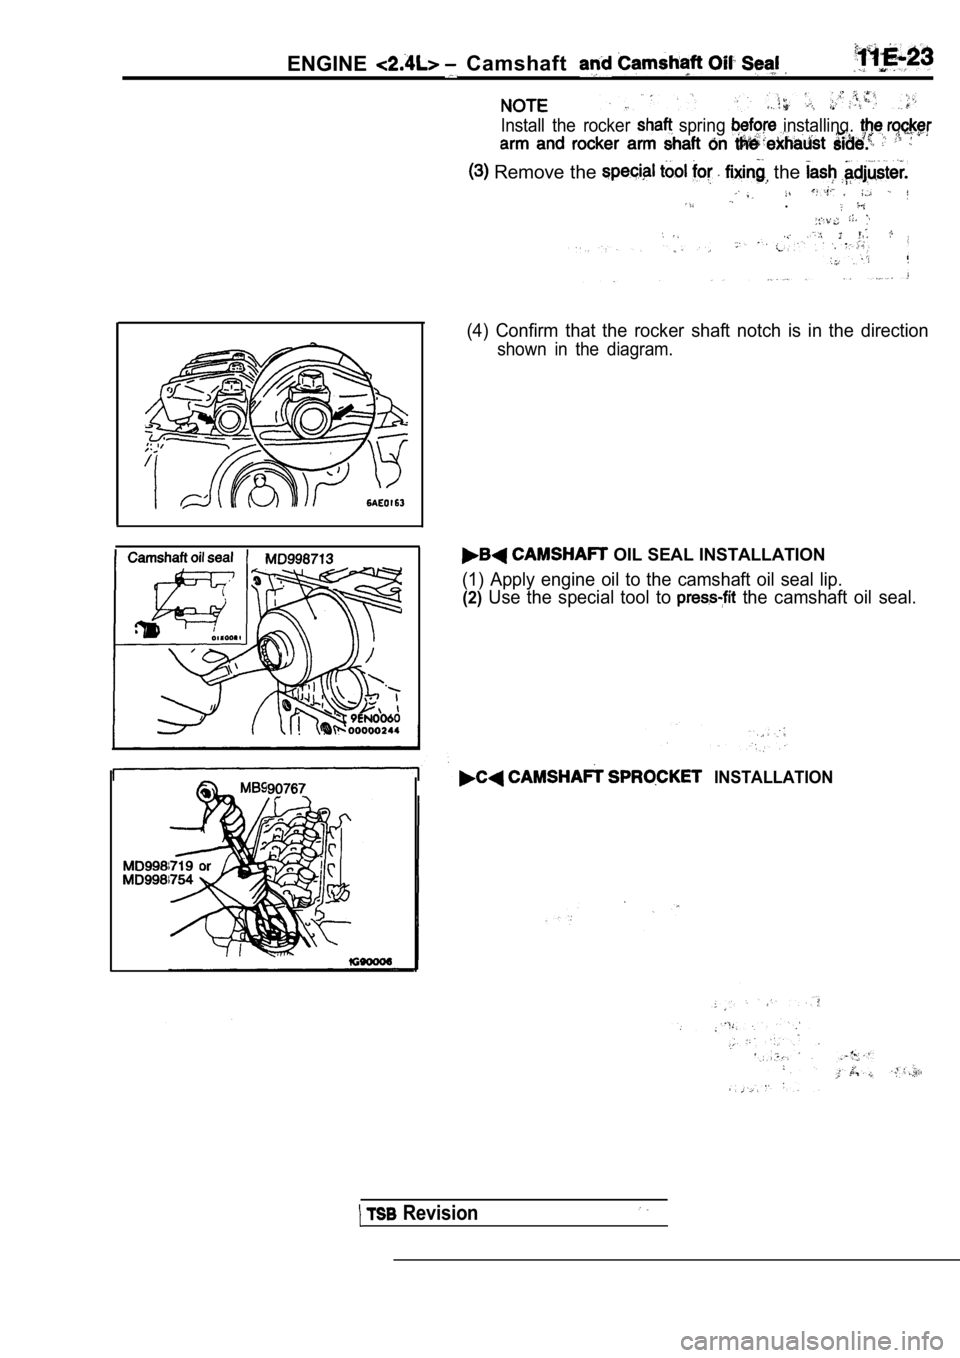
Install the rocker spring installing,
Remove the the
.
.,
(4) Confirm that the rocker shaft notch is in the direction
shown in the diagram.
OIL SEAL INSTALLATION
(1) Apply engine oil to the camshaft oil seal lip.
(2)Use the special tool to the camshaft oil seal.
INSTALLATION
Revision
Page 292 of 2103
11ENGINE Pan and Oil Screen
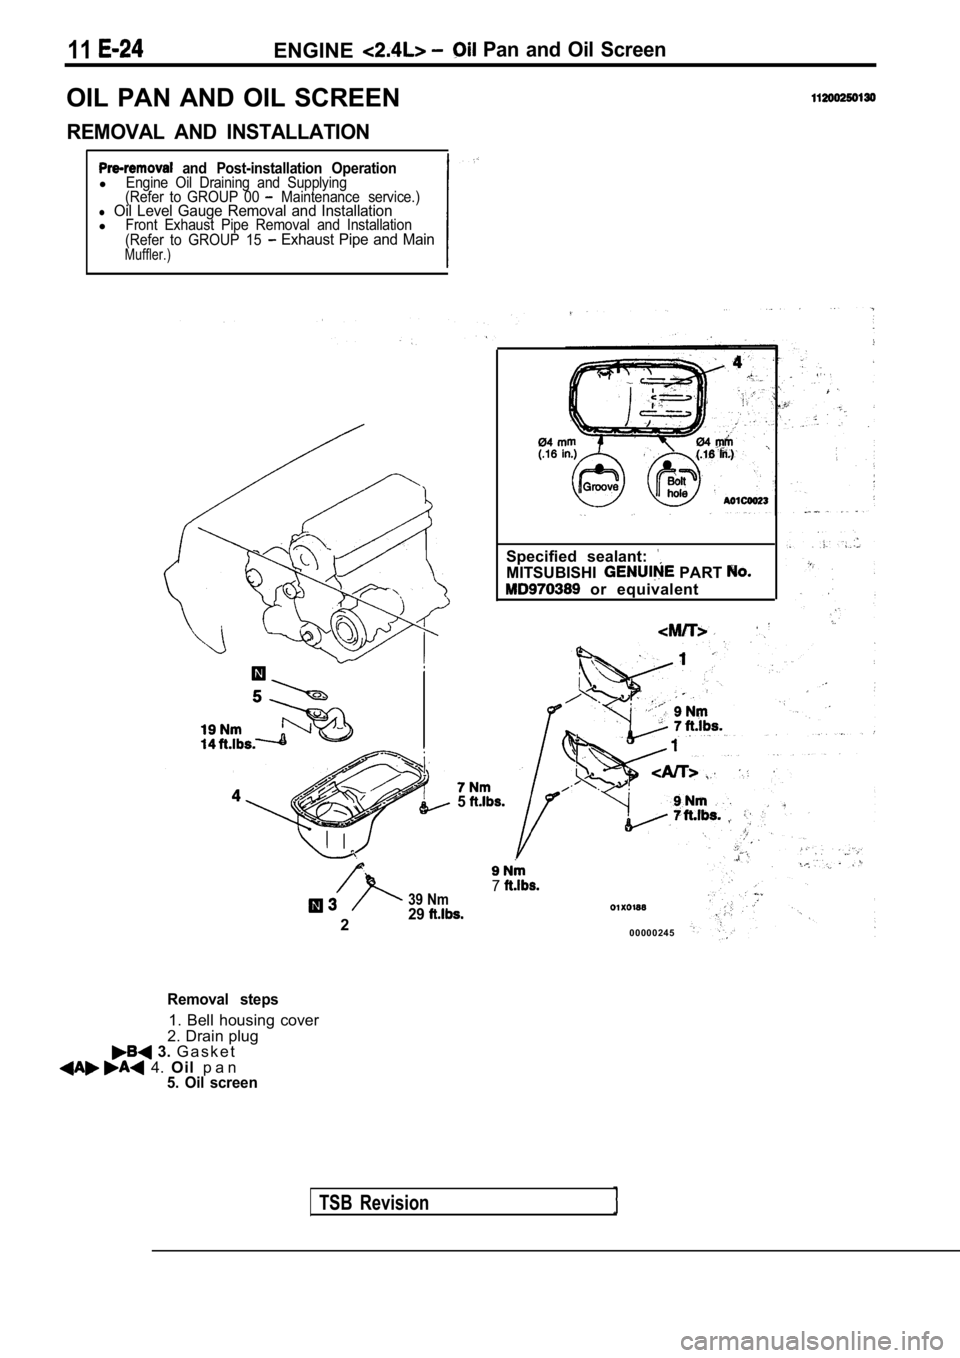
OIL PAN AND OIL SCREEN
REMOVAL AND INSTALLATION
and Post-installation OperationlEngine Oil Draining and Supplying
(Refer to GROUP 00 Maintenance service.)l Oil Level Gauge Removal and InstallationlFront Exhaust Pipe Removal and Installation
(Refer to GROUP 15 Exhaust Pipe and MainMuffler.)
TSB Revision
5
Specified sealant:
MITSUBISHI PART
or equivalent
739 Nm
229
0 0 0 0 0 2 4 5
Removal steps
1. Bell housing cover
2. Drain plug
3. G a s k e t 4. Oil p a n5. Oil screen
Page 293 of 2103
ENGINE Oil Pan and Oil
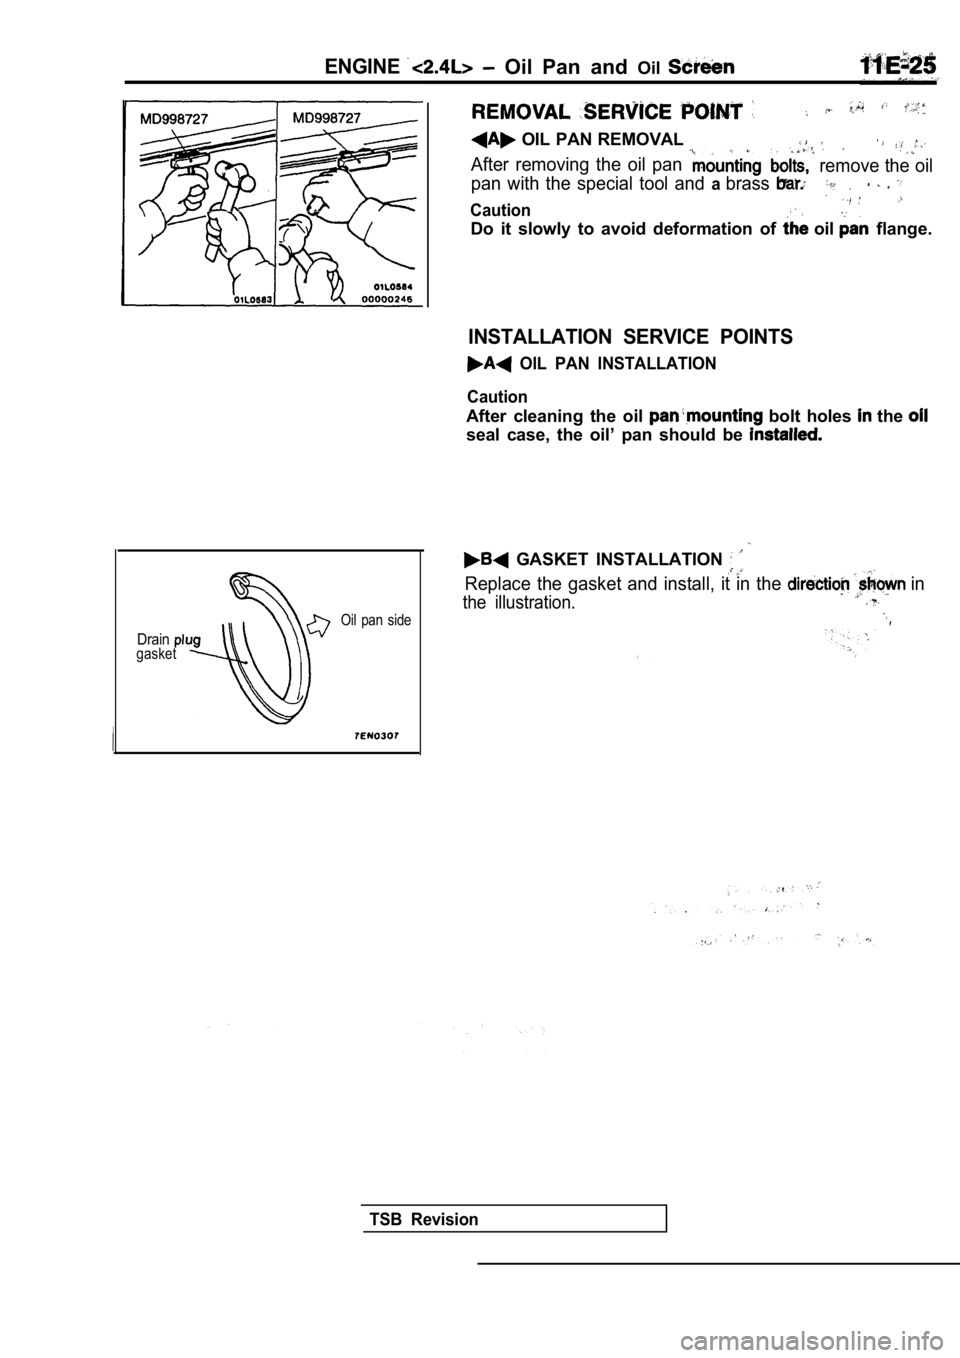
Draingasket Oil pan side
OIL PAN REMOVAL
After removing the oil pan remove the oil
pan with the special tool and
abrass
Caution
Do it slowly to avoid deformation of oil flange.
INSTALLATION SERVICE POINTS
OIL PAN INSTALLATION
Caution
After cleaning the oil bolt holes the
seal case, the oil’ pan should be
GASKET INSTALLATION
Replace the gasket and install, it in the in
the illustration.
TSB Revision
Page 294 of 2103
11ENGINE Crankshaft Front Oil Seal
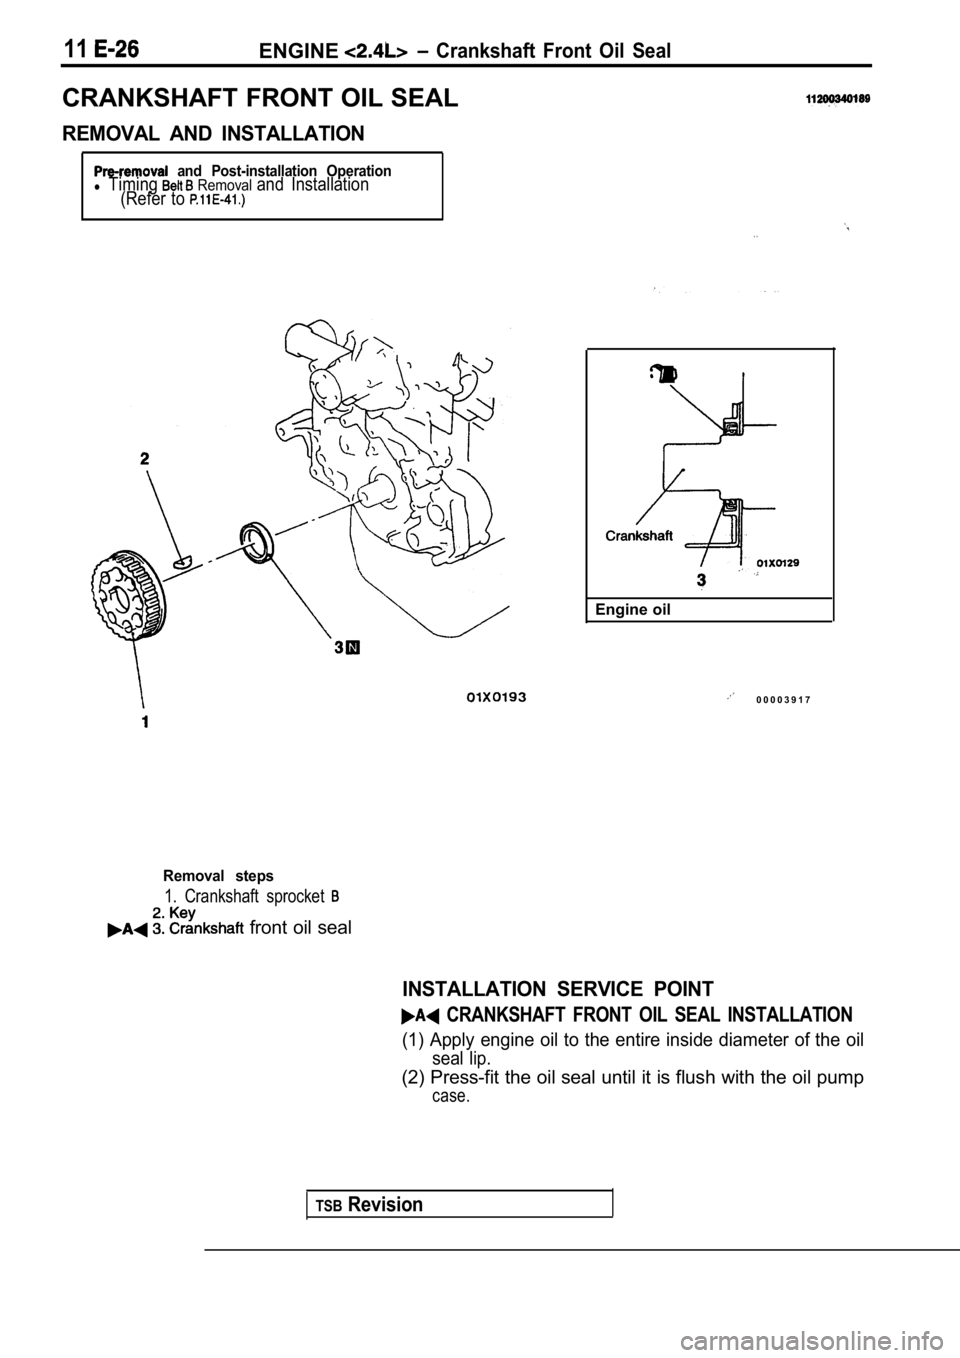
CRANKSHAFT FRONT OIL SEAL
REMOVAL AND INSTALLATION
and Post-installation Operationl Timing Removal and Installation
(Refer to
. .
TSBRevision
Engine oil
0 0 0 0 3 9 1 7
Removal steps
1. Crankshaft sprocket
front oil seal
INSTALLATION SERVICE POINT
CRANKSHAFT FRONT OIL SEAL INSTALLATION
(1) Apply engine oil to the entire inside diameter of the oil
seal lip.
(2) Press-fit the oil seal until it is flush with the oil pump
case.
Page 295 of 2103
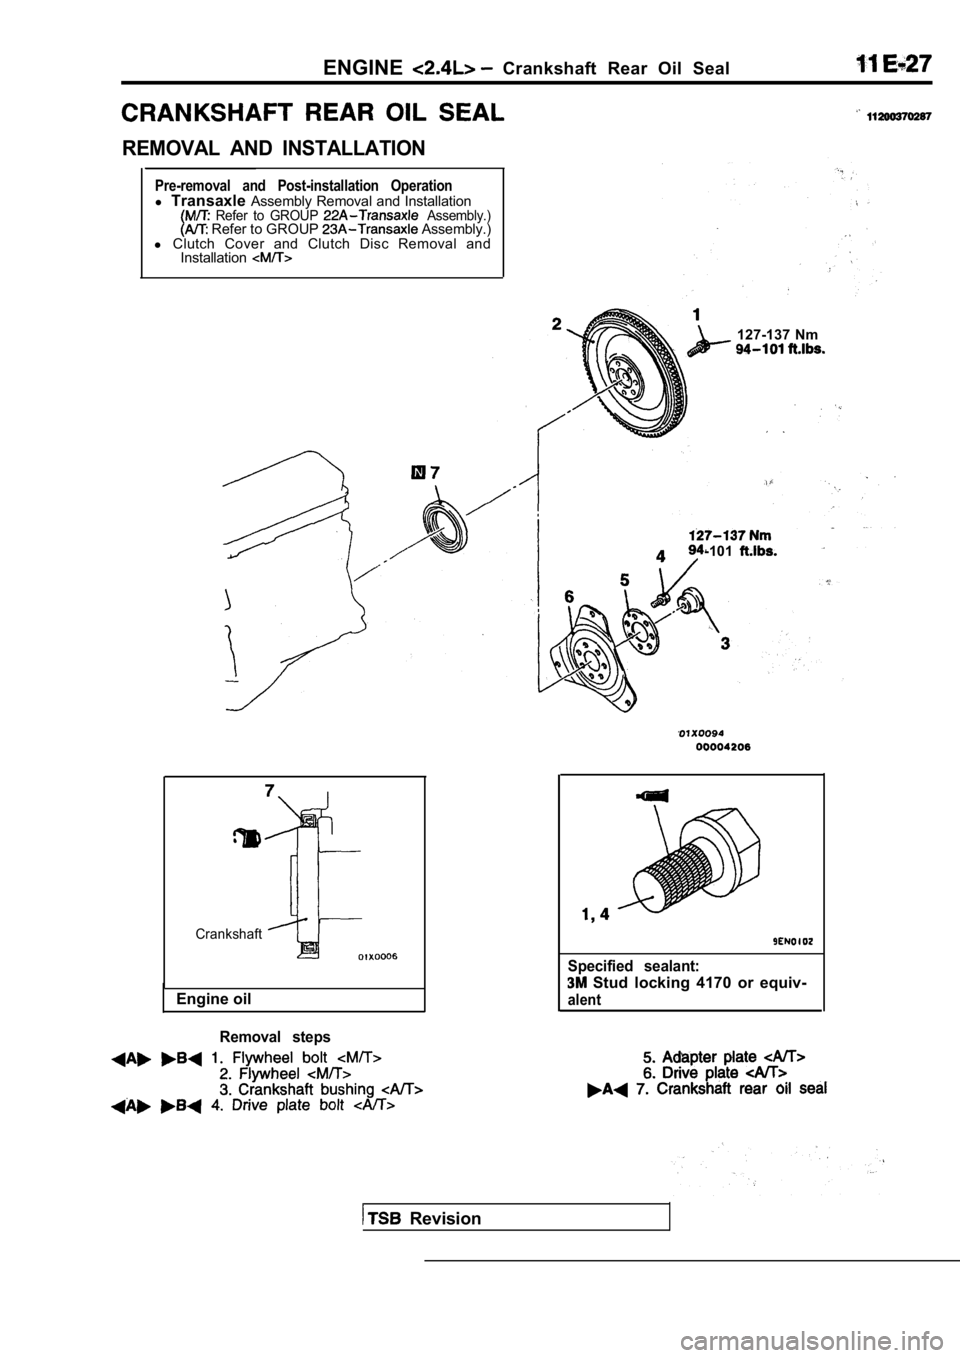
ENGINECrankshaft Rear Oil Seal
REMOVAL AND INSTALLATION
Pre-removal and Post-installation Operationl Transaxle Assembly Removal and Installation Refer to GROUP Assembly.) Refer to GROUP Assembly.)
l Clutch Cover and Clutch Disc Removal and
Installation
127-137 Nm
-101
Crankshaft
Engine oil
Removal steps
Specified sealant:
Stud locking 4170 or equiv-
alent
Revision
Page 296 of 2103
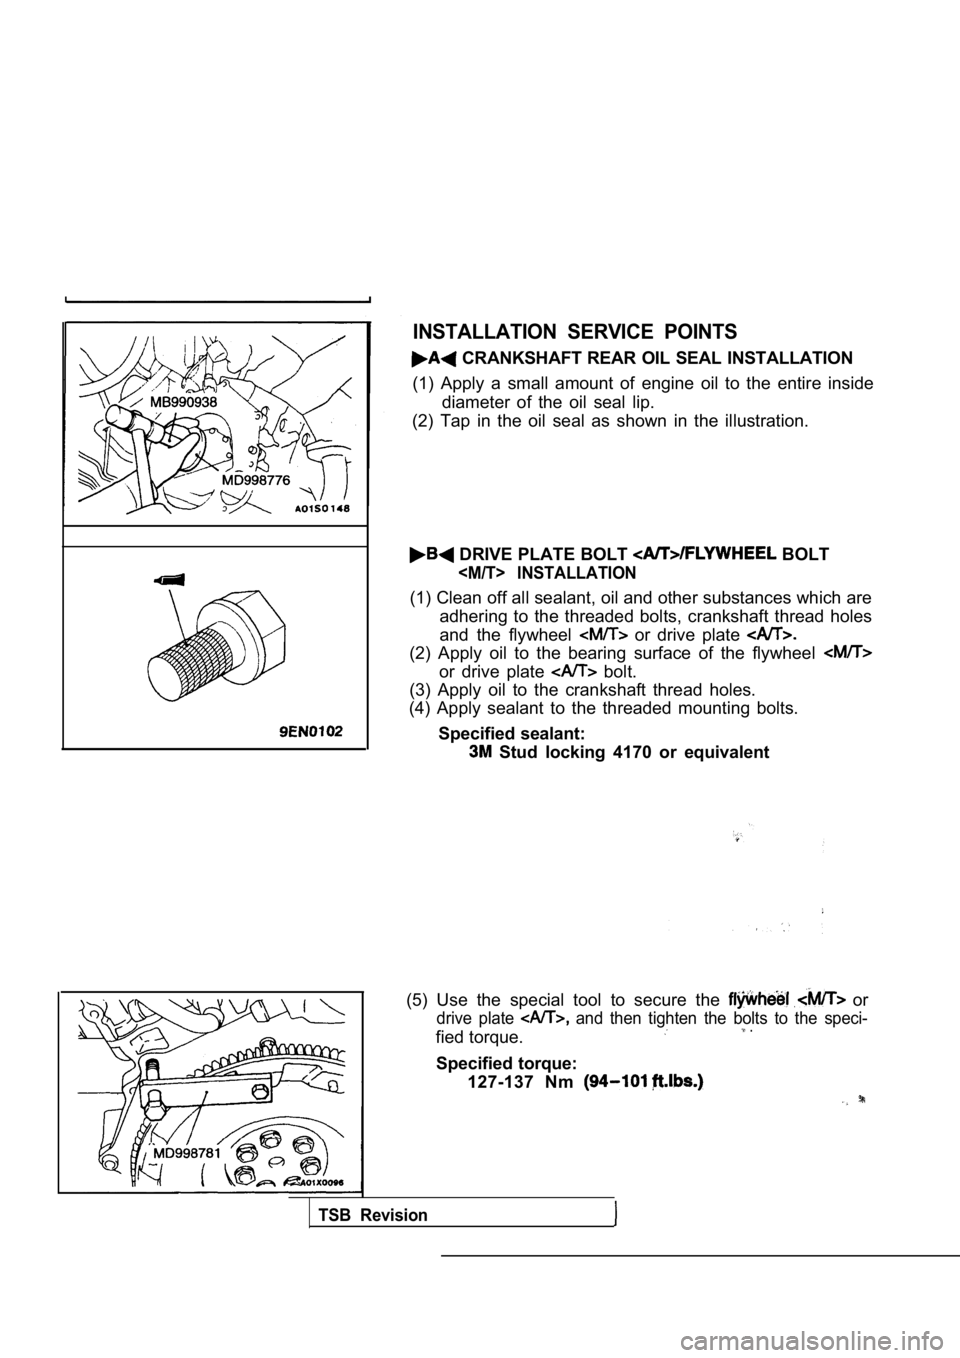
INSTALLATION SERVICE POINTS
CRANKSHAFT REAR OIL SEAL INSTALLATION
(1) Apply a small amount of engine oil to the entir e inside
diameter of the oil seal lip.
(2) Tap in the oil seal as shown in the illustratio n.
DRIVE PLATE BOLT BOLT
INSTALLATION
(1) Clean off all sealant, oil and other substances which are
adhering to the threaded bolts, crankshaft thread h oles
and the flywheel
or drive plate
(2) Apply oil to the bearing surface of the flywhee l
or drive plate bolt.
(3) Apply oil to the crankshaft thread holes.
(4) Apply sealant to the threaded mounting bolts.
Specified sealant:
Stud locking 4170 or equivalent
(5) Use the special tool to secure the
or
drive plate and then tighten the bolts to the speci-
fied torque. .
Specified torque: 127-137 Nm
TSB Revision
Page 297 of 2103
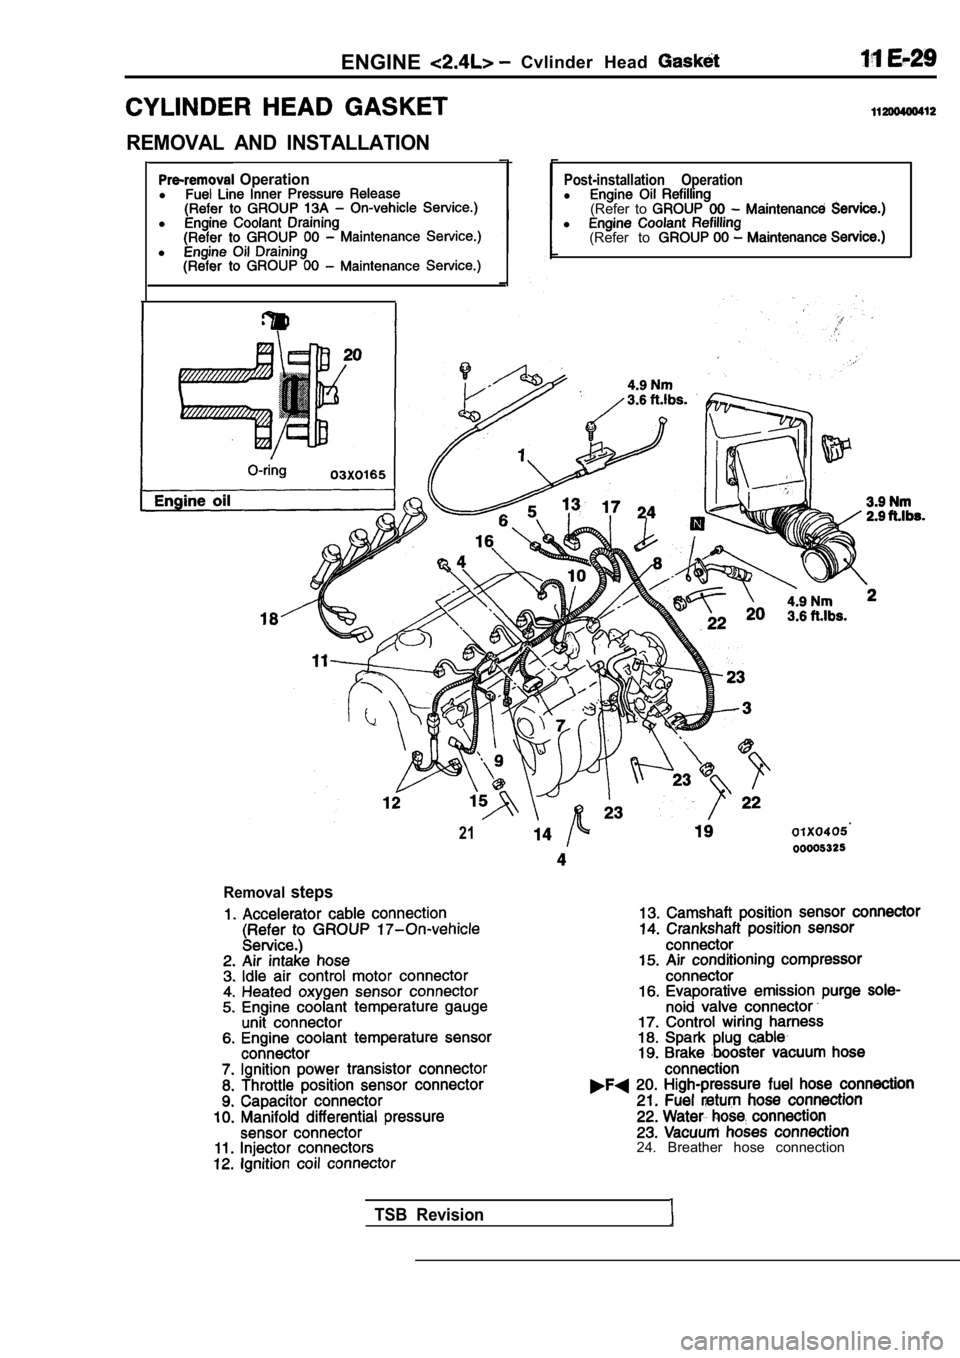
ENGINECvlinder Head
REMOVAL AND INSTALLATION
Operationl
l
l
Post-installation Operationl (Refer to l (Refer to
21
Removalsteps
24. Breather hose connection
TSB Revision
Page 298 of 2103
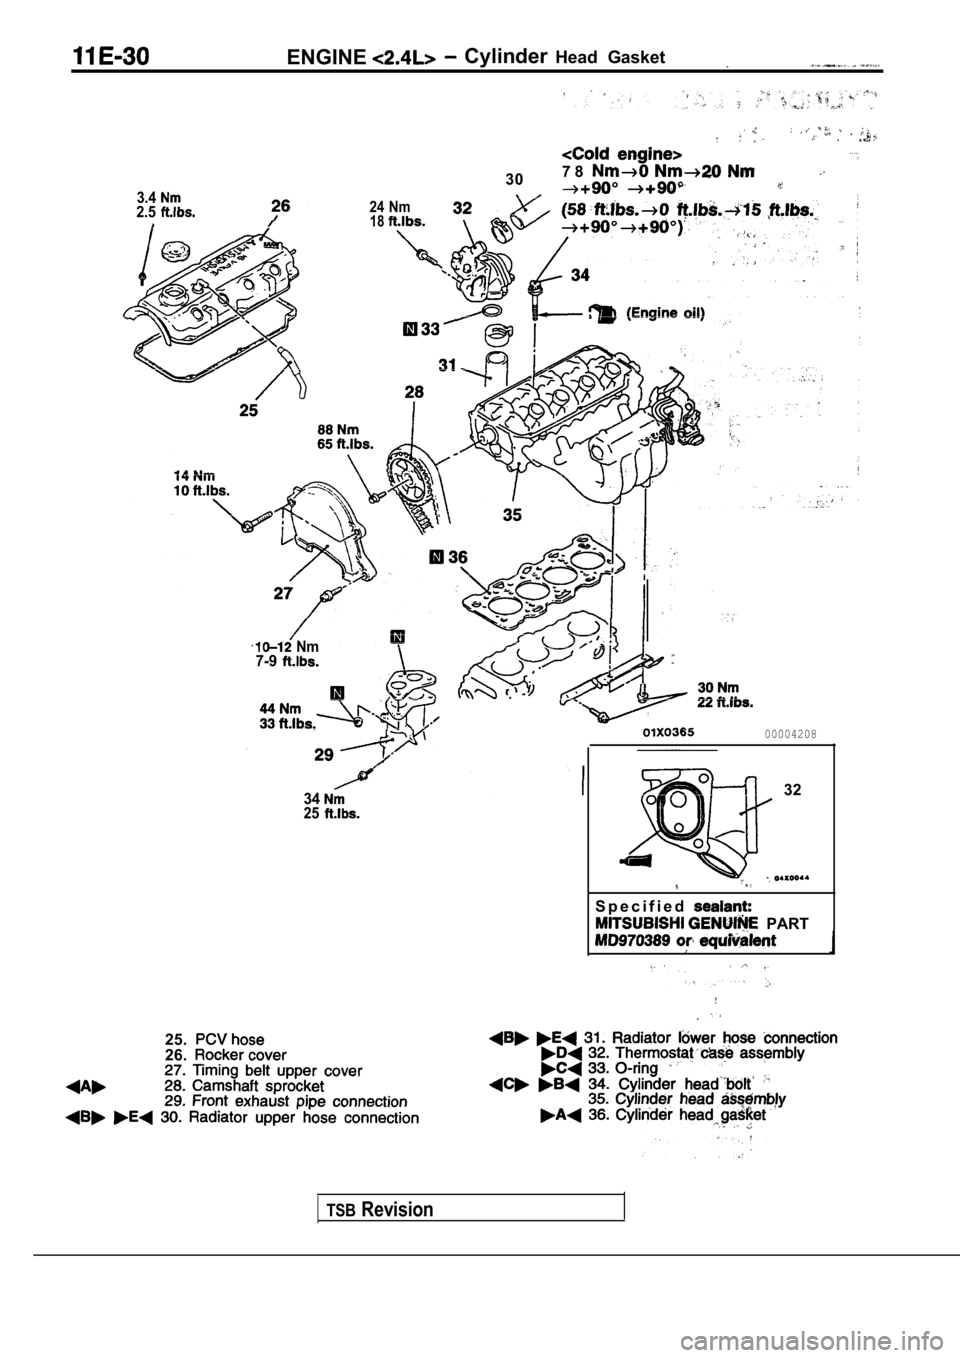
ENGINE Cylinder Head Gasket
3.42.524 Nm18
307 8
Nm7-9
3425
00004208
32
S p e c i f i e d
PART
25.26.
TSBRevision
Page 299 of 2103
ENGINE Cylinder Head
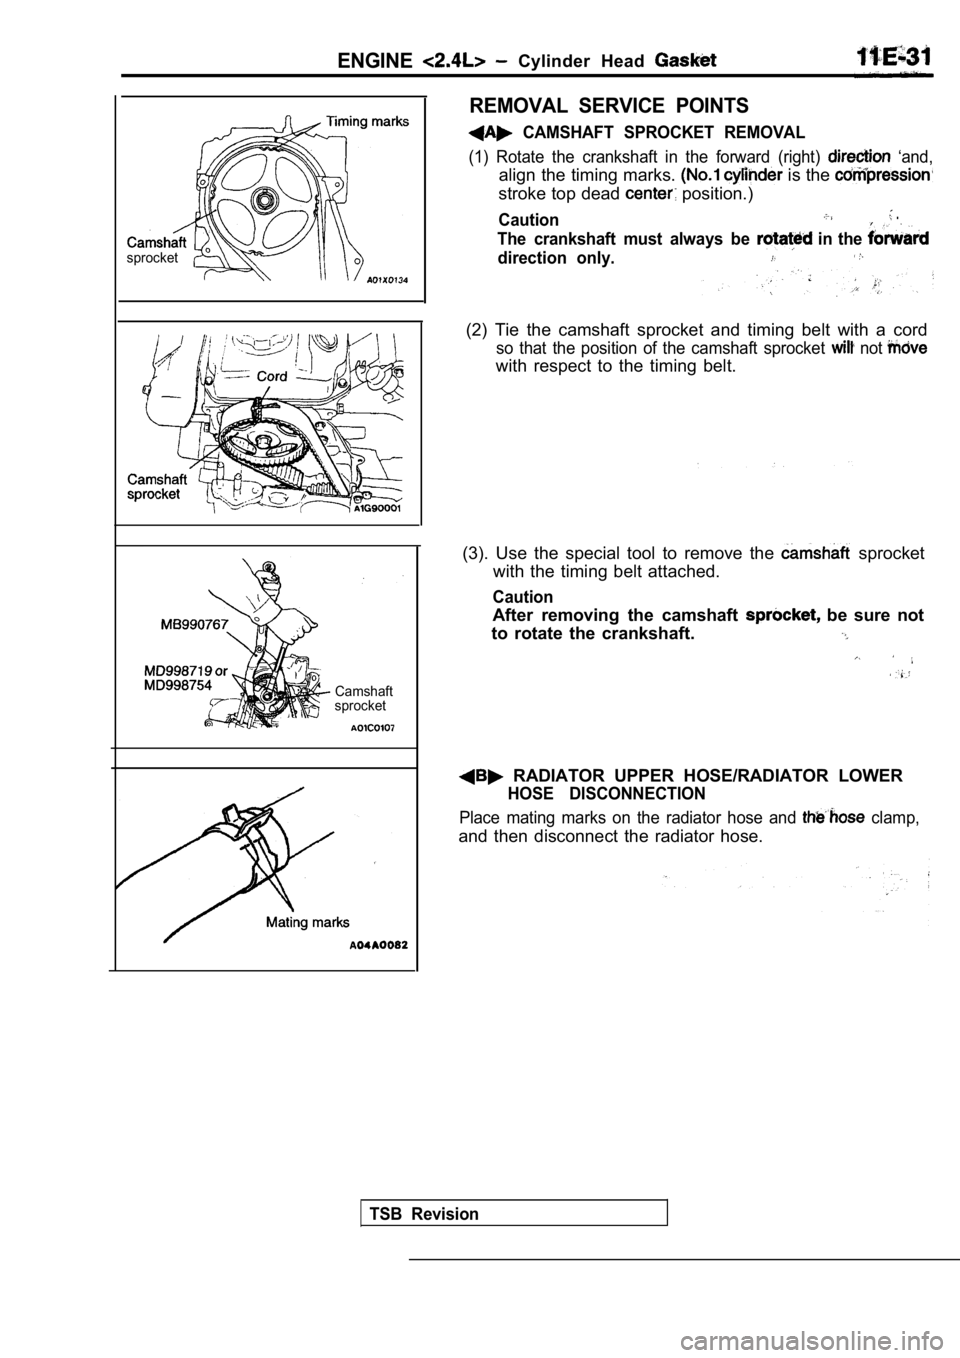
sprocketCamshaft
sprocket
REMOVAL SERVICE POINTS
CAMSHAFT SPROCKET REMOVAL
(1) Rotate the crankshaft in the forward (right) ‘and,
align the timing marks. is the
stroke top dead position.)
Caution .
The crankshaft must always be in the
direction only.
(2) Tie the camshaft sprocket and timing belt with a cord
so that the position of the camshaft sprocket not
with respect to the timing belt.
(3). Use the special tool to remove the
sprocket
with the timing belt attached.
Caution
After removing the camshaft be sure not
to rotate the crankshaft.
RADIATOR UPPER HOSE/RADIATOR LOWER
HOSE DISCONNECTION
Place mating marks on the radiator hose and clamp,
and then disconnect the radiator hose.
TSB Revision
Page 300 of 2103
ENGINE Cylinder Head Gasket
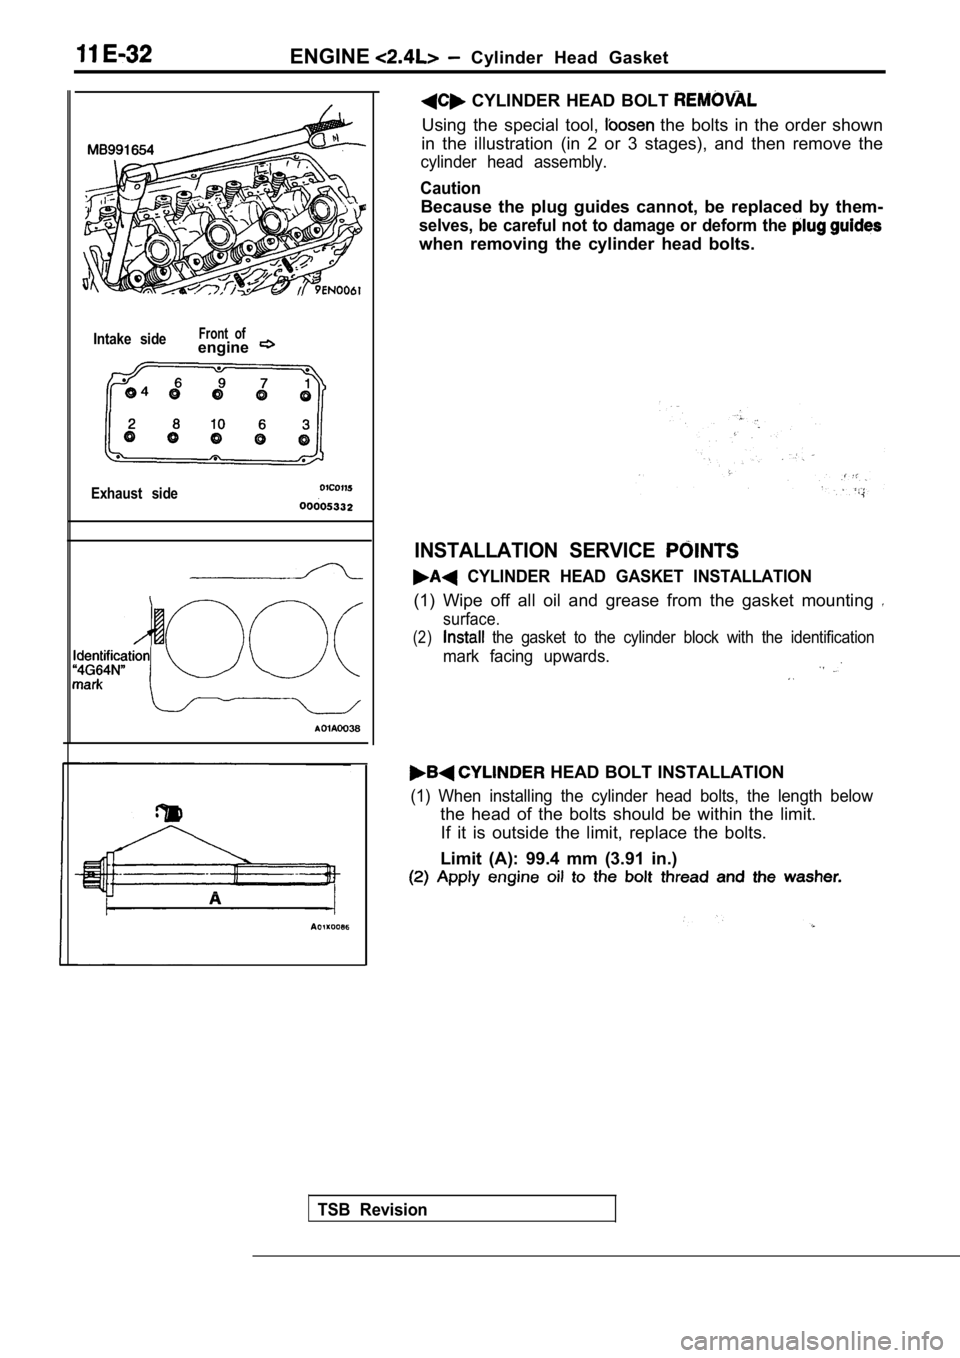
Intake sideFront ofengine
Exhaust side
TSB Revision
CYLINDER HEAD BOLT
Using the special tool, the bolts in the order shown
in the illustration (in 2 or 3 stages), and then re move the
cylinder head assembly.
Caution
Because the plug guides cannot, be replaced by them -
selves, be careful not to damage or deform the
when removing the cylinder head bolts.
INSTALLATION SERVICE
CYLINDER HEAD GASKET INSTALLATION
(1) Wipe off all oil and grease from the gasket mounting
surface.
(2) the gasket to the cylinder block with the identification
mark facing upwards.
HEAD BOLT INSTALLATION
(1) When installing the cylinder head bolts, the le ngth below
the head of the bolts should be within the limit.
If it is outside the limit, replace the bolts.
Limit (A): 99.4 mm (3.91 in.)
Trending: fuel pressure, fuel cap release, oil level, fuse chart, run flat, headlights, tow
