NISSAN ALMERA N15 1995 Service Manual
Manufacturer: NISSAN, Model Year: 1995, Model line: ALMERA N15, Model: NISSAN ALMERA N15 1995Pages: 1701, PDF Size: 82.27 MB
Page 1581 of 1701
REPAIRFORCOMPONENT PARTS
I
RS5F32A
I
•
Input
Shaft andGears
DISASSEMBL Y
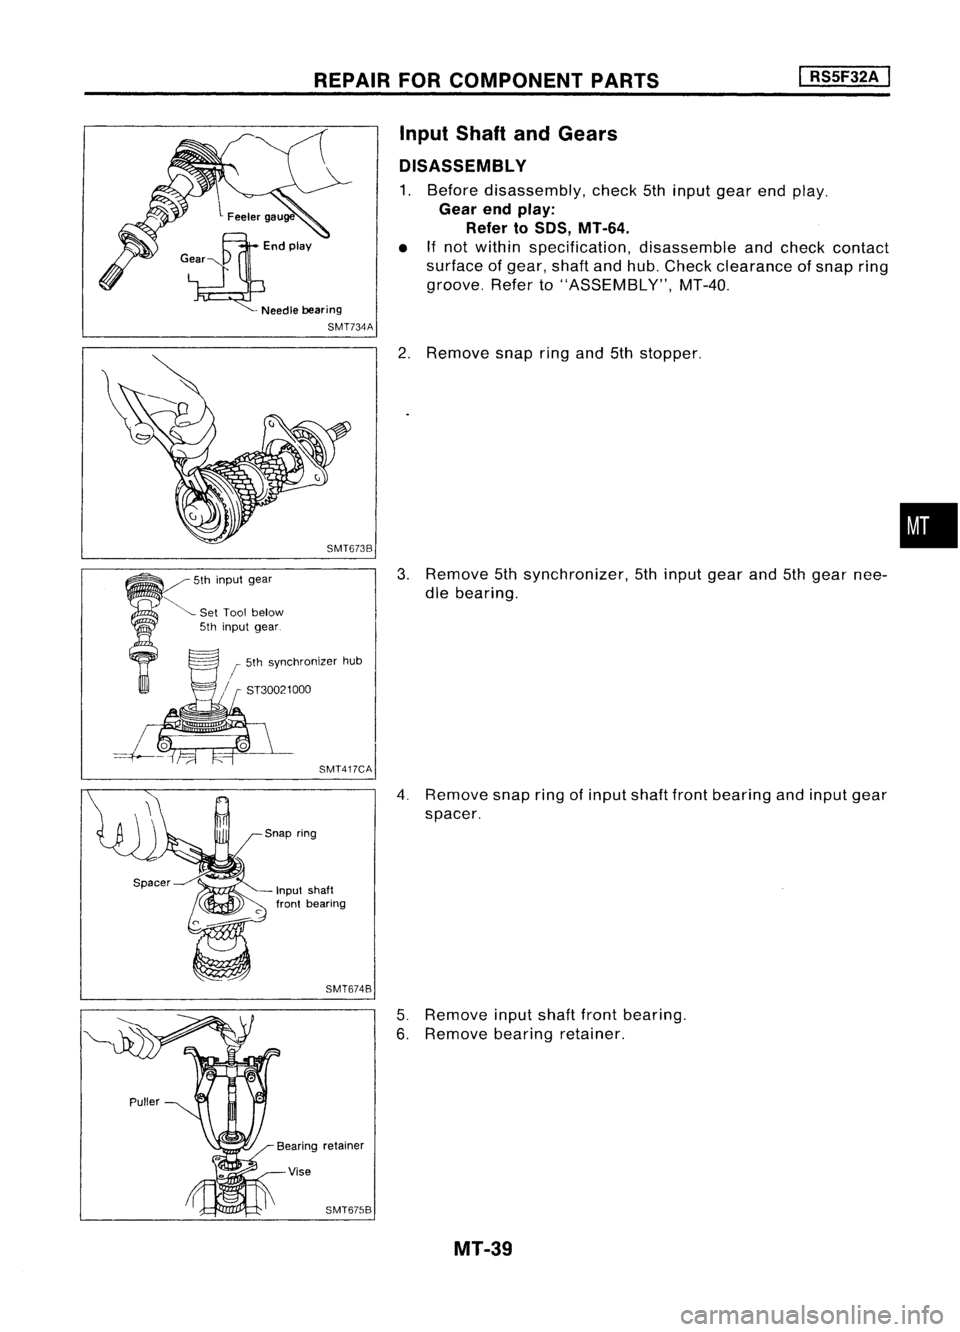
1. Before disassembly, check5thinput gearendplay.
Gear endplay:
Refer to50S, MT-64.
• Ifnot within specification, disassembleandcheck contact
surface ofgear, shaftandhub. Check clearance ofsnap ring
groove. Referto"ASSEMBLY", MT-40.
2. Remove snapringand5thstopper.
3. Remove 5thsynchronizer, 5thinput gearand5thgear nee-
dle bearing.
4. Remove snapringofinput shaftfrontbearing andinput gear
spacer.
SMT674B
SMT417CA
Input shaft
front bearing
-
r
5th synchronizer hub
/ ST30021 000
5th
input gear
~ SetTool below
5th input gear.
Spacer
5.Remove inputshaftfrontbearing.
6. Remove bearingretainer.
MT-39
Page 1582 of 1701
I
RS5F32A
I
Shifting insert
Baulkringto
gear clearance
REPAIR
FORCOMPONENT PARTS
Input Shaft andGears (Cont'd)
INSPECTION
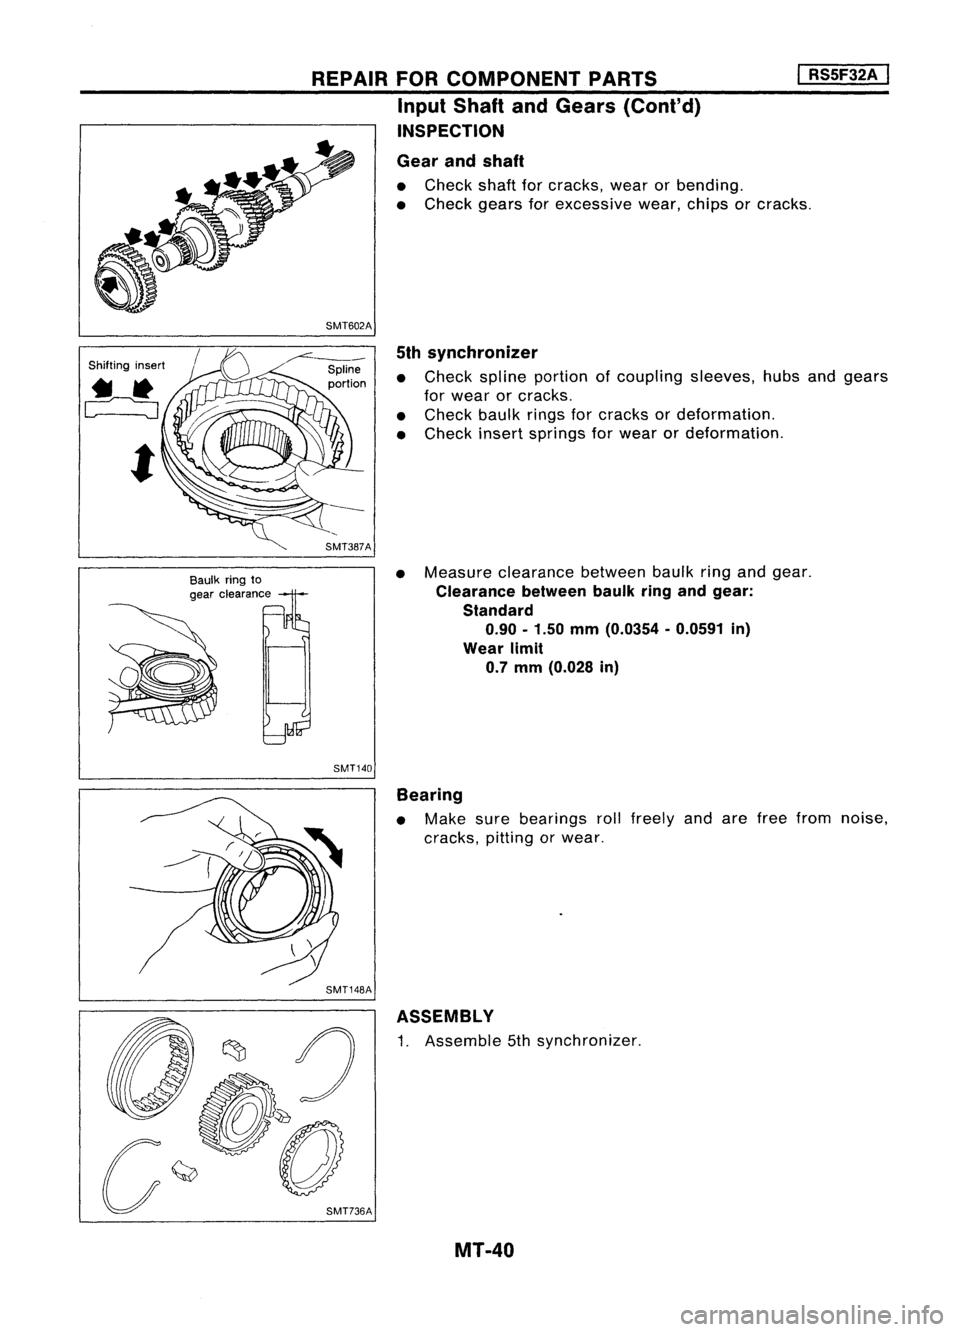
Gear andshaft
• Check shaftforcracks, wearorbending.
• Check gearsforexcessive wear,chipsorcracks.
SMT602A 5thsynchronizer
• Check splineportion ofcoupling sleeves,hubsandgears
for wear orcracks.
• Check baulkringsforcracks ordeformation.
• Check insertsprings forwear ordeformation.
SMT387A
•Measure clearance betweenbaulkringandgear.
Clearance betweenbaulkringandgear:
Standard 0.90 -1.50 mm(0.0354 -0.0591 in)
Wear limit
0.7 mm (0.028 in)
SMT140 Bearing
• Make surebearings rollfreely andarefree from noise,
cracks, pittingorwear.
ASSEMBLY
1. Assemble 5thsynchronizer.
MT-40
Page 1583 of 1701
SMT761B
REPAIR
FORCOMPONENT PARTS
I
RS5F32A
I
Input Shaft andGears (Cont'd)
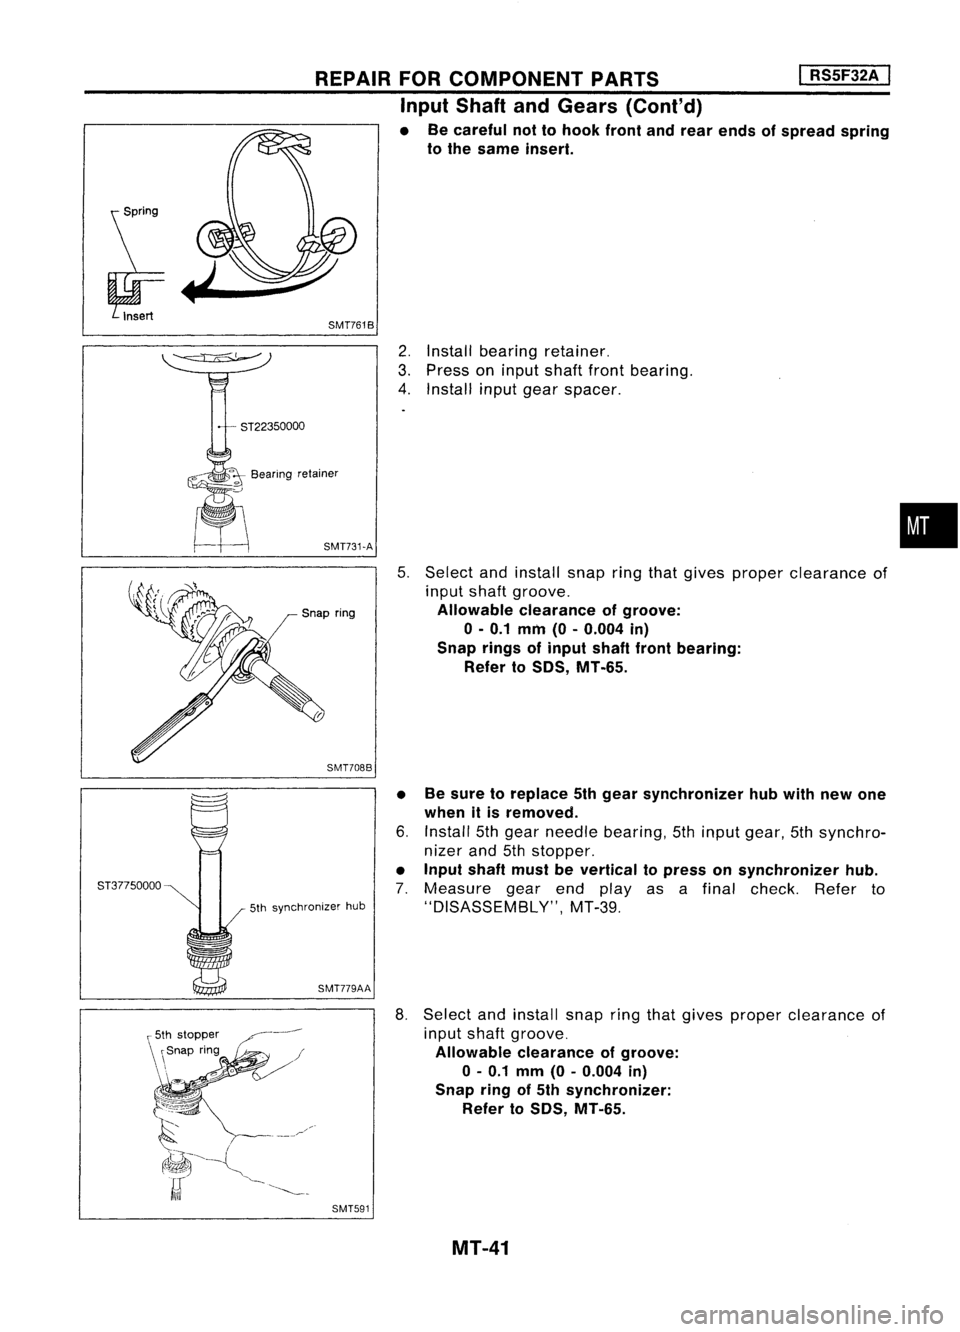
• Becareful nottohook frontandrear ends ofspread spring
to the same insert.
•
5. Select andinstall snapringthatgives proper clearance of
input shaftgroove.
Allowable clearance ofgroove:
o -
0.1 mOl (0-0.004 in)
Snap ringsofinput shaftfrontbearing:
Refer toSOS, MT-65.
2.
Install bearing retainer.
3. Press oninput shaft frontbearing.
4. Install inputgearspacer.
• Besure toreplace 5thgear synchronizer hubwith newone
when itis removed.
6. Install 5thgear needle bearing, 5thinput gear, 5thsynchro-
nizer and5thstopper.
• Input shaftmustbevertical topress onsynchronizer hub.
7. Measure gearendplayas afinal check. Referto
"DISASSEMBLY", MT-39.
8. Select andinstall snapringthatgives proper clearance of
input shaft groove.
Allowable clearance ofgroove:
o -
0.1 mm (0-0.004 in)
Snap ringof5th synchronizer:
Refer toSOS, MT-65.
SMT708B
SMT731-A
SMT779AA
Snap
ring
5th synchronizer hub
~
=
Bearing retainer
ST37750000 ~
SMT591MT-41
Page 1584 of 1701
REPAIRFORCOMPONENT PARTS
I
RS5F32A
I
Snap ring End
play
Mainshaft
andGears
DISASSEMBL Y
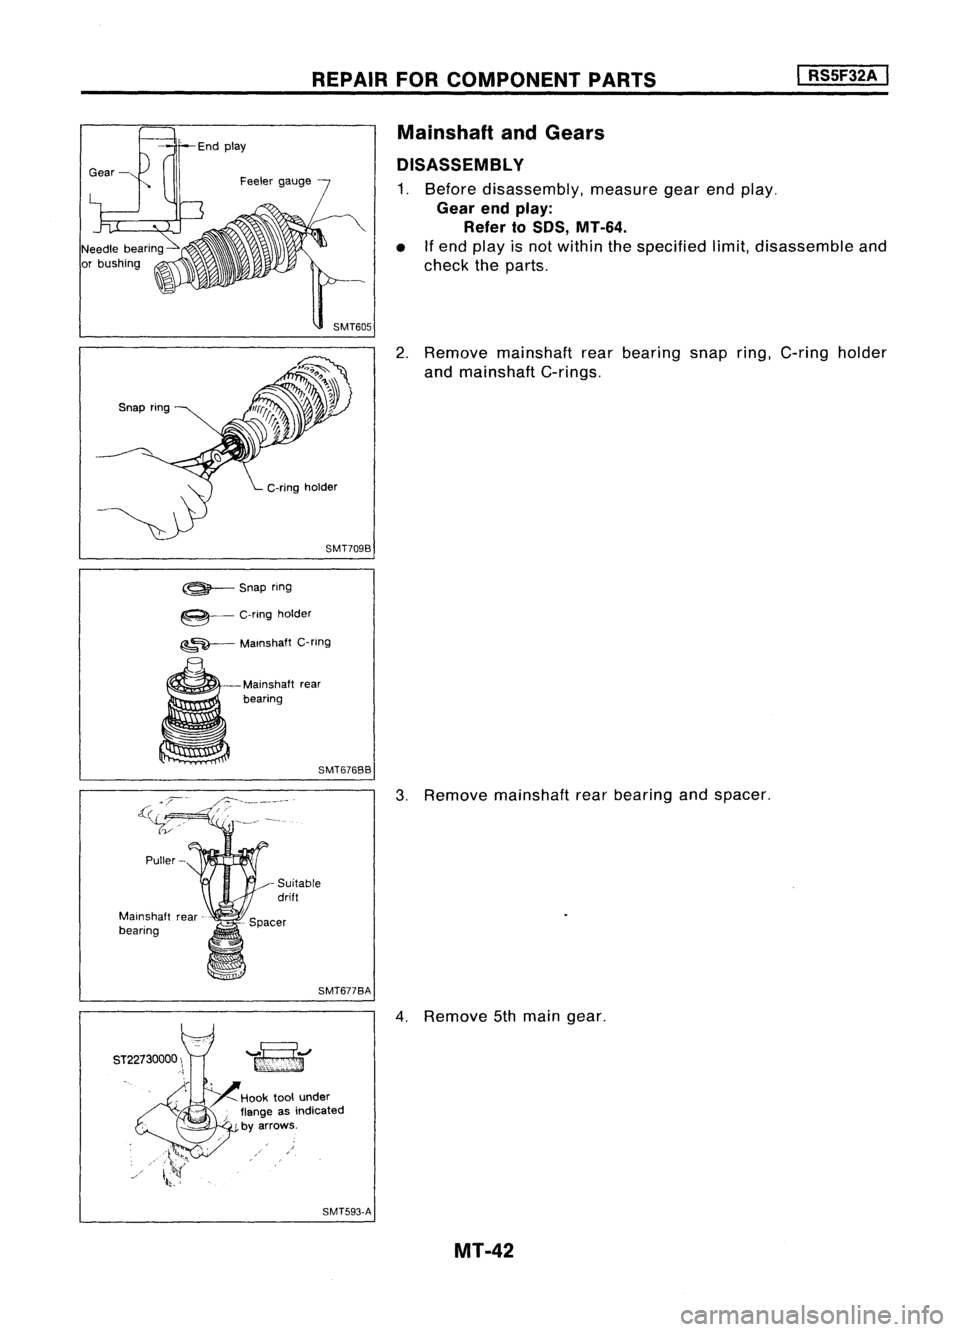
1. Before disassembly, measuregearendplay.
Gear endplay:
Refer to50S, MT-64.
• Ifend play isnot within thespecified limit,disassemble and
check theparts.
2. Remove mainshaft rearbearing snapring,Coring holder
and mainshaft C-rings.
C-ring holder
SMT709B
~Snapring
@---
C-ringholder
~~ MalnshaftC-r1ng
Puller-
Mainshaft rear
bearing -
Mainshaft rear
bearing
SMT676BB
3.Remove mainshaft rearbearing andspacer.
./- Suitable
drift
SMT677BA
4.Remove 5thmain gear.
SMT593-A MT-42
Page 1585 of 1701
2nd&3rd~
bushing -'-~)
2nd gear ~
1 st main gear REPAIR
FORCOMPONENT PARTS
I
RSSF32A
I
Mainshaft andGears (Cont'd)
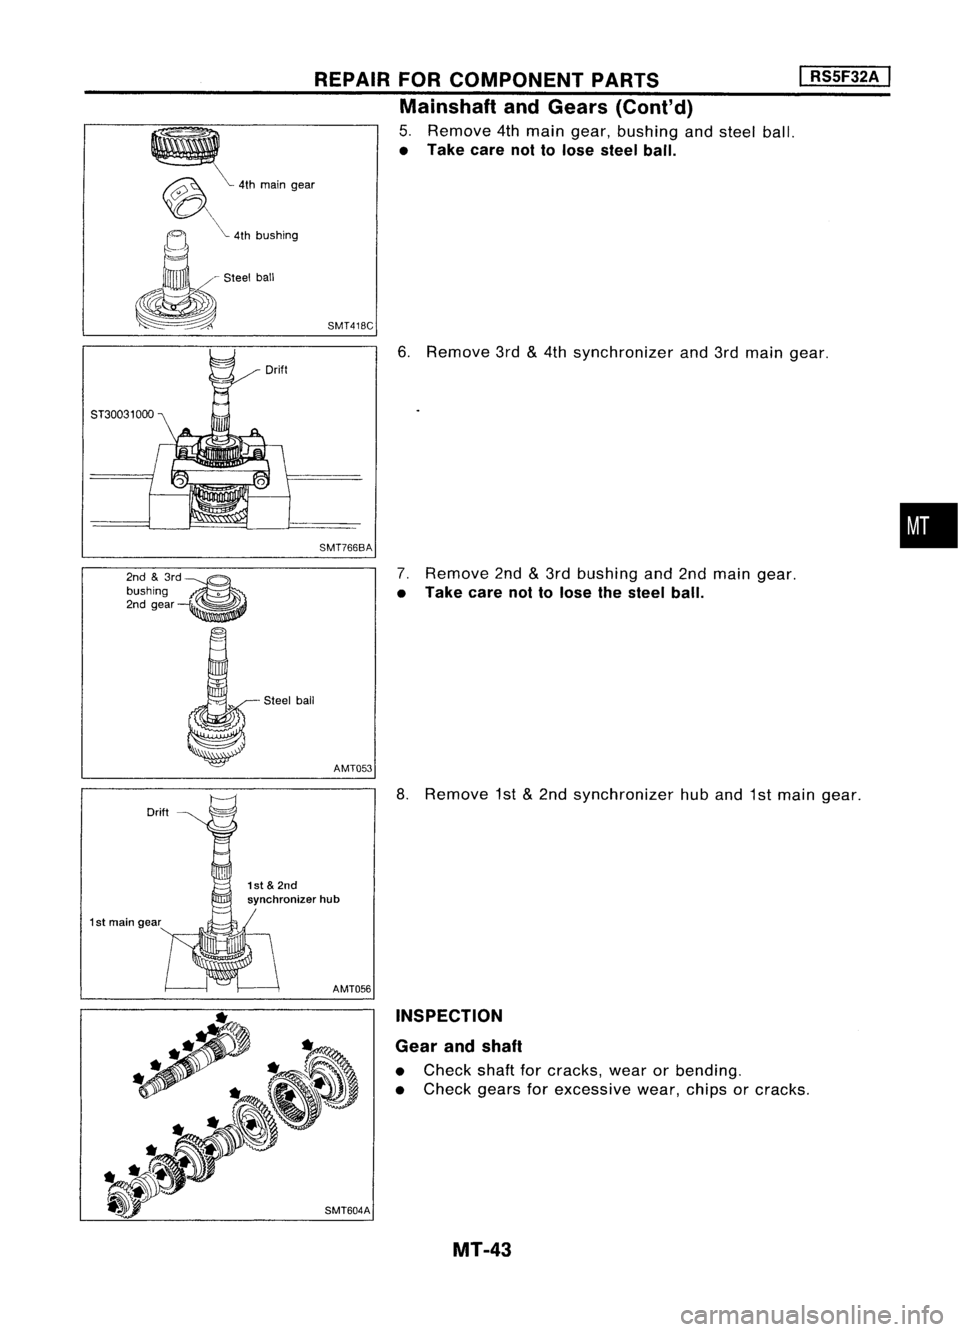
5. Remove 4thmain gear, bushing andsteel ball.
• Take carenottolose steel ball.
SMT418C
6.Remove 3rd
&
4th synchronizer and3rdmain gear.
SMT766BA
7.Remove 2nd
&
3rd bushing and2ndmain gear.
• Take carenottolose thesteel ball.
AMT053
8.Remove 1st
&
2nd synchronizer huband 1stmain gear.
AMT056 INSPECTION
Gear andshaft
• Check shaftforcracks, wearorbending.
• Check gearsforexcessive wear,chipsorcracks.
SMT604A MT-43
•
Page 1586 of 1701
t
REPAIR
FORCOMPONENT PARTS
I
RS5F32A
I
Mainshaft andGears (Cont'd)
Synchronizer
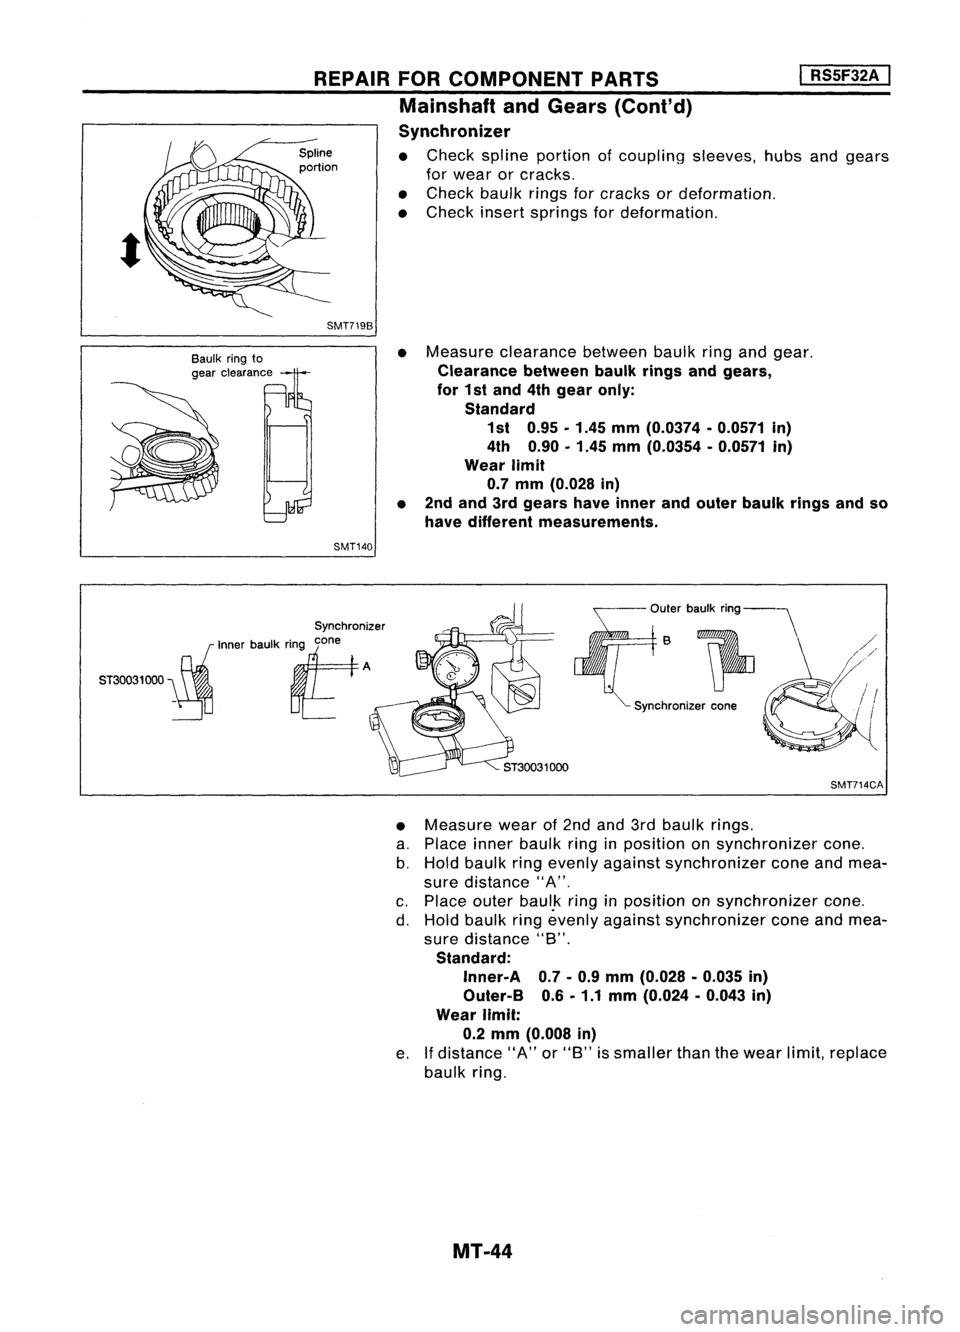
• Check spline portion ofcoupling sleeves,hubsandgears
for wear orcracks.
• Check baulkringsforcracks ordeformation.
• Check insertsprings fordeformation.
SMT7198
Baulk ringto
gear clearance
SMT140
Synchronizer
, fli
10M'
baolk
'fOM FA
ST30031000 ~
•
Measure clearance betweenbaulkringandgear.
Clearance betweenbaulkringsandgears,
for 1st and 4thgear only:
Standard 1st 0.95. 1.45mm(0.0374 •0.0571 in)
4th 0.90. 1.45mm(0.0354 •0.0571 in)
Wear limit
0.7 mm (0.028 in)
• 2nd and 3rdgears haveinner andouter baulk ringsandso
have different measurements.
Outerbaulkring--\
B
SMT714CA
• Measure wearof2nd and3rdbaulk rings.
a. Place innerbaulk ringinposition onsynchronizer cone.
b. Hold baulk ringevenly against synchronizer coneandmea-
sure distance "A".
c. Place outerbaul.k ringinposition onsynchronizer cone.
d. Hold baulk ringevenly against synchronizer coneandmea-
sure distance "B".
Standard: Inner-A 0.7-0.9 mm (0.028 -0.035 in)
Outer-B 0.6-1.1 mm (0.024 -0.043 in)
Wear limit:
0.2 mm (0.008 in)
e.
If
distance "A"or"B" issmaller thanthewear limit,replace
baulk ring.
MT-44
Page 1587 of 1701
SPD715
•
I
RS5F32A
I
Ensure correct fittingof1st
&
2nd synchronizer hub.
ASSEMBLY
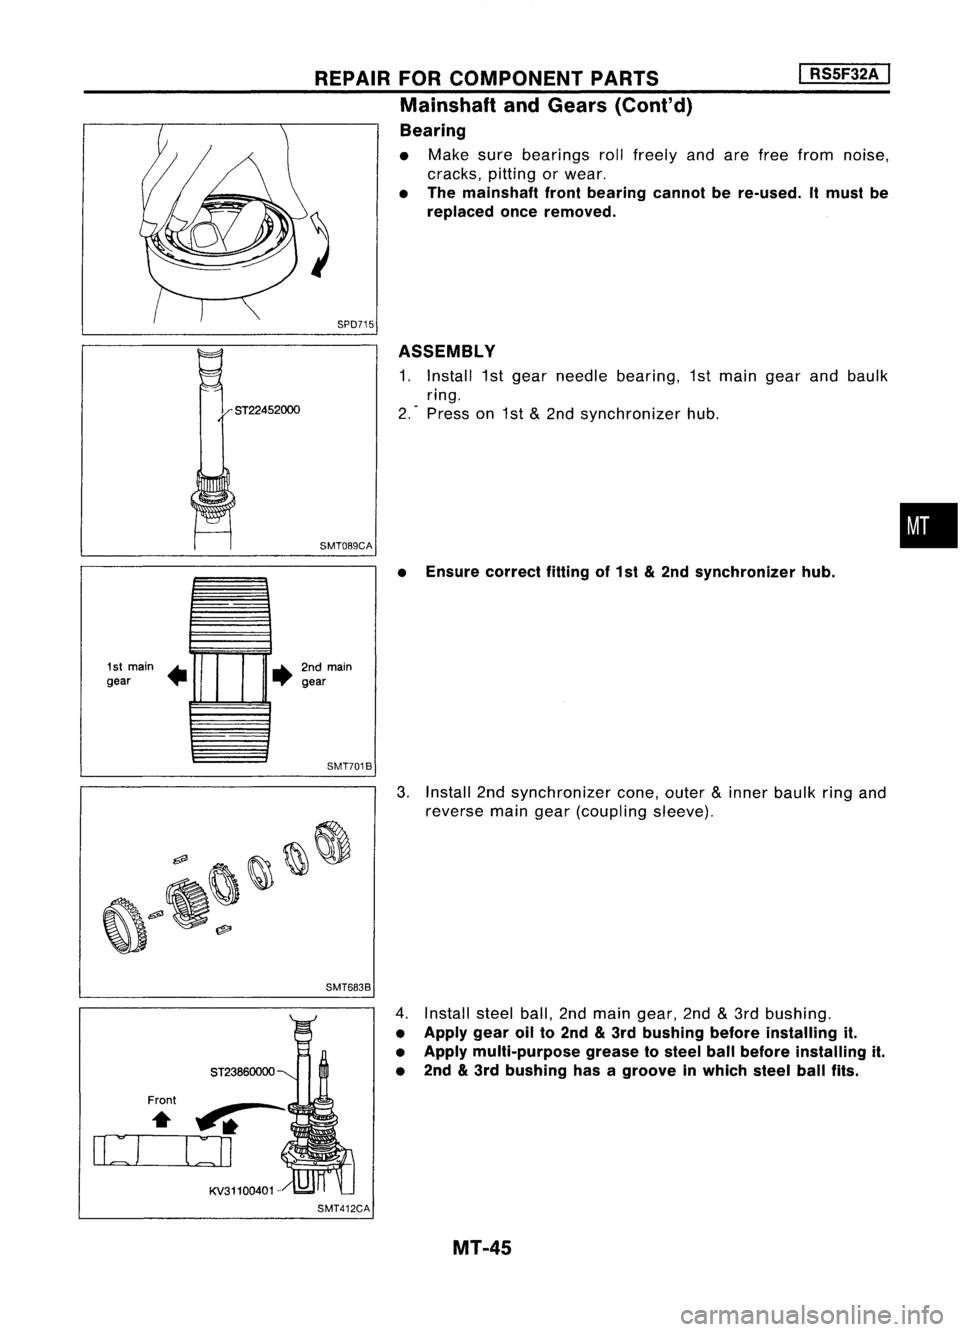
1. Install 1stgear needle bearing, 1stmain gearandbaulk
ring.
2. Press on1st
&
2nd synchronizer hub.
•
SMT089CA
REPAIR
FORCOMPONENT PARTS
Mainshaft andGears (Cont'd)
Bearing
• Make surebearings rollfreely andarefree from noise,
cracks, pittingorwear.
• The mainshaft frontbearing cannotbere-used. Itmust be
replaced onceremoved.
1st main.
gear •
2ndmain
gear
SMT7018
3.Install 2ndsynchronizer cone,outer
&
inner baulk ringand
reverse maingear(coupling sleeve).
SMT6838
ST23860000
Front
.....
rr=DJ
KV31100401-
4.
Install steelball,2ndmain gear, 2nd
&
3rd bushing.
• Apply gearoilto2nd
&
3rd bushing beforeinstalling it.
• Apply multi-purpose greasetosteel ballbefore installing it.
• 2nd
&
3rd bushing hasagroove inwhich steelballfits.
SMT412CA MT-45
Page 1588 of 1701
4thmain .....
gear ...... REPAIR
FORCOMPONENT PARTS
I
RS5F32A
I
Mainshaft andGears (Cont'd)
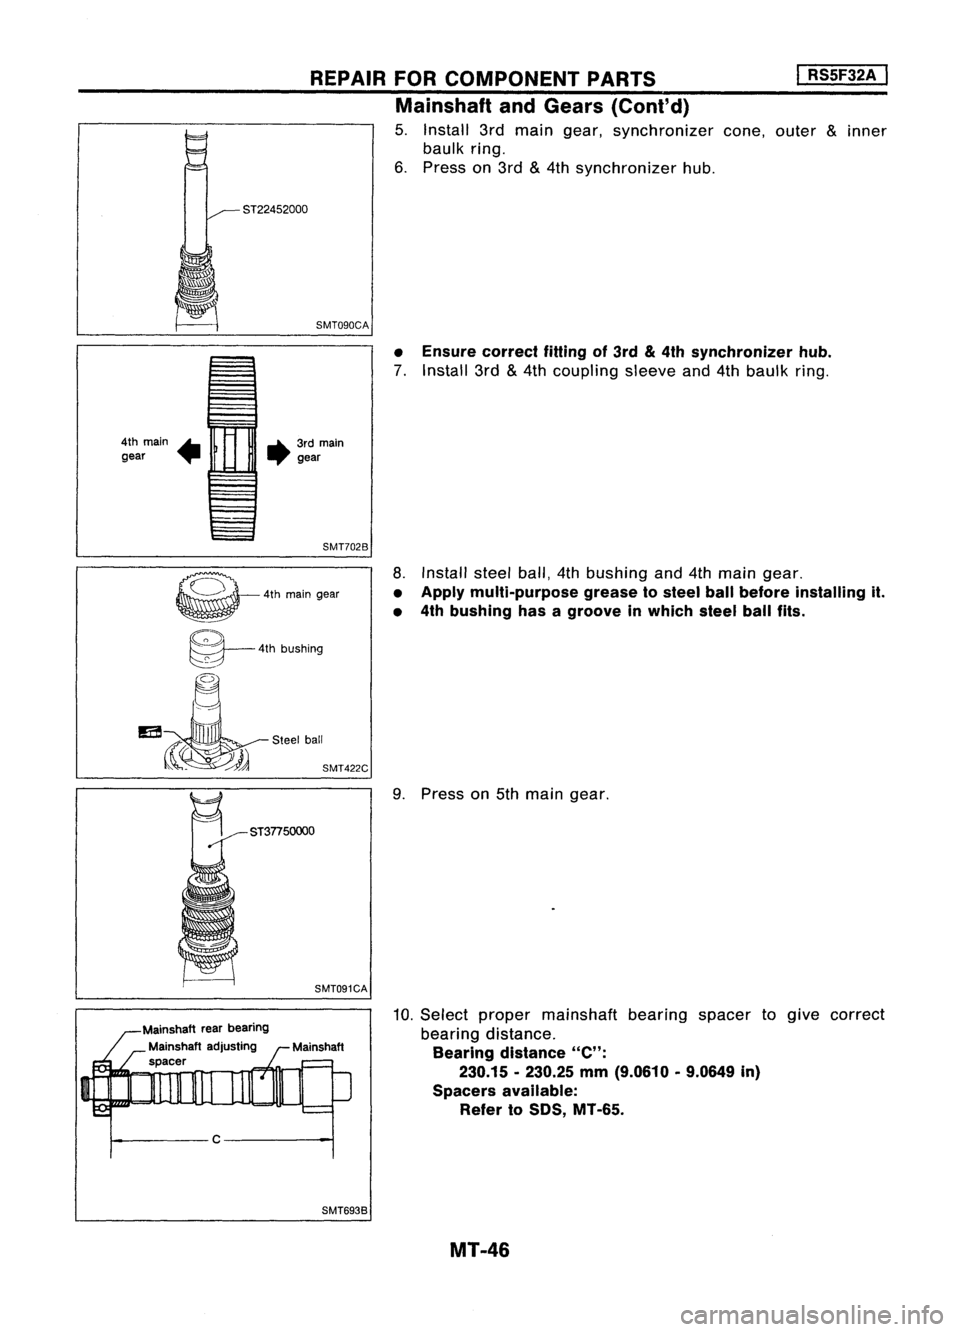
5. Install 3rdmain gear, synchronizer cone,outer
&
inner
baulk ring.
6. Press on3rd
&
4th synchronizer hub.
SMT090CA •Ensure correct fittingof3rd &4th synchronizer hub.
7. Install 3rd
&
4th coupling sleeveand4thbaulk ring.
..... 3rdmain
.".. gear
SMT7028
~ 4thm.lo
g.. '
~-
~ 4thbushing
mAr-51""'"
l(~J
SMT422C
8.
Install steelball,4thbushing and4thmain gear.
• Apply multi-purpose greasetosteel ballbefore installing it.
• 4th bushing hasagroove inwhich steelballfits.
ST3n50000
SMT091CA
9.
Press on5th main gear.
Mainshaft rearbearing
Mainshaft adjusting
spacer
c
SMT6938
10.
Select proper mainshaft bearingspacertogive correct
bearing distance.
Bearing distance
"e":
230.15 -230.25 mm(9.0610 -9.0649 in)
Spacers available:
Refer toSOS, MT-65.
MT-46
Page 1589 of 1701
SMT092CA
REPAIR
FORCOMPONENT PARTS
Mainshaft andGears (Cont'd)
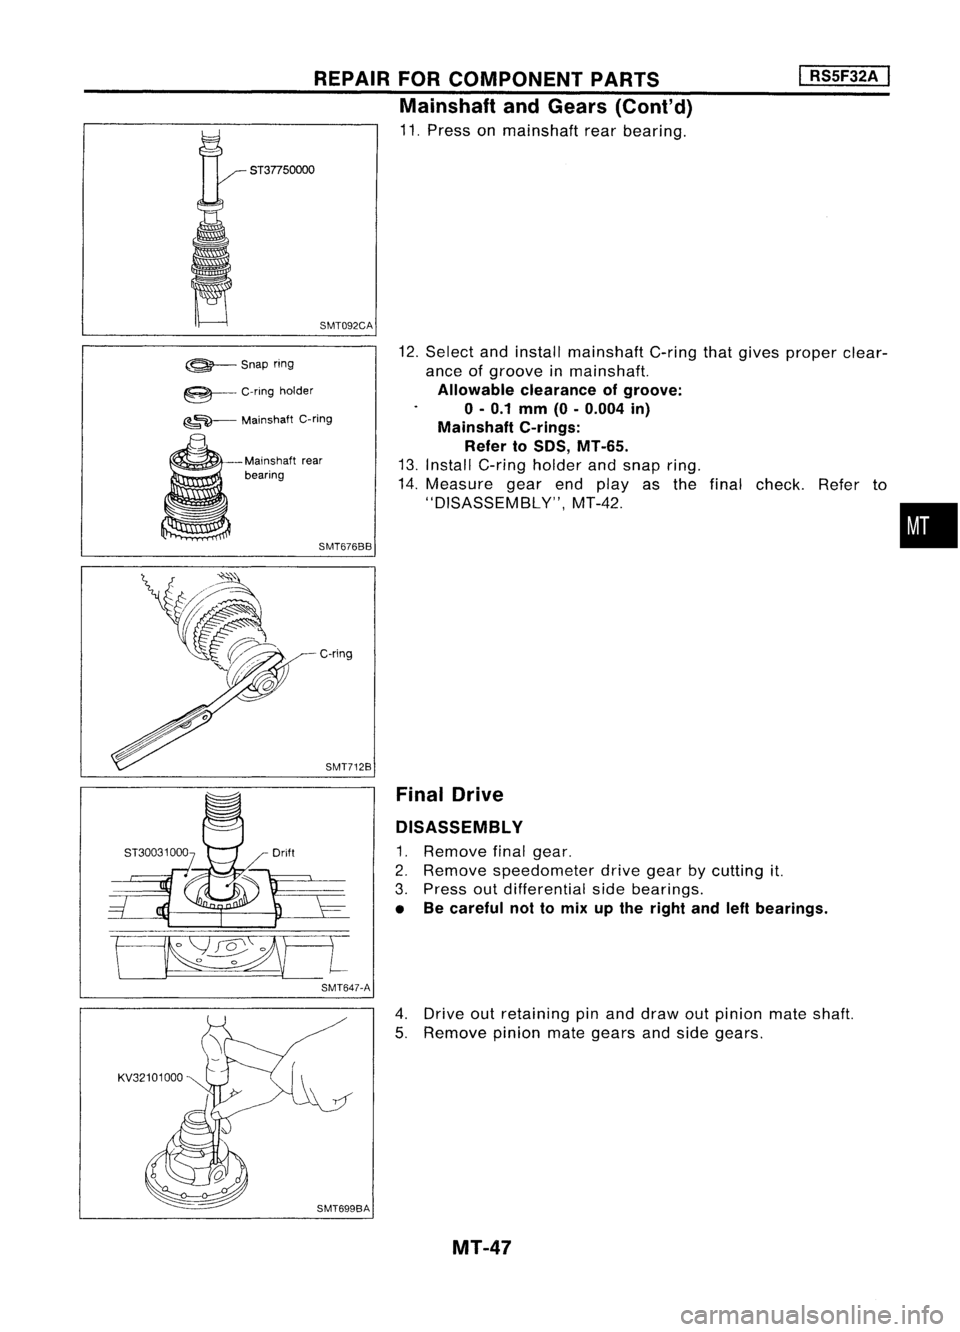
11. Press onmainshaft rearbearing.
•
I
RS5F32A
I
12. Select andinstall mainshaft C-ringthatgives proper clear-
ance ofgroove inmainshaft.
Allowable clearanceofgroove:
o -
0.1
mm
(0-0.004
in)
Mainshaft C-rings:
Refer to50S, MT-65.
13. Install C-ring holder andsnap ring.
14. Measure gearendplayas thefinal check. Referto
"DISASSEMBLY", MT-42.
ST37750000
SMT676BB
Mainshaft
rear
bearing
@-Snapring
e---
C-ringholder
~~ MainshaftC-ring
C-ring
SMT712B FinalDrive
DISASSEMBL Y
1. Remove finalgear.
2. Remove speedometer drivegearbycutting it.
3. Press outdifferential sidebearings.
• Becareful nottomix upthe right andleftbearings.
SMT647-A
4.Drive outretaining pinand draw outpinion mateshaft.
5. Remove pinionmategears andside gears.
MT-47
Page 1590 of 1701
SPD715
SMT083A
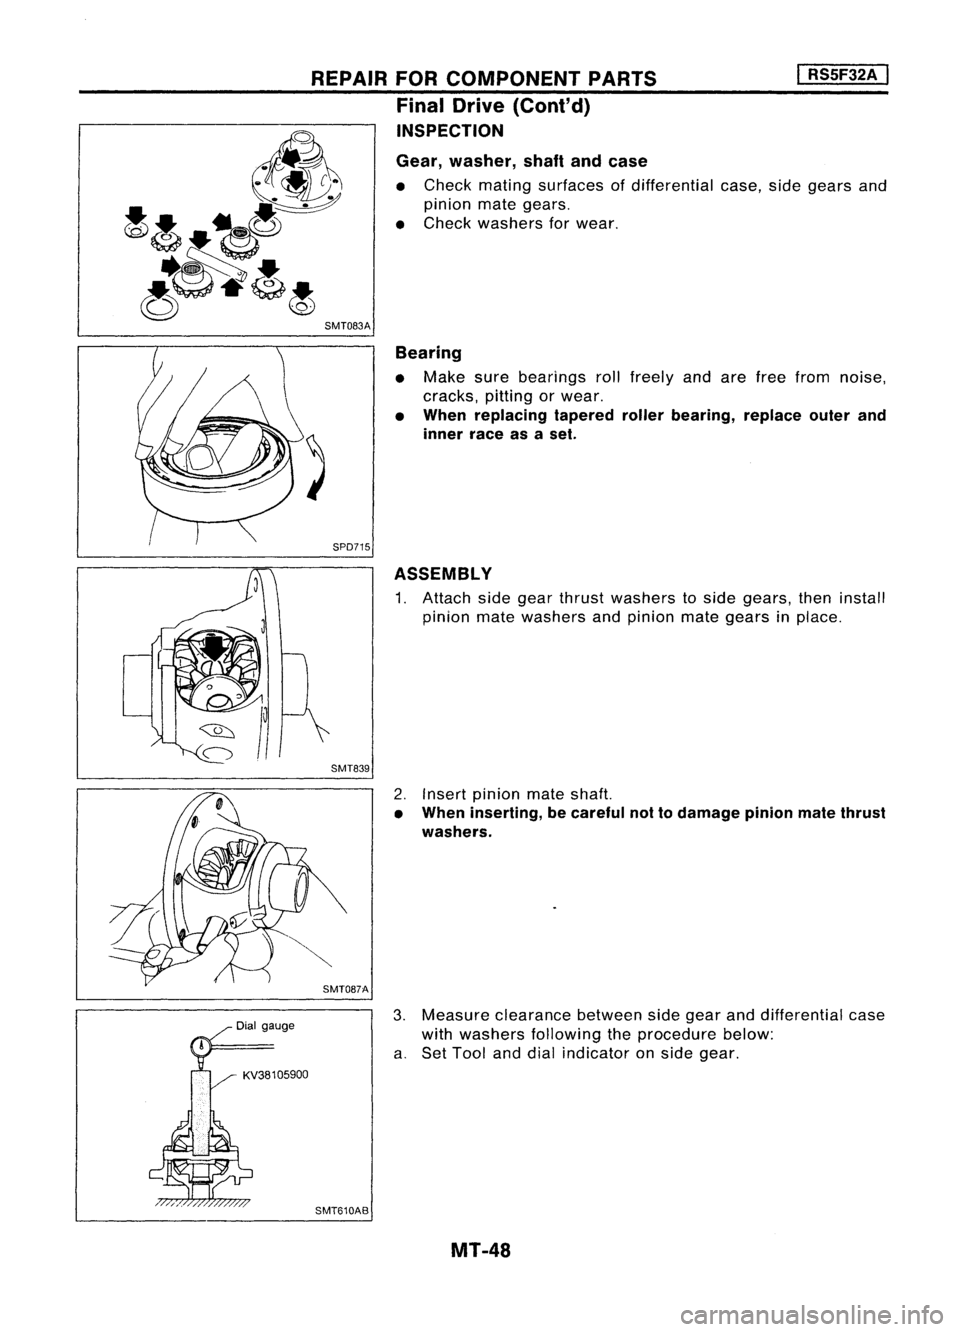
ASSEMBLY
1. Attach sidegear thrust washers toside gears, theninstall
pinion matewashers andpinion mategears inplace.
I
RS5F32A
I
Gear, washer, shaftandcase
• Check mating surfaces ofdifferential case,sidegears and
pinion mategears.
• Check washers forwear.
Bearing
• Make surebearings rollfreely andarefree from noise,
cracks, pittingorwear.
• When replacing taperedrollerbearing, replaceouterand
inner raceasaset.
REPAIR
FORCOMPONENT PARTS
Final Drive (Cont'd)
INSPECTION
SMT839
KV381 05900
2.
Insert pinion mateshaft.
• When inserting, becareful nottodamage pinionmatethrust
washers.
3. Measure clearance betweensidegear anddifferential case
with washers following theprocedure below:
a. Set Tool anddial indicator onside gear.
SMT610AB MT-48