NISSAN LATIO 2009 Service Repair Manual
Manufacturer: NISSAN, Model Year: 2009, Model line: LATIO, Model: NISSAN LATIO 2009Pages: 4331, PDF Size: 58.04 MB
Page 2981 of 4331
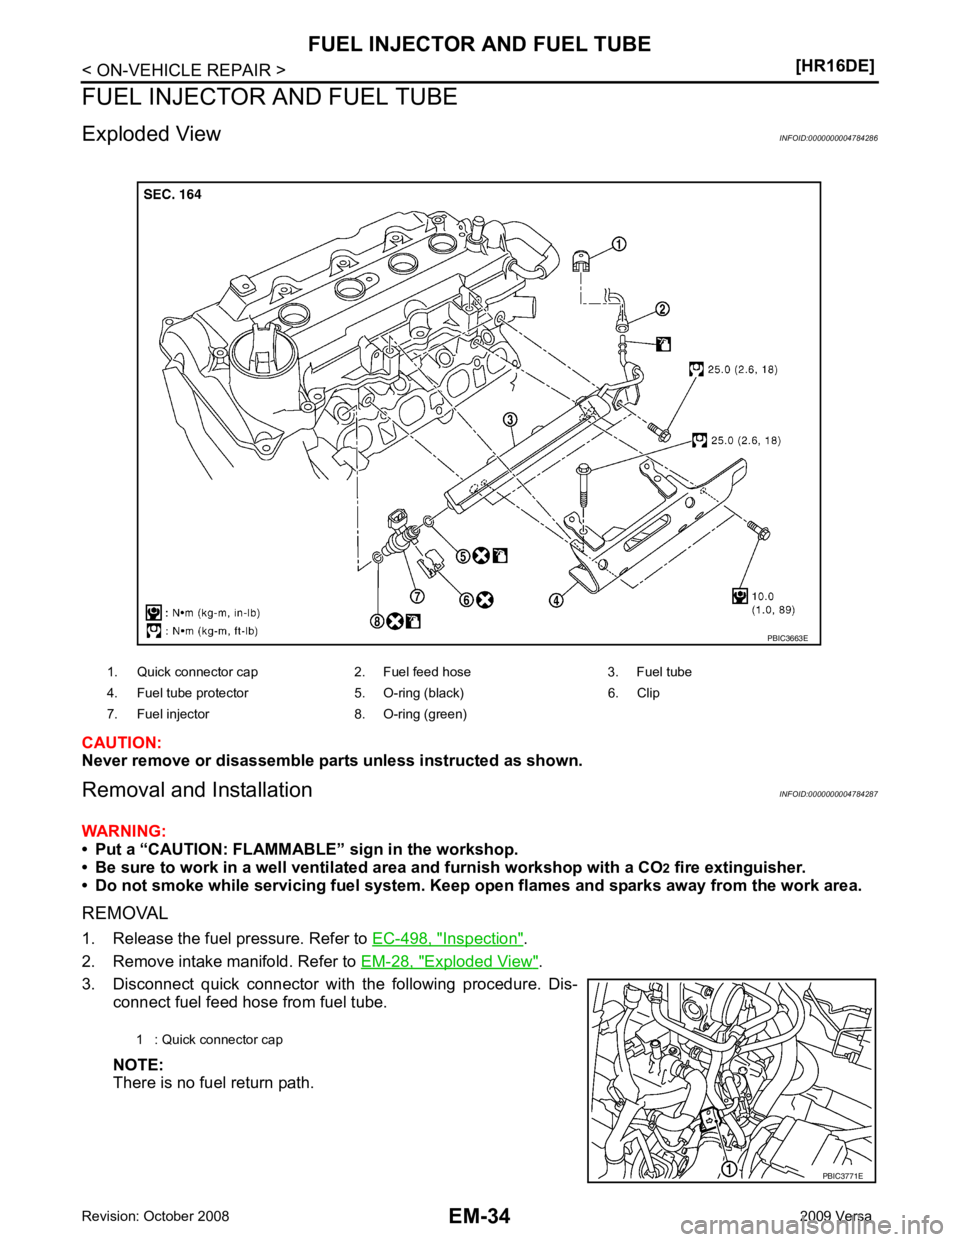
Inspection " .
2. Remove intake manifold. Refer to EM-28, " Exploded View " .
3. Disconnect quick connector with the following procedure. Dis- connect fuel feed hose from fuel tube.
NOTE:
There is no fuel return path.
1. Quick connector cap 2. Fuel feed hose 3. Fuel tube
4. Fuel tube protector 5. O-ring (black) 6. Clip
7. Fuel injector 8. O-ring (green)
Page 2982 of 4331
EM
NP
O
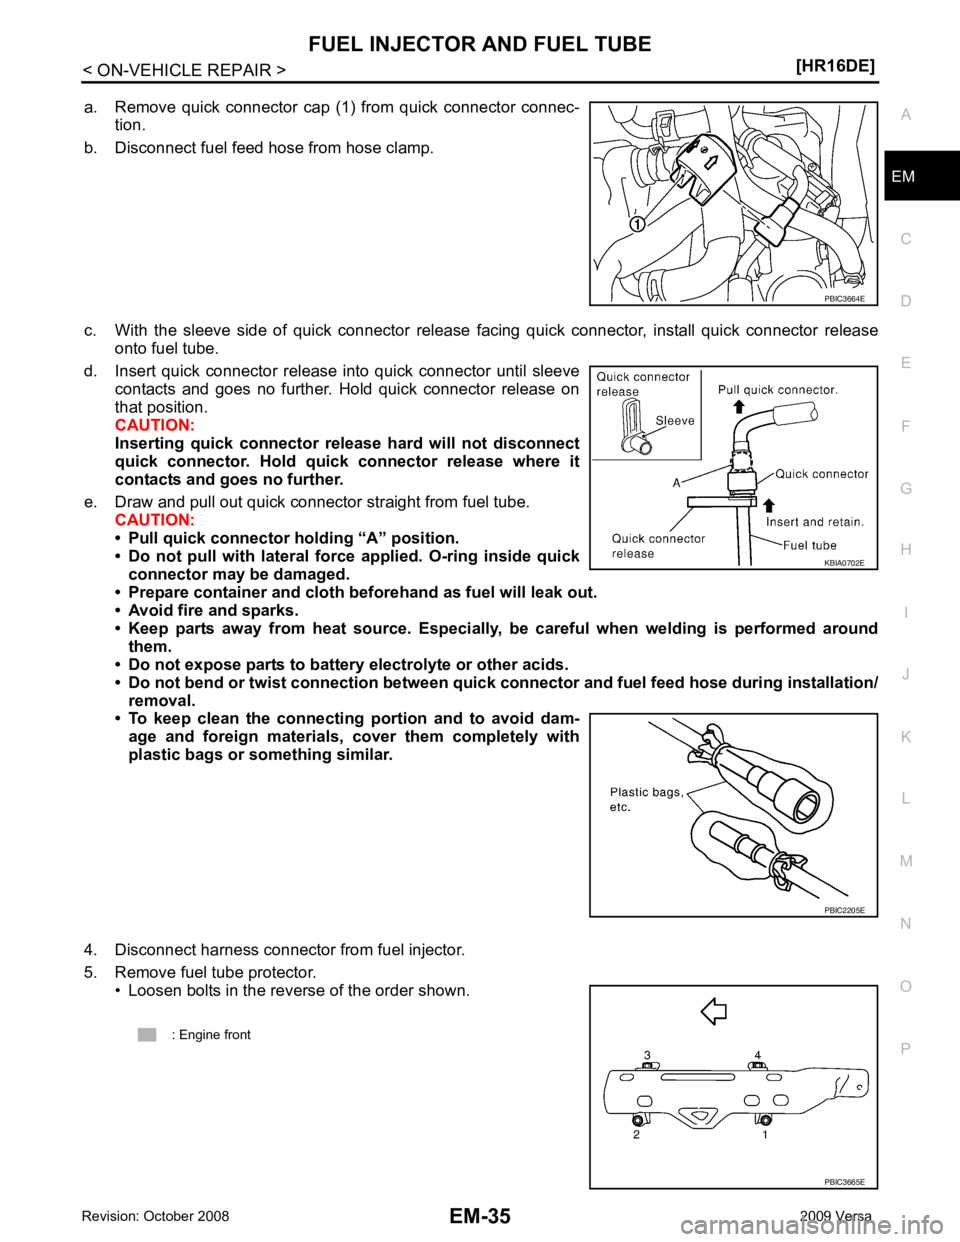
a. Remove quick connector cap (1) from quick connector connec-
tion.
b. Disconnect fuel feed hose from hose clamp.
c. With the sleeve side of quick connector release facing quick connector, install quick connector release onto fuel tube.
d. Insert quick connector release into quick connector until sleeve contacts and goes no further. Hold quick connector release on
that position.
CAUTION:
Inserting quick connector re lease hard will not disconnect
quick connector. Hold qui ck connector release where it
contacts and goes no further.
e. Draw and pull out quick connector straight from fuel tube. CAUTION:
• Pull quick connector holding “A” position.
• Do not pull with lateral force applied. O-ring inside quick
connector may be damaged.
• Prepare container and cloth be forehand as fuel will leak out.
• Avoid fire and sparks.
• Keep parts away from heat source. Especially, be careful when welding is performed around
them.
• Do not expose parts to battery electrolyte or other acids.
• Do not bend or twist connection between quick co nnector and fuel feed hose during installation/
removal.
• To keep clean the connecting portion and to avoid dam-
age and foreign materials, cover them completely with
plastic bags or something similar.
4. Disconnect harness connector from fuel injector.
5. Remove fuel tube protector. • Loosen bolts in the reverse of the order shown. KBIA0702E
Page 2983 of 4331
PBIC3667E
Page 2984 of 4331
EM
NP
O
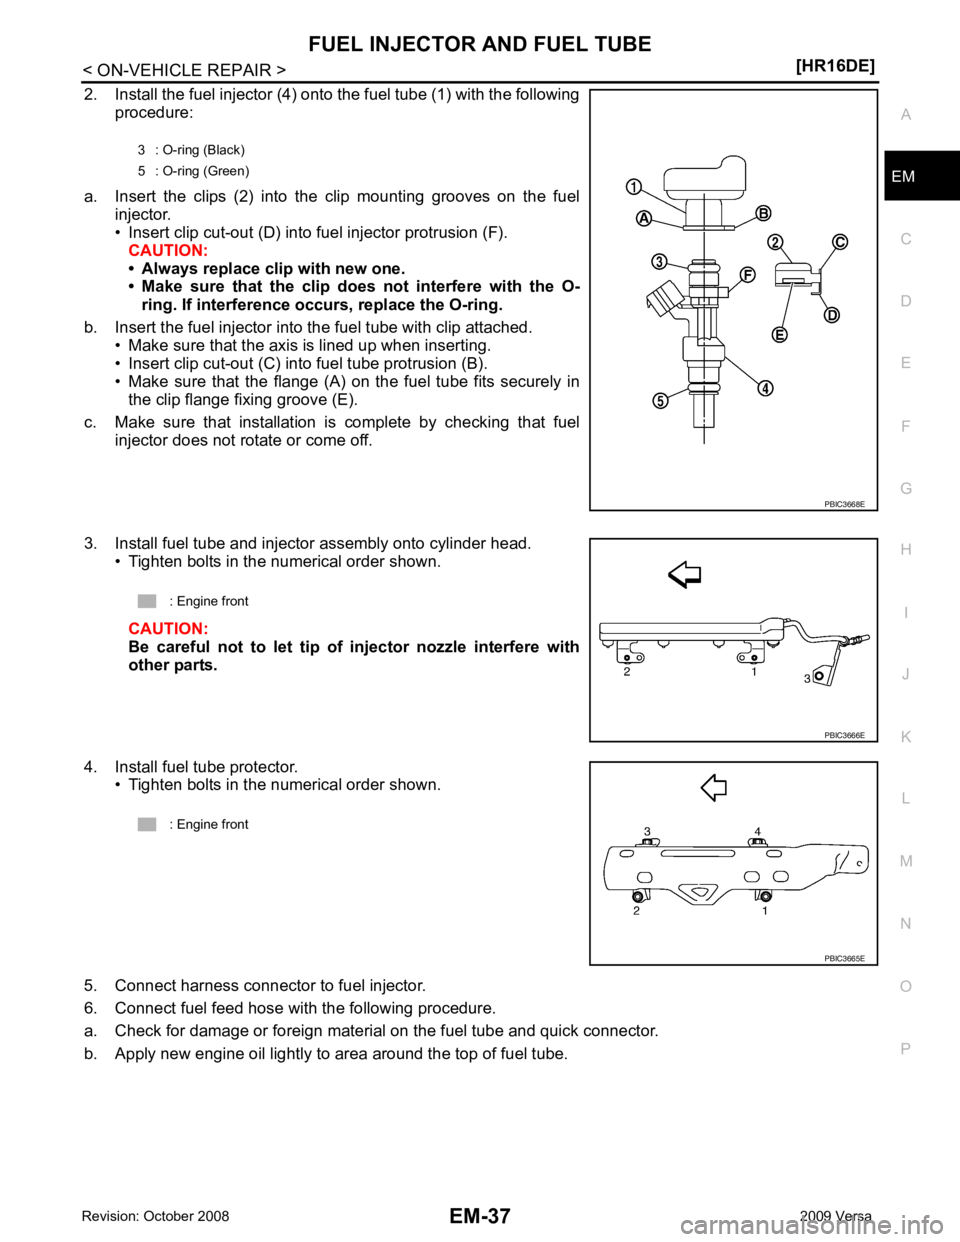
2. Install the fuel injector (4) onto the fuel tube (1) with the following
procedure:
a. Insert the clips (2) into the clip mounting grooves on the fuel injector.
• Insert clip cut-out (D) into fuel injector protrusion (F). CAUTION:
• Always replace clip with new one.
• Make sure that the clip do es not interfere with the O-
ring. If interference occurs, replace the O-ring.
b. Insert the fuel injector into the fuel tube with clip attached. • Make sure that the axis is lined up when inserting.
• Insert clip cut-out (C) into fuel tube protrusion (B).
• Make sure that the flange (A) on the fuel tube fits securely in the clip flange fixing groove (E).
c. Make sure that installation is complete by checking that fuel injector does not rotate or come off.
3. Install fuel tube and injector assembly onto cylinder head. • Tighten bolts in the numerical order shown.
CAUTION:
Be careful not to let tip of injector nozzle interfere with
other parts.
4. Install fuel tube protector. • Tighten bolts in the numerical order shown.
5. Connect harness connector to fuel injector.
6. Connect fuel feed hose with the following procedure.
a. Check for damage or foreign material on the fuel tube and quick connector.
b. Apply new engine oil lightly to area around the top of fuel tube. 3 : O-ring (Black)
5 : O-ring (Green)
Page 2985 of 4331
![NISSAN LATIO 2009 Service Repair Manual EM-38< ON-VEHICLE REPAIR >
[HR16DE]
FUEL INJECTOR AND FUEL TUBE
c. Align center to insert quick connector straightly into fuel tube. • Insert quick connector to fuel tube until the top spoo NISSAN LATIO 2009 Service Repair Manual EM-38< ON-VEHICLE REPAIR >
[HR16DE]
FUEL INJECTOR AND FUEL TUBE
c. Align center to insert quick connector straightly into fuel tube. • Insert quick connector to fuel tube until the top spoo](/img/5/57359/w960_57359-2984.png)
EM-38< ON-VEHICLE REPAIR >
[HR16DE]
FUEL INJECTOR AND FUEL TUBE
c. Align center to insert quick connector straightly into fuel tube. • Insert quick connector to fuel tube until the top spool on fueltube is inserted completely and the 2nd level spool is posi-
tioned slightly below quick connector bottom end.
CAUTION:
• Hold “A” position shown when inserting fuel tube into
quick connector.
• Carefully align center to avoid inclined insertion to pre-
vent damage to O-ring inside quick connector.
• Insert until you hear a “click” sound and actually feel
the engagement.
• To avoid misidentification of engagement with a similar sound, be sure to pe rform the next step.
d. Before clamping fuel feed hose with hose clamp, pull quick connector hard by hand holding “A” position.
Make sure it is completely engaged (connected) so that it does not come out from fuel tube.
e. Install quick connector cap (1) to quick connector connection. • Install quick connector cap with the side arrow facing quick
connector side (fuel feed hose side).
CAUTION:
• Make sure that the quick connector and fuel tube are
securely engaged with the quick connector cap mount-
ing groove.
• Quick connector may not be connected correctly if quick connector cap cannot be installed easily. Remove
the quick connector cap, and then check the connection
of quick connector again.
f. Install fuel feed hose to hose clamp.
7. Installation of the remaining components is in the reverse order of removal.
Inspection INFOID:0000000004784288
INSPECTION AFTER INSTALLATION
Check on Fuel Leakage
1. Turn ignition switch “ON” (with the engine stopped). With fuel pressure applied to fuel piping, make sure
there are no fuel leaks at connection points.
NOTE:
Use mirrors for checking at points out of clear sight.
2. Start the engine. With engine speed increased, make su re again that there are no fuel leaks at connection
points.
CAUTION:
Never touch the engine immediately after it is stopped, as the engine becomes extremely hot. KBIA0272E
PBIC3664E
Page 2986 of 4331
EM
NP
O
OIL PAN (LOWER)
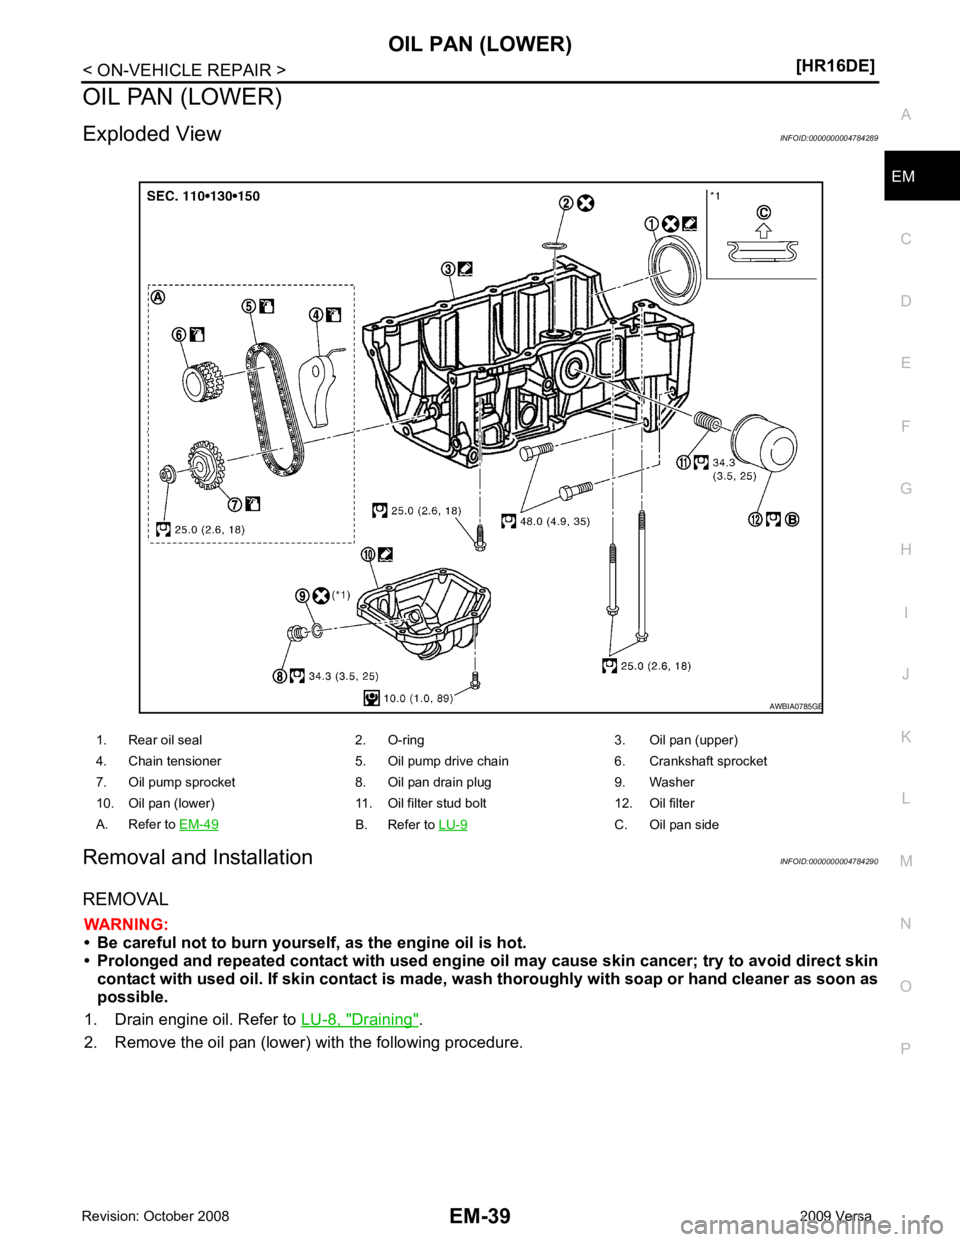
Exploded View INFOID:0000000004784289
Removal and Installation INFOID:0000000004784290
REMOVAL WARNING:
• Be careful not to burn yourself, as the engine oil is hot.
• Prolonged and repeated contact with used engine oil may cau se skin cancer; try to avoid direct skin
contact with used oil. If skin contact is made, w ash thoroughly with soap or hand cleaner as soon as
possible.
1. Drain engine oil. Refer to LU-8, " Draining " .
2. Remove the oil pan (lower) with the following procedure. 1. Rear oil seal 2. O-ring 3. Oil pan (upper)
4. Chain tensioner 5. Oil pump drive chain 6. Crankshaft sprocket
7. Oil pump sprocket 8. Oil pan drain plug 9. Washer
10. Oil pan (lower) 11. Oil filter stud bolt 12. Oil filter
A. Refer to EM-49 B. Refer to
LU-9 C. Oil pan side
Page 2987 of 4331
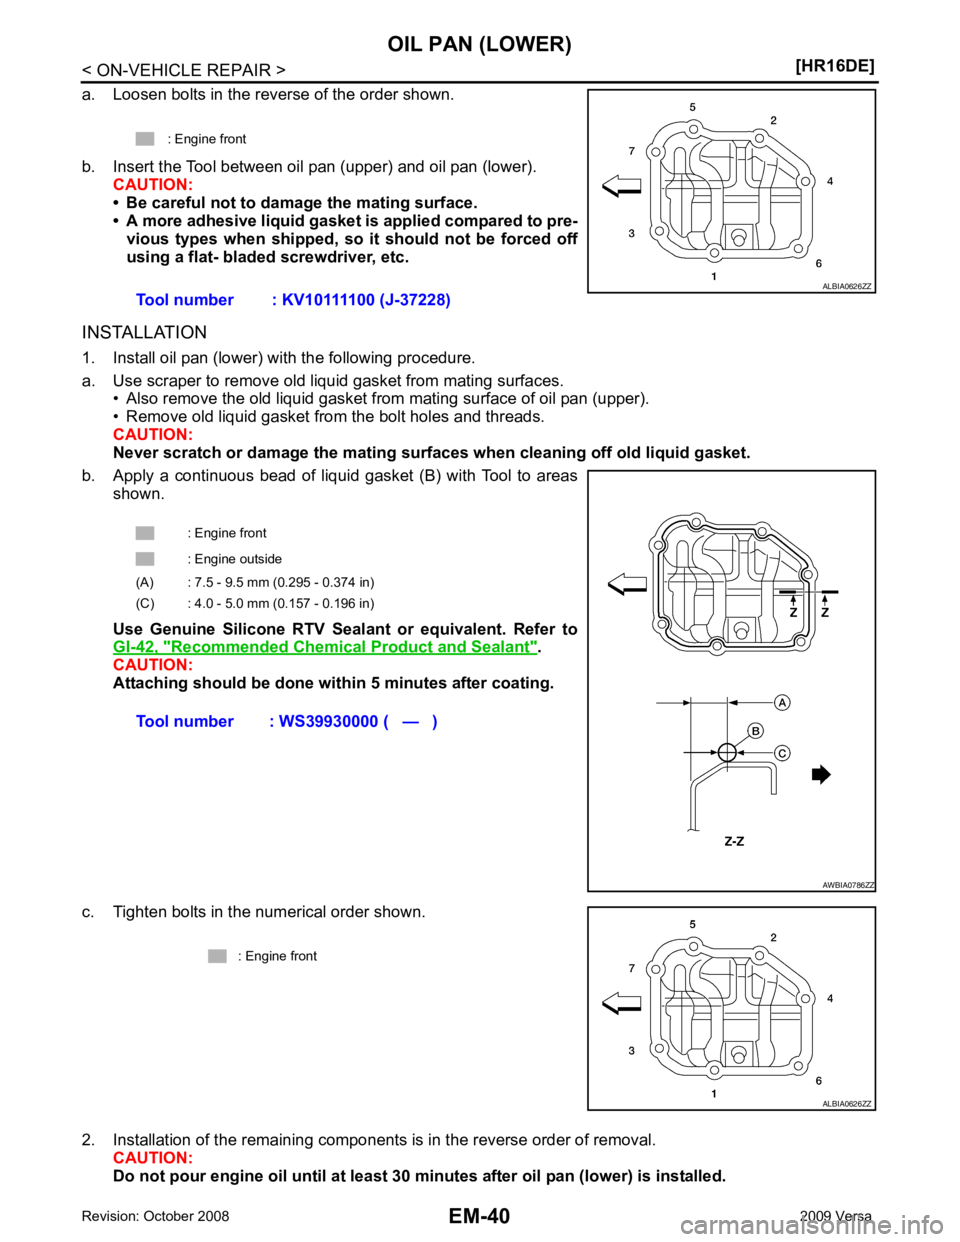
Recommended Chemical
Product and Sealant " .
CAUTION:
Attaching should be done with in 5 minutes after coating.
c. Tighten bolts in the numerical order shown.
2. Installation of the remaining components is in the reverse order of removal. CAUTION:
Do not pour engine oil unti l at least 30 minutes after oil pan (lower) is installed.
: Engine front
Tool number : KV10111100 (J-37228)
Page 2988 of 4331
EM
NP
O
Inspection
INFOID:0000000004784291
INSPECTION AFTER INSTALLATION 1. Check the engine oil level and adjust as necessary. Refer to LU-7, " Inspection " .
2. Start engine, and check there are no leaks of engine oil.
3. Stop engine and wait for 10 minutes.
4. Check the engine oil level again. Refer to LU-7, " Inspection " .
Page 2989 of 4331
![NISSAN LATIO 2009 Service Repair Manual EM-42< ON-VEHICLE REPAIR >
[HR16DE]
OIL PAN (UPPER) AND OIL STRAINER
OIL PAN (UPPER) AND OIL STRAINER
Component INFOID:0000000004784292
Removal and Installation INFOID:0000000004784293
NOTE:
The oil s NISSAN LATIO 2009 Service Repair Manual EM-42< ON-VEHICLE REPAIR >
[HR16DE]
OIL PAN (UPPER) AND OIL STRAINER
OIL PAN (UPPER) AND OIL STRAINER
Component INFOID:0000000004784292
Removal and Installation INFOID:0000000004784293
NOTE:
The oil s](/img/5/57359/w960_57359-2988.png)
EM-42< ON-VEHICLE REPAIR >
[HR16DE]
OIL PAN (UPPER) AND OIL STRAINER
OIL PAN (UPPER) AND OIL STRAINER
Component INFOID:0000000004784292
Removal and Installation INFOID:0000000004784293
NOTE:
The oil strainer and oil pump are included in the oil pan (upper). Individual disassembly is prohibited.
REMOVAL
1. Remove engine and transaxle assembly from the vehicle, and then separate engine and transaxle. Refer to EM-88, " Removal and Installation " .
2. Install engine assembly to widely use engine stand. Refer to EM-93, " Setting " .
3. Drain engine oil. Refer to LU-8, " Draining " .
4. Remove the oil pan (lower). Refer to EM-39, " Removal and Installation " .
5. Remove oil level gauge.
6. Remove front cover and timing chain. Refer to EM-49, " Removal and Installation " .
7. Remove oil pump sprocket and crankshaft sprocket together with oil pump drive chain. Refer to EM-49," Exploded View " .
8. Remove oil pan (upper) using the following procedure. 1. Rear oil seal 2. O-ring 3. Oil pan (upper)
4. Chain tensioner 5. Oil pump drive chain 6. Crankshaft sprocket
7. Oil pump sprocket 8. Oil pan drain plug 9. Washer
10. Oil pan (lower) 11. Oil filter stud bolt 12. Oil filter
A. Refer to EM-49 B. Refer to
LU-9 C. Oil pan side AWBIA0785GB
Page 2990 of 4331
EM
NP
O
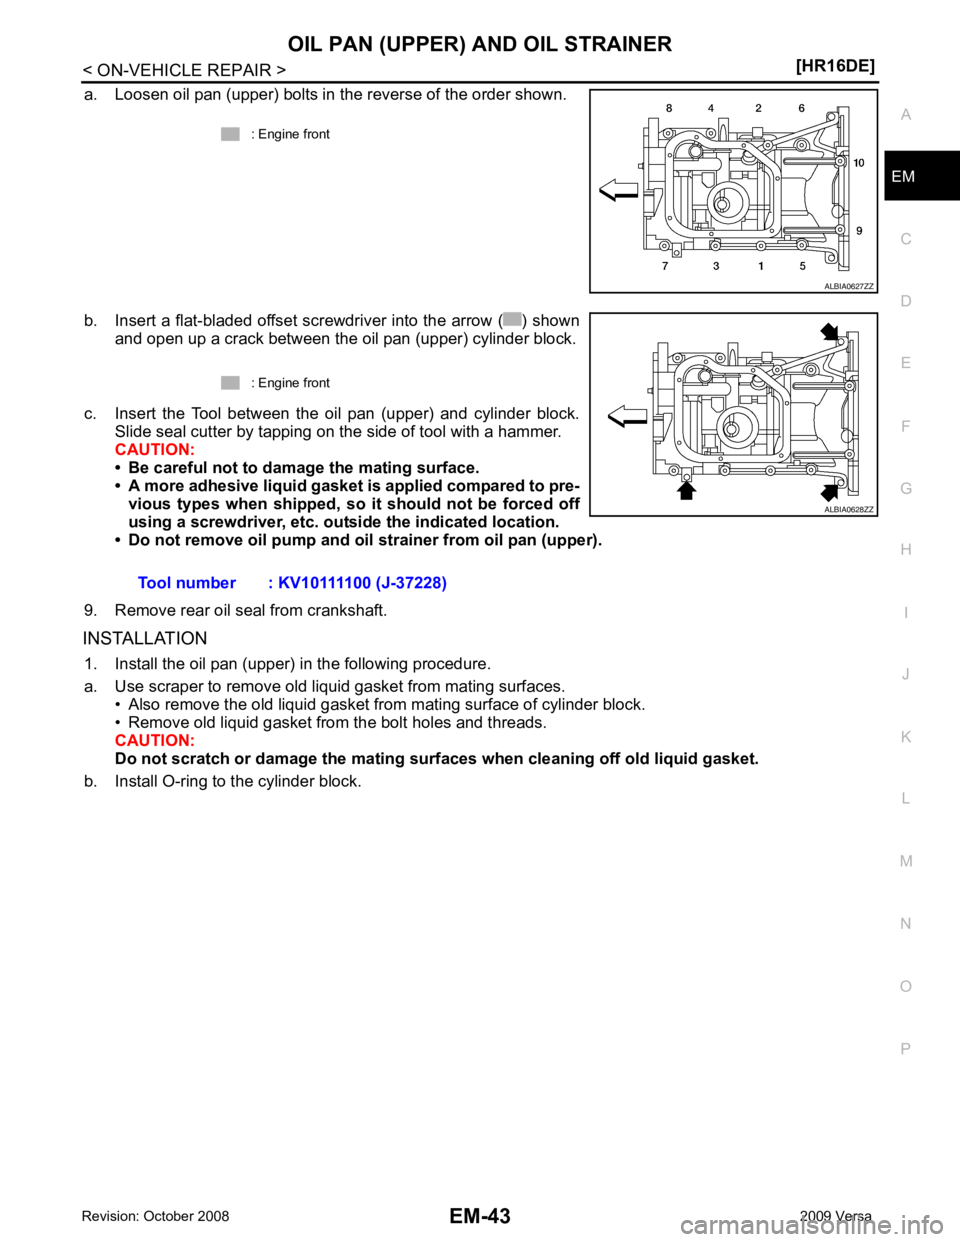
a. Loosen oil pan (upper) bolts in the reverse of the order shown.
b. Insert a flat-bladed offset screwdriver into the arrow ( ) shown and open up a crack between the oil pan (upper) cylinder block.
c. Insert the Tool between the oil pan (upper) and cylinder block. Slide seal cutter by tapping on the side of tool with a hammer.
CAUTION:
• Be careful not to damage the mating surface.
• A more adhesive liquid gasket is applied compared to pre-
vious types when shipped, so it should not be forced off
using a screwdriver, etc. ou tside the indicated location.
• Do not remove oil pump and oil strainer from oil pan (upper).
9. Remove rear oil seal from crankshaft.
INSTALLATION 1. Install the oil pan (upper) in the following procedure.
a. Use scraper to remove old liquid gasket from mating surfaces. • Also remove the old liquid gasket from mating surface of cylinder block.
• Remove old liquid gasket from the bolt holes and threads.
CAUTION:
Do not scratch or damage the mating su rfaces when cleaning off old liquid gasket.
b. Install O-ring to the cylinder block. : Engine front