NISSAN NAVARA 2005 Repair Workshop Manual
Manufacturer: NISSAN, Model Year: 2005, Model line: NAVARA, Model: NISSAN NAVARA 2005Pages: 3171, PDF Size: 49.59 MB
Page 1771 of 3171
IP-12
INSTRUMENT PANEL ASSEMBLY
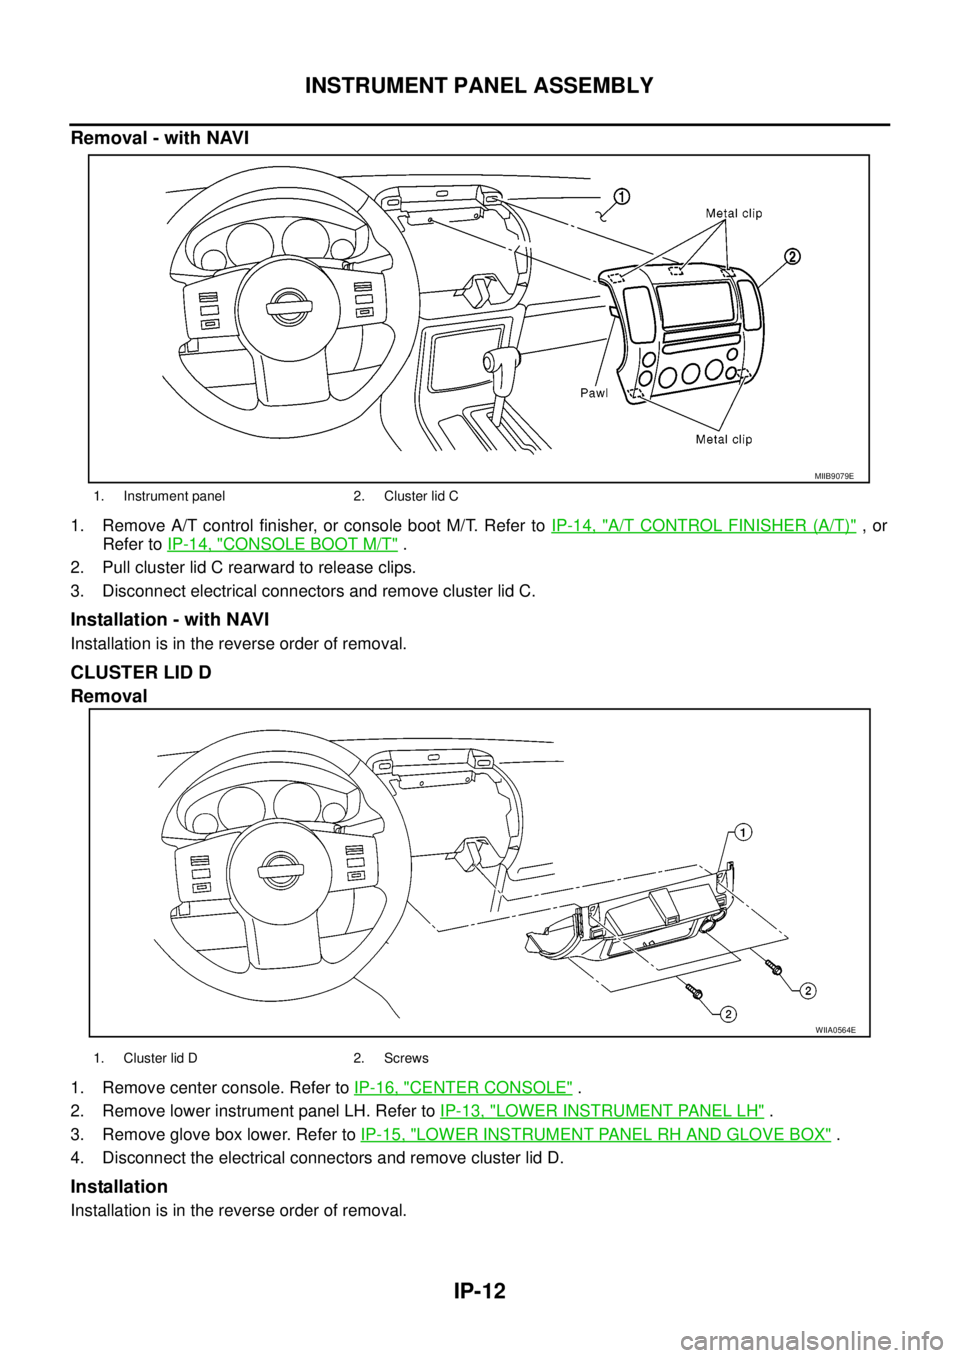
Removal - with NAVI
1. Remove A/T control finisher, or console boot M/T. Refer toIP-14, "A/T CONTROL FINISHER (A/T)",or
Refer toIP-14, "
CONSOLE BOOT M/T".
2. Pull cluster lid C rearward to release clips.
3. Disconnect electrical connectors and remove cluster lid C.
Installation - with NAVI
Installation is in the reverse order of removal.
CLUSTER LID D
Removal
1. Remove center console. Refer toIP-16, "CENTER CONSOLE".
2. Remove lower instrument panel LH. Refer toIP-13, "
LOWER INSTRUMENT PANEL LH".
3. Remove glove box lower. Refer toIP-15, "
LOWER INSTRUMENT PANEL RH AND GLOVE BOX".
4. Disconnect the electrical connectors and remove cluster lid D.
Installation
Installation is in the reverse order of removal.
1. Instrument panel 2. Cluster lid C
MIIB9079E
WIIA0564E
1. Cluster lid D 2. Screws
Page 1772 of 3171
INSTRUMENT PANEL ASSEMBLY
IP-13
C
D
E
F
G
H
J
K
L
MA
B
IP
LOWER INSTRUMENT PANEL LH
Removal
1. Remove LH front kick plate.
2. Remove lower dash side finisher. Refer toEI-34, "
Removal".
3. Remove front pillar finisher. Refer toEI-35, "
Removal".
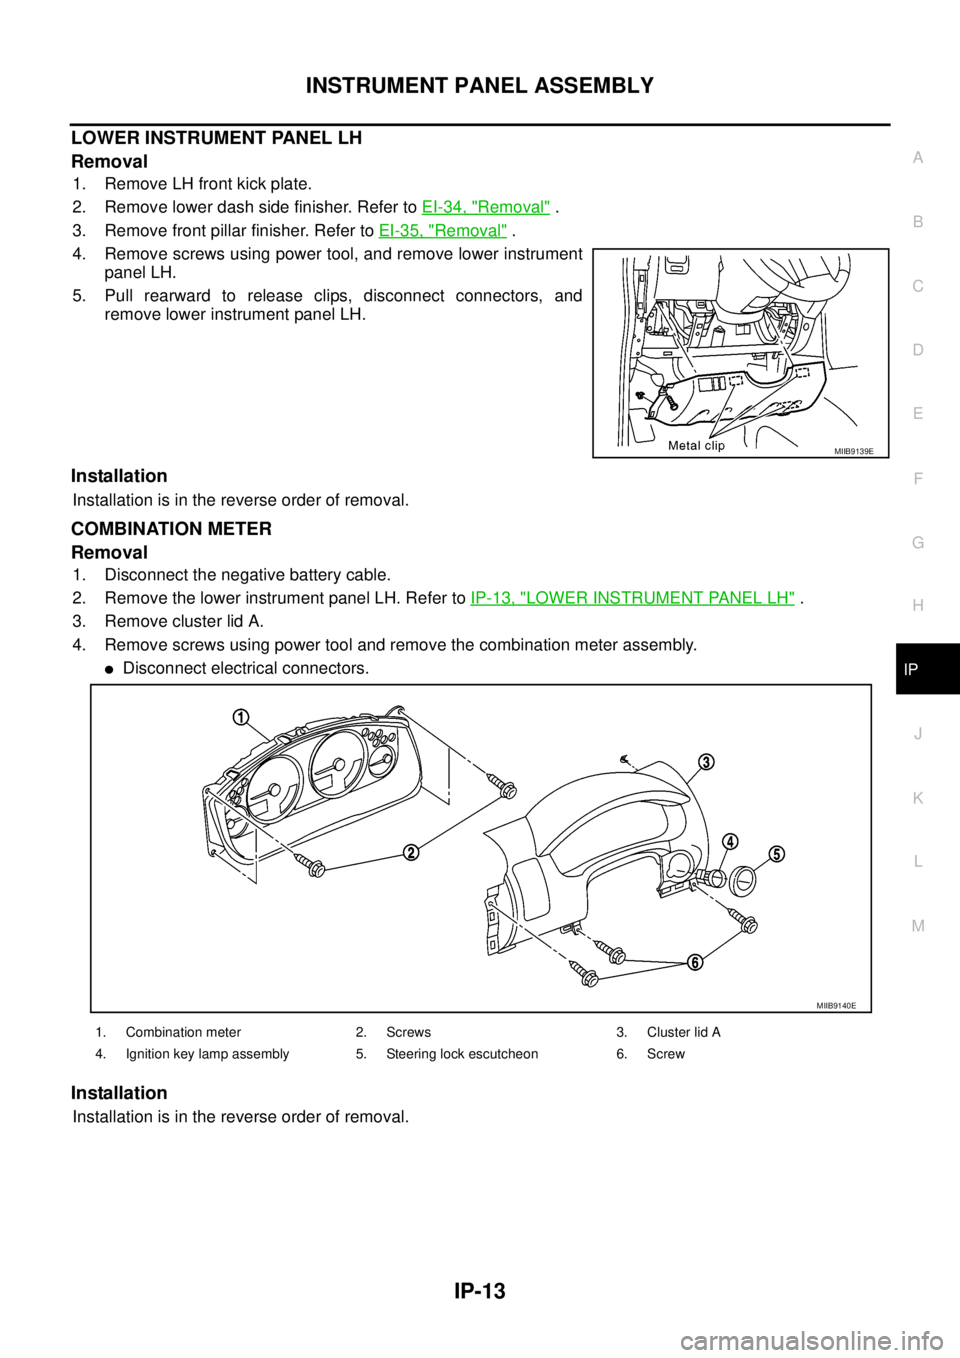
4. Remove screws using power tool, and remove lower instrument
panel LH.
5. Pull rearward to release clips, disconnect connectors, and
remove lower instrument panel LH.
Installation
Installation is in the reverse order of removal.
COMBINATION METER
Removal
1. Disconnect the negative battery cable.
2. Remove the lower instrument panel LH. Refer toIP-13, "
LOWER INSTRUMENT PANEL LH".
3. Remove cluster lid A.
4. Remove screws using power tool and remove the combination meter assembly.
lDisconnect electrical connectors.
Installation
Installation is in the reverse order of removal.
MIIB9139E
1. Combination meter 2. Screws 3. Cluster lid A
4. Ignition key lamp assembly 5. Steering lock escutcheon 6. Screw
MIIB9140E
Page 1773 of 3171
IP-14
INSTRUMENT PANEL ASSEMBLY
A/T CONTROL FINISHER (A/T)
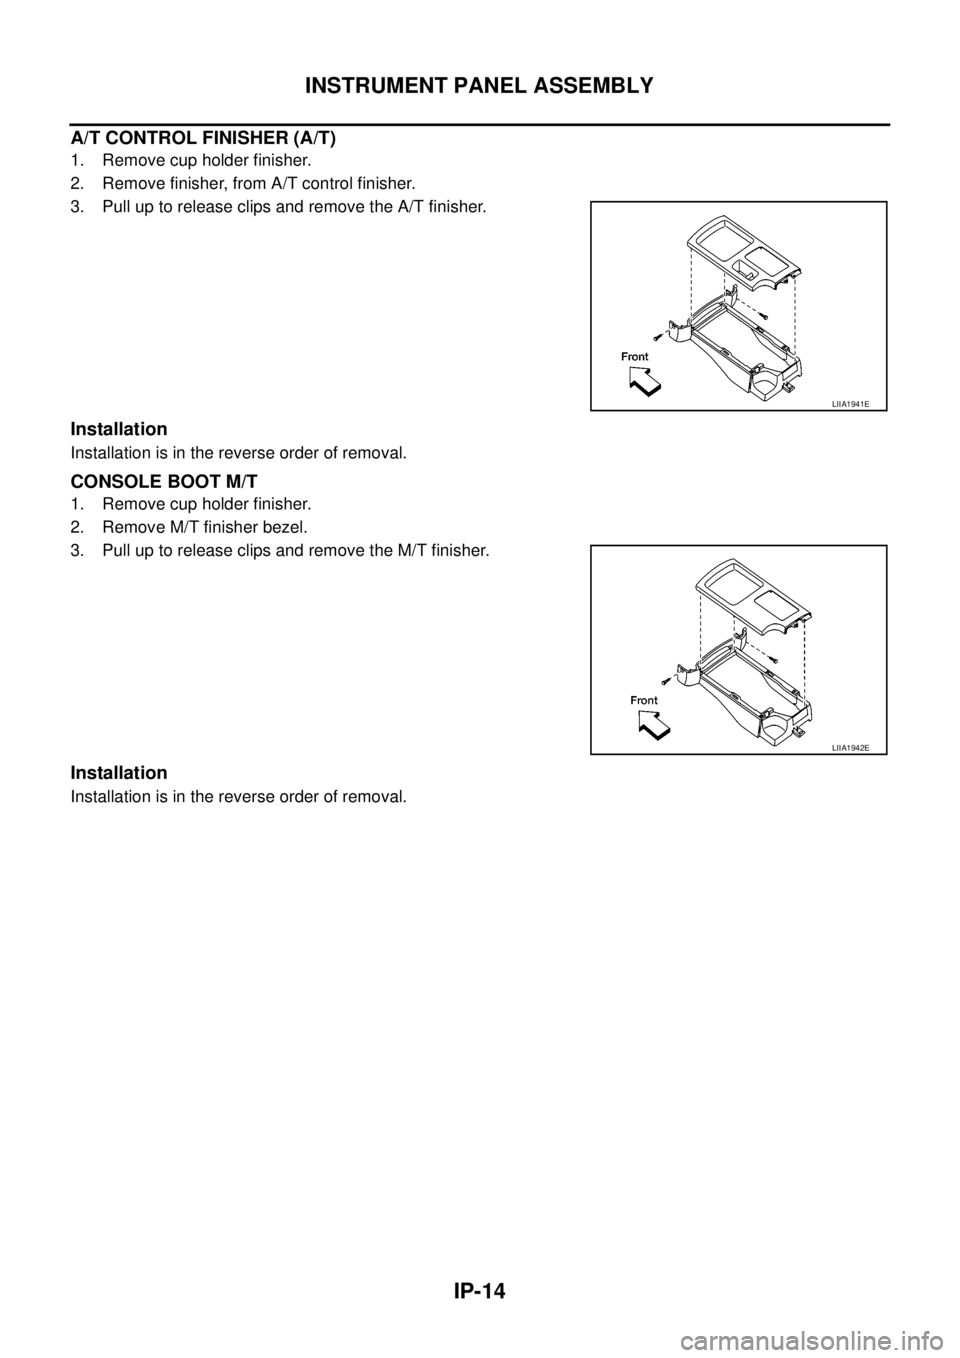
1. Remove cup holder finisher.
2. Remove finisher, from A/T control finisher.
3. Pull up to release clips and remove the A/T finisher.
Installation
Installation is in the reverse order of removal.
CONSOLE BOOT M/T
1. Remove cup holder finisher.
2. Remove M/T finisher bezel.
3. Pull up to release clips and remove the M/T finisher.
Installation
Installation is in the reverse order of removal.
LIIA1941E
LIIA1942E
Page 1774 of 3171
INSTRUMENT PANEL ASSEMBLY
IP-15
C
D
E
F
G
H
J
K
L
MA
B
IP
LOWER INSTRUMENT PANEL RH AND GLOVE BOX
Removal - lower glove box
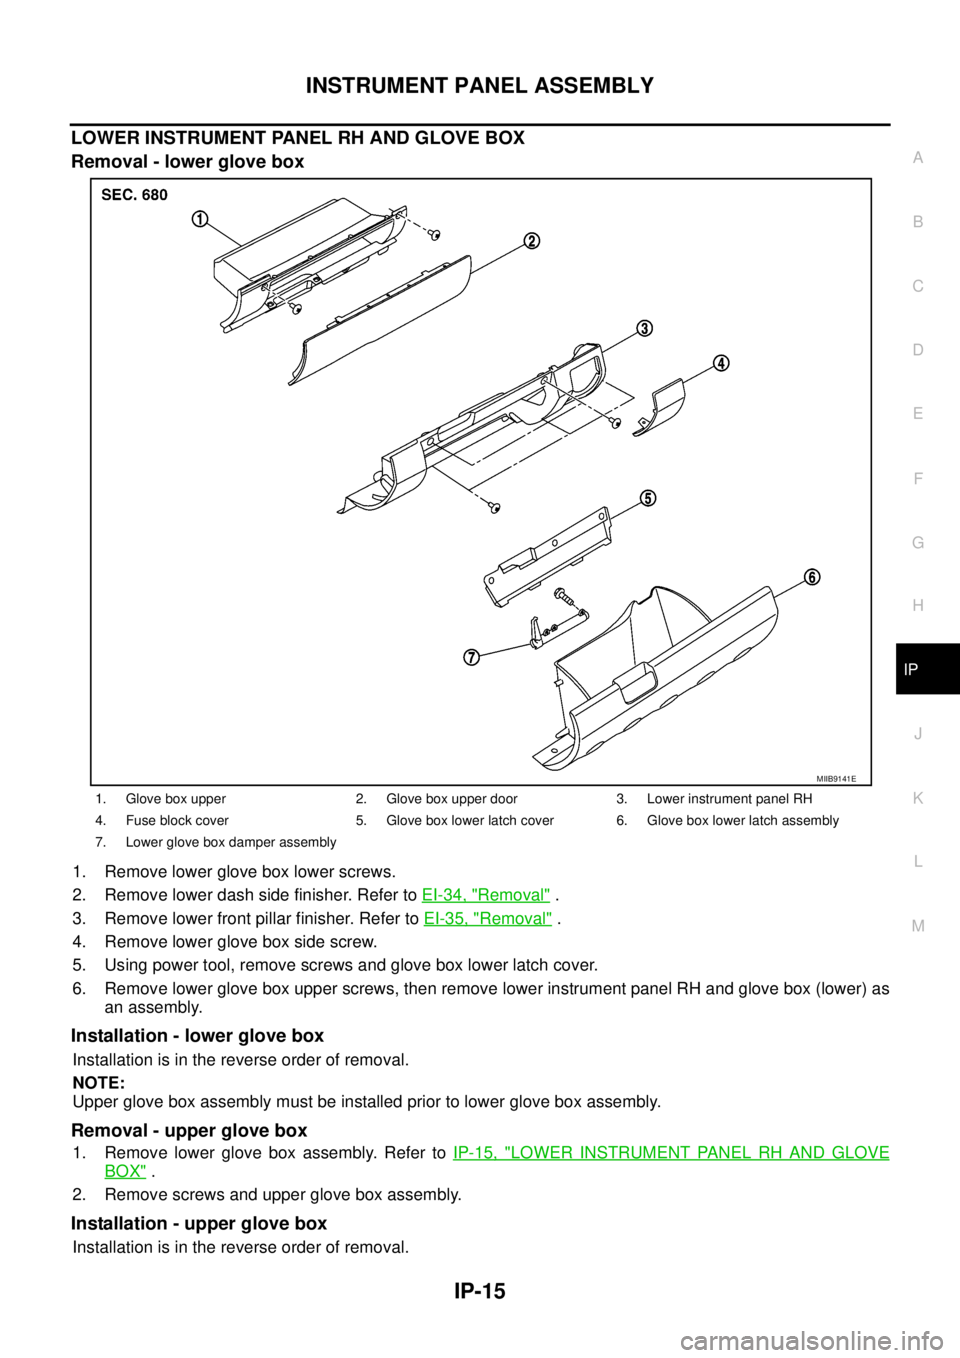
1. Remove lower glove box lower screws.
2. Remove lower dash side finisher. Refer toEI-34, "
Removal".
3. Remove lower front pillar finisher. Refer toEI-35, "
Removal".
4. Remove lower glove box side screw.
5. Using power tool, remove screws and glove box lower latch cover.
6. Remove lower glove box upper screws, then remove lower instrument panel RH and glove box (lower) as
an assembly.
Installation - lower glove box
Installation is in the reverse order of removal.
NOTE:
Upper glove box assembly must be installed prior to lower glove box assembly.
Removal - upper glove box
1. Remove lower glove box assembly. Refer toIP-15, "LOWER INSTRUMENT PANEL RH AND GLOVE
BOX".
2. Remove screws and upper glove box assembly.
Installation - upper glove box
Installation is in the reverse order of removal.
1. Glove box upper 2. Glove box upper door 3. Lower instrument panel RH
4. Fuse block cover 5. Glove box lower latch cover 6. Glove box lower latch assembly
7. Lower glove box damper assembly
MIIB9141E
Page 1775 of 3171
IP-16
INSTRUMENT PANEL ASSEMBLY
CENTER CONSOLE
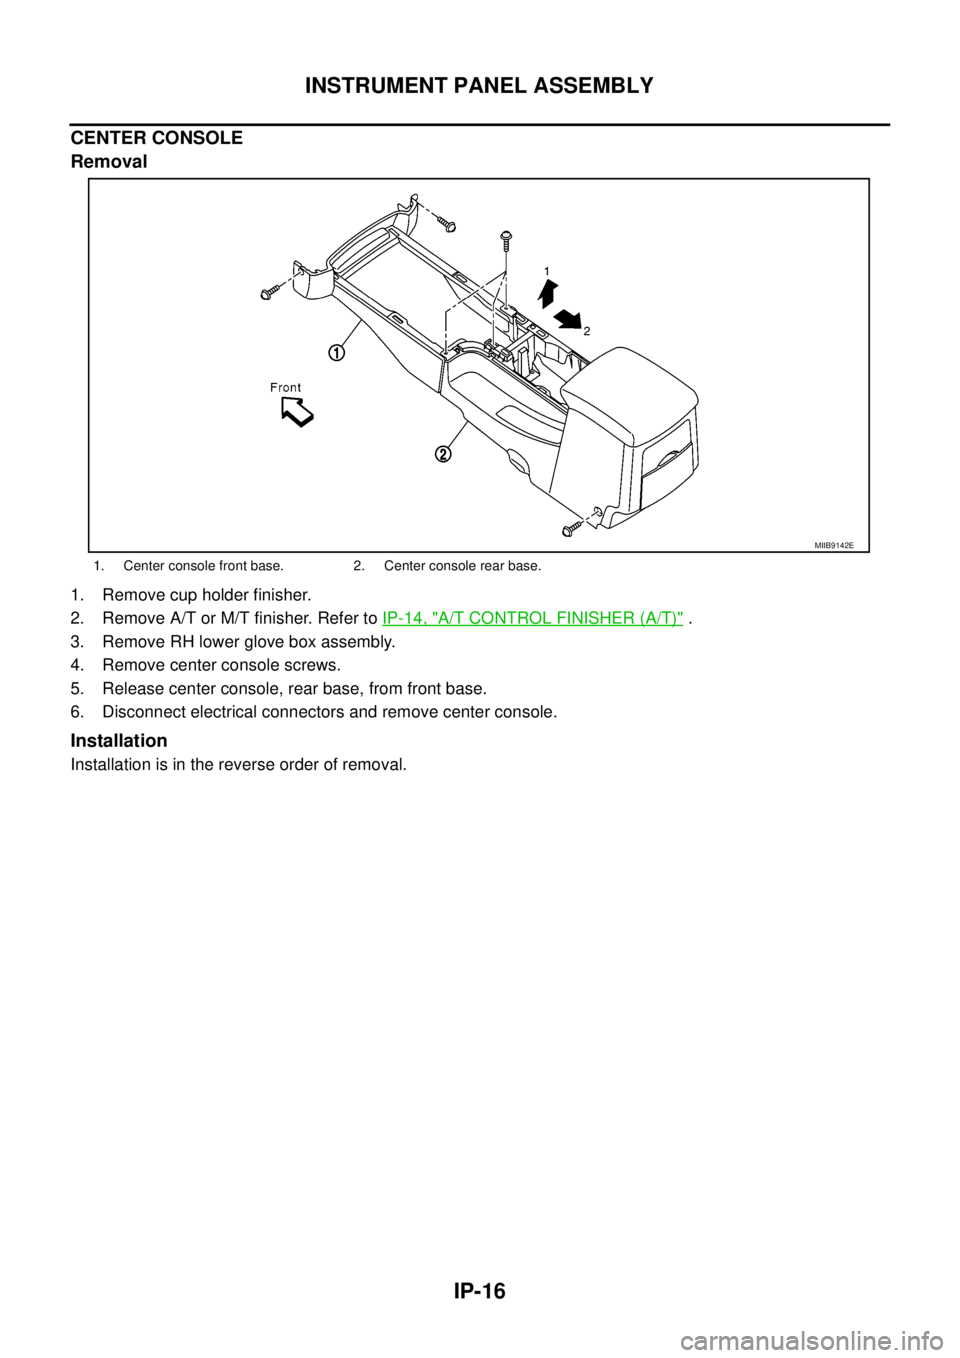
Removal
1. Remove cup holder finisher.
2. Remove A/T or M/T finisher. Refer toIP-14, "
A/T CONTROL FINISHER (A/T)".
3. Remove RH lower glove box assembly.
4. Remove center console screws.
5. Release center console, rear base, from front base.
6. Disconnect electrical connectors and remove center console.
Installation
Installation is in the reverse order of removal.
1. Center console front base. 2. Center console rear base.
MIIB9142E
Page 1776 of 3171
INSTRUMENT PANEL ASSEMBLY
IP-17
C
D
E
F
G
H
J
K
L
MA
B
IP
Disassembly and AssemblyEIS00DZ0
CENTER CONSOLE
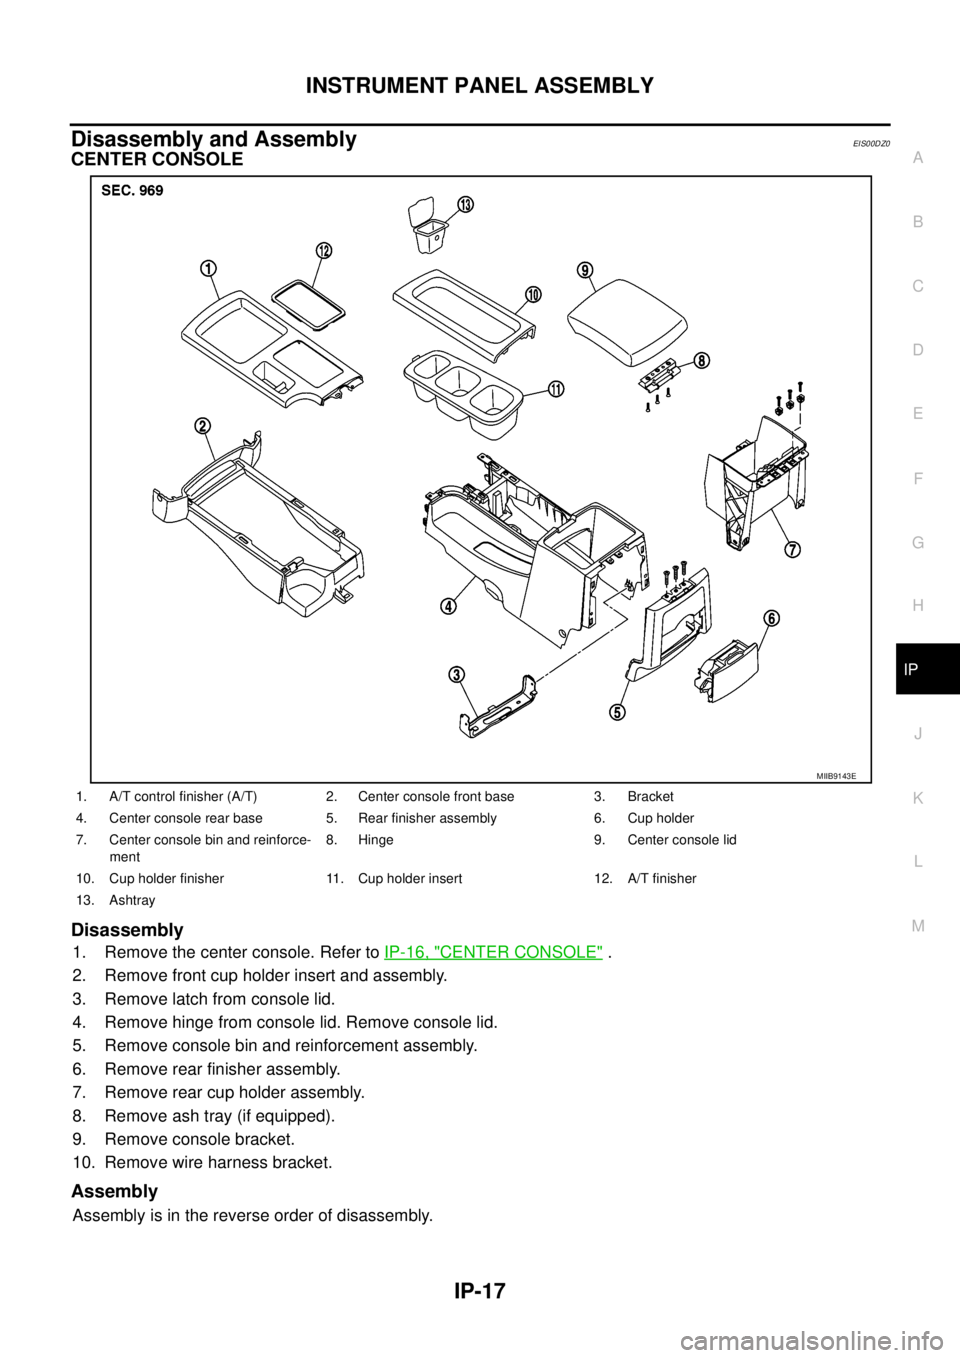
Disassembly
1. Remove the center console. Refer toIP-16, "CENTER CONSOLE".
2. Remove front cup holder insert and assembly.
3. Remove latch from console lid.
4. Remove hinge from console lid. Remove console lid.
5. Remove console bin and reinforcement assembly.
6. Remove rear finisher assembly.
7. Remove rear cup holder assembly.
8. Remove ash tray (if equipped).
9. Remove console bracket.
10. Remove wire harness bracket.
Assembly
Assembly is in the reverse order of disassembly.
MIIB9143E
1. A/T control finisher (A/T) 2. Center console front base 3. Bracket
4. Center console rear base 5. Rear finisher assembly 6. Cup holder
7. Center console bin and reinforce-
ment8. Hinge 9. Center console lid
10. Cup holder finisher 11. Cup holder insert 12. A/T finisher
13. Ashtray
Page 1777 of 3171

IP-18
INSTRUMENT PANEL ASSEMBLY
Page 1778 of 3171
LAN-1
LAN SYSTEM
K ELECTRICAL
CONTENTS
C
D
E
F
G
H
I
J
L
M
SECTIONLAN
A
B
LAN
LAN SYSTEM
CAN
PRECAUTIONS .......................................................... 3
Precautions for Supplemental Restraint System
(SRS)“AIRBAG”and“SEATBELTPRE-TEN-
SIONER” .................................................................. 3
Precautions When Using CONSULT-II ..................... 3
CHECK POINTS FOR USING CONSULT-II ......... 3
Precautions For Trouble Diagnosis .......................... 3
CAN SYSTEM ....................................................... 3
Precautions For Harness Repair .............................. 3
CAN SYSTEM ....................................................... 3
TROUBLE DIAGNOSES WORK FLOW .................... 5
When Displaying CAN Communication System
Errors ....................................................................... 5
WHEN A MALFUNCTION IS DETECTED BY
CAN COMMUNICATION SYSTEM ....................... 5
WHEN A MALFUNCTION IS DETECTED
EXCEPT CAN COMMUNICATION SYSTEM ........ 5
TROUBLE DIAGNOSIS FLOW CHART ............... 6
Diagnosis Procedure ................................................ 7
SELECTING CAN SYSTEM TYPE (HOW TO
USE SPECIFICATION TABLE) ............................. 7
ACQUISITION OF DATA BY CONSULT-II ............ 8
HOW TO USE CHECK SHEET TABLE ................ 9
CAN Diagnostic Support Monitor ........................... 15
DESCRIPTION OF “CAN DIAG SUPPORT
MNTR” SCREEN FOR ECM ............................... 15
DESCRIPTION OF “CAN DIAG SUPPORT
MNTR” SCREEN FOR TCM ............................... 16
DESCRIPTION OF “CAN DIAG SUPPORT
MNTR” SCREEN FOR NAVI CONTROL UNIT ... 17
DESCRIPTION OF “CAN DIAG SUPPORT
MNTR” SCREEN FOR DIFFERENTIAL LOCK
CONTROL UNIT ................................................. 18
DESCRIPTION OF “CAN DIAG SUPPORT
MNTR” SCREEN FOR FRONT AIR CONTROL... 19
DESCRIPTION OF “CAN DIAG SUPPORT
MNTR” SCREEN FOR BCM ............................... 20
DESCRIPTION OF “CAN DIAG SUPPORT
MNTR” SCREEN FOR TRANSFER CONTROLUNIT .................................................................... 21
DESCRIPTION OF “CAN DIAG SUPPORT
MNTR” SCREEN FOR ABS ACTUATOR AND
ELECTRIC UNIT (CONTROL UNIT) ................... 21
DESCRIPTION OF “CAN DIAG SUPPORT
MNTR” SCREEN FOR IPDM E/R ....................... 22
CAN COMMUNICATION ........................................... 23
System Description ................................................. 23
Component Parts and Harness Connector Location... 23
LHD MODELS ..................................................... 23
RHD MODELS .................................................... 24
Schematic ............................................................... 25
Wiring Diagram — CAN — ..................................... 26
CAN Communication Unit ....................................... 30
TYPE 1/ TYPE 2/ TYPE 3 ................................... 32
TYPE 4/ TYPE 5 .................................................. 34
TYPE 6/ TYPE 7/ TYPE 8/ TYPE 9/ TYPE 10/
TYPE 11/ TYPE 16/ TYPE 17 .............................. 36
TYPE 12/ TYPE 13/ TYPE 14/ TYPE 15 ............. 40
CAN SYSTEM (TYPE 1) ........................................... 44
Component Parts and Harness Connector Location... 44
Schematic ............................................................... 44
Wiring Diagram — CAN — ..................................... 44
Check Sheet ........................................................... 45
CHECK SHEET RESULTS (EXAMPLE) ............. 47
CAN SYSTEM (TYPE 2) ........................................... 56
Component Parts and Harness Connector Location... 56
Schematic ............................................................... 56
Wiring Diagram — CAN — ..................................... 56
Check Sheet ........................................................... 57
CHECK SHEET RESULTS (EXAMPLE) ............. 59
CAN SYSTEM (TYPE 3) ........................................... 68
Component Parts and Harness Connector Location... 68
Schematic ............................................................... 68
Wiring Diagram — CAN — ..................................... 68
Check Sheet ........................................................... 69
CHECK SHEET RESULTS (EXAMPLE) ............. 71
CAN SYSTEM (TYPE 4) ........................................... 82
Component Parts and Harness Connector Location... 82
Schematic ............................................................... 82
Page 1779 of 3171

LAN-2
Wiring Diagram — CAN — ..................................... 82
Check Sheet ........................................................... 83
CHECK SHEET RESULTS (EXAMPLE) ............. 85
CAN SYSTEM (TYPE 5) ........................................... 96
Component Parts and Harness Connector Location... 96
Schematic ............................................................... 96
Wiring Diagram — CAN — ..................................... 96
Check Sheet ........................................................... 97
CHECK SHEET RESULTS (EXAMPLE) ............. 99
CAN SYSTEM (TYPE 6) .........................................112
Component Parts and Harness Connector Location.112
Schematic .............................................................112
Wiring Diagram — CAN — ...................................112
Check Sheet .........................................................113
CHECK SHEET RESULTS (EXAMPLE) ...........115
CAN SYSTEM (TYPE 7) .........................................125
Component Parts and Harness Connector Location.125
Schematic .............................................................125
Wiring Diagram — CAN — ...................................125
Check Sheet .........................................................126
CHECK SHEET RESULTS (EXAMPLE) ...........128
CAN SYSTEM (TYPE 8) .........................................139
Component Parts and Harness Connector Location.139
Schematic .............................................................139
Wiring Diagram — CAN — ...................................139
Check Sheet .........................................................140
CHECK SHEET RESULTS (EXAMPLE) ...........142
CAN SYSTEM (TYPE 9) .........................................152
Component Parts and Harness Connector Location.152
Schematic .............................................................152
Wiring Diagram — CAN — ...................................152
Check Sheet .........................................................153
CHECK SHEET RESULTS (EXAMPLE) ...........155
CAN SYSTEM (TYPE 10) .......................................166
Component Parts and Harness Connector Location.166
Schematic .............................................................166
Wiring Diagram — CAN — ...................................166
Check Sheet .........................................................167
CHECK SHEET RESULTS (EXAMPLE) ...........169
CAN SYSTEM (TYPE 11) ........................................181
Component Parts and Harness Connector Location.181
Schematic .............................................................181
Wiring Diagram — CAN — ...................................181
Check Sheet .........................................................182
CHECK SHEET RESULTS (EXAMPLE) ...........185
CAN SYSTEM (TYPE 12) .......................................198
Component Parts and Harness Connector Location.198
Schematic .............................................................198
Wiring Diagram — CAN — ...................................198
Check Sheet .........................................................199
CHECK SHEET RESULTS (EXAMPLE) ...........201
CAN SYSTEM (TYPE 13) .......................................213
Component Parts and Harness Connector Location.213Schematic .............................................................213
Wiring Diagram — CAN — ...................................213
Check Sheet .........................................................214
CHECK SHEET RESULTS (EXAMPLE) ............217
CAN SYSTEM (TYPE 14) ........................................230
Component Parts and Harness Connector Location.230
Schematic .............................................................230
Wiring Diagram — CAN — ...................................230
Check Sheet .........................................................231
CHECK SHEET RESULTS (EXAMPLE) ............234
CAN SYSTEM (TYPE 15) ........................................248
Component Parts and Harness Connector Location.248
Schematic .............................................................248
Wiring Diagram — CAN — ...................................248
Check Sheet .........................................................249
CHECK SHEET RESULTS (EXAMPLE) ............252
CAN SYSTEM (TYPE 16) ........................................267
Component Parts and Harness Connector Location.267
Schematic .............................................................267
Wiring Diagram — CAN — ...................................267
Check Sheet .........................................................268
CHECK SHEET RESULTS (EXAMPLE) ............270
CAN SYSTEM (TYPE 17) ........................................279
Component Parts and Harness Connector Location.279
Schematic .............................................................279
Wiring Diagram — CAN — ...................................279
Check Sheet .........................................................280
CHECK SHEET RESULTS (EXAMPLE) ............282
TROUBLE DIAGNOSIS FOR SYSTEM ..................292
Inspection Between TCM and Data Link Connector
Circuit ....................................................................292
Inspection Between TCM and NAVI Control Unit Cir-
cuit ........................................................................293
Inspection Between NAVI Control Unit and Data
Link Connector Circuit ...........................................295
Inspection Between Data Link Connector and ABS
Actuator and Electric Unit (Control Unit) Circuit ....296
ECM Circuit Inspection for M/T Models ................297
ECM Circuit Inspection for A/T Models .................298
TCM Circuit Inspection ..........................................298
NAVI Control Unit Circuit Inspection .....................299
Differential Lock Control Unit Circuit Inspection ....299
Front Air Control Circuit Inspection .......................300
Data Link Connector Circuit Inspection .................300
BCM Circuit Inspection .........................................301
Combination Meter Circuit Inspection ...................301
Transfer Control Unit Circuit Inspection ................302
ABS Actuator and Electric Unit (Control Unit) Circuit
Inspection ..............................................................302
IPDM E/R Circuit Inspection .................................303
CAN Communication Circuit Inspection ................303
IPDM E/R Ignition Relay Circuit Inspection ...........304
Page 1780 of 3171
![NISSAN NAVARA 2005 Repair Workshop Manual PRECAUTIONS
LAN-3
[CAN]
C
D
E
F
G
H
I
J
L
MA
B
LAN
[CAN]PRECAUTIONSPFP:00001
Precautions for Supplemental Restraint System (SRS) “AIR BAG” and “SEAT
BELT PRE-TENSIONER”
EKS00Q9Y
The Supplement NISSAN NAVARA 2005 Repair Workshop Manual PRECAUTIONS
LAN-3
[CAN]
C
D
E
F
G
H
I
J
L
MA
B
LAN
[CAN]PRECAUTIONSPFP:00001
Precautions for Supplemental Restraint System (SRS) “AIR BAG” and “SEAT
BELT PRE-TENSIONER”
EKS00Q9Y
The Supplement](/img/5/57362/w960_57362-1779.png)
PRECAUTIONS
LAN-3
[CAN]
C
D
E
F
G
H
I
J
L
MA
B
LAN
[CAN]PRECAUTIONSPFP:00001
Precautions for Supplemental Restraint System (SRS) “AIR BAG” and “SEAT
BELT PRE-TENSIONER”
EKS00Q9Y
The Supplemental Restraint System such as “AIR BAG” and “SEAT BELT PRE-TENSIONER”, used along
with a front seat belt, helps to reduce the risk or severity of injury to the driver and front passenger for certain
types of collision. Information necessary to service the system safely is included in the SRS and SB section of
this Service Manual.
WARNING:
lTo avoid rendering the SRS inoperative, which could increase the risk of personal injury or death
in the event of a collision which would result in air bag inflation, all maintenance must be per-
formed by an authorized NISSAN/INFINITI dealer.
lImproper maintenance, including incorrect removal and installation of the SRS, can lead to per-
sonal injury caused by unintentional activation of the system. For removal of Spiral Cable and Air
Bag Module, see the SRS section.
lDo not use electrical test equipment on any circuit related to the SRS unless instructed to in this
Service Manual. SRS wiring harnesses can be identified by yellow and/or orange harnesses or
harness connectors.
Precautions When Using CONSULT-IIEKS00LBE
When connecting CONSULT-II to data link connector, connect them through CONSULT-II CONVERTER.
CAUTION:
If CONSULT-II is used with no connection of CONSULT-II CONVERTER, malfunctions might be
detected in self-diagnosis depending on control unit which carry out CAN communication.
CHECK POINTS FOR USING CONSULT-II
1. Has CONSULT-II been used without connecting CONSULT-II CONVERTER on this vehicle?
–If YES, GO TO 2.
–If NO, GO TO 5.
2. Is there any indication other than indications relating to CAN communication system in the self-diagnosis
results?
–If YES, GO TO 3.
–If NO, GO TO 4.
3. Based on self-diagnosis results unrelated to CAN communication, carry out the inspection.
4. Malfunctions may be detected in self-diagnosis depending on control units carrying out CAN communica-
tion. Therefore, erase the self-diagnosis results.
5. Diagnose CAN communication system. Refer toLAN-5, "
TROUBLE DIAGNOSES WORK FLOW".
Precautions For Trouble DiagnosisEKS00LBF
CAN SYSTEM
lDo not apply voltage of 7.0 V or higher to the measurement terminals.
lUse the tester with its open terminal voltage being 7.0 V or less.
lBe sure to turn ignition switch off and disconnect negative battery terminal before checking the circuit.
Precautions For Harness RepairEKS00LBG
CAN SYSTEM
lSolder the repaired parts, and wrap with tape. [Frays of twisted
line must be within 110 mm (4.33 in).]
PKIA0306E