NISSAN NAVARA 2005 Repair Workshop Manual
Manufacturer: NISSAN, Model Year: 2005, Model line: NAVARA, Model: NISSAN NAVARA 2005Pages: 3171, PDF Size: 49.59 MB
Page 2081 of 3171
![NISSAN NAVARA 2005 Repair Workshop Manual LAN-304
[CAN]
TROUBLE DIAGNOSIS FOR SYSTEM
3.CHECK HARNESS FOR SHORT CIRCUIT
Check continuity between data link connector M45 terminals 6, 14
and ground.
OK or NG
OK >> GO TO 4.
NG >>
lRepair harness. NISSAN NAVARA 2005 Repair Workshop Manual LAN-304
[CAN]
TROUBLE DIAGNOSIS FOR SYSTEM
3.CHECK HARNESS FOR SHORT CIRCUIT
Check continuity between data link connector M45 terminals 6, 14
and ground.
OK or NG
OK >> GO TO 4.
NG >>
lRepair harness.](/img/5/57362/w960_57362-2080.png)
LAN-304
[CAN]
TROUBLE DIAGNOSIS FOR SYSTEM
3.CHECK HARNESS FOR SHORT CIRCUIT
Check continuity between data link connector M45 terminals 6, 14
and ground.
OK or NG
OK >> GO TO 4.
NG >>
lRepair harness.
lChange harness if shielded lines are used for the har-
ness.
4.ECM AND IPDM E/R INTERNAL CIRCUIT INSPECTION
1. Remove ECM and IPDM E/R from vehicle.
2. Check resistance between ECM terminals.
3. Check resistance between IPDM E/R terminals.
OK or NG
OK >> GO TO 5.
NG >> Replace ECM and/or IPDM E/R.
5.CHECK SYMPTOM
1. Fill in described symptoms on the column “Symptom” in the check sheet.
2. Connect all connectors, and then make sure that the symptom is reproduced.
OK or NG
OK >> GO TO 6.
NG >> Refer toLAN-13, "
Example of Filling in Check Sheet When Initial Conditions Are Not Reproduced"
.
6.UNIT REPRODUCIBILITY INSPECTION
Perform the following procedure for each unit on the CAN network, and then perform reproducibility test.
1. Turn ignition switch OFF.
2. Disconnect the battery cable from the negative terminal.
3. Disconnect the unit connector.
4. Connect the battery cable to the negative terminal.
5. Make sure that the symptom filled in the “Symptom” of the check sheet is reproduced. (Do not confuse it
with the symptom related to removed unit.)
6. Make sure that the same symptom is reproduced.
Inspection results
Reproduced>>Install removed unit, and then check the other unit.
Not reproduced>>Replace removed unit.
IPDM E/R Ignition Relay Circuit InspectionEKS00O5C
Check the following. If no malfunction is found, replace the IPDM E/R.
lIPDM E/R power supply circuit. Refer toPG-24, "Check IPDM E/R Power Supply and Ground Circuit". 6 – Ground : Continuity should not exist.
14 – Ground : Continuity should not exist.
PKIA9872E
Terminal Resistance (Approx.)
95 87 108 – 132W
Terminal Resistance (Approx.)
39 40 108 – 132W
LKIA0037E
Page 2082 of 3171
![NISSAN NAVARA 2005 Repair Workshop Manual TROUBLE DIAGNOSIS FOR SYSTEM
LAN-305
[CAN]
C
D
E
F
G
H
I
J
L
MA
B
LAN
lIgnition power supply circuit. Refer toPG-12, "IGNITION POWER SUPPLY—IGNITION SW. IN ON
AND/OR START". NISSAN NAVARA 2005 Repair Workshop Manual TROUBLE DIAGNOSIS FOR SYSTEM
LAN-305
[CAN]
C
D
E
F
G
H
I
J
L
MA
B
LAN
lIgnition power supply circuit. Refer toPG-12, "IGNITION POWER SUPPLY—IGNITION SW. IN ON
AND/OR START".](/img/5/57362/w960_57362-2081.png)
TROUBLE DIAGNOSIS FOR SYSTEM
LAN-305
[CAN]
C
D
E
F
G
H
I
J
L
MA
B
LAN
lIgnition power supply circuit. Refer toPG-12, "IGNITION POWER SUPPLY—IGNITION SW. IN ON
AND/OR START".
Page 2083 of 3171
![NISSAN NAVARA 2005 Repair Workshop Manual LAN-306
[CAN]
TROUBLE DIAGNOSIS FOR SYSTEM NISSAN NAVARA 2005 Repair Workshop Manual LAN-306
[CAN]
TROUBLE DIAGNOSIS FOR SYSTEM](/img/5/57362/w960_57362-2082.png)
LAN-306
[CAN]
TROUBLE DIAGNOSIS FOR SYSTEM
Page 2084 of 3171
LT-1
LIGHTING SYSTEM
K ELECTRICAL
CONTENTS
C
D
E
F
G
H
I
J
L
M
SECTIONLT
A
B
LT
LIGHTING SYSTEM
PRECAUTIONS .......................................................... 4
Precautions for Supplemental Restraint System
(SRS)“AIRBAG”and“SEATBELTPRE-TEN-
SIONER” .................................................................. 4
General Precautions for Service Operations ............ 4
Wiring Diagrams and Trouble Diagnosis .................. 4
HEADLAMP -CONVENTIONAL TYPE- ..................... 5
Component Parts and Harness Connector Location..... 5
System Description .................................................. 5
OUTLINE ............................................................... 5
FRIENDLY LIGHTING FUNCTION ....................... 6
CAN Communication System Description ................ 6
Schematic ................................................................ 7
Wiring Diagram - H/LAMP - ...................................... 8
Terminals and Reference Value for BCM ............... 12
Terminals and Reference Values for IPDM E/R ..... 12
How to Proceed With Trouble Diagnosis ................ 13
Preliminary Check .................................................. 13
CHECK POWER SUPPLY AND GROUND CIR-
CUIT .................................................................... 13
CONSULT-II Functions (BCM) ............................... 15
CONSULT-II BASIC OPERATION ....................... 15
WORK SUPPORT ............................................... 16
DATA MONITOR ................................................. 16
ACTIVE TEST ..................................................... 17
CONSULT-II Functions (IPDM E/R) ....................... 18
CONSULT-II BASIC OPERATION ....................... 18
DATA MONITOR ................................................. 19
ACTIVE TEST ..................................................... 19
Headlamp High Beam Does Not Illuminate (Both
Sides) ..................................................................... 20
Headlamp HI Beam Does Not Illuminate (One Side)... 22
High Beam Indicator Lamp Does Not Illuminate .... 23
Headlamp LO Beam Does Not Illuminate (Both
Sides) ..................................................................... 23
Headlamp LO Beam Does Not Illuminate (One Side)
... 25
Headlamps Do Not Turn OFF ................................ 26
Aiming Adjustment ................................................. 28
LOW BEAM AND HIGH BEAM ........................... 28Bulb Replacement .................................................. 29
HEADLAMP HIGH/LOW BEAM .......................... 29
FRONT TURN SIGNAL LAMP ............................ 29
CLEARANCE LAMP ............................................ 29
Removal and Installation ........................................ 30
REMOVAL ........................................................... 30
INSTALLATION ................................................... 30
Disassembly and Assembly .................................... 30
DISASSEMBLY ................................................... 30
HEADLAMP - DAYTIME LIGHT SYSTEM - ............. 31
Component Parts and Harness Connector Location... 31
System Description ................................................. 31
OUTLINE ............................................................. 32
DAYTIME LIGHT OPERATION ........................... 32
COMBINATION SWITCH READING FUNCTION... 33
AUTO LIGHT OPERATION ................................. 33
CAN Communication System Description .............. 33
CAN Communication Unit ....................................... 33
Schematic ............................................................... 34
Wiring Diagram — DTRL — ................................... 35
Terminals and Reference Values for BCM .............. 39
Terminals and Reference Values for IPDM E/R ...... 39
How to Proceed With Trouble Diagnosis ................ 40
Preliminary Check .................................................. 40
CHECK POWER SUPPLY AND GROUND CIR-
CUIT .................................................................... 40
CONSULT-II Functions (BCM) ................................ 42
CONSULT-II BASIC OPERATION ....................... 42
DATA MONITOR ................................................. 43
ACTIVE TEST ..................................................... 44
CONSULT-II Functions (IPDM E/R) ........................ 45
CONSULT-II BASIC OPERATION ....................... 45
DATA MONITOR ................................................. 46
ACTIVE TEST ..................................................... 46
Daytime Light Control Does Not Operate Properly
(Normal Headlamps Operate Properly) .................. 47
Aiming Adjustment .................................................. 48
Bulb Replacement .................................................. 48
Removal and Installation ........................................ 48
Disassembly and Assembly .................................... 48
Page 2085 of 3171

LT-2
AUTO LIGHT SYSTEM ............................................. 49
Component Parts and Harness Connector Location... 49
System Description ................................................. 49
OUTLINE ............................................................. 49
COMBINATION SWITCH READING FUNCTION... 50
CAN Communication System Description .............. 50
Major Components and Functions .......................... 50
Schematic ............................................................... 51
Wiring Diagram — AUTO/L — ................................ 52
Terminals and Reference Values for BCM .............. 56
Terminals and Reference Values for IPDM E/R ...... 57
How to Proceed With Trouble Diagnosis ................ 57
Preliminary Check .................................................. 58
SETTING CHANGE FUNCTIONS ....................... 58
CHECK POWER SUPPLY AND GROUND CIR-
CUIT .................................................................... 58
CONSULT-II Function (BCM) .................................. 59
CONSULT-II OPERATION ................................... 59
WORK SUPPORT ............................................... 60
DATA MONITOR .................................................. 60
ACTIVE TEST ..................................................... 61
Trouble Diagnosis Chart by Symptom .................... 62
Lighting Switch Inspection ...................................... 62
Light and Rain Sensor System Inspection .............. 63
Removal and Installation of Light and Rain Sensor... 65
REMOVAL ........................................................... 65
INSTALLATION .................................................... 65
HEADLAMP AIMING CONTROL (MANUAL) ........... 66
Schematic ............................................................... 66
Wiring Diagram — H/AIM — ................................... 67
Removal and Installation ........................................ 70
Switch Circuit Inspection ........................................ 70
FRONT FOG LAMP .................................................. 71
Component Parts and Harness Connector Location... 71
System Description ................................................. 71
OUTLINE ............................................................. 71
COMBINATION SWITCH READING FUNCTION... 72
CAN Communication System Description .............. 72
Schematic ............................................................... 73
Wiring Diagram — F/FOG — .................................. 74
Terminals and Reference Values for BCM .............. 77
Terminals and Reference Values for IPDM E/R ...... 77
How to Proceed With Trouble Diagnosis ................ 78
Preliminary Check .................................................. 78
CHECK POWER SUPPLY AND GROUND CIR-
CUIT .................................................................... 78
CONSULT-II Functions (BCM) ................................ 79
CONSULT-II Functions (IPDM E/R) ........................ 79
Front Fog Lamps Do Not Illuminate (Both Sides) ... 80
Front Fog Lamp Does Not Illuminate (One Side) ... 82
Front Fog Lamp Indicator Lamp Does Not Illuminate... 83
Front Fog Lamps Do Not Turn OFF ........................ 84
Aiming Adjustment .................................................. 85
Bulb Replacement .................................................. 86
Removal and Installation of Front Fog Lamp .......... 86
REMOVAL ........................................................... 86
INSTALLATION .................................................... 86
REAR FOG LAMP ..................................................... 87
Component Parts and Harness Connector Location... 87System Description ................................................. 87
OUTLINE ............................................................. 87
COMBINATION SWITCH READING FUNCTION... 88
CAN Communication System Description .............. 88
CAN Communication Unit ....................................... 88
Wiring Diagram — R/FOG — .................................. 89
Terminals and Reference Values for BCM .............. 91
How to Proceed With Trouble Diagnosis ................ 91
Preliminary Check ................................................... 92
CHECK POWER SUPPLY AND GROUND CIR-
CUIT ..................................................................... 92
CONSULT-II Functions (BCM) ................................ 93
Rear Fog Lamp Does Not Operate ......................... 93
Rear Fog Lamp Indicator Lamp Does Not Illuminate... 95
Rear Fog Lamp Does Not Turn OFF ....................... 96
Bulb Replacement ................................................... 96
Removal and Installation ......................................... 96
TURN SIGNAL AND HAZARD WARNING LAMPS... 97
Component Parts and Harness Connector Location... 97
System Description ................................................. 97
OUTLINE ............................................................. 97
TURN SIGNAL OPERATION ............................... 97
HAZARD LAMP OPERATION ............................. 98
REMOTE KEYLESS ENTRY SYSTEM OPERA-
TION .................................................................... 99
COMBINATION SWITCH READING FUNCTION... 99
CAN Communication System Description .............. 99
Wiring Diagram — TURN — .................................100
Terminals and Reference Values for BCM ............102
How to Proceed With Trouble Diagnosis ..............103
Preliminary Check .................................................103
CHECK POWER SUPPLY AND GROUND CIR-
CUIT ...................................................................103
CONSULT-II Function (BCM) ................................105
CONSULT-II OPERATION .................................105
DATA MONITOR ................................................106
ACTIVE TEST ....................................................106
Turn Signal Lamp Does Not Operate ....................107
Hazard Warning Lamp Does Not Operate But Turn
Signal Lamps Operate ..........................................109
Turn Signal Indicator Lamp Does Not Operate .....110
Bulb Replacement (Front Turn Signal Lamp) ........ 111
Bulb Replacement (Rear Turn Signal Lamp) ........ 111
Bulb Replacement (Side Turn Signal Lamp) ......... 111
Removal and Installation of Front Turn Signal Lamp. 111
Removal and Installation of Rear Turn Signal Lamp. 111
Removal and Installation of Side Turn Signal Lamp. 111
REMOVAL .......................................................... 111
INSTALLATION .................................................. 111
LIGHTING AND TURN SIGNAL SWITCH ..............112
Removal and Installation .......................................112
REMOVAL ..........................................................112
INSTALLATION ..................................................112
HAZARD SWITCH ...................................................113
Removal and Installation .......................................113
REMOVAL ..........................................................113
INSTALLATION ..................................................113
COMBINATION SWITCH ........................................114
Wiring Diagram — COMBSW — ..........................114
Page 2086 of 3171
LT-3
C
D
E
F
G
H
I
J
L
MA
B
LT Combination Switch Reading Function ................. 115
CONSULT-II Function (BCM) ................................ 115
CONSULT-II OPERATION ................................. 115
DATA MONITOR ................................................ 116
Combination Switch Inspection ............................. 118
Removal and Installation ...................................... 120
Switch Circuit Inspection ...................................... 120
STOP LAMP ........................................................... 121
Wiring Diagram — STOP/L — .............................. 121
Bulb Replacement ................................................ 122
Removal and Installation ...................................... 122
BACK-UP LAMP .................................................... 123
Wiring Diagram — BACK/L — ............................. 123
Bulb Replacement ................................................ 124
Removal and Installation ...................................... 124
PARKING, LICENSE PLATE AND TAIL LAMPS ... 125
Component Parts and Harness Connector Location. 125
System Description .............................................. 125
OUTLINE ........................................................... 125
OPERATION BY LIGHTING SWITCH .............. 126
COMBINATION SWITCH READING FUNCTION. 126
CAN Communication System Description ............ 126
Schematic ............................................................ 127
WITHOUT DAYTIME LIGHT SYSTEM ............. 127
Wiring Diagram — TAIL/L — ................................ 128
WITHOUT DAYTIME LIGHT SYSTEM ............. 128
Schematic ............................................................ 131
WITH DAYTIME LIGHT SYSTEM ..................... 131
Wiring Diagram — TAIL/L — ................................ 132
WITH DAYTIME LIGHT SYSTEM ..................... 132
Terminals and Reference Values for BCM ........... 135
Terminals and Reference Values for IPDM E/R ... 135
How to Proceed With Trouble Diagnosis .............. 136
Preliminary Check ................................................ 136
CHECK POWER SUPPLY AND GROUND CIR-
CUIT .................................................................. 136
CONSULT-II Functions (BCM) ............................. 137
CONSULT-II Functions (IPDM E/R) ..................... 137
Clarence, License Plate and Tail Lamps Do Not Illu-
minate .................................................................. 138
Clearance, License Plate and Tail Lamps Do Not
Turn OFF (After Approx. 10 Minutes) ................... 141
Front Clearance Lamp ......................................... 142BULB REPLACEMENT .....................................142
Tail Lamp ..............................................................142
BULB REPLACEMENT .....................................142
REAR COMBINATION LAMP .................................143
Bulb Replacement ................................................143
REMOVAL .........................................................143
INSTALLATION .................................................143
Removal and Installation ......................................144
REMOVAL .........................................................144
INSTALLATION .................................................144
INTERIOR ROOM LAMP ........................................145
Component Parts and Harness Connector Location.145
System Description ...............................................145
POWER SUPPLY AND GROUND ....................145
SWITCH OPERATION ......................................147
ROOM LAMP TIMER OPERATION ..................147
INTERIOR LAMP BATTERY SAVER CONTROL.147
Schematic .............................................................148
Wiring Diagram — INT/L — ..................................149
Terminals and Reference Values for BCM ............154
How to Proceed With Trouble Diagnosis ..............155
Preliminary Check ................................................155
INSPECTION FOR POWER SUPPLY AND
GROUND CIRCUIT ...........................................155
CONSULT-II Function ...........................................157
CONSULT-II OPERATION .................................157
WORK SUPPORT .............................................158
DATA MONITOR ...............................................158
ACTIVE TEST ...................................................159
Map Lamp Control Does Not Operate ..................160
All Interior Room Lamps Do Not Operate .............161
ILLUMINATION .......................................................162
System Description ...............................................162
ILLUMINATION OPERATION BY LIGHTING
SWITCH ............................................................162
CAN Communication System Description ............163
CAN Communication Unit .....................................163
Schematic .............................................................164
Wiring Diagram — ILL — ......................................166
BULB SPECIFICATIONS ........................................173
Headlamp .............................................................173
Exterior Lamp .......................................................173
Interior Lamp/Illumination .....................................173
Page 2087 of 3171
LT-4
PRECAUTIONS
PRECAUTIONS
PFP:00011
Precautions for Supplemental Restraint System (SRS) “AIR BAG” and “SEAT
BELT PRE-TENSIONER”
EKS00N1L
The Supplemental Restraint System such as “AIR BAG” and “SEAT BELT PRE-TENSIONER”, used along
with a front seat belt, helps to reduce the risk or severity of injury to the driver and front passenger for certain
types of collision. Information necessary to service the system safely is included in the SRS and SB section of
this Service Manual.
WARNING:
lTo avoid rendering the SRS inoperative, which could increase the risk of personal injury or death
in the event of a collision which would result in air bag inflation, all maintenance must be per-
formed by an authorized NISSAN/INFINITI dealer.
lImproper maintenance, including incorrect removal and installation of the SRS, can lead to per-
sonal injury caused by unintentional activation of the system. For removal of Spiral Cable and Air
Bag Module, see the SRS section.
lDo not use electrical test equipment on any circuit related to the SRS unless instructed to in this
Service Manual. SRS wiring harnesses can be identified by yellow and/or orange harnesses or
harness connectors.
General Precautions for Service OperationsEKS00L4H
lNever work with wet hands.
lTurn the lighting switch OFF before disconnecting and connecting the connector.
lWhen checking the headlamp on/off operation, check it on vehicle and with the power connected to the
vehicle-side connector.
lDo not touch the headlamp bulb glass surface with bare hands or allow oil or grease to get on it. Do not
touch the headlamp bulb just after the headlamp is turned off, because it is very hot.
lWhen the bulb has burned out, wrap it in a thick vinyl bag and discard. Do not break the bulb.
lLeaving the bulb removed from the headlamp housing for a long period of time can deteriorate the perfor-
mance of the lens and reflector (dirt, clouding). Always prepare a new bulb and have it on hand when
replacing the bulb.
lDo not use organic solvent (paint thinner or gasoline) to clean lamps and to remove old sealant.
Wiring Diagrams and Trouble DiagnosisEKS00L4I
When you read wiring diagrams, refer to the following:
lRefer toGI-15, "How to Read Wiring Diagrams".
lRefer toPG-4, "POWER SUPPLY ROUTING CIRCUIT".
When you perform trouble diagnosis, refer to the following:
lRefer toGI-11, "HOW TO FOLLOW TEST GROUPS IN TROUBLE DIAGNOSES".
lRefer toGI-24, "How to Perform Efficient Diagnosis for an Electrical Incident".
Page 2088 of 3171
HEADLAMP -CONVENTIONAL TYPE-
LT-5
C
D
E
F
G
H
I
J
L
MA
B
LT
HEADLAMP -CONVENTIONAL TYPE-PFP:26010
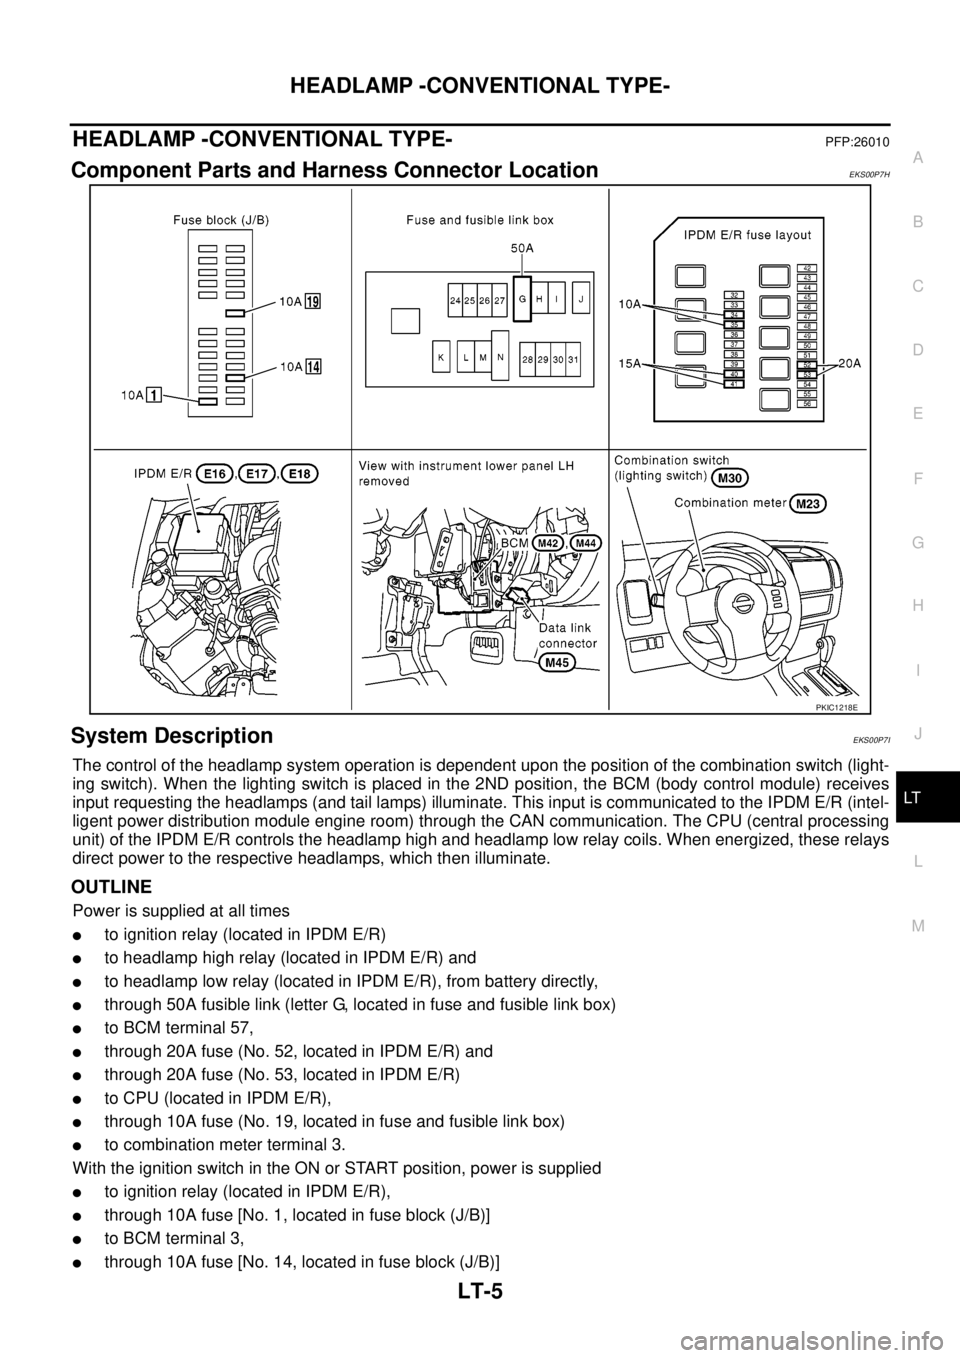
Component Parts and Harness Connector LocationEKS00P7H
System DescriptionEKS00P7I
The control of the headlamp system operation is dependent upon the position of the combination switch (light-
ing switch). When the lighting switch is placed in the 2ND position, the BCM (body control module) receives
input requesting the headlamps (and tail lamps) illuminate. This input is communicated to the IPDM E/R (intel-
ligent power distribution module engine room) through the CAN communication. The CPU (central processing
unit) of the IPDM E/R controls the headlamp high and headlamp low relay coils. When energized, these relays
direct power to the respective headlamps, which then illuminate.
OUTLINE
Power is supplied at all times
lto ignition relay (located in IPDM E/R)
lto headlamp high relay (located in IPDM E/R) and
lto headlamp low relay (located in IPDM E/R), from battery directly,
lthrough 50A fusible link (letter G, located in fuse and fusible link box)
lto BCM terminal 57,
lthrough 20A fuse (No. 52, located in IPDM E/R) and
lthrough 20A fuse (No. 53, located in IPDM E/R)
lto CPU (located in IPDM E/R),
lthrough 10A fuse (No. 19, located in fuse and fusible link box)
lto combination meter terminal 3.
With the ignition switch in the ON or START position, power is supplied
lto ignition relay (located in IPDM E/R),
lthrough 10A fuse [No. 1, located in fuse block (J/B)]
lto BCM terminal 3,
lthrough 10A fuse [No. 14, located in fuse block (J/B)]
PKIC1218E
Page 2089 of 3171
LT-6
HEADLAMP -CONVENTIONAL TYPE-
lto combination meter terminal 16.
Ground is supplied at all times
lto BCM terminal 55 and
lto combination meter terminal 23
lthrough grounds M21, M80 and M83,
lto IPDM E/R terminals 38 and 59
lthrough grounds E21, E41 and E61.
Low Beam Operation
With the lighting switch in 2ND position, the BCM receives input requesting the headlamps to illuminate. This
input is communicated to the IPDM E/R through the CAN communication. The CPU of the IPDM E/R controls
the headlamp low relay coil. When energized, this relay directs power
lthrough 15A fuse (No. 41, located in IPDM E/R)
lthrough IPDM E/R terminal 54
lto front combination lamp RH terminal 1,
lthrough 15A fuse (No. 40, located in IPDM E/R)
lthrough IPDM E/R terminal 52
lto front combination lamp LH terminal 1.
Ground is supplied
lto front combination lamp RH and LH terminals 3
lthrough grounds E21, E41 and E61.
With power and ground supplied, low beam headlamps illuminate.
High Beam Operation/Flash-to-Pass Operation
With the lighting switch in 2ND position and placed in HIGH or PASS position, the BCM receives input request-
ing the headlamp high beams to illuminate. This input is communicated to the IPDM E/R through the CAN
communication. The CPU of the IPDM E/R controls the headlamp high relay coil. When energized, this relay
directs power
lthrough 10A fuse (No. 34, located in IPDM E/R)
lthrough IPDM E/R terminal 56
lto front combination lamp RH terminal 2,
lthrough 10A fuse (No. 35, located in IPDM E/R)
lthrough IPDM E/R terminal 55
lto front combination lamp LH terminal 2.
Ground is supplied
lto front combination lamp RH and LH terminals 3
lthrough grounds E21, E41 and E61.
With power and ground supplied, the high beam headlamps illuminate.
Combination meter that received high beam request signal by BCM through the CAN communication makes a
high beam indicator lamp turn on in combination meter.
FRIENDLY LIGHTING FUNCTION
This function starts timer function of BCM by operating passing switch, and illuminates headlamps (LOW
beam) for a given length of time.
Headlamps (LOW beam) stay ON for a given length of time by operating passing switch when ignition switch is
OFF and lighting switch is OFF.
Headlamps (LOW beam) stays ON for two minutes at a maximum by operating passing switch repeatedly.
CONSULT-II is capable of setting a lighting time. Refer toLT- 1 6 , "
WORK SUPPORT".
CAN Communication System DescriptionEKS00P7J
Refer toLAN-23, "CAN COMMUNICATION".
Page 2090 of 3171
HEADLAMP -CONVENTIONAL TYPE-
LT-7
C
D
E
F
G
H
I
J
L
MA
B
LT
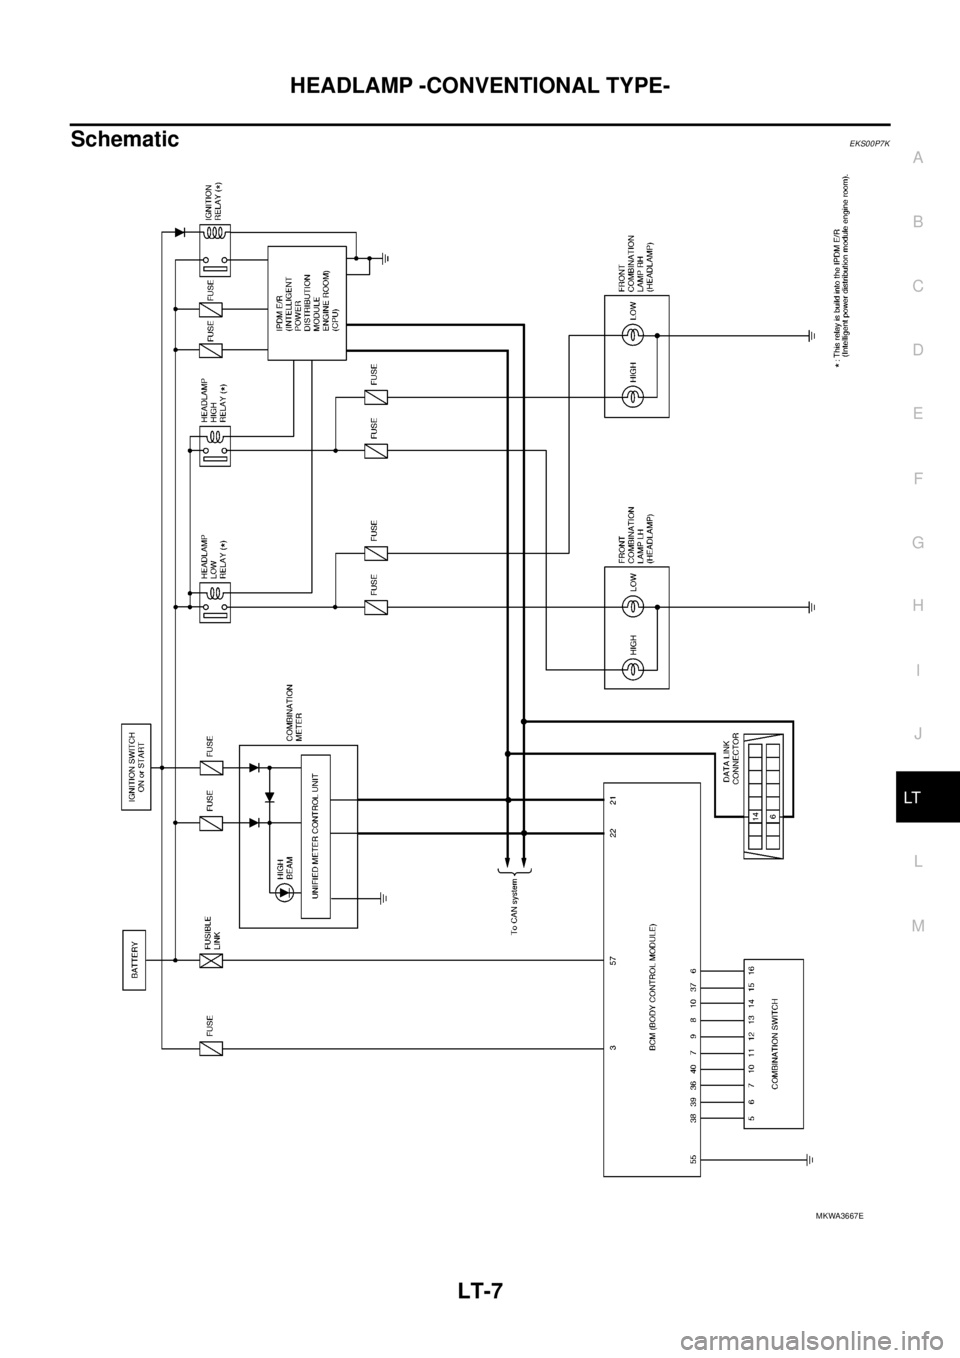
SchematicEKS00P7K
MKWA3667E