NISSAN PRIMERA 1999 Electronic Repair Manual
PRIMERA 1999
NISSAN
NISSAN
https://www.carmanualsonline.info/img/5/57377/w960_57377-0.png
NISSAN PRIMERA 1999 Electronic Repair Manual
Trending: CD changer, center console, wheel torque, display, dashboard, checking oil, clutch
Page 231 of 2267
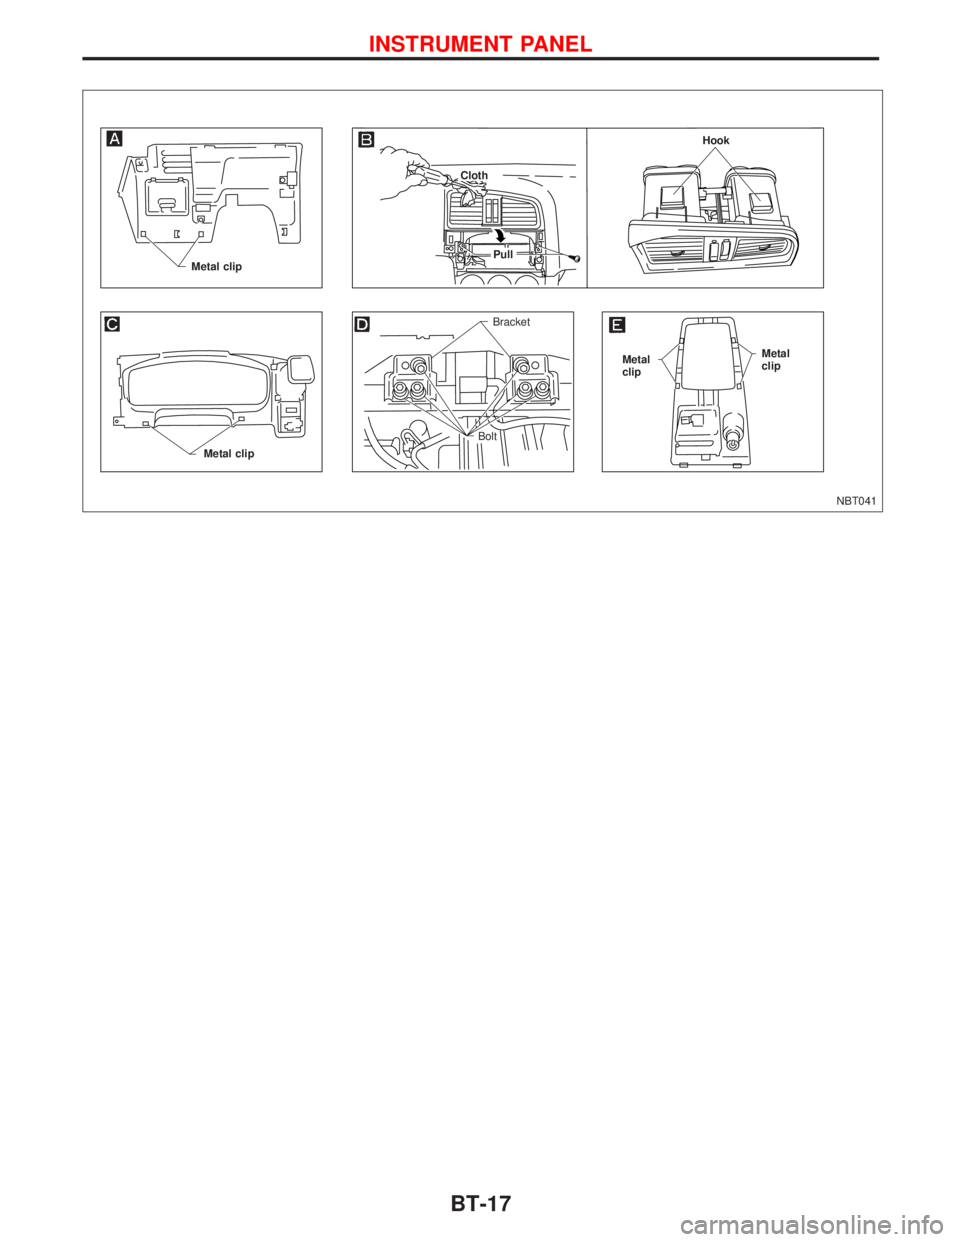
NBT041 Metal clip
Metal
clip
.Cloth
Bracket
Metal clipMetal
clip
Bolt
.PullHook
INSTRUMENT PANEL
BT-17
Page 232 of 2267
Side and Floor Trim
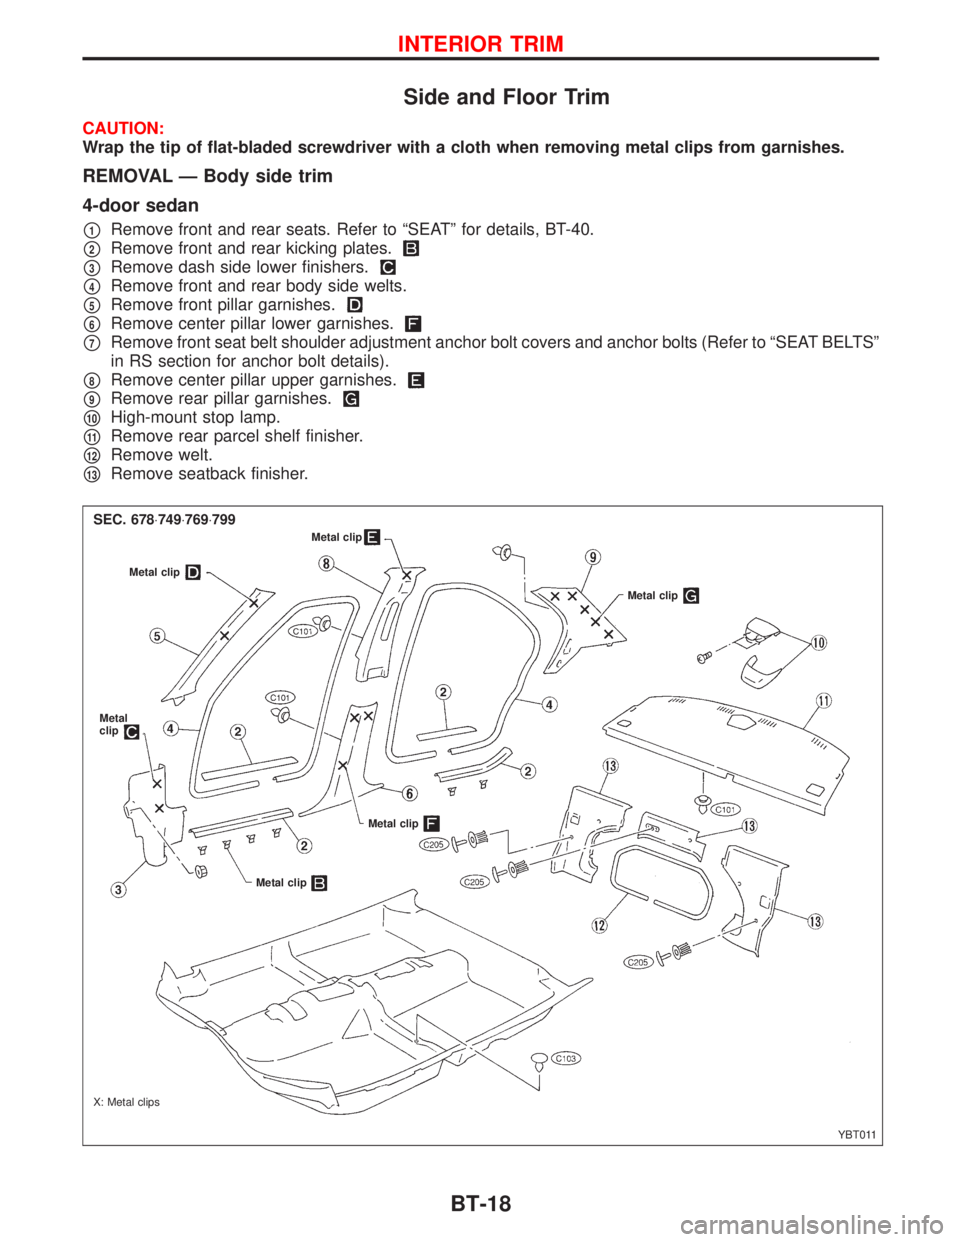
CAUTION:
Wrap the tip of flat-bladed screwdriver with a cloth when removing metal clips from garnishes.
REMOVAL Ð Body side trim
4-door sedan
p1Remove front and rear seats. Refer to ªSEATº for details, BT-40.
p2Remove front and rear kicking plates.
p3Remove dash side lower finishers.
p4Remove front and rear body side welts.
p5Remove front pillar garnishes.
p6Remove center pillar lower garnishes.
p7Remove front seat belt shoulder adjustment anchor bolt covers and anchor bolts (Refer to ªSEAT BELTSº
in RS section for anchor bolt details).
p8Remove center pillar upper garnishes.
p9Remove rear pillar garnishes.
p10High-mount stop lamp.
p11Remove rear parcel shelf finisher.
p12Remove welt.
p13Remove seatback finisher.
YBT011 X: Metal clipsMetal clip
Metal clip
Metal clip
Metal
clip
Metal clip
Metal clip
SEC. 678×749×769×799
INTERIOR TRIM
BT-18
Page 233 of 2267
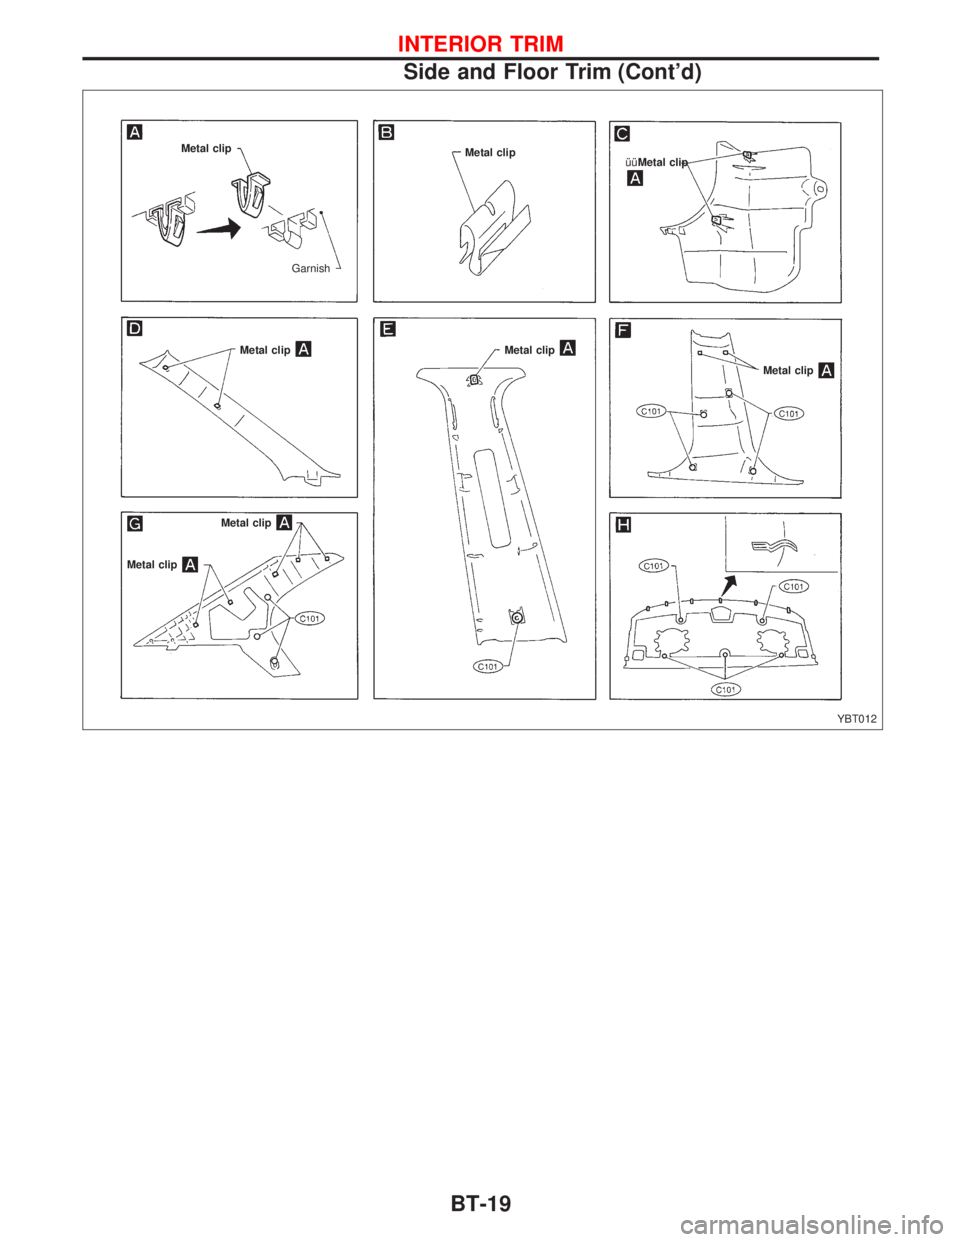
YBT012 Metal clip
Metal clip
Metal clip
Metal clip
Metal clip
Metal clip
GarnishMetal clip
îîMetal clip
INTERIOR TRIM
Side and Floor Trim (Cont'd)
BT-19
Page 234 of 2267
REMOVAL Ð Body side trim
5-door hatchback
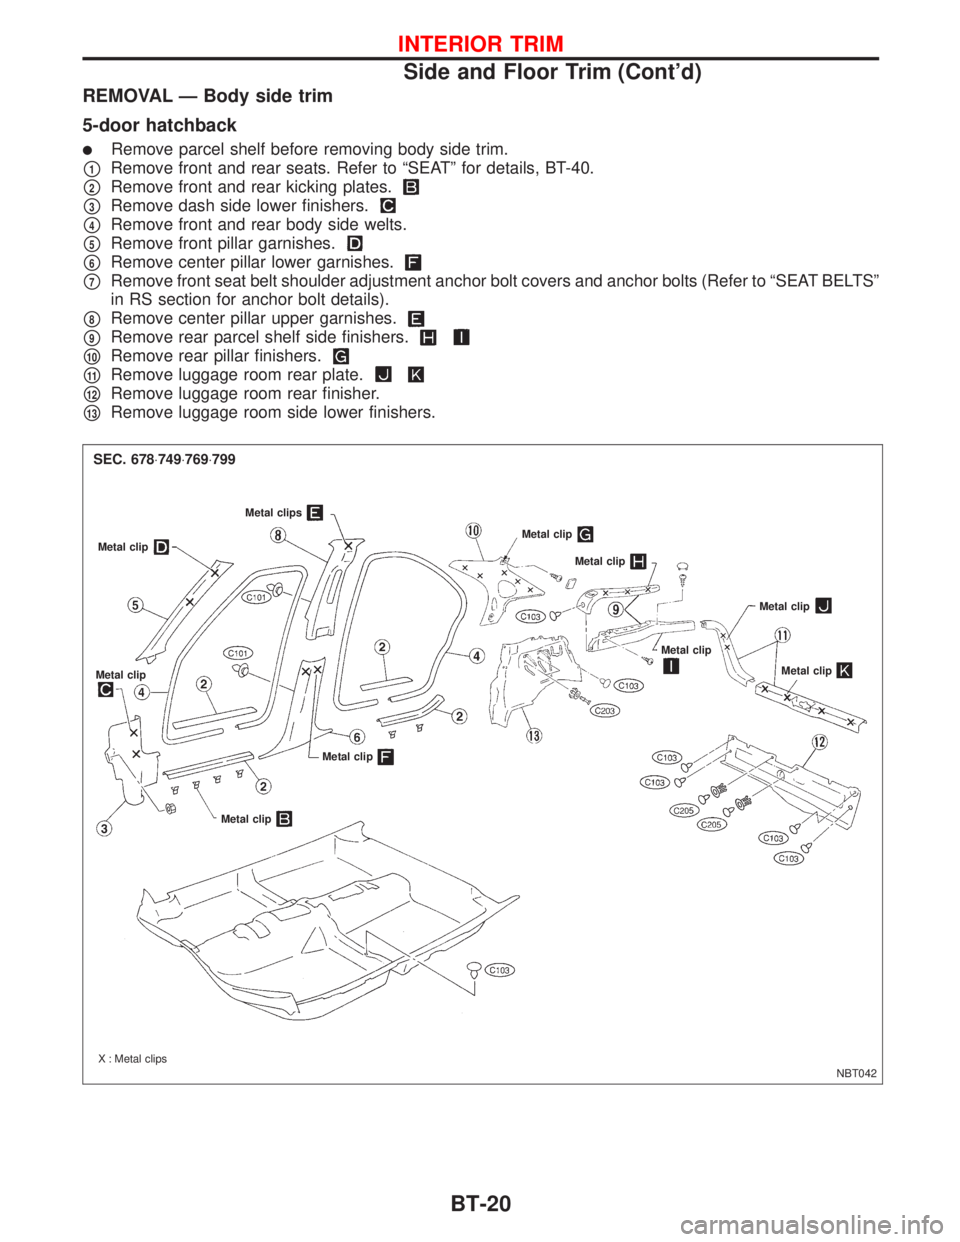
lRemove parcel shelf before removing body side trim.
p1Remove front and rear seats. Refer to ªSEATº for details, BT-40.
p2Remove front and rear kicking plates.
p3Remove dash side lower finishers.
p4Remove front and rear body side welts.
p5Remove front pillar garnishes.
p6Remove center pillar lower garnishes.
p7Remove front seat belt shoulder adjustment anchor bolt covers and anchor bolts (Refer to ªSEAT BELTSº
in RS section for anchor bolt details).
p8Remove center pillar upper garnishes.
p9Remove rear parcel shelf side finishers.
p10Remove rear pillar finishers.
p11Remove luggage room rear plate.
p12Remove luggage room rear finisher.
p13Remove luggage room side lower finishers.
NBT042 Metal clip
Metal clips
Metal clip
Metal clip
Metal clip
Metal clip
Metal clip
Metal clip
Metal clip
SEC. 678×749×769×799
Metal clip
X : Metal clips
INTERIOR TRIM
Side and Floor Trim (Cont'd)
BT-20
Page 235 of 2267
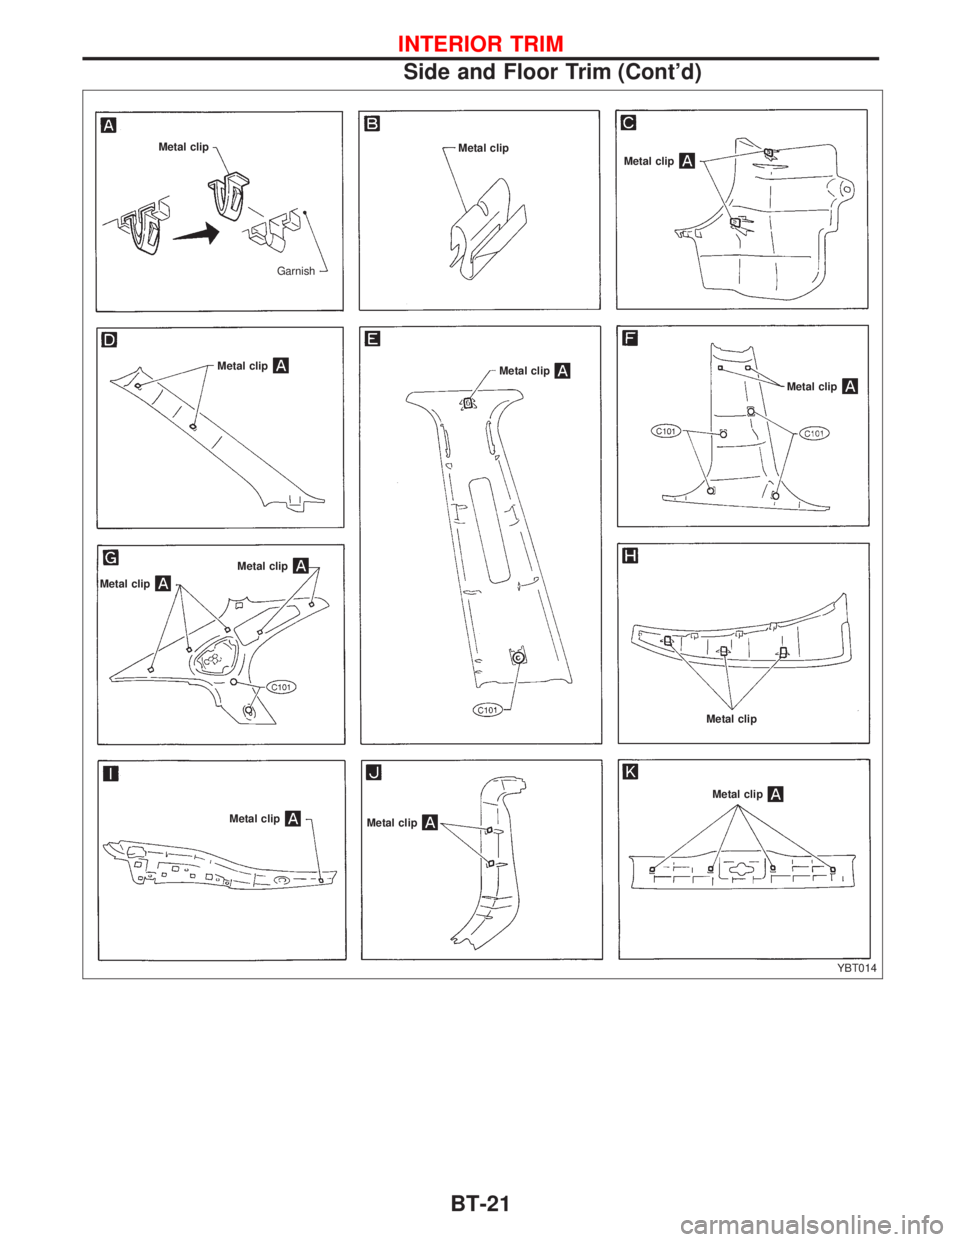
YBT014 Metal clip
GarnishMetal clip
Metal clip
Metal clip
Metal clip
Metal clip
Metal clip
Metal clipMetal clip
Metal clip
Metal clip
Metal clip
INTERIOR TRIM
Side and Floor Trim (Cont'd)
BT-21
Page 236 of 2267
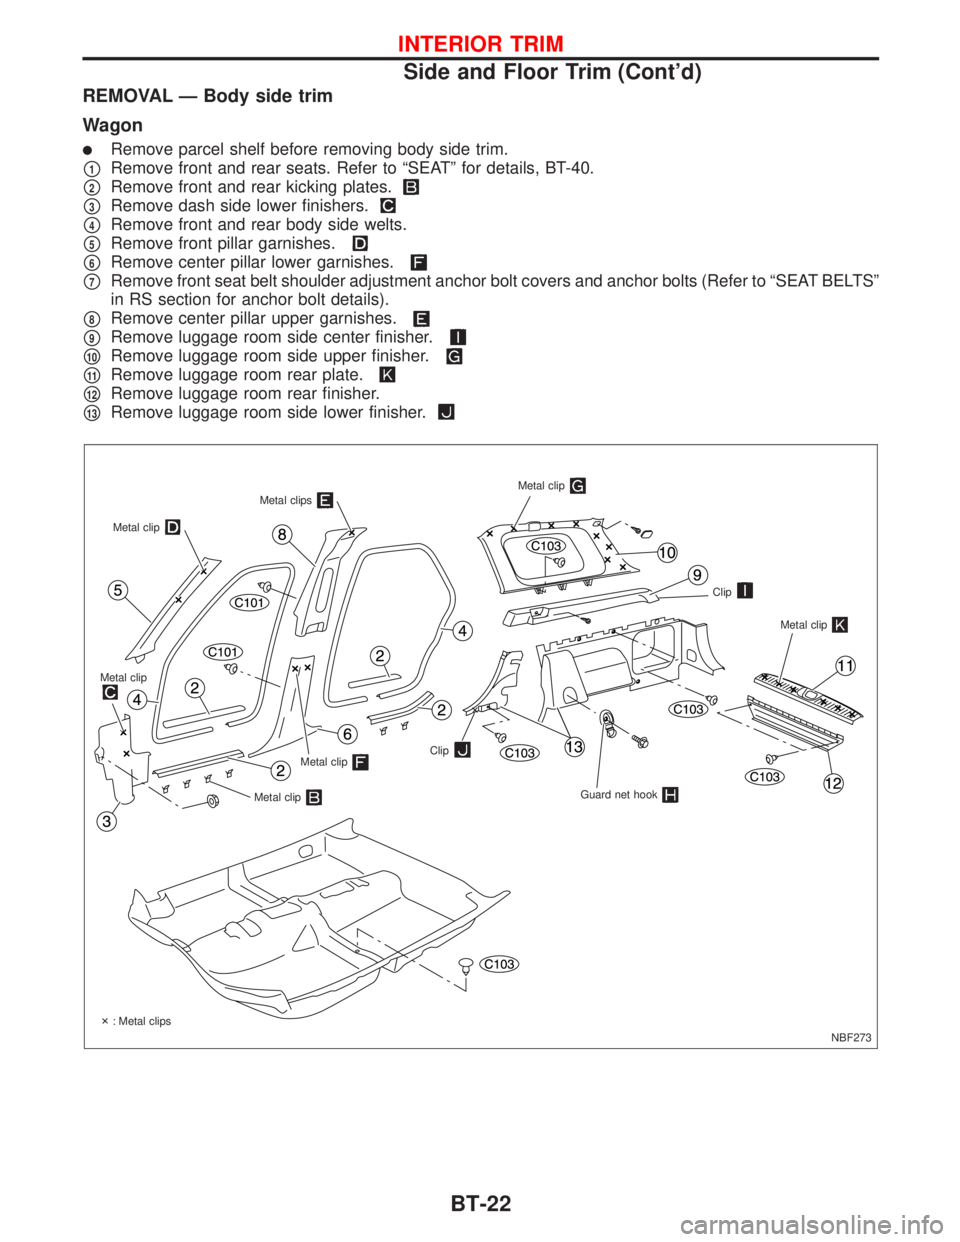
REMOVAL Ð Body side trim
Wagon
lRemove parcel shelf before removing body side trim.
p1Remove front and rear seats. Refer to ªSEATº for details, BT-40.
p2Remove front and rear kicking plates.
p3Remove dash side lower finishers.
p4Remove front and rear body side welts.
p5Remove front pillar garnishes.
p6Remove center pillar lower garnishes.
p7Remove front seat belt shoulder adjustment anchor bolt covers and anchor bolts (Refer to ªSEAT BELTSº
in RS section for anchor bolt details).
p8Remove center pillar upper garnishes.
p9Remove luggage room side center finisher.
p10Remove luggage room side upper finisher.
p11Remove luggage room rear plate.
p12Remove luggage room rear finisher.
p13Remove luggage room side lower finisher.
NBF273 Metal clip
Metal clipsMetal clip
Guard net hook
Metal clip
Metal clip
Metal clip
Metal clip
Clip
.
Clip
: Metal clips
INTERIOR TRIM
Side and Floor Trim (Cont'd)
BT-22
Page 237 of 2267
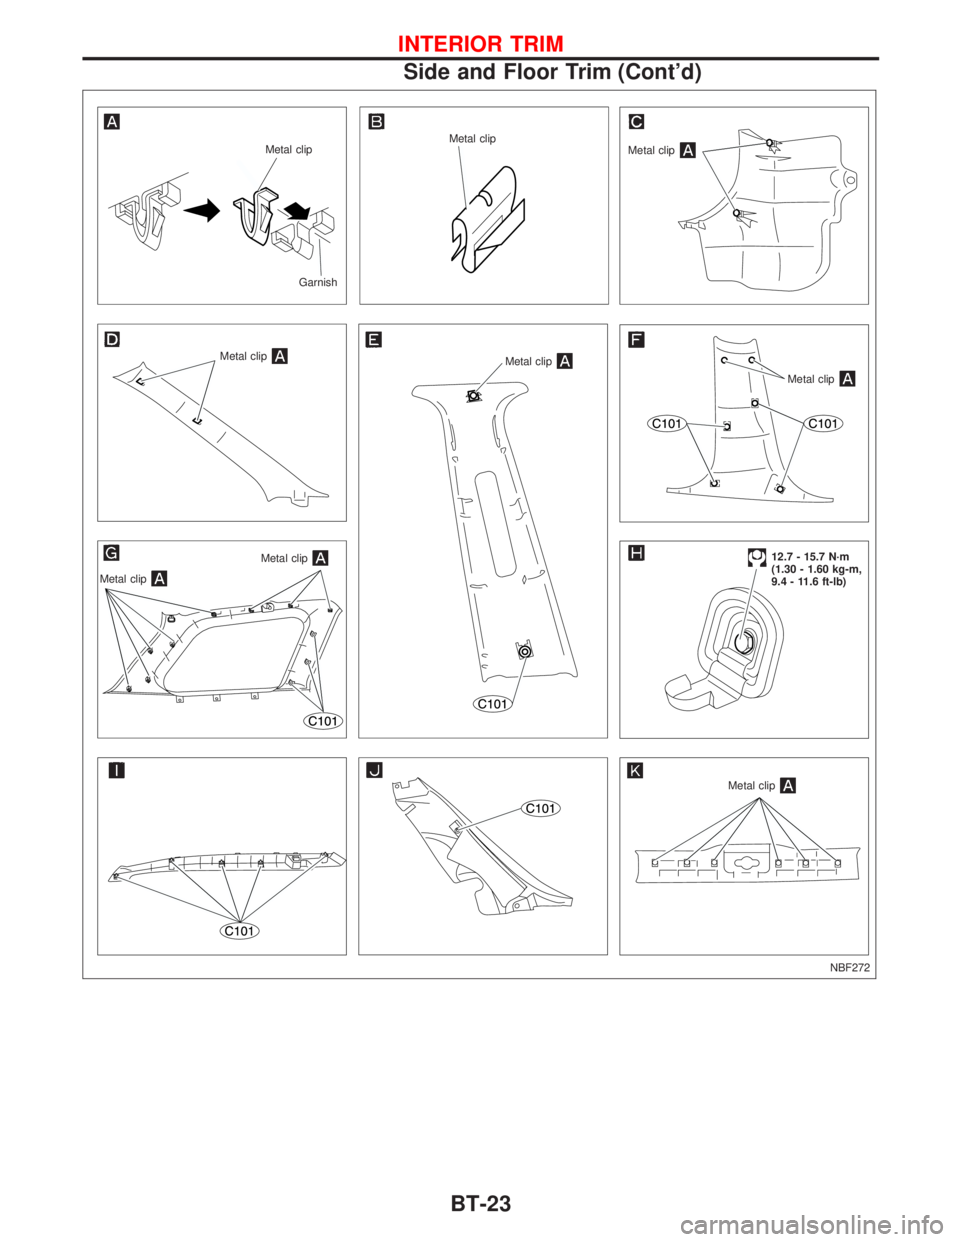
NBF272 Metal clip
GarnishMetal clip
Metal clip
Metal clip
Metal clip
Metal clip
Metal clip
Metal clip
Metal clip
12.7 - 15.7 N´m
(1.30 - 1.60 kg-m,
9.4 - 11.6 ft-lb)
INTERIOR TRIM
Side and Floor Trim (Cont'd)
BT-23
Page 238 of 2267
Door Trim
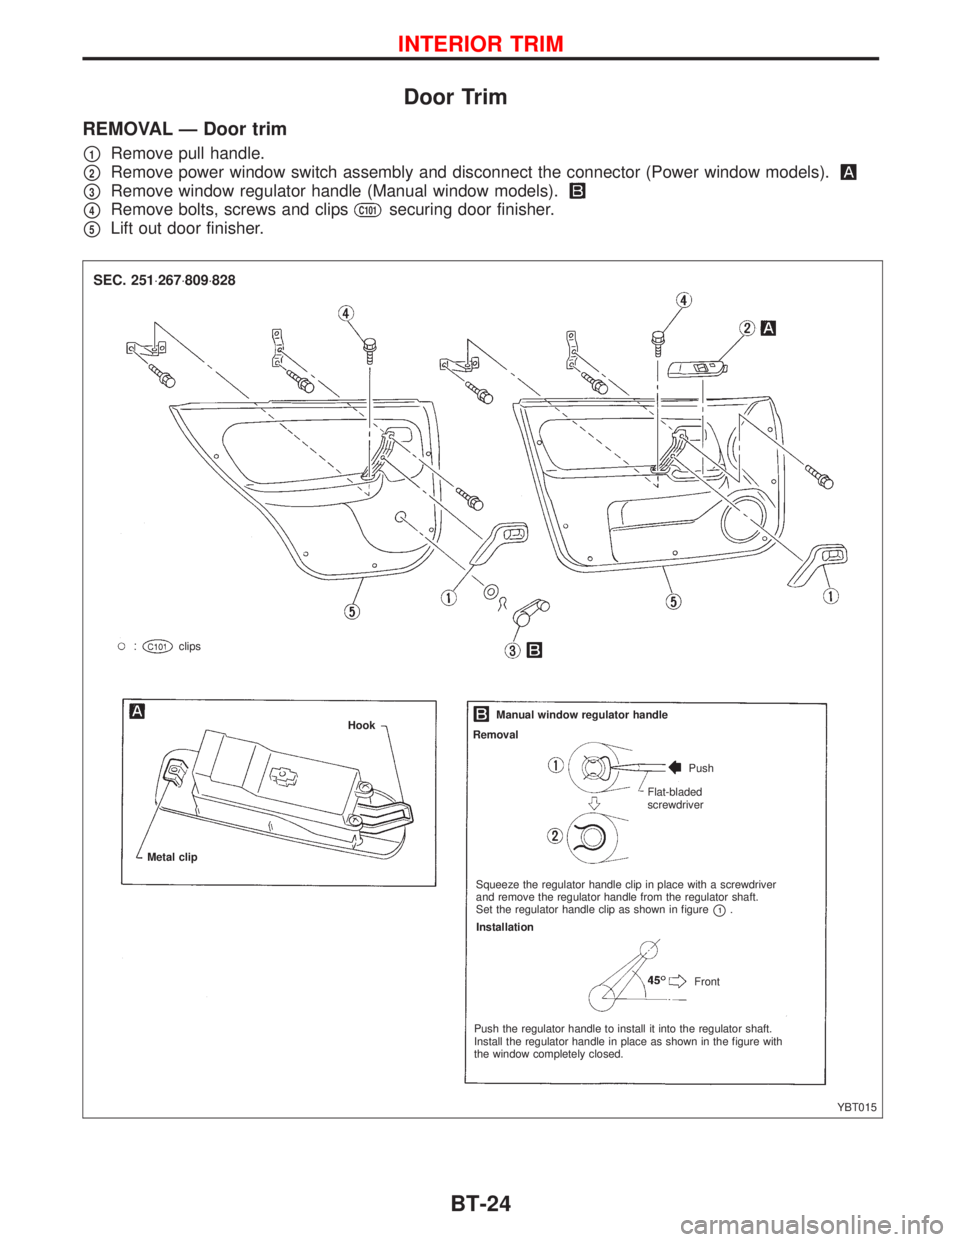
REMOVAL Ð Door trim
p1Remove pull handle.
p2Remove power window switch assembly and disconnect the connector (Power window models).
p3Remove window regulator handle (Manual window models).
p4Remove bolts, screws and clipsC101securing door finisher.
p5Lift out door finisher.
YBT015 clips
Metal clipHookManual window regulator handle
Removal
Push
Flat-bladed
screwdriver
Squeeze the regulator handle clip in place with a screwdriver
and remove the regulator handle from the regulator shaft.
Set the regulator handle clip as shown in figure
p1.
Installation
Front
Push the regulator handle to install it into the regulator shaft.
Install the regulator handle in place as shown in the figure with
the window completely closed.
SEC. 251×267×809×828
INTERIOR TRIM
BT-24
Page 239 of 2267
Roof Trim
REMOVAL Ð Headlining
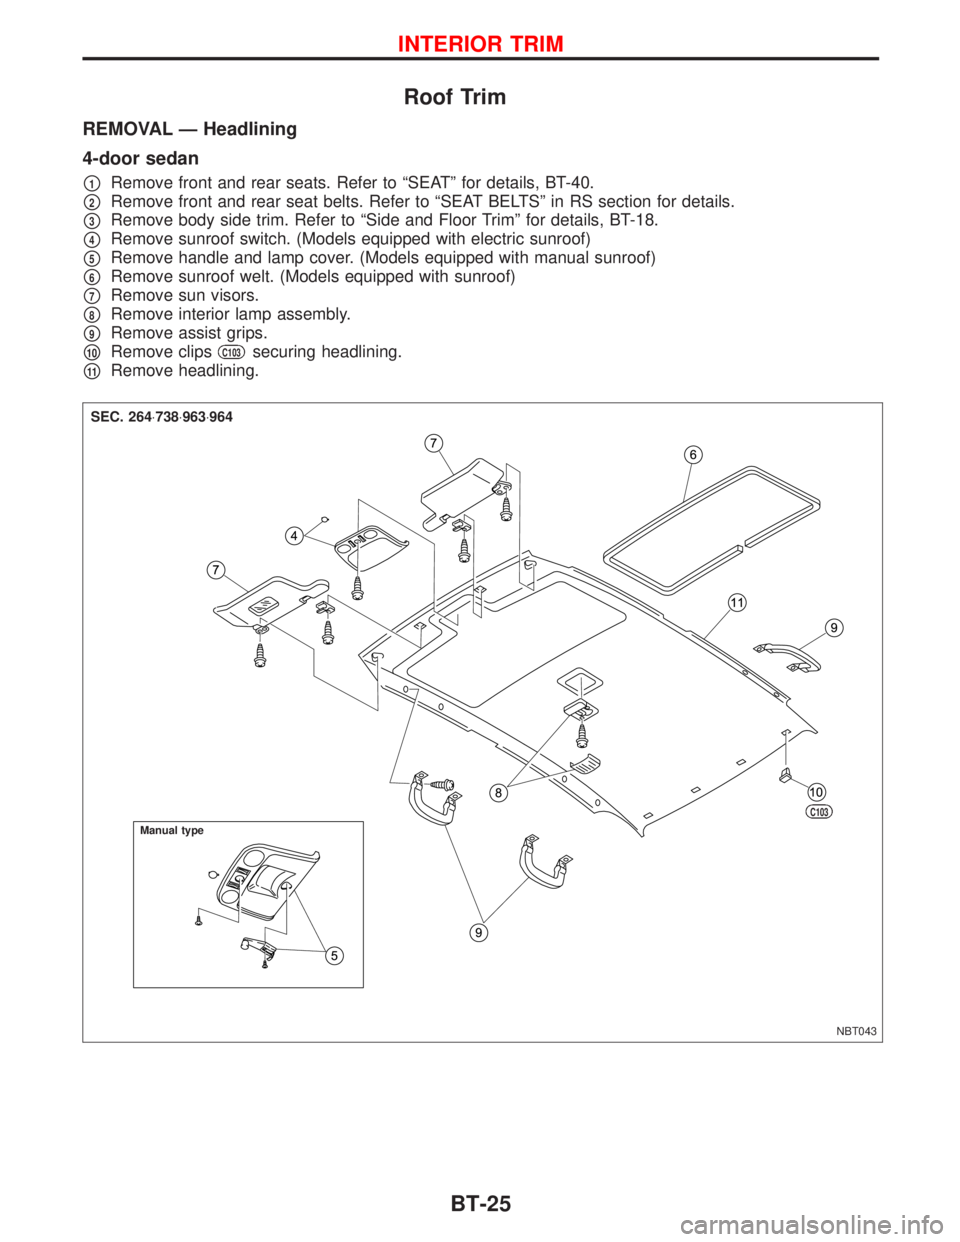
4-door sedan
p1Remove front and rear seats. Refer to ªSEATº for details, BT-40.
p2Remove front and rear seat belts. Refer to ªSEAT BELTSº in RS section for details.
p3Remove body side trim. Refer to ªSide and Floor Trimº for details, BT-18.
p4Remove sunroof switch. (Models equipped with electric sunroof)
p5Remove handle and lamp cover. (Models equipped with manual sunroof)
p6Remove sunroof welt. (Models equipped with sunroof)
p7Remove sun visors.
p8Remove interior lamp assembly.
p9Remove assist grips.
p10Remove clipsC103securing headlining.
p11Remove headlining.
NBT043
SEC. 264×738×963×964
Manual type
C103
INTERIOR TRIM
BT-25
Page 240 of 2267
REMOVAL Ð Headlining
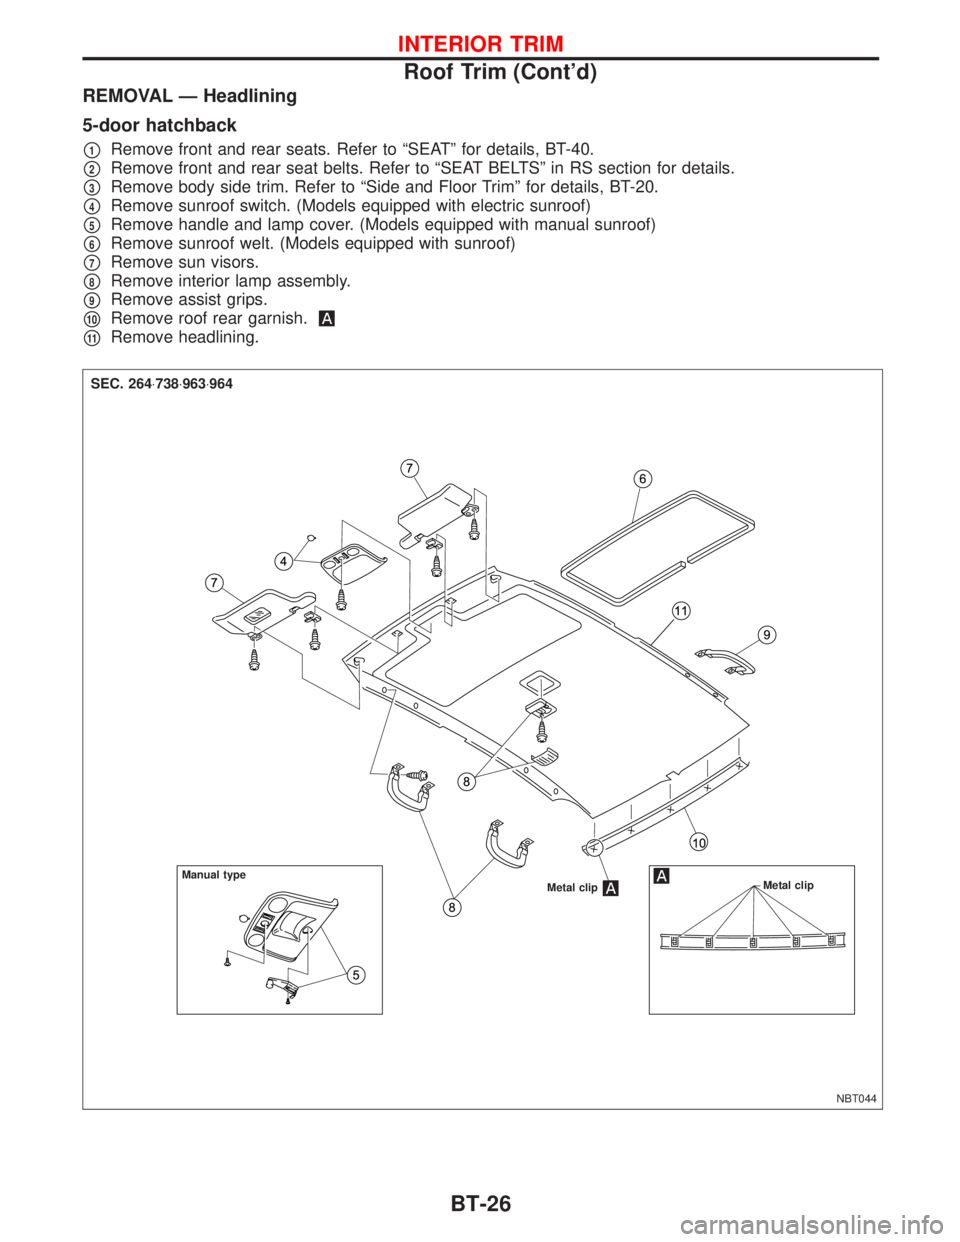
5-door hatchback
p1Remove front and rear seats. Refer to ªSEATº for details, BT-40.
p2Remove front and rear seat belts. Refer to ªSEAT BELTSº in RS section for details.
p3Remove body side trim. Refer to ªSide and Floor Trimº for details, BT-20.
p4Remove sunroof switch. (Models equipped with electric sunroof)
p5Remove handle and lamp cover. (Models equipped with manual sunroof)
p6Remove sunroof welt. (Models equipped with sunroof)
p7Remove sun visors.
p8Remove interior lamp assembly.
p9Remove assist grips.
p10Remove roof rear garnish.
p11Remove headlining.
NBT044 Metal clip
Metal clip
SEC. 264×738×963×964
Manual type
INTERIOR TRIM
Roof Trim (Cont'd)
BT-26
Trending: transmission, fuel cap, alternator, jump start, mileage, warning light, charging
