NISSAN TEANA 2008 Service Manual
Manufacturer: NISSAN, Model Year: 2008, Model line: TEANA, Model: NISSAN TEANA 2008Pages: 5121, PDF Size: 69.03 MB
Page 5111 of 5121
WASHER TANK
WW-99
< ON-VEHICLE REPAIR >
C
D
E
F
G
H
I
J
K
MA
B
WW
N
O
P
WASHER TANK
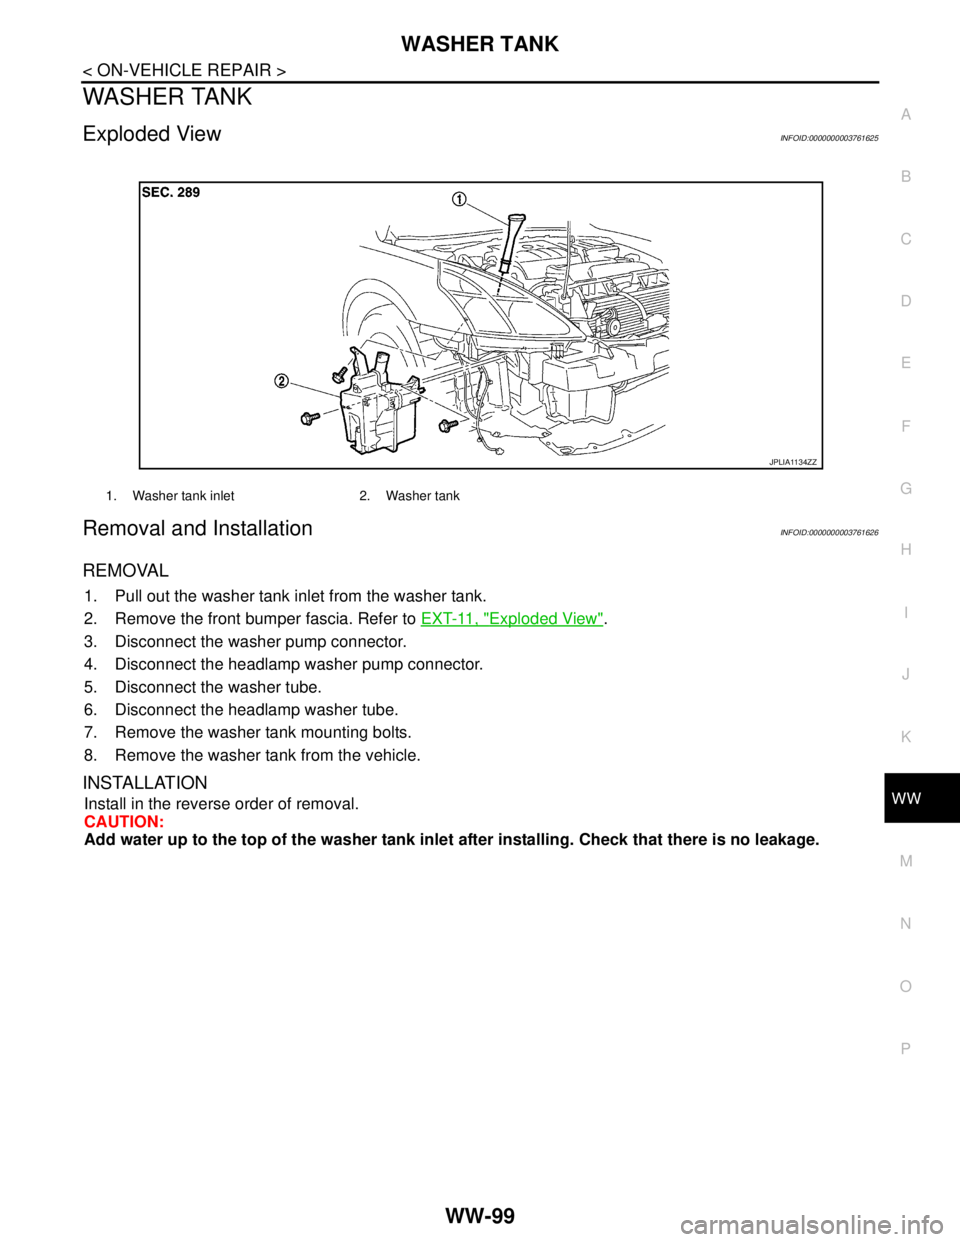
Exploded ViewINFOID:0000000003761625
Removal and InstallationINFOID:0000000003761626
REMOVAL
1. Pull out the washer tank inlet from the washer tank.
2. Remove the front bumper fascia. Refer to EXT-11, "
Exploded View".
3. Disconnect the washer pump connector.
4. Disconnect the headlamp washer pump connector.
5. Disconnect the washer tube.
6. Disconnect the headlamp washer tube.
7. Remove the washer tank mounting bolts.
8. Remove the washer tank from the vehicle.
INSTALLATION
Install in the reverse order of removal.
CAUTION:
Add water up to the top of the washer tank inlet after installing. Check that there is no leakage.
1. Washer tank inlet 2. Washer tank
JPLIA1134ZZ
Page 5112 of 5121
WW-100
< ON-VEHICLE REPAIR >
WASHER PUMP
WASHER PUMP
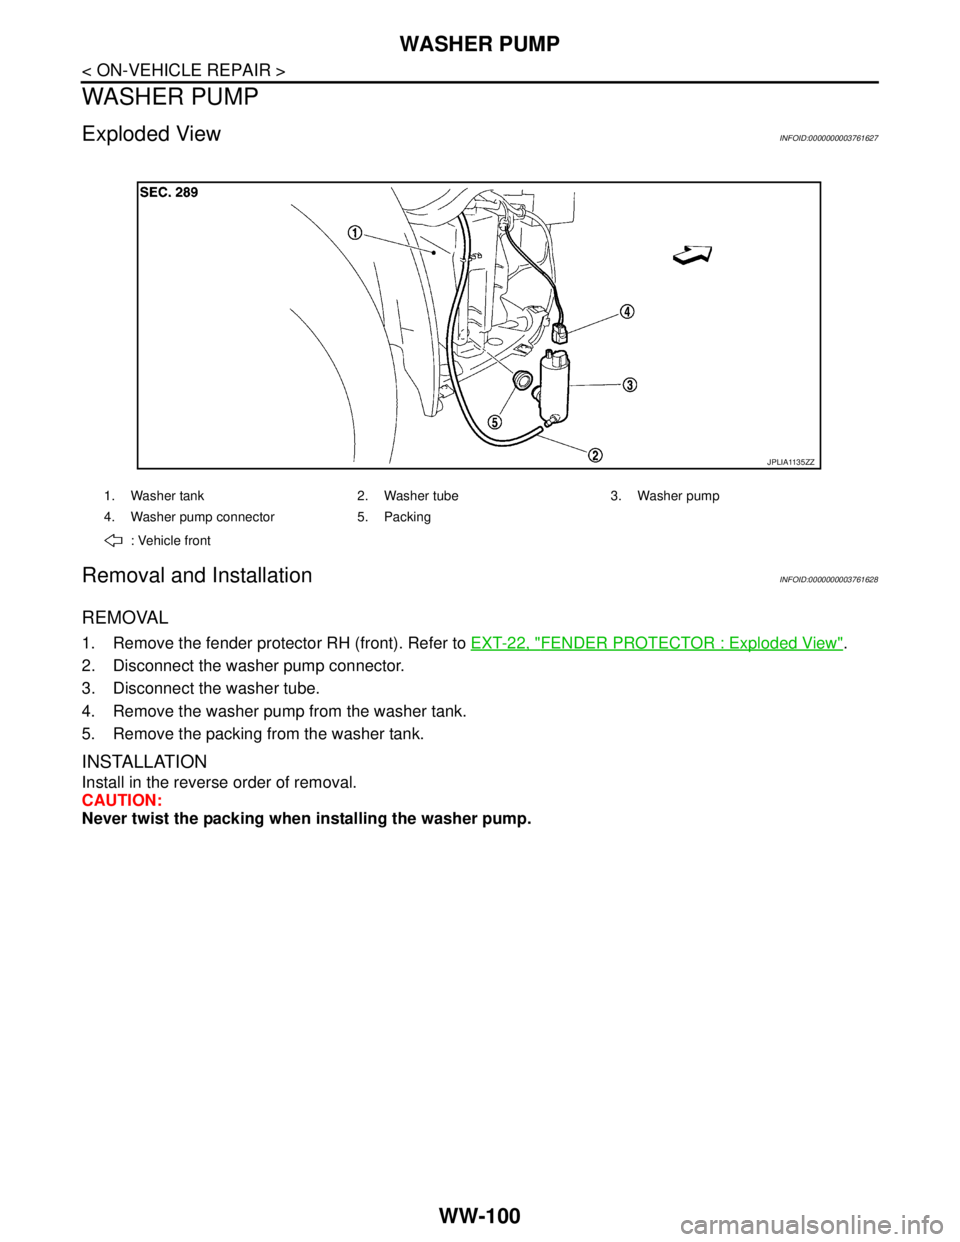
Exploded ViewINFOID:0000000003761627
Removal and InstallationINFOID:0000000003761628
REMOVAL
1. Remove the fender protector RH (front). Refer to EXT-22, "FENDER PROTECTOR : Exploded View".
2. Disconnect the washer pump connector.
3. Disconnect the washer tube.
4. Remove the washer pump from the washer tank.
5. Remove the packing from the washer tank.
INSTALLATION
Install in the reverse order of removal.
CAUTION:
Never twist the packing when installing the washer pump.
1. Washer tank 2. Washer tube 3. Washer pump
4. Washer pump connector 5. Packing
: Vehicle front
JPLIA1135ZZ
Page 5113 of 5121
HEADLAMP WASHER PUMP
WW-101
< ON-VEHICLE REPAIR >
C
D
E
F
G
H
I
J
K
MA
B
WW
N
O
P
HEADLAMP WASHER PUMP
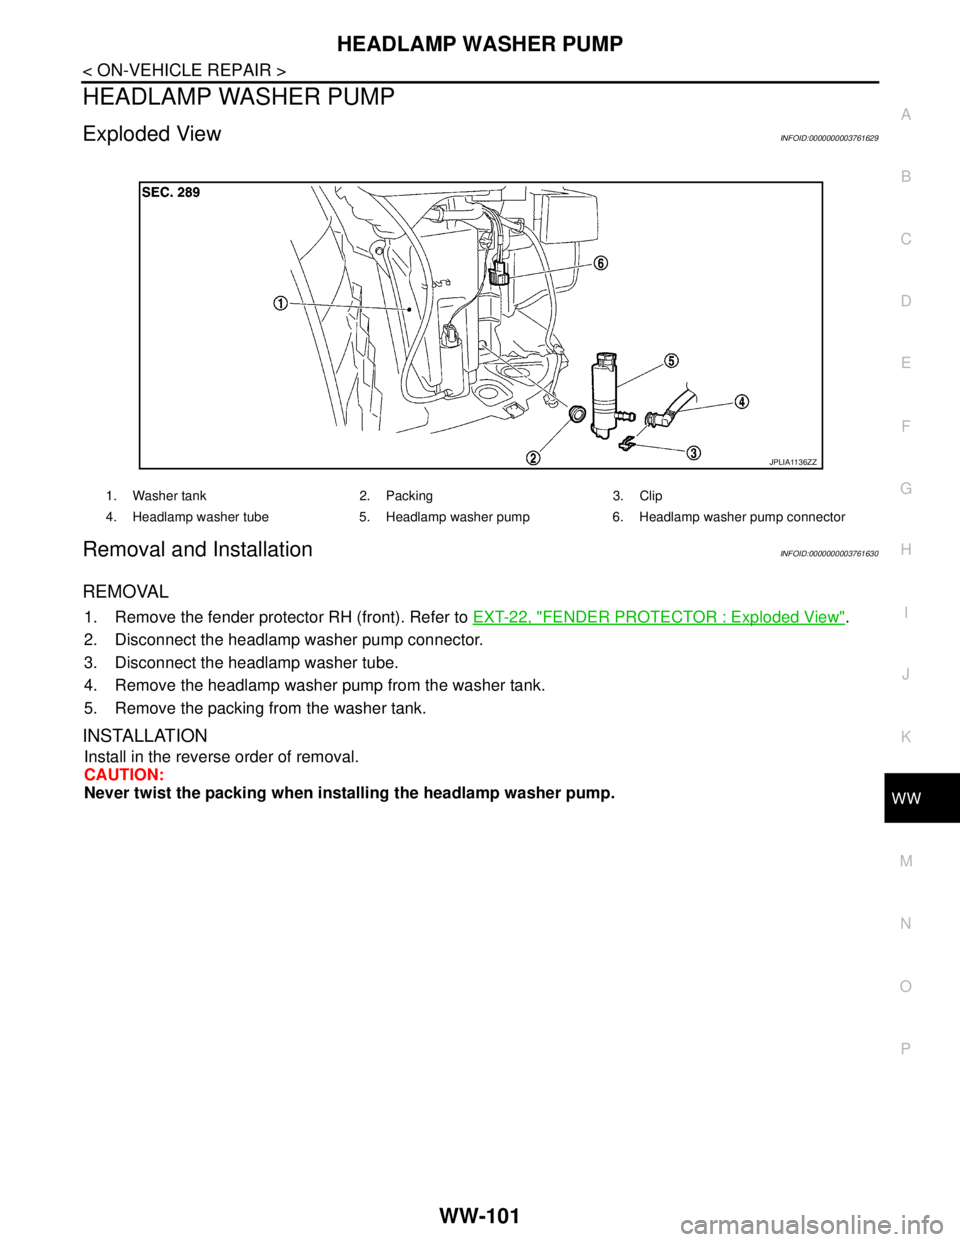
Exploded ViewINFOID:0000000003761629
Removal and InstallationINFOID:0000000003761630
REMOVAL
1. Remove the fender protector RH (front). Refer to EXT-22, "FENDER PROTECTOR : Exploded View".
2. Disconnect the headlamp washer pump connector.
3. Disconnect the headlamp washer tube.
4. Remove the headlamp washer pump from the washer tank.
5. Remove the packing from the washer tank.
INSTALLATION
Install in the reverse order of removal.
CAUTION:
Never twist the packing when installing the headlamp washer pump.
1. Washer tank 2. Packing 3. Clip
4. Headlamp washer tube 5. Headlamp washer pump 6. Headlamp washer pump connector
JPLIA1136ZZ
Page 5114 of 5121
WW-102
< ON-VEHICLE REPAIR >
FRONT WASHER NOZZLE AND TUBE
FRONT WASHER NOZZLE AND TUBE
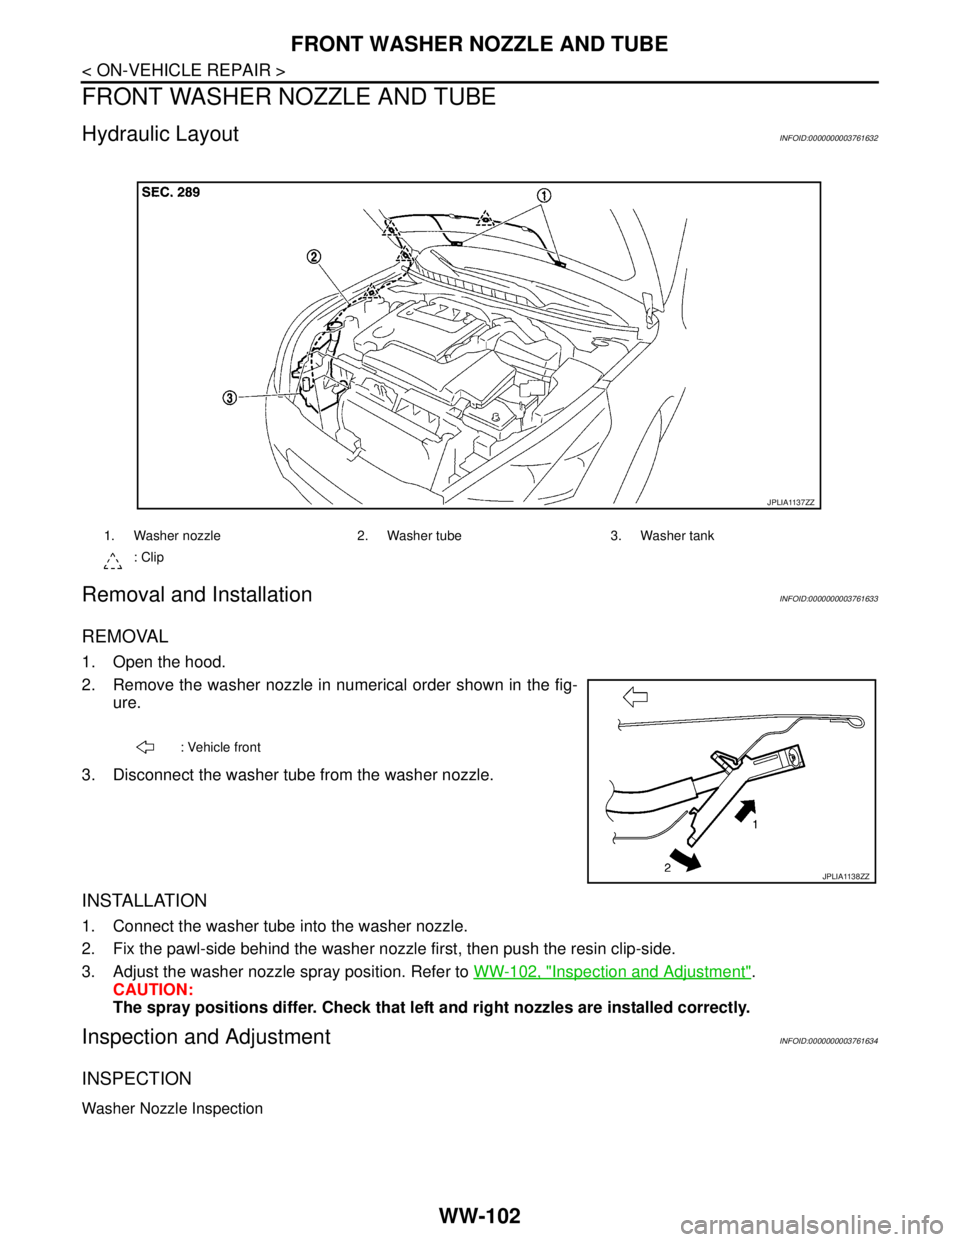
Hydraulic LayoutINFOID:0000000003761632
Removal and InstallationINFOID:0000000003761633
REMOVAL
1. Open the hood.
2. Remove the washer nozzle in numerical order shown in the fig-
ure.
3. Disconnect the washer tube from the washer nozzle.
INSTALLATION
1. Connect the washer tube into the washer nozzle.
2. Fix the pawl-side behind the washer nozzle first, then push the resin clip-side.
3. Adjust the washer nozzle spray position. Refer to WW-102, "
Inspection and Adjustment".
CAUTION:
The spray positions differ. Check that left and right nozzles are installed correctly.
Inspection and AdjustmentINFOID:0000000003761634
INSPECTION
Washer Nozzle Inspection
1. Washer nozzle 2. Washer tube 3. Washer tank
: Clip
JPLIA1137ZZ
: Vehicle front
JPLIA1138ZZ
Page 5115 of 5121
FRONT WASHER NOZZLE AND TUBE
WW-103
< ON-VEHICLE REPAIR >
C
D
E
F
G
H
I
J
K
MA
B
WW
N
O
P
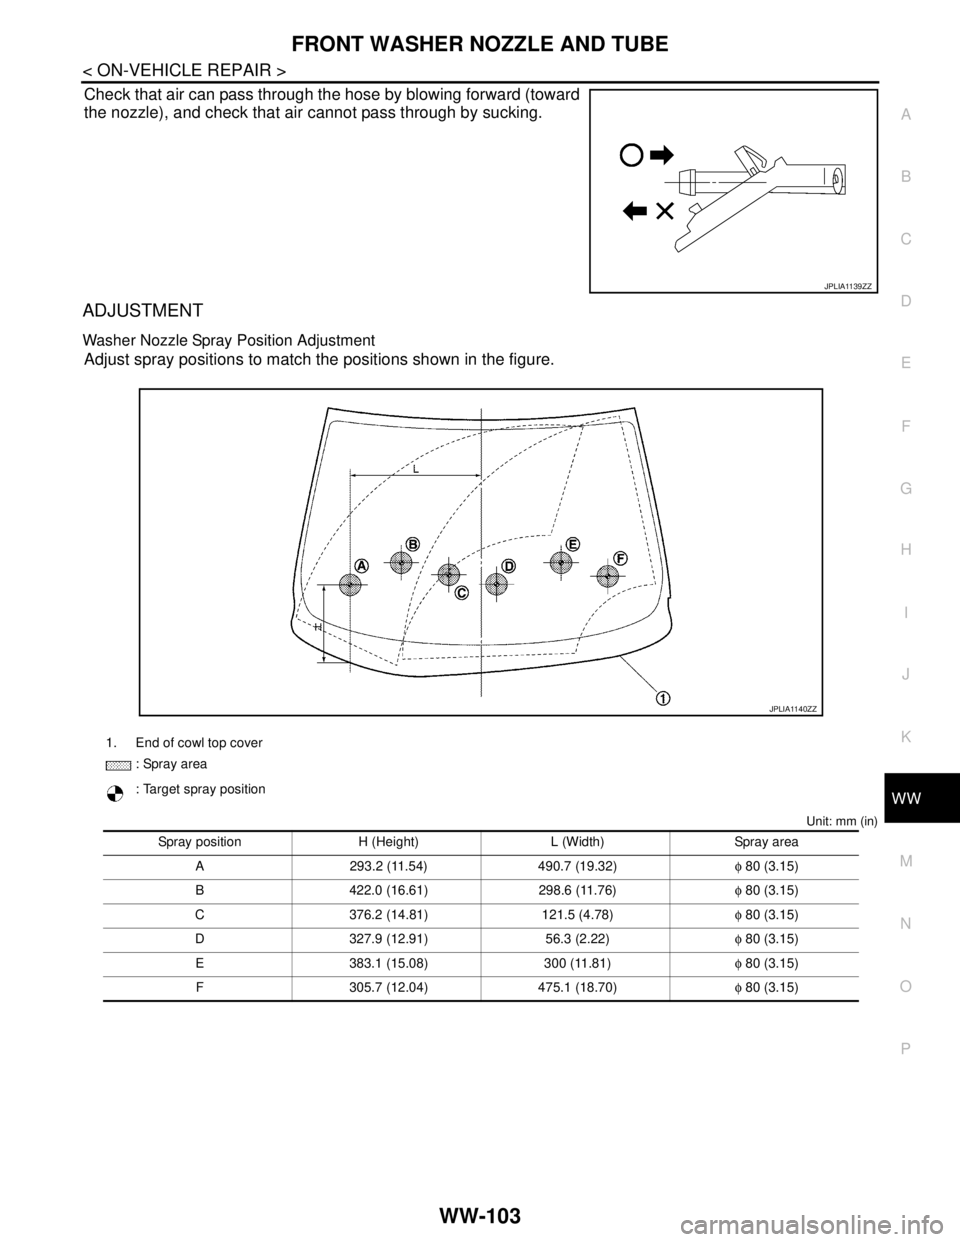
Check that air can pass through the hose by blowing forward (toward
the nozzle), and check that air cannot pass through by sucking.
ADJUSTMENT
Washer Nozzle Spray Position Adjustment
Adjust spray positions to match the positions shown in the figure.
Unit: mm (in)
JPLIA1139ZZ
1. End of cowl top cover
: Spray area
: Target spray position
Spray position H (Height) L (Width) Spray area
A 293.2 (11.54) 490.7 (19.32)φ 80 (3.15)
B 422.0 (16.61) 298.6 (11.76)φ 80 (3.15)
C 376.2 (14.81) 121.5 (4.78)φ 80 (3.15)
D 327.9 (12.91) 56.3 (2.22)φ 80 (3.15)
E 383.1 (15.08) 300 (11.81)φ 80 (3.15)
F 305.7 (12.04) 475.1 (18.70)φ 80 (3.15)
JPLIA1140ZZ
Page 5116 of 5121
WW-104
< ON-VEHICLE REPAIR >
FRONT WASHER NOZZLE AND TUBE
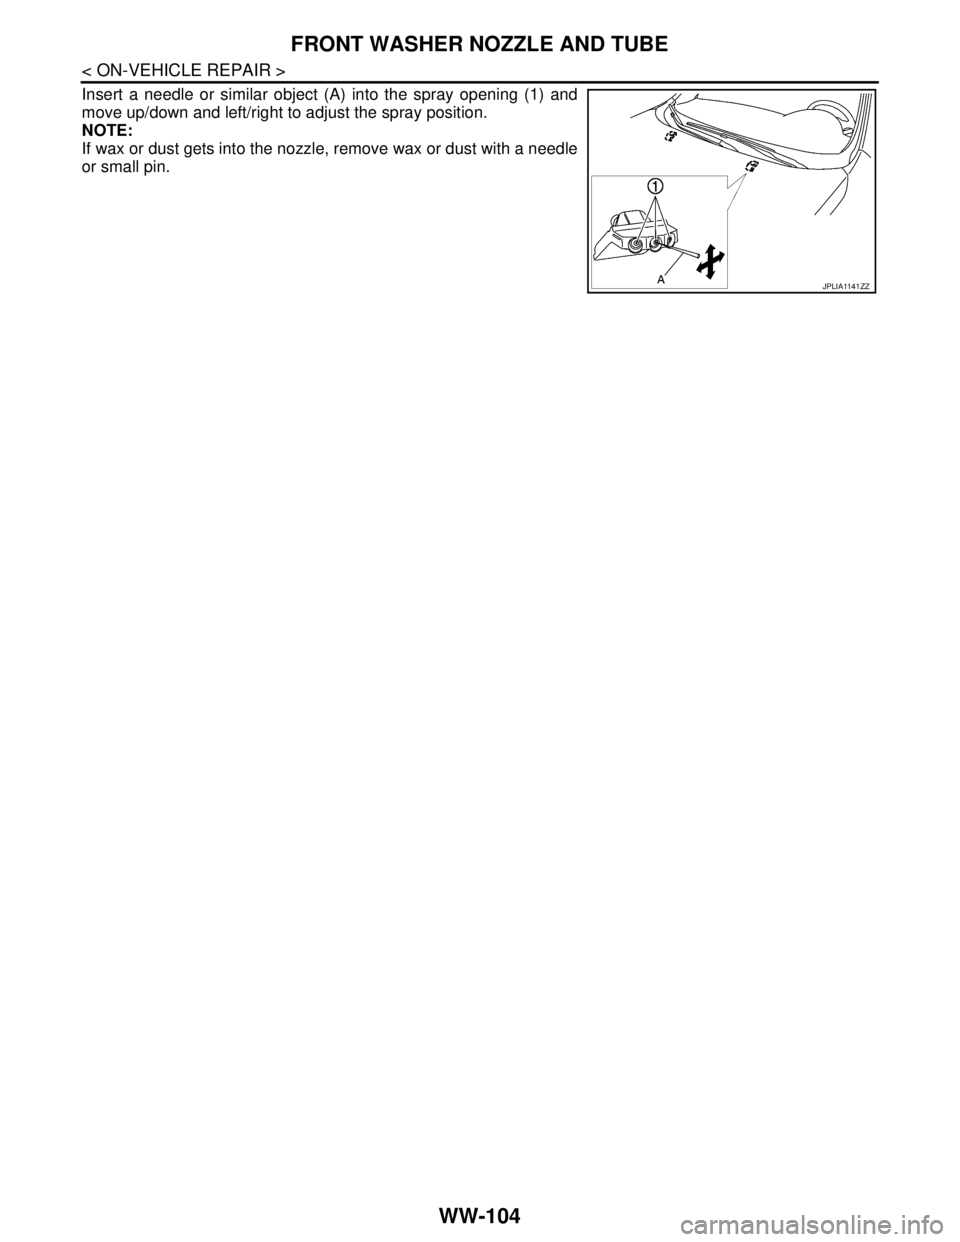
Insert a needle or similar object (A) into the spray opening (1) and
move up/down and left/right to adjust the spray position.
NOTE:
If wax or dust gets into the nozzle, remove wax or dust with a needle
or small pin.
JPLIA1141ZZ
Page 5117 of 5121
FRONT WIPER ARM
WW-105
< ON-VEHICLE REPAIR >
C
D
E
F
G
H
I
J
K
MA
B
WW
N
O
P
FRONT WIPER ARM
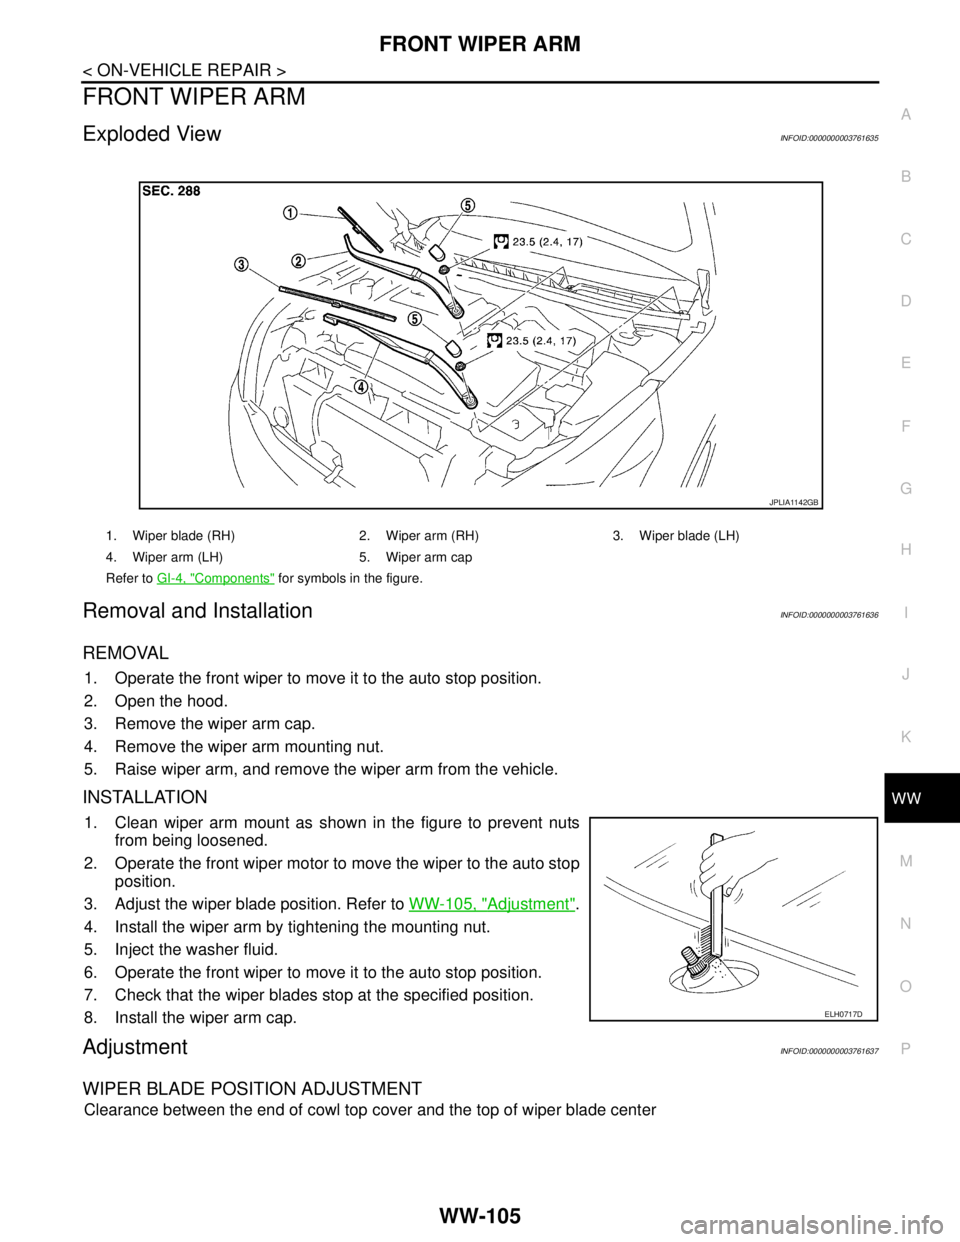
Exploded ViewINFOID:0000000003761635
Removal and InstallationINFOID:0000000003761636
REMOVAL
1. Operate the front wiper to move it to the auto stop position.
2. Open the hood.
3. Remove the wiper arm cap.
4. Remove the wiper arm mounting nut.
5. Raise wiper arm, and remove the wiper arm from the vehicle.
INSTALLATION
1. Clean wiper arm mount as shown in the figure to prevent nuts
from being loosened.
2. Operate the front wiper motor to move the wiper to the auto stop
position.
3. Adjust the wiper blade position. Refer to WW-105, "
Adjustment".
4. Install the wiper arm by tightening the mounting nut.
5. Inject the washer fluid.
6. Operate the front wiper to move it to the auto stop position.
7. Check that the wiper blades stop at the specified position.
8. Install the wiper arm cap.
AdjustmentINFOID:0000000003761637
WIPER BLADE POSITION ADJUSTMENT
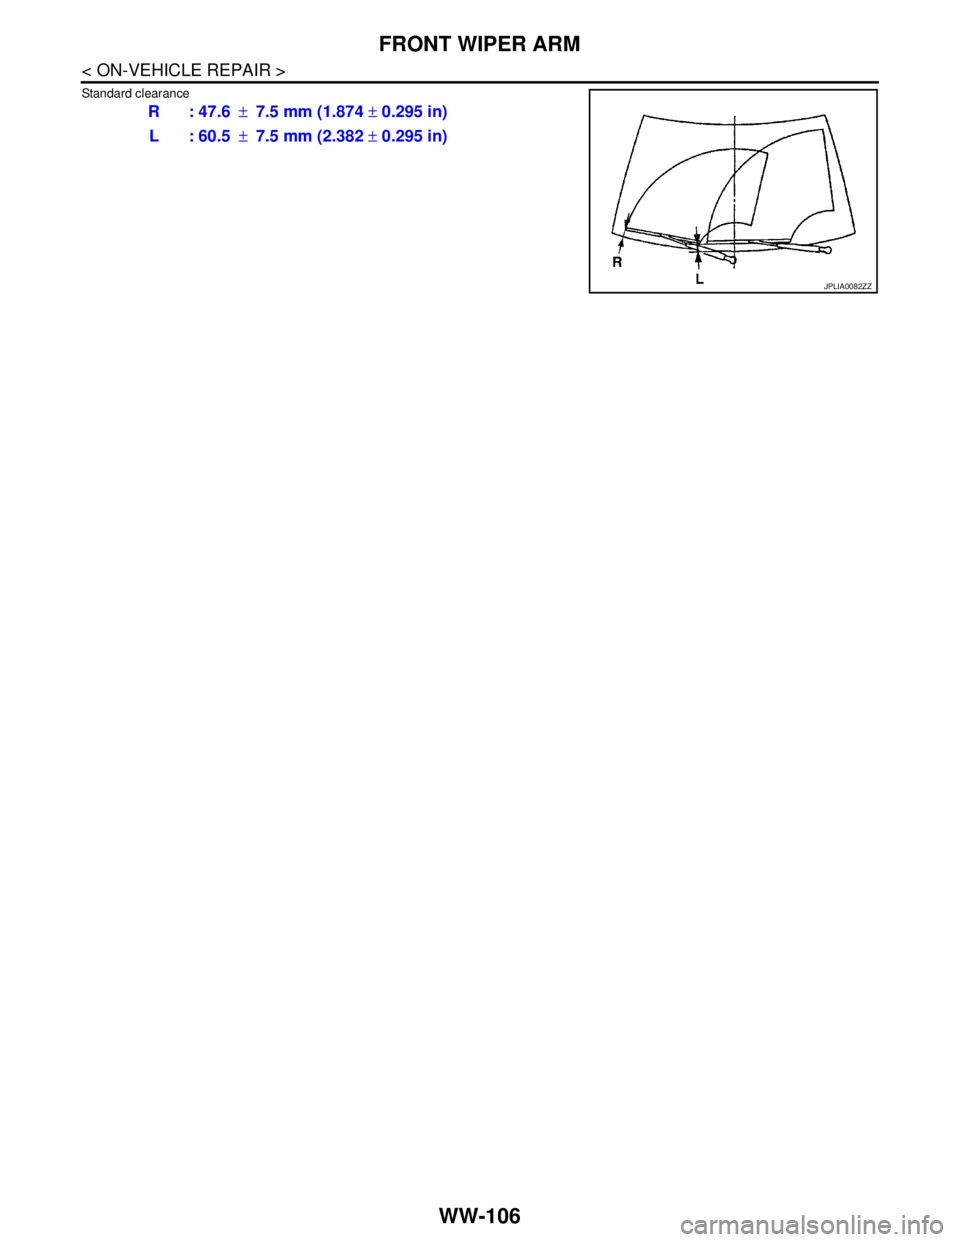
Clearance between the end of cowl top cover and the top of wiper blade center
1. Wiper blade (RH) 2. Wiper arm (RH) 3. Wiper blade (LH)
4. Wiper arm (LH) 5. Wiper arm cap
Refer to GI-4, "
Components" for symbols in the figure.
JPLIA1142GB
ELH0717D
Page 5118 of 5121
WW-106
< ON-VEHICLE REPAIR >
FRONT WIPER ARM
Standard clearance
R : 47.6±7.5 mm (1.874 ± 0.295 in)
L : 60.5±7.5 mm (2.382 ± 0.295 in)
JPLIA0082ZZ
Page 5119 of 5121
FRONT WIPER DRIVE ASSEMBLY
WW-107
< ON-VEHICLE REPAIR >
C
D
E
F
G
H
I
J
K
MA
B
WW
N
O
P
FRONT WIPER DRIVE ASSEMBLY
Exploded ViewINFOID:0000000003761638
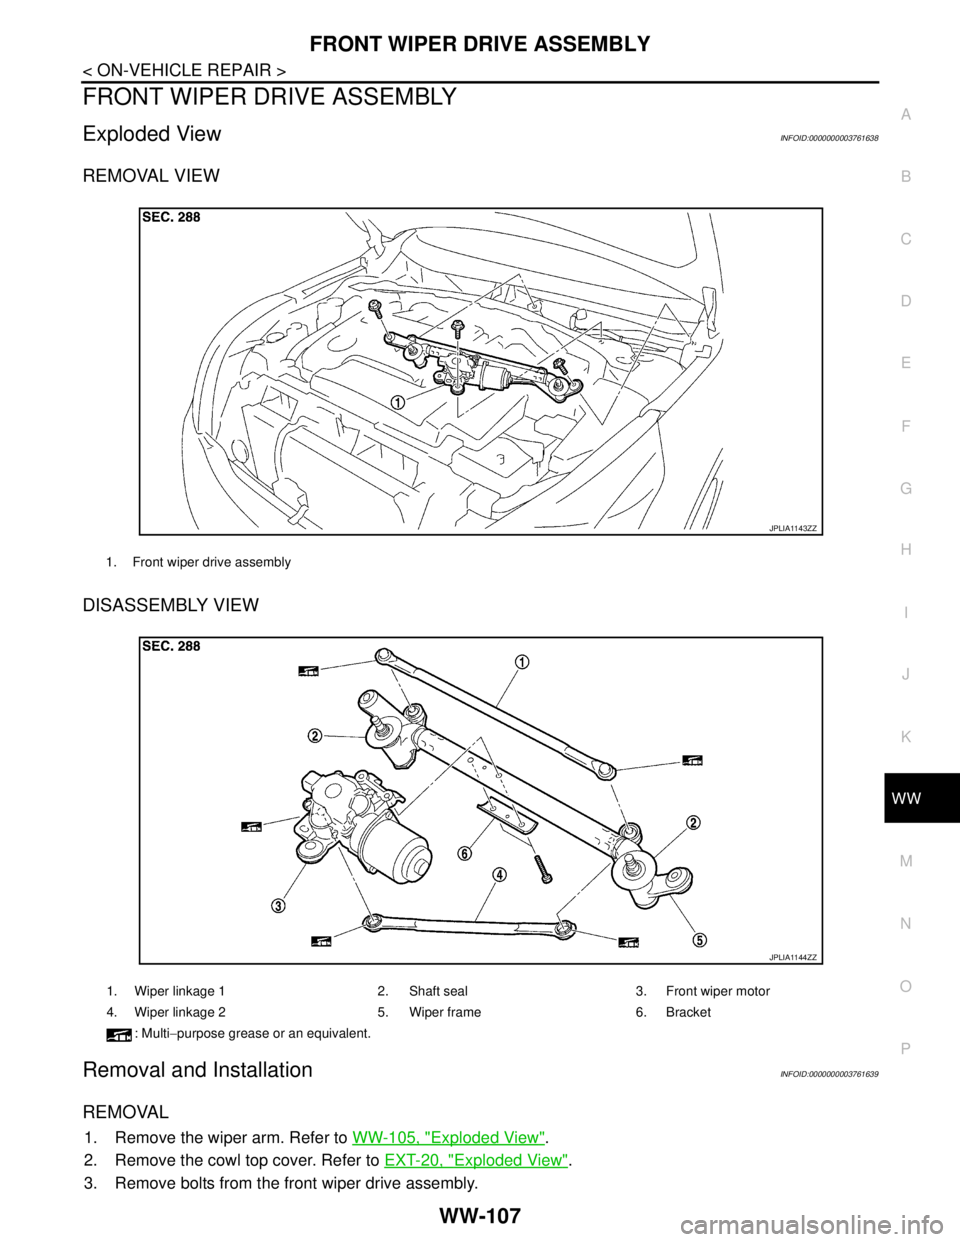
REMOVAL VIEW
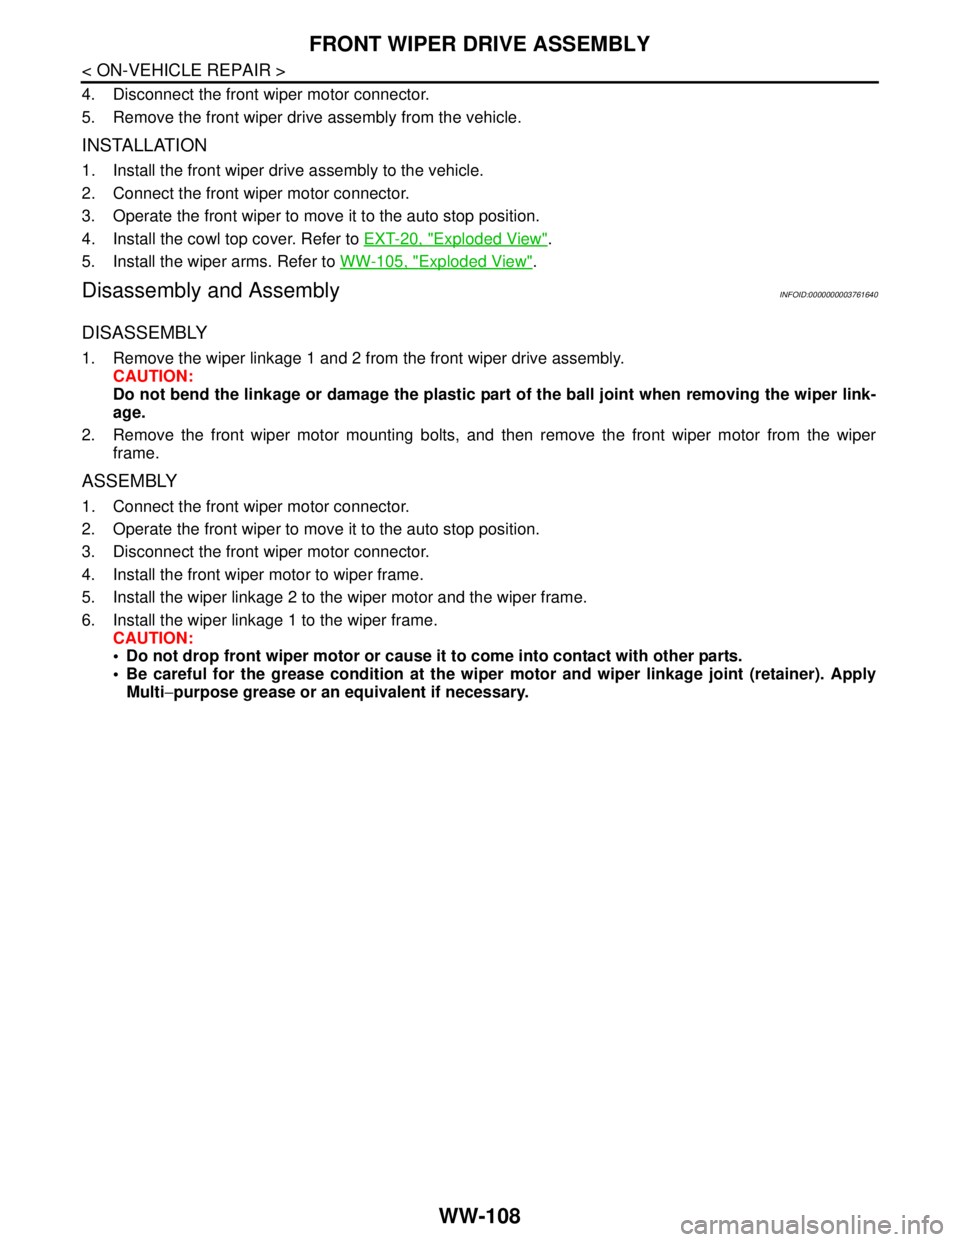
DISASSEMBLY VIEW
Removal and InstallationINFOID:0000000003761639
REMOVAL
1. Remove the wiper arm. Refer to WW-105, "Exploded View".
2. Remove the cowl top cover. Refer to EXT-20, "
Exploded View".
3. Remove bolts from the front wiper drive assembly.
1. Front wiper drive assembly
JPLIA1143ZZ
1. Wiper linkage 1 2. Shaft seal 3. Front wiper motor
4. Wiper linkage 2 5. Wiper frame 6. Bracket
: Multi−purpose grease or an equivalent.
JPLIA1144ZZ
Page 5120 of 5121
WW-108
< ON-VEHICLE REPAIR >
FRONT WIPER DRIVE ASSEMBLY
4. Disconnect the front wiper motor connector.
5. Remove the front wiper drive assembly from the vehicle.
INSTALLATION
1. Install the front wiper drive assembly to the vehicle.
2. Connect the front wiper motor connector.
3. Operate the front wiper to move it to the auto stop position.
4. Install the cowl top cover. Refer to EXT-20, "
Exploded View".
5. Install the wiper arms. Refer to WW-105, "
Exploded View".
Disassembly and AssemblyINFOID:0000000003761640
DISASSEMBLY
1. Remove the wiper linkage 1 and 2 from the front wiper drive assembly.
CAUTION:
Do not bend the linkage or damage the plastic part of the ball joint when removing the wiper link-
age.
2. Remove the front wiper motor mounting bolts, and then remove the front wiper motor from the wiper
frame.
ASSEMBLY
1. Connect the front wiper motor connector.
2. Operate the front wiper to move it to the auto stop position.
3. Disconnect the front wiper motor connector.
4. Install the front wiper motor to wiper frame.
5. Install the wiper linkage 2 to the wiper motor and the wiper frame.
6. Install the wiper linkage 1 to the wiper frame.
CAUTION:
Do not drop front wiper motor or cause it to come into contact with other parts.
Be careful for the grease condition at the wiper motor and wiper linkage joint (retainer). Apply
Multi−purpose grease or an equivalent if necessary.