NISSAN TEANA 2014 Service Manual
Manufacturer: NISSAN, Model Year: 2014, Model line: TEANA, Model: NISSAN TEANA 2014Pages: 4801, PDF Size: 51.2 MB
Page 4671 of 4801
WCS
SEAT BELT BUCKLE SWITCH SIGNAL CIRCUIT
WCS-29
< DTC/CIRCUIT DIAGNOSIS >
C
D E
F
G H
I
J
K L
M B
A
O P
NO >> Repair or replace harness or connectors.
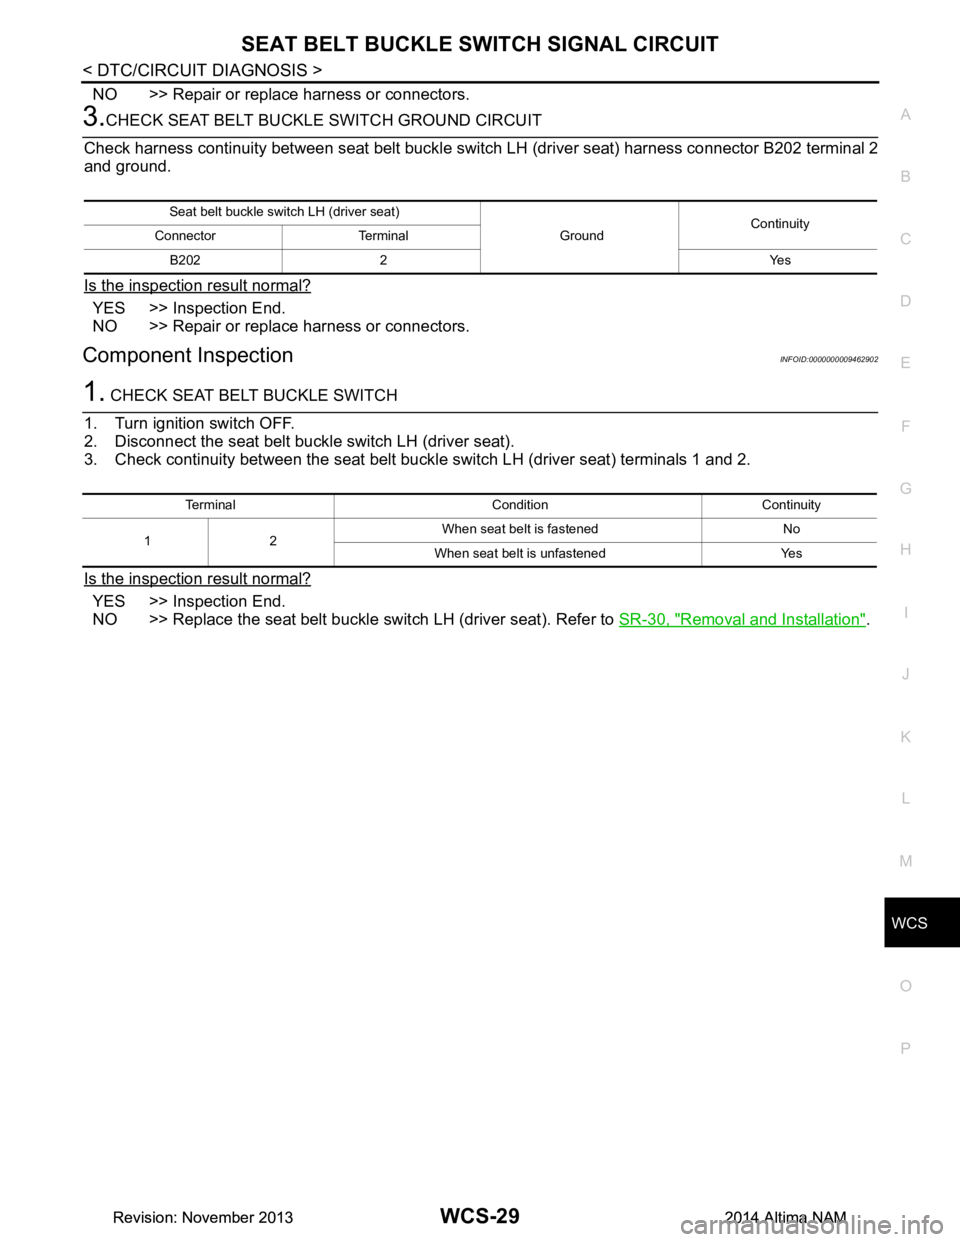
3.CHECK SEAT BELT BUCKLE SWITCH GROUND CIRCUIT
Check harness continuity between seat belt buckle switch LH (driver seat) harness connector B202 terminal 2
and ground.
Is the inspection result normal?
YES >> Inspection End.
NO >> Repair or replace harness or connectors.
Component InspectionINFOID:0000000009462902
1. CHECK SEAT BELT BUCKLE SWITCH
1. Turn ignition switch OFF.
2. Disconnect the seat belt buckle switch LH (driver seat).
3. Check continuity between the seat belt buckl e switch LH (driver seat) terminals 1 and 2.
Is the inspection result normal?
YES >> Inspection End.
NO >> Replace the seat belt buckle switch LH (driver seat). Refer to SR-30, "Removal and Installation"
.
Seat belt buckle switch LH (driver seat)
GroundContinuity
Connector Terminal
B202 2 Yes
Terminal Condition Continuity
12 When seat belt is fastened No
When seat belt is unfastened Yes
Revision: November 20132014 Altima NAMRevision: November 20132014 Altima NAM
Page 4672 of 4801
WCS-30
< SYMPTOM DIAGNOSIS >
WARNING CHIME SYSTEM SYMPTOMS
SYMPTOM DIAGNOSIS
WARNING CHIME SYSTEM SYMPTOMS
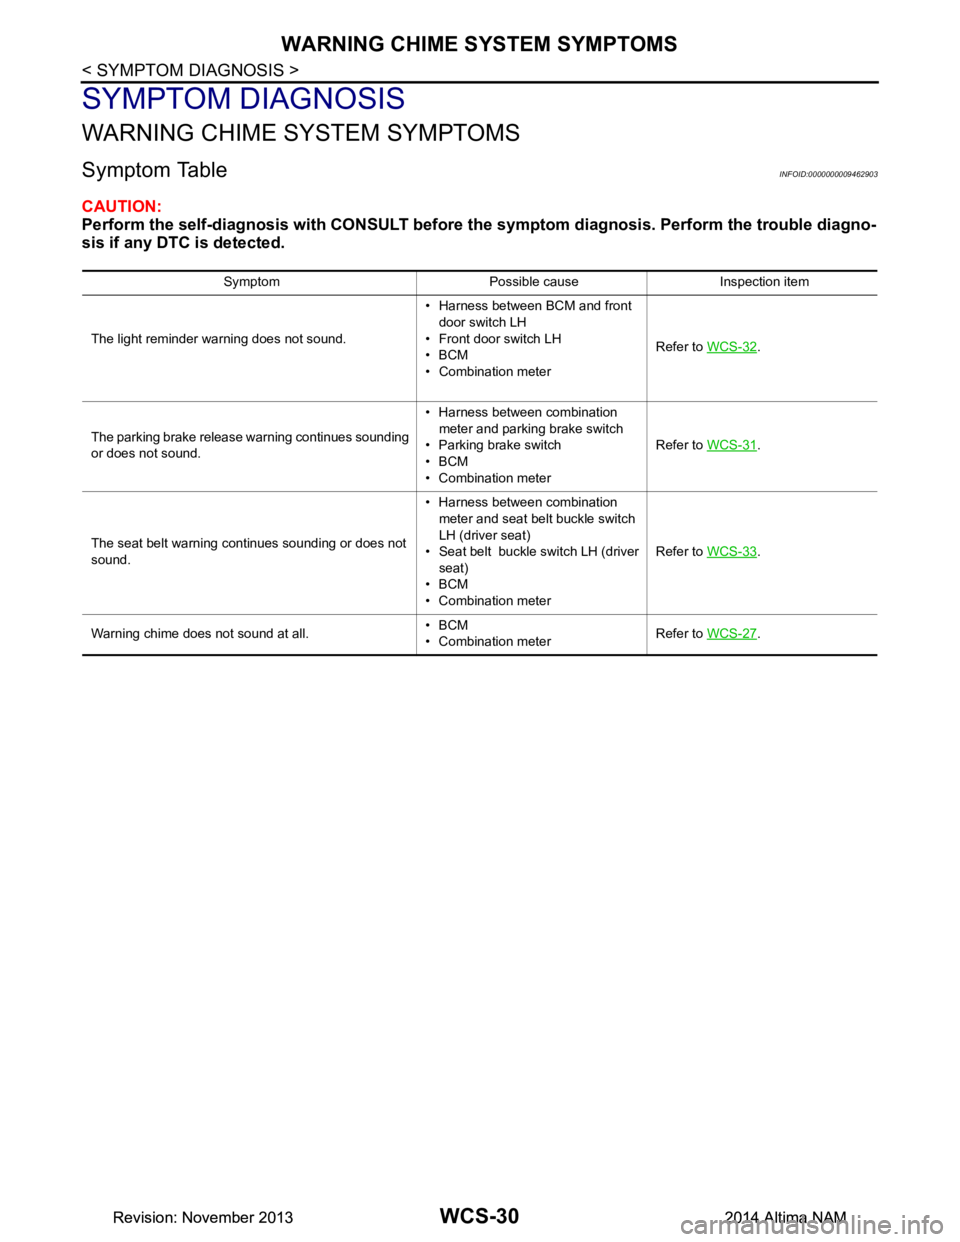
Symptom TableINFOID:0000000009462903
CAUTION:
Perform the self-diagnosis with CONSULT before th e symptom diagnosis. Perform the trouble diagno-
sis if any DTC is detected.
Symptom Possible cause Inspection item
The light reminder warning does not sound. • Harness between BCM and front
door switch LH
• Front door switch LH
•BCM
• Combination meter Refer to
WCS-32
.
The parking brake release warning continues sounding
or does not sound. • Harness between combination
meter and parking brake switch
• Parking brake switch
•BCM
• Combination meter Refer to
WCS-31
.
The seat belt warning continues sounding or does not
sound. • Harness between combination
meter and seat belt buckle switch
LH (driver seat)
• Seat belt buckle switch LH (driver seat)
•BCM
• Combination meter Refer to
WCS-33
.
Warning chime does not sound at all. •BCM
• Combination meter Refer to
WCS-27
.
Revision: November 20132014 Altima NAMRevision: November 20132014 Altima NAM
Page 4673 of 4801
WCS
THE PARKING BRAKE RELEASE WARNING CONTINUES SOUNDING, OR
DOES NOT SOUND
WCS-31
< SYMPTOM DIAGNOSIS >
C
D E
F
G H
I
J
K L
M B
A
O P
THE PARKING BRAKE RELEASE WARN ING CONTINUES SOUNDING, OR
DOES NOT SOUND
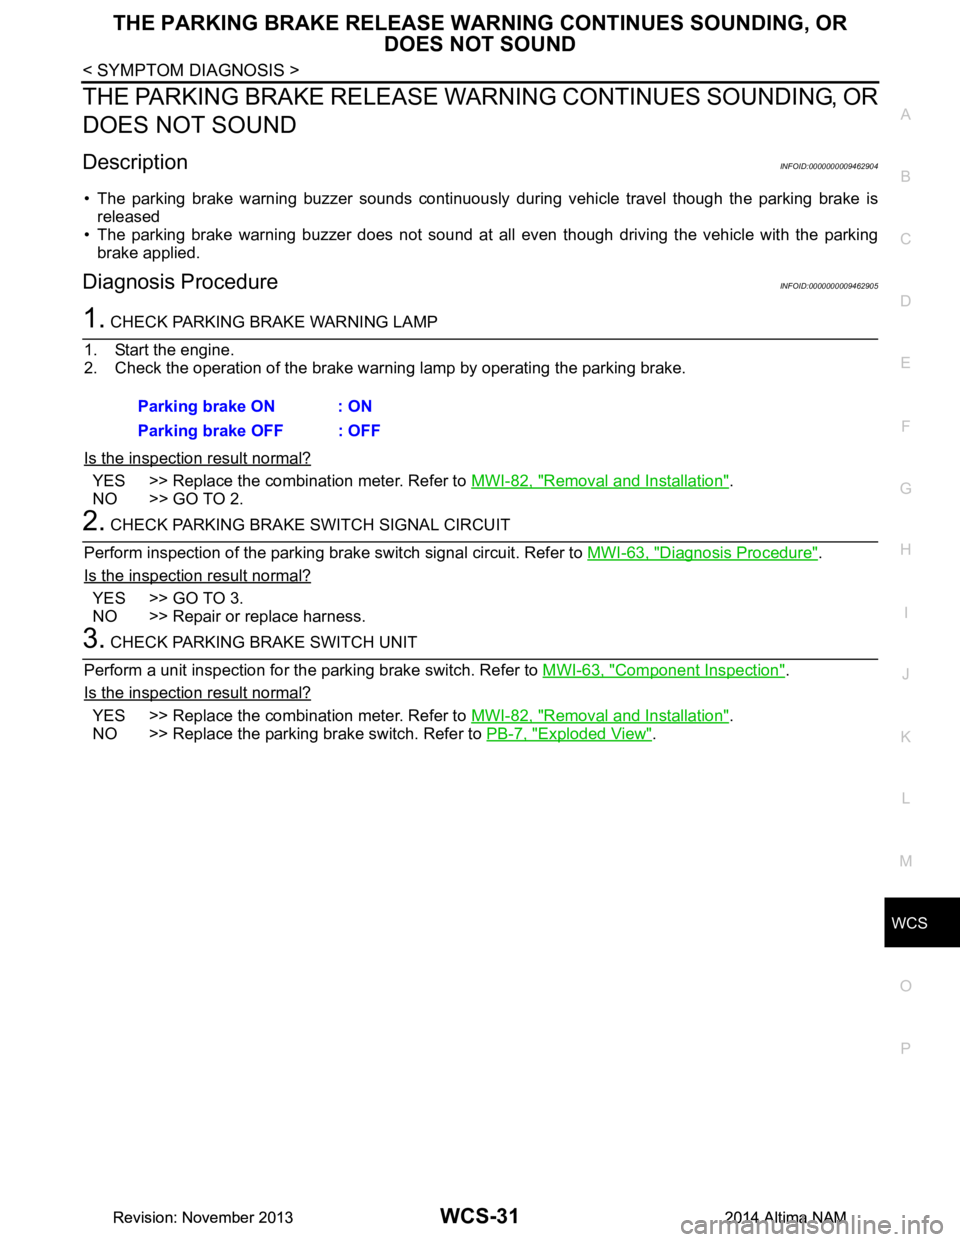
DescriptionINFOID:0000000009462904
• The parking brake warning buzzer sounds continuously during vehicle travel though the parking brake is
released
• The parking brake warning buzzer does not sound at all even though driving the vehicle with the parking
brake applied.
Diagnosis ProcedureINFOID:0000000009462905
1. CHECK PARKING BRAKE WARNING LAMP
1. Start the engine.
2. Check the operation of the brake warning lamp by operating the parking brake.
Is the inspection result normal?
YES >> Replace the combination meter. Refer to MWI-82, "Removal and Installation".
NO >> GO TO 2.
2. CHECK PARKING BRAKE SWITCH SIGNAL CIRCUIT
Perform inspection of the parking brak e switch signal circuit. Refer to MWI-63, "Diagnosis Procedure"
.
Is the inspection result normal?
YES >> GO TO 3.
NO >> Repair or replace harness.
3. CHECK PARKING BRAKE SWITCH UNIT
Perform a unit inspection for the parking brake switch. Refer to MWI-63, "Component Inspection"
.
Is the inspection result normal?
YES >> Replace the combination meter. Refer to MWI-82, "Removal and Installation".
NO >> Replace the parking brake switch. Refer to PB-7, "Exploded View"
.
Parking brake ON : ON
Parking brake OFF : OFF
Revision: November 20132014 Altima NAMRevision: November 20132014 Altima NAM
Page 4674 of 4801
WCS-32
< SYMPTOM DIAGNOSIS >
THE LIGHT REMINDER WARNING DOES NOT SOUND
THE LIGHT REMINDER WARNING DOES NOT SOUND
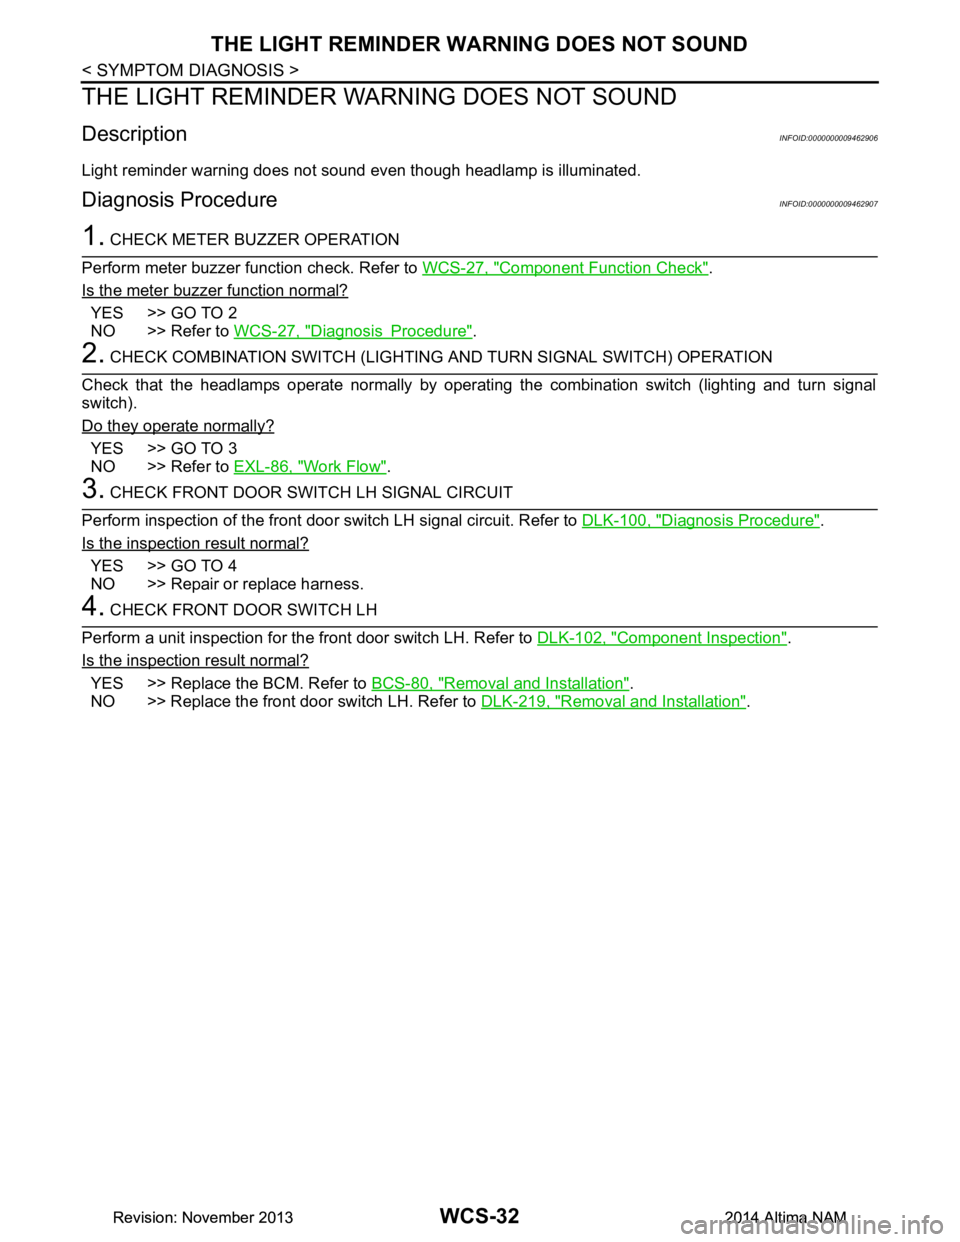
DescriptionINFOID:0000000009462906
Light reminder warning does not sound even though headlamp is illuminated.
Diagnosis ProcedureINFOID:0000000009462907
1. CHECK METER BUZZER OPERATION
Perform meter buzzer function check. Refer to WCS-27, "Component Function Check"
.
Is the meter buzzer function normal?
YES >> GO TO 2
NO >> Refer to WCS-27, "Diagnosis Procedure"
.
2. CHECK COMBINATION SWITCH (LIGHTIN G AND TURN SIGNAL SWITCH) OPERATION
Check that the headlamps operate normally by operati ng the combination switch (lighting and turn signal
switch).
Do they operate normally?
YES >> GO TO 3
NO >> Refer to EXL-86, "Work Flow"
.
3. CHECK FRONT DOOR SWITCH LH SIGNAL CIRCUIT
Perform inspection of the front door s witch LH signal circuit. Refer to DLK-100, "Diagnosis Procedure"
.
Is the inspection result normal?
YES >> GO TO 4
NO >> Repair or replace harness.
4. CHECK FRONT DOOR SWITCH LH
Perform a unit inspection for the front door switch LH. Refer to DLK-102, "Component Inspection"
.
Is the inspection result normal?
YES >> Replace the BCM. Refer to BCS-80, "Removal and Installation".
NO >> Replace the front door switch LH. Refer to DLK-219, "Removal and Installation"
.
Revision: November 20132014 Altima NAMRevision: November 20132014 Altima NAM
Page 4675 of 4801
WCS
THE SEAT BELT WARNING CONTINUES SOUNDING, OR DOES NOT SOUND
WCS-33
< SYMPTOM DIAGNOSIS >
C
D E
F
G H
I
J
K L
M B
A
O P
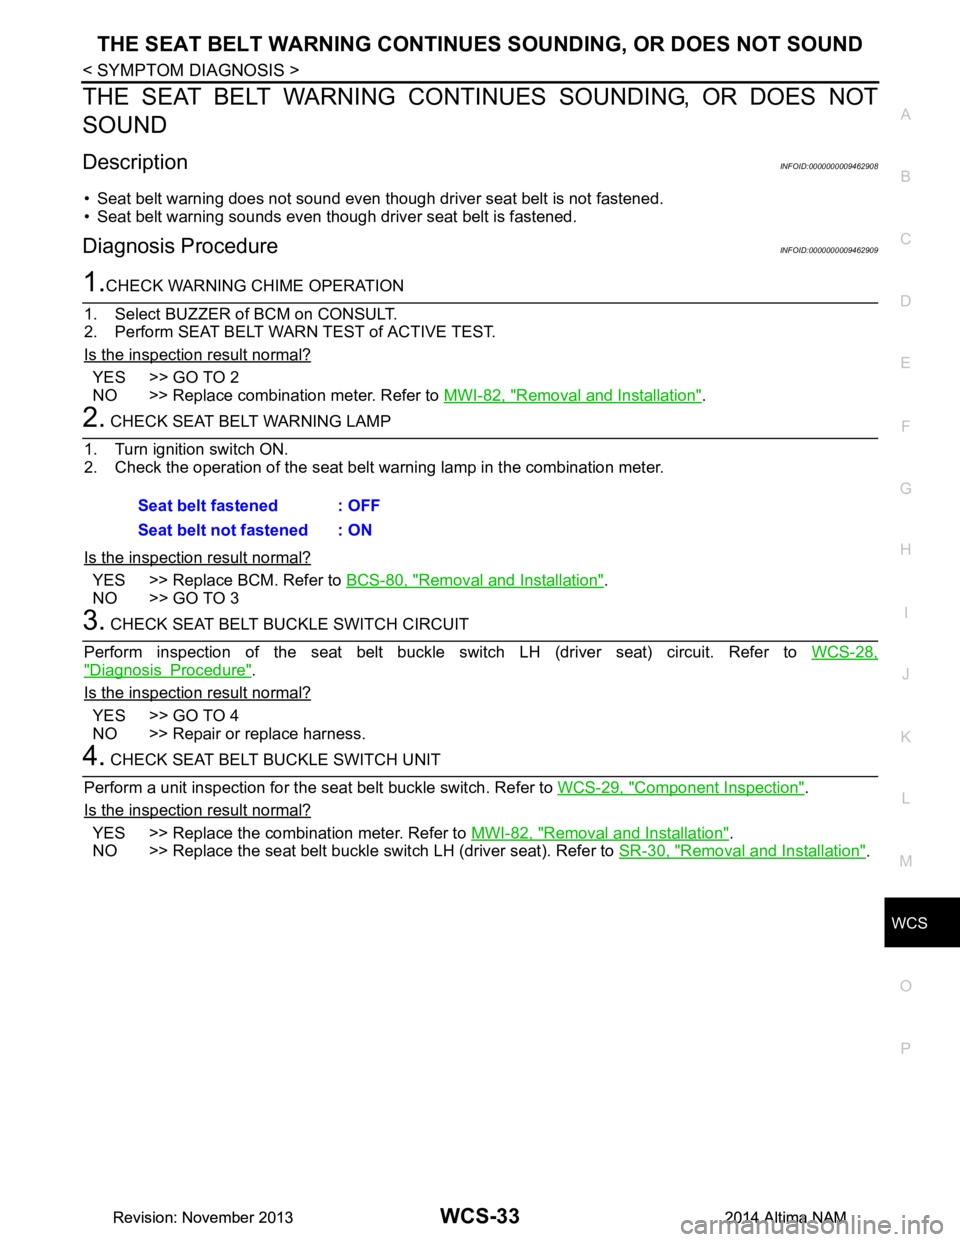
THE SEAT BELT WARNING CONTIN UES SOUNDING, OR DOES NOT
SOUND
DescriptionINFOID:0000000009462908
• Seat belt warning does not sound even though driver seat belt is not fastened.
• Seat belt warning sounds even though driver seat belt is fastened.
Diagnosis ProcedureINFOID:0000000009462909
1.CHECK WARNING CHIME OPERATION
1. Select BUZZER of BCM on CONSULT.
2. Perform SEAT BELT WARN TEST of ACTIVE TEST.
Is the inspection result normal?
YES >> GO TO 2
NO >> Replace combination meter. Refer to MWI-82, "Removal and Installation"
.
2. CHECK SEAT BELT WARNING LAMP
1. Turn ignition switch ON.
2. Check the operation of the seat belt warning lamp in the combination meter.
Is the inspection result normal?
YES >> Replace BCM. Refer to BCS-80, "Removal and Installation".
NO >> GO TO 3
3. CHECK SEAT BELT BUCKLE SWITCH CIRCUIT
Perform inspection of the seat belt buckle sw itch LH (driver seat) circuit. Refer to WCS-28,
"Diagnosis Procedure".
Is the inspection result normal?
YES >> GO TO 4
NO >> Repair or replace harness.
4. CHECK SEAT BELT BUCKLE SWITCH UNIT
Perform a unit inspection for the seat belt buckle switch. Refer to WCS-29, "Component Inspection"
.
Is the inspection result normal?
YES >> Replace the combination meter. Refer to MWI-82, "Removal and Installation".
NO >> Replace the seat belt buckle switch LH (driver seat). Refer to SR-30, "Removal and Installation"
.
Seat belt fastened : OFF
Seat belt not fastened : ON
Revision: November 20132014 Altima NAMRevision: November 20132014 Altima NAM
Page 4676 of 4801

WT-1
SUSPENSION
C
D
F
G H
I
J
K L
M
SECTION WT
A
B
WT
N
O PCONTENTS
ROAD WHEELS & TIRES
PRECAUTION ................ ...............................3
PRECAUTIONS .............................................. .....3
Precaution for Supplemental Restraint System
(SRS) "AIR BAG" and "SEAT BELT PRE-TEN-
SIONER" ............................................................. ......
3
Service Notice and Precautions for TPMS ................3
Precaution for Road Wheel .......................................4
PREPARATION ............................................5
PREPARATION .............................................. .....5
Special Service Tool ........................................... ......5
Commercial Service Tool ..........................................5
SYSTEM DESCRIPTION ..............................6
COMPONENT PARTS ................................... .....6
Component Parts Location .................................. ......6
Component Description .............................................6
BCM ..........................................................................6
Transmitter ................................................................7
Remote Keyless Entry Receiver ...............................7
Outside Key Antennas ..............................................7
Combination Meter ....................................................7
SYSTEM ..............................................................8
System Diagram .................................................. ......8
System Description ...................................................9
Easy Fill Tire Alert Function ......................................9
DIAGNOSIS SYSTEM (BCM) ............................10
COMMON ITEM ..................................................... ....10
COMMON ITEM : CONSULT Function (BCM -
COMMON ITEM) ................................................. ....
10
AIR PRESSURE MONITOR ......................................11
AIR PRESSURE MONITOR : CONSULT Function
(BCM-AIR PRESSURE MO NITOR) ........................
11
ECU DIAGNOSIS INFORMATION ........... ...13
BCM ...................................................................13
List of ECU Reference ......................................... ....13
WIRING DIAGRAM ......................................14
TIRE PRESSURE MONITORING SYSTEM ......14
Wiring Diagram - With Individual Tire Pressure
Display ................................................................. ....
14
Wiring Diagram - Without Individual Tire Pressure
Display ................................................................. ....
20
BASIC INSPECTION ...................................24
DIAGNOSIS AND REPAIR WORK FLOW .......24
Work Flow ............................................................ ....24
ID REGISTRATION PROCEDURE ...................25
Description ...............................................................25
Work Procedure .......................................................25
DTC/CIRCUIT DIAGNOSIS .........................28
C1704, C1705, C1706, C1707 LOW TIRE
PRESSURE .......................................................
28
DTC Logic ............................................................ ....28
Diagnosis Procedure ...............................................28
C1708, C1709, C1710, C1711 TRANSMITTER
(NO DATA) ........................................................
30
DTC Logic ............................................................ ....30
Diagnosis Procedure ...............................................30
C1712, C1713, C1714, C1715 TRANSMITTER
(CHECKSUM) ....................................................
33
DTC Logic ............................................................ ....33
Diagnosis Procedure ...............................................33
C1716, C1717, C1718, C1719 TRANSMITTER
(PRESSURE DATA) ..........................................
35
DTC Logic ............................................................ ....35
Diagnosis Procedure ...............................................35
Revision: November 20132014 Altima NAMRevision: November 20132014 Altima NAM
Page 4677 of 4801

WT-2
C1720, C1721, C1722, C1723 TRANSMITTER ...
37
DTC Logic ............................................................ ...37
Diagnosis Procedure ..............................................37
C1724, C1725, C1726, C1727 TRANSMITTER
(BATT VOLT) .................................................. ...
39
DTC Logic ............................................................ ...39
Diagnosis Procedure ..............................................39
C1729 VEHICLE SPEED SIGNAL ....................41
DTC Logic ............................................................ ...41
Diagnosis Procedure ..............................................41
C1730, C1731, C1732, C1733 FLAT TIRE ........42
DTC Logic ............................................................ ...42
Diagnosis Procedure ..............................................42
C1734 BCM ........................................................44
DTC Logic ............................................................ ...44
Diagnosis Procedure ..............................................44
C1735 IGNITION SIGNAL .................................46
DTC Logic ............................................................ ...46
Diagnosis Procedure ..............................................46
SYMPTOM DIAGNOSIS .............................48
TPMS .............................................................. ...48
Symptom Table ................................................... ...48
LOW TIRE PRESSURE WARNING LAMP
DOES NOT TURN ON .................................... ...
49
Low Tire Pressure Warning Lamp Does Not Come
On When Ignition Switch Is Turned On ............... ...
49
LOW TIRE PRESSURE WARNING LAMP
STAYS ON ...................................................... ...
50
Low Tire Pressure Warning Lamp Stays On When
Ignition Switch Is Turned On ................................ ...
50
EASY FILL TIRE ALERT DOES NOT ACTI-
VATE ............................................................... ...
51
Description ........................................................... ...51
Diagnosis Procedure ...............................................51
NOISE, VIBRATION AND HARSHNESS
(NVH) TROUBLESHOOTING ......................... ...
52
NVH Troubleshooting Chart ....................................52
PERIODIC MAINTENANCE .......................53
ROAD WHEEL ................................................ ...53
Inspection ............................................................. ...53
REMOVAL AND INSTALLATION ..............54
REMOTE KEYLESS ENTRY RECEIVER ...... ...54
Removal and Installation .........................................54
ROAD WHEEL TIRE ASSEMBLY ................. ...55
Adjustment ........................................................... ...55
UNIT REMOVAL AND INSTALLATION ....57
TIRE PRESSURE SENSOR ........................... ...57
Exploded View ..................................................... ...57
Removal and Installation .........................................57
SERVICE DATA AND SPECIFICATIONS
(SDS) ............... ...........................................
60
SERVICE DATA AND SPECIFICATIONS
(SDS) .............................................................. ...
60
Road Wheel ......................................................... ...60
Tire ..........................................................................60
Revision: November 20132014 Altima NAMRevision: November 20132014 Altima NAM
Page 4678 of 4801
PRECAUTIONSWT-3
< PRECAUTION >
C
D
F
G H
I
J
K L
M A
B
WT
N
O P
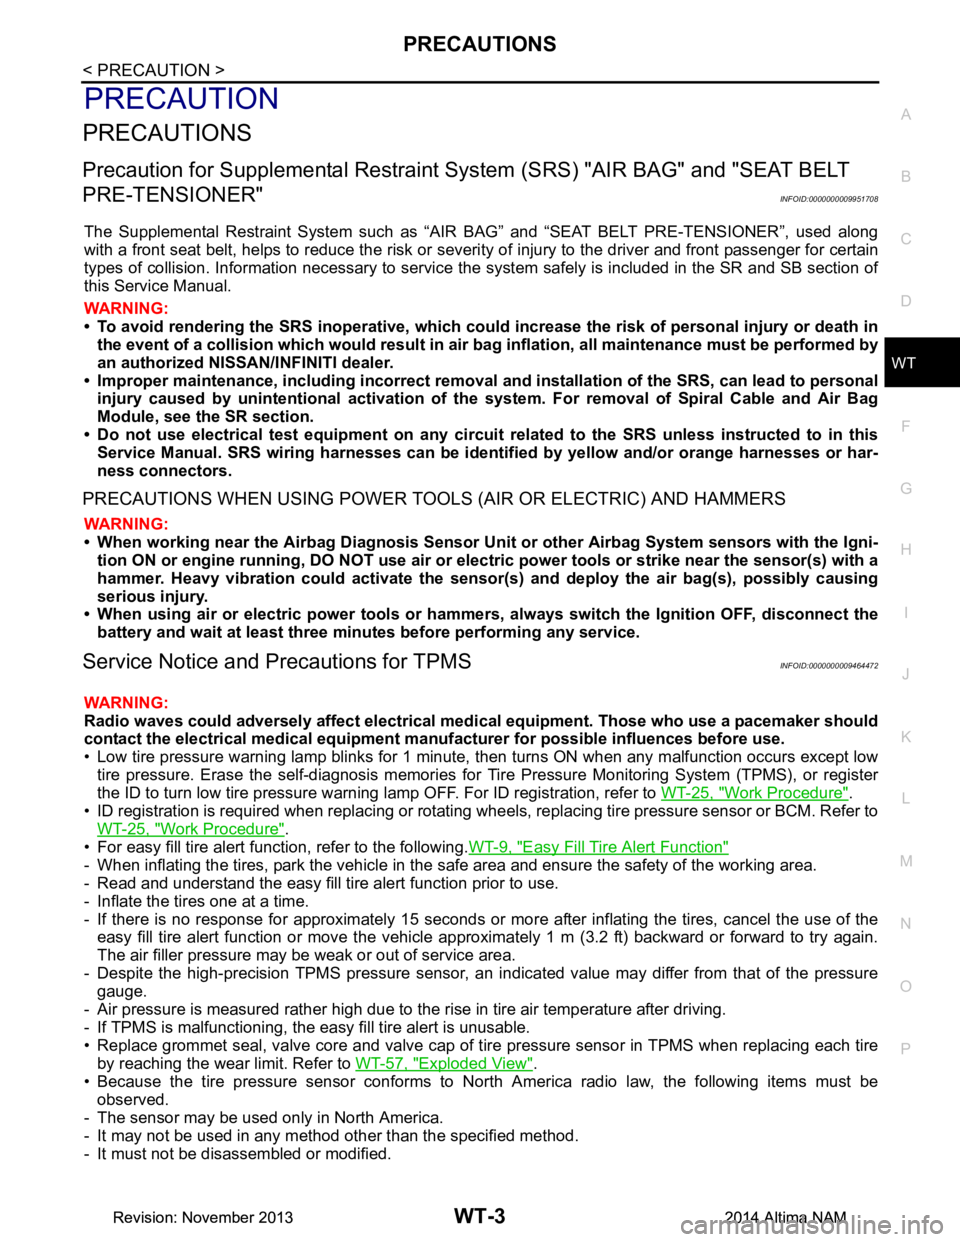
PRECAUTION
PRECAUTIONS
Precaution for Supplemental Restraint System (SRS) "AIR BAG" and "SEAT BELT
PRE-TENSIONER"
INFOID:0000000009951708
The Supplemental Restraint System such as “A IR BAG” and “SEAT BELT PRE-TENSIONER”, used along
with a front seat belt, helps to reduce the risk or severi ty of injury to the driver and front passenger for certain
types of collision. Information necessary to service t he system safely is included in the SR and SB section of
this Service Manual.
WARNING:
• To avoid rendering the SRS inoper ative, which could increase the risk of personal injury or death in
the event of a collision which would result in air bag inflation, all maintenance must be performed by
an authorized NISSAN/INFINITI dealer.
• Improper maintenance, including in correct removal and installation of the SRS, can lead to personal
injury caused by unintentional act ivation of the system. For removal of Spiral Cable and Air Bag
Module, see the SR section.
• Do not use electrical test equipm ent on any circuit related to the SRS unless instructed to in this
Service Manual. SRS wiring harnesses can be identi fied by yellow and/or orange harnesses or har-
ness connectors.
PRECAUTIONS WHEN USING POWER TOOLS (AIR OR ELECTRIC) AND HAMMERS
WARNING:
• When working near the Airbag Diagnosis Sensor Un it or other Airbag System sensors with the Igni-
tion ON or engine running, DO NOT use air or el ectric power tools or strike near the sensor(s) with a
hammer. Heavy vibration could activate the sensor( s) and deploy the air bag(s), possibly causing
serious injury.
• When using air or electric power tools or hammers , always switch the Ignition OFF, disconnect the
battery and wait at least three mi nutes before performing any service.
Service Notice and Precautions for TPMSINFOID:0000000009464472
WARNING:
Radio waves could adversely affect electrical medi cal equipment. Those who use a pacemaker should
contact the electrical medical equipment manu facturer for possible influences before use.
• Low tire pressure warning lamp blinks for 1 minute, then turns ON when any malfunction occurs except low
tire pressure. Erase the self-diagnosis memories for Tire Pressure Monitoring System (TPMS), or register
the ID to turn low tire pressure warning lamp OFF. For ID registration, refer to WT-25, "Work Procedure"
.
• ID registration is required when replacing or rotating wheels, replacing tire pressure sensor or BCM. Refer to WT-25, "Work Procedure"
.
• For easy fill tire alert function, refer to the following. WT-9, "Easy Fill Tire Alert Function"
- When inflating the tires, park the vehicle in the safe area and ensure the safety of the working area.
- Read and understand the easy fill tire alert function prior to use.
- Inflate the tires one at a time.
- If there is no response for approximately 15 seconds or mo re after inflating the tires, cancel the use of the
easy fill tire alert function or move the vehicle approximately 1 m (3.2 ft) backward or forward to try again.
The air filler pressure may be weak or out of service area.
- Despite the high-precision TPMS pressure sensor, an i ndicated value may differ from that of the pressure
gauge.
- Air pressure is measured rather high due to the rise in tire air temperature after driving.
- If TPMS is malfunctioning, the easy fill tire alert is unusable.
• Replace grommet seal, valve core and valve cap of tire pressure sensor in TPMS when replacing each tire
by reaching the wear limit. Refer to WT-57, "Exploded View"
.
• Because the tire pressure sensor conforms to No rth America radio law, the following items must be
observed.
- The sensor may be used only in North America.
- It may not be used in any method other than the specified method.
- It must not be disassembled or modified.
Revision: November 20132014 Altima NAMRevision: November 20132014 Altima NAM
Page 4679 of 4801

WT-4
< PRECAUTION >
PRECAUTIONS
Precaution for Road Wheel
INFOID:0000000009464473
• Genuine NISSAN aluminum wheel is designed for each type of vehicle. Use it on the specified vehicle only.
• Use Genuine NISSAN parts for the wheel nuts.
• Always adjusting the wheel balance prior to using them . For the balance weights, use Genuine NISSAN alu-
minum wheel weights.
• Use caution when handling the aluminum wheels, because they can be easily scratched. When removing
dirt, do not use any abrasives, a wire brush, or other it ems that may scratch the coating. Use a neutral deter-
gent if a detergent is needed.
• After driving on roads scattered with anti-ici ng salts, wash off the wheels completely.
• When installing road wheels onto the vehicle, always wipe of f any dirt or foreign substances to prevent them
from being trapped between the contact surfaces of wheel.
• Do not apply oil to nut and bolt threads.
Revision: November 20132014 Altima NAMRevision: November 20132014 Altima NAM
Page 4680 of 4801
PREPARATIONWT-5
< PREPARATION >
C
D
F
G H
I
J
K L
M A
B
WT
N
O P
PREPARATION
PREPARATION
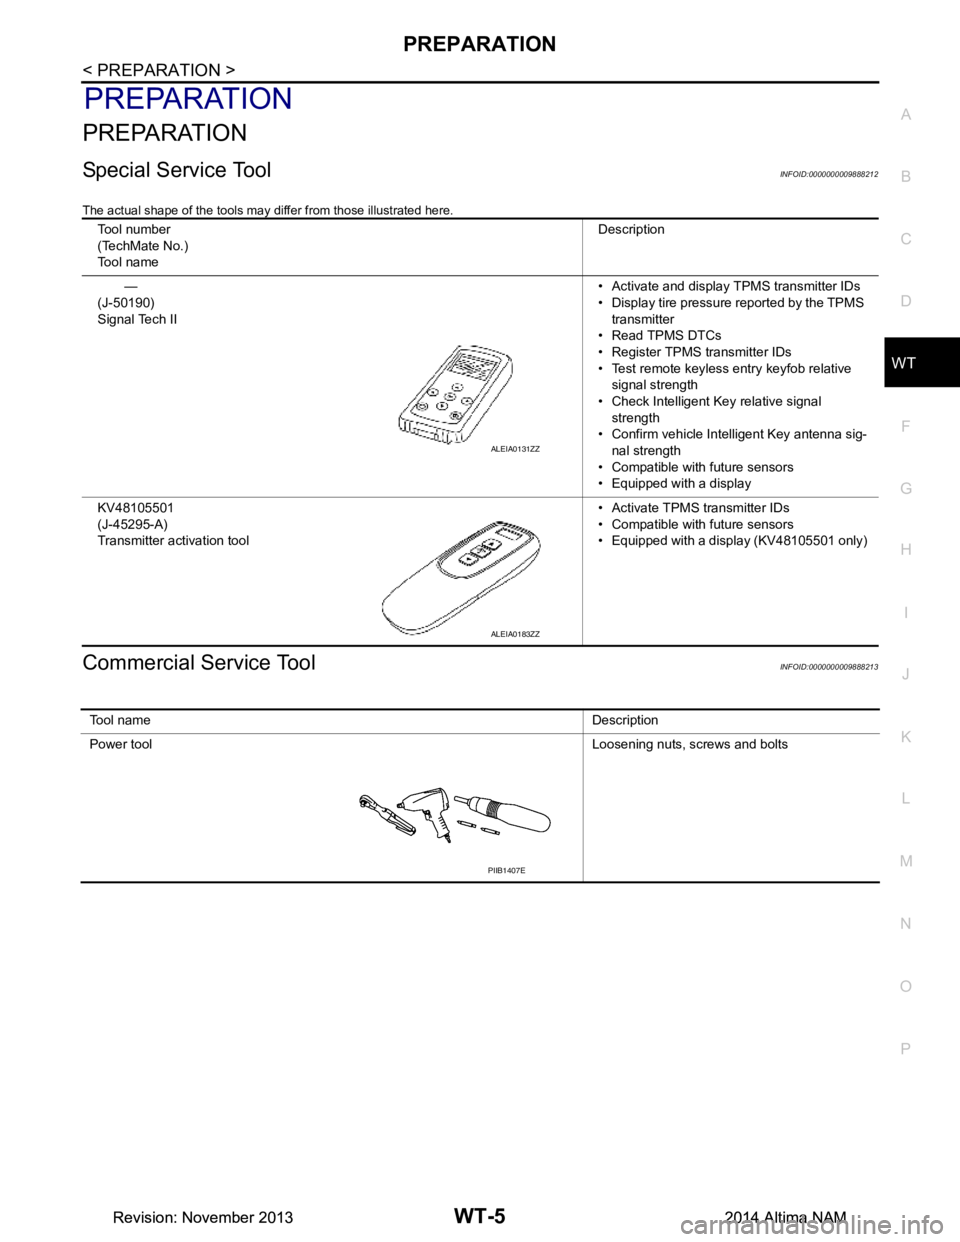
Special Service ToolINFOID:0000000009888212
The actual shape of the tools may di ffer from those illustrated here.
Commercial Service ToolINFOID:0000000009888213
Tool number
(TechMate No.)
Tool name Description
—
(J-50190)
Signal Tech II • Activate and display TPMS transmitter IDs
• Display tire pressure reported by the TPMS transmitter
• Read TPMS DTCs
• Register TPMS transmitter IDs
• Test remote keyless entry keyfob relative signal strength
• Check Intelligent Key relative signal strength
• Confirm vehicle Intelligent Key antenna sig-
nal strength
• Compatible with future sensors
• Equipped with a display
KV48105501
(J-45295-A)
Transmitter activation tool • Activate TPMS transmitter IDs
• Compatible with future sensors
• Equipped with a display (KV48105501 only)
ALEIA0131ZZ
ALEIA0183ZZ
To o l n a m e Description
Power tool Loosening nuts, screws and bolts
PIIB1407E
Revision: November 20132014 Altima NAMRevision: November 20132014 Altima NAM