NISSAN X-TRAIL 2001 Service Repair Manual
X-TRAIL 2001
NISSAN
NISSAN
https://www.carmanualsonline.info/img/5/57405/w960_57405-0.png
NISSAN X-TRAIL 2001 Service Repair Manual
Trending: open gas tank, brake rotor, change wheel, tf-35, tf-36, light, spare wheel
Page 3611 of 3833
WARNING LAMPS
DI-53
C
D
E
F
G
H
I
J
L
MA
B
DI
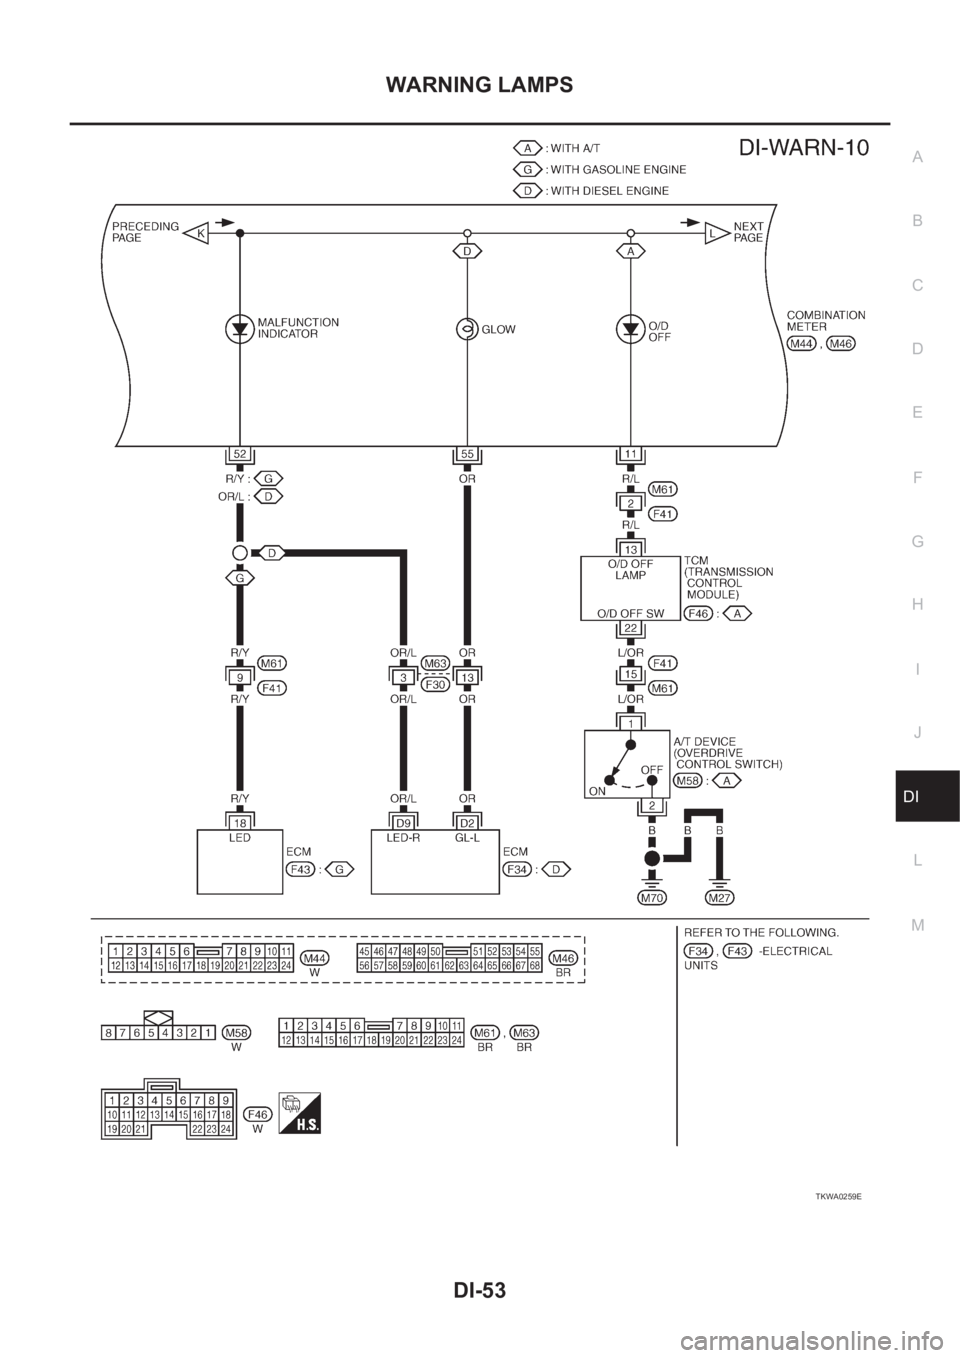
TKWA0259E
Page 3612 of 3833
DI-54
WARNING LAMPS
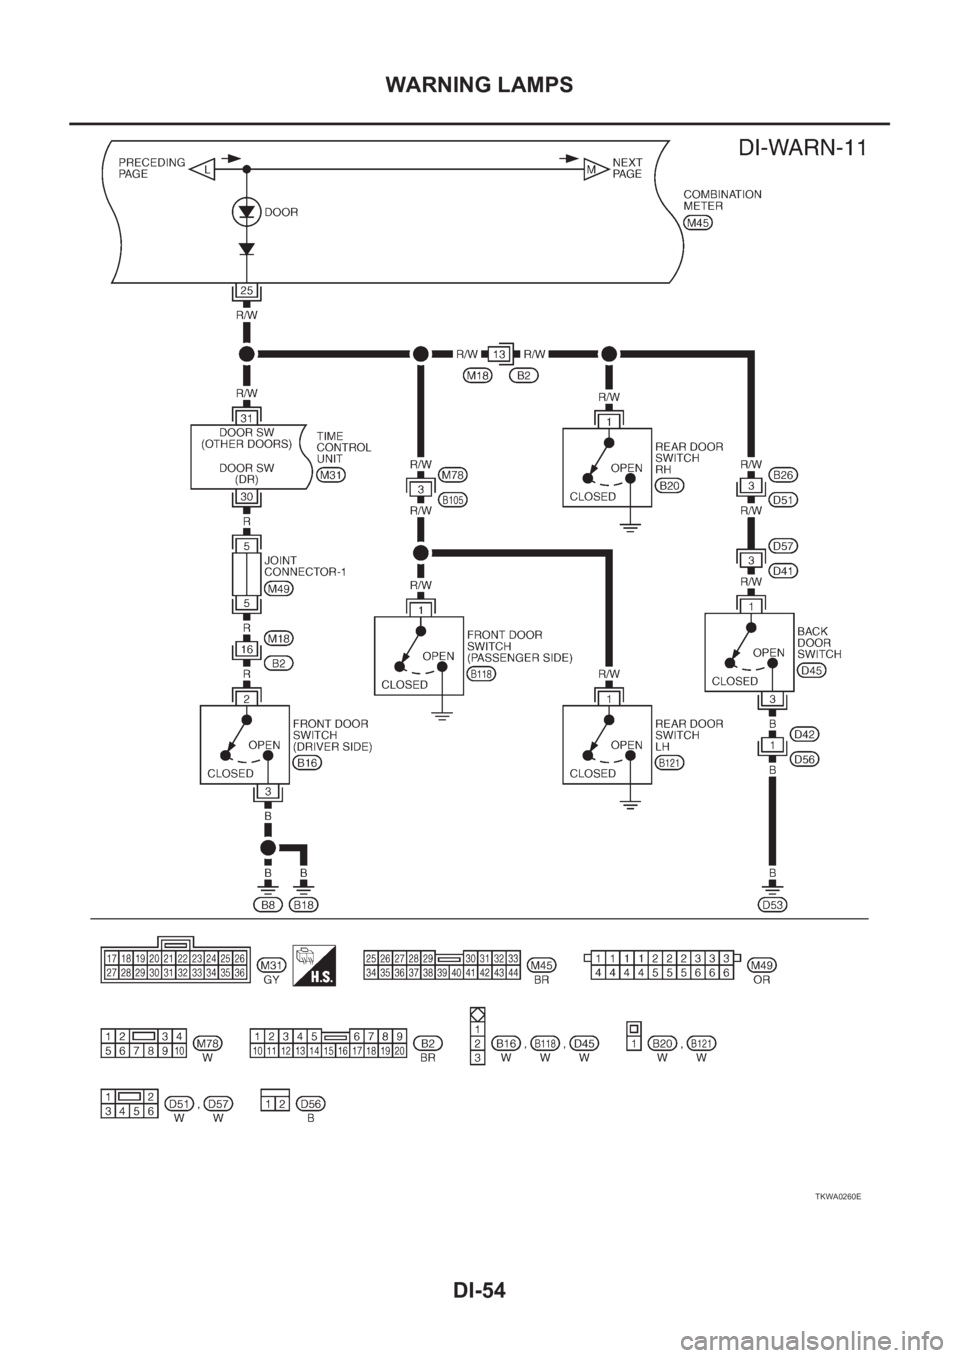
TKWA0260E
Page 3613 of 3833
WARNING LAMPS
DI-55
C
D
E
F
G
H
I
J
L
MA
B
DI
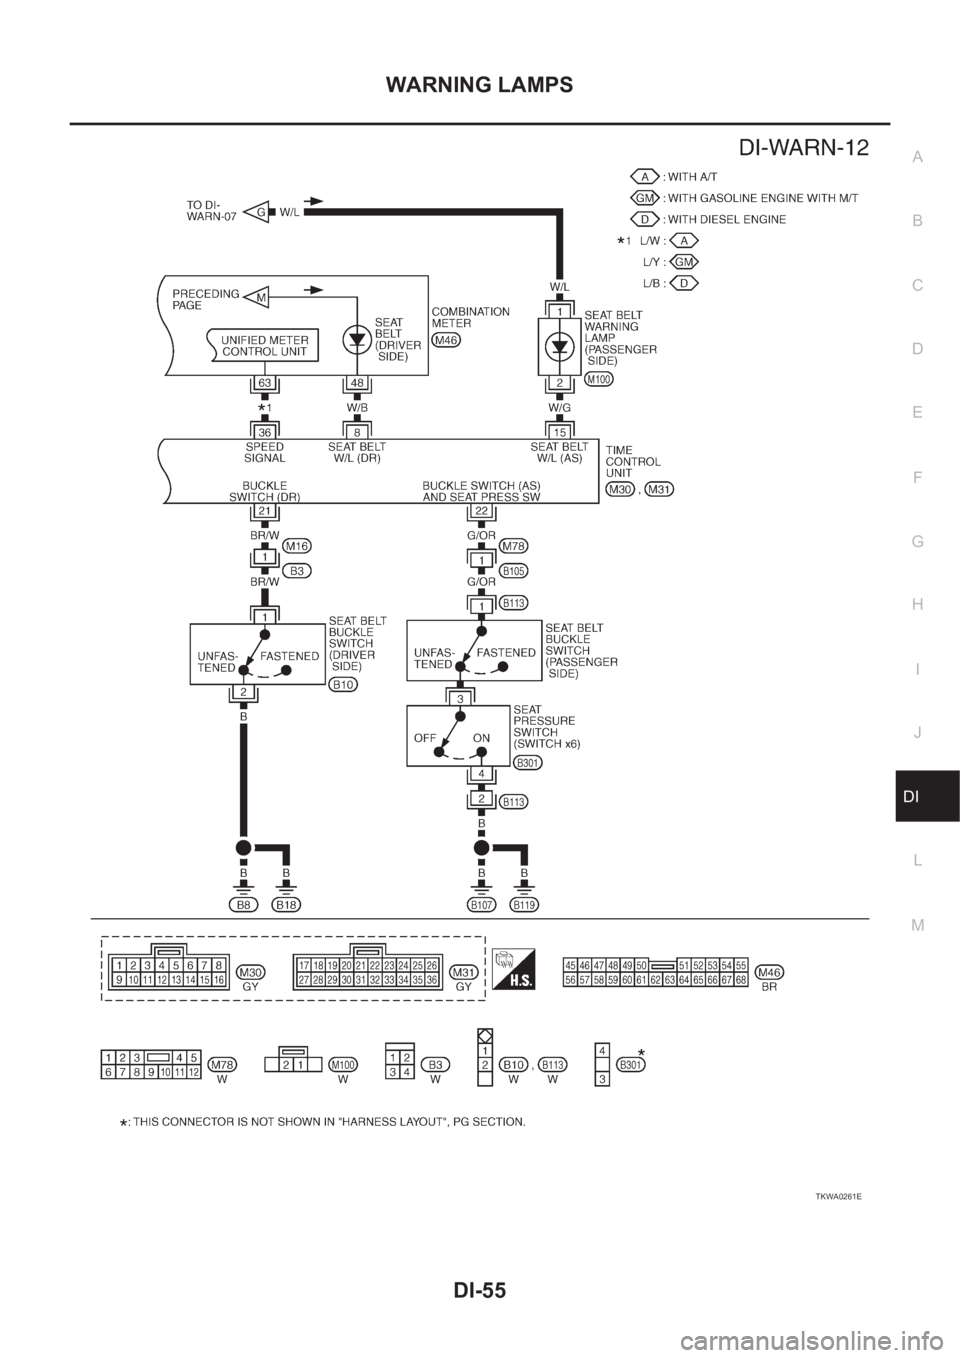
TKWA0261E
Page 3614 of 3833
DI-56
WARNING LAMPS
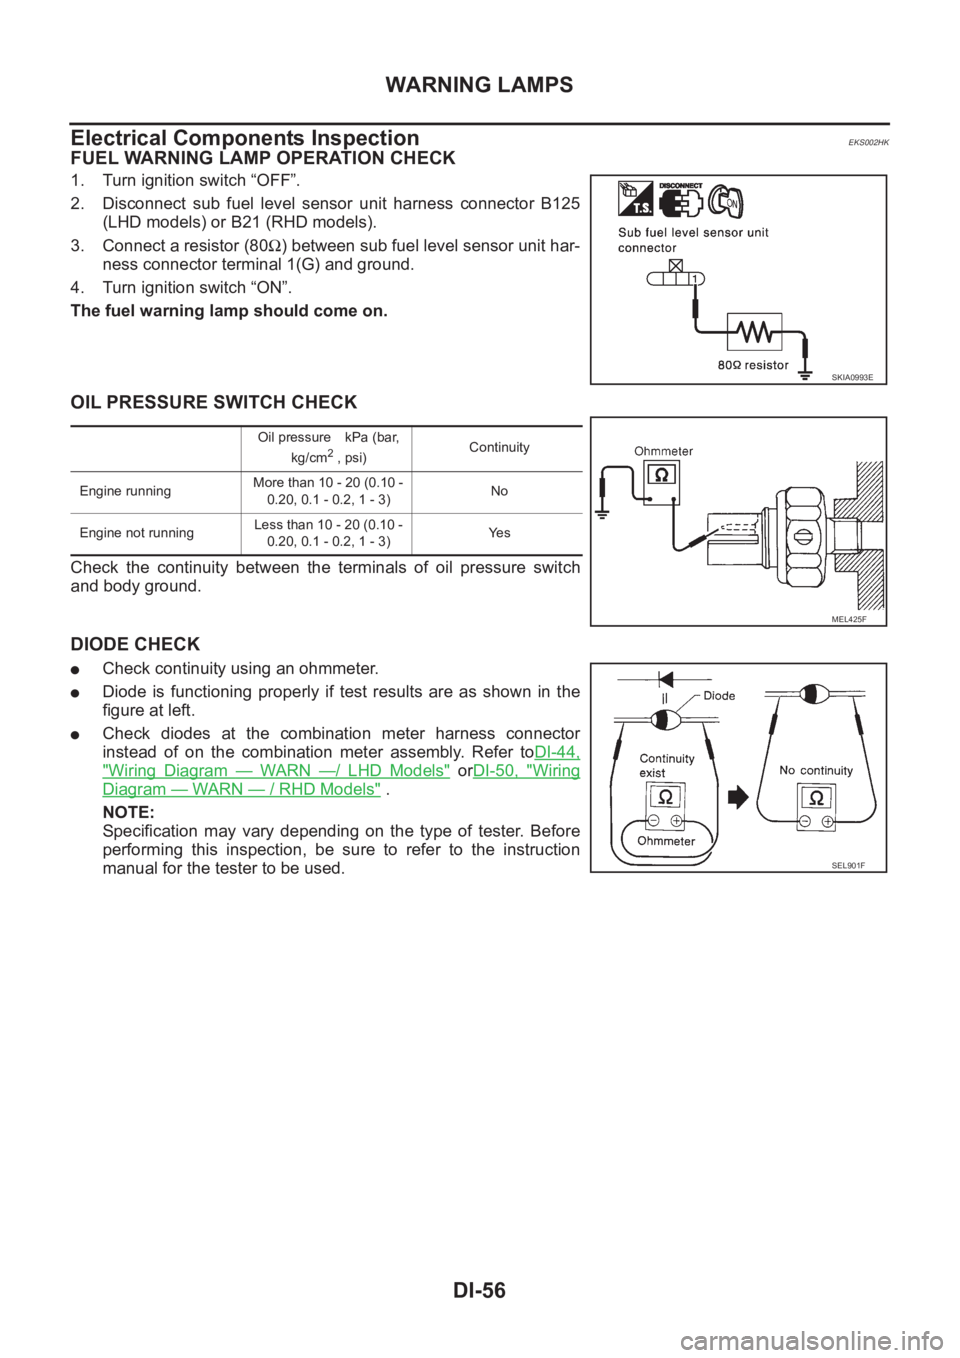
Electrical Components Inspection
EKS002HK
FUEL WARNING LAMP OPERATION CHECK
1. Turn ignition switch “OFF”.
2. Disconnect sub fuel level sensor unit harness connector B125
(LHD models) or B21 (RHD models).
3. Connect a resistor (80Ω) between sub fuel level sensor unit har-
ness connector terminal 1(G) and ground.
4. Turn ignition switch “ON”.
The fuel warning lamp should come on.
OIL PRESSURE SWITCH CHECK
Check the continuity between the terminals of oil pressure switch
and body ground.
DIODE CHECK
●Check continuity using an ohmmeter.
●Diode is functioning properly if test results are as shown in the
figure at left.
●Check diodes at the combination meter harness connector
instead of on the combination meter assembly. Refer toDI-44,
"Wiring Diagram — WARN —/ LHD Models" orDI-50, "Wiring
Diagram — WARN — / RHD Models" .
NOTE:
Specification may vary depending on the type of tester. Before
performing this inspection, be sure to refer to the instruction
manual for the tester to be used.
SKIA0993E
Oil pressure kPa (bar,
kg/cm2 , psi)Continuity
Engine runningMore than 10 - 20 (0.10 -
0.20, 0.1 - 0.2, 1 - 3)No
Engine not runningLess than 10 - 20 (0.10 -
0.20, 0.1 - 0.2, 1 - 3)Ye s
MEL425F
SEL901F
Page 3615 of 3833
A/T INDICATOR
DI-57
C
D
E
F
G
H
I
J
L
MA
B
DI
A/T INDICATORPFP:24814
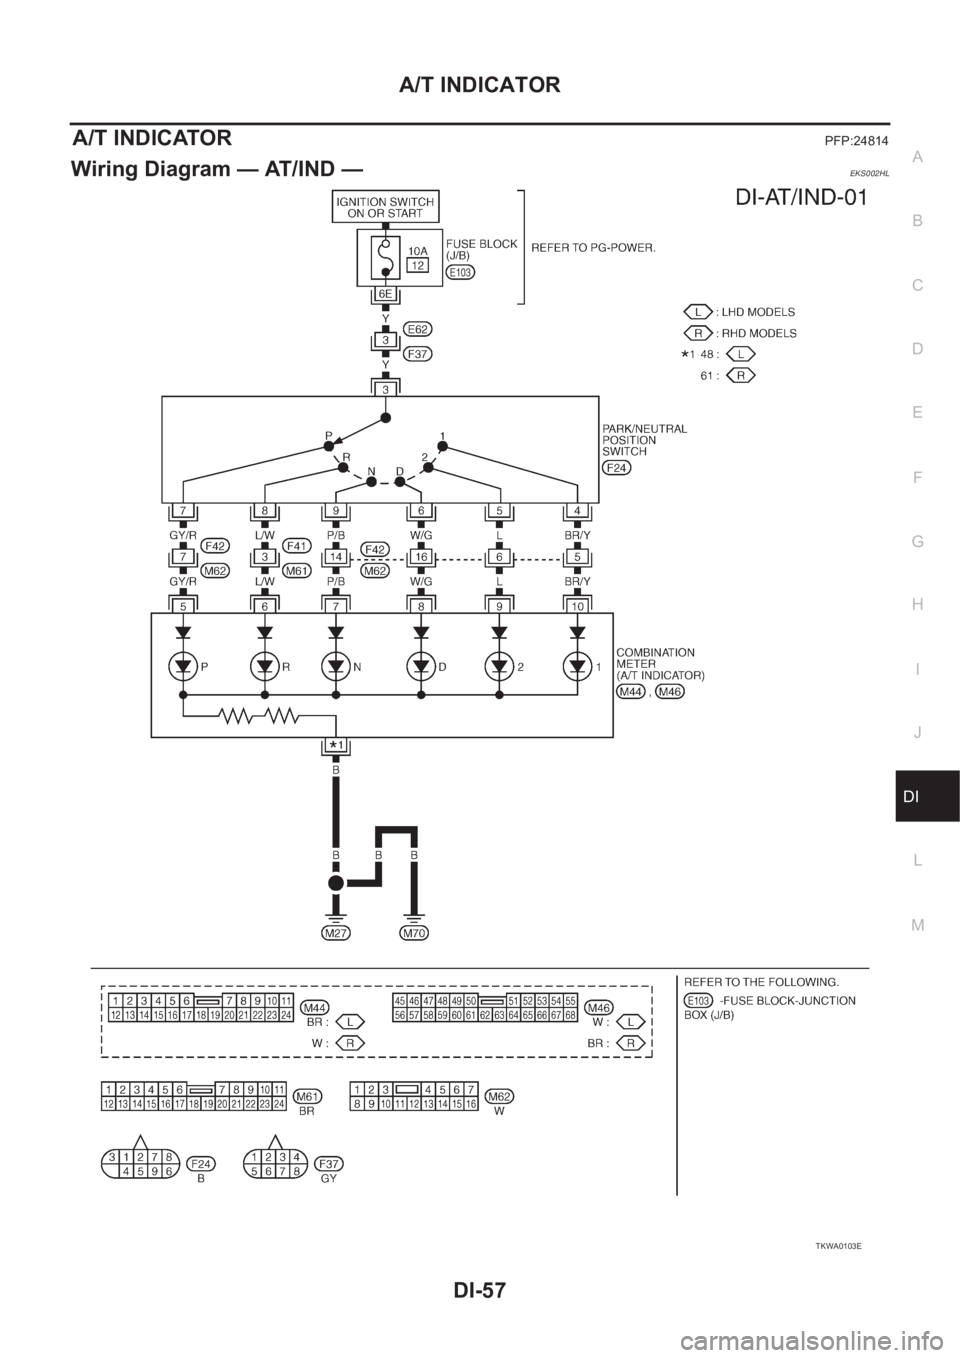
Wiring Diagram — AT/IND —EKS002HL
TKWA0103E
Page 3616 of 3833
DI-58
WARNING CHIME
WARNING CHIME
PFP:24814
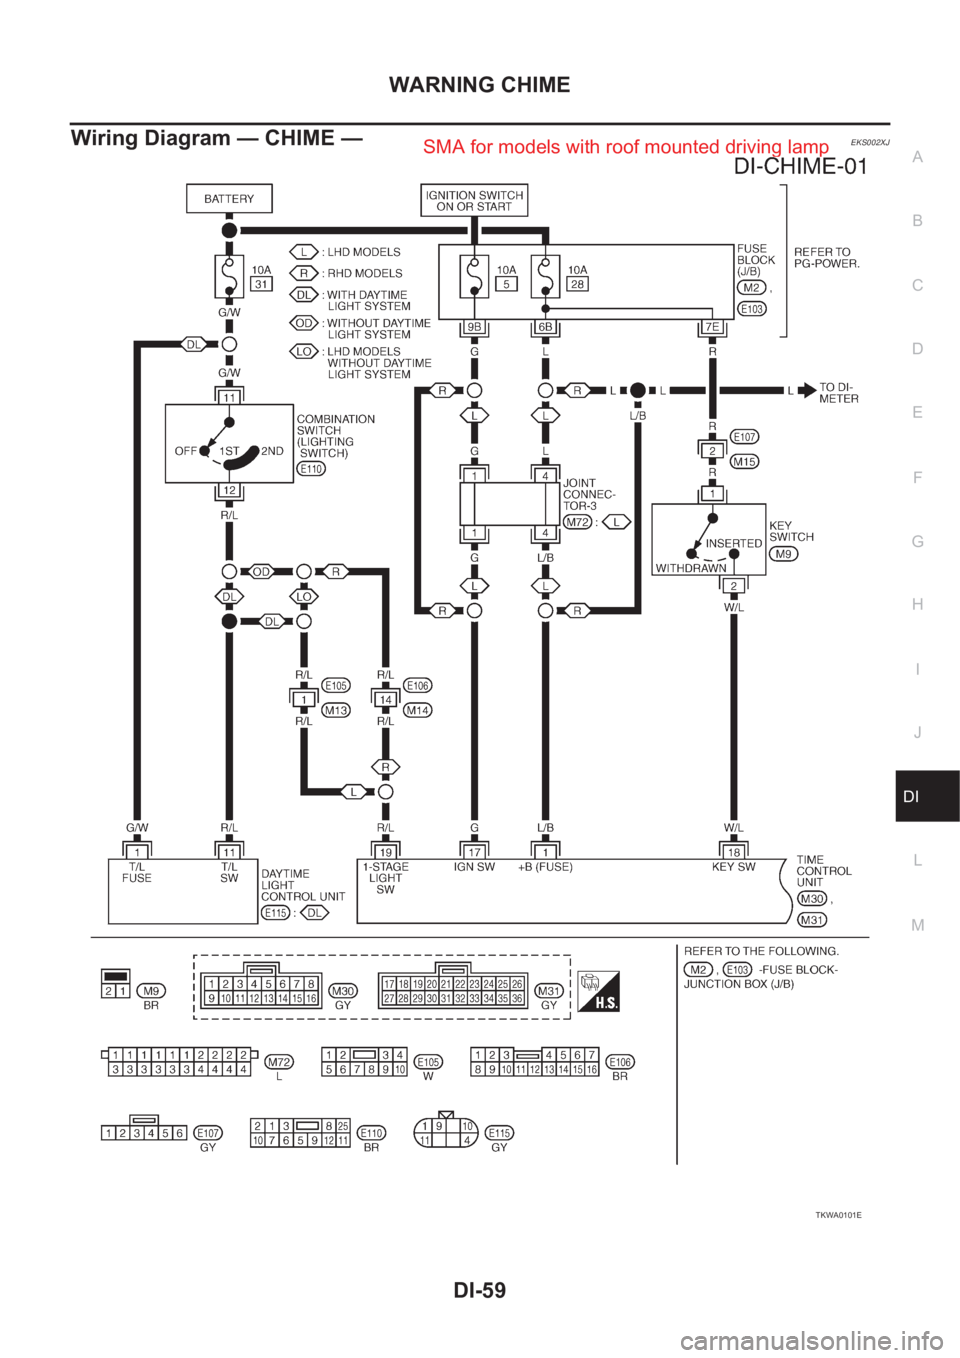
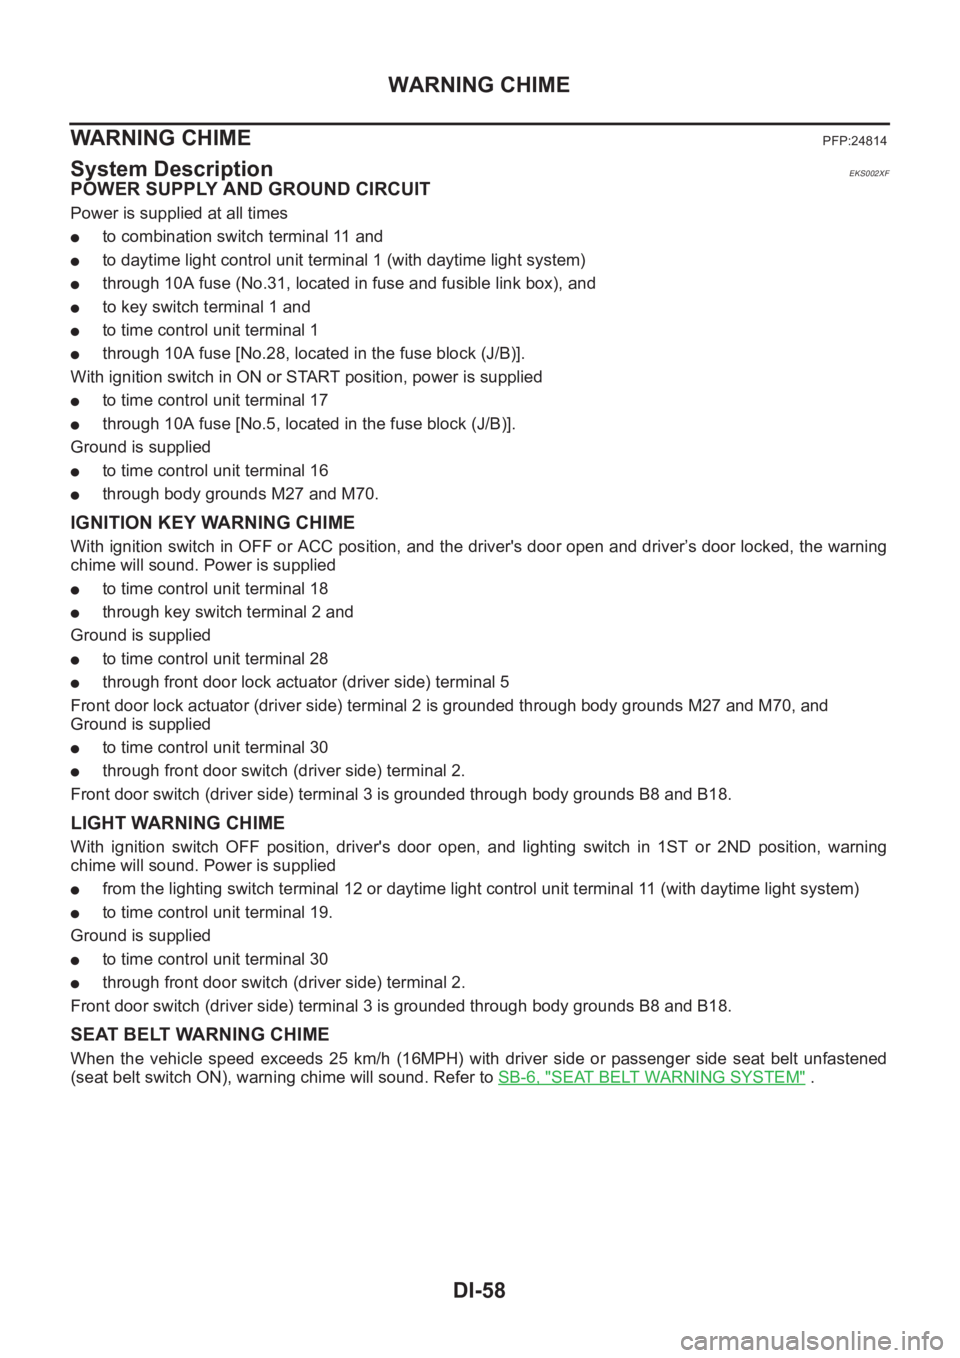
System DescriptionEKS002XF
POWER SUPPLY AND GROUND CIRCUIT
Power is supplied at all times
●to combination switch terminal 11 and
●to daytime light control unit terminal 1 (with daytime light system)
●through 10A fuse (No.31, located in fuse and fusible link box), and
●to key switch terminal 1 and
●to time control unit terminal 1
●through 10A fuse [No.28, located in the fuse block (J/B)].
With ignition switch in ON or START position, power is supplied
●to time control unit terminal 17
●through 10A fuse [No.5, located in the fuse block (J/B)].
Ground is supplied
●to time control unit terminal 16
●through body grounds M27 and M70.
IGNITION KEY WARNING CHIME
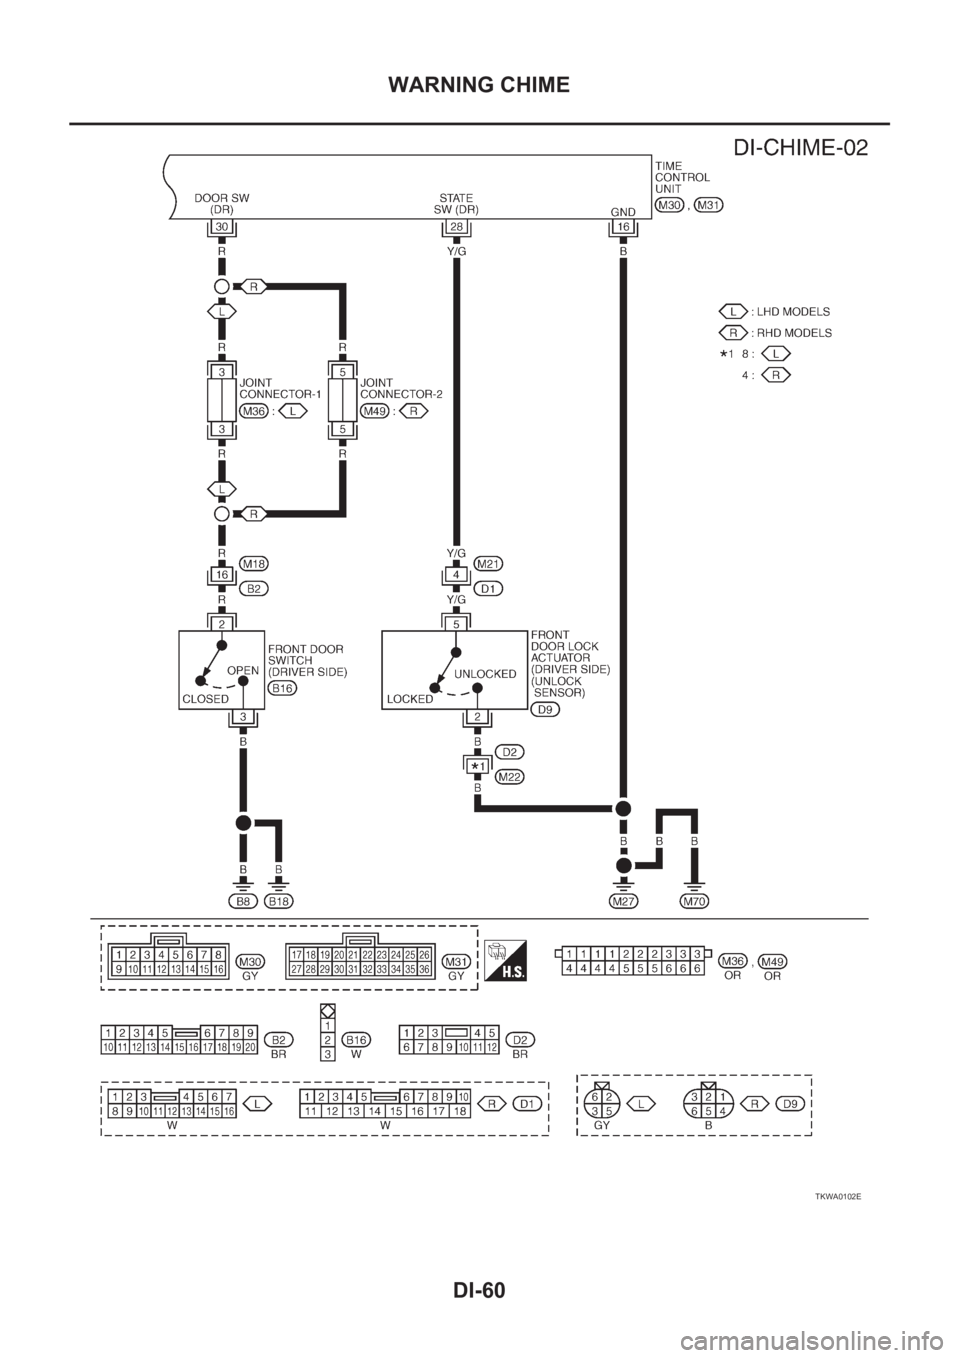
With ignition switch in OFF or ACC position, and the driver's door open and driver’s door locked, the warning
chime will sound. Power is supplied
●to time control unit terminal 18
●through key switch terminal 2 and
Ground is supplied
●to time control unit terminal 28
●through front door lock actuator (driver side) terminal 5
Front door lock actuator (driver side) terminal 2 is grounded through body grounds M27 and M70, and
Ground is supplied
●to time control unit terminal 30
●through front door switch (driver side) terminal 2.
Front door switch (driver side) terminal 3 is grounded through body grounds B8 and B18.
LIGHT WARNING CHIME
With ignition switch OFF position, driver's door open, and lighting switch in 1ST or 2ND position, warning
chime will sound. Power is supplied
●from the lighting switch terminal 12 or daytime light control unit terminal 11 (with daytime light system)
●to time control unit terminal 19.
Ground is supplied
●to time control unit terminal 30
●through front door switch (driver side) terminal 2.
Front door switch (driver side) terminal 3 is grounded through body grounds B8 and B18.
SEAT BELT WARNING CHIME
When the vehicle speed exceeds 25 km/h (16MPH) with driver side or passenger side seat belt unfastened
(seat belt switch ON), warning chime will sound. Refer to SB-6, "
SEAT BELT WARNING SYSTEM" .
Page 3617 of 3833
WARNING CHIME
DI-59
C
D
E
F
G
H
I
J
L
MA
B
DI
Wiring Diagram — CHIME —EKS002XJ
TKWA0101E
SMA for models with roof mounted driving lamp
Page 3618 of 3833
DI-60
WARNING CHIME
TKWA0102E
Page 3619 of 3833
WARNING CHIME
DI-61
C
D
E
F
G
H
I
J
L
MA
B
DI
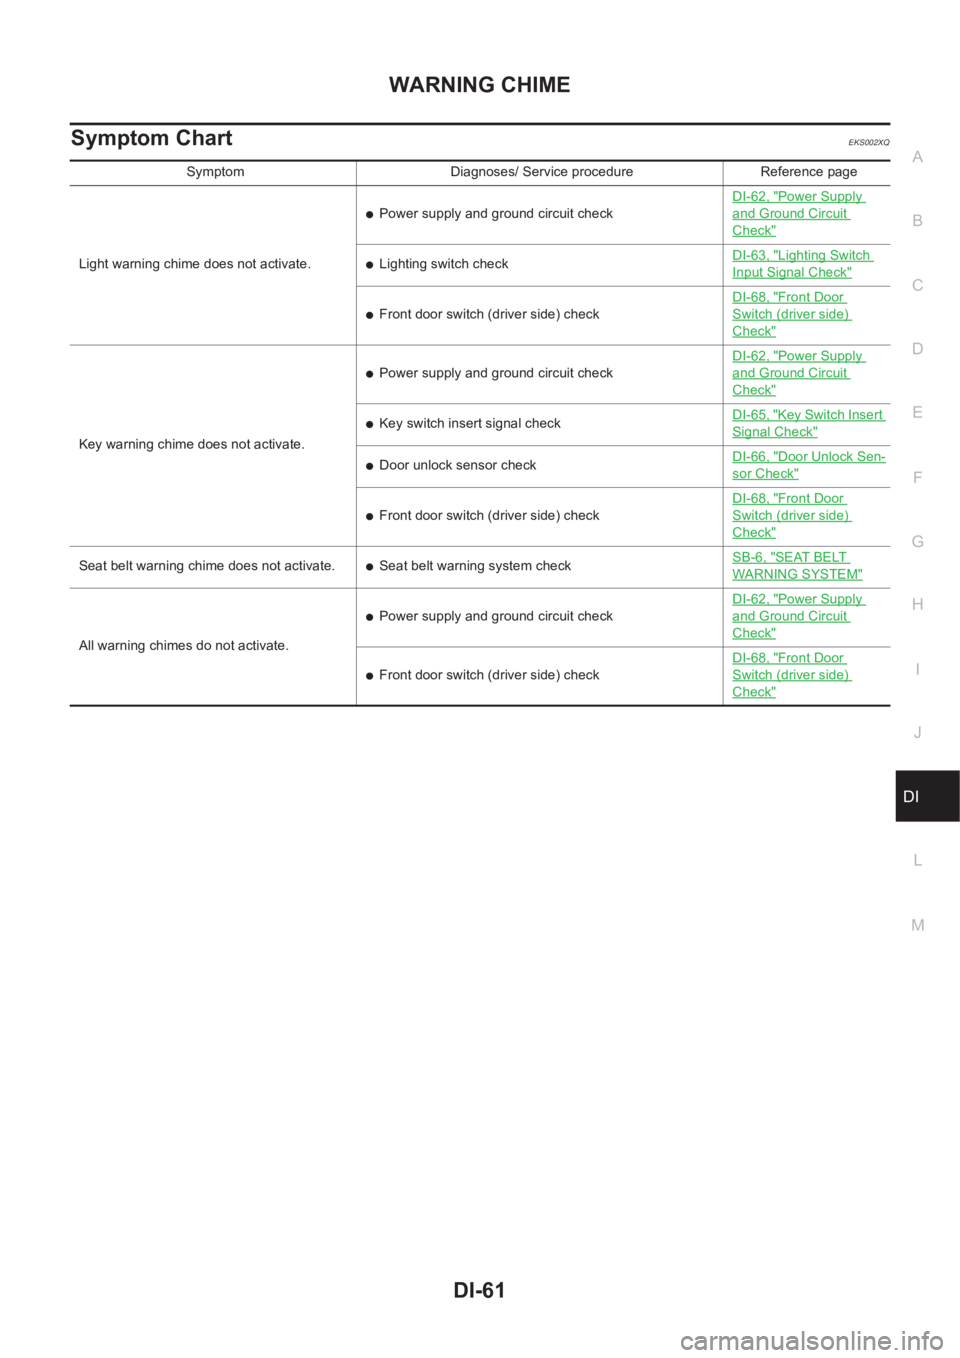
Symptom ChartEKS002XQ
Symptom Diagnoses/ Service procedure Reference page
Light warning chime does not activate.
●Power supply and ground circuit checkDI-62, "
Power Supply
and Ground Circuit
Check"
●Lighting switch checkDI-63, "Lighting Switch
Input Signal Check"
●Front door switch (driver side) checkDI-68, "
Front Door
Switch (driver side)
Check"
Key warning chime does not activate.
●Power supply and ground circuit checkDI-62, "
Power Supply
and Ground Circuit
Check"
●Key switch insert signal checkDI-65, "Key Switch Insert
Signal Check"
●Door unlock sensor checkDI-66, "Door Unlock Sen-
sor Check"
●Front door switch (driver side) checkDI-68, "
Front Door
Switch (driver side)
Check"
Seat belt warning chime does not activate.●Seat belt warning system checkSB-6, "SEAT BELT
WARNING SYSTEM"
All warning chimes do not activate.
●Power supply and ground circuit checkDI-62, "
Power Supply
and Ground Circuit
Check"
●Front door switch (driver side) checkDI-68, "
Front Door
Switch (driver side)
Check"
Page 3620 of 3833
DI-62
WARNING CHIME
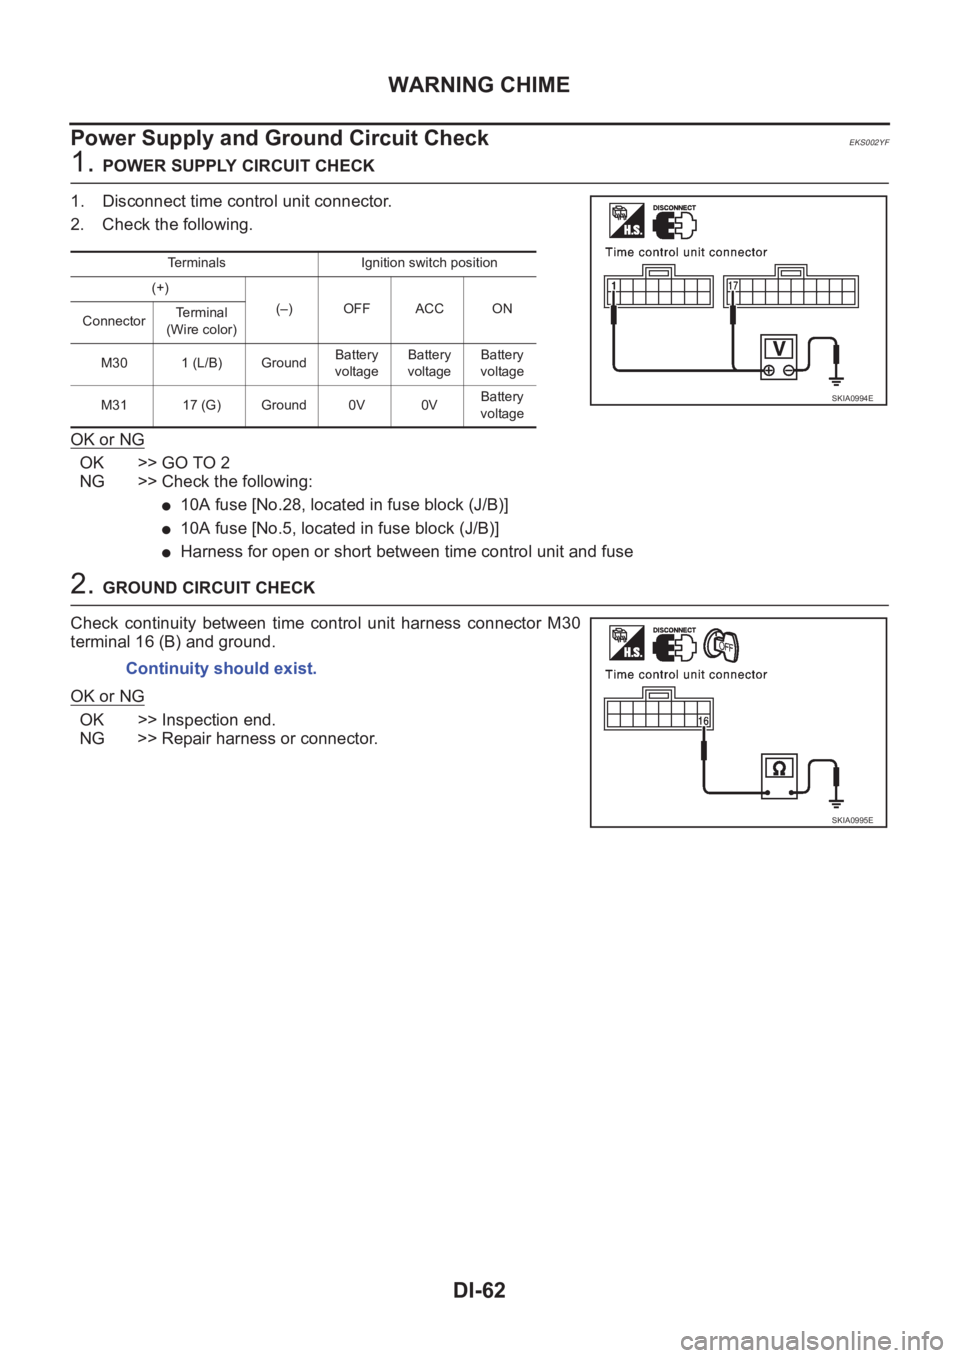
Power Supply and Ground Circuit Check
EKS002YF
1. POWER SUPPLY CIRCUIT CHECK
1. Disconnect time control unit connector.
2. Check the following.
OK or NG
OK >> GO TO 2
NG >> Check the following:
●10A fuse [No.28, located in fuse block (J/B)]
●10A fuse [No.5, located in fuse block (J/B)]
●Harness for open or short between time control unit and fuse
2. GROUND CIRCUIT CHECK
Check continuity between time control unit harness connector M30
terminal 16 (B) and ground.
OK or NG
OK >> Inspection end.
NG >> Repair harness or connector.
Terminals Ignition switch position
(+)
(–) OFF ACC ON
ConnectorTerminal
(Wire color)
M30 1 (L/B) GroundBattery
voltageBattery
voltageBattery
voltage
M31 17 (G) Ground 0V 0VBattery
voltage
SKIA0994E
Continuity should exist.
SKIA0995E
Trending: engine overheat, air suspension, oil, roof rack, protrusion, crankshaft, jack points
