PONTIAC FIERO 1988 Service Repair Manual
Manufacturer: PONTIAC, Model Year: 1988, Model line: FIERO, Model: PONTIAC FIERO 1988Pages: 1825, PDF Size: 99.44 MB
Page 911 of 1825
6E3-C3-2 5.OL (VIN F) & 5.7L (WIN 8) DRIVEABILITY AND EMISSIONS
The ECM turns "ON" the solenoid valve and allows
purge when:
@ Above a specified road speed.
r Engine is warm
@ After the engine has been running a specified
time.
@ Above a specified throttle opening.
This
is an ECM feedback system that increases
purge until the ECM senses a rich condition from the
O2 sensor. The purge is then regulated until the ECM
no longer receives
a rich signal from the O2 sensor.
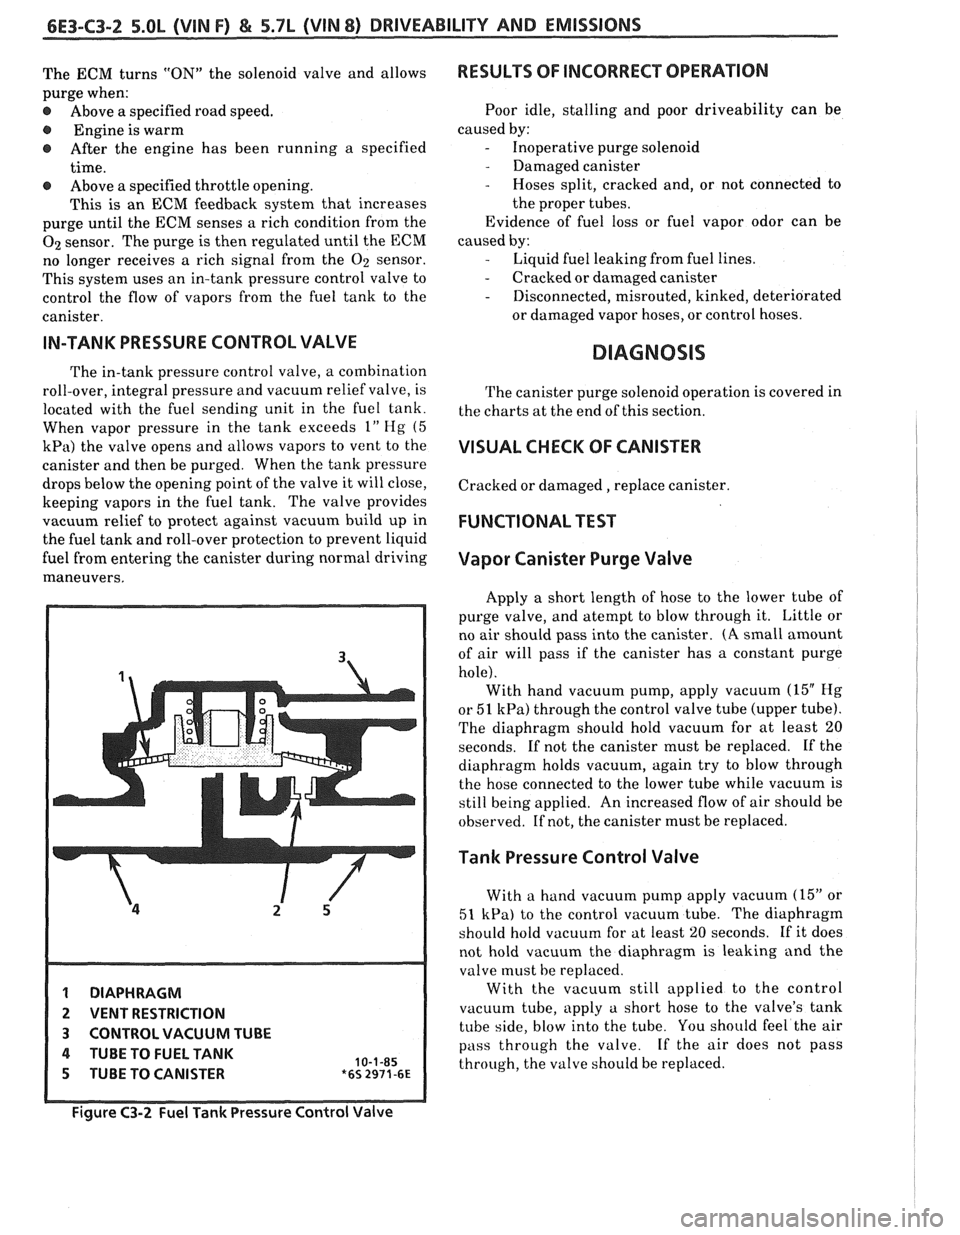
This system uses an in-tank pressure control valve to
control the flow of vapors from the fuel tank to the
canister.
IN-TANK PRESSURE CONTROL VALVE
The in-tank pressure control valve, a combination
roll-over, integral pressure and vacuum relief valve, is
located with the fuel sending unit in the fuel tank.
When vapor pressure in the tank exceeds
1" Hg (5
kPa) the valve opens and allows vapors to vent to the
canister and then be purged. When the tank pressure
drops below the opening point of the valve it will close,
keeping vapors in the fuel tank. The valve provides
vacuum relief to protect against vacuum build up in
the fuel tank and roll-over protection to prevent liquid
fuel from entering the canister during normal driving
maneuvers.
1 DIAPHRAGM
2 VENT RESTRICTION
3 CONTROL VACUUM TUBE
4 TUBE TO FUEL TANK 10-1-85 5 TUBE TO CANISTER *6s 2971-6~
RESULTS OF INCORRECT OPERATION
Poor idle, stalling and poor driveability can be
caused by:
- Inoperative purge solenoid
- Damaged canister
- Hoses split, cracked and, or not connected to
the proper tubes.
Evidence of fuel loss or fuel vapor odor can be
caused by:
- Liquid fuel leaking from fuel lines.
- Cracked or damaged canister
- Disconnected, misrouted, kinked, deteriorated
or damaged vapor hoses, or control hoses.
DIAGNOSIS
The canister purge solenoid operation is covered in
the charts at the end of this section.
VISUAL CHECK OF CANISTER
Cracked or damaged, replace canister.
FUNCTIONAL TEST
Vapor Canister Purge Valve
Apply a short length of hose to the lower tube of
purge valve, and atempt to blow through it. Little or
no air should pass into the canister.
(A small amount
of air will pass if the canister has a constant purge
hole). With hand vacuum pump, apply vacuum
(15" Hg
or 51 kPa) through the control valve tube (upper tube).
The diaphragm should hold vacuum for at least
20
seconds. If not the canister must be replaced. If the
diaphragm holds vacuum, again try to blow through
the hose connected to the lower tube while vacuum is
still being applied. An increased flow of air should be
observed. If not, the canister must be replaced.
Tank Pressure Control Valve
With a hand vacuum pump apply vacuum (15" or
51 kPa) to the control vacuum tube. The diaphragm
should hold vacuum for at least
20 seconds. If it does
not hold vacuum the diaphragm is leaking and the
valve must be replaced.
With the vacuum still applied to the control
vacuum tube, apply a short hose to the valve's tank
tube side, blow into the tube. You should feel the air
pass through the valve. If the air does not pass
through, the valve should be replaced.
Figure C3-2 Fuel Tank Pressure Control Valve
Page 912 of 1825
DRIVEABILITY AND EMISSIONS 5.OL (WIN F) & 5.7L (WIN 8) 6E3-C3-3
ON-CAR SERVICE
FUEL VAPOR CANISTER
Remove or Disconnect
1. Hoses from canister. Mark hoses to install on
new canister.
2. Canister.
Install or Connect
1. Canister as removed.
2. Hoses. Make sure connections are correct.
CANISTER HOSES
Refer to Vehicle Emission Control Information
Label for routing of canister hoses.
PARTS INFORMATION
PART NAME GROUP
.................. Canister, Fuel Vapor 3.130
.......... Solenoid, Fuel Vapor Canister 3.140
....... Valve, Fuel Tank Pressure Control 3.140
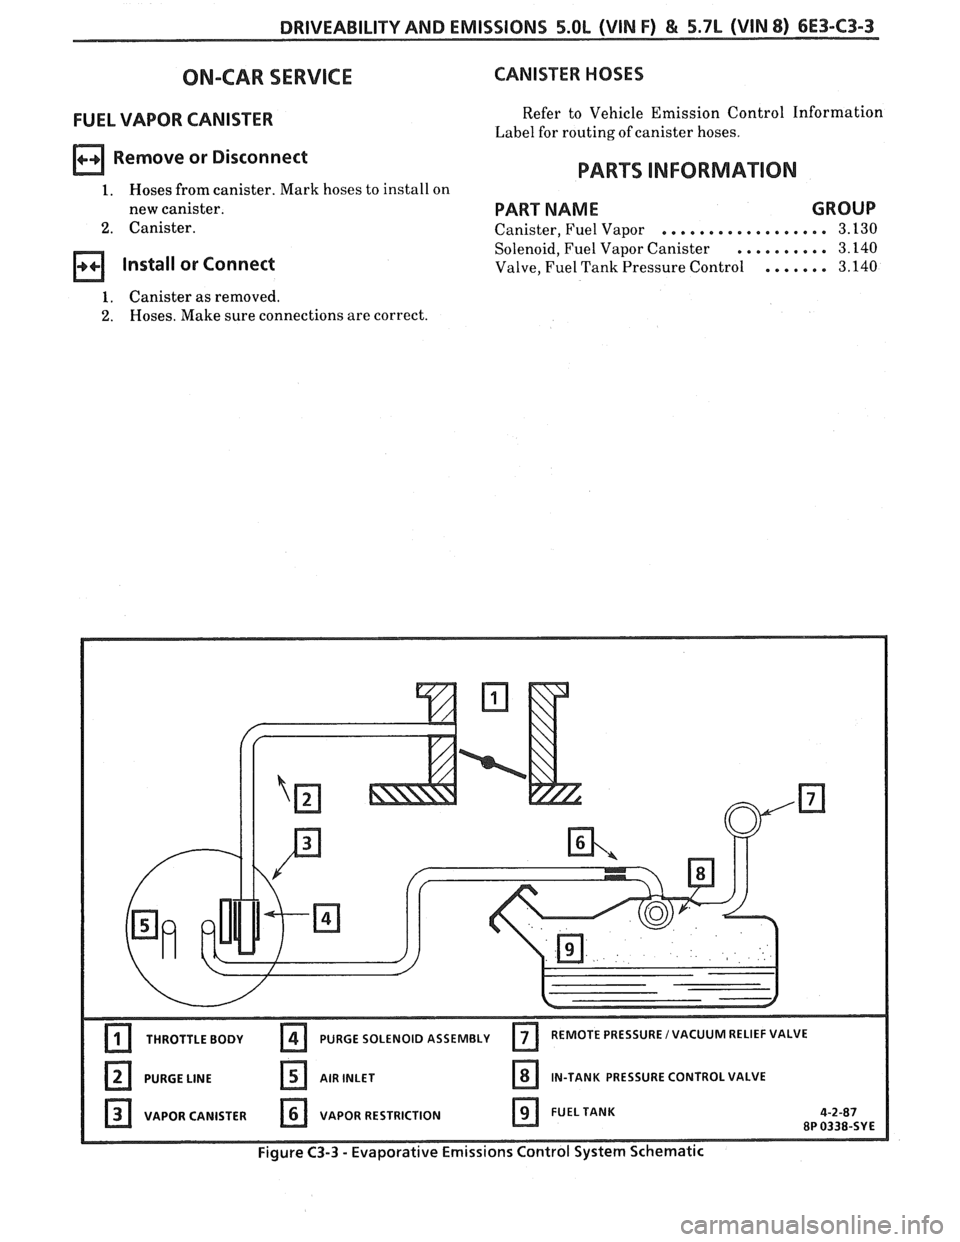
VAPOR CANISTER
VAPOR RESTRICTION
Figure C3-3 - Evaporative Emissions Control System Schematic
Page 913 of 1825
6E3-C3-4 5.OL (VIN F) & 5.7L (VIN 8) DRIVEABILITY AND EMISSIONS
428 DK GUNNEL
BULKHEAD
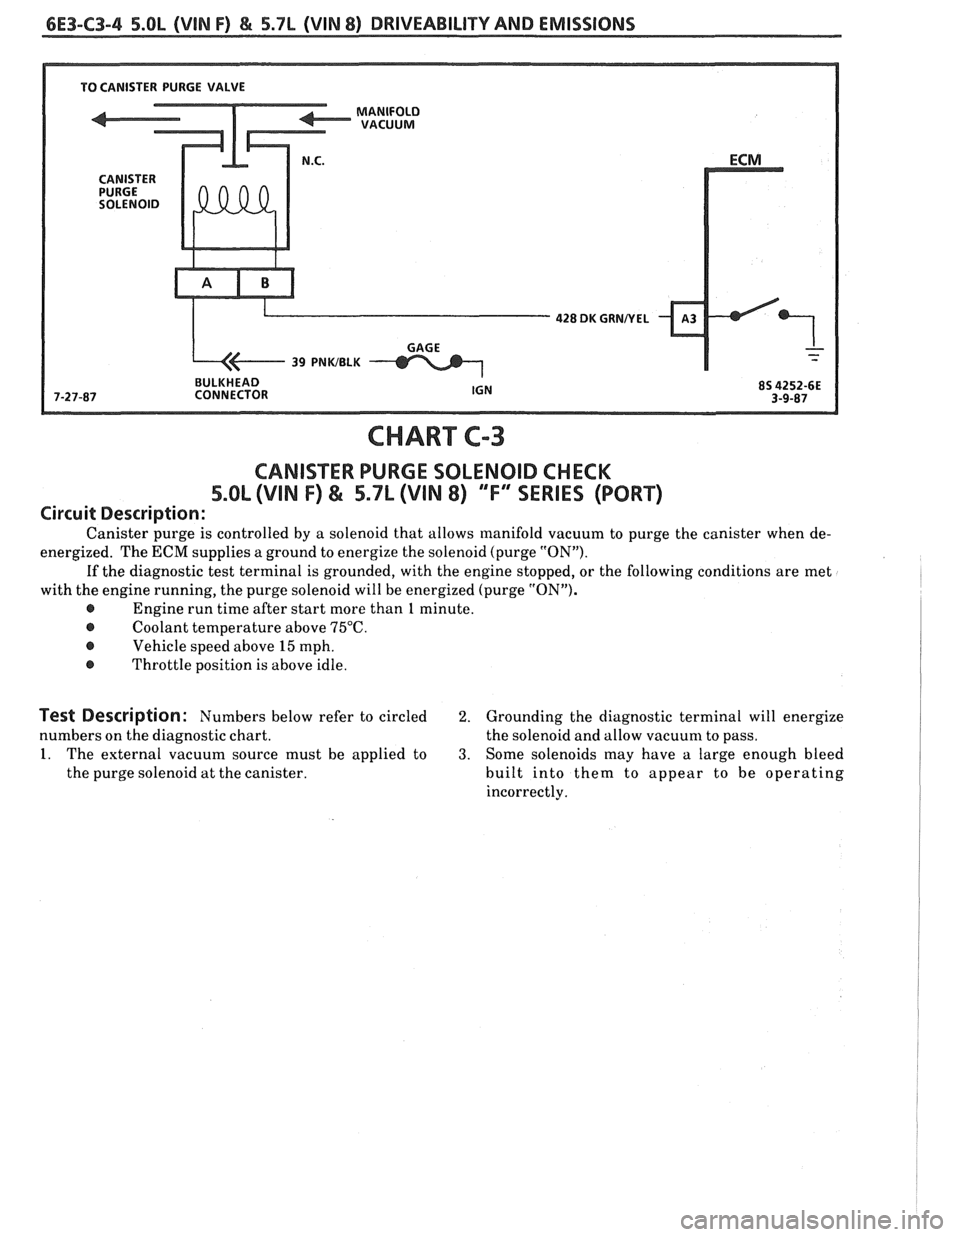
CHART
CANISTER PURGE SOLENOID CHECK
5.OL (VIN F) & 5.7L (VIN 8) ""FYSERIES (PORT)
Circuit Description:
Canister purge is controlled by a solenoid that allows manifold vacuum to purge the canister when de-
energized. The
ECM supplies a ground to energize the solenoid (purge "ON").
If the diagnostic test terminal is grounded, with the engine stopped, or the following conditions are met
with the engine running, the purge solenoid will be energized (purge "ON").
@ Engine run time after start more than 1 minute.
@ Coolant temperature above 75°C.
@ Vehicle speed above 15 mph.
@ Throttle position is above idle.
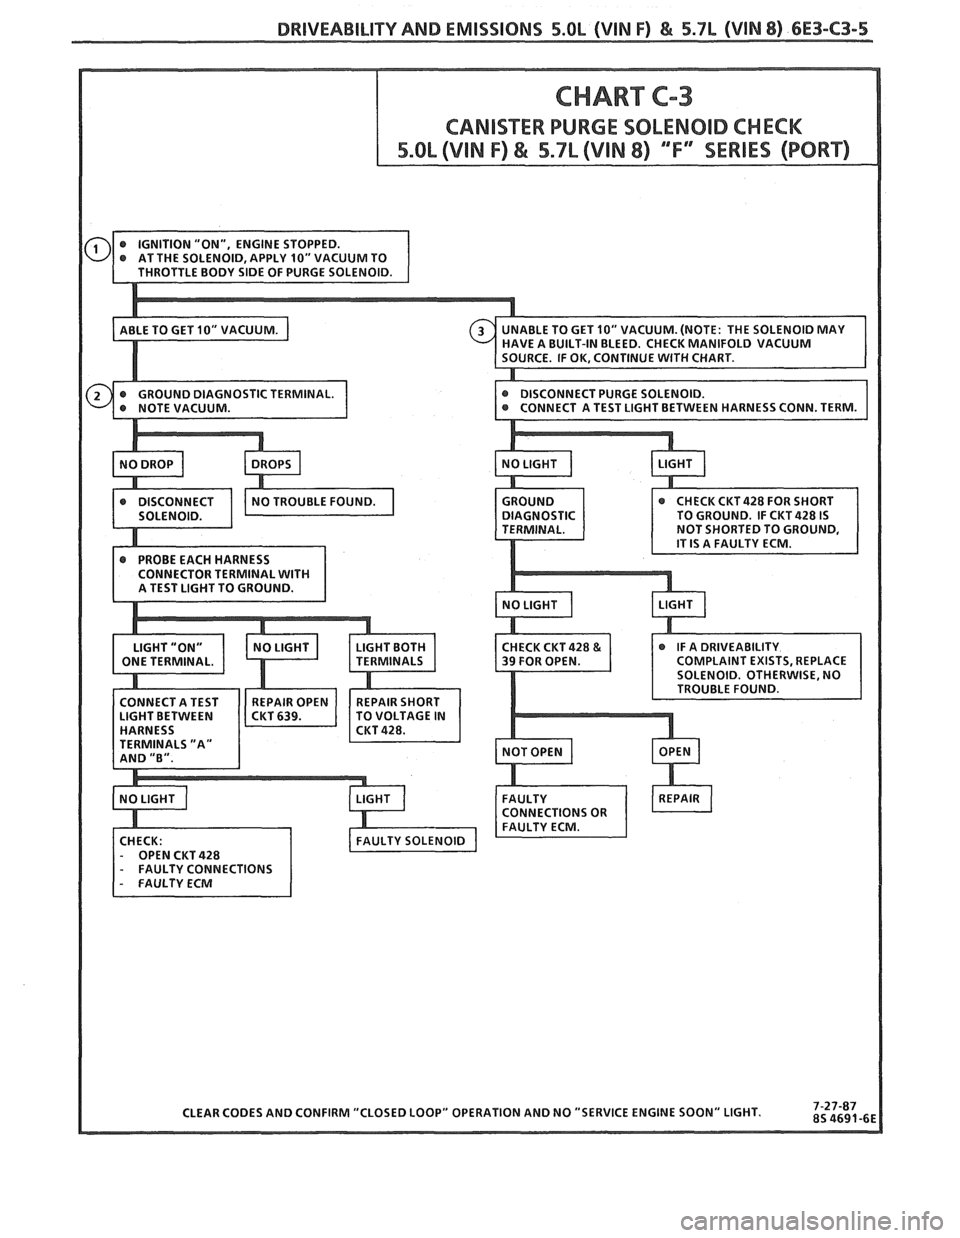
Test Description: Numbers below refer to circled 2. Grounding the diagnostic terminal will energize
numbers on the diagnostic chart. the solenoid and allow vacuum to pass.
1. The external vacuum source must be applied to 3. Some solenoids may have a large enough bleed
the purge solenoid at the canister. built into them to appear to be operating
incorrectly.
Page 914 of 1825
DRlVEABlLlTY AND EMISSIONS 5.OL (VIN F) & 5.7L (VlN 8) 6E3-C3-5
Page 915 of 1825
6E3-C3-6 5.OL (VIN F) €4 5.7L (VIN 8) DRIVEABILITY AND EMISSIONS
BLANK
Page 916 of 1825
DRIVEABILITY AND EMISSIONS 5.OL (VIN F) & 5.7L (VIN 8) 6E3-C4-1
SECTION C4
IGNIION SYSTEM 1 EST
..................... GENERAL DESCRIPTION ................ C4-1 ON-CAR SERVICE C4-2
.................. PURPOSE ......................... C4-1 SETTING TIMING.. C4-2
OPERATION ....................... C4-1 HOW CODE 42 IS DETERMINED.. ....... C4-2
................. RESULTS OF INCORRECT OPERATION .... C4-1 PARTS INFORMATION C4-2
DIAGNOSIS ......................... C4-1
CODE12.......................... C4-1
GENERAL DESCRIPTION
PURPOSE
The high energy ignition (HEI) system controls
fuel combustion by providing a spark to ignite the
compressed
airlfuel mixture at the correct time. To
provide improved engine performance, fuel economy,
and control of exhaust emissions, the
ECM controls
distributor spark advance (timing) with the electronic
spark timing (EST) system.
Only the electronic spark timing (EST) system
will be described here. Additional information on the
FIE1 system is found in Section "6D".
To properly control ignitionlcombustion timing
the ECM needs to know:
e Crankshaft position
e Engine speed (rpm)
@ Mass Air Flow
@ Engine temperature
OPERATION
The EST system consists of the distributor
module, ECM, and connecting wires. The connector
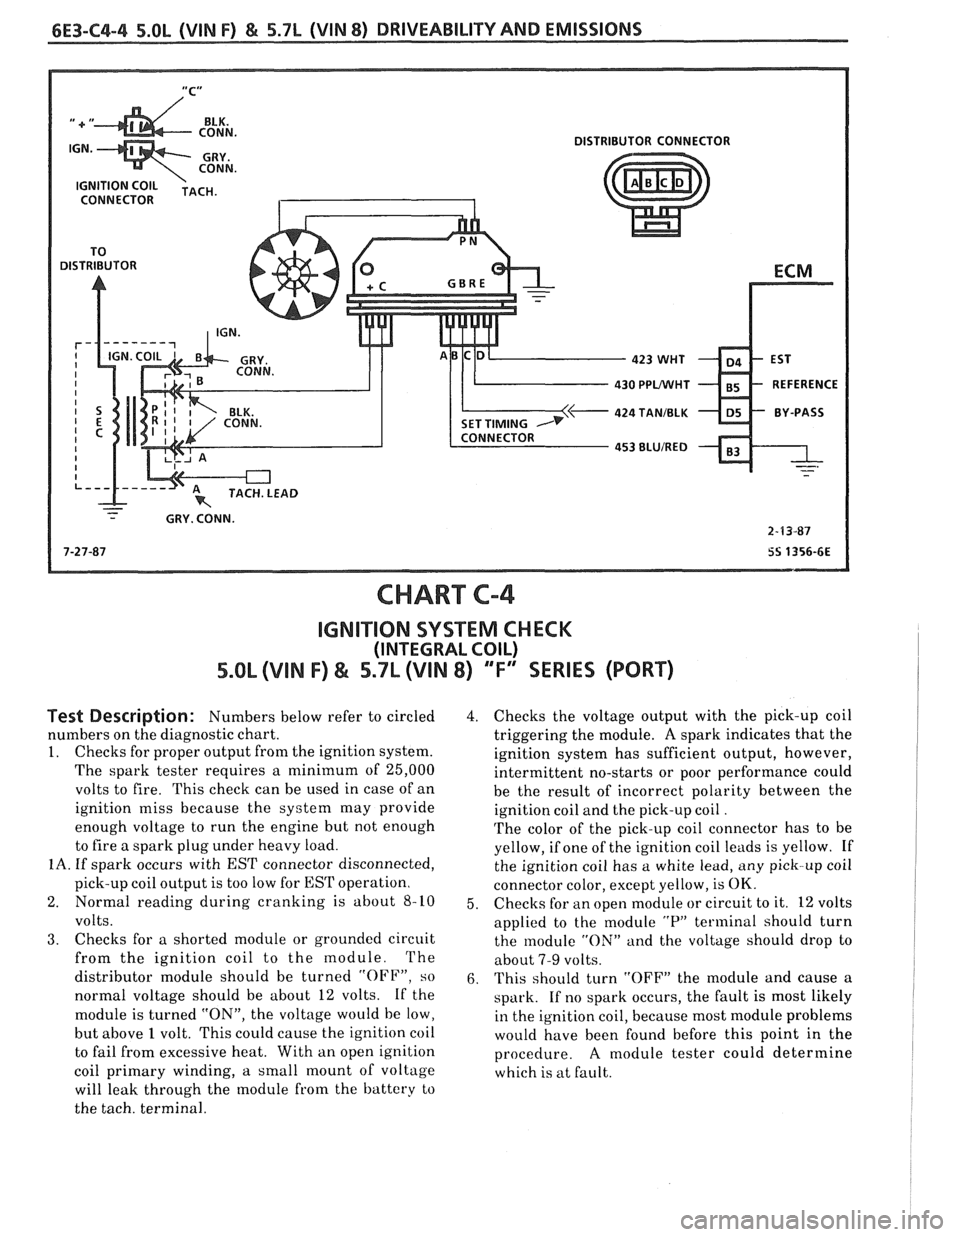
terminals are lettered as shown in CHART C-4.
These circuits perform the following functions:
@ Distributor reference (CKT 430).
This provides the ECM with rpm and crankshaft
position information.
If the wire becomes open or
grounded the engine will not run, because the ECM
will not operate the injectors.
If the engine cranks hut
won't run, see CHART
A-3.
e Reference ground (CKT 453).
This wire is grounded in the distributor and
makes sure the ground circuit has no voltage drop
which could affect performance. If it is open, it may
cause poor performance.
@ Bvpass (CKT 424).
At about 400 rpm, the ECM applies
5 volts to this
circuit to switch spark timing control from the
I-IEI
module to the ECM. The wire goes through a
connector between the 4 wire connector and the ECM.
This is disconnected to the set hase timing. An
open or grounded bypass circuit will set a Code
42 and the engine will run at base timing, plus a small
amount of advance built into the
HE1 module.
@ EST (CKT 423). - This circuit triggers the HE1 module after the
engine is started and no Code 42 detected. The ECM
does not know what the actual timing is, but it does
know when it gets the reference signal. It then
advances or retards the spark from that point.
Therefore, if the base timing is set incorrectly, the
entire spark curve will be incorrect.
RESULTS OF INCORRECT OPERATION
An open or ground in the EST circuit will set u
Code 42 and cause the engine to run on the HE1
module timing. This will cause reduced performance
and poor fuel economy.
The ECM uses information from the
MAE' and
coolant sensors in addition to rpm to calculate spark
advance as follows:
e Cold engine = more spark advance.
r Engine under minimum load based on rpm
and low amount of air flow- more spark
advance. Hot engine
= less spark advance.
@ Engine under heavy load based on rpm and
high amount
of air flow- less spark advance.
DIAGNOSIS
The description, operation, and repair procedures
of the
HE1 system are found in Section "6D" of this
manual. For an ignition system check, refer to
CHART C-4 at the end of this section.
CODE 12
Code 12 is used during the diagnostic circuit check
procedure to test the code display ability of the
ECM
This code indicates that the ECM is not receiving the
engine rpm (REFERENCE) signal.
'Phis occurs with
the ignition key
"ON", and the engine not running.
Page 917 of 1825
6E3-C4-2 5.OL (VIN F) & 5.7L (VIN 8) DRIVEABILITY AND EMISSIONS
The "Reference" signal also triggers the fuel
injection system. Without the "Reference" signal the
engine cannot run. This signal can be checked by
using
a "Scan" tool which will help determine the
cause of an engine that cranks but won't start.
OM-CAR SERVICE
SETTING TIMING
The initial base timing is set by disconnecting the
timing connector. Then set the timing to the
specification shown on emmision control information
label. This will cause Code 42 to be stored in the
memory of the ECM. The memory must be cleared
after setting timing.
How Code 42 Is Determined
When the system is running on the HE1 module,
that is, no voltage on the bypass line, the
HE1 module
grounds the EST signal. The ECM expects to see no
voltage on the EST line during this condition.
If it
sees a voltage, it sets code 42 and will not go into the
EST mode.
When the rpm for EST is reached, (about
400
rpm), the ECM applies 5 volts to the bypass line and
the EST should no longer be grounded in the
HE1
module, so the EST voltage should be varying.
If the bypass line is open or grounded, the
HE1
module will not switch to EST mode, so the EST
voltage will be low and Code 42 will be set.
PARTS INFORMATION
PART NAME GROUP
Coil, Distr ........................... 2.170
Controller, ECM
(Remanufactured)
................ 3.670
Distributor
.......................... 2.361
Module, Distr
........................ 2.383
Page 918 of 1825

BLANK
Page 919 of 1825
6E3-C4-4 5.OL (VIN F) & 5.7L (VIN 8) DRIVEABILITY AND EMISSIONS
"C" /
DISTRIBUTOR CONNECTOR
CONNECTOR
430 PPLNVHT
424 TANIBLK
- - - GRY. CONN.
2-F3-87
7-27-87
SS 1356-6E
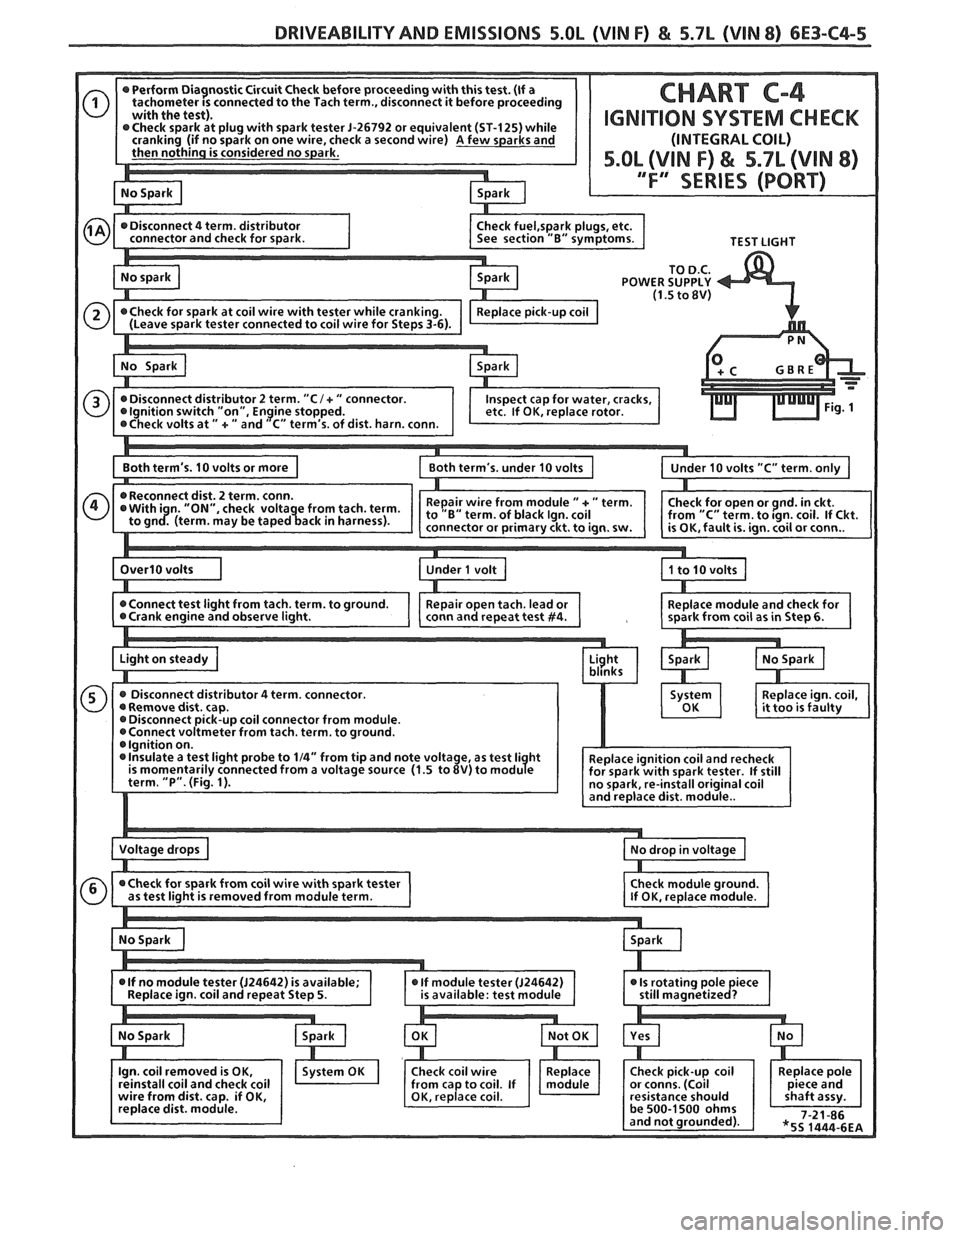
CHART C-4
IGNITION SYSTEM CHECK
(INTEGRAL COIL)
5.0b (VIN F) & 5.7L (VIN 8) "F" SERIES (PORT)
Test Description: Numbers below refer to circled
numbers on the diagnostic chart.
1. Checks for proper output from the ignition system.
The spark tester requires a minimum of 25,000
volts to fire. This check can be used in case of an
ignition miss because the system may provide
enough voltage to run the engine but not enough
to fire a spark plug under heavy load.
IA. If spark occurs with EST connector disconnected,
pick-up coil output is too low for
EST operation.
2. Normal reading during cranking is about
8-10
volts.
3. Checks for a shorted module or grounded circuit
from the ignition coil to the module. The
distributor module should be turned
"OFF", so
normal voltage should be about 12 volts. If the
module is turned
"ON", the voltage would be low,
but above
1 volt. This could cause the ignition coil
to fail from excessive heat. With an open ignition
coil primary winding,
a small mount of voltage
will leak through the module from the battery to
the tach. terminal.
4. Checks the voltage output with the pick-up coil
triggering the module.
A spark indicates that the
ignition system has sufficient output, however,
intermittent no-starts or poor performance could
be the result of incorrect polarity between the
ignition coil and the pick-up coil
.
The color of the pick-up coil connector has to be
yellow, if one of the ignition coil leads is yellow. If
the ignition coil has a white lead, any pick-up coil
connector color, except yellow, is
OK.
5. Checks
for an open module or circuit to it. 12 volts
applied to the module
"P" terminal should turn
the module
"ON" and the voltage should drop to
about
7-9 volts.
6. This should turn "OFF" the module and cause a
spark. If no spark occurs, the fault is most likely
in the ignition coil, because most module problems
would have been found before this point in the
procedure.
A module tester could determine
which is at fault.
Page 920 of 1825
DRIVEABILITY AND EMISSIONS 5.OL (VIN F) & 5.7L (VIN 8) 6E3-C4-5
26792 or equivalent (ST-125) while k a second wire) A few sparks and
CHART C-4
IGNIVION SYSTEM CHECK
(INTEGRAL COIL)
5.OL (VIN F) & 5.7L (VIN 8)
/ .F" SERIES (PORT)
TEST LIGHT
POWER SUPPLY
I
dist. harn. conn.
0
ter from tach, term. to ground.