PONTIAC FIERO 1988 Service Repair Manual
Manufacturer: PONTIAC, Model Year: 1988, Model line: FIERO, Model: PONTIAC FIERO 1988Pages: 1825, PDF Size: 99.44 MB
Page 921 of 1825

6E3-C4-6 5.OL (WIN F) & 5.7% (WIN 8) DRIVEABILITY AND EMISSIONS
BLANK
Page 922 of 1825
DRIVEABILITY AND EMISSIONS 5.OL (VIN F) & 5.7L (VIN 8) 6E3-C5-1
SECTION C5
ELECTRONIC SPARK CONTROL (ESC) SYSTEM
CONTENTS
GENERAL DESCRIPTION ................ C5-1 ON-CAR SERVICE ..................... C5-1
PURPOSE ......................... C5-1 ESCSENSOR e............e......... C5-1
GENERAL DESCRIPTION .............. C5-1 ESC MODULE AND BRACKET .......... C5-2
DIAGNOSIS
......................... C5-1 PARTS INFORMATION ................. C5-2
GENERAL DESCRIPTION DIAGNOSIS
PURPOSE
Varying octane levels in today's gasoline can
cause detonation in high performance engines.
Detonation is sometimes called spark knock.
To control spark knock, an electronic spark control
(ESC) system has been added. This system is designed
to retard spark timing up to
20°, if necessary, to reduce
spark knock in the engine. This allows the engine to
use maximum spark advance to improve driveability
and fuel economy. Code
43 indicates that the ECM terminal
"B7" is
receiving less than
6 volts for a 4 second period with
the engine running. This is CKT 485, which normally
provides
u 8 to 10 volt signal from the ESC module to
the ECM. See Code 43 CHART for diagnosis if the
code is present.
When no Code 43 is present but the ESC system is
a potential cause of excessive spark knock, see
CI-IART C-5 which follows.
ON-CAR SERVICE
GENERAL DESCRIPTION ESC SENSOR
The ESC system has two major components:
@ ESC module
@ ESC knock sensor
The ESC knock sensor detects abnormal vibration
(spark knocking) in the engine. The
sensor is
mounted in the engine block near the cylinders. The
ESC module receives the knock sensor information
and sends a signal to the ECM. The ECM then adjusts
the electronic spark timing (EST) to reduce spark
knocking.
The ESC module sends a voltage signal
(8 to 10
volts) to the ECM when NO spark knock is detected by
the knock sensor, and the ECM provides normal spark
advance. When the knock sensor detects spark knock, the
module turns
"OFF" CKT 485 to the ECM. The ECM
then retards EST to reduce spark knock.
Loss of the ESC knock sensor signal or loss of
ground at ESC module terminal
"1)" would cause the
signal on CKT 485 to the ECM to remain high.
This
condition would cause the ECM to control EST as if no
spark knock was occuring. No retard would occur,
and
spark knock could become severe under heavy engine
load conditions. This condition should, however, cause
a Code
43 to set.
Loss of the ESC signal to the ECM would cause the
ECM to constantly retard EST. This will result in
sluggish performance and set a Code
43.
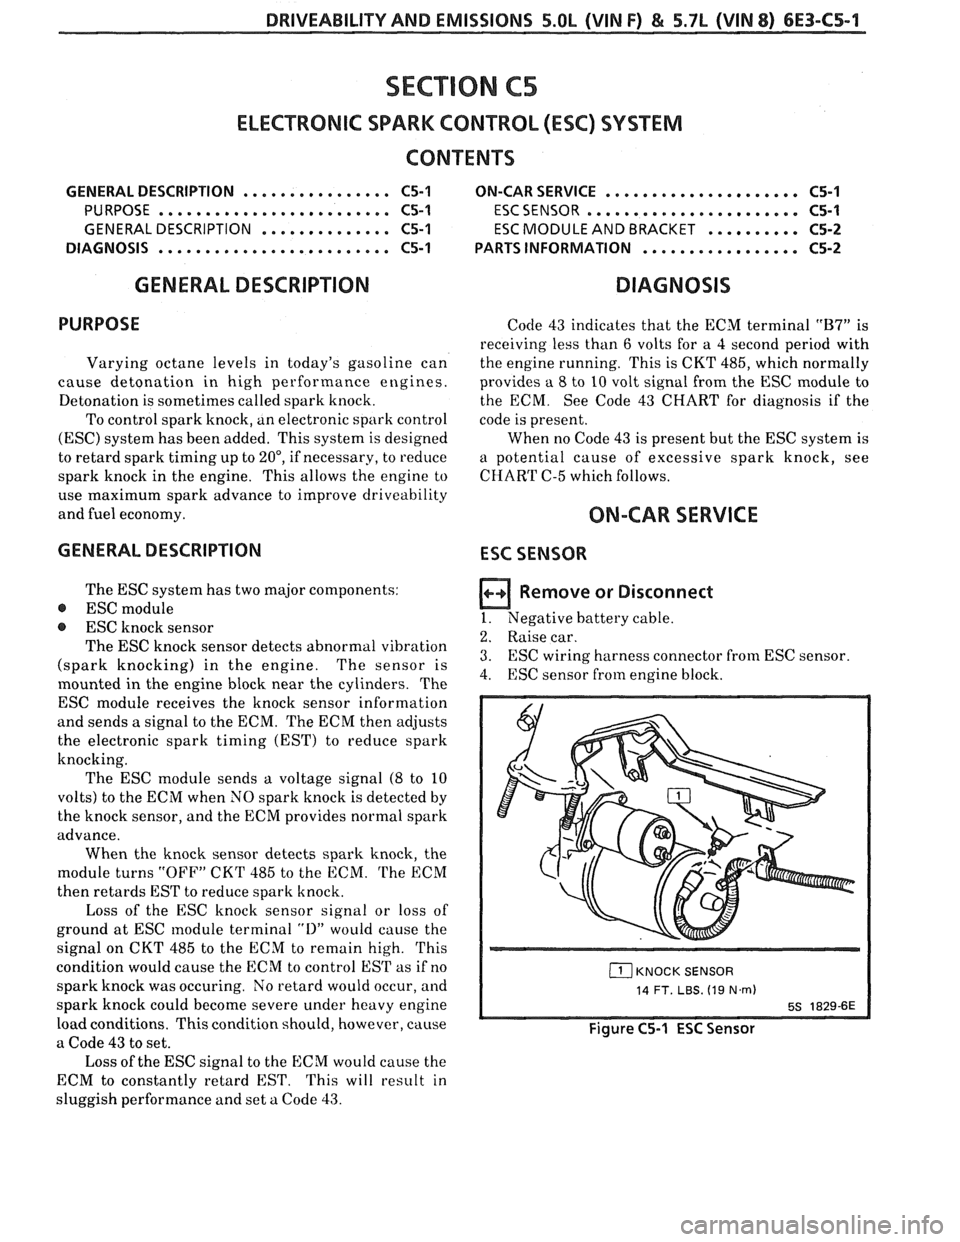
Remove or Disconnect
I. Negative battery cable.
2. Raise car.
3. ESC wiring harness connector from ESC sensor.
4. ESC sensor
from engine block.
(1 KNOCK SENSOR
14 FT. LBS. (19 N.m)
5s 1829-6E
Figure C5-1 ESC Sensor
Page 923 of 1825
Install or Connect
1. ESC sensor into engine block.
e Tighten to 14 ft. lbs. (19 Nsm).
2. ESC
wiring harness connector to the ESC sensor.
3. Lower car.
4. Negative battery cable.
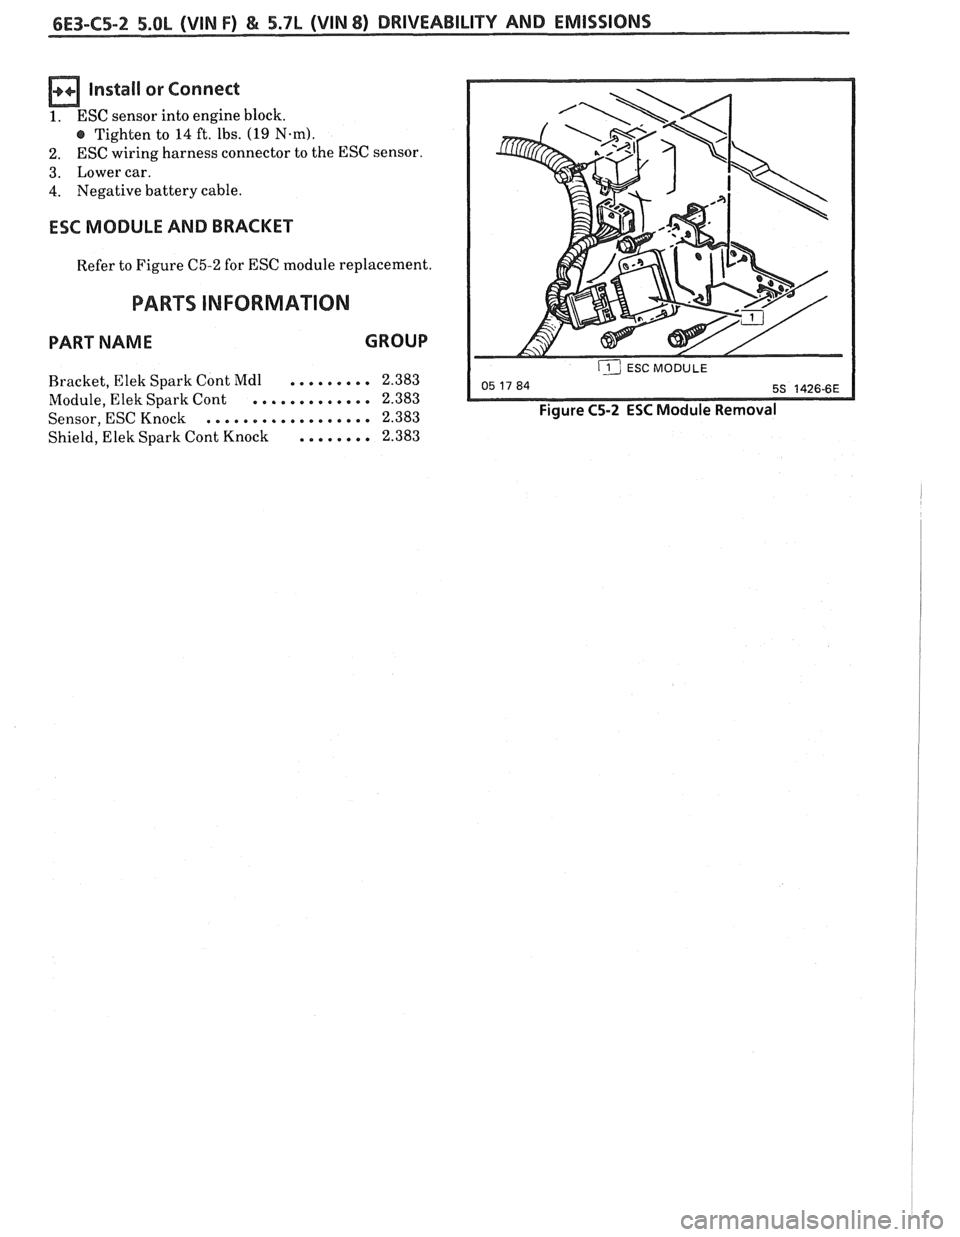
ESC MODULE AND BRACKET
Refer to Figure C5-2 for ESC module replacement.
PARTS INFORMATION
PART NAME GROUP
......... Bracket, Elek Spark Cont Mdl 2.383
............. Module,
Elek Spark Cont 2.383
.................. Sensor, ESC Knock 2.383
Shield, Elek Spark Cont Knock
........ 2.383
ij ESC MODULE --
Figure C5-2 ESC Module Removal
Page 924 of 1825
DRIVEABILITY AND EMISSIONS 5.OL (VIN F) & 5.7b (VIN 8) 6E3-C5-3
BLANK
Page 925 of 1825
6E3-C5-4 5.OL (VIN F) & 5.7L (VIN 8) DRIVEABILITY AND EMISSIONS
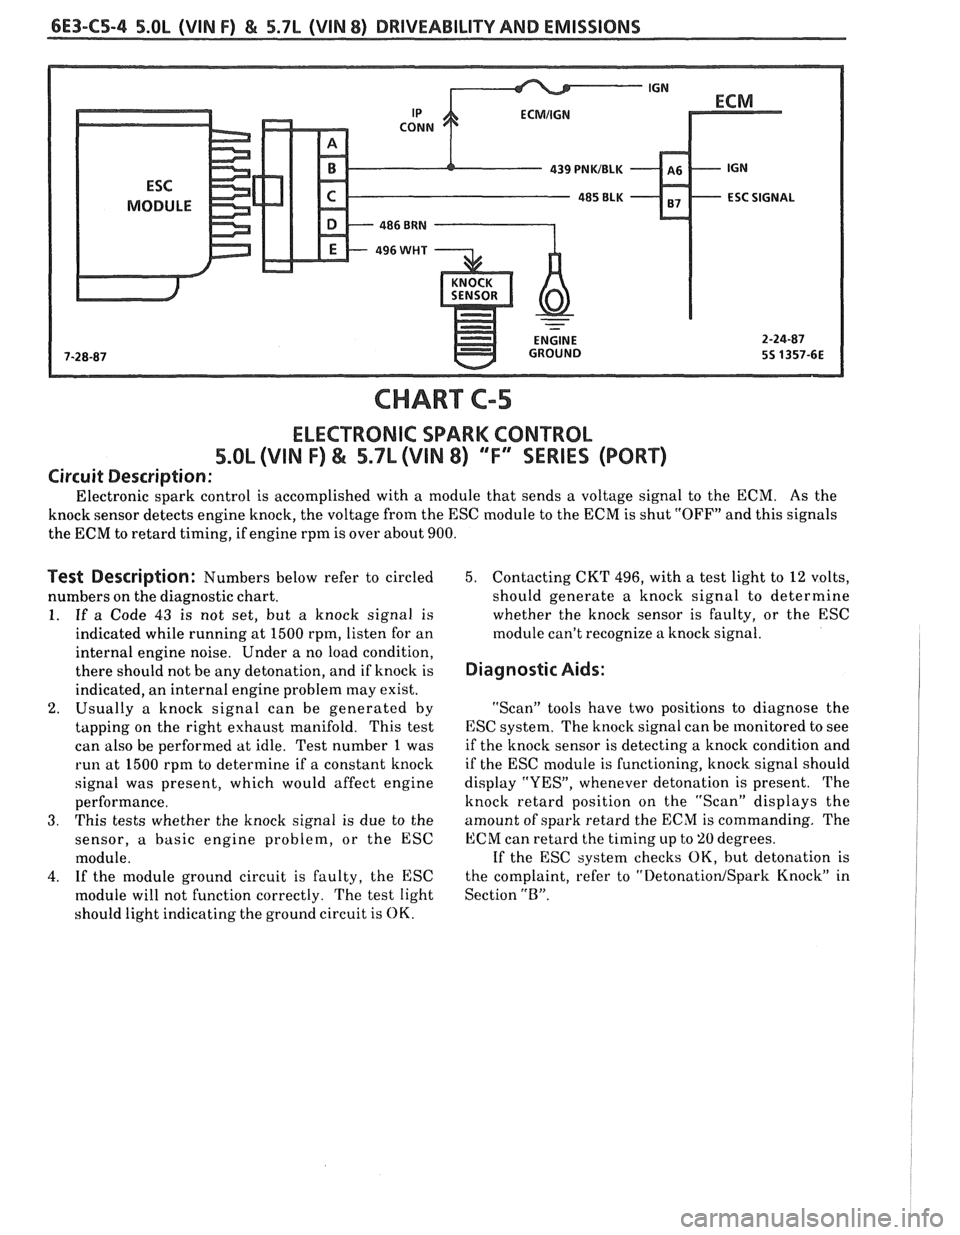
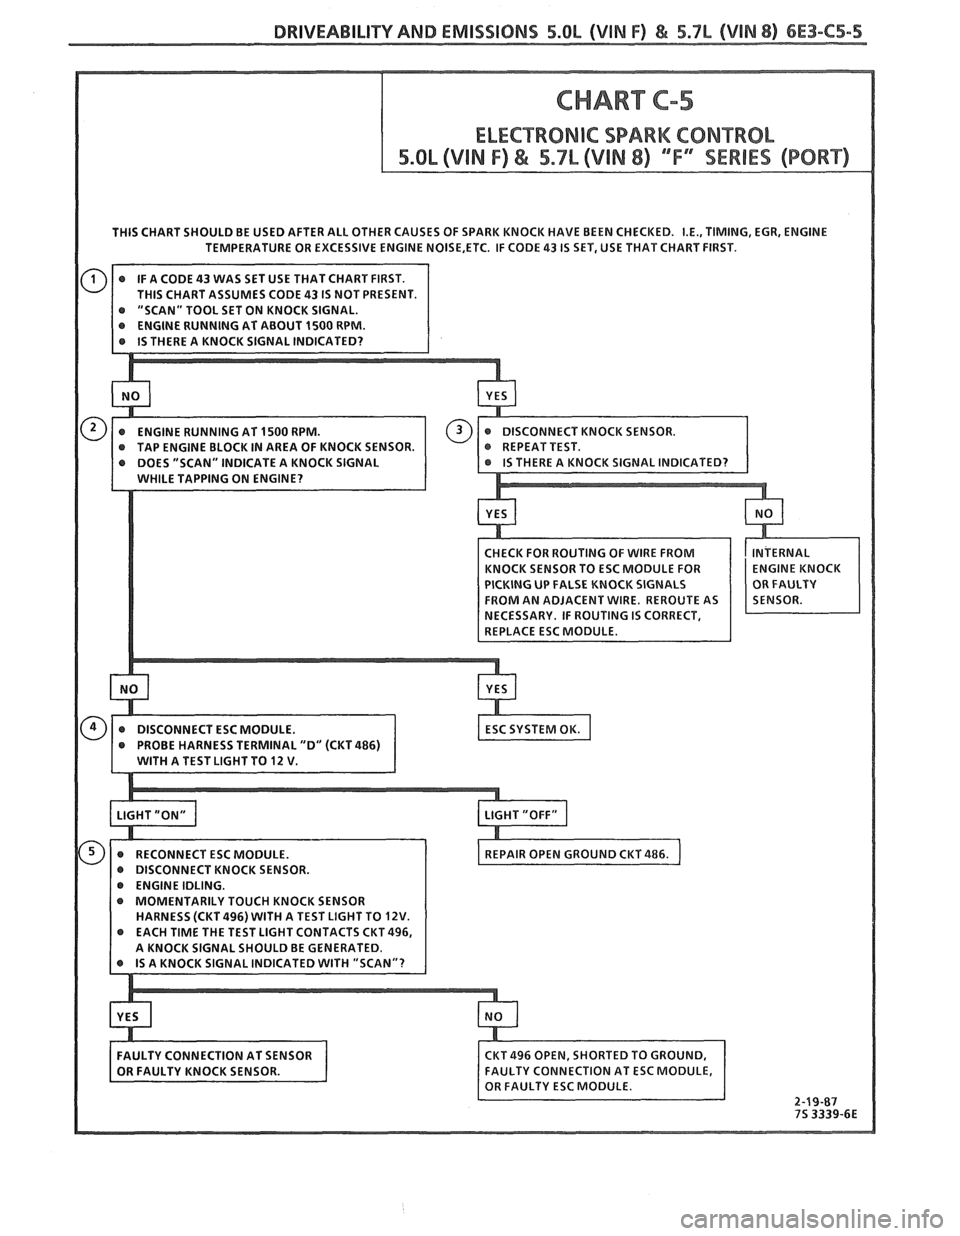
CHART C-5
ELECTRONIC SPARK CONTROL
5.OL (VIN F) & 5.7L (VIN 8) ""F-ERIES (PORT)
Circuit Description:
Electronic spark control is accomplished with a module that sends a voltage signal to the ECM. As the
knock sensor detects engine knock, the voltage from the
ESC module to the ECM is shut "OFF" and this signals
the ECM to retard timing, if engine rpm is over about 900.
Test Description: Numbers below refer to circled
numbers on the diagnostic chart.
1.
If a Code 43 is not set, but a knock signal is
indicated while running at 1500 rpm, listen for an
internal engine noise. Under a no load condition,
there should not be any detonation, and if knock is
indicated, an internal engine problem may exist.
2. Usually a knock signal can be generated by
tapping on the right exhaust manifold. This test
can also be performed at idle. Test number
1 was
run at 1500 rpm to determine if a constant knock
signal was present, which would affect engine
performance.
3. This tests whether the knock signal is due to the
sensor,
a basic engine problem, or the ESC
module.
4. If the module ground circuit is faulty, the ESC
module will not function correctly. The test light
should light indicating the ground circuit is
OK.
5. Contacting CKT 496, with a test light to 12 volts,
should generate a knock signal to determine
whether the knock sensor is faulty, or the ESC
module can't recognize a knock signal.
Diagnostic Aids:
"Scan" tools have two positions to diagnose the
ESC system. The knock signal can be tnonitored to see
if the knock sensor is detecting a knock condition and
if the ESC module is functioning, knock signal should
display "YES", whenever detonation is present. The
knock retard position on the "Scan" displays the
amount of spark retard the ECM is commanding. The
ECM can retard the timing up to 'LO degrees.
If the ESC system checks
OK, but detonation is
the complaint, refer to
"Detonation/Spark Knock" in
Section
"B".
Page 926 of 1825
DRIVEABILITY AND EMISSIONS 5.0L (VIN F) & 5.7b (VIN 8) 6E3-C5-5
THIS CHART SHOULD BE USED AFTER ALL OTHER CAUSES OF SPARK KNOCK HAVE BEEN CHECKED. I.E., TIMING, EGR, ENGINE
TEMPERATURE OR EXCESSIVE ENGINE
NOISE,ETC. IF CODE 43 IS SET, USE THAT CHART FIRST.
@ "SCAN" TOOL SET ON KNOCK SIGNAL.
@ RECONNECT ESC MODULE.
DISCONNECT KNOCK SENSOR.
@ ENGINE IDLING.
MOMENTARILY TOUCH KNOCK SENSOR
HARNESS (CKT
496) WITH A TEST LIGHT TO 12V.
Page 927 of 1825

6E3-C5-6 5.OL (VIM F) & 5.7L (VIN 8) DRIVEABILITY AND EMISSIONS
BLANK
Page 928 of 1825
DRIVEABILITY AND EMISSIONS 5.OL (VIN F) & 5.7L (VIN 8) 6E3-C6-1
SECTION C6
AIR INJECTION REACTION (A.I.R.) SYSEEM
CONTENTS
GENERAL DESCRIPTION ............... C6-1
PURPOSE ....................... C6-1
OPERATION. ..................... C6-1
AIR CONTROL PEDES VALVE ......... C6-1
.... RESULTS OF INCORRECT OPERATION C6-2
DIAGNOSIS
........................ C6-2
OPERATIONAL CHECKS ............. C6-2
Air Pump ...................... C6-2
Hoses and Pipes ................. C6-3
GENERAL DESCRIPTION
PURPOSE
The A.I.R. system helps reduce hydrocarbon (HC),
carbon monoxide (CO), and oxides of nitrogen (NO,)
exhaust emissions. It also heats up the catalytic
converter quickly on engine start-up so conversion of
exhaust gases can occur sooner.
A dual bed converter is used. It consists of a three
way catalyst (which controls all three emissions) in
series with
a two way catalyst (which controls only HC
and
CO) both are in one housing. A pipe between the
two converters allows air to be injected into the second
(two way) converter to increase its efficiency to further
control HC and CO (Figure
C6-L).
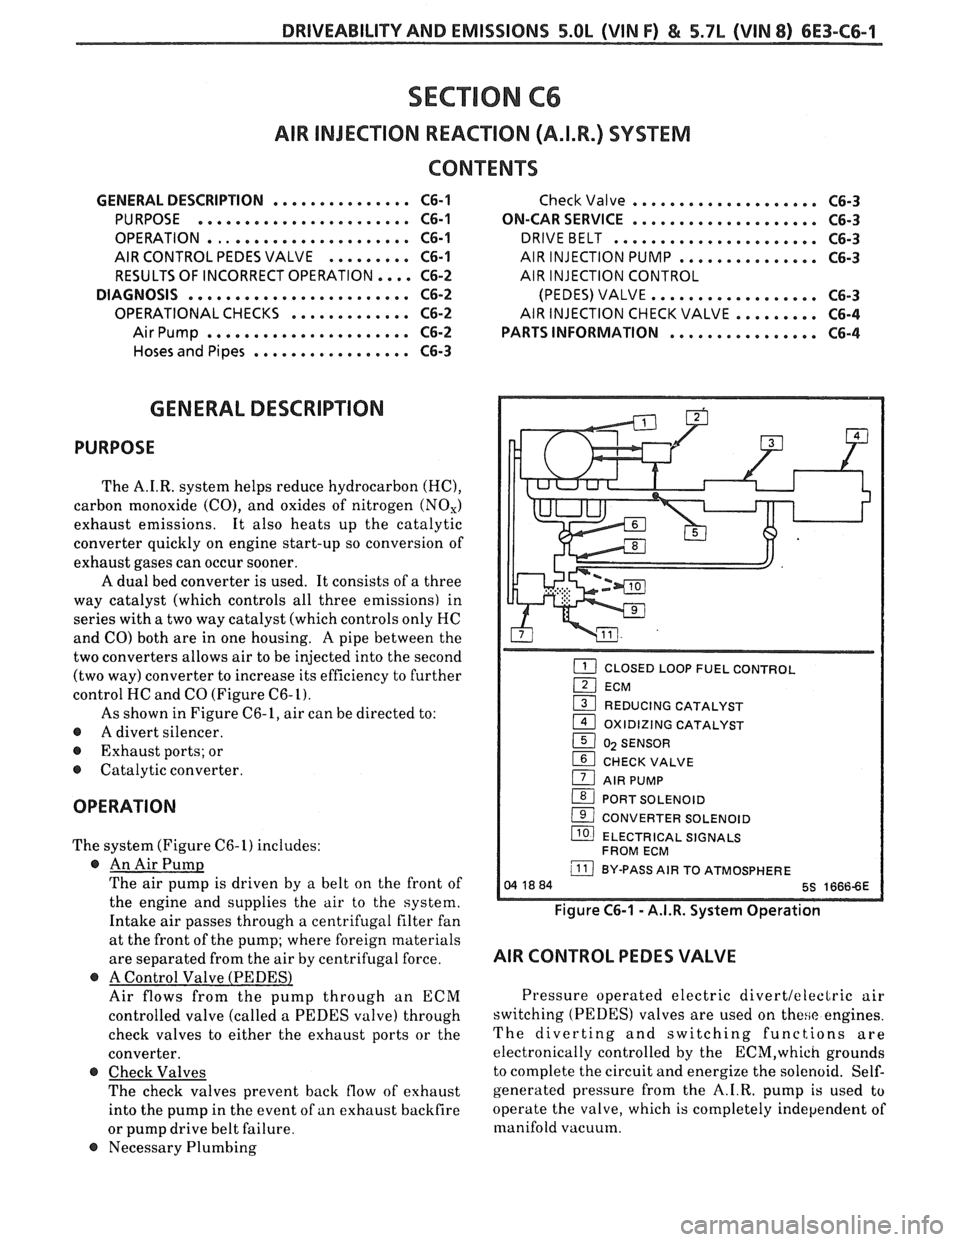
As shown in Figure C6-1, air can be directed to:
@ A divert silencer.
@ Exhaust ports; or
@ Catalytic converter.
OPERATION
The system (Figure C6-1) includes:
@ An Air Pump
The air pump is driven by a belt on the front of
the engine and supplies the air to the system.
Intake air passes through a centrifugal filter fan
at the front of the pump; where foreign materials
are separated from the air by centrifugal force.
@ A Control Valve (PEDESl
Air flows from the pump through an ECM
controlled valve (called a PEDES valve) through
check valves to either the exhaust ports or the
converter.
@ Check Valves
The check valves prevent back flow of exhaust
into the pump in the event of
an exhaust backfire
or pump drive belt failure.
@ Necessary Plumbing
Check Valve .................... C6-3
ON-CAR SERVICE
.................... C6-3
DRIVEBELT ...................... C6-3
AIR INJECTION PUMP ............... C6-3
AIR INJECTION CONTROL
(PEDES) VALVE..
................ C6-3
AIRINJECTIONCHECKVALVE.. ....... C6-4
PARTS INFORMATION
................ C6-4
CLOSED LOOP FUEL CONTROL I
(2I ECM
1 REDUCING CATALYST
1 OXIDIZING CATALYST
1 0) SENSOR
1 CHECK VALVE
1 AIR PUMP
(BI PORT SOLENOID
( CONVERTER SOLENOID
llO) ELECTRICAL SIGNALS
FROM ECM
j BY-PASS AIR TO ATMOSPHERE
Figure C6-1 - A.I.R. System Operation
AIR CONTROL PEDES VALVE
Pressure operated electric divertleleclric air
switching (PEDES) valves are used on
these engines.
The diverting and switching functions are
electronically controlled by the
ECM,which grounds
to complete the circuit and energize the solenoid. Self-
generated pressure from the A.I.R. pump
is used to
operate the valve, which is completely independent of
manifold vacuum.
Page 929 of 1825
6E3-C6-2 5.OL (VIN F) & 5.7L (VIN 8) DRIVEABILITY AND EMISSIONS
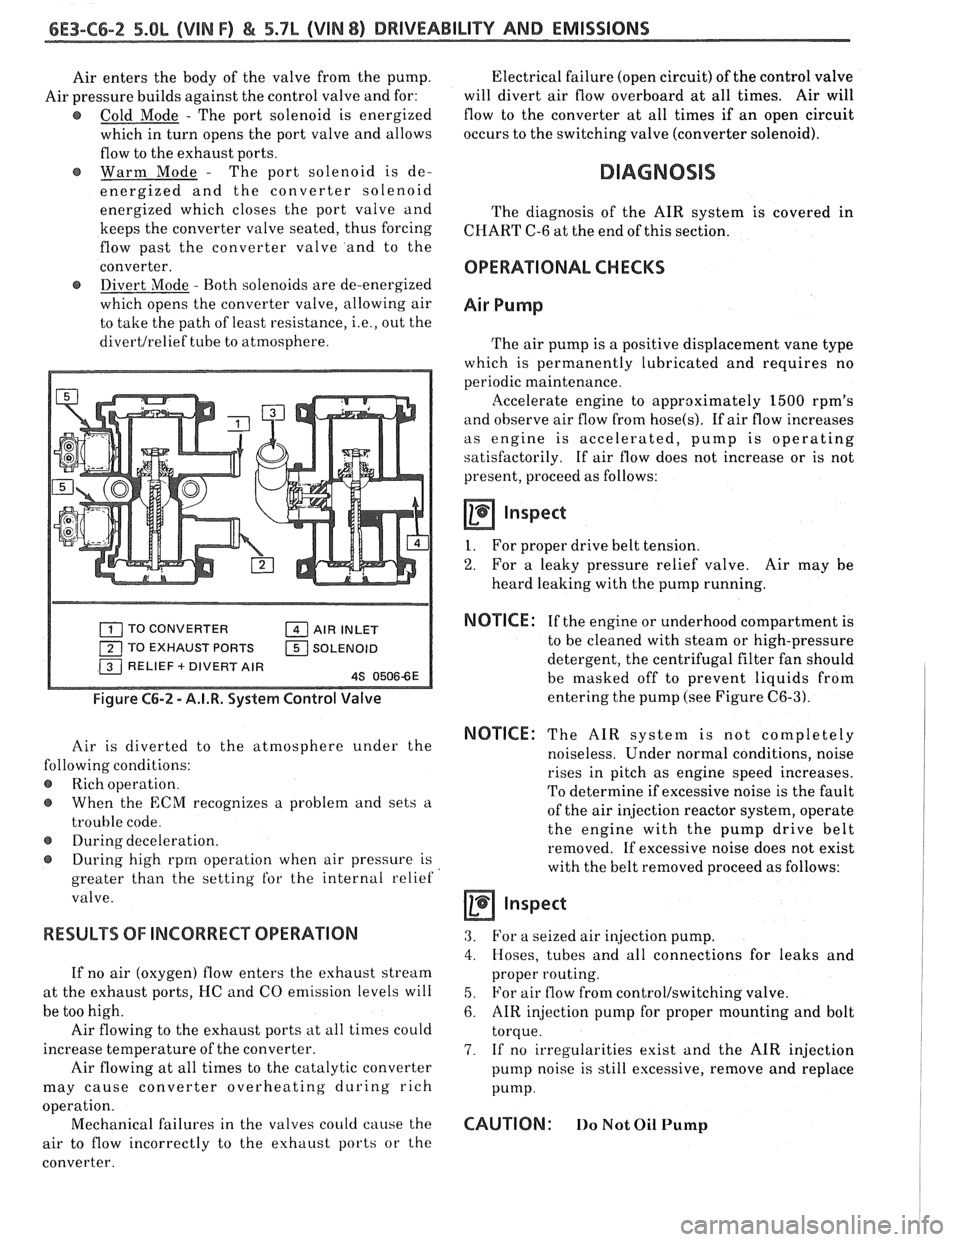
Air enters the body of the valve from the pump.
Air pressure builds against the control valve and for:
@ Cold Mode - The port solenoid is energized
which in turn opens the port valve and allows
flow to the exhaust ports.
Warm Mode
- The port solenoid is de-
energized and the converter solenoid
energized which closes the port valve and
keeps the converter valve seated, thus forcing
flow past the converter valve and to the
converter.
@ Divert Mode - Both solenoids are de-energized
which opens the converter valve, allowing air
to take the path of least resistance,
i.e., out the
divertlrelief tube to atmosphere. Electrical
failure (open circuit) of the control valve
will divert air flow overboard at all times. Air will
flow to the converter at all times if an open circuit
occurs to the switching valve (converter solenoid).
DIAGNOSIS
The diagnosis of the AIR system is covered in
CHART C-6 at the end of this section.
OPERATIONAL CHECKS
Air Pump
The air pump is a positive displacement vane type
which is permanently lubricated and requires no
periodic maintenance.
llccelerate engine to approximately 1500 rpm's
and observe air flow from hose(s). If air flow increases
as engine is accelerated, pump is operating
satisfactorily. If air flow does not increase or is not
present, proceed as follows:
Inspect
I. For proper drive belt tension.
2. For a leaky pressure relief valve. Air may be
heard leaking with the pump running.
TO CONVERTER AIR INLET
TO EXHAUST PORTS
1 SOLENOID
Figure C6-2 - A.I.R. System Control Valve
Air is diverted to the atmosphere under the
lowing conditions:
Rich operation.
When the
ECM recognizes a problem and sets a
trouble code.
@ During deceleration.
During high rprn operation when air pressure is
greater than the setting
for the internal relief
valve.
RESULTS OF INCORRECT OPERATION
If no air (oxygen) flow enters the exhaust stream
at the exhaust ports, I-IC and CO emission levels will
be too high.
Air flowing to the exhaust ports at all times could
increase temperature of the converter.
Air flowing at all times to the catalytic converter
may cause converter overheating during rich
a ion.
oper
t'
Mechanical failures in the valves could cause the
air to flow incorrectly to the exhaust ports or the
converter.
NOTICE : If the engine or underhood compartment is
to be cleaned with steam or high-pressure
detergent, the centrifugal filter fan should
be masked off to prevent liquids from
entering the pump (see Figure
C6-3).
NOTICE: The AIR system is not completely
noiseless. Under normal conditions, noise
rises in pitch as engine speed increases.
To determine if excessive noise is the fault
of the air injection reactor system, operate
the engine with the pump drive belt
removed. If excessive noise does not exist
with the belt removed proceed as follows:
a inspect
3. For a seized air injection pump.
4. Hoses, tubes and all connections for leaks and
proper routing.
5. For air flow from control/switching valve.
6. AIR injection pump for proper mounting and bolt
torque.
7. If no irregularities exist and the AIR injection
pump noise is still excessive, remove and replace
Pump.
CAUTION: 110 Not Oil Pump
Page 930 of 1825
DRlVEABlLlfVAND EMISSIONS 5.OL (VIN F) & 5.7L (VIN 8) 6E3-C6-3
Hoses and Pipes
1. Hose or pipe for deterioration or holes.
2. All hoses or pipe connections, and clamp tightness.
3. Hose or pipe routing. Interference may cause
wear.
4. If
a leak is suspected on the pressure side of the
system or if a hose or pipe has been disconnected
on the pressure side, the connections should be
checked for leaks with a soapy water solution.
With the pump running, bubbles will form if a
leak exists.
Check Valve
Inspect
1. A check valve should be inspected whenever the
hose is disconnected from a check valve or
whenever check valve failure is suspected.
(A
pump that had become inoperative and had shown
indications of having exhaust gases in the pump
would indicate check valve failure).
2. Blow through the check valve (toward the cylinder
head) then attempt to suck back through the check
valve. Flow should only be in one
direction(toward the exhaust manifold). Replace
valve which does not operate properly.
ON-CAR SERVICE
DRIVE BELT
Remove or Disconnect
1. Inspect drive belt for wear, cracks or deterioration
and replace if required. When installing a new
belt, it must be seated and fully secured in grooves
of all belt driven components.
AIR INJECTION PUMP
Remove or Disconnect
1. Hold pump pulley from turning by cotnpressing
drive belt, then loosen pump pulley bolts.
2. Drive belt and pulley.
3. Hoses, vacuum, and electrical connections from
air injection control valve.
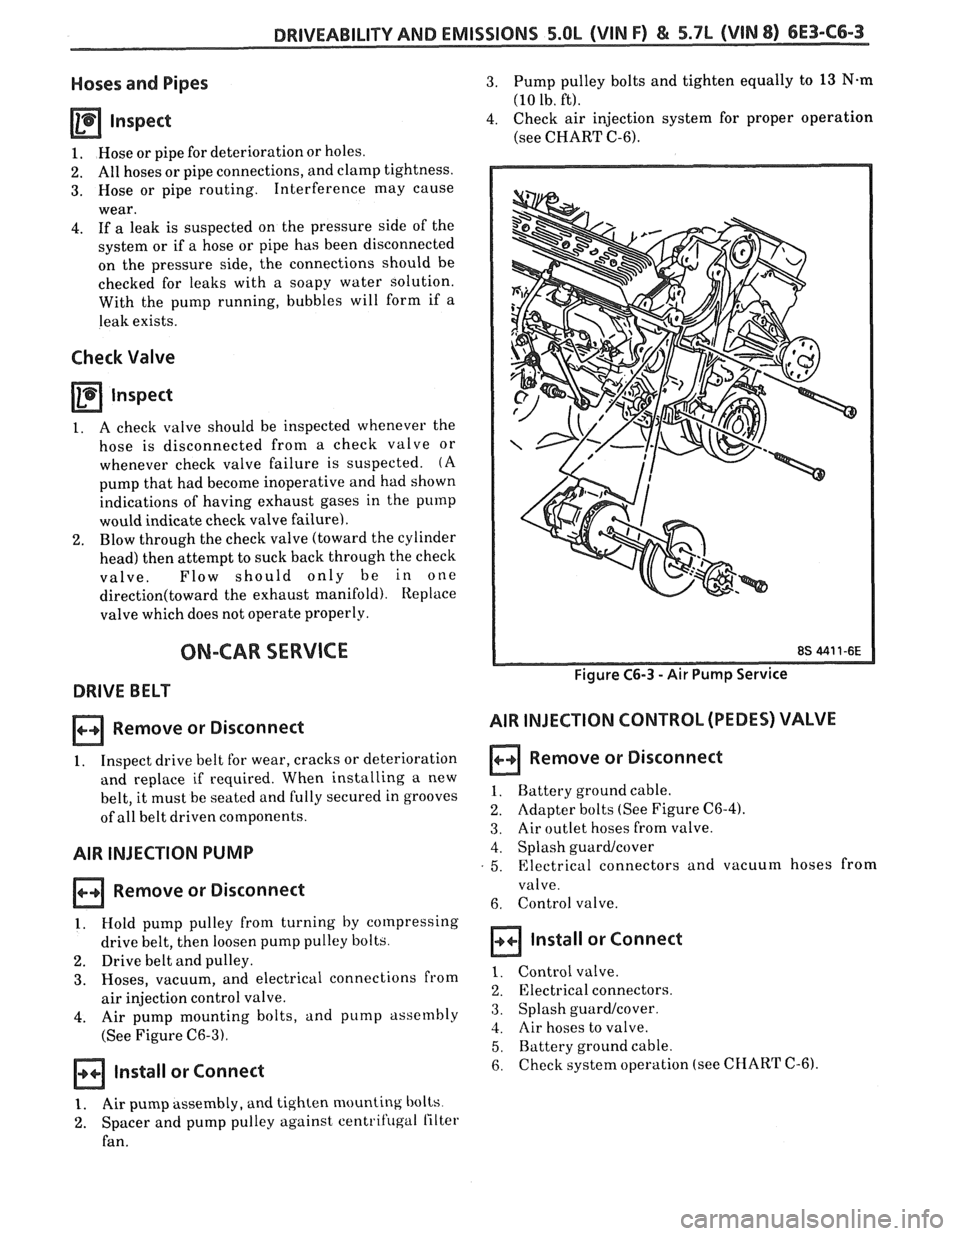
4. Air pump mounting bolts, and pump assembly
(See Figure
C6-3).
Install or Connect
3. Pump pulley bolts and tighten equally to 13 N.m
(10 lb. ft).
4. Check air injection system for proper operation
(see CHART C-6).
Figure C6-3 - Air Pump Service
AIR INJECTION CONTROL (PEDES) VALVE
Remove or Disconnect
1. Battery ground cable.
2. Adapter bolts (See Figure C6-4).
3. Air outlet hoses from valve.
4. Splash guardlcover
5. Electrical connectors and vacuum hoses from
valve.
6. Control valve.
Install or Connect
1. Control valve.
2. Electrical connectors.
3. Splash guard/cover.
4. Air hoses to valve.
5. Battery ground cable.
6. checksystem operation (see CHART C-6).
1. Air pump assembly, and tighten mounting bolts
2. Spacer and pump pulley against centrifugal lilter
fan.