RENAULT SCENIC 2011 J95 / 3.G Engine And Peripherals Siemens Injection Service Manual
Manufacturer: RENAULT, Model Year: 2011, Model line: SCENIC, Model: RENAULT SCENIC 2011 J95 / 3.GPages: 329, PDF Size: 1.71 MB
Page 41 of 329
13B-41
MR-372-J84-13B050$390.mif
V17
DIESEL INJECTION
Fault finding – Interpretation of faults
Siemens Injection
SID301 and 304
Vdiag No. 44-45-48-49-4D-4C
Program No.: B1 and B2
13B
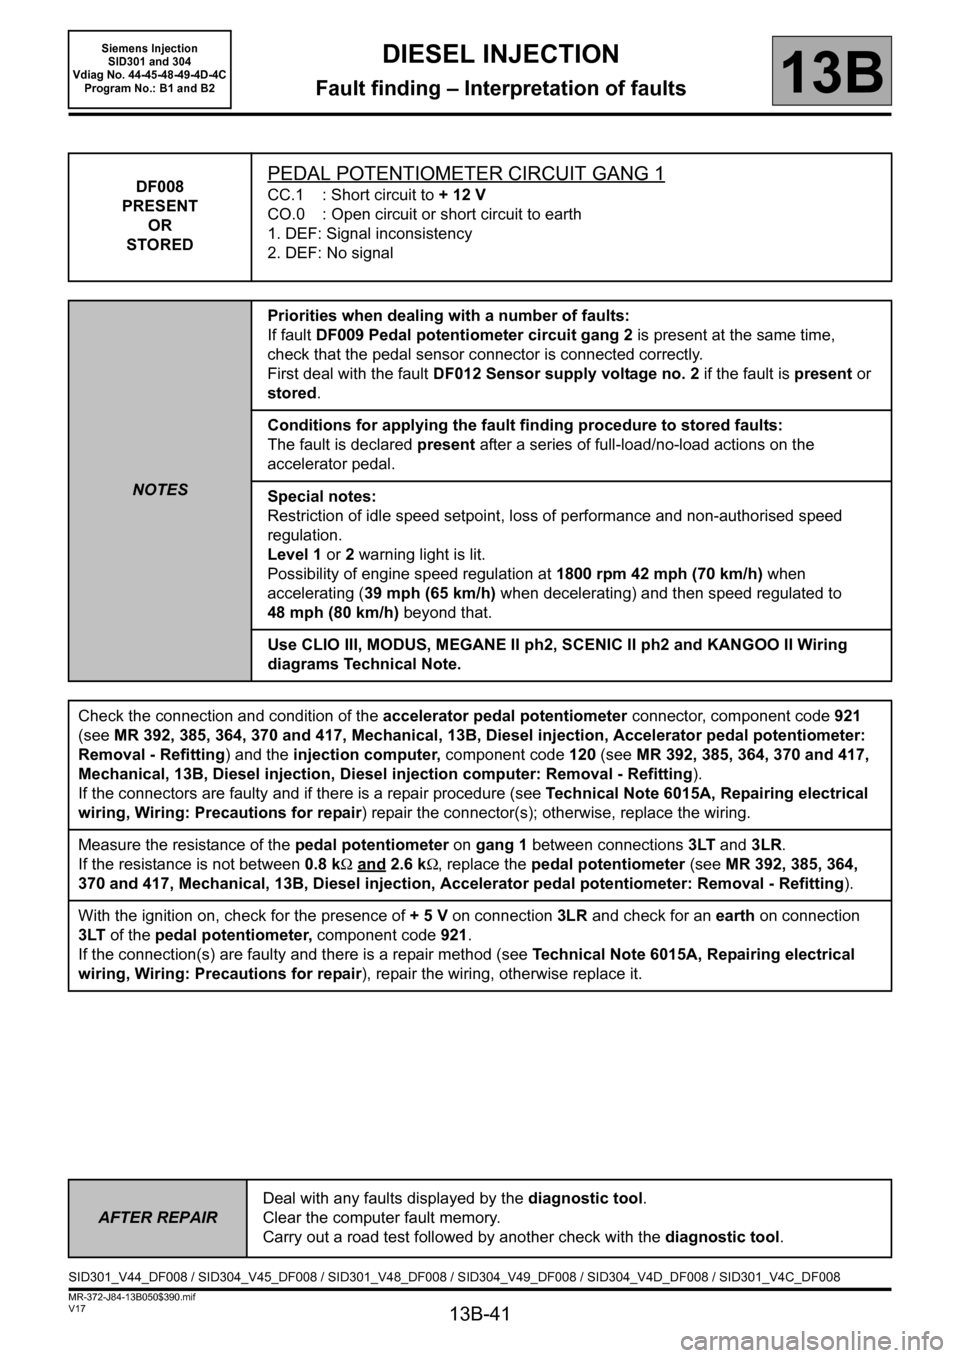
DF008
PRESENT
OR
STOREDPEDAL POTENTIOMETER CIRCUIT GANG 1
CC.1 : Short circuit to + 12 V
CO.0 : Open circuit or short circuit to earth
1. DEF: Signal inconsistency
2. DEF: No signal
NOTESPriorities when dealing with a number of faults:
If fault DF009 Pedal potentiometer circuit gang 2 is present at the same time,
check that the pedal sensor connector is connected correctly.
First deal with the fault DF012 Sensor supply voltage no. 2 if the fault is present or
stored.
Conditions for applying the fault finding procedure to stored faults:
The fault is declared present after a series of full-load/no-load actions on the
accelerator pedal.
Special notes:
Restriction of idle speed setpoint, loss of performance and non-authorised speed
regulation.
Level 1 or 2 warning light is lit.
Possibility of engine speed regulation at 1800 rpm 42 mph (70 km/h) when
accelerating (39 mph (65 km/h) when decelerating) and then speed regulated to
48 mph (80 km/h) beyond that.
Use CLIO III, MODUS, MEGANE II ph2, SCENIC II ph2 and KANGOO II Wiring
diagrams Technical Note.
Check the connection and condition of the accelerator pedal potentiometer connector, component code921
(see MR 392, 385, 364, 370 and 417, Mechanical, 13B, Diesel injection, Accelerator pedal potentiometer:
Removal - Refitting) and the injection computer, component code120 (see MR 392, 385, 364, 370 and 417,
Mechanical, 13B, Diesel injection, Diesel injection computer: Removal - Refitting).
If the connectors are faulty and if there is a repair procedure (see Technical Note 6015A, Repairing electrical
wiring, Wiring: Precautions for repair) repair the connector(s); otherwise, replace the wiring.
Measure the resistance of the pedal potentiometer on gang 1 between connections3LT and 3LR.
If the resistance is not between 0.8 kΩ and
2.6 kΩ, replace the pedal potentiometer (see MR 392, 385, 364,
370 and 417, Mechanical, 13B, Diesel injection, Accelerator pedal potentiometer: Removal - Refitting).
With the ignition on, check for the presence of + 5 V on connection 3LR and check for an earth on connection
3LT of the pedal potentiometer, component code 921.
If the connection(s) are faulty and there is a repair method (see Technical Note 6015A, Repairing electrical
wiring, Wiring: Precautions for repair), repair the wiring, otherwise replace it.
AFTER REPAIRDeal with any faults displayed by the diagnostic tool.
Clear the computer fault memory.
Carry out a road test followed by another check with the diagnostic tool.
SID301_V44_DF008 / SID304_V45_DF008 / SID301_V48_DF008 / SID304_V49_DF008 / SID304_V4D_DF008 / SID301_V4C_DF008
Page 42 of 329
13B-42
MR-372-J84-13B050$390.mif
V17
DIESEL INJECTION
Fault finding – Interpretation of faults
Siemens Injection
SID301 and 304
Vdiag No. 44-45-48-49-4D-4C
Program No.: B1 and B2
13B
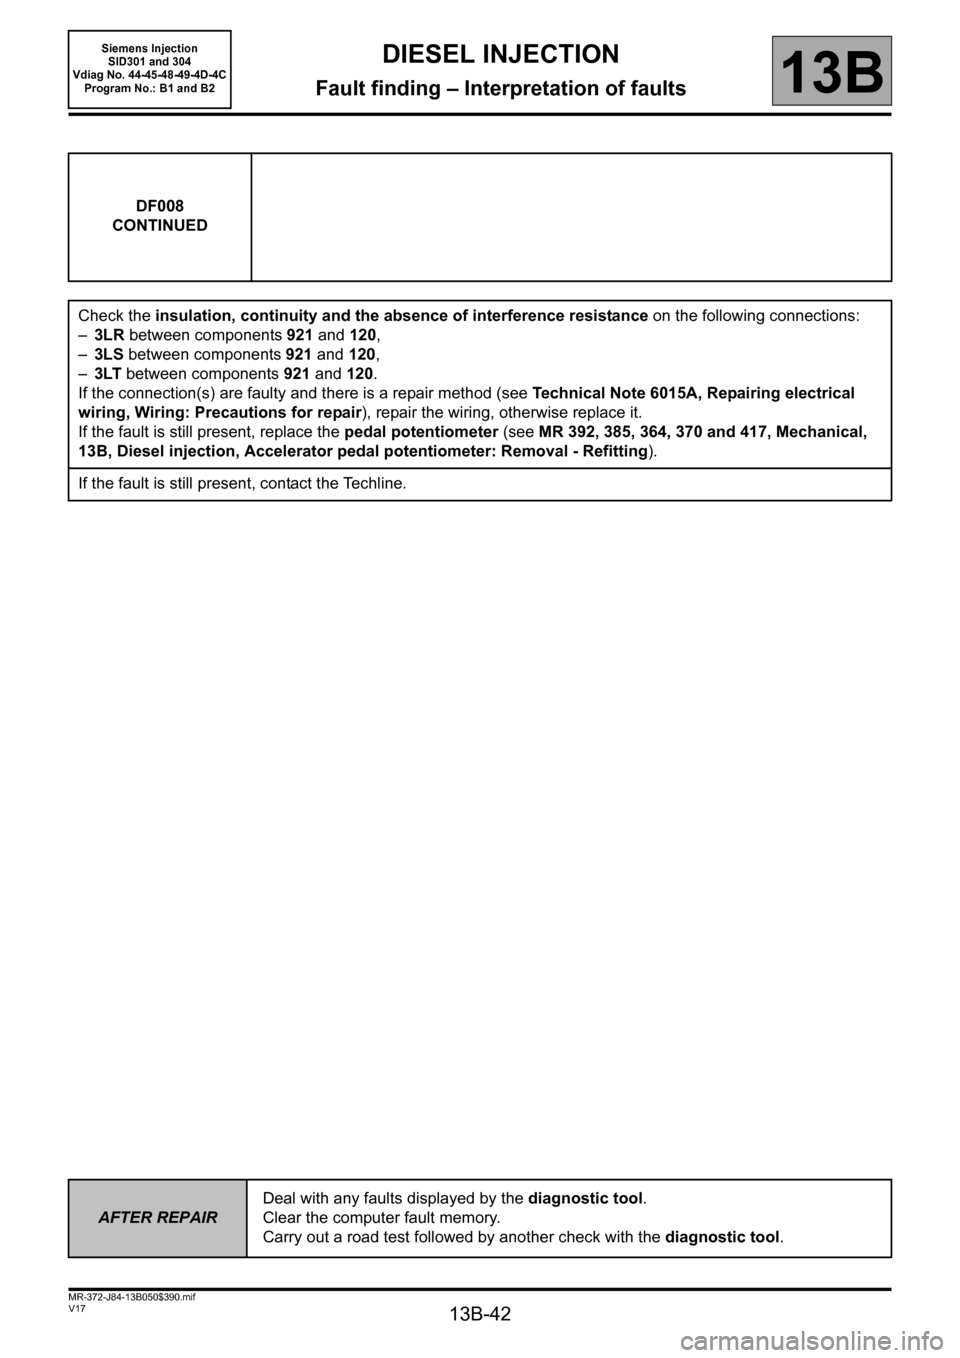
DF008
CONTINUED
Check the insulation, continuity and the absence of interference resistance on the following connections:
–3LR between components 921 and 120,
–3LS between components 921 and 120,
–3LT between components 921 and 120.
If the connection(s) are faulty and there is a repair method (see Technical Note 6015A, Repairing electrical
wiring, Wiring: Precautions for repair), repair the wiring, otherwise replace it.
If the fault is still present, replace the pedal potentiometer (see MR 392, 385, 364, 370 and 417, Mechanical,
13B, Diesel injection, Accelerator pedal potentiometer: Removal - Refitting).
If the fault is still present, contact the Techline.
AFTER REPAIRDeal with any faults displayed by the diagnostic tool.
Clear the computer fault memory.
Carry out a road test followed by another check with the diagnostic tool.
Page 43 of 329
13B-43
MR-372-J84-13B050$390.mif
V17
DIESEL INJECTION
Fault finding – Interpretation of faults
Siemens Injection
SID301 and 304
Vdiag No. 44-45-48-49-4D-4C
Program No.: B1 and B2
13B
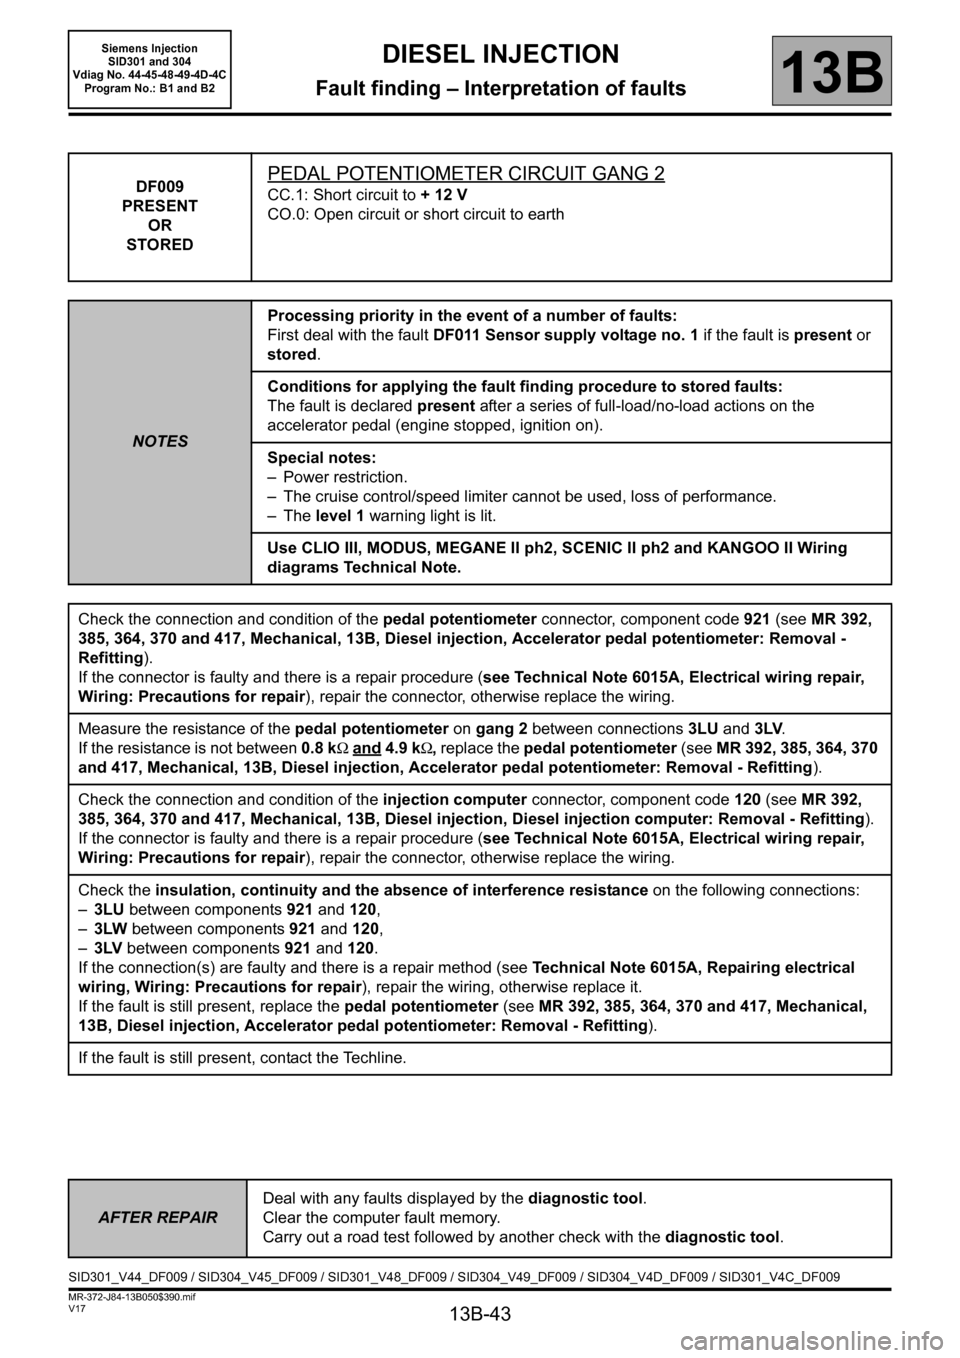
DF009
PRESENT
OR
STOREDPEDAL POTENTIOMETER CIRCUIT GANG 2
CC.1: Short circuit to + 12 V
CO.0: Open circuit or short circuit to earth
NOTESProcessing priority in the event of a number of faults:
First deal with the fault DF011 Sensor supply voltage no. 1 if the fault is present or
stored.
Conditions for applying the fault finding procedure to stored faults:
The fault is declared present after a series of full-load/no-load actions on the
accelerator pedal (engine stopped, ignition on).
Special notes:
– Power restriction.
– The cruise control/speed limiter cannot be used, loss of performance.
–The level 1 warning light is lit.
Use CLIO III, MODUS, MEGANE II ph2, SCENIC II ph2 and KANGOO II Wiring
diagrams Technical Note.
Check the connection and condition of the pedal potentiometer connector, component code921 (see MR 392,
385, 364, 370 and 417, Mechanical, 13B, Diesel injection, Accelerator pedal potentiometer: Removal -
Refitting).
If the connector is faulty and there is a repair procedure (see Technical Note 6015A, Electrical wiring repair,
Wiring: Precautions for repair), repair the connector, otherwise replace the wiring.
Measure the resistance of the pedal potentiometer on gang 2 between connections 3LU and 3LV.
If the resistance is not between 0.8 kΩ and
4.9 kΩ, replace the pedal potentiometer (see MR 392, 385, 364, 370
and 417, Mechanical, 13B, Diesel injection, Accelerator pedal potentiometer: Removal - Refitting).
Check the connection and condition of the injection computer connector, component code 120 (see MR 392,
385, 364, 370 and 417, Mechanical, 13B, Diesel injection, Diesel injection computer: Removal - Refitting).
If the connector is faulty and there is a repair procedure (see Technical Note 6015A, Electrical wiring repair,
Wiring: Precautions for repair), repair the connector, otherwise replace the wiring.
Check the insulation, continuity and the absence of interference resistance on the following connections:
–3LU between components921 and 120,
–3LW between components 921 and 120,
–3LV between components 921 and 120.
If the connection(s) are faulty and there is a repair method (see Technical Note 6015A, Repairing electrical
wiring, Wiring: Precautions for repair), repair the wiring, otherwise replace it.
If the fault is still present, replace the pedal potentiometer (see MR 392, 385, 364, 370 and 417, Mechanical,
13B, Diesel injection, Accelerator pedal potentiometer: Removal - Refitting).
If the fault is still present, contact the Techline.
AFTER REPAIRDeal with any faults displayed by the diagnostic tool.
Clear the computer fault memory.
Carry out a road test followed by another check with the diagnostic tool.
SID301_V44_DF009 / SID304_V45_DF009 / SID301_V48_DF009 / SID304_V49_DF009 / SID304_V4D_DF009 / SID301_V4C_DF009
Page 44 of 329
13B-44
MR-372-J84-13B050$390.mif
V17
DIESEL INJECTION
Fault finding – Interpretation of faults
Siemens Injection
SID301 and 304
Vdiag No. 44-45-48-49-4D-4C
Program No.: B1 and B2
13B
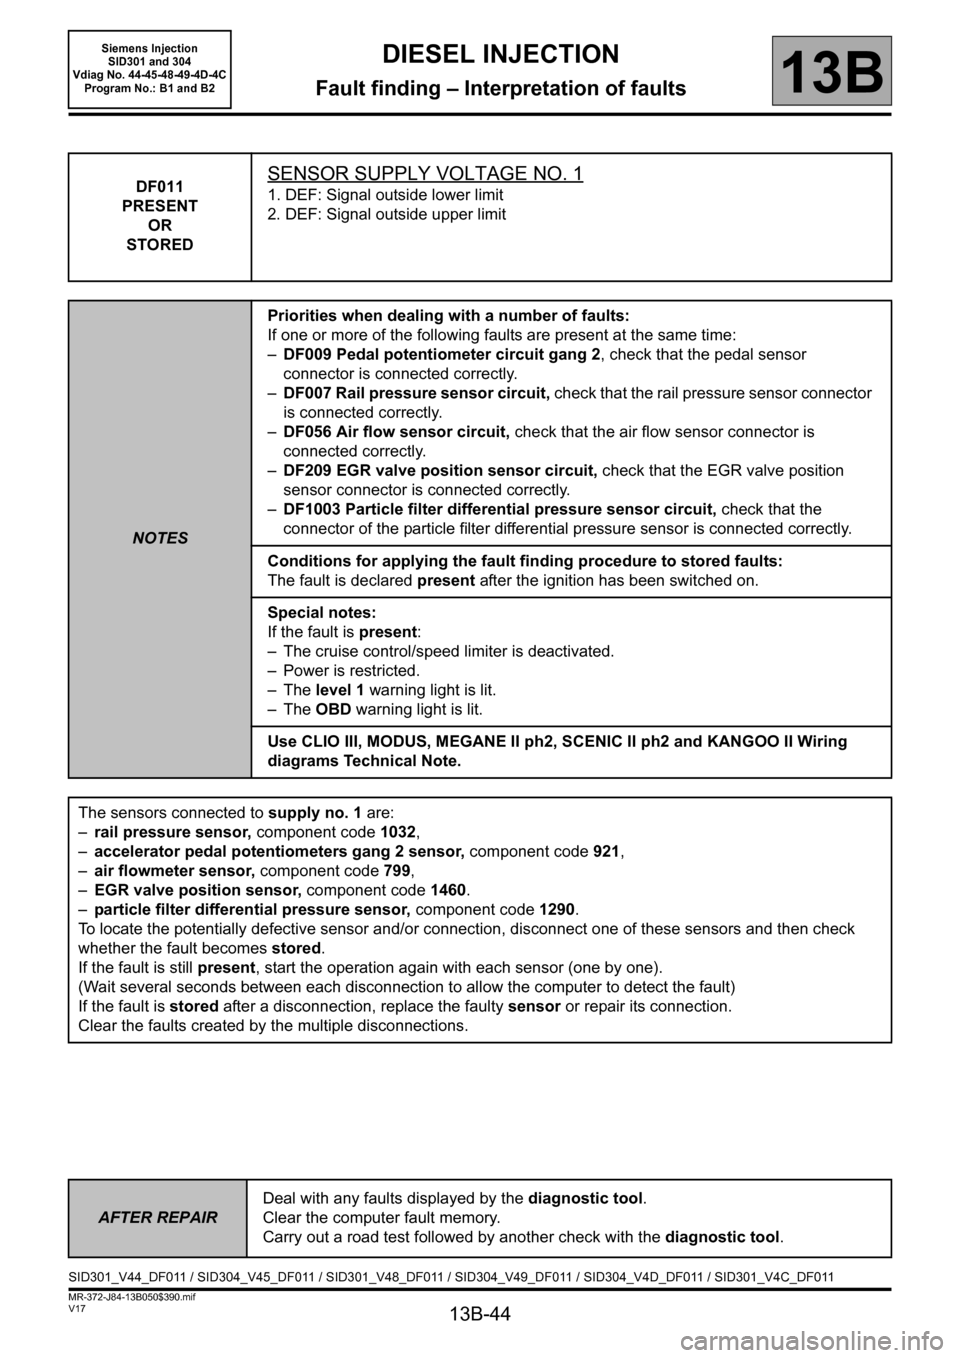
DF011
PRESENT
OR
STOREDSENSOR SUPPLY VOLTAGE NO. 1
1. DEF: Signal outside lower limit
2. DEF: Signal outside upper limit
NOTESPriorities when dealing with a number of faults:
If one or more of the following faults are present at the same time:
–DF009 Pedal potentiometer circuit gang 2, check that the pedal sensor
connector is connected correctly.
–DF007 Rail pressure sensor circuit, check that the rail pressure sensor connector
is connected correctly.
–DF056 Air flow sensor circuit, check that the air flow sensor connector is
connected correctly.
–DF209 EGR valve position sensor circuit, check that the EGR valve position
sensor connector is connected correctly.
–DF1003 Particle filter differential pressure sensor circuit, check that the
connector of the particle filter differential pressure sensor is connected correctly.
Conditions for applying the fault finding procedure to stored faults:
The fault is declared present after the ignition has been switched on.
Special notes:
If the fault is present:
– The cruise control/speed limiter is deactivated.
– Power is restricted.
–The level 1 warning light is lit.
–The OBD warning light is lit.
Use CLIO III, MODUS, MEGANE II ph2, SCENIC II ph2 and KANGOO II Wiring
diagrams Technical Note.
The sensors connected to supply no. 1 are:
–rail pressure sensor, component code1032,
–accelerator pedal potentiometers gang 2 sensor, component code921,
–air flowmeter sensor, component code799,
–EGR valve position sensor, component code 1460.
–particle filter differential pressure sensor, component code 1290.
To locate the potentially defective sensor and/or connection, disconnect one of these sensors and then check
whether the fault becomes stored.
If the fault is still present, start the operation again with each sensor (one by one).
(Wait several seconds between each disconnection to allow the computer to detect the fault)
If the fault is stored after a disconnection, replace the faulty sensor or repair its connection.
Clear the faults created by the multiple disconnections.
AFTER REPAIRDeal with any faults displayed by the diagnostic tool.
Clear the computer fault memory.
Carry out a road test followed by another check with the diagnostic tool.
SID301_V44_DF011 / SID304_V45_DF011 / SID301_V48_DF011 / SID304_V49_DF011 / SID304_V4D_DF011 / SID301_V4C_DF011
Page 45 of 329
13B-45
MR-372-J84-13B050$390.mif
V17
DIESEL INJECTION
Fault finding – Interpretation of faults
Siemens Injection
SID301 and 304
Vdiag No. 44-45-48-49-4D-4C
Program No.: B1 and B2
13B
DF011
CONTINUED
Check the connection and condition of the connector for the sensors and the injection computer (see MR 392,
385, 364, 370 and 417, Mechanical, 13B, Diesel injection, Diesel injection computer: Removal - Refitting).
If the connectors are faulty and if there is a repair procedure (see Technical Note 6015A, Repairing electrical
wiring, Wiring: Precautions for repair) repair the connector(s); otherwise, replace the wiring.
If the fault is still present when the sensors have been disconnected:
Check the insulation, continuity and the absence of interference resistance on the following connections:
–3LZ between components 1032 and 120,
–3LX between components 1032 and 120,
–3LU between components921 and 120,
–3LV between components 921 and 120,
–3KJ between components 799 and 120,
–3DW between components 799 and 120,
–3GC between components 1460 and 120,
–3GD between components 1460 and 120,
–3YD between components 1290 and 120,
–3AAM between components 1290 and 120.
If the connection(s) are faulty and there is a repair method (see Technical Note 6015A, Repairing electrical
wiring, Wiring: Precautions for repair),
repair the wiring, otherwise replace it.
If the fault is still present, contact the Techline.
AFTER REPAIRDeal with any faults displayed by the diagnostic tool.
Clear the computer fault memory.
Carry out a road test followed by another check with the diagnostic tool.
Page 46 of 329
13B-46
MR-372-J84-13B050$390.mif
V17
DIESEL INJECTION
Fault finding – Interpretation of faults
Siemens Injection
SID301 and 304
Vdiag No. 44-45-48-49-4D-4C
Program No.: B1 and B2
13B
DF012
PRESENT
OR
STOREDSENSOR SUPPLY VOLTAGE NO. 2
1. DEF: Signal outside lower limit
2. DEF: Signal outside upper limit
NOTESPriorities when dealing with a number of faults:
If one or more of the following faults are present at the same time:
–DF008 Pedal potentiometer circuit gang 1, check that the pedal sensor
connector is connected correctly.
–DF004 Turbocharging pressure sensor circuit, check that the turbocharging
pressure sensor connector is connected correctly.
–DF049 Refrigerant sensor circuit, check that the refrigerant sensor connector is
connected correctly.
Conditions for applying the fault finding procedure to stored faults:
The fault is declared present after the ignition has been switched on.
Special notes:
If the fault is present:
– The cruise control/speed limiter is deactivated.
– Power is restricted.
–The level 1 warning light is lit.
–The OBD warning light is illuminated.
Use CLIO III, MODUS, MEGANE II ph2, SCENIC II ph2 and KANGOO II Wiring
diagrams Technical Note.
The sensors connected to supply no. 2 are:
–Accelerator pedal potentiometer gang 1 sensor, component code 921,
–Turbocharging pressure sensor, component code 1071,
–Refrigerant pressure sensor, component code 1202.
To locate the potentially defective sensor and/or connection, disconnect one of these sensors and then check
whether the fault becomes stored.
If the fault is still present, start the operation again with each sensor (one by one).
(Wait several seconds between each disconnection to allow the computer to detect the fault)
If the fault is stored after a disconnection, replace the faulty sensor or repair its connection.
Clear the faults created by the multiple disconnections.
AFTER REPAIRDeal with any faults displayed by the diagnostic tool.
Clear the computer fault memory.
Carry out a road test followed by another check with the diagnostic tool.
SID301_V44_DF012 / SID304_V45_DF012 / SID301_V48_DF012 / SID304_V49_DF012 / SID304_V4D_DF012 / SID301_V4C_DF012
Page 47 of 329
13B-47
MR-372-J84-13B050$390.mif
V17
DIESEL INJECTION
Fault finding – Interpretation of faults
Siemens Injection
SID301 and 304
Vdiag No. 44-45-48-49-4D-4C
Program No.: B1 and B2
13B
DF012
CONTINUED
Check the connection and condition of the connector for the sensors and for the injection computer,
component code120 (see MR 392, 385, 364, 370 and 417, Mechanical, 13B, Diesel injection, Diesel injection
computer: Removal - Refitting).
If the connectors are faulty and if there is a repair procedure (see Technical Note 6015A, Repairing electrical
wiring, Wiring: Precautions for repair) repair the connector(s); otherwise, replace the wiring.
If the fault is still present when these sensors are disconnected:
Check the insulation, continuity and the absence of interference resistance on the following connections:
–3LQ between components 1071 and 120,
–3LN between components 1071 and 120,
–3LR between components 921 and 120,
–3LT between components 921 and 120,
–38Y between components1202 and 120,
–38U between components 1202 and 120.
If the connection(s) are faulty and there is a repair method (see Technical Note 6015A, Repairing electrical
wiring, Wiring: Precautions for repair), repair the wiring, otherwise replace it.
If the fault is still present, contact the Techline.
AFTER REPAIRDeal with any faults displayed by the diagnostic tool.
Clear the computer fault memory.
Carry out a road test followed by another check with the diagnostic tool.
Page 48 of 329
13B-48
MR-372-J84-13B050$390.mif
V17
DIESEL INJECTION
Fault finding – Interpretation of faults
Siemens Injection
SID301 and 304
Vdiag No. 44-45-48-49-4D-4C
Program No.: B1 and B2
13B
DF015
PRESENT
OR
STOREDMAIN RELAY CONTROL CIRCUIT
CC.0 : Short circuit to earth
CC.1 : Short circuit to + 12 V
CO : Open circuit
NOTESSpecial notes:
The "injection control unit supply relay" (50A) is located on the relay plate, inside
the engine compartment connection unit.
Engine stalls or is impossible to restart.
If the fault is present:
The level 2 warning light is lit.
Use CLIO III, MODUS, MEGANE II ph2, SCENIC II ph2 and KANGOO II Wiring
diagrams Technical Note.
Check the condition of the battery (see MR 392, 385, 364, 370 and 417, Mechanical, 80A, Battery, Battery:
Removal - Refitting) and carry out fault finding on the charging circuit (see Technical Note 6014A, Charging
circuit check or 87G, Engine compartment connection unit).
Check the condition of the injection supply relay.
Check the injection system fuses (see MR 392, 385, 364, 370 and 417, Mechanical, 81C, Fuses, Fuses: List
and location of components).
Check the connection of the injection computer connector, component code120 (see MR 392, 385, 364, 370
and 417, Mechanical, 13B, Diesel injection, Diesel injection computer: Removal - Refitting).
If the connector is faulty and there is a repair procedure (see Technical Note 6015A, Electrical wiring repair,
Wiring: Precautions for repair), repair the connector, otherwise replace the wiring.
With the ignition on, check for + 12 V on connections BP of the UPC computer, component code 1337.
If the connection is faulty and there is a repair procedure (see Technical Note 6015A, Electrical wiring repair,
Wiring: Precautions for repair), repair the wiring, otherwise replace it.
Check the continuity, insulation and the absence of interference resistance on the following connections:
–3FB1 between components 1337 and 120,
–3FB2 between components 1337 and 120,
If the connection(s) are faulty and there is a repair method (see Technical Note 6015A, Repairing electrical
wiring, Wiring: Precautions for repair), repair the wiring, otherwise replace it.
If the fault is still present, replace the main relay or test the Protection and Switching Unit computer (see
87G, Engine compartment connection unit).
If the fault is still present, contact the Techline.
AFTER REPAIRDeal with any faults displayed by the diagnostic tool.
Clear the computer fault memory.
Carry out a road test followed by another check with the diagnostic tool.
SID301_V44_DF015 / SID304_V45_DF015 / SID301_V48_DF015 / SID304_V49_DF015 / SID304_V4D_DF015 / SID301_V4C_DF015
Page 49 of 329
13B-49
MR-372-J84-13B050$390.mif
V17
DIESEL INJECTION
Fault finding – Interpretation of faults
Siemens Injection
SID301 and 304
Vdiag No. 44-45-48-49-4D-4C
Program No.: B1 and B2
13B
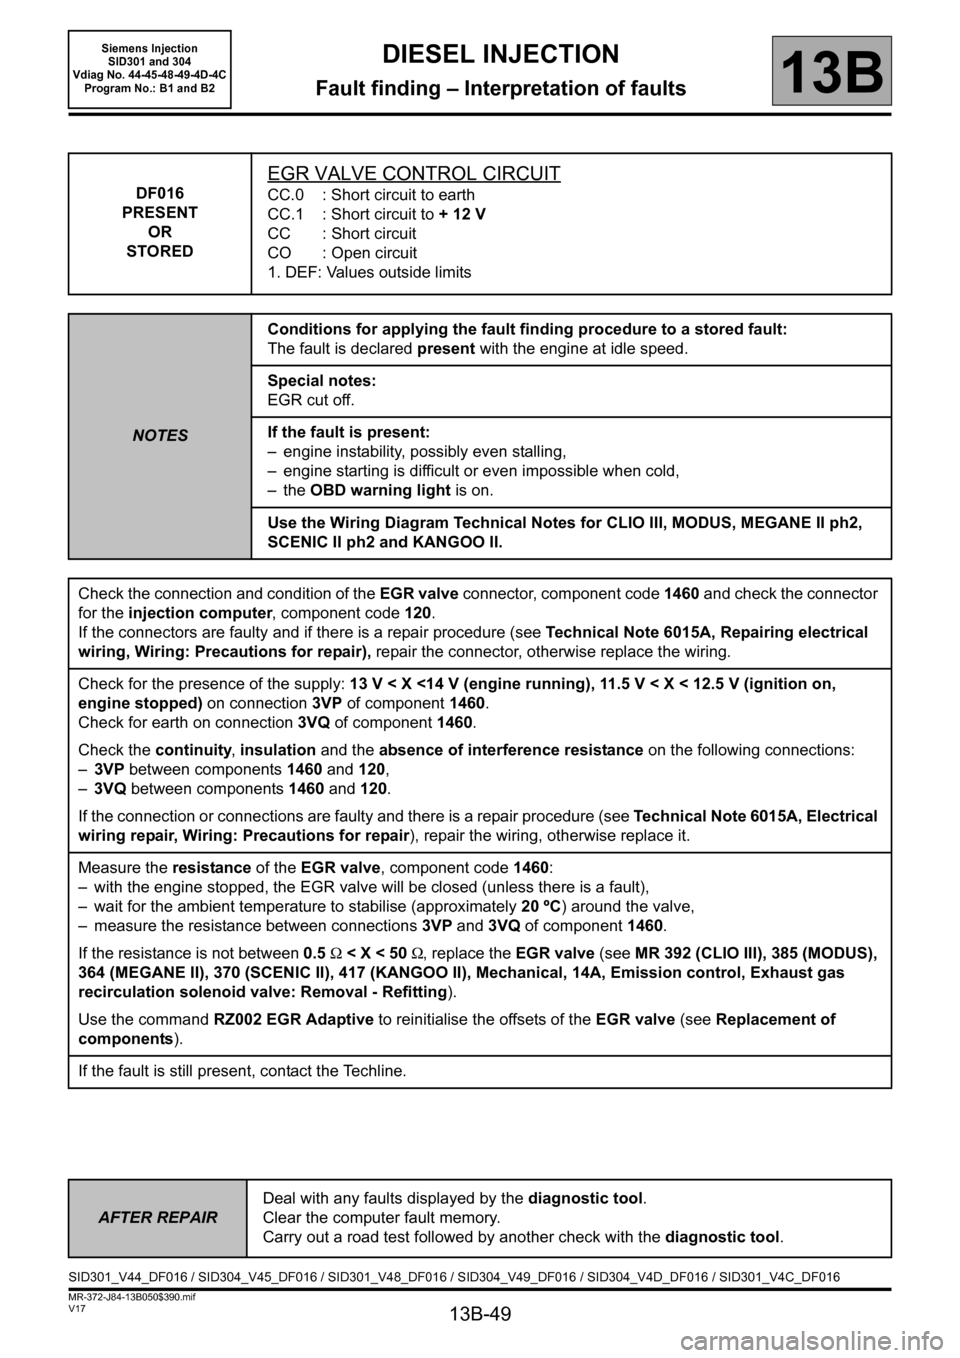
DF016
PRESENT
OR
STORED
EGR VALVE CONTROL CIRCUIT
CC.0 : Short circuit to earth
CC.1 : Short circuit to + 12 V
CC : Short circuit
CO : Open circuit
1. DEF: Values outside limits
NOTESConditions for applying the fault finding procedure to a stored fault:
The fault is declared present with the engine at idle speed.
Special notes:
EGR cut off.
If the fault is present:
– engine instability, possibly even stalling,
– engine starting is difficult or even impossible when cold,
– the OBD warning light is on.
Use the Wiring Diagram Technical Notes for CLIO III, MODUS, MEGANE II ph2,
SCENIC II ph2 and KANGOO II.
Check the connection and condition of the EGR valve connector, component code 1460 and check the connector
for the injection computer, component code 120.
If the connectors are faulty and if there is a repair procedure (see Technical Note 6015A, Repairing electrical
wiring, Wiring: Precautions for repair), repair the connector, otherwise replace the wiring.
Check for the presence of the supply: 13 V < X <14 V (engine running), 11.5 V < X < 12.5 V (ignition on,
engine stopped) on connection 3VP of component 1460.
Check for earth on connection3VQ of component1460.
Check the continuity, insulation and the absence of interference resistance on the following connections:
–3VP between components 1460 and 120,
–3VQ between components 1460 and 120.
If the connection or connections are faulty and there is a repair procedure (see Technical Note 6015A, Electrical
wiring repair, Wiring: Precautions for repair), repair the wiring, otherwise replace it.
Measure the resistance of the EGR valve, component code 1460:
– with the engine stopped, the EGR valve will be closed (unless there is a fault),
– wait for the ambient temperature to stabilise (approximately 20 ºC) around the valve,
– measure the resistance between connections3VP and 3VQ of component1460.
If the resistance is not between 0.5 Ω < X < 50 Ω, replace the EGR valve (see MR 392 (CLIO III), 385 (MODUS),
364 (MEGANE II), 370 (SCENIC II), 417 (KANGOO II), Mechanical, 14A, Emission control, Exhaust gas
recirculation solenoid valve: Removal - Refitting
).
Use the command RZ002 EGR Adaptive to reinitialise the offsets of the EGR valve (see Replacement of
components).
If the fault is still present, contact the Techline.
AFTER REPAIRDeal with any faults displayed by the diagnostic tool.
Clear the computer fault memory.
Carry out a road test followed by another check with the diagnostic tool.
SID301_V44_DF016 / SID304_V45_DF016 / SID301_V48_DF016 / SID304_V49_DF016 / SID304_V4D_DF016 / SID301_V4C_DF016
Page 50 of 329
13B-50
MR-372-J84-13B050$390.mif
V17
DIESEL INJECTION
Fault finding – Interpretation of faults
Siemens Injection
SID301 and 304
Vdiag No. 44-45-48-49-4D-4C
Program No.: B1 and B2
13B
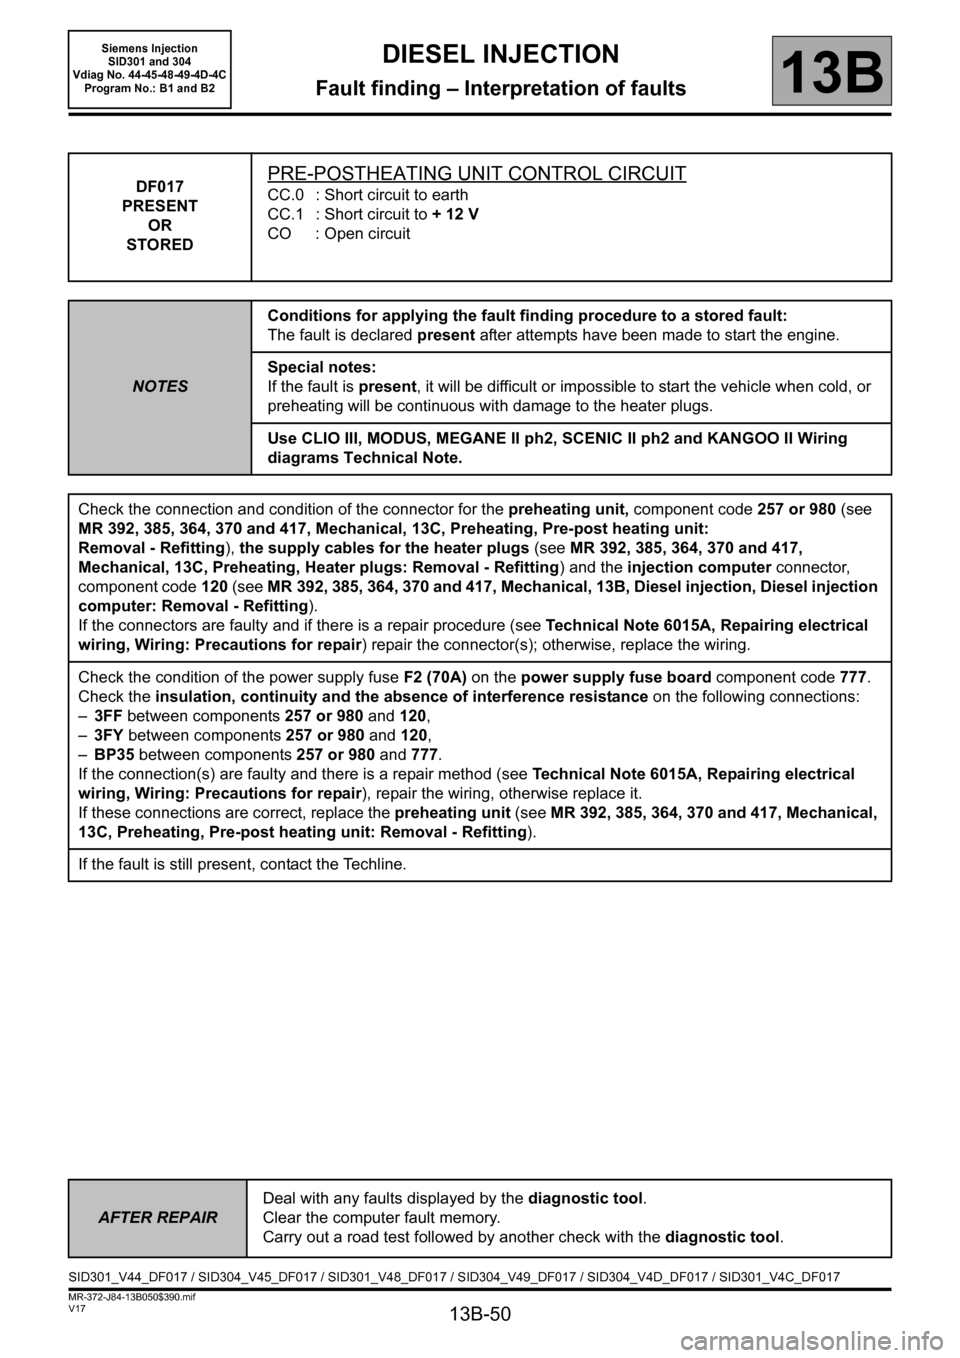
DF017
PRESENT
OR
STOREDPRE-POSTHEATING UNIT CONTROL CIRCUIT
CC.0 : Short circuit to earth
CC.1 : Short circuit to + 12 V
CO : Open circuit
NOTESConditions for applying the fault finding procedure to a stored fault:
The fault is declared present after attempts have been made to start the engine.
Special notes:
If the fault is present, it will be difficult or impossible to start the vehicle when cold, or
preheating will be continuous with damage to the heater plugs.
Use CLIO III, MODUS, MEGANE II ph2, SCENIC II ph2 and KANGOO II Wiring
diagrams Technical Note.
Check the connection and condition of the connector for the preheating unit, component code257 or 980 (see
MR 392, 385, 364, 370 and 417, Mechanical, 13C, Preheating, Pre-post heating unit:
Removal - Refitting), the supply cables for the heater plugs (see MR 392, 385, 364, 370 and 417,
Mechanical, 13C, Preheating, Heater plugs: Removal - Refitting) and the injection computer connector,
component code120 (see MR 392, 385, 364, 370 and 417, Mechanical, 13B, Diesel injection, Diesel injection
computer: Removal - Refitting).
If the connectors are faulty and if there is a repair procedure (see Technical Note 6015A, Repairing electrical
wiring, Wiring: Precautions for repair) repair the connector(s); otherwise, replace the wiring.
Check the condition of the power supply fuseF2 (70A) on the power supply fuse board component code777.
Check the insulation, continuity and the absence of interference resistance on the following connections:
–3FF between components257 or 980 and 120,
–3FY between components257 or 980 and 120,
–BP35 between components257 or 980 and 777.
If the connection(s) are faulty and there is a repair method (see Technical Note 6015A, Repairing electrical
wiring, Wiring: Precautions for repair), repair the wiring, otherwise replace it.
If these connections are correct, replace the preheating unit (see MR 392, 385, 364, 370 and 417, Mechanical,
13C, Preheating, Pre-post heating unit: Removal - Refitting).
If the fault is still present, contact the Techline.
AFTER REPAIRDeal with any faults displayed by the diagnostic tool.
Clear the computer fault memory.
Carry out a road test followed by another check with the diagnostic tool.
SID301_V44_DF017 / SID304_V45_DF017 / SID301_V48_DF017 / SID304_V49_DF017 / SID304_V4D_DF017 / SID301_V4C_DF017