SUBARU FORESTER 2004 Service Repair Manual
Manufacturer: SUBARU, Model Year: 2004, Model line: FORESTER, Model: SUBARU FORESTER 2004Pages: 2870, PDF Size: 38.67 MB
Page 1011 of 2870
CO(H4SO)-28
COOLING
Radiator
6. Radiator
A: REMOVAL
1. NON-TURBO MODEL
WARNING:
The radiator is pressurized. Wait until the en-
gine cools down before working on the radia-
tor.
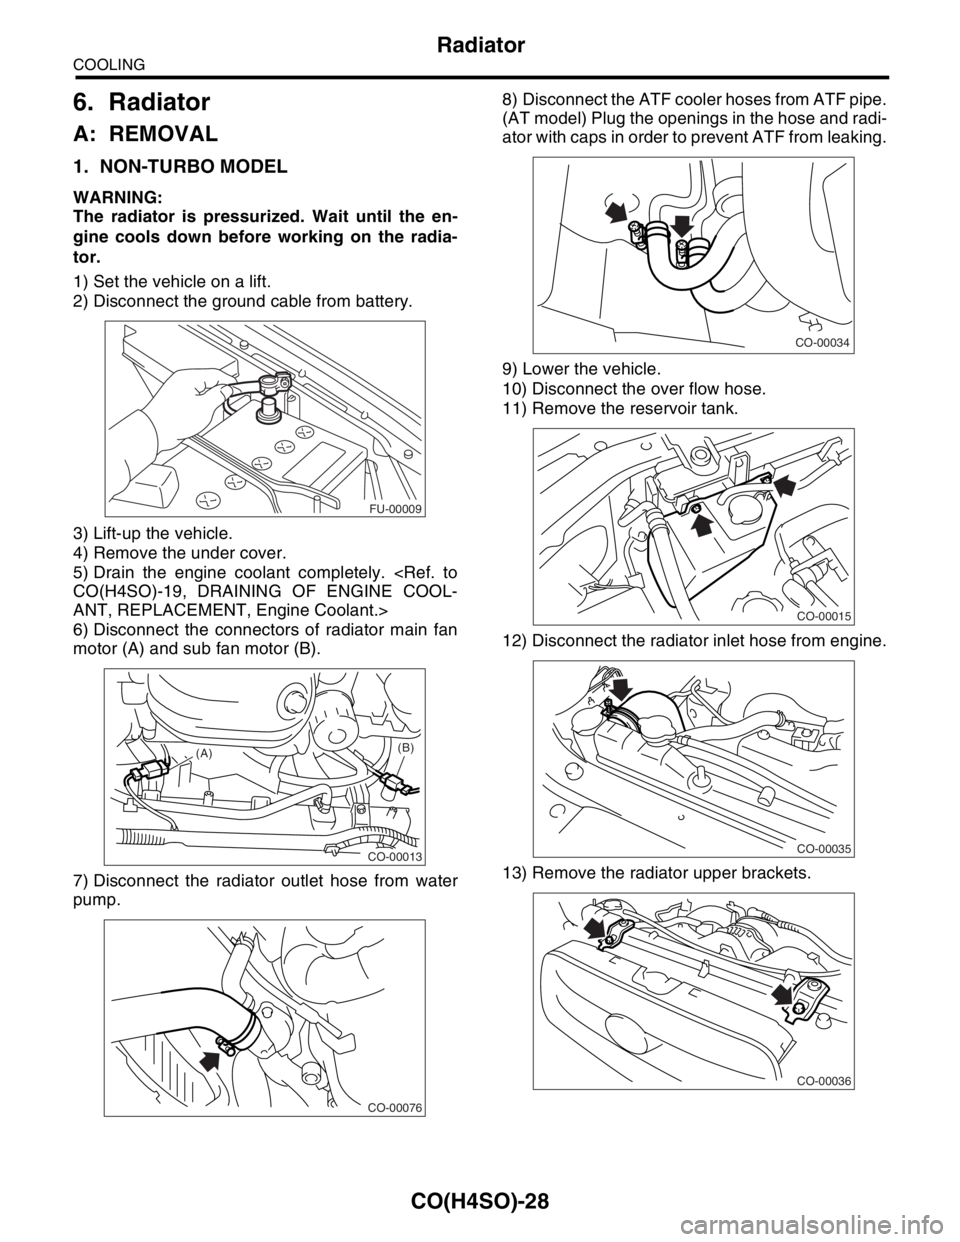
1) Set the vehicle on a lift.
2) Disconnect the ground cable from battery.
3) Lift-up the vehicle.
4) Remove the under cover.
5) Drain the engine coolant completely.
ANT, REPLACEMENT, Engine Coolant.>
6) Disconnect the connectors of radiator main fan
motor (A) and sub fan motor (B).
7) Disconnect the radiator outlet hose from water
pump.8) Disconnect the ATF cooler hoses from ATF pipe.
(AT model) Plug the openings in the hose and radi-
ator with caps in order to prevent ATF from leaking.
9) Lower the vehicle.
10) Disconnect the over flow hose.
11) Remove the reservoir tank.
12) Disconnect the radiator inlet hose from engine.
13) Remove the radiator upper brackets.
FU-00009
CO-00013
(A)(B)
CO-00076
CO-00034
CO-00015
CO-00035
CO-00036
Page 1012 of 2870
CO(H4SO)-29
COOLING
Radiator
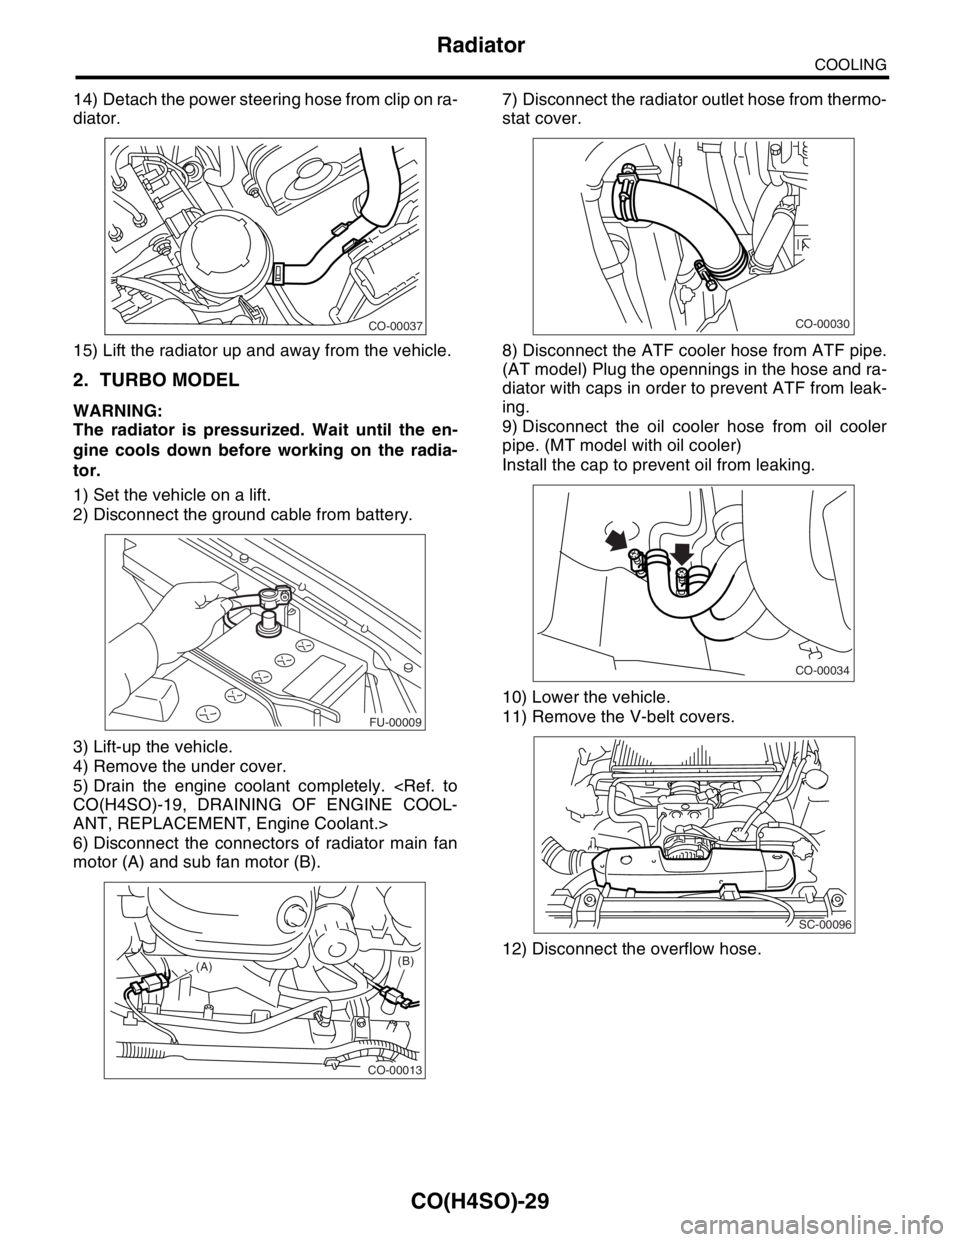
14) Detach the power steering hose from clip on ra-
diator.
15) Lift the radiator up and away from the vehicle.
2. TURBO MODEL
WARNING:
The radiator is pressurized. Wait until the en-
gine cools down before working on the radia-
tor.
1) Set the vehicle on a lift.
2) Disconnect the ground cable from battery.
3) Lift-up the vehicle.
4) Remove the under cover.
5) Drain the engine coolant completely.
ANT, REPLACEMENT, Engine Coolant.>
6) Disconnect the connectors of radiator main fan
motor (A) and sub fan motor (B).7) Disconnect the radiator outlet hose from thermo-
stat cover.
8) Disconnect the ATF cooler hose from ATF pipe.
(AT model) Plug the opennings in the hose and ra-
diator with caps in order to prevent ATF from leak-
ing.
9) Disconnect the oil cooler hose from oil cooler
pipe. (MT model with oil cooler)
Install the cap to prevent oil from leaking.
10) Lower the vehicle.
11) Remove the V-belt covers.
12) Disconnect the overflow hose.
CO-00037
FU-00009
CO-00013
(A)(B)
CO-00030
CO-00034
SC-00096
Page 1013 of 2870
CO(H4SO)-30
COOLING
Radiator
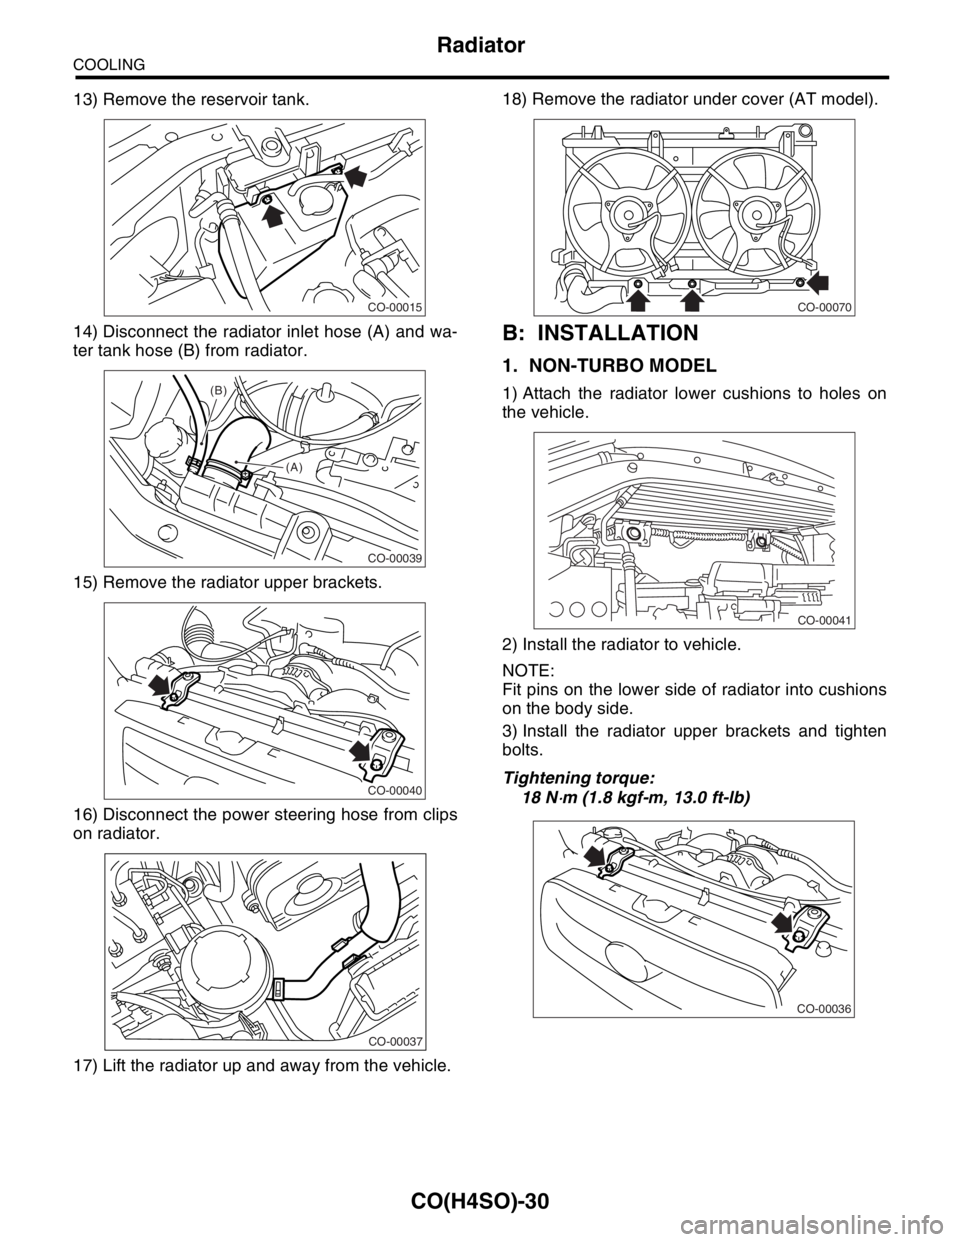
13) Remove the reservoir tank.
14) Disconnect the radiator inlet hose (A) and wa-
ter tank hose (B) from radiator.
15) Remove the radiator upper brackets.
16) Disconnect the power steering hose from clips
on radiator.
17) Lift the radiator up and away from the vehicle.18) Remove the radiator under cover (AT model).
B: INSTALLATION
1. NON-TURBO MODEL
1) Attach the radiator lower cushions to holes on
the vehicle.
2) Install the radiator to vehicle.
NOTE:
Fit pins on the lower side of radiator into cushions
on the body side.
3) Install the radiator upper brackets and tighten
bolts.
Tightening torque:
18 N
⋅m (1.8 kgf-m, 13.0 ft-lb)
CO-00015
CO-00039
(A) (B)
CO-00040
CO-00037
CO-00070
CO-00041
CO-00036
Page 1014 of 2870
CO(H4SO)-31
COOLING
Radiator
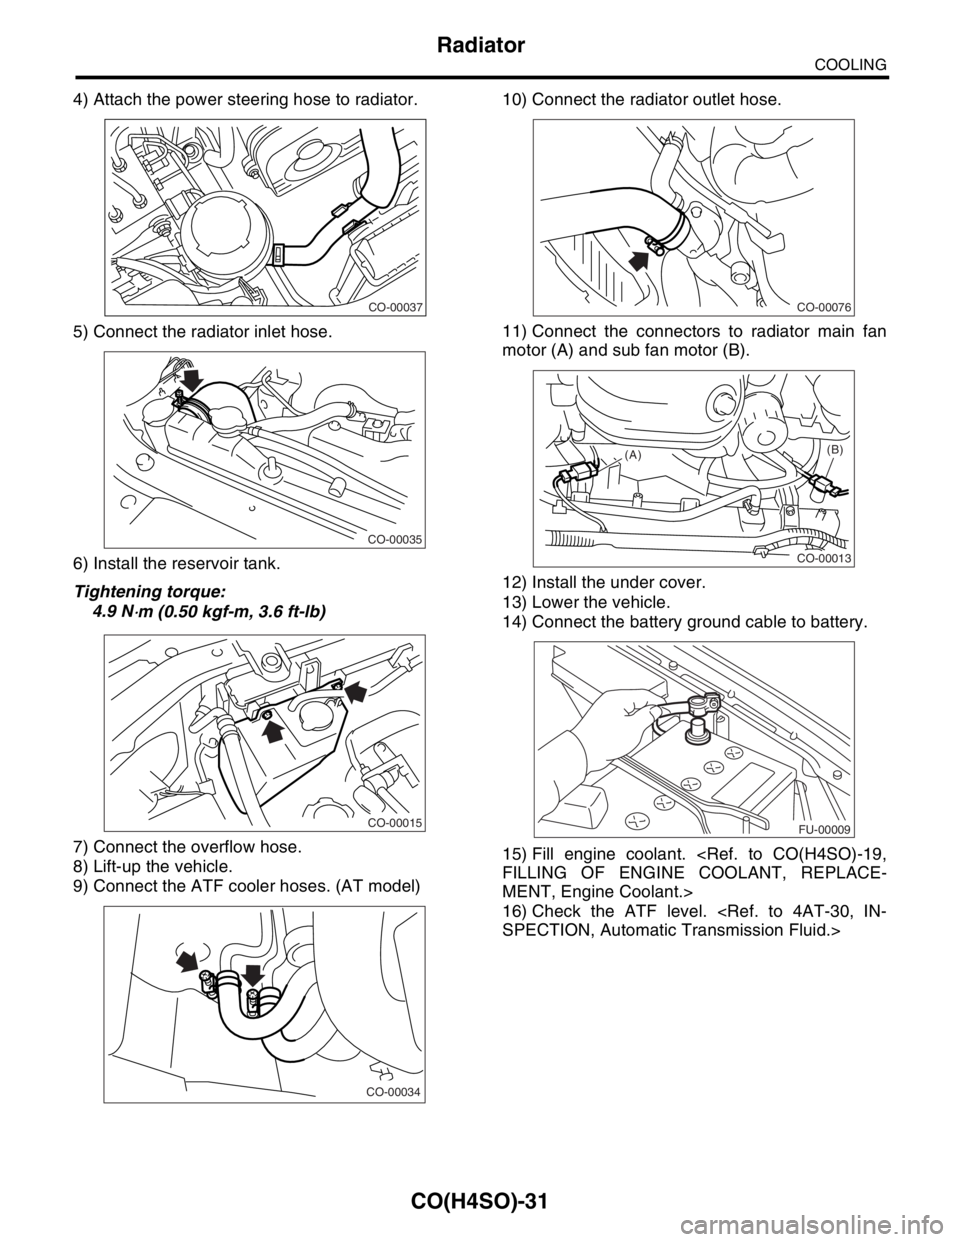
4) Attach the power steering hose to radiator.
5) Connect the radiator inlet hose.
6) Install the reservoir tank.
Tightening torque:
4.9 N
⋅m (0.50 kgf-m, 3.6 ft-lb)
7) Connect the overflow hose.
8) Lift-up the vehicle.
9) Connect the ATF cooler hoses. (AT model)10) Connect the radiator outlet hose.
11) Connect the connectors to radiator main fan
motor (A) and sub fan motor (B).
12) Install the under cover.
13) Lower the vehicle.
14) Connect the battery ground cable to battery.
15) Fill engine coolant.
MENT, Engine Coolant.>
16) Check the ATF level.
CO-00037
CO-00035
CO-00015
CO-00034
CO-00076
CO-00013
(A)(B)
FU-00009
Page 1015 of 2870
CO(H4SO)-32
COOLING
Radiator
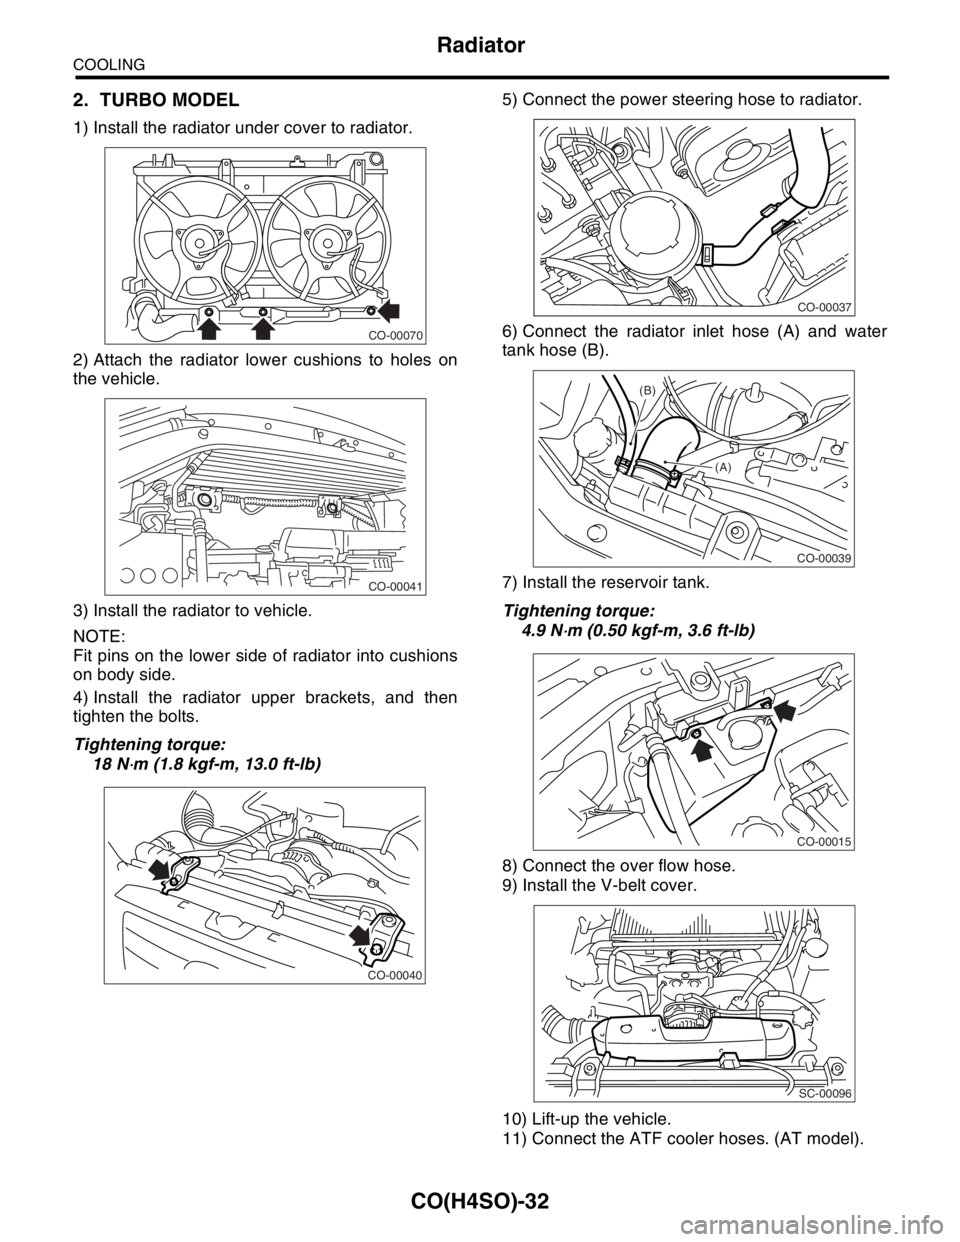
2. TURBO MODEL
1) Install the radiator under cover to radiator.
2) Attach the radiator lower cushions to holes on
the vehicle.
3) Install the radiator to vehicle.
NOTE:
Fit pins on the lower side of radiator into cushions
on body side.
4) Install the radiator upper brackets, and then
tighten the bolts.
Tightening torque:
18 N
⋅m (1.8 kgf-m, 13.0 ft-lb)5) Connect the power steering hose to radiator.
6) Connect the radiator inlet hose (A) and water
tank hose (B).
7) Install the reservoir tank.
Tightening torque:
4.9 N
⋅m (0.50 kgf-m, 3.6 ft-lb)
8) Connect the over flow hose.
9) Install the V-belt cover.
10) Lift-up the vehicle.
11) Connect the ATF cooler hoses. (AT model).
CO-00070
CO-00041
CO-00040
CO-00037
CO-00039
(A) (B)
CO-00015
SC-00096
Page 1016 of 2870
CO(H4SO)-33
COOLING
Radiator
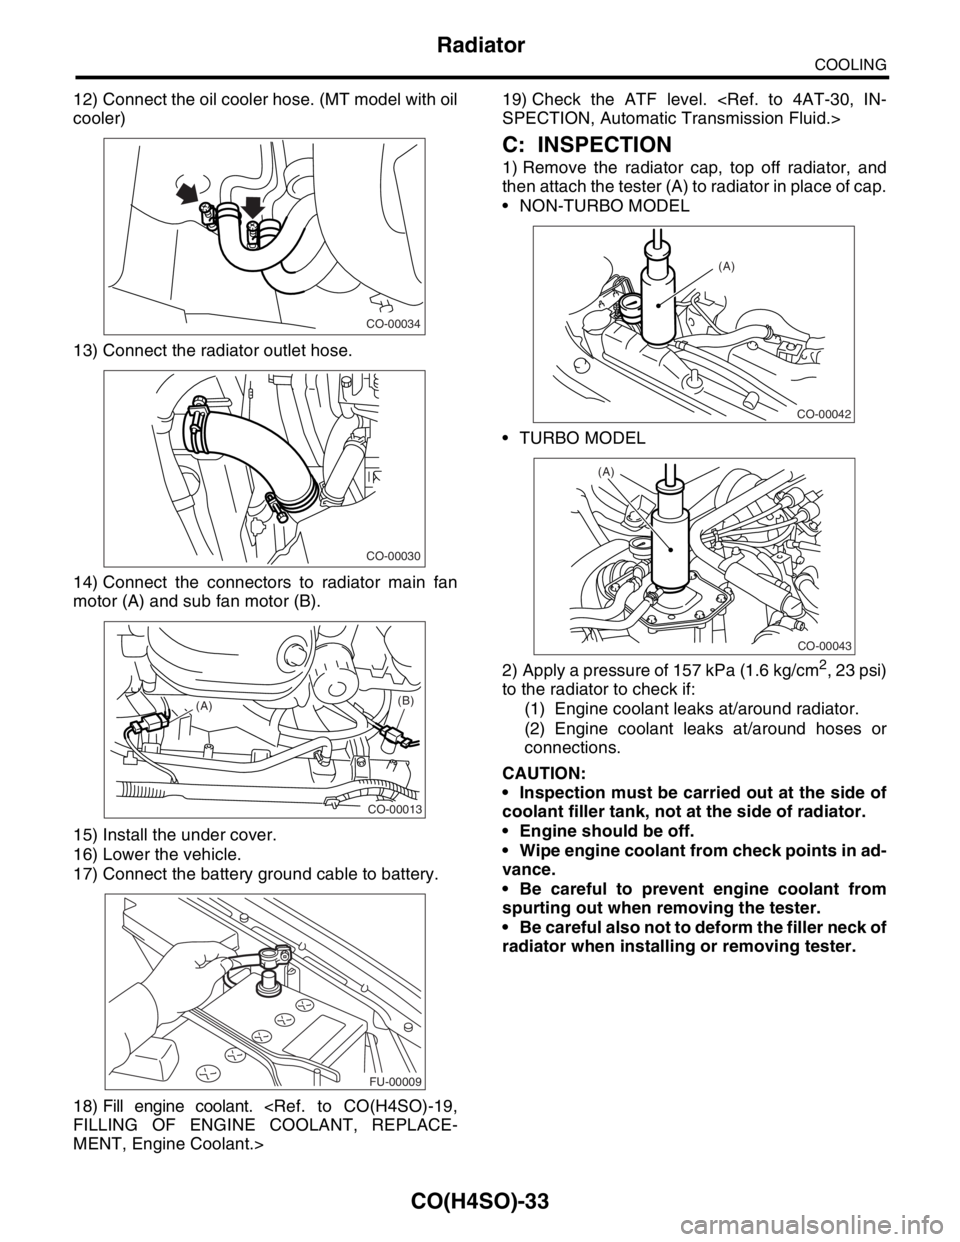
12) Connect the oil cooler hose. (MT model with oil
cooler)
13) Connect the radiator outlet hose.
14) Connect the connectors to radiator main fan
motor (A) and sub fan motor (B).
15) Install the under cover.
16) Lower the vehicle.
17) Connect the battery ground cable to battery.
18) Fill engine coolant.
MENT, Engine Coolant.>19) Check the ATF level.
C: INSPECTION
1) Remove the radiator cap, top off radiator, and
then attach the tester (A) to radiator in place of cap.
NON-TURBO MODEL
TURBO MODEL
2) Apply a pressure of 157 kPa (1.6 kg/cm
2, 23 psi)
to the radiator to check if:
(1) Engine coolant leaks at/around radiator.
(2) Engine coolant leaks at/around hoses or
connections.
CAUTION:
Inspection must be carried out at the side of
coolant filler tank, not at the side of radiator.
Engine should be off.
Wipe engine coolant from check points in ad-
vance.
Be careful to prevent engine coolant from
spurting out when removing the tester.
Be careful also not to deform the filler neck of
radiator when installing or removing tester.
CO-00034
CO-00030
CO-00013
(A)(B)
FU-00009
CO-00042
(A)
CO-00043
(A)
Page 1017 of 2870
CO(H4SO)-34
COOLING
Radiator Cap
7. Radiator Cap
A: INSPECTION
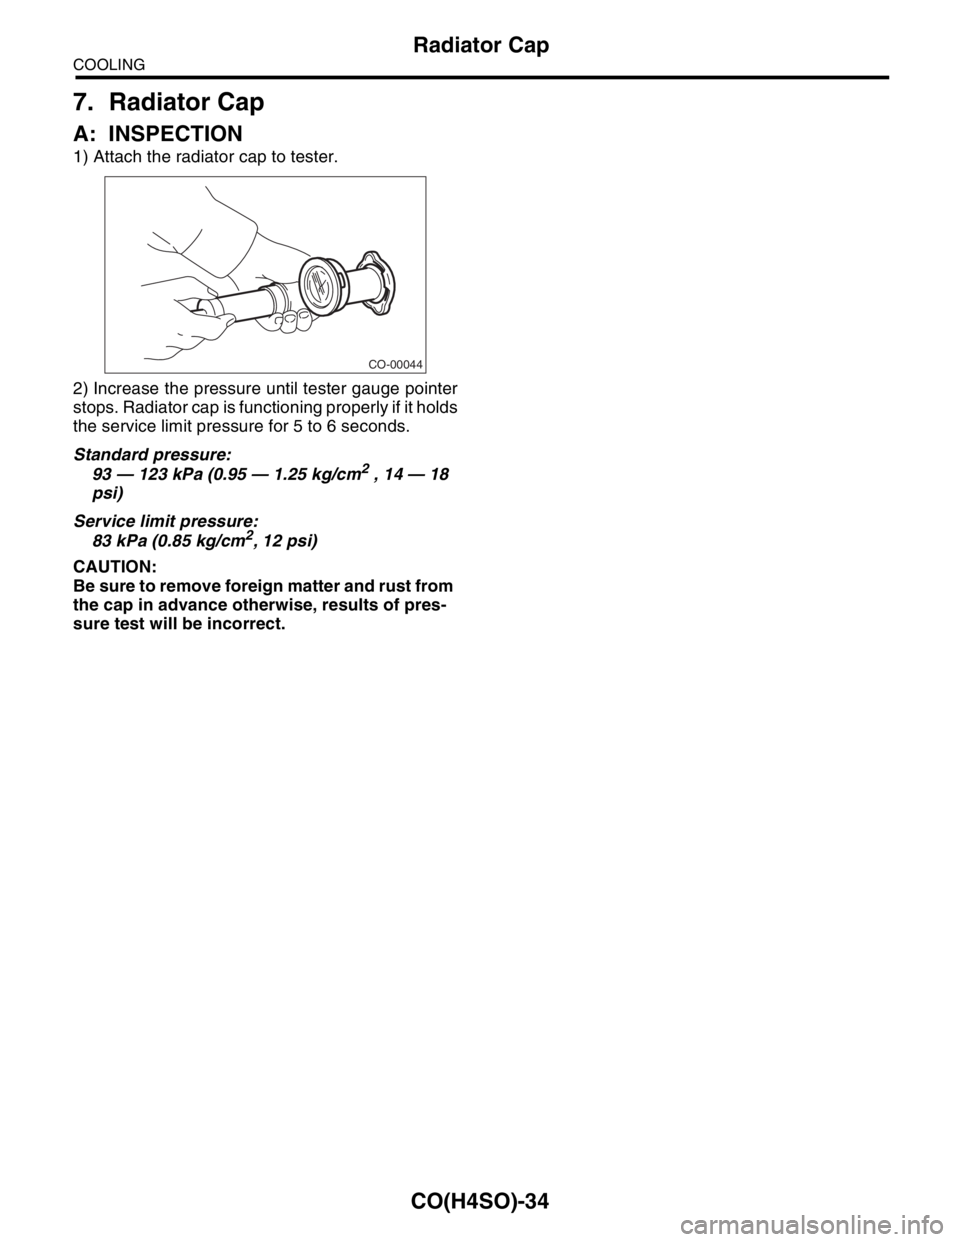
1) Attach the radiator cap to tester.
2) Increase the pressure until tester gauge pointer
stops. Radiator cap is functioning properly if it holds
the service limit pressure for 5 to 6 seconds.
Standard pressure:
93 — 123 kPa (0.95 — 1.25 kg/cm
2 , 14 — 18
psi)
Service limit pressure:
83 kPa (0.85 kg/cm
2, 12 psi)
CAUTION:
Be sure to remove foreign matter and rust from
the cap in advance otherwise, results of pres-
sure test will be incorrect.
CO-00044
Page 1018 of 2870
CO(H4SO)-35
COOLING
Radiator Main Fan and Fan Motor
8. Radiator Main Fan and Fan
Motor
A: REMOVAL
1. NON-TURBO MODEL
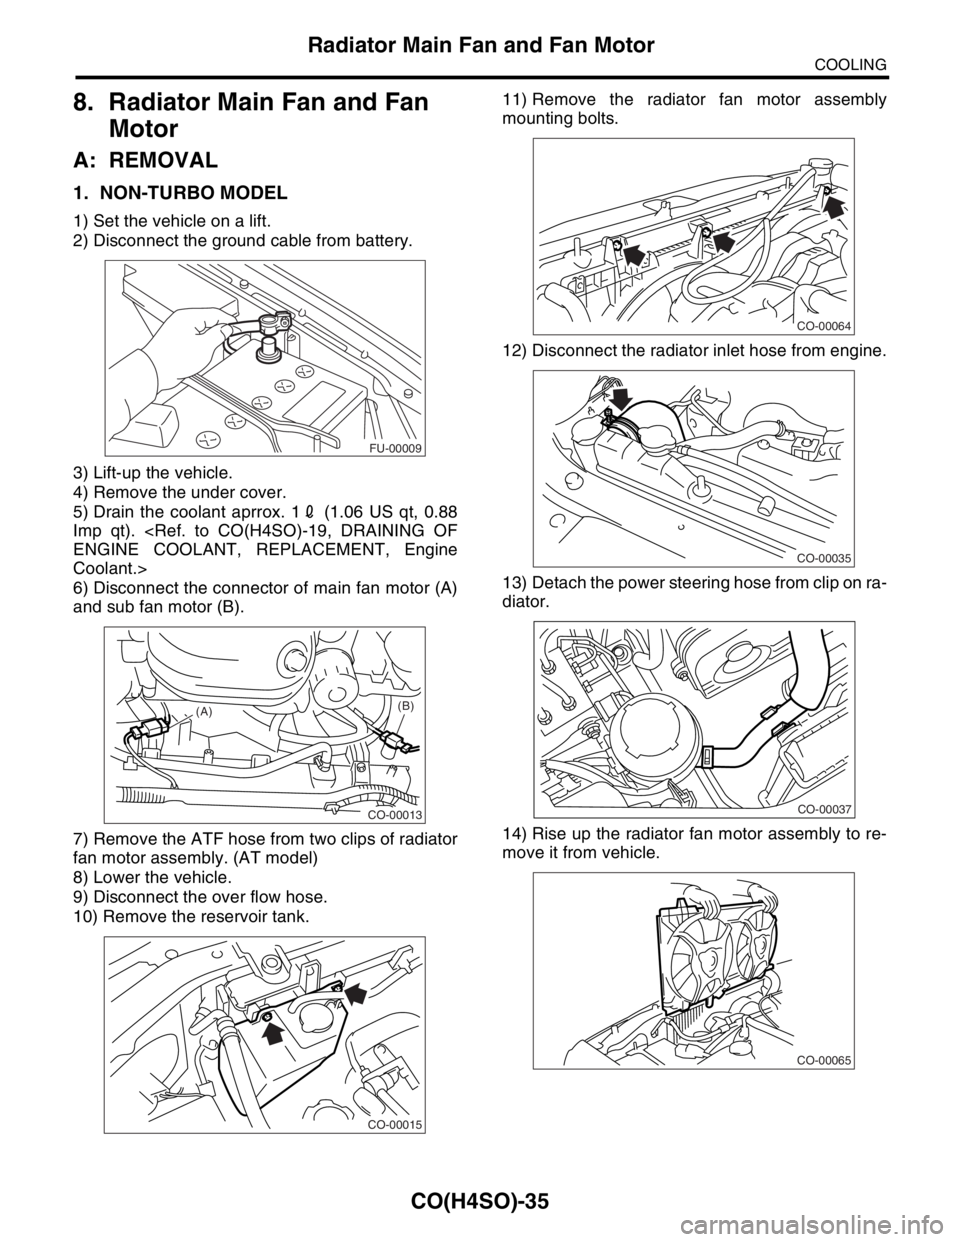
1) Set the vehicle on a lift.
2) Disconnect the ground cable from battery.
3) Lift-up the vehicle.
4) Remove the under cover.
5) Drain the coolant aprrox. 12 (1.06 US qt, 0.88
Imp qt).
Coolant.>
6) Disconnect the connector of main fan motor (A)
and sub fan motor (B).
7) Remove the ATF hose from two clips of radiator
fan motor assembly. (AT model)
8) Lower the vehicle.
9) Disconnect the over flow hose.
10) Remove the reservoir tank.11) Remove the radiator fan motor assembly
mounting bolts.
12) Disconnect the radiator inlet hose from engine.
13) Detach the power steering hose from clip on ra-
diator.
14) Rise up the radiator fan motor assembly to re-
move it from vehicle.
FU-00009
CO-00013
(A)(B)
CO-00015
CO-00064
CO-00035
CO-00037
CO-00065
Page 1019 of 2870
CO(H4SO)-36
COOLING
Radiator Main Fan and Fan Motor
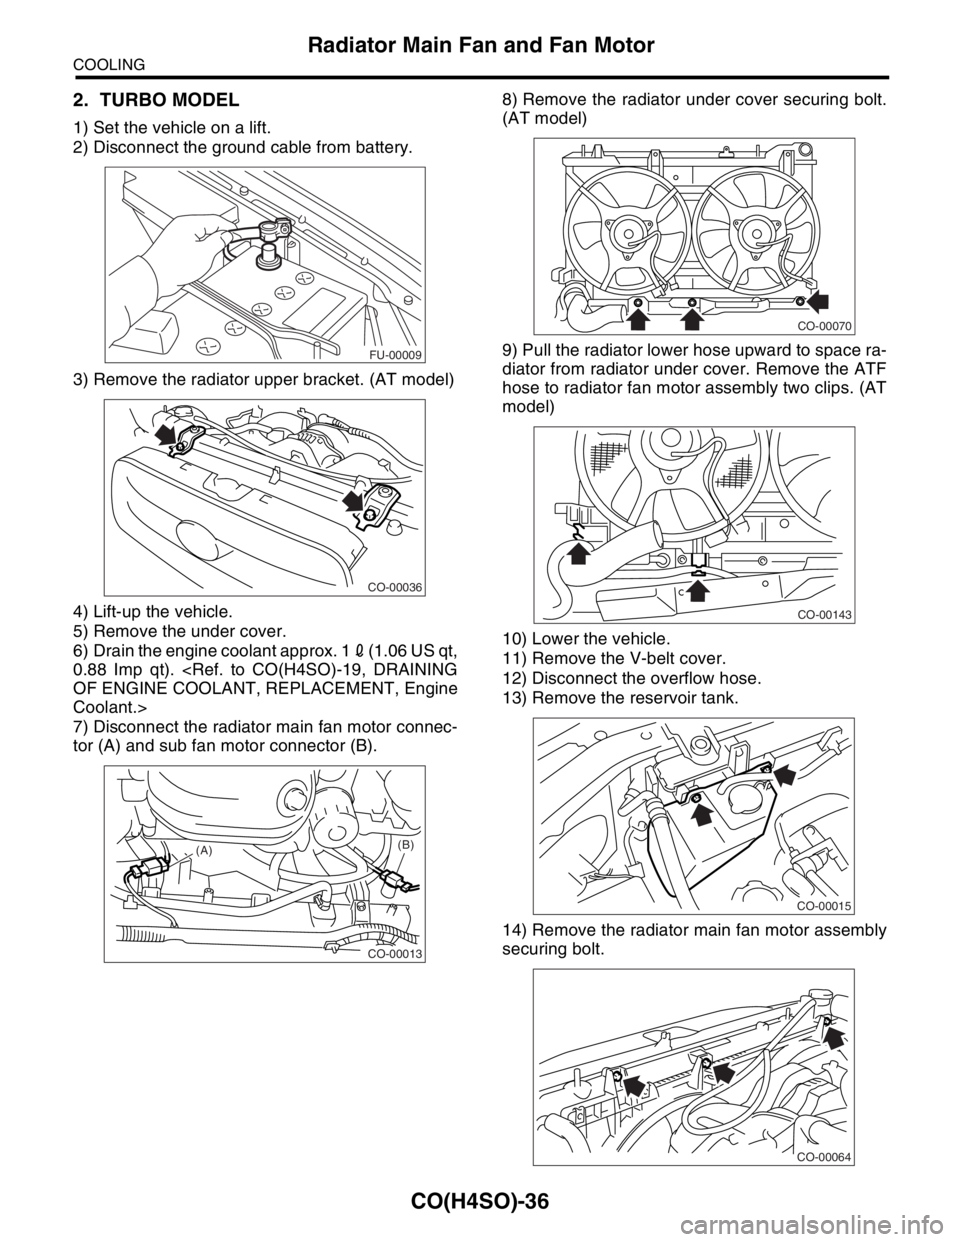
2. TURBO MODEL
1) Set the vehicle on a lift.
2) Disconnect the ground cable from battery.
3) Remove the radiator upper bracket. (AT model)
4) Lift-up the vehicle.
5) Remove the under cover.
6) Drain the engine coolant approx. 12(1.06 US qt,
0.88 Imp qt).
Coolant.>
7) Disconnect the radiator main fan motor connec-
tor (A) and sub fan motor connector (B).8) Remove the radiator under cover securing bolt.
(AT model)
9) Pull the radiator lower hose upward to space ra-
diator from radiator under cover. Remove the ATF
hose to radiator fan motor assembly two clips. (AT
model)
10) Lower the vehicle.
11) Remove the V-belt cover.
12) Disconnect the overflow hose.
13) Remove the reservoir tank.
14) Remove the radiator main fan motor assembly
securing bolt.
FU-00009
CO-00036
CO-00013
(A)(B)
CO-00070
CO-00143
CO-00015
CO-00064
Page 1020 of 2870
CO(H4SO)-37
COOLING
Radiator Main Fan and Fan Motor
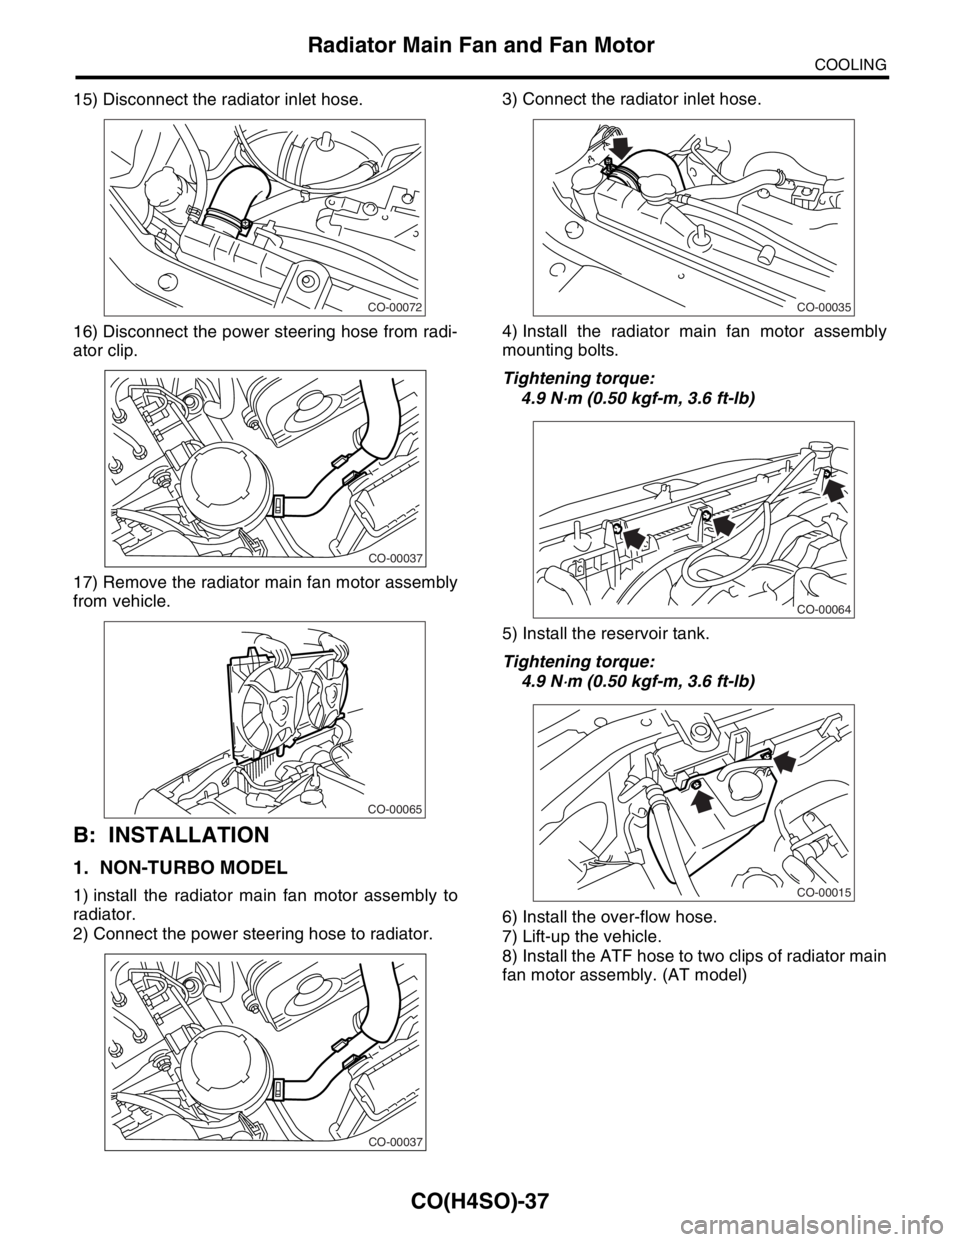
15) Disconnect the radiator inlet hose.
16) Disconnect the power steering hose from radi-
ator clip.
17) Remove the radiator main fan motor assembly
from vehicle.
B: INSTALLATION
1. NON-TURBO MODEL
1) install the radiator main fan motor assembly to
radiator.
2) Connect the power steering hose to radiator.3) Connect the radiator inlet hose.
4) Install the radiator main fan motor assembly
mounting bolts.
Tightening torque:
4.9 N
⋅m (0.50 kgf-m, 3.6 ft-lb)
5) Install the reservoir tank.
Tightening torque:
4.9 N
⋅m (0.50 kgf-m, 3.6 ft-lb)
6) Install the over-flow hose.
7) Lift-up the vehicle.
8) Install the ATF hose to two clips of radiator main
fan motor assembly. (AT model)
CO-00072
CO-00037
CO-00065
CO-00037
CO-00035
CO-00064
CO-00015