SUBARU FORESTER 2004 Service Repair Manual
Manufacturer: SUBARU, Model Year: 2004, Model line: FORESTER, Model: SUBARU FORESTER 2004Pages: 2870, PDF Size: 38.67 MB
Page 971 of 2870

EX(H4SO)-3
EXHAUST
General Description
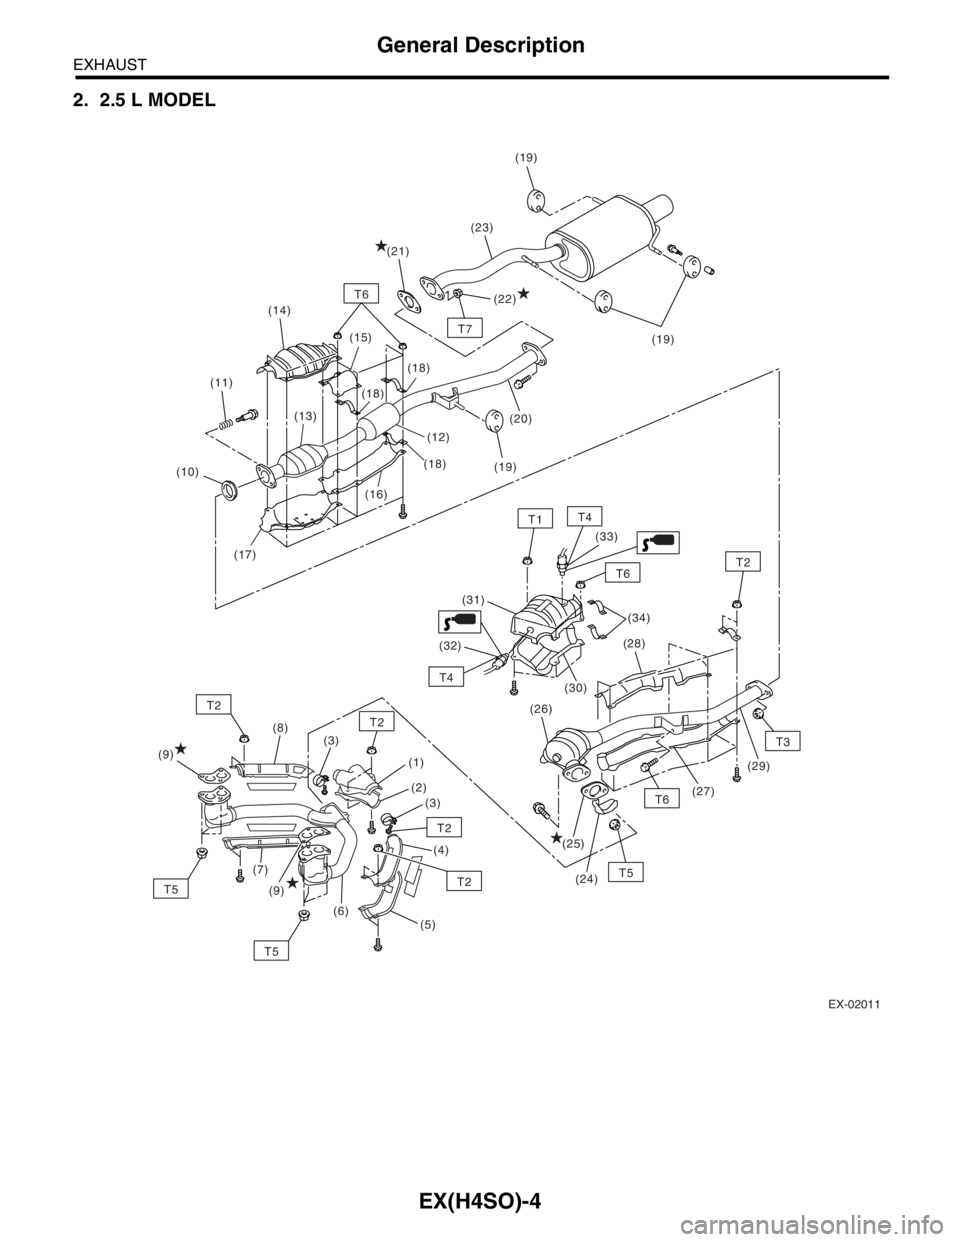
(1) Front exhaust pipe upper cover
CTR(14) Muffler (28) Rear catalytic converter upper
cover
(15) Cushion rubber
(2) Front exhaust pipe lower cover
CTR(16) Rear exhaust pipe (29) Rear catalytic converter lower
cover
(17) Clamp
(3) Clamp (18) Center exhaust pipe upper cover (30) Rear catalytic converter
(4) Front exhaust pipe upper cover LH (19) Center exhaust pipe lower cover (31) Gasket
(5) Front exhaust pipe lower cover LH (20) Protector
(6) Front exhaust pipe (21) GasketTightening torque: N
⋅m (kgf-m, ft-lb)
(7) Front exhaust pipe lower cover RH (22) Front oxygen (A/F) sensorT1: 8 (0.8, 5.8)
(8) Front exhaust pipe upper cover
RH(23) Front catalytic converterT2: 13 (1.3, 9.4)
(24) Center exhaust pipeT3: 18 (1.8, 13.0)
(9) Gasket (25) Front catalytic converter lower
coverT4: 21 (2.1, 15.2)
(10) SpringT5: 30 (3.1, 22.4)
(11) Chamber (26) Front catalytic converter upper
coverT6: 35 (3.6, 26.0)
(12) GasketT7: 48 (4.9, 35.4)
(13) Self-locking nut (27) Rear oxygen sensor
Page 972 of 2870
EX(H4SO)-4
EXHAUST
General Description
2. 2.5 L MODEL
EX-02011
T7
T1
T6T2
T6
T3
T5
T5
T4
T4
T2
T2
T2
T6
(19)
(19)(19)
(33)
(34)
(28)
(24) (25)(27)(29) (31)
(32)
(30)
(26)
(1)
(2)
(3) (3)
(4)
(5) (6) (7)(8)(20)
(10)(11)
(13)(23)
(21)(22)(14)
T5T2
(9)
(9)
(12)
(16)(18) (18) (15)
(17)
(18)
Page 973 of 2870

EX(H4SO)-5
EXHAUST
General Description
(1) Front exhaust pipe upper cover
CTR(15) Rear exhaust upper cover (31) Front catalytic converter upper
cover
(16) Rear exhaust lower cover
(2) Front exhaust pipe lower cover
CTR(17) Rear catalytic lower converter
cover(32) Front oxygen (A/F) sensor
(33) Rear oxygen sensor
(3) Clamp (18) Clamp (34) Clamp
(4) Front exhaust pipe upper cover LH (19) Cushion rubber
(5) Front exhaust pipe lower cover LH (20) Rear exhaust pipeTightening torque: N
⋅m (kgf-m, ft-lb)
(6) Front exhaust pipe (21) GasketT1: 8 (0.8, 5.8)
(7) Front exhaust pipe lower cover RH (22) Self-locking nutT2: 13 (1.3, 9.4)
(8) Front exhaust pipe upper cover
RH(23) MufflerT3: 18 (1.8, 13.0)
(24) ProtectorT4: 21 (2.1, 15.2)
(9) Gasket (25) GasketT5: 30 (3.1, 22.4)
(10) Gasket (26) Front catalytic converterT6: 35 (3.6, 26.0)
(11) Spring (27) Center exhaust lower coverT7: 48 (4.9, 35.4)
(12) Chamber (28) Center exhaust upper cover
(13) Rear catalytic converter (29) Center exhaust pipe
(14) Rear catalytic converter upper
cover(30) Front catalytic converter lower
cover
Page 974 of 2870

EX(H4SO)-6
EXHAUST
General Description
B: CAUTION
Wear working clothing, including a cap, protec-
tive goggles, and protective shoes during opera-
tion.
Remove contamination including dirt and corro-
sion before removal, installation or disassembly.
Keep the disassembled parts in order and pro-
tect them from dust or dirt.
Before removal, installation or disassembly, be
sure to clarify the failure. Avoid unnecessary re-
moval, installation, disassembly, and replacement.
Be careful not to burn your hands, because each
part on the vehicle is hot after running.
Be sure to tighten fasteners including bolts and
nuts to the specified torque.
Place shop jacks or rigid racks at the specified
points.
Before disconnecting electrical connectors of
sensors or units, be sure to disconnect the ground
cable from battery.
Page 975 of 2870
EX(H4SO)-7
EXHAUST
Front Exhaust Pipe
2. Front Exhaust Pipe
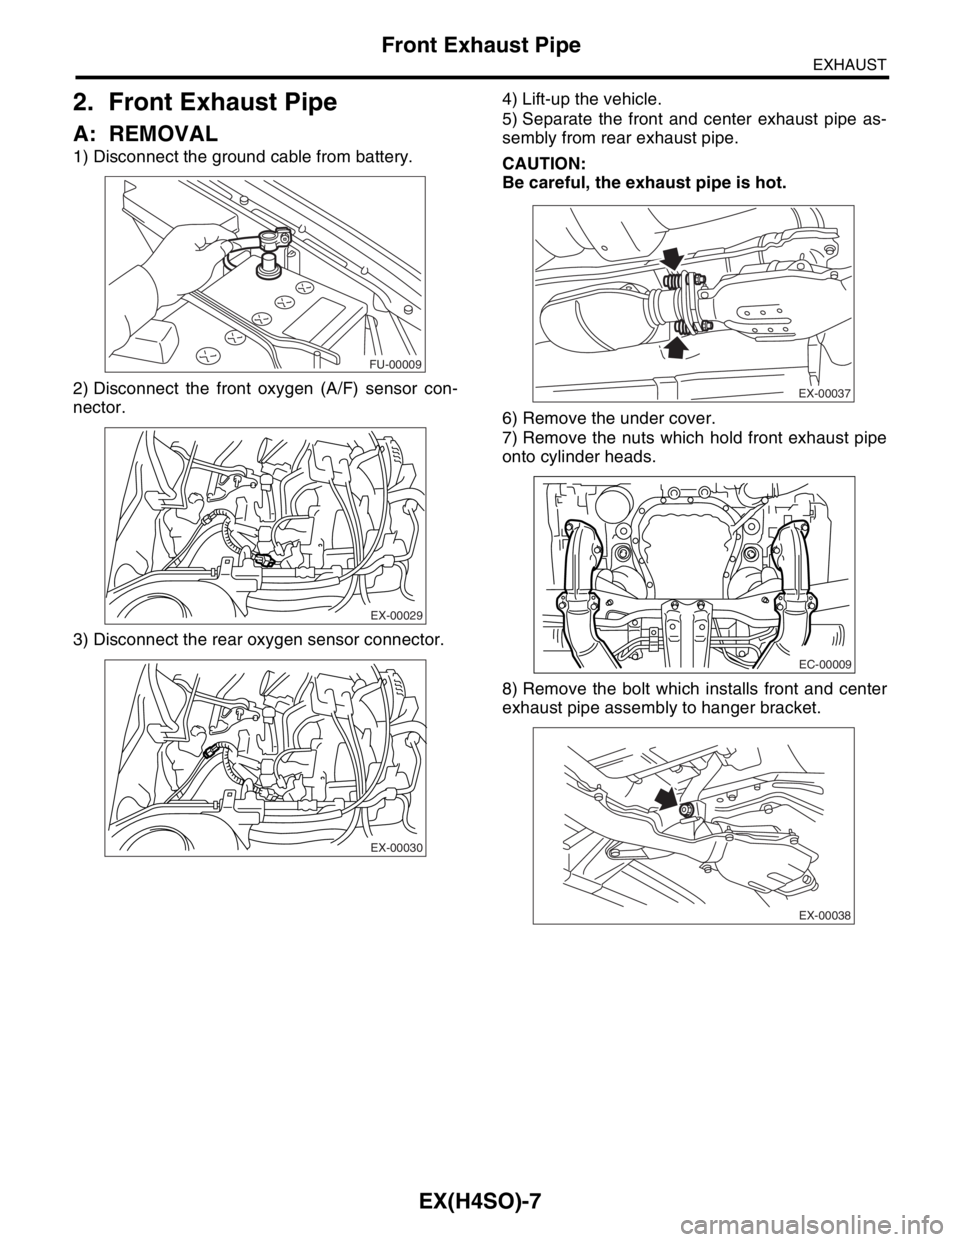
A: REMOVAL
1) Disconnect the ground cable from battery.
2) Disconnect the front oxygen (A/F) sensor con-
nector.
3) Disconnect the rear oxygen sensor connector.4) Lift-up the vehicle.
5) Separate the front and center exhaust pipe as-
sembly from rear exhaust pipe.
CAUTION:
Be careful, the exhaust pipe is hot.
6) Remove the under cover.
7) Remove the nuts which hold front exhaust pipe
onto cylinder heads.
8) Remove the bolt which installs front and center
exhaust pipe assembly to hanger bracket.
FU-00009
EX-00029
EX-00030
EX-00037
EC-00009
EX-00038
Page 976 of 2870
EX(H4SO)-8
EXHAUST
Front Exhaust Pipe
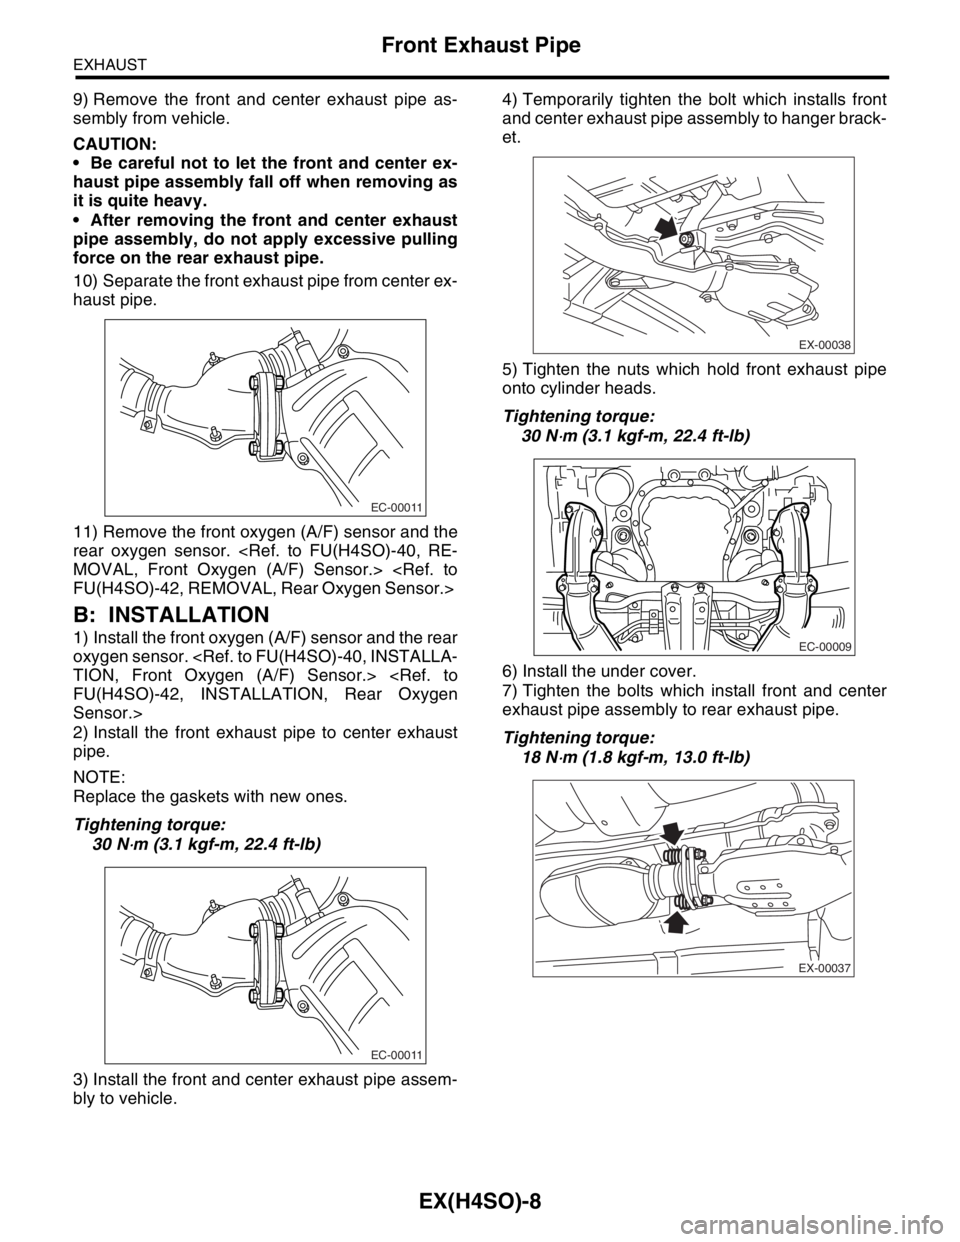
9) Remove the front and center exhaust pipe as-
sembly from vehicle.
CAUTION:
Be careful not to let the front and center ex-
haust pipe assembly fall off when removing as
it is quite heavy.
After removing the front and center exhaust
pipe assembly, do not apply excessive pulling
force on the rear exhaust pipe.
10) Separate the front exhaust pipe from center ex-
haust pipe.
11) Remove the front oxygen (A/F) sensor and the
rear oxygen sensor.
B: INSTALLATION
1) Install the front oxygen (A/F) sensor and the rear
oxygen sensor.
Sensor.>
2) Install the front exhaust pipe to center exhaust
pipe.
NOTE:
Replace the gaskets with new ones.
Tightening torque:
30 N
⋅m (3.1 kgf-m, 22.4 ft-lb)
3) Install the front and center exhaust pipe assem-
bly to vehicle.4) Temporarily tighten the bolt which installs front
and center exhaust pipe assembly to hanger brack-
et.
5) Tighten the nuts which hold front exhaust pipe
onto cylinder heads.
Tightening torque:
30 N
⋅m (3.1 kgf-m, 22.4 ft-lb)
6) Install the under cover.
7) Tighten the bolts which install front and center
exhaust pipe assembly to rear exhaust pipe.
Tightening torque:
18 N
⋅m (1.8 kgf-m, 13.0 ft-lb)
EC-00011
EC-00011
EX-00038
EC-00009
EX-00037
Page 977 of 2870
EX(H4SO)-9
EXHAUST
Front Exhaust Pipe
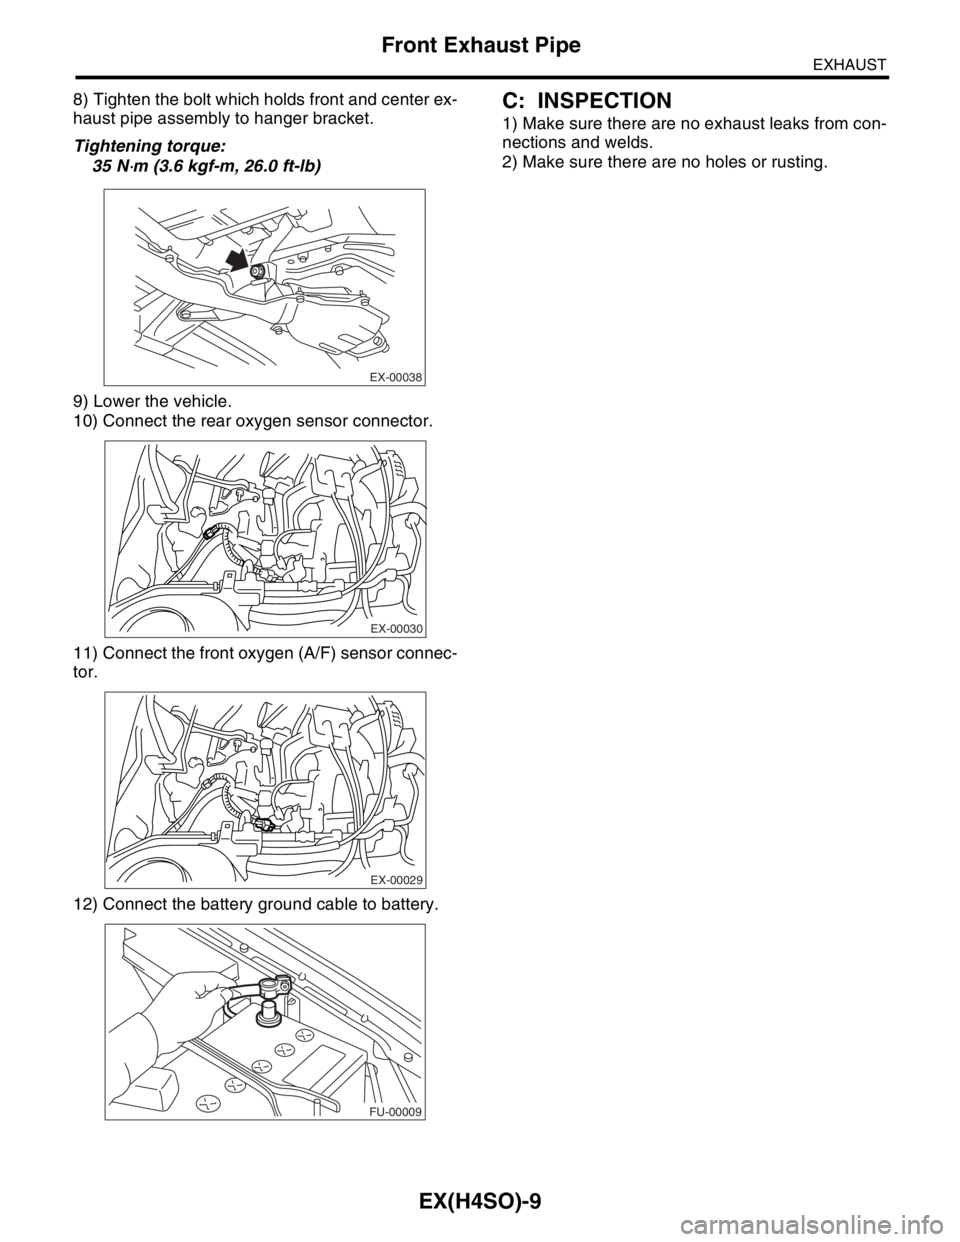
8) Tighten the bolt which holds front and center ex-
haust pipe assembly to hanger bracket.
Tightening torque:
35 N
⋅m (3.6 kgf-m, 26.0 ft-lb)
9) Lower the vehicle.
10) Connect the rear oxygen sensor connector.
11) Connect the front oxygen (A/F) sensor connec-
tor.
12) Connect the battery ground cable to battery.
C: INSPECTION
1) Make sure there are no exhaust leaks from con-
nections and welds.
2) Make sure there are no holes or rusting.
EX-00038
EX-00030
EX-00029
FU-00009
Page 978 of 2870

EX(H4SO)-10
EXHAUST
Center Exhaust Pipe
3. Center Exhaust Pipe
A: REMOVAL
After removing the center and front exhaust pipes
as one unit, separate them. Refer to the procedure
for removing the front exhaust pipe.
B: INSTALLATION
Install the center exhaust pipe and front exhaust
pipe as one unit. Refer to the procedure for install-
ing the front exhaust pipe.
C: INSPECTION
1) Make sure there are no exhaust leaks from con-
nections and welds.
2) Make sure there are no holes or rusting.
Page 979 of 2870
EX(H4SO)-11
EXHAUST
Rear Exhaust Pipe
4. Rear Exhaust Pipe
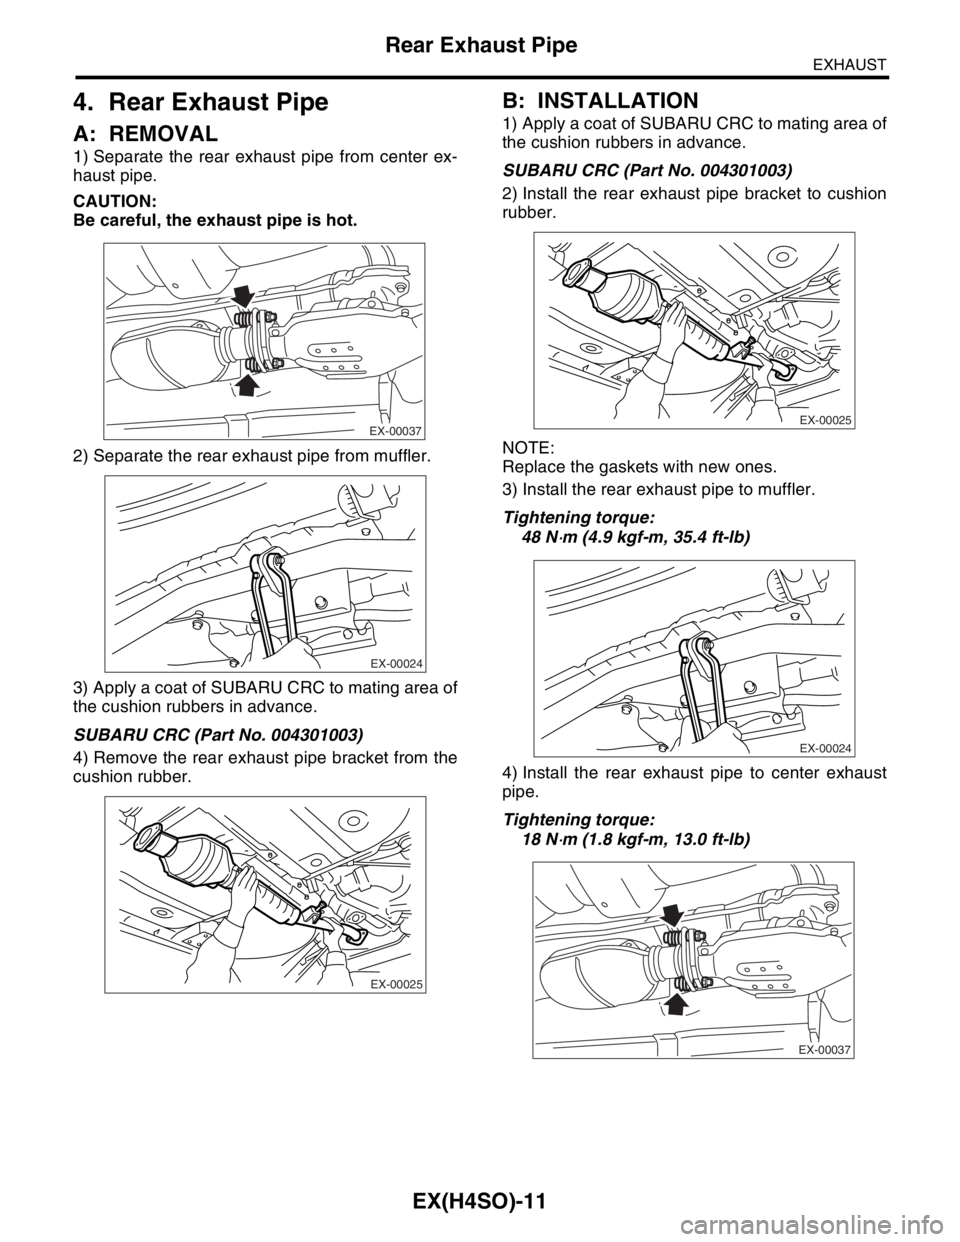
A: REMOVAL
1) Separate the rear exhaust pipe from center ex-
haust pipe.
CAUTION:
Be careful, the exhaust pipe is hot.
2) Separate the rear exhaust pipe from muffler.
3) Apply a coat of SUBARU CRC to mating area of
the cushion rubbers in advance.
SUBARU CRC (Part No. 004301003)
4) Remove the rear exhaust pipe bracket from the
cushion rubber.
B: INSTALLATION
1) Apply a coat of SUBARU CRC to mating area of
the cushion rubbers in advance.
SUBARU CRC (Part No. 004301003)
2) Install the rear exhaust pipe bracket to cushion
rubber.
NOTE:
Replace the gaskets with new ones.
3) Install the rear exhaust pipe to muffler.
Tightening torque:
48 N
⋅m (4.9 kgf-m, 35.4 ft-lb)
4) Install the rear exhaust pipe to center exhaust
pipe.
Tightening torque:
18 N
⋅m (1.8 kgf-m, 13.0 ft-lb)
EX-00037
EX-00024
EX-00025
EX-00025
EX-00024
EX-00037
Page 980 of 2870

EX(H4SO)-12
EXHAUST
Rear Exhaust Pipe
C: INSPECTION
1) Make sure there are no exhaust leaks from con-
nections and welds.
2) Make sure there are no holes or rusting.
3) Make sure the cushion rubber is not worn or
cracked.