SUBARU FORESTER 2004 Service Repair Manual
Manufacturer: SUBARU, Model Year: 2004, Model line: FORESTER, Model: SUBARU FORESTER 2004Pages: 2870, PDF Size: 38.67 MB
Page 2301 of 2870
CS-16
CONTROL SYSTEM
N-R Lock Solenoid
4. N-R Lock Solenoid
A: REMOVAL
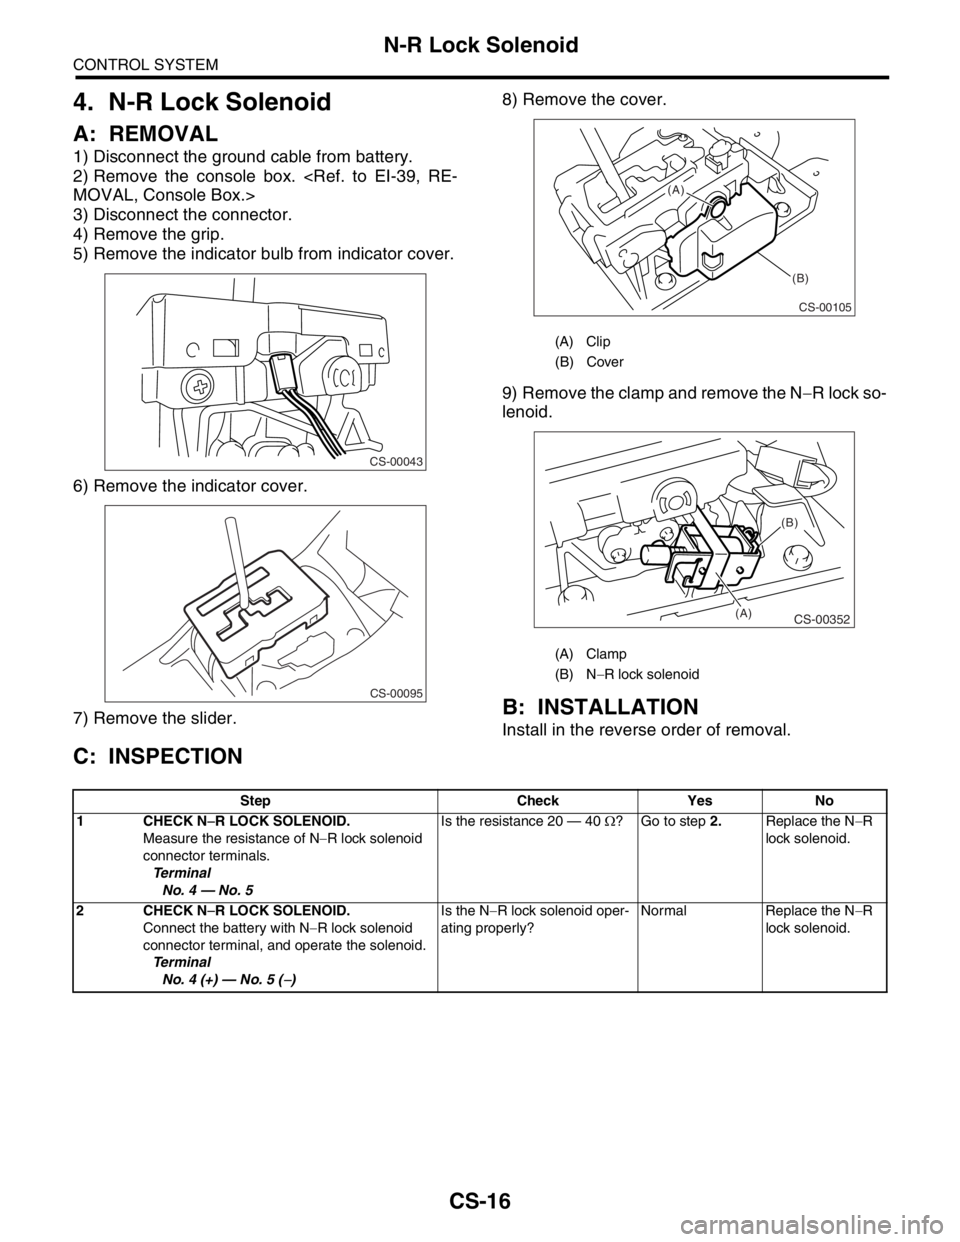
1) Disconnect the ground cable from battery.
2) Remove the console box.
3) Disconnect the connector.
4) Remove the grip.
5) Remove the indicator bulb from indicator cover.
6) Remove the indicator cover.
7) Remove the slider.8) Remove the cover.
9) Remove the clamp and remove the N−R lock so-
lenoid.
B: INSTALLATION
Install in the reverse order of removal.
C: INSPECTION
CS-00043
CS-00095
(A) Clip
(B) Cover
(A) Clamp
(B) N−R lock solenoid
CS-00105
(A)
(B)
CS-00352
(B)
(A)
Step Check Yes No
1 CHECK N−R LOCK SOLENOID.
Measure the resistance of N−R lock solenoid
connector terminals.
Te r m i n a l
No. 4 — No. 5Is the resistance 20 — 40 Ω? Go to step 2.Replace the N−R
lock solenoid.
2 CHECK N−R LOCK SOLENOID.
Connect the battery with N−R lock solenoid
connector terminal, and operate the solenoid.
Te r m i n a l
No. 4 (+) — No. 5 (
−)Is the N−R lock solenoid oper-
ating properly?Normal Replace the N−R
lock solenoid.
Page 2302 of 2870
CS-17
CONTROL SYSTEM
MT Gear Shift Lever
5. MT Gear Shift Lever
A: REMOVAL
1) Set the vehicle on a lift.
2) Remove the gear shift knob.
3) Disconnect the ground cable from battery.
4) Remove the console box.
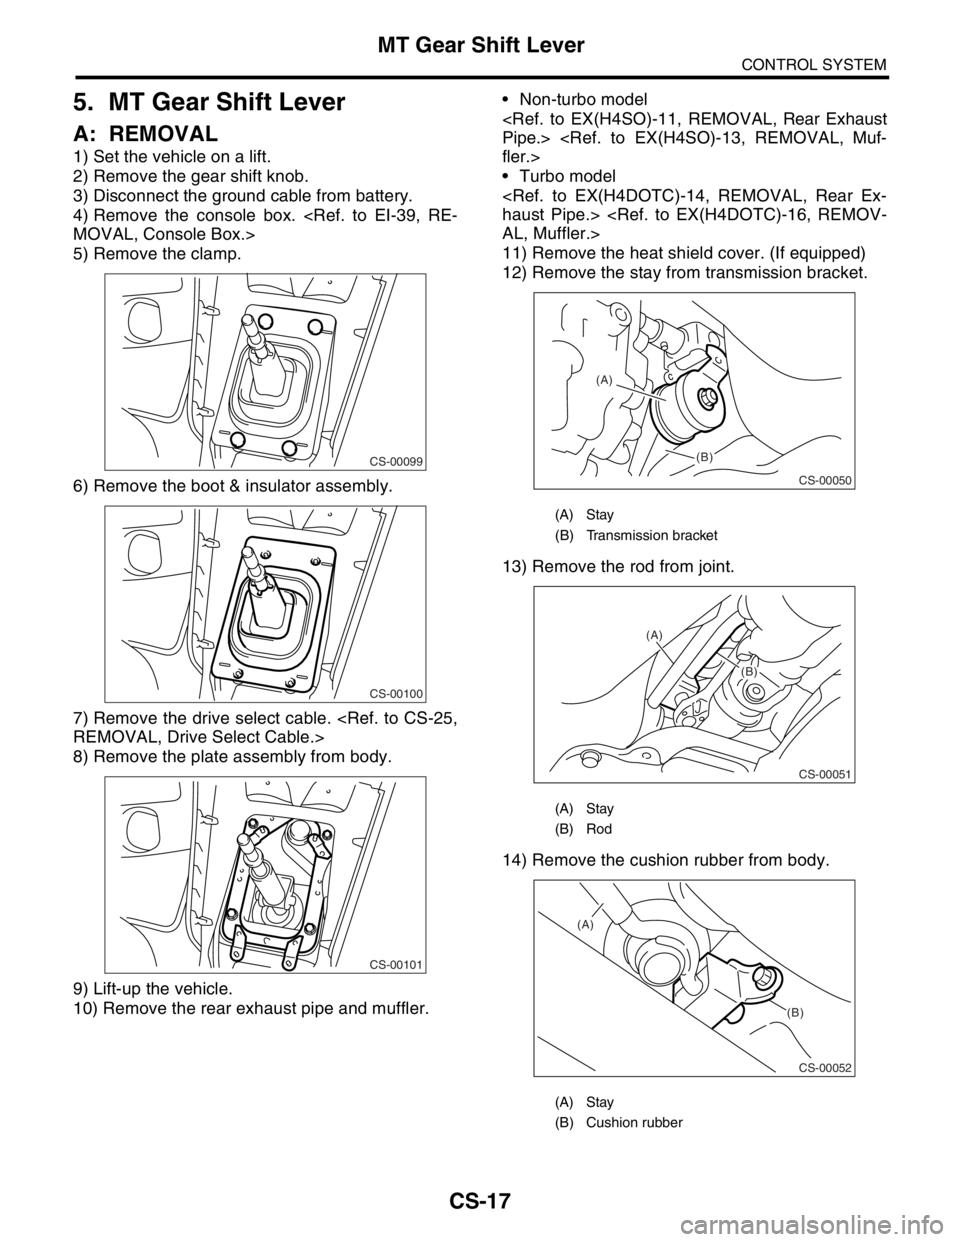
5) Remove the clamp.
6) Remove the boot & insulator assembly.
7) Remove the drive select cable.
8) Remove the plate assembly from body.
9) Lift-up the vehicle.
10) Remove the rear exhaust pipe and muffler. Non-turbo model
Turbo model
11) Remove the heat shield cover. (If equipped)
12) Remove the stay from transmission bracket.
13) Remove the rod from joint.
14) Remove the cushion rubber from body.
CS-00099
CS-00100
CS-00101
(A) Stay
(B) Transmission bracket
(A) Stay
(B) Rod
(A) Stay
(B) Cushion rubber
CS-00050
(A)
(B)
CS-00051
(A)
(B)
CS-00052
(A)
(B)
Page 2303 of 2870
CS-18
CONTROL SYSTEM
MT Gear Shift Lever
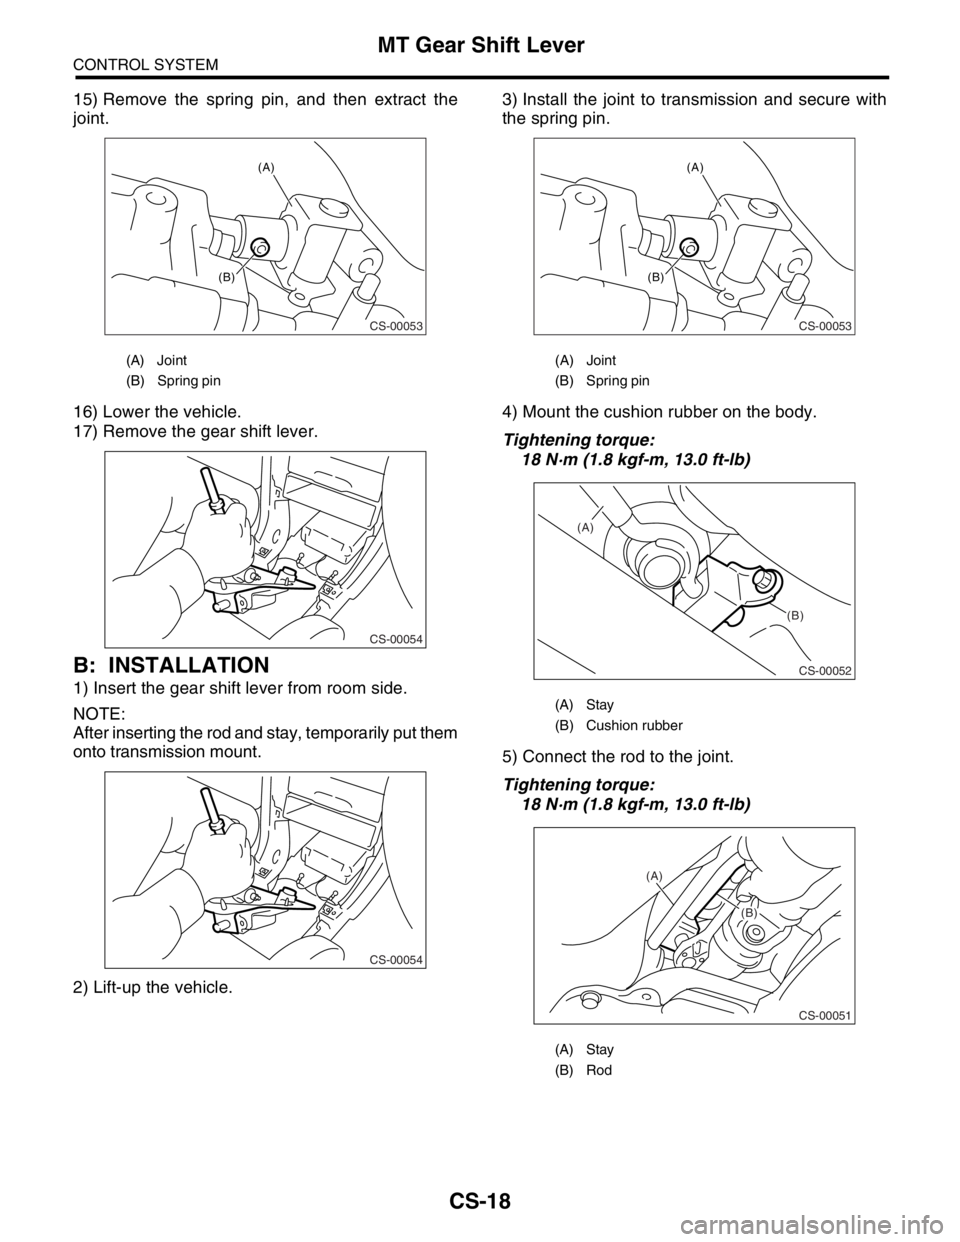
15) Remove the spring pin, and then extract the
joint.
16) Lower the vehicle.
17) Remove the gear shift lever.
B: INSTALLATION
1) Insert the gear shift lever from room side.
NOTE:
After inserting the rod and stay, temporarily put them
onto transmission mount.
2) Lift-up the vehicle.3) Install the joint to transmission and secure with
the spring pin.
4) Mount the cushion rubber on the body.
Tightening torque:
18 N·m (1.8 kgf-m, 13.0 ft-lb)
5) Connect the rod to the joint.
Tightening torque:
18 N·m (1.8 kgf-m, 13.0 ft-lb)
(A) Joint
(B) Spring pin
CS-00053
(A)
(B)
CS-00054
CS-00054
(A) Joint
(B) Spring pin
(A) Stay
(B) Cushion rubber
(A) Stay
(B) Rod
CS-00053
(A)
(B)
CS-00052
(A)
(B)
CS-00051
(A)
(B)
Page 2304 of 2870
CS-19
CONTROL SYSTEM
MT Gear Shift Lever
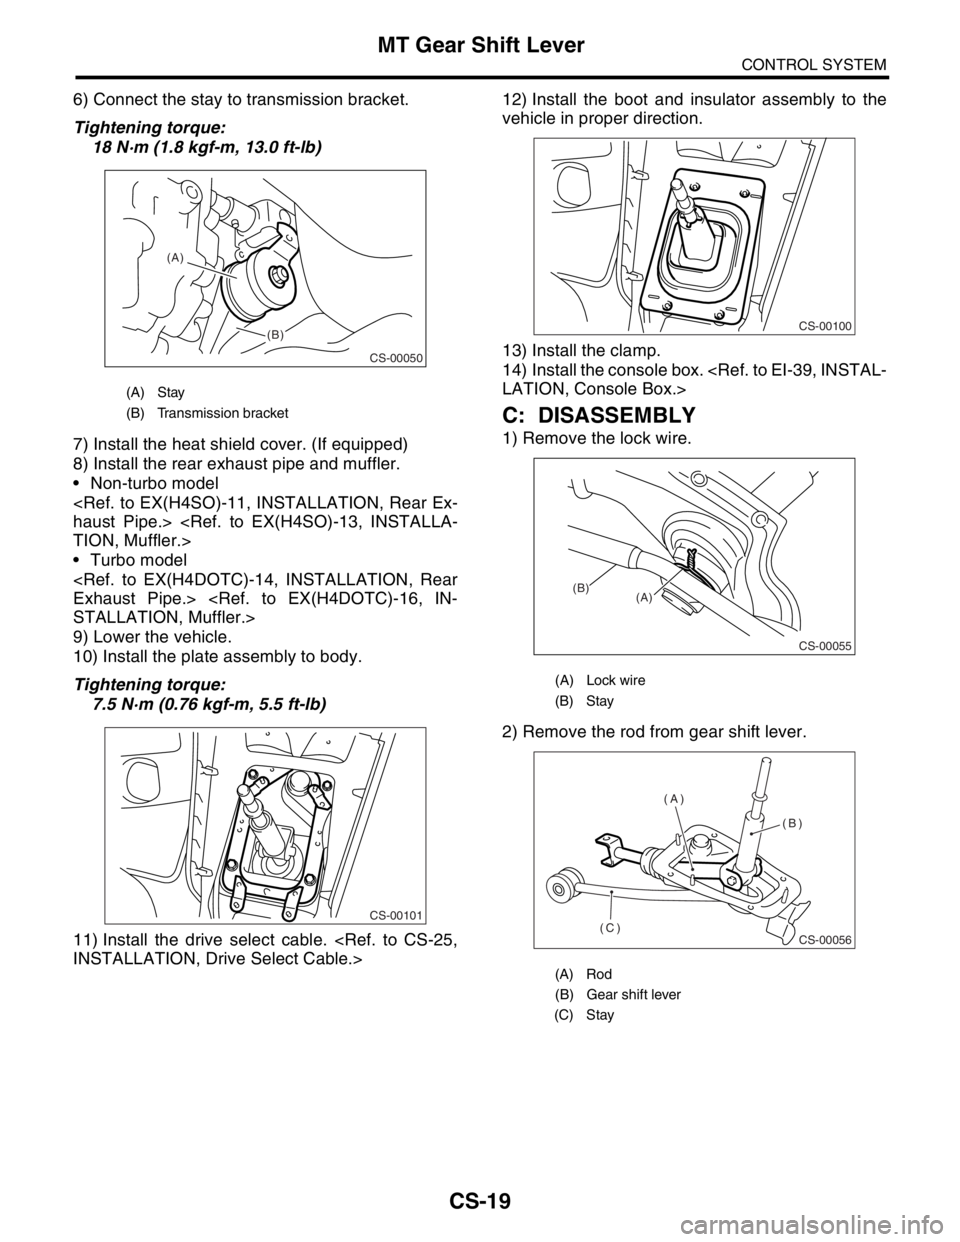
6) Connect the stay to transmission bracket.
Tightening torque:
18 N·m (1.8 kgf-m, 13.0 ft-lb)
7) Install the heat shield cover. (If equipped)
8) Install the rear exhaust pipe and muffler.
Non-turbo model
Turbo model
9) Lower the vehicle.
10) Install the plate assembly to body.
Tightening torque:
7.5 N·m (0.76 kgf-m, 5.5 ft-lb)
11) Install the drive select cable.
vehicle in proper direction.
13) Install the clamp.
14) Install the console box.
C: DISASSEMBLY
1) Remove the lock wire.
2) Remove the rod from gear shift lever.
(A) Stay
(B) Transmission bracket
CS-00050
(A)
(B)
CS-00101
(A) Lock wire
(B) Stay
(A) Rod
(B) Gear shift lever
(C) Stay
CS-00100
CS-00055
(B)
(A)
CS-00056
(A)
(B)
(C)
Page 2305 of 2870
CS-20
CONTROL SYSTEM
MT Gear Shift Lever
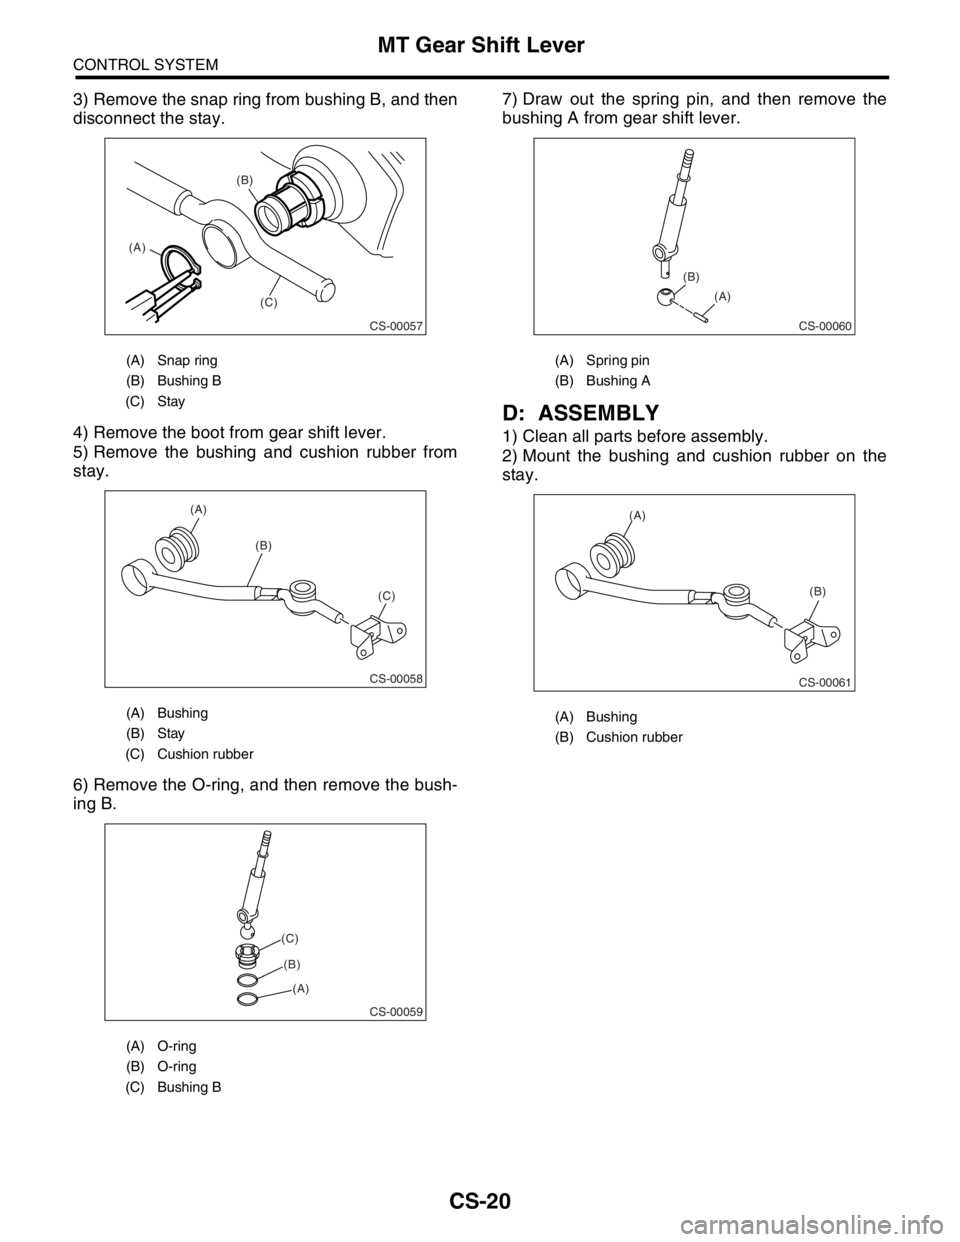
3) Remove the snap ring from bushing B, and then
disconnect the stay.
4) Remove the boot from gear shift lever.
5) Remove the bushing and cushion rubber from
stay.
6) Remove the O-ring, and then remove the bush-
ing B.7) Draw out the spring pin, and then remove the
bushing A from gear shift lever.
D: ASSEMBLY
1) Clean all parts before assembly.
2) Mount the bushing and cushion rubber on the
stay.
(A) Snap ring
(B) Bushing B
(C) Stay
(A) Bushing
(B) Stay
(C) Cushion rubber
(A) O-ring
(B) O-ring
(C) Bushing B
CS-00057
(A)(B)
(C)
CS-00058
(A)
(B)
(C)
CS-00059
(C)
(B)
(A)
(A) Spring pin
(B) Bushing A
(A) Bushing
(B) Cushion rubber
CS-00060
(B)
(A)
CS-00061
(A)
(B)
Page 2306 of 2870
CS-21
CONTROL SYSTEM
MT Gear Shift Lever
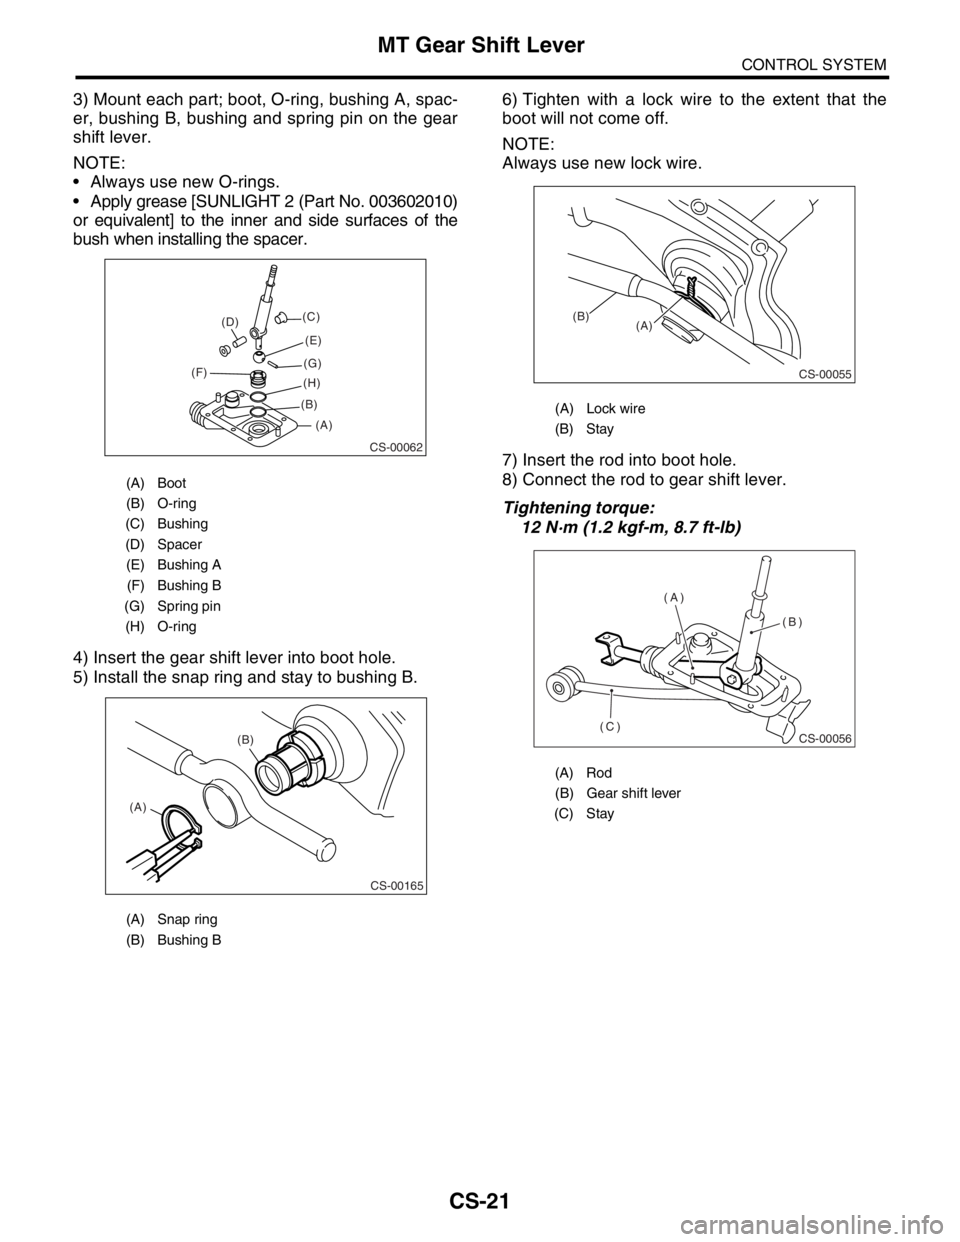
3) Mount each part; boot, O-ring, bushing A, spac-
er, bushing B, bushing and spring pin on the gear
shift lever.
NOTE:
Always use new O-rings.
Apply grease [SUNLIGHT 2 (Part No. 003602010)
or equivalent] to the inner and side surfaces of the
bush when installing the spacer.
4) Insert the gear shift lever into boot hole.
5) Install the snap ring and stay to bushing B.6) Tighten with a lock wire to the extent that the
boot will not come off.
NOTE:
Always use new lock wire.
7) Insert the rod into boot hole.
8) Connect the rod to gear shift lever.
Tightening torque:
12 N·m (1.2 kgf-m, 8.7 ft-lb)
(A) Boot
(B) O-ring
(C) Bushing
(D) Spacer
(E) Bushing A
(F) Bushing B
(G) Spring pin
(H) O-ring
(A) Snap ring
(B) Bushing B
CS-00062
(F)(D)(C)
(E)
(G)
(H)
(B)
(A)
CS-00165
(A)(B)
(A) Lock wire
(B) Stay
(A) Rod
(B) Gear shift lever
(C) Stay
CS-00055
(B)
(A)
CS-00056
(A)
(B)
(C)
Page 2307 of 2870
CS-22
CONTROL SYSTEM
MT Gear Shift Lever
E: INSPECTION
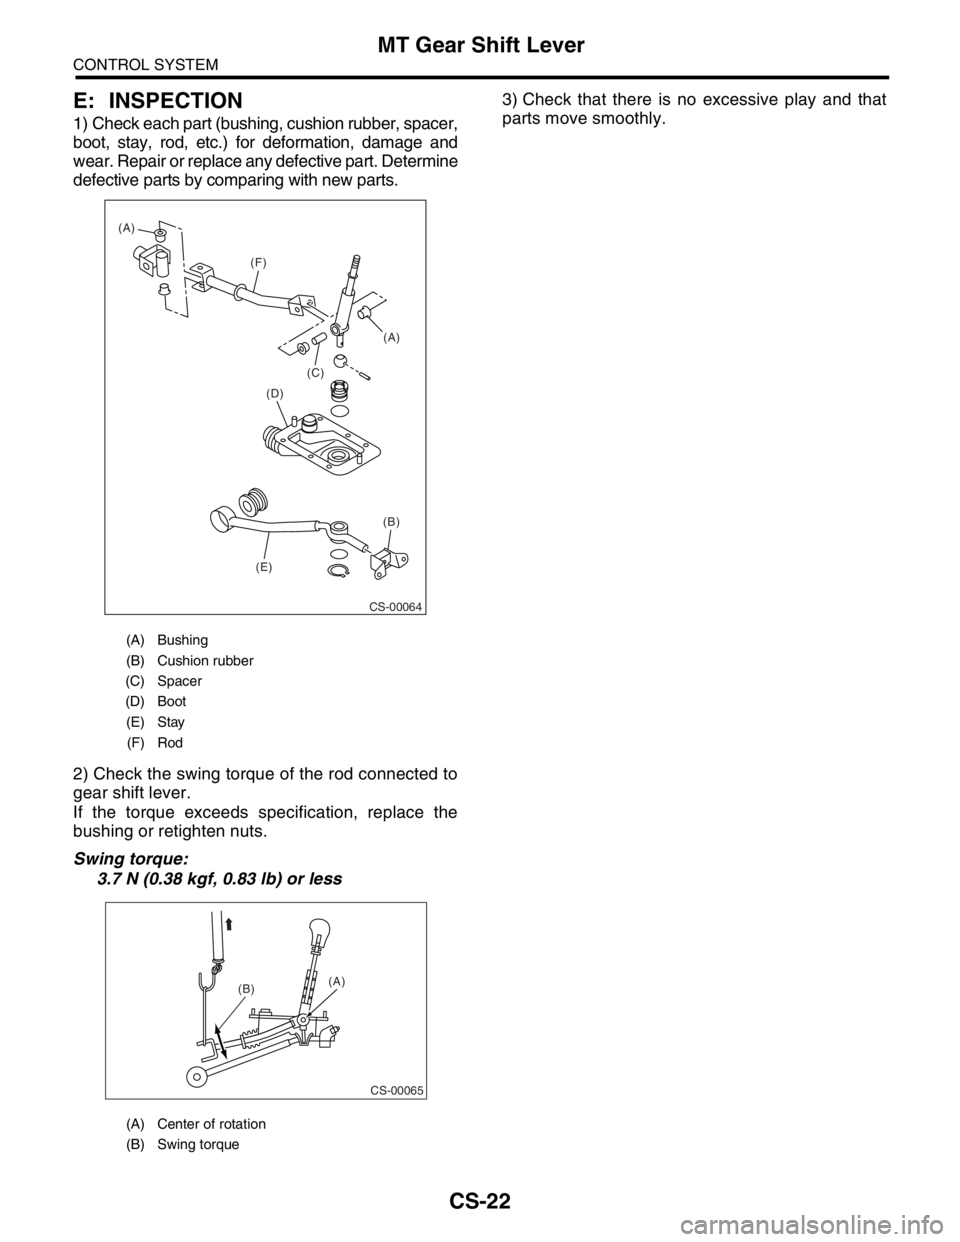
1) Check each part (bushing, cushion rubber, spacer,
boot, stay, rod, etc.) for deformation, damage and
wear. Repair or replace any defective part. Determine
defective parts by comparing with new parts.
2) Check the swing torque of the rod connected to
gear shift lever.
If the torque exceeds specification, replace the
bushing or retighten nuts.
Swing torque:
3.7 N (0.38 kgf, 0.83 lb) or less3) Check that there is no excessive play and that
parts move smoothly.
(A) Bushing
(B) Cushion rubber
(C) Spacer
(D) Boot
(E) Stay
(F) Rod
(A) Center of rotation
(B) Swing torque
(C)
(D)(A) (F) (A)
CS-00064
(E)(B)
CS-00065
(A)
(B)
Page 2308 of 2870
CS-23
CONTROL SYSTEM
MT Drive Select Lever
6. MT Drive Select Lever
A: REMOVAL
1) Apply parking brake and place chocks to hold
wheels.
2) Disconnect the ground cable from battery.
3) Shift the drive select lever to HI position.
4) Remove the knob.
5) Remove the console box.
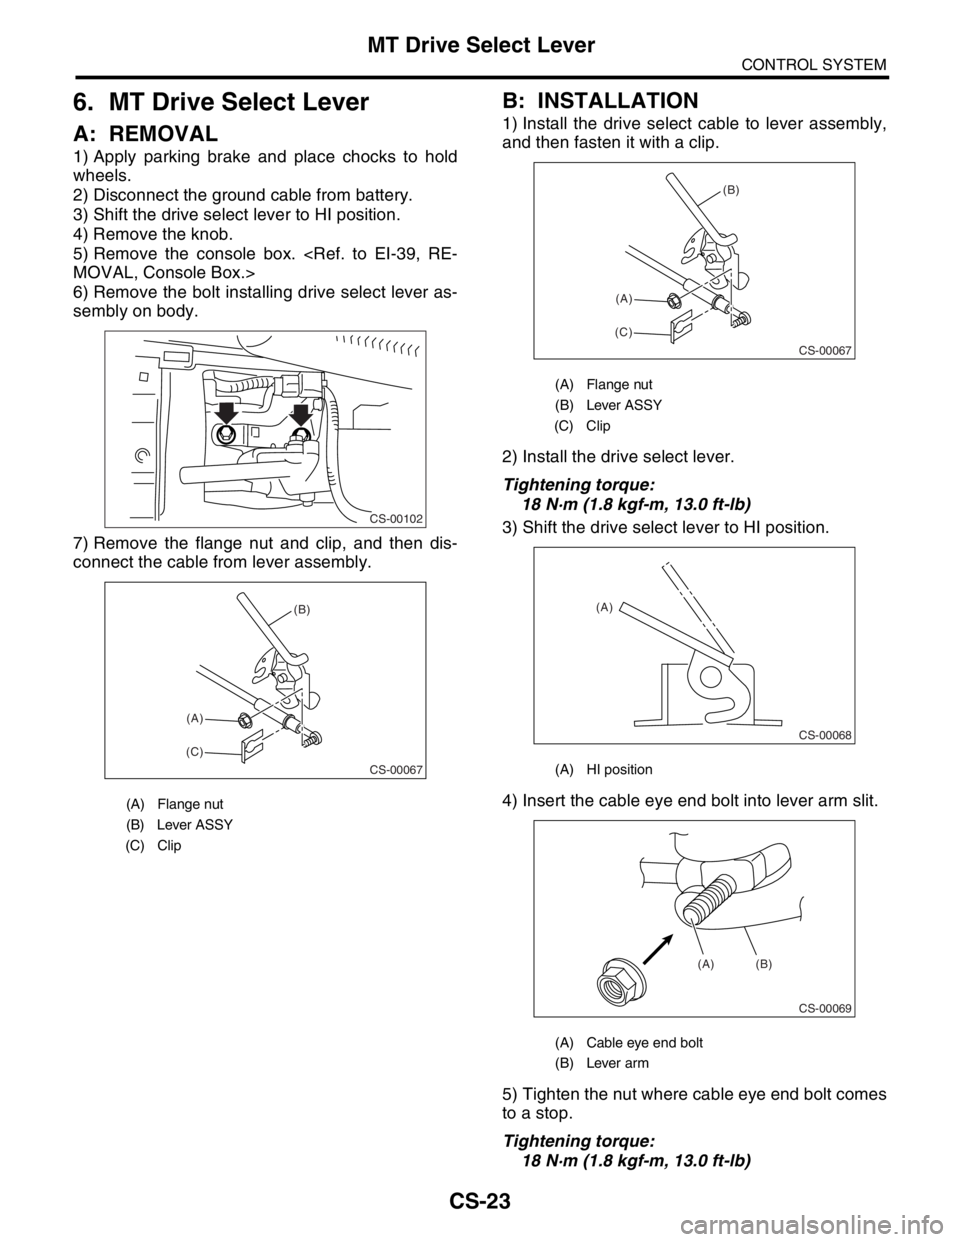
6) Remove the bolt installing drive select lever as-
sembly on body.
7) Remove the flange nut and clip, and then dis-
connect the cable from lever assembly.
B: INSTALLATION
1) Install the drive select cable to lever assembly,
and then fasten it with a clip.
2) Install the drive select lever.
Tightening torque:
18 N·m (1.8 kgf-m, 13.0 ft-lb)
3) Shift the drive select lever to HI position.
4) Insert the cable eye end bolt into lever arm slit.
5) Tighten the nut where cable eye end bolt comes
to a stop.
Tightening torque:
18 N·m (1.8 kgf-m, 13.0 ft-lb)
(A) Flange nut
(B) Lever ASSY
(C) Clip
CS-00102
CS-00067
(C)(A)(B)
(A) Flange nut
(B) Lever ASSY
(C) Clip
(A) HI position
(A) Cable eye end bolt
(B) Lever arm
CS-00067
(C)(A)(B)
CS-00068
(A)
CS-00069
(A) (B)
Page 2309 of 2870
CS-24
CONTROL SYSTEM
MT Drive Select Lever
6) Install in the reverse order of removal.
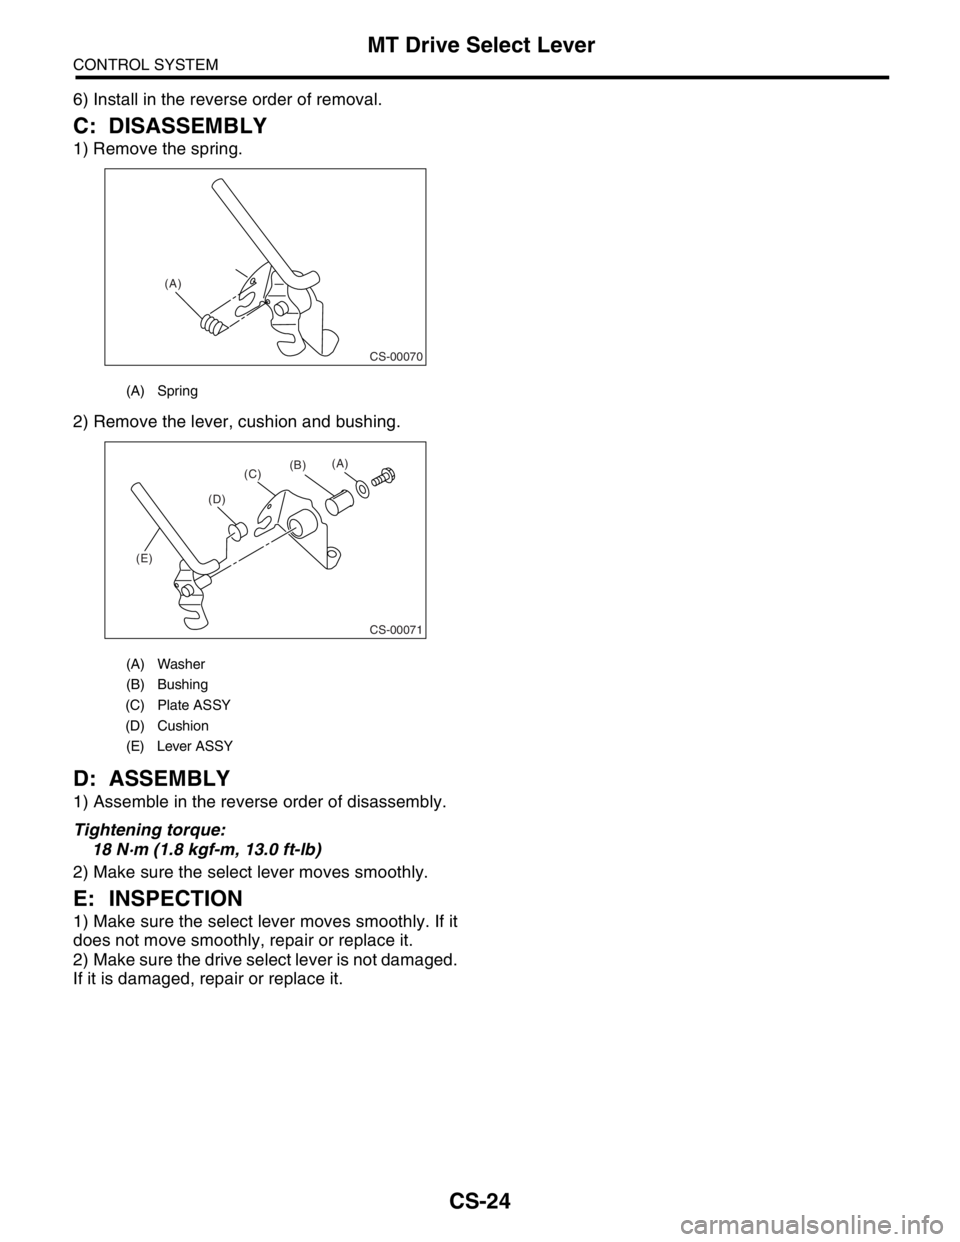
C: DISASSEMBLY
1) Remove the spring.
2) Remove the lever, cushion and bushing.
D: ASSEMBLY
1) Assemble in the reverse order of disassembly.
Tightening torque:
18 N·m (1.8 kgf-m, 13.0 ft-lb)
2) Make sure the select lever moves smoothly.
E: INSPECTION
1) Make sure the select lever moves smoothly. If it
does not move smoothly, repair or replace it.
2) Make sure the drive select lever is not damaged.
If it is damaged, repair or replace it.
(A) Spring
(A) Washer
(B) Bushing
(C) Plate ASSY
(D) Cushion
(E) Lever ASSY
CS-00070
(A)
CS-00071
(E)(C)
(D)(B)(A)
Page 2310 of 2870
CS-25
CONTROL SYSTEM
Drive Select Cable
7. Drive Select Cable
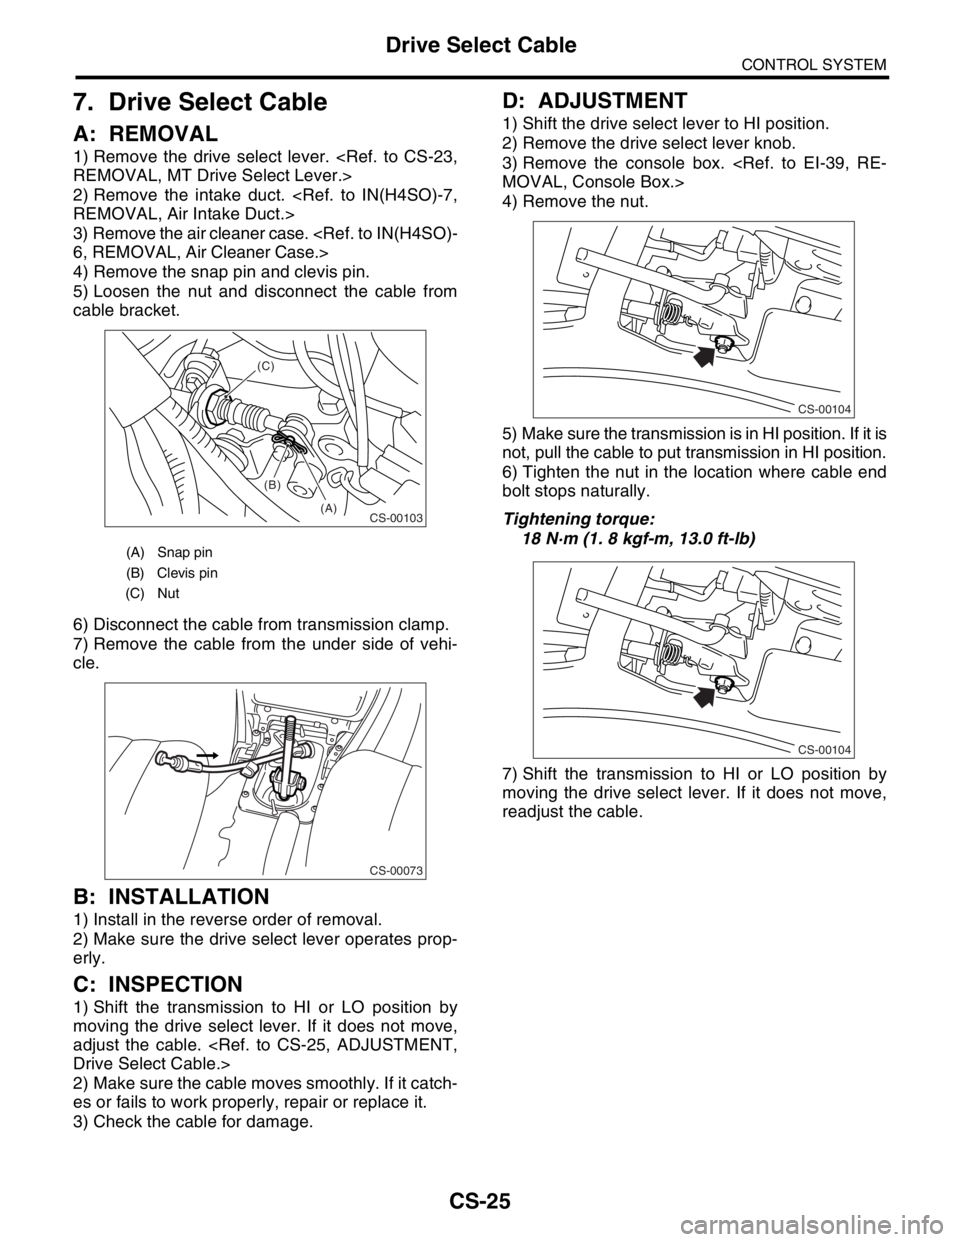
A: REMOVAL
1) Remove the drive select lever.
2) Remove the intake duct.
3) Remove the air cleaner case.
4) Remove the snap pin and clevis pin.
5) Loosen the nut and disconnect the cable from
cable bracket.
6) Disconnect the cable from transmission clamp.
7) Remove the cable from the under side of vehi-
cle.
B: INSTALLATION
1) Install in the reverse order of removal.
2) Make sure the drive select lever operates prop-
erly.
C: INSPECTION
1) Shift the transmission to HI or LO position by
moving the drive select lever. If it does not move,
adjust the cable.
2) Make sure the cable moves smoothly. If it catch-
es or fails to work properly, repair or replace it.
3) Check the cable for damage.
D: ADJUSTMENT
1) Shift the drive select lever to HI position.
2) Remove the drive select lever knob.
3) Remove the console box.
4) Remove the nut.
5) Make sure the transmission is in HI position. If it is
not, pull the cable to put transmission in HI position.
6) Tighten the nut in the location where cable end
bolt stops naturally.
Tightening torque:
18 N·m (1. 8 kgf-m, 13.0 ft-lb)
7) Shift the transmission to HI or LO position by
moving the drive select lever. If it does not move,
readjust the cable.
(A) Snap pin
(B) Clevis pin
(C) Nut
CS-00103(A) (B) (C)
CS-00073
CS-00104
CS-00104