SUBARU FORESTER 2004 Service Manual PDF
Manufacturer: SUBARU, Model Year: 2004, Model line: FORESTER, Model: SUBARU FORESTER 2004Pages: 2870, PDF Size: 38.67 MB
Page 71 of 2870

AC-15
HVAC SYSTEM (AUTO A/C)(DIAGNOSTIC)
Diagnostics for A/C System Malfunction
Step Check Yes No
1 CHECK FUSE.
1) Remove the fuse No. 1, 2 and 17 from fuse
& relay box.
2) Check the condition of fuse.Is any fuse blown-out? Replace the fuse. Go to step 2.
2 CHECK POWER SUPPLY FOR BLOWER
MOTOR.
1) Turn the ignition switch to ON.
2) Turn the fan speed control dial clockwise.
3) Measure the voltage between blower motor
and chassis ground.
Connector & terminal
(B87) No. 1 (+) — Chassis ground (
−):Is the voltage more than 8 V (at
normal temperature)?Go to step 3.Repair the open
circuit of blower
motor power sup-
ply line harness.
3 CHECK BLOWER MOTOR RELAY.
1) Turn the ignition switch to OFF.
2) Remove the blower motor relay.
3) Connect the battery positive (+) terminal to
terminal No. 1 of blower motor relay, and nega-
tive (−) terminal to terminal No. 3.
4) Measure the resistance between terminals
No. 2 and 4.
Te r m i n a l s
No. 2 — No. 4:Is the resistance less than 1
Ω?Go to step 4.Replace the
blower motor relay.
4 CHECK BLOWER MOTOR.
1) Disconnect the connector from blower
motor.
2) Connect the battery positive (+) terminal to
terminal No. 1 of blower motor connector, and
negative (−) terminal to terminal No. 2 and No.
5.
3) Make sure the blower motor runs.Does the blower motor run? Go to step 5.Replace the
blower motor.
5 CHECK POOR CONTACT.
Check poor contact in auto A/C control module
connector.Is there poor contact in con-
nector?Repair the con-
nector.Replace the auto
A/C control mod-
ule.
Page 72 of 2870

AC-16
HVAC SYSTEM (AUTO A/C)(DIAGNOSTIC)
Diagnostics for A/C System Malfunction
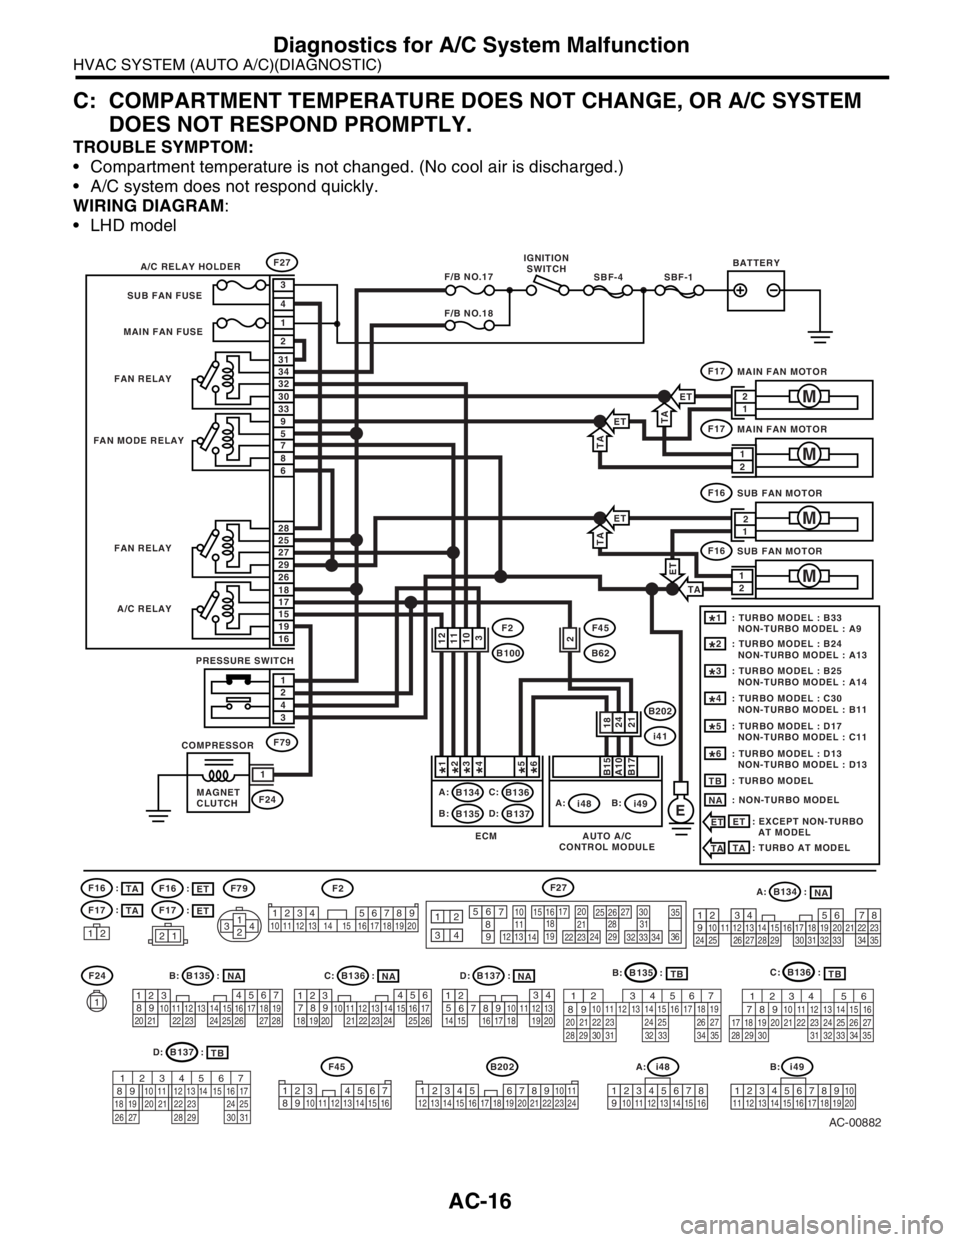
C: COMPARTMENT TEMPERATURE DOES NOT CHANGE, OR A/C SYSTEM
DOES NOT RESPOND PROMPTLY.
TROUBLE SYMPTOM:
Compartment temperature is not changed. (No cool air is discharged.)
A/C system does not respond quickly.
WIRING DIAGRAM:
LHD model
AC-00882
A: B134 :
B: B135 :
B202
D: B137 :C: B136 :
F2F27
EA:
i48
F27
F17
F79
F45
B62
B202
i41
F24
F24
F16F79
F45
F17
B:
i49A:
B134 B136
B135 B137C:
B:D:IGNITION
SWITCHBATTERY
A/C RELAY HOLDER
FAN RELAY
FAN RELAY
A/C RELAY
PRESSURE SWITCH
COMPRESSOR
MAGNET
CLUTCH FAN MODE RELAYSUB FAN FUSE
MAIN FAN FUSE
MAIN FAN MOTOR
1
M
SBF-1SBF-4F/B NO.17
F/B NO.18
1
2
3
2
1
4
3033
32 31
34
86
7 9
5
2926
27 28
25
1916
15 18
17
43
21
B15A10B17
F17
MAIN FAN MOTOR
M
F16
SUB FAN MOTOR
M
F16
SUB FAN MOTOR
M
1
2112 1314
15 16171819
20
10
1121222324
2526272829
3031323334
35
36
12
93456
7
82 314
567
82 1
94
310
24 22 23 251112131415
26 27
281617181920 21
4
1
53
2618 15 167891011
17 19
20121314
1234567891011121314151617181920212223242526272829303132333435
AUTO A/C
CONTROL MODULE ECM
2421
1234 5678910 11 12 13 14 15 16 17 18 19 20
123 4567
8910 11 12 13 14 15 16
56
78 2 1
94
310
24 22 23 251112131415
261617181920 21
34 12 8910 11
12 13 14 15 16 17 18 19 20 21 22 23 24567
D: B137 :
B: B135 :C: B136 :
A: i48
12345678
910 11 12 13 14 15 16
B: i49
12345678910
11 12 13 14 15 1617 18 19 20
: TURBO MODEL : B33
NON-TURBO MODEL : A91*
: TURBO MODEL : B24
NON-TURBO MODEL : A132*
: TURBO MODEL : B25
NON-TURBO MODEL : A143*
: TURBO MODEL : C30
NON-TURBO MODEL : B114*
: TURBO MODEL : D17
NON-TURBO MODEL : C115*
: TURBO MODEL : D13
NON-TURBO MODEL : D136*
: TURBO MODELTB
: NON-TURBO MODEL
NA
: EXCEPT NON-TURBO
AT MODEL
ET
ETNA
TB
TBNANANATB
1112
10
3
18 1
*2*3*4*5*6*
2F2
B100
ET
ETTA
TA
ET
TA
ET
: TURBO AT MODEL
TATA
TA
ET
:
ET :
F16
F17
TA :
TA :
567
82 1
94 310
24 22 23 2511 12 13 14 15
26 27
2816 17 18 19
20 21
29 30 31 32 33 34 3556
782 1
94 310
24 22 23 2511 12 13
1415
26 27
2816
17 18 19 20 21
33 34 29
32 30
31 35
567
82 1
94 310
22 23 11 12 13 14 15
24 25
2616 17
18 19 20 21
27 28 29 30 31
12
1
2
2 1
12
Page 73 of 2870

AC-17
HVAC SYSTEM (AUTO A/C)(DIAGNOSTIC)
Diagnostics for A/C System Malfunction
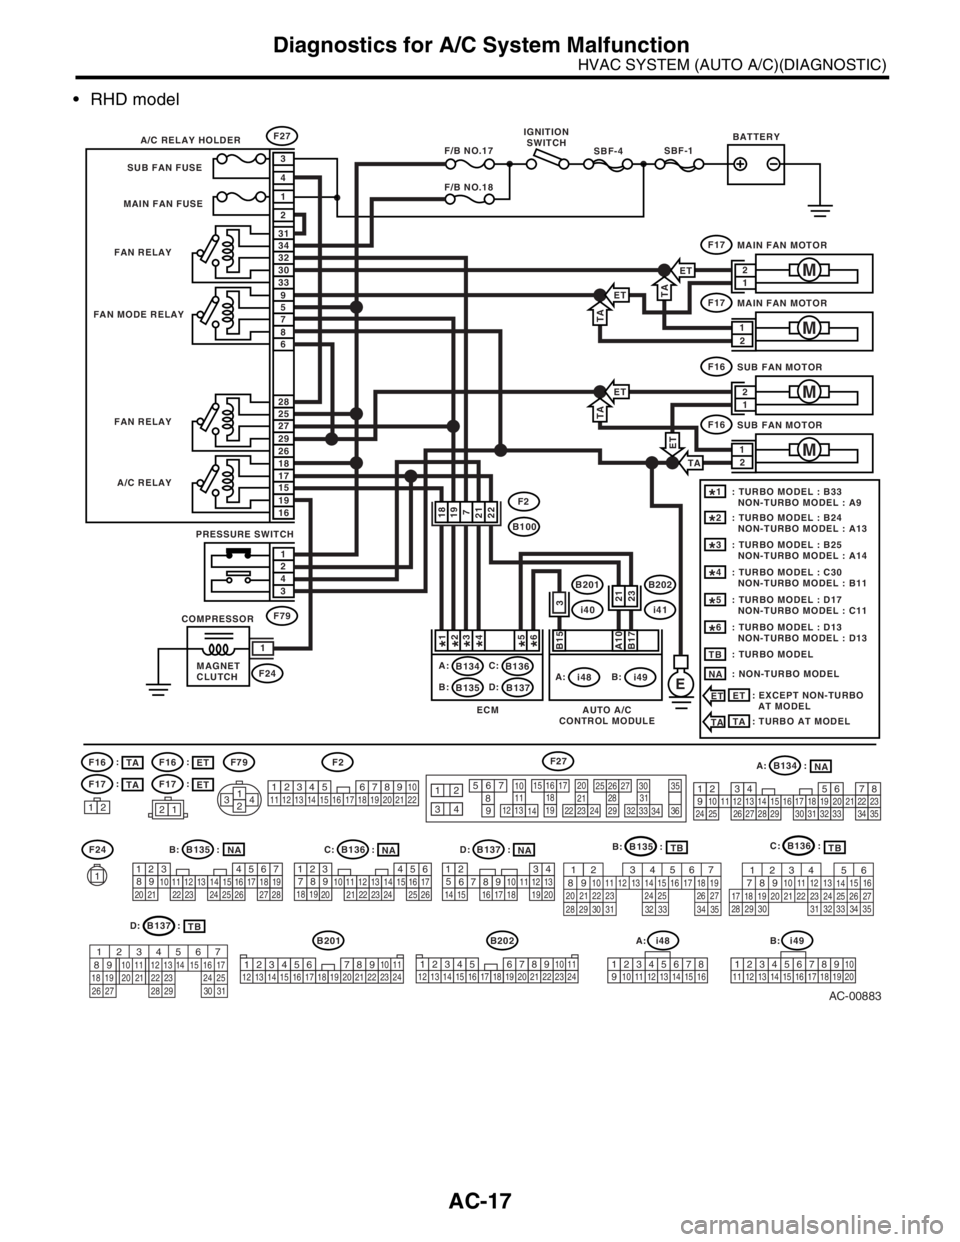
RHD model
AC-00883
A: B134 :
B: B135 :
B202
D: B137 :C: B136 :
F2F27
EA:
i48
F27
F17
F79
B202
i41
B201
i40
F24
F16F79
B201
F17
B:
i49A:
B134 B136
B135 B137C:
B:D:IGNITION
SWITCHBATTERY
A/C RELAY HOLDER
FAN RELAY
FAN RELAY
A/C RELAY
PRESSURE SWITCH
COMPRESSOR
MAGNET
CLUTCH FAN MODE RELAYSUB FAN FUSE
MAIN FAN FUSE
MAIN FAN MOTOR
1
M
SBF-1SBF-4F/B NO.17
F/B NO.18
1
2
3
2
1
4
3033
32 31
34
86
7 9
5
2926
27 28
25
1916
15 18
17
43
21
B15A10B17
F17
MAIN FAN MOTOR
M
F16
SUB FAN MOTOR
M2
1
F16
SUB FAN MOTOR
M
2112 1314
15 16171819
20
10
1121222324
2526272829
3031323334
35
36
12
93456
7
82 314
567
82 1
94
310
24 22 23 251112131415
26 27
281617181920 21
4
1
53
2618 15 167891011
17 19
20121314
1234567891011121314151617181920212223242526272829303132333435
AUTO A/C
CONTROL MODULE ECM
2123
56
78 2 1
94
310
24 22 23 251112131415
261617181920 21
34 12 8910 11
12 13 14 15 16 17 18 19 20 21 22 23 24567
D: B137 :
B: B135 :C: B136 :
A: i48
12345678
910 11 12 13 14 15 16
B: i49
12345678910
11 12 13 14 15 1617 18 19 20
: TURBO MODEL : B33
NON-TURBO MODEL : A91*
: TURBO MODEL : B24
NON-TURBO MODEL : A132*
: TURBO MODEL : B25
NON-TURBO MODEL : A143*
: TURBO MODEL : C30
NON-TURBO MODEL : B114*
: TURBO MODEL : D17
NON-TURBO MODEL : C115*
: TURBO MODEL : D13
NON-TURBO MODEL : D136*
: TURBO MODELTB
: NON-TURBO MODEL
NA
: EXCEPT NON-TURBO
AT MODEL
ET
ETNA
TB
TBNANANATB
1918
7
2122
3 1
*2*3*4*5*6*
F2
B100
ET
ETTA
TA
ET
TA
ET
: TURBO AT MODEL
TATA
TA
ET
:
ET :
567
82 1
94 310
24 22 23 2511 12 13 14 15
26 27
2816 17 18 19
20 21
29 30 31 32 33 34 3556
782 1
94 310
24 22 23 2511 12 13
1415
26 27
2816
17 18 19 20 21
33 34 29
32 30
31 35
567
82 1
94 310
22 23 11 12 13 14 15
24 25
2616 17
18 19 20 21
27 28 29 30 31
12345 678910
11
1219 20 21
13 14 151617
18 22
34 12 8910 11
12 13 14 15 16 17 18 19 20 21 22 23 2456 7
F24
1
F16
F17
TA :
TA :
12
2 1
2 1
Page 74 of 2870

AC-18
HVAC SYSTEM (AUTO A/C)(DIAGNOSTIC)
Diagnostics for A/C System Malfunction
Step Check Yes No
1 CHECK FUSE.
1) Turn the ignition switch to OFF.
2) Remove the main fan fuse and sub fan fuse
in main fuse box.
3) Check the condition of fuse.Is the fuse blown out? Replace the fuse. Go to step 2.
2 CHECK THE POWER SUPPLY TO PRES-
SURE SWITCH.
1) Disconnect the connector from pressure
switch.
2) Turn the ignition switch to ON.
3) Measure the voltage between harness con-
nector and chassis ground.
Connector & terminal
(F79) No. 1 (+) — Chassis ground (
−):Is the voltage more than 10 V? Go to step 3.Repair the har-
ness for pressure
switch power sup-
ply circuit.
3 CHECK THE HARNESS BETWEEN PRES-
SURE SWITCH AND A/C RELAY HARNESS.
1) Turn the ignition switch to OFF.
2) Remove the A/C relay in the main fuse box.
3) Measure the resistance between A/C relay
and pressure switch connector.
Connector & terminal
(F27) No. 17 — (F79) No. 2:Is the resistance less than 1
Ω?Go to step 4.Repair the har-
ness between A/C
relay and pres-
sure switch.
4 CHECK THE PRESSURE SWITCH.
Measure the resistance between pressure
switch terminals.
Te r m i n a l s
No. 1 — No. 2:Is the resistance less than 1
Ω?Go to step 5.Replace the pres-
sure switch.
5 CHECK THE A/C CUT SIGNAL CIRCUIT.
1) Disconnect the connector from auto A/C
control module.
2) Measure the resistance between auto A/C
control module and pressure switch connector.
Connector & terminal
(i48) No. 10 — (F79) No. 2:Is the resistance less than 1
Ω?Go to step 6.Repair the har-
ness between auto
A/C control mod-
ule and pressure
switch.
6 CHECK THE A/C ON SIGNAL CIRCUIT.
1) Disconnect the connector from ECM.
2) Measure the resistance between ECM and
auto A/C control module connector.
Connector & terminal
Turbo model
(B137) No. 17 — (i49) No. 17:
Non-turbo model
(B136) No. 11 — (i49) No. 17:Is the resistance less than 1
Ω?Go to step 7.Repair the har-
ness between auto
A/C control mod-
ule and ECM.
7 CHECK A/C RELAY.
1) Remove the A/C relay in main fuse box.
2) Check the A/C relay.
OK?Go to step 8.Replace the A/C
relay.
8 CHECK POWER SUPPLY TO MAGNET
CLUTCH OF A/C COMPRESSOR.
1) Turn the ignition switch to OFF, and then
connect the A/C relay connector and all
removed connectors.
2) Start the engine, and turn A/C switch to
ON.
3) Set the temperature control dial to maxi-
mum cold position.
4) Measure the voltage between magnet
clutch harness connector and chassis ground.
Connector & terminal
(F24) No. 1 (+) — Chassis ground (
−):Is the voltage more than 10.5 V
(at normal temperature)?Go to step 9.Repair the har-
ness for power
supply line of A/C
compressor.
Page 75 of 2870

AC-19
HVAC SYSTEM (AUTO A/C)(DIAGNOSTIC)
Diagnostics for A/C System Malfunction
9 CHECK OPERATION OF MAIN FAN MOTOR.
1) Start the engine and turn the A/C switch to
ON.
2) Check the operation of main fan motor.Does the main fan motor oper-
ate normally?Go to step 14.Go to step 10.
10 CHECK POWER SUPPLY TO MAIN FAN MO-
TOR.
CAUTION:
Be careful not to overheat the engine during
repair.
1) Turn the ignition switch to OFF.
2) Disconnect the connector from main fan
motor.
3) Start the engine, and warm it up until
engine coolant temperature increases over
100°C (212°F).
4) Stop the engine and turn ignition switch to
ON.
5) Measure the voltage between main fan
motor harness connector and chassis ground.
Connector & terminal
Except turbo AT model:
(F17) No. 2 (+) — Chassis ground (
−):
Turbo AT model:
(F17) No. 1 (+) — Chassis ground (
−):Is the voltage more than 10 V? Go to step 11.Repair the har-
ness for main fan
motor power sup-
ply circuit.
11 CHECK GROUND CIRCUIT OF MAIN FAN
MOTOR.
Measure the resistance between main fan
motor harness connector and chassis ground.
Connector & terminal
Except turbo AT model:
(F17) No. 1 — Chassis ground:
Turbo AT model:
(F17) No. 2 — Chassis ground:Is the resistance less than 1
Ω?Go to step 12.Repair the har-
ness for main fan
motor ground cir-
cuit.
12 CHECK MAIN FAN MOTOR.
Connect the battery positive (+) terminal to ter-
minal No. 2, and ground (−) terminal to termi-
nal No. 1 of main fan motor connector to make
sure that main fan motor rotate.Does the main fan rotate? Go to step 13.Replace the main
fan motor.
13 CHECK POOR CONTACT IN MAIN FAN MO-
TOR CONNECTOR.
Check poor contact in main fan motor harness
connector.Is there poor contact in con-
nector?Go to step 14.Repair the poor
contact in main fan
motor connector.
14 CHECK OPERATION OF SUB FAN MOTOR.
1) Start the engine and turn the A/C switch to
ON.
2) Check the operation of sub fan motor.Does the sub fan motor oper-
ate normally?Go to step 19.Go to step 15. Step Check Yes No
Page 76 of 2870

AC-20
HVAC SYSTEM (AUTO A/C)(DIAGNOSTIC)
Diagnostics for A/C System Malfunction
15 CHECK POWER SUPPLY TO SUB FAN MO-
TOR.
CAUTION:
Be careful not to overheat the engine during
repair.
1) Turn the ignition switch to OFF.
2) Disconnect the connector from sub fan
motor.
3) Start the engine, and warm it up until
engine coolant temperature increases over
100°C (212°F).
4) Stop the engine and turn ignition switch to
ON.
5) Measure the voltage between sub fan
motor harness connector and chassis ground.
Connector & terminal
Except turbo AT model:
(F16) No. 2 (+) — Chassis ground (
−):
Turbo AT model:
(F16) No. 1 (+) — Chassis ground (
−):Is the voltage more than 10 V? Go to step 16.Repair the har-
ness for sub fan
motor power sup-
ply circuit.
16 CHECK GROUND CIRCUIT OF SUB FAN
MOTOR.
Measure the resistance between sub fan motor
harness connector and chassis ground.
Connector & terminal
Except turbo AT model:
(F16) No. 1 — Chassis ground:
Turbo AT model:
(F16) No. 2 — Chassis ground:Is the resistance less than 1
Ω?Go to step 17.Repair the har-
ness for sub fan
motor ground cir-
cuit.
17 CHECK SUB FAN MOTOR.
Connect the battery positive (+) terminal to ter-
minal No. 2, and ground (−) terminal to termi-
nal No. 1 of sub fan motor connector to make
sure that sub fan motor rotate.Does the sub fan motor rotate? Go to step 18.Replace the sub
fan motor.
18 CHECK POOR CONTACT IN SUB FAN MO-
TOR CONNECTOR.
Check poor contact in sub fan motor connec-
tor.Is there poor contact in con-
nector?Go to step 19.Repair the poor
contact in sub fan
motor connector.
19 CHECK POOR CONTACT IN AUTO A/C
CONTROL MODULE CONNECTOR.
Check poor contact in auto A/C control module
connector.Is there poor contact in con-
nector?Replace the auto
A/C control mod-
ule.Repair the con-
nector. Step Check Yes No
Page 77 of 2870

AC-21
HVAC SYSTEM (AUTO A/C)(DIAGNOSTIC)
Diagnostic Procedure for Actuators
7. Diagnostic Procedure for Actuators
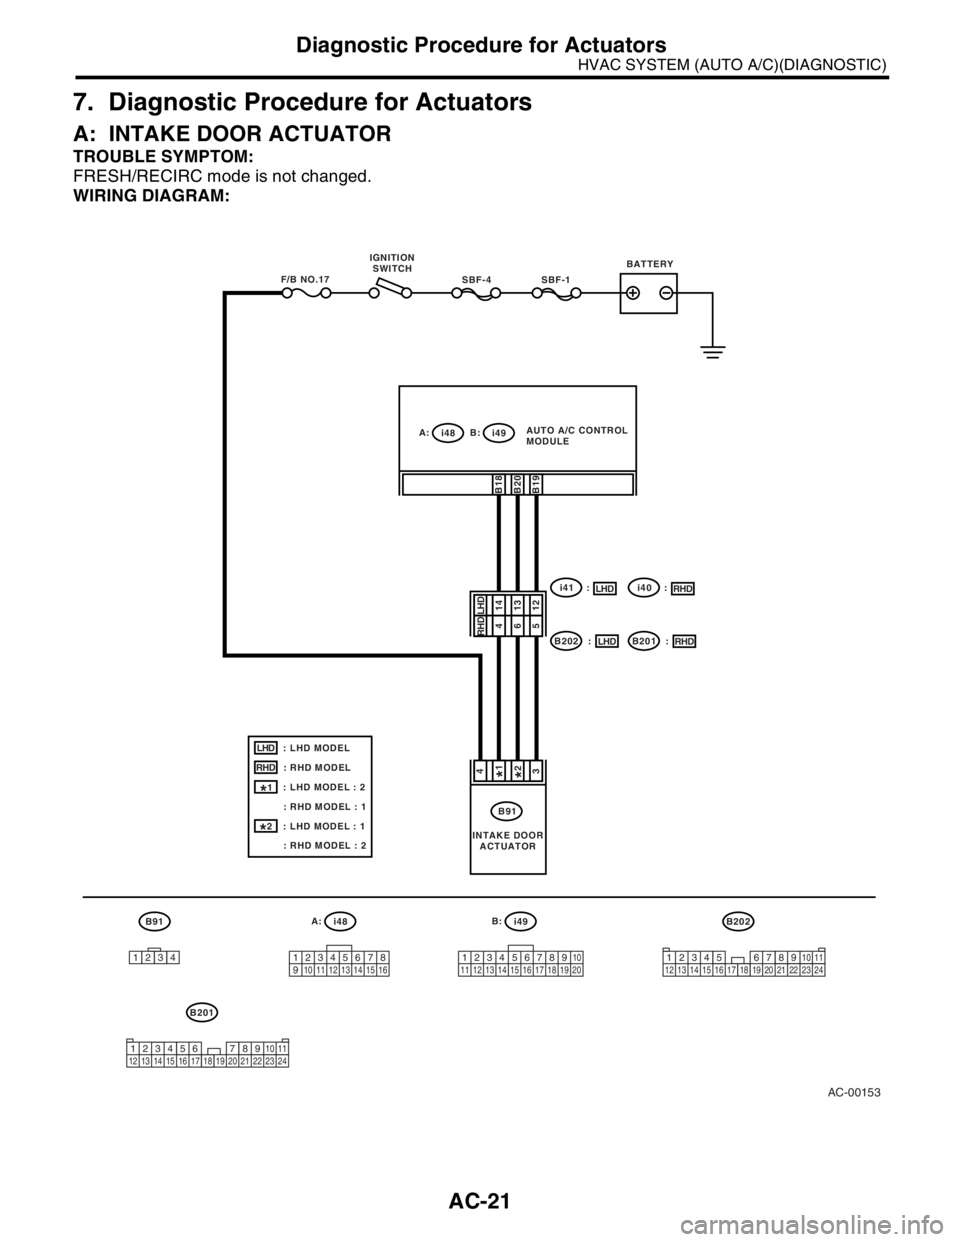
A: INTAKE DOOR ACTUATOR
TROUBLE SYMPTOM:
FRESH/RECIRC mode is not changed.
WIRING DIAGRAM:
AC-00153
B91A:
i48B:
i49
12345678
910 11 12 13 14 15 1612345678910
11 12 13 14 15 16 17 18 19 20
B91
i41 :
B202 : IGNITION
SWITCHBATTERY
SBF-1SBF-4F/B NO.17
43
141312
B18B20B19
1234
B202
34 12 8910 11
12 13 14 15 16 17 18 19 20 21 22 23 24567
A:
i48B:
i49AUTO A/C CONTROL
MODULE
INTAKE DOOR
ACTUATOR
B201
34 12 8910 11
12 13 14 15 16 17 18 19 20 21 22 23 2456 7
: LHD MODEL
: RHD MODELLHD
RHD
: LHD MODEL : 2
: RHD MODEL : 1
: LHD MODEL : 1
: RHD MODEL : 2
1*
2*
LHD465RHD
i40 :
B201 :
LHDRHD
LHDRHD
1*2*
Page 78 of 2870

AC-22
HVAC SYSTEM (AUTO A/C)(DIAGNOSTIC)
Diagnostic Procedure for Actuators
Step Check Yes No
1 CHECK POWER SUPPLY FOR INTAKE
DOOR ACTUATOR.
1) Turn the ignition switch to OFF.
2) Disconnect the intake door actuator con-
nector.
3) Turn the ignition switch to ON.
4) Measure the voltage between intake door
actuator connector and chassis ground.
Connector & terminal
(B91) No. 4 (+) — Chassis ground (
−):Is the voltage 7 V (at normal
temperature)?Go to step 2.Check open or
short circuit in har-
ness between
intake door actua-
tor and fuse.
2 CHECK HARNESS BETWEEN AUTO A/C
CONTROL MODULE AND INTAKE DOOR
ACTUATOR.
1) Turn the ignition switch to OFF.
2) Disconnect the auto A/C control module
connector.
3) Measure the resistance between intake
door actuator connector and auto A/C control
module connector.
Connector & terminal
LHD model:
(i49) No. 18 — (B91) No. 2:
(i49) No. 19 — (B91) No. 3:
(i49) No. 20 — (B91) No. 1:
RHD model:
(i49) No. 18 — (B91) No. 1:
(i49) No. 19 — (B91) No. 3:
(i49) No. 20 — (B91) No. 2:Is the resistance less than 1
Ω?Go to step 3.Repair the har-
ness between auto
A/C control mod-
ule and intake
door actuator.
3 CHECK OPERATION OF INTAKE DOOR AC-
TUATOR.
1) Connect the intake door actuator connec-
tor.
2) Ground the auto A/C control module con-
nector with a suitable wire.
3) Turn the ignition switch to ON, and check
the operation of intake door actuator.
Connector & terminal
(i49) No. 20 — Chassis ground:Does the actuator move to
FRESH side?Go to step 4.Replace the intake
door actuator.
4 CHECK OPERATION OF INTAKE DOOR AC-
TUATOR.
1) Turn the ignition switch to OFF.
2) Ground the auto A/C control module con-
nector with a suitable wire.
3) Turn the ignition switch to ON, and check
the operation of intake door actuator.
Connector & terminal:
(i49) No. 18 — Chassis ground:Does the actuator move to
RECIRC side?Replace the auto
A/C control mod-
ule.Replace the intake
door actuator.
Page 79 of 2870

AC-23
HVAC SYSTEM (AUTO A/C)(DIAGNOSTIC)
Diagnostic Procedure for Actuators
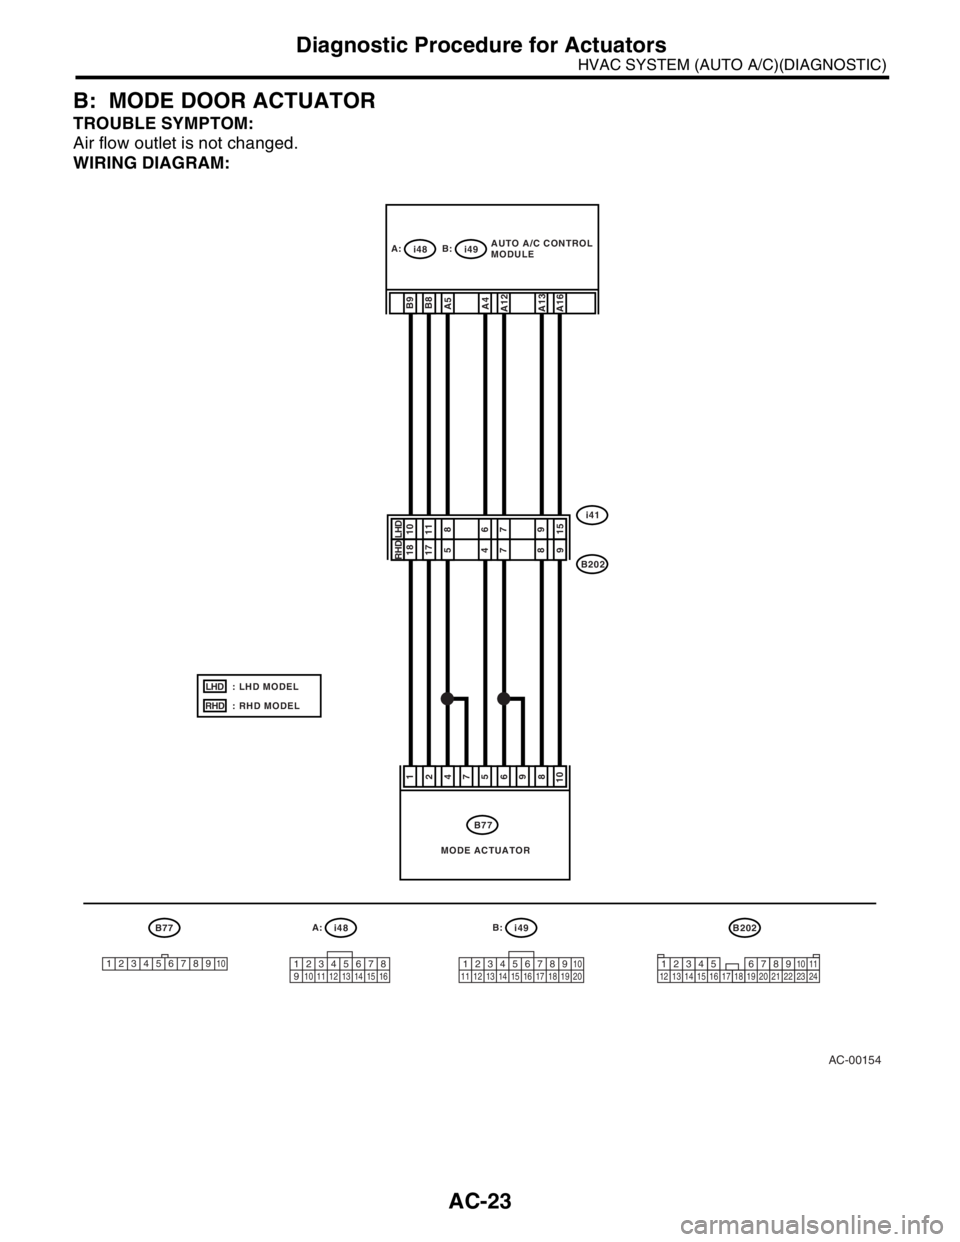
B: MODE DOOR ACTUATOR
TROUBLE SYMPTOM:
Air flow outlet is not changed.
WIRING DIAGRAM:
AC-00154
B77A:
i48B:
i49B202
12345678
910 11 12 13 14 15 1612345678910
11 12 13 14 15 16 17 18 19 203
4 128910 11
12 13 14 15 16 17 18 19 20 21 22 23 24567
B77
i41
B202
471210895
6
1110867915
B8B9A5
A4A12
A13
A16
12345678910
A:
i48B:
i49AUTO A/C CONTROL
MODULE
MODE ACTUATOR : LHD MODEL
: RHD MODEL
LHD
RHD
171854789LHD RHD
Page 80 of 2870

AC-24
HVAC SYSTEM (AUTO A/C)(DIAGNOSTIC)
Diagnostic Procedure for Actuators
Step Check Yes No
1 CHECK POWER SUPPLY FOR AUTO A/C
CONTROL MODULE SIDE.
1) Turn the ignition switch to ON.
2) Turn the mode control dial to VENT posi-
tion.
3) Press the defroster switch and measure the
voltage between auto A/C control module and
chassis ground when VENT is changed to DEF
position.
Connector & terminal
(i49) No. 9 (+) — Chassis ground (
−):Is the voltage more than 12 V? Go to step 2.Replace the auto
A/C control mod-
ule.
2 CHECK POWER SUPPLY FOR ACTUATOR
SIDE.
1) Turn the mode control dial to VENT posi-
tion.
2) Press the defroster switch and measure the
voltage between mode door actuator harness
connector and chassis ground when VENT is
changed to DEF position.
Connector & terminal
(B77) No. 1 (+) — Chassis ground (
−):Is the voltage more than 7 V (at
normal temperature)?Go to step 3.Repair the har-
ness between auto
A/C control mod-
ule and mode door
actuator.
3 CHECK POWER SUPPLY FOR AUTO A/C
CONTROL MODULE SIDE.
1) Press the defroster switch.
2) Turn the mode control dial to VENT position
and measure the voltage between auto A/C
control module and chassis ground when DEF
is changed to VENT position.
Connector & terminal
(i49) No. 8 (+) — Chassis ground (
−):Is the voltage more than 12 V? Go to step 4.Replace the auto
A/C control mod-
ule.
4 CHECK POWER SUPPLY FOR ACTUATOR
SIDE.
1) Press the defroster switch.
2) Turn the mode control dial to VENT position
and measure the voltage between mode door
actuator harness connector and chassis
ground when DEF is changed to VENT posi-
tion.
Connector & terminal
(B77) No. 2 (+) — Chassis ground (
−):Is the voltage more than 7 V (at
normal temperature)?Go to step 5.Repair the har-
ness between auto
A/C control mod-
ule and mode door
actuator.
5 CHECK ACTUATOR.
1) Turn the ignition switch to OFF.
2) Disconnect the connector from mode door
actuator.
3) Connect the battery positive (+) terminal to
terminal No. 1 and ground (−) terminal to termi-
nal No. 2 of mode door actuator to make sure
that actuator operates.
4) Connect the battery positive (+) terminal to
terminal No. 2 and ground (−) terminal to termi-
nal No. 1 of mode door actuator to make sure
that actuator operates.Does the motor operate nor-
mally?Go to step 6.Replace the mode
door actuator.