sensor SUBARU TRIBECA 2009 1.G Service Workshop Manual
[x] Cancel search | Manufacturer: SUBARU, Model Year: 2009, Model line: TRIBECA, Model: SUBARU TRIBECA 2009 1.GPages: 2453, PDF Size: 46.32 MB
Page 1833 of 2453
GD(H6DO)-221
Diagnostic Trouble Code (DTC) Detecting Criteria
GENERAL DESCRIPTION
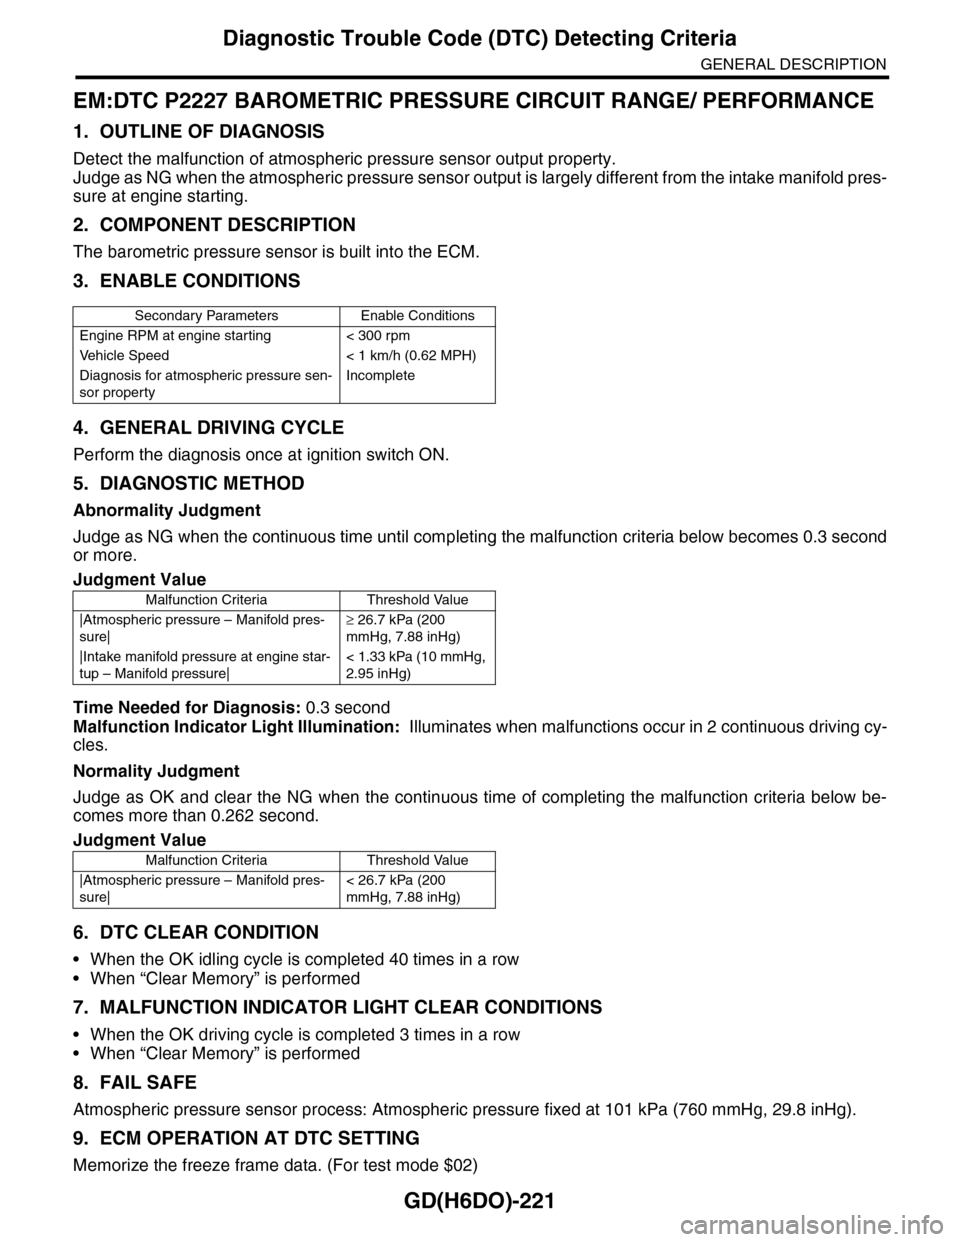
EM:DTC P2227 BAROMETRIC PRESSURE CIRCUIT RANGE/ PERFORMANCE
1. OUTLINE OF DIAGNOSIS
Detect the malfunction of atmospheric pressure sensor output property.
Judge as NG when the atmospheric pressure sensor output is largely different from the intake manifold pres-
sure at engine starting.
2. COMPONENT DESCRIPTION
The barometric pressure sensor is built into the ECM.
3. ENABLE CONDITIONS
4. GENERAL DRIVING CYCLE
Perform the diagnosis once at ignition switch ON.
5. DIAGNOSTIC METHOD
Abnormality Judgment
Judge as NG when the continuous time until completing the malfunction criteria below becomes 0.3 second
or more.
Time Needed for Diagnosis: 0.3 second
Malfunction Indicator Light Illumination: Illuminates when malfunctions occur in 2 continuous driving cy-
cles.
Normality Judgment
Judge as OK and clear the NG when the continuous time of completing the malfunction criteria below be-
comes more than 0.262 second.
6. DTC CLEAR CONDITION
•When the OK idling cycle is completed 40 times in a row
•When “Clear Memory” is performed
7. MALFUNCTION INDICATOR LIGHT CLEAR CONDITIONS
•When the OK driving cycle is completed 3 times in a row
•When “Clear Memory” is performed
8. FAIL SAFE
Atmospheric pressure sensor process: Atmospheric pressure fixed at 101 kPa (760 mmHg, 29.8 inHg).
9. ECM OPERATION AT DTC SETTING
Memorize the freeze frame data. (For test mode $02)
Secondary Parameters Enable Conditions
Engine RPM at engine starting < 300 rpm
Ve h i c l e S p e e d < 1 k m / h ( 0 . 6 2 M P H )
Diagnosis for atmospheric pressure sen-
sor property
Incomplete
Judgment Value
Malfunction Criteria Threshold Value
|Atmospheric pressure – Manifold pres-
sure|
≥ 26.7 kPa (200
mmHg, 7.88 inHg)
|Intake manifold pressure at engine star-
tup – Manifold pressure|
< 1.33 kPa (10 mmHg,
2.95 inHg)
Judgment Value
Malfunction Criteria Threshold Value
|Atmospheric pressure – Manifold pres-
sure|
< 26.7 kPa (200
mmHg, 7.88 inHg)
Page 1834 of 2453
GD(H6DO)-222
Diagnostic Trouble Code (DTC) Detecting Criteria
GENERAL DESCRIPTION
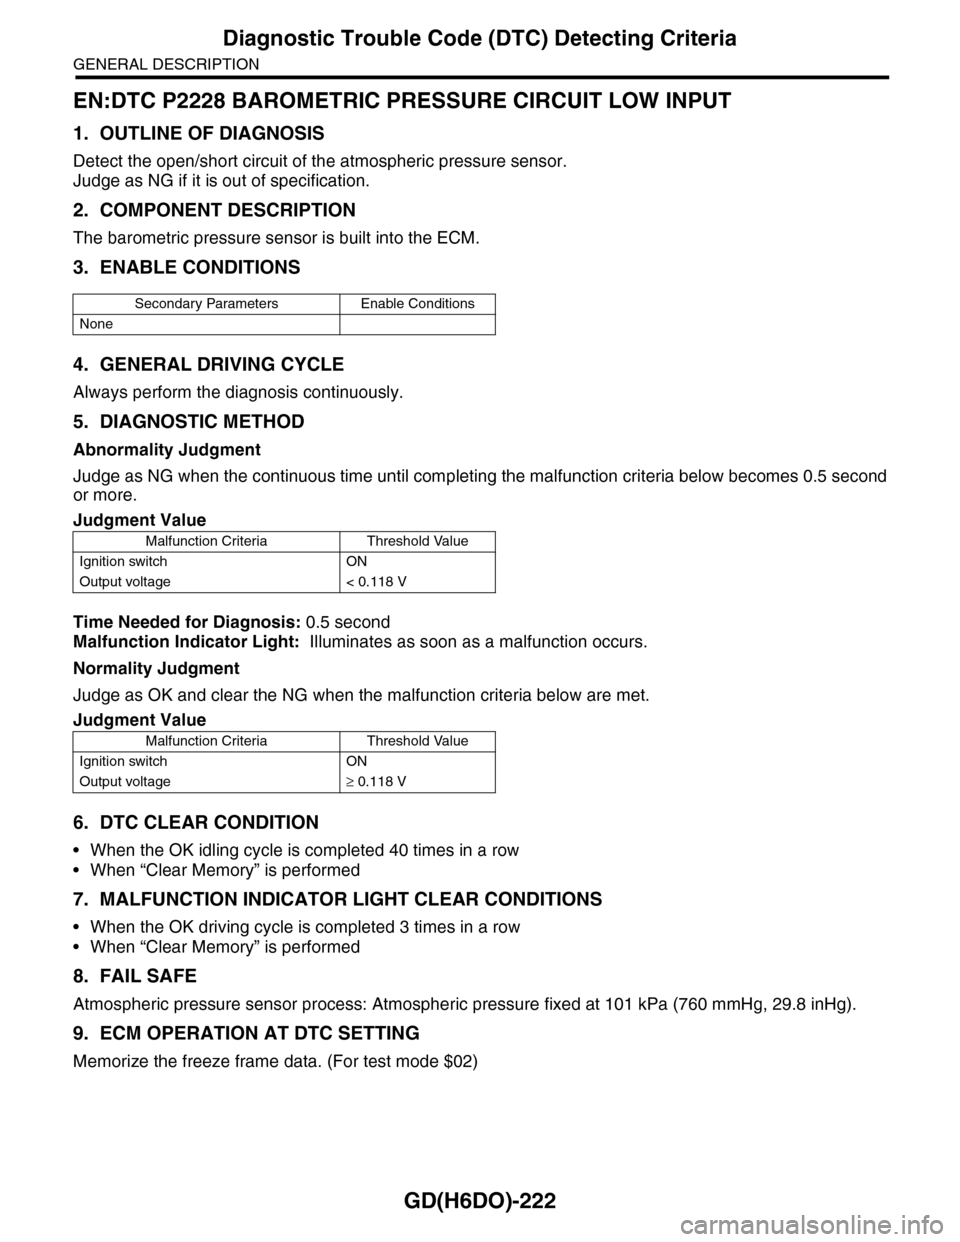
EN:DTC P2228 BAROMETRIC PRESSURE CIRCUIT LOW INPUT
1. OUTLINE OF DIAGNOSIS
Detect the open/short circuit of the atmospheric pressure sensor.
Judge as NG if it is out of specification.
2. COMPONENT DESCRIPTION
The barometric pressure sensor is built into the ECM.
3. ENABLE CONDITIONS
4. GENERAL DRIVING CYCLE
Always perform the diagnosis continuously.
5. DIAGNOSTIC METHOD
Abnormality Judgment
Judge as NG when the continuous time until completing the malfunction criteria below becomes 0.5 second
or more.
Time Needed for Diagnosis: 0.5 second
Malfunction Indicator Light: Illuminates as soon as a malfunction occurs.
Normality Judgment
Judge as OK and clear the NG when the malfunction criteria below are met.
6. DTC CLEAR CONDITION
•When the OK idling cycle is completed 40 times in a row
•When “Clear Memory” is performed
7. MALFUNCTION INDICATOR LIGHT CLEAR CONDITIONS
•When the OK driving cycle is completed 3 times in a row
•When “Clear Memory” is performed
8. FAIL SAFE
Atmospheric pressure sensor process: Atmospheric pressure fixed at 101 kPa (760 mmHg, 29.8 inHg).
9. ECM OPERATION AT DTC SETTING
Memorize the freeze frame data. (For test mode $02)
Secondary Parameters Enable Conditions
None
Judgment Value
Malfunction Criteria Threshold Value
Ignition switch ON
Output voltage < 0.118 V
Judgment Value
Malfunction Criteria Threshold Value
Ignition switch ON
Output voltage≥ 0.118 V
Page 1835 of 2453
GD(H6DO)-223
Diagnostic Trouble Code (DTC) Detecting Criteria
GENERAL DESCRIPTION
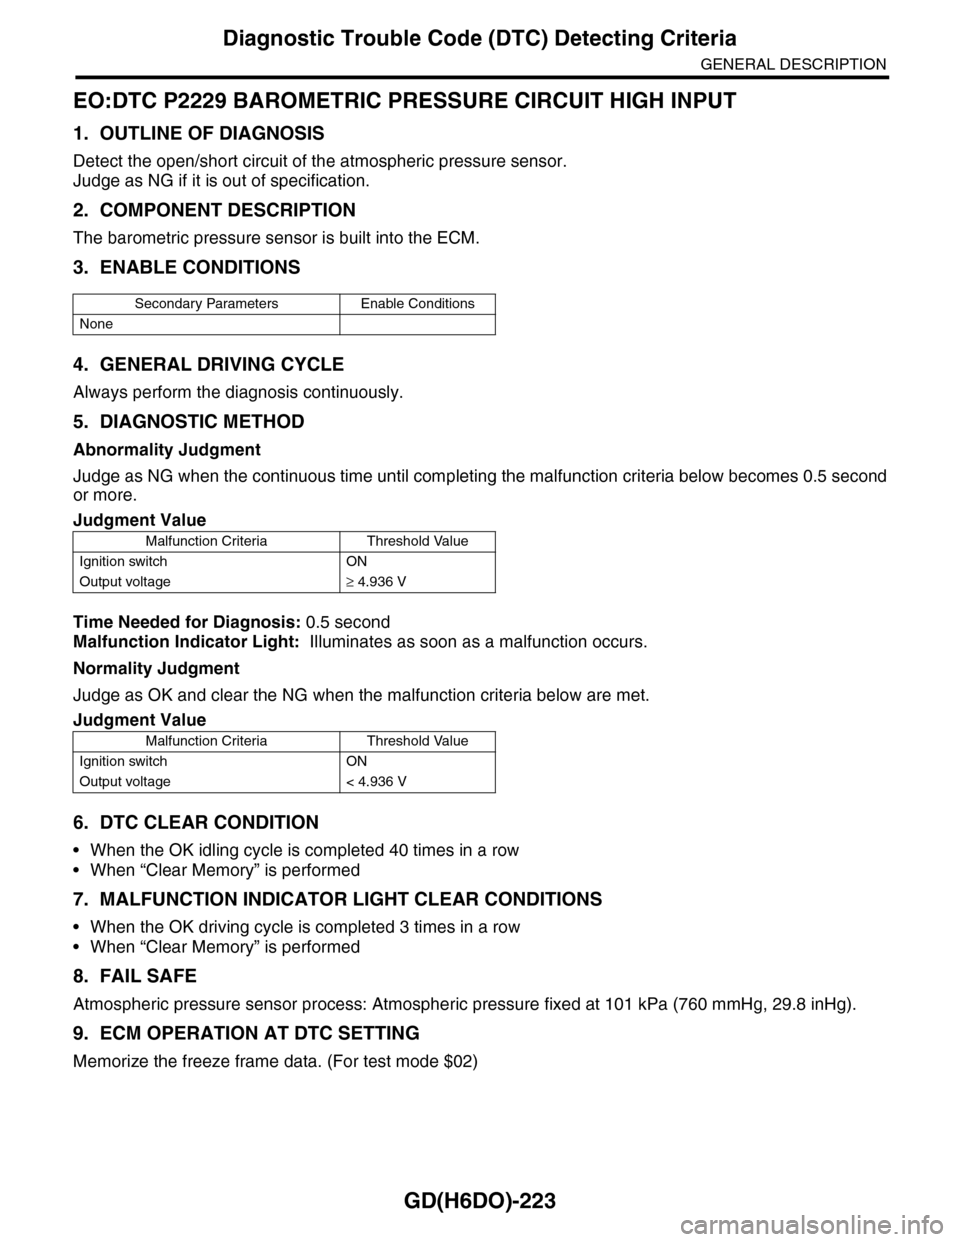
EO:DTC P2229 BAROMETRIC PRESSURE CIRCUIT HIGH INPUT
1. OUTLINE OF DIAGNOSIS
Detect the open/short circuit of the atmospheric pressure sensor.
Judge as NG if it is out of specification.
2. COMPONENT DESCRIPTION
The barometric pressure sensor is built into the ECM.
3. ENABLE CONDITIONS
4. GENERAL DRIVING CYCLE
Always perform the diagnosis continuously.
5. DIAGNOSTIC METHOD
Abnormality Judgment
Judge as NG when the continuous time until completing the malfunction criteria below becomes 0.5 second
or more.
Time Needed for Diagnosis: 0.5 second
Malfunction Indicator Light: Illuminates as soon as a malfunction occurs.
Normality Judgment
Judge as OK and clear the NG when the malfunction criteria below are met.
6. DTC CLEAR CONDITION
•When the OK idling cycle is completed 40 times in a row
•When “Clear Memory” is performed
7. MALFUNCTION INDICATOR LIGHT CLEAR CONDITIONS
•When the OK driving cycle is completed 3 times in a row
•When “Clear Memory” is performed
8. FAIL SAFE
Atmospheric pressure sensor process: Atmospheric pressure fixed at 101 kPa (760 mmHg, 29.8 inHg).
9. ECM OPERATION AT DTC SETTING
Memorize the freeze frame data. (For test mode $02)
Secondary Parameters Enable Conditions
None
Judgment Value
Malfunction Criteria Threshold Value
Ignition switch ON
Output voltage≥ 4.936 V
Judgment Value
Malfunction Criteria Threshold Value
Ignition switch ON
Output voltage < 4.936 V
Page 1838 of 2453
IG(H6DO)-3
General Description
IGNITION
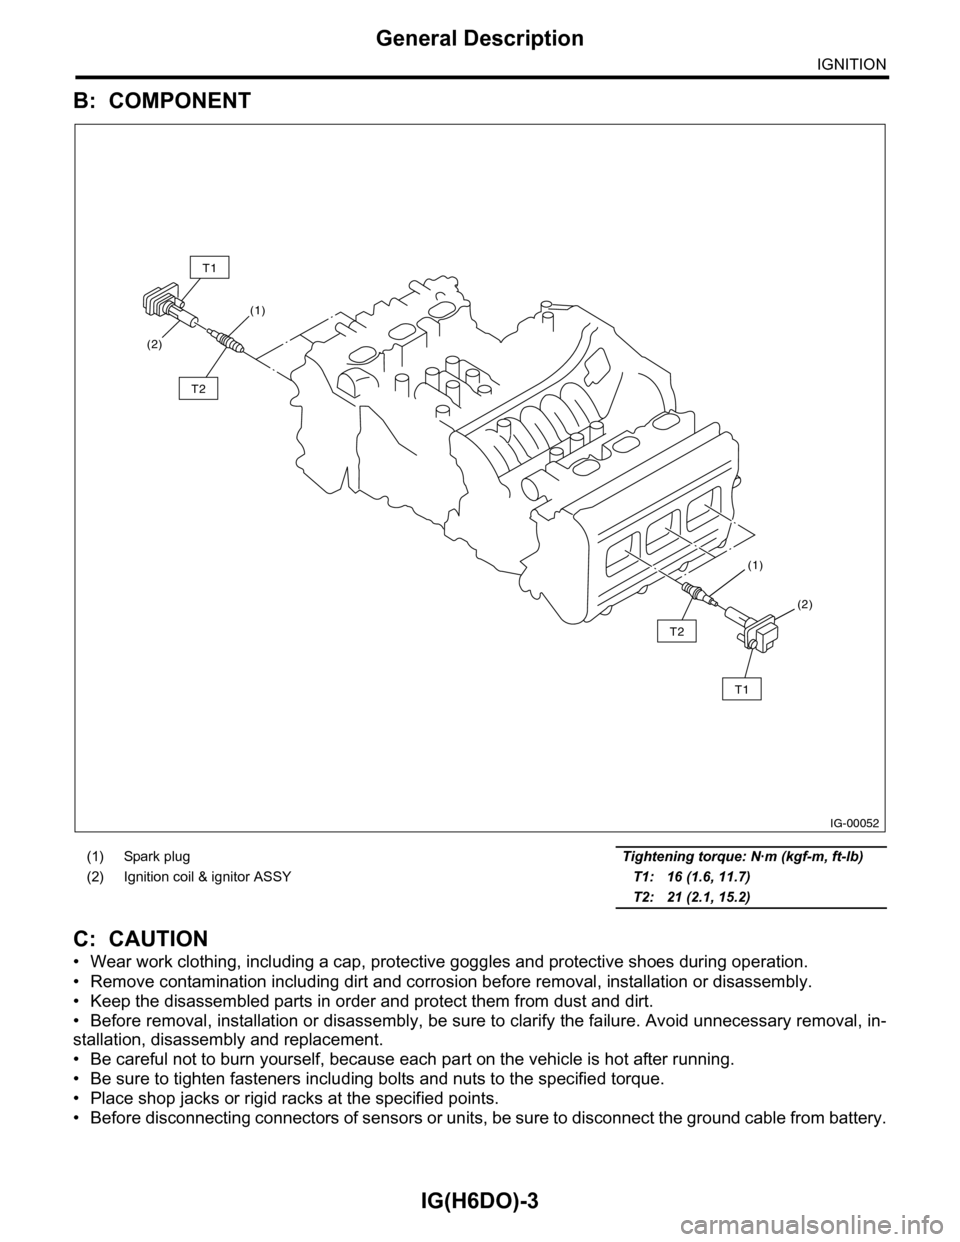
B: COMPONENT
C: CAUTION
•Wear work clothing, including a cap, protective goggles and protective shoes during operation.
•Remove contamination including dirt and corrosion before removal, installation or disassembly.
•Keep the disassembled parts in order and protect them from dust and dirt.
•Before removal, installation or disassembly, be sure to clarify the failure. Avoid unnecessary removal, in-
stallation, disassembly and replacement.
•Be careful not to burn yourself, because each part on the vehicle is hot after running.
•Be sure to tighten fasteners including bolts and nuts to the specified torque.
•Place shop jacks or rigid racks at the specified points.
•Before disconnecting connectors of sensors or units, be sure to disconnect the ground cable from battery.
(1) Spark plug Tightening torque: N·m (kgf-m, ft-lb)
(2) Ignition coil & ignitor ASSY T1: 16 (1.6, 11.7)
T2: 21 (2.1, 15.2)
IG-00052
(1)
(1)
(2)
(2)
T1
T2
T2
T1
Page 1845 of 2453
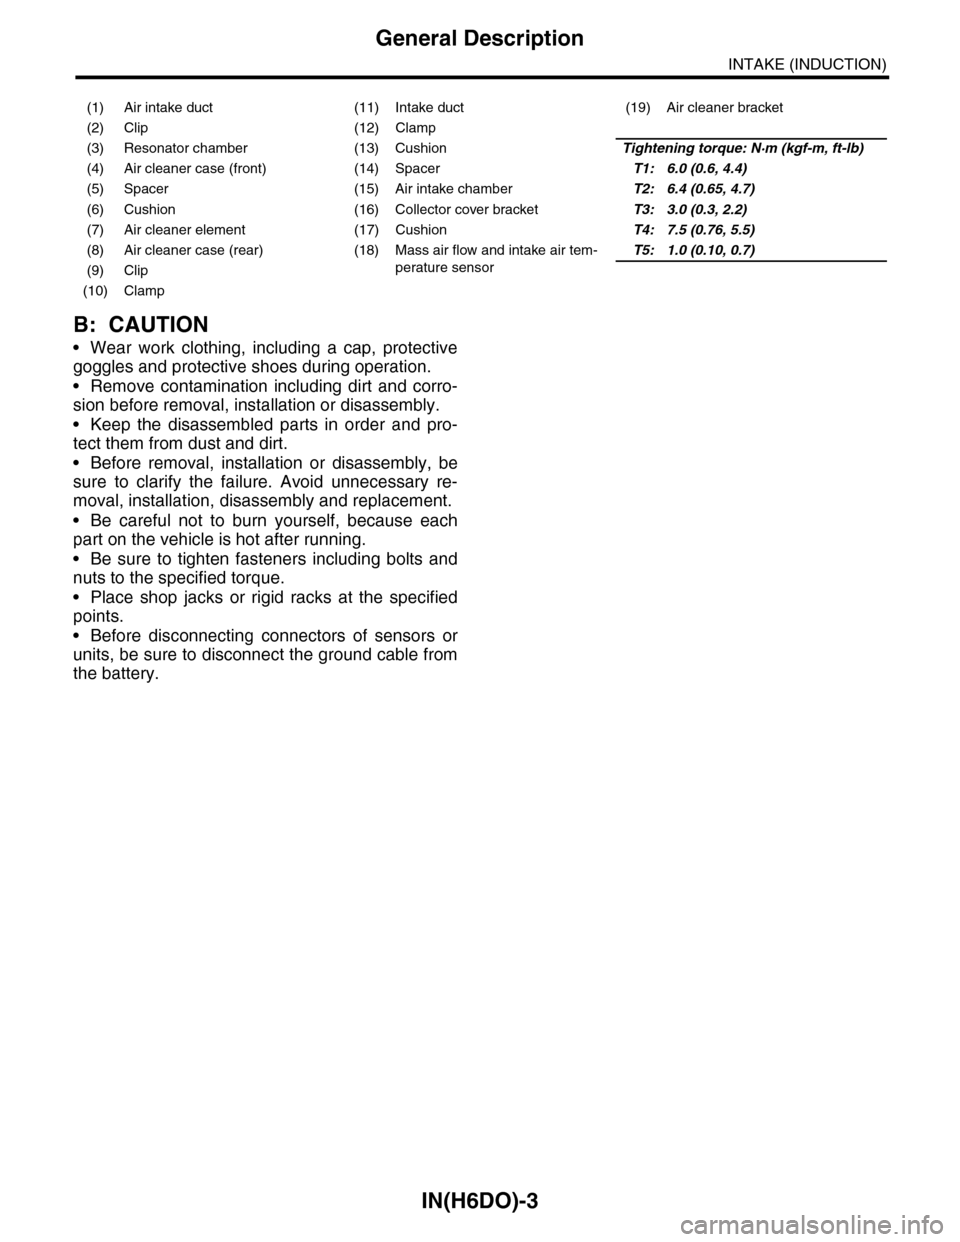
IN(H6DO)-3
General Description
INTAKE (INDUCTION)
B: CAUTION
•Wear work clothing, including a cap, protective
goggles and protective shoes during operation.
•Remove contamination including dirt and corro-
sion before removal, installation or disassembly.
•Keep the disassembled parts in order and pro-
tect them from dust and dirt.
•Before removal, installation or disassembly, be
sure to clarify the failure. Avoid unnecessary re-
moval, installation, disassembly and replacement.
•Be careful not to burn yourself, because each
part on the vehicle is hot after running.
•Be sure to tighten fasteners including bolts and
nuts to the specified torque.
•Place shop jacks or rigid racks at the specified
points.
•Before disconnecting connectors of sensors or
units, be sure to disconnect the ground cable from
the battery.
(1) Air intake duct (11) Intake duct (19) Air cleaner bracket
(2) Clip (12) Clamp
(3) Resonator chamber (13) CushionTightening torque: N·m (kgf-m, ft-lb)
(4) Air cleaner case (front) (14) SpacerT1: 6.0 (0.6, 4.4)
(5) Spacer (15) Air intake chamberT2: 6.4 (0.65, 4.7)
(6) Cushion (16) Collector cover bracketT3: 3.0 (0.3, 2.2)
(7) Air cleaner element (17) CushionT4: 7.5 (0.76, 5.5)
(8) Air cleaner case (rear) (18) Mass air flow and intake air tem-
perature sensor
T5: 1.0 (0.10, 0.7)
(9) Clip
(10) Clamp
Page 1846 of 2453
IN(H6DO)-4
Air Cleaner Element
INTAKE (INDUCTION)
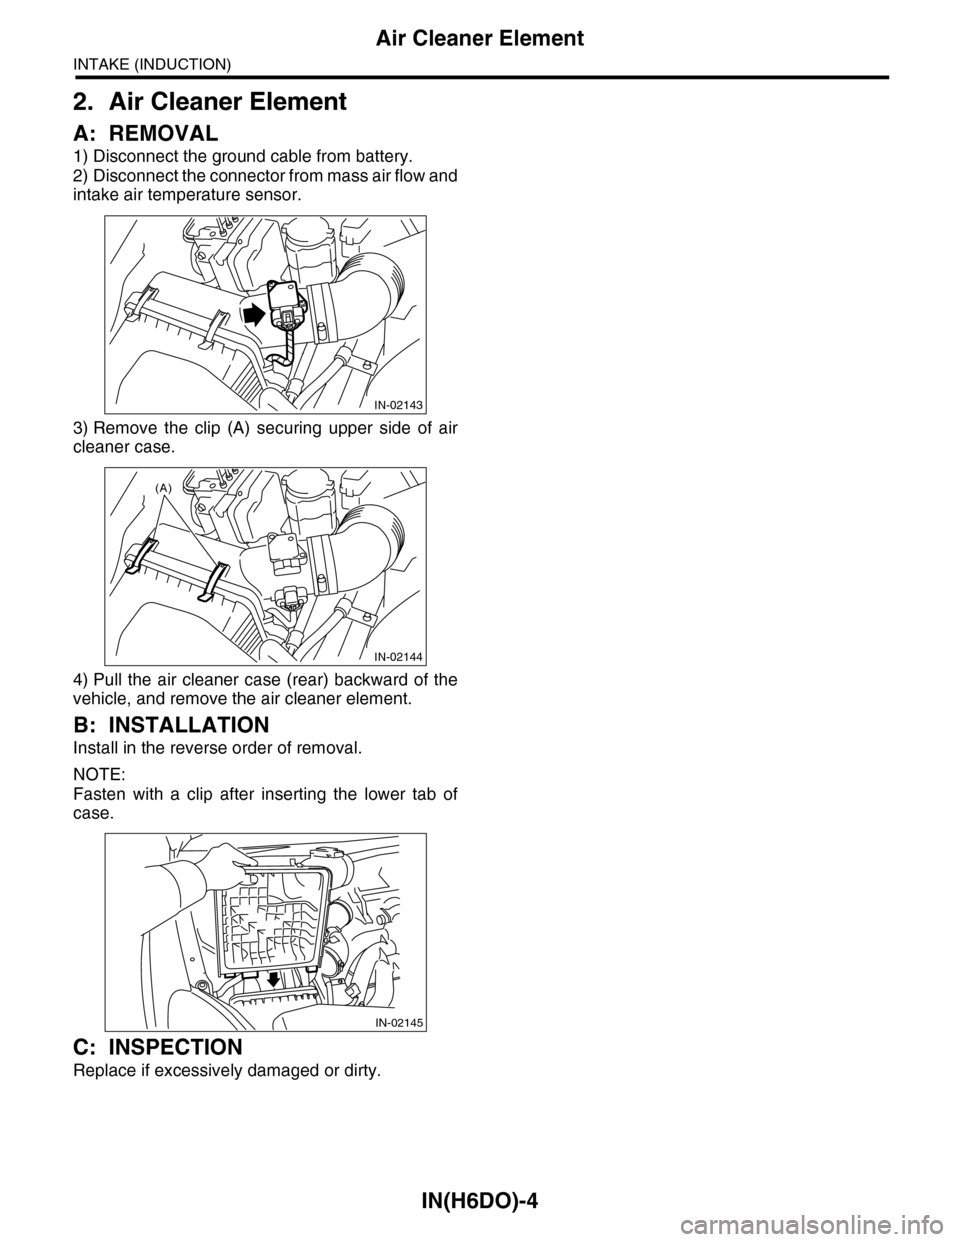
2. Air Cleaner Element
A: REMOVAL
1) Disconnect the ground cable from battery.
2) Disconnect the connector from mass air flow and
intake air temperature sensor.
3) Remove the clip (A) securing upper side of air
cleaner case.
4) Pull the air cleaner case (rear) backward of the
vehicle, and remove the air cleaner element.
B: INSTALLATION
Install in the reverse order of removal.
NOTE:
Fasten with a clip after inserting the lower tab of
case.
C: INSPECTION
Replace if excessively damaged or dirty.
IN-02143
IN-02144
(A)
IN-02145
Page 1847 of 2453
IN(H6DO)-5
Air Cleaner Case
INTAKE (INDUCTION)
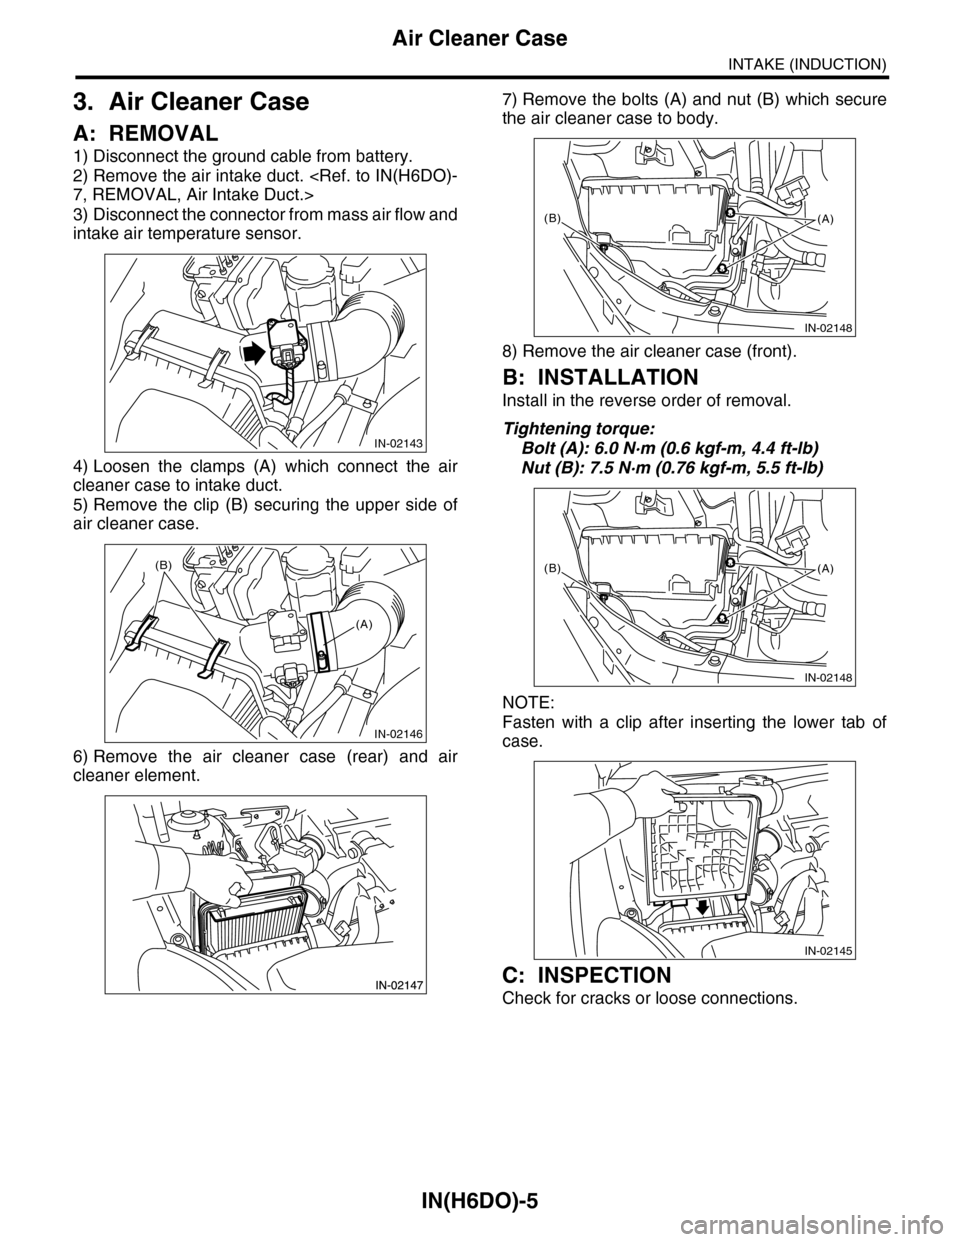
3. Air Cleaner Case
A: REMOVAL
1) Disconnect the ground cable from battery.
2) Remove the air intake duct.
3) Disconnect the connector from mass air flow and
intake air temperature sensor.
4) Loosen the clamps (A) which connect the air
cleaner case to intake duct.
5) Remove the clip (B) securing the upper side of
air cleaner case.
6) Remove the air cleaner case (rear) and air
cleaner element.
7) Remove the bolts (A) and nut (B) which secure
the air cleaner case to body.
8) Remove the air cleaner case (front).
B: INSTALLATION
Install in the reverse order of removal.
Tightening torque:
Bolt (A): 6.0 N·m (0.6 kgf-m, 4.4 ft-lb)
Nut (B): 7.5 N·m (0.76 kgf-m, 5.5 ft-lb)
NOTE:
Fasten with a clip after inserting the lower tab of
case.
C: INSPECTION
Check for cracks or loose connections.
IN-02143
IN-02146
(B)
(A)
IN-02148
(B)(A)
IN-02148
(B)(A)
IN-02145
Page 1853 of 2453
LU(H6DO)-4
General Description
LUBRICATION
C: CAUTION
•Wear work clothing, including a cap, protective goggles and protective shoes during operation.
•Remove contamination including dirt and corrosion before removal, installation or disassembly.
•Keep the disassembled parts in order and protect them from dust and dirt.
•Before removal, installation or disassembly, be sure to clarify the failure. Avoid unnecessary removal, in-
stallation, disassembly and replacement.
•Be careful not to burn yourself, because each part on the vehicle is hot after running.
•Be sure to tighten fasteners including bolts and nuts to the specified torque.
•Place shop jacks or rigid racks at the specified points.
•Before disconnecting connectors of sensors or units, be sure to disconnect the ground cable from battery.
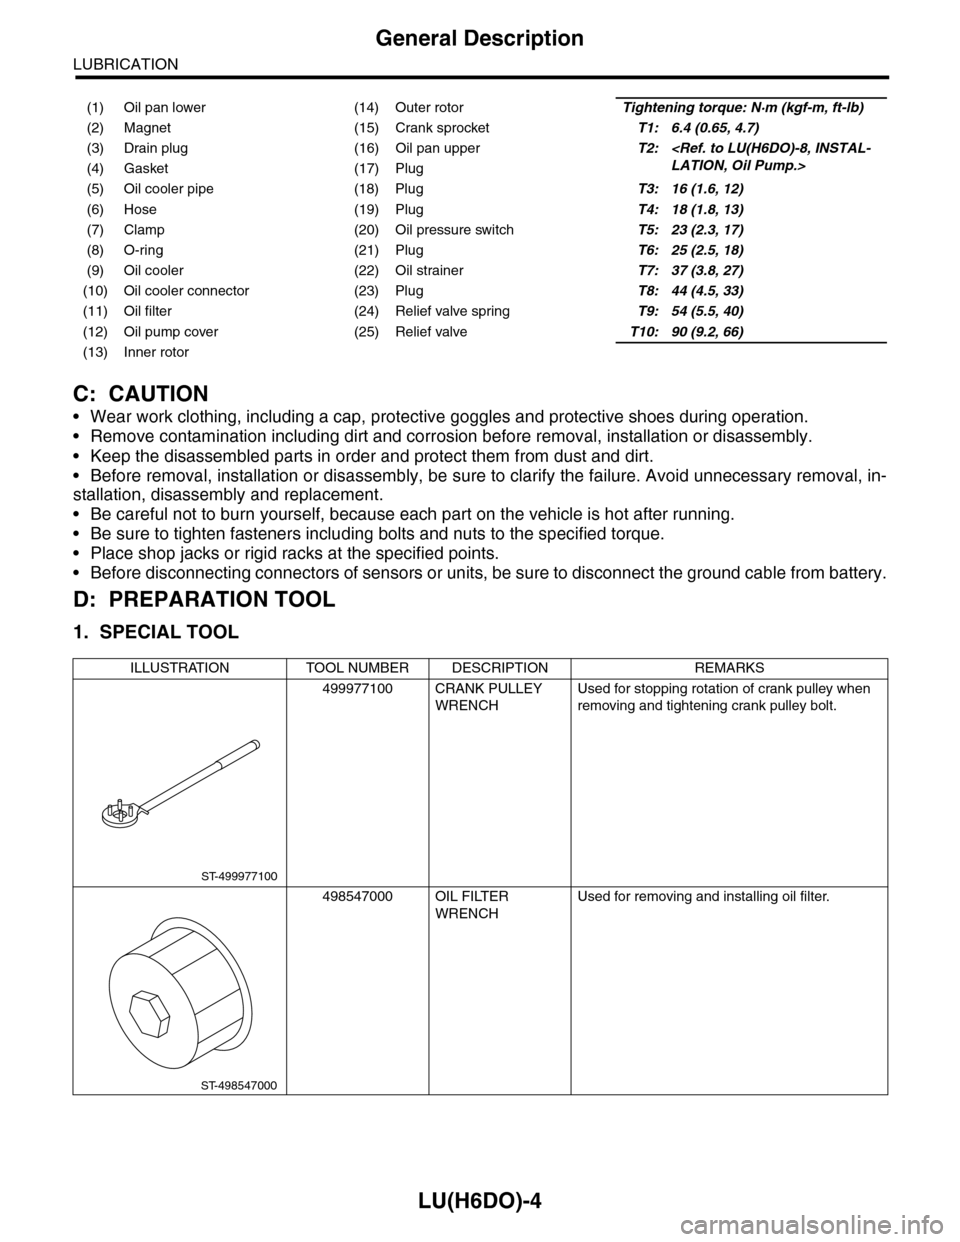
D: PREPARATION TOOL
1. SPECIAL TOOL
(1) Oil pan lower (14) Outer rotorTightening torque: N·m (kgf-m, ft-lb)
(2) Magnet (15) Crank sprocketT1: 6.4 (0.65, 4.7)
(3) Drain plug (16) Oil pan upperT2:
(5) Oil cooler pipe (18) PlugT3: 16 (1.6, 12)
(6) Hose (19) PlugT4: 18 (1.8, 13)
(7) Clamp (20) Oil pressure switchT5: 23 (2.3, 17)
(8) O-ring (21) PlugT6: 25 (2.5, 18)
(9) Oil cooler (22) Oil strainerT7: 37 (3.8, 27)
(10) Oil cooler connector (23) PlugT8: 44 (4.5, 33)
(11) Oil filter (24) Relief valve springT9: 54 (5.5, 40)
(12) Oil pump cover (25) Relief valveT10: 90 (9.2, 66)
(13) Inner rotor
ILLUSTRATION TOOL NUMBER DESCRIPTION REMARKS
499977100 CRANK PULLEY
WRENCH
Used for stopping rotation of crank pulley when
removing and tightening crank pulley bolt.
498547000 OIL FILTER
WRENCH
Used for removing and installing oil filter.
ST-499977100
ST-498547000
Page 1878 of 2453
ME(H6DO)-12
General Description
MECHANICAL
(1) Cylinder block (RH) (13) ClampTightening torque: N·m (kgf-m, ft-lb)
(2) Cylinder block (LH) (14) HoseT1: 6.4 (0.65, 4.7)
(3) Rear oil seal (15) Oil cooler pipeT2: 18 (1.8, 13.3)
(4) Service hole cover (16) Oil coolerT3: 25 (2.5, 18)
(5) O-ring (17) ConnectorT4: 16 (1.6, 12)
(6) Oil pan upper (18) Oil filterT5: 37 (3.8, 27)
(7) Oil pressure switch (19) PlugT6: 44 (4.5, 33)
(8) Oil strainer (20) Crankshaft position sensor holderT7: 54 (5.5, 40)
(9) Magnet (21) Relief valveT8: 70 (7.1, 52)
(10) Oil pan lower (22) Relief valve springT9: 23 (2.3, 17)
(11) Metal gasket (23) PlugT10: 90 (9.2, 67)
(12) Drain plug
Page 1879 of 2453
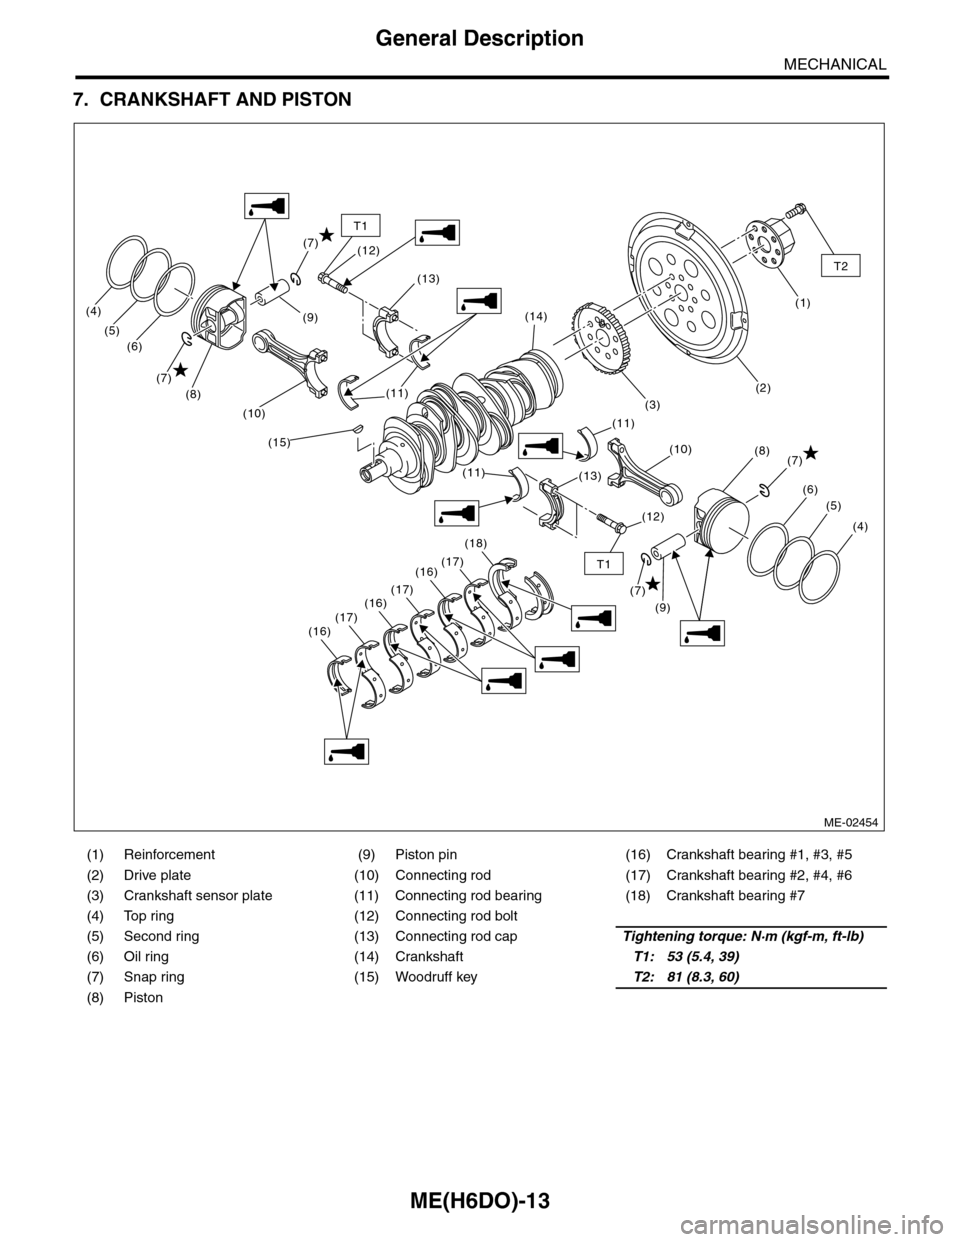
ME(H6DO)-13
General Description
MECHANICAL
7. CRANKSHAFT AND PISTON
(1) Reinforcement (9) Piston pin (16) Crankshaft bearing #1, #3, #5
(2) Drive plate (10) Connecting rod (17) Crankshaft bearing #2, #4, #6
(3) Crankshaft sensor plate (11) Connecting rod bearing (18) Crankshaft bearing #7
(4) Top ring (12) Connecting rod bolt
(5) Second ring (13) Connecting rod capTightening torque: N·m (kgf-m, ft-lb)
(6) Oil ring (14) CrankshaftT1: 53 (5.4, 39)
(7) Snap ring (15) Woodruff keyT2: 81 (8.3, 60)
(8) Piston
(9)(1)
(3)
(2)
(4)
(5)
(6)
(7)(8)
(9)
(7)
(8)
(7)
(6)
(5)
(4)
(7)
(15)
(11)
(13)
(12)
(12)
(14)
(10)
(11)
(11)(13)
(18)
(16)(17)
(17)(16)(17)(16)
(10)
T1
T2
T1
ME-02454