TOYOTA BZ4X 2022 Owners Manual (in English)
Manufacturer: TOYOTA, Model Year: 2022, Model line: BZ4X, Model: TOYOTA BZ4X 2022Pages: 674, PDF Size: 120.02 MB
Page 141 of 674
139
2
Owners Manual_Europe_M42D76_en
2-2. Charging
Electric Vehicle system
Change the desired settings as
described starting from step 7 of the
“Registering the charging schedule”
procedure. ( P.136)
Press to return to the previous
screen.
“Delete”
A deletion confirmation screen will be
displayed.
Press or of the meter control
switches to select “Yes”, and then press
to delete the selected charging
schedule.
To cancel deletion, select “No” and then
press .
Press to return to the previous
screen.
■Setting “Charge Now” to on
The “Charge Now” setting can be
changed by performing one of the
two following procedures.
Operation on “Charging Sched-
ule” screen
1 Perform step 1 to 4 of the “Reg-
istering the charging schedule”
procedure ( P.136) and display
“Charging Schedule” screen.
2 Press or of the meter
control switches to select
“Charge Now”, and then press
.
Each time is pressed, “Charge
Now” switches between on and off.
Operation on “Closing Display”
screen*
*: If “Closing Display” is not set to
“Charging Schedule” on the
screen of the multi-information dis-
play, the “Closing Display” is not dis-
played. In this case, check the
settings on the multi-information dis-
play.
1 Turn the power switch off. The
“Closing Display” screen is dis-
played on the multi-information
display.
(If the door is opened while wait-
ing for charging schedule, the
same screen will be displayed.)
2 Press to set “Charge Now”
to on.
After setting operations are com-
plete, charging starts when the AC
charging connector is connected.
■Displaying “Next Event”
1 Perform step 1 to 4 of the “Reg-
istering the charging schedule”
procedure ( P.136) and display
“Charging Schedule” screen.
2 Press or of the meter
control switches to select “Next
Event”, and then press .
The “Next Event” screen will be dis- played.
Page 142 of 674
140
Owners Manual_Europe_M42D76_en
2-2. Charging
■When charging schedule setting operations are canceled
When the vehicle is in the following con- ditions, charging schedule setting oper-ations are canceled.
●The power switch is operated before the settings are confirmed
●The vehicle starts off
●A display with a higher priority than that of the charging schedule setting is shown
For details on how to operate the
audio system screen, refer to “Mul-
timedia owner’s manual”.
Setting operations related to the
charging schedule are performed
on the “Charging schedule” screen.
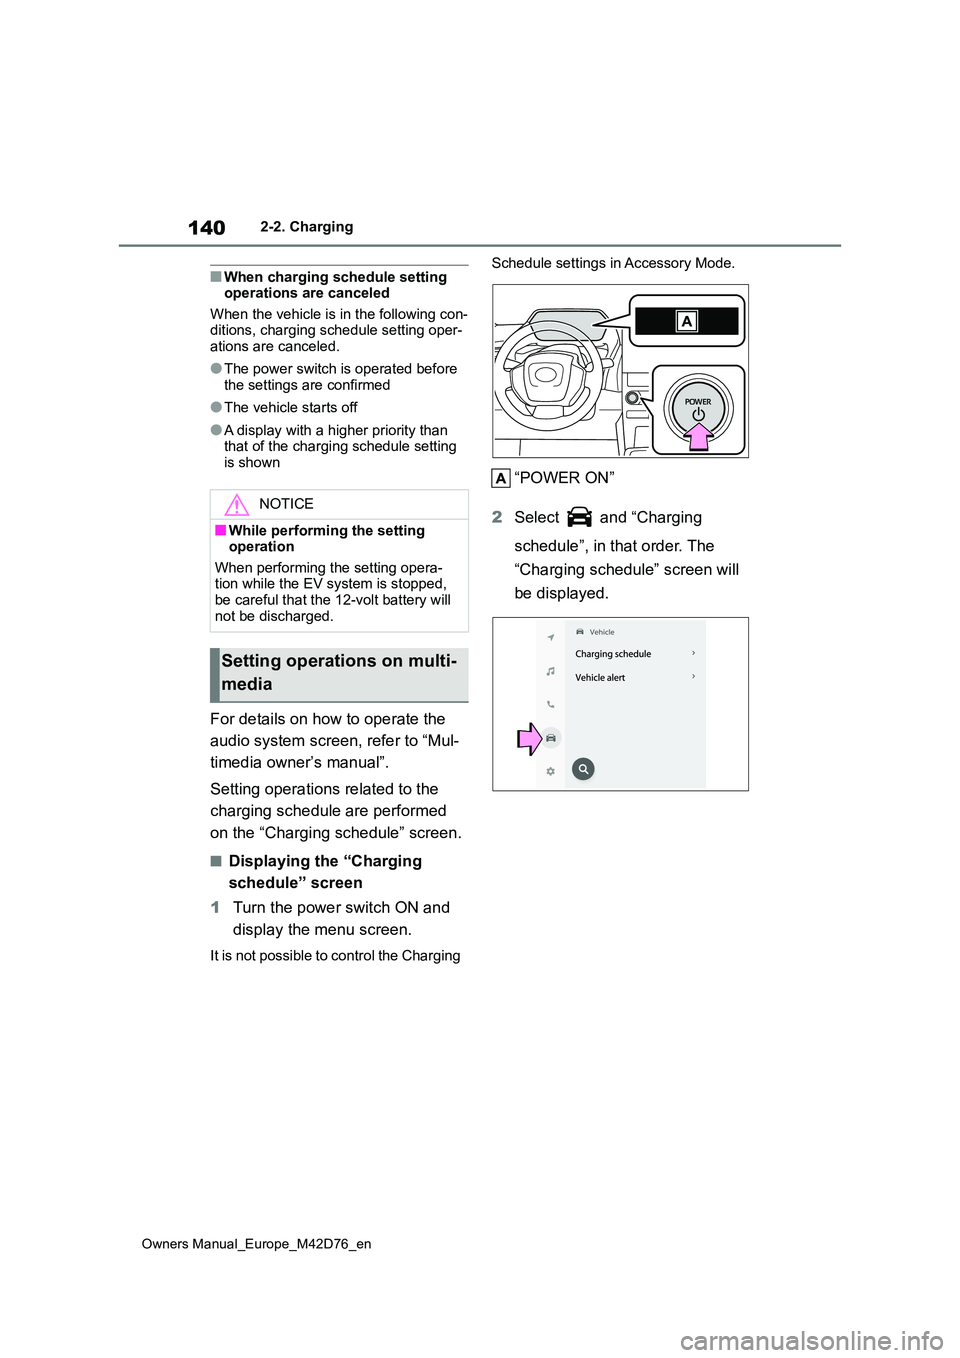
■Displaying the “Charging
schedule” screen
1 Turn the power switch ON and
display the menu screen.
It is not possible to control the Charging
Schedule settings in Accessory Mode.
“POWER ON”
2 Select and “Charging
schedule”, in that order. The
“Charging schedule” screen will
be displayed.
NOTICE
■While performing the setting operation
When performing the setting opera- tion while the EV system is stopped, be careful that the 12-volt battery will
not be discharged.
Setting operations on multi-
media
Page 143 of 674
141
2
Owners Manual_Europe_M42D76_en
2-2. Charging
Electric Vehicle system
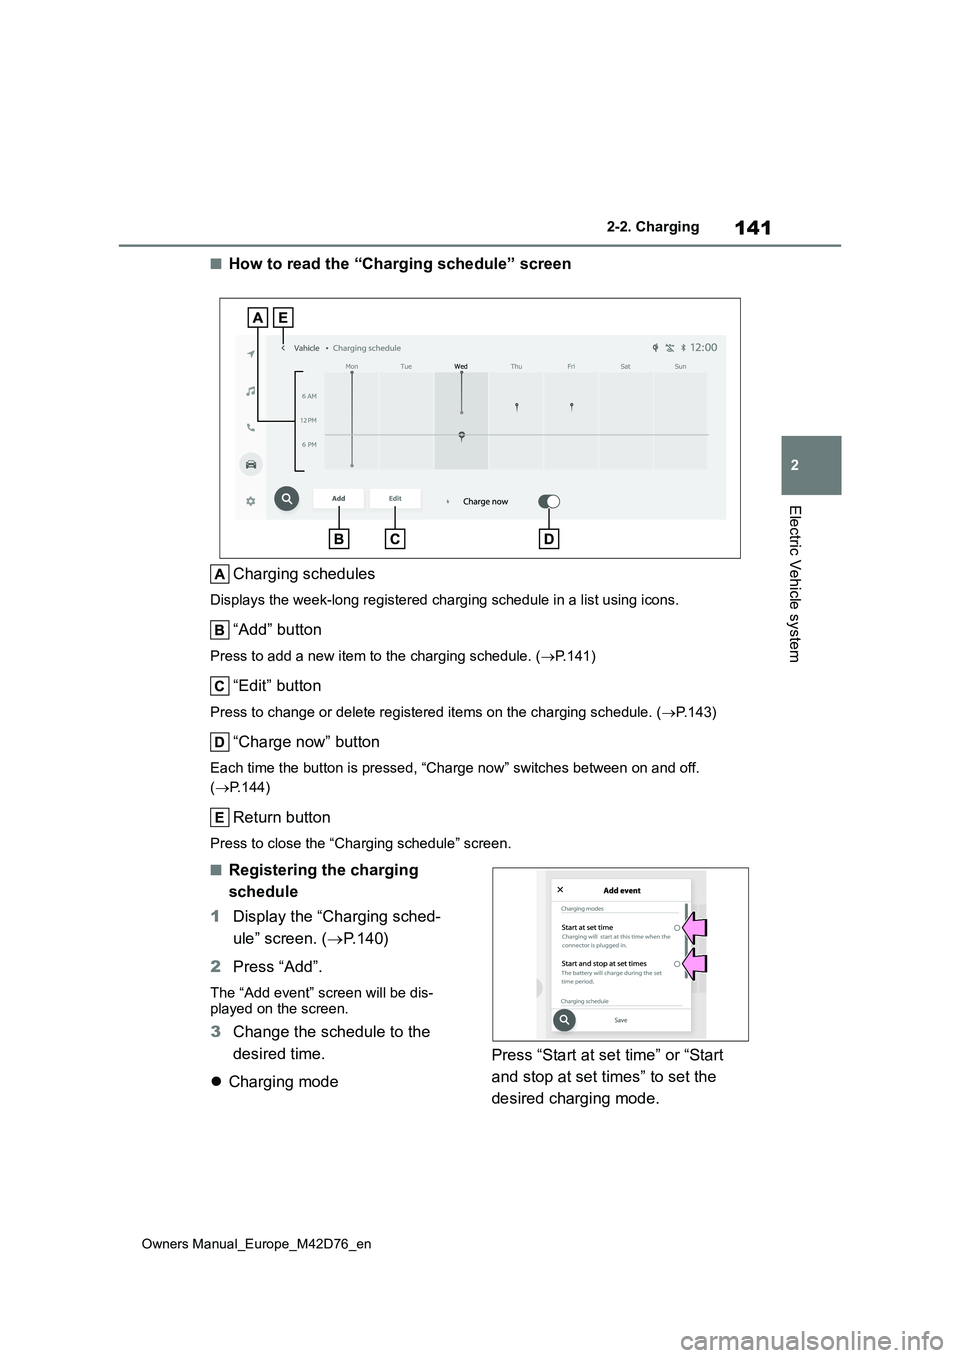
■How to read the “Charging schedule” screen
Charging schedules
Displays the week-long registered charging schedule in a list u sing icons.
“Add” button
Press to add a new item to the charging schedule. (P.141)
“Edit” button
Press to change or delete registered items on the charging schedule. (P.143)
“Charge now” button
Each time the button is pressed, “Charge now” switches between on and off.
( P.144)
Return button
Press to close the “Charging schedule” screen.
■Registering the charging
schedule
1 Display the “Charging sched-
ule” screen. ( P. 1 4 0 )
2 Press “Add”.
The “Add event” screen will be dis- played on the screen.
3 Change the schedule to the
desired time.
Charging mode
Press “Start at set time” or “Start
and stop at set times” to set the
desired charging mode.
Page 144 of 674
142
Owners Manual_Europe_M42D76_en
2-2. Charging
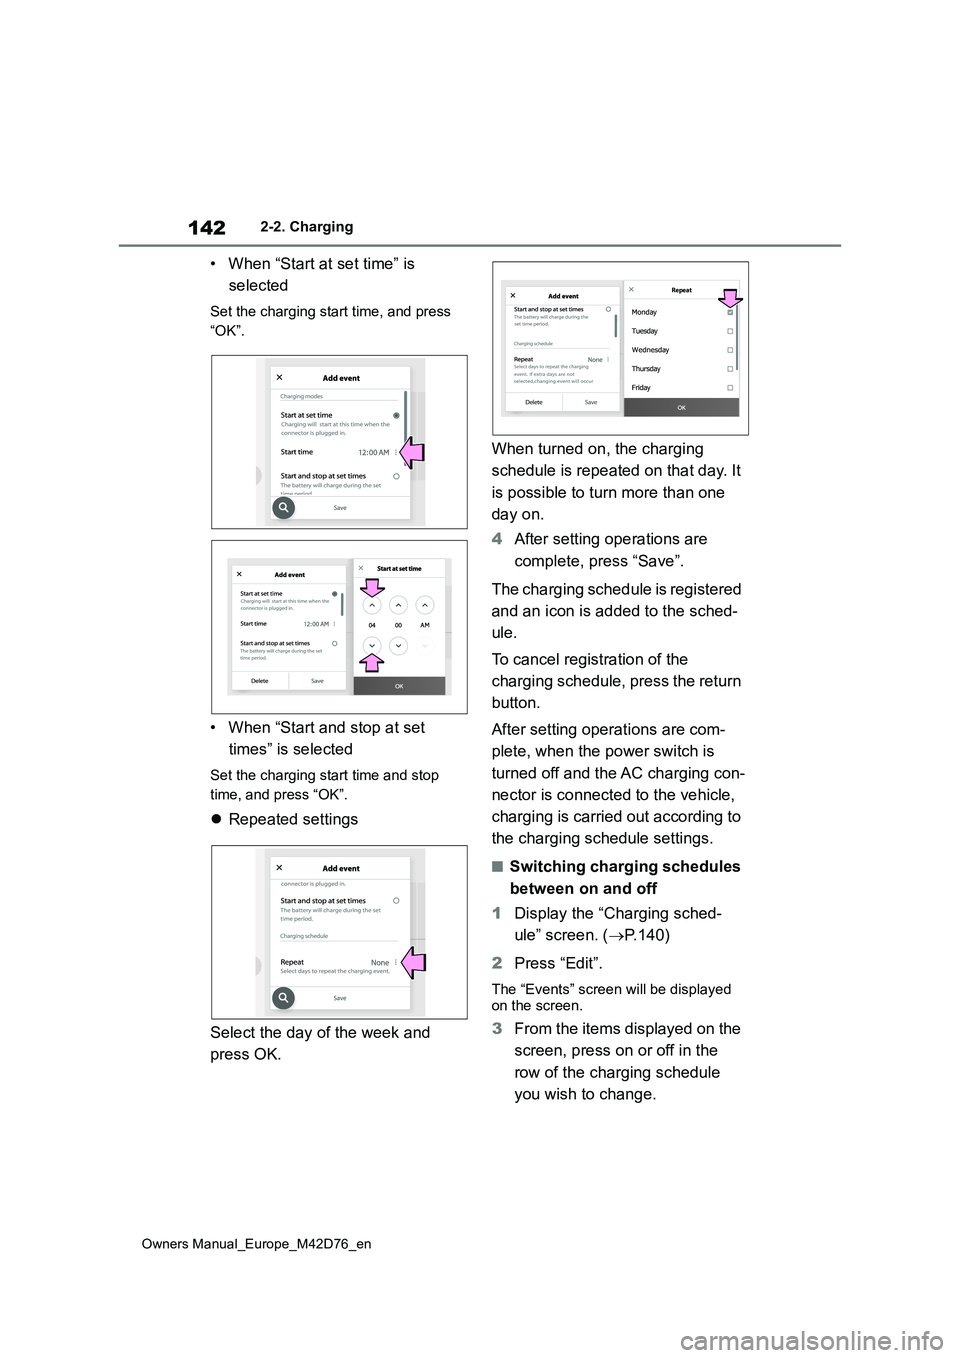
• When “Start at set time” is
selected
Set the charging start time, and press
“OK”.
• When “Start and stop at set
times” is selected
Set the charging start time and stop
time, and press “OK”.
Repeated settings
Select the day of the week and
press OK.
When turned on, the charging
schedule is repeated on that day. It
is possible to turn more than one
day on.
4 After setting operations are
complete, press “Save”.
The charging schedule is registered
and an icon is added to the sched-
ule.
To cancel registration of the
charging schedule, press the return
button.
After setting operations are com-
plete, when the power switch is
turned off and the AC charging con-
nector is connected to the vehicle,
charging is carried out according to
the charging schedule settings.
■Switching charging schedules
between on and off
1 Display the “Charging sched-
ule” screen. ( P.140)
2 Press “Edit”.
The “Events” screen will be displayed on the screen.
3 From the items displayed on the
screen, press on or off in the
row of the charging schedule
you wish to change.
Repeat
Page 145 of 674
143
2
Owners Manual_Europe_M42D76_en
2-2. Charging
Electric Vehicle system
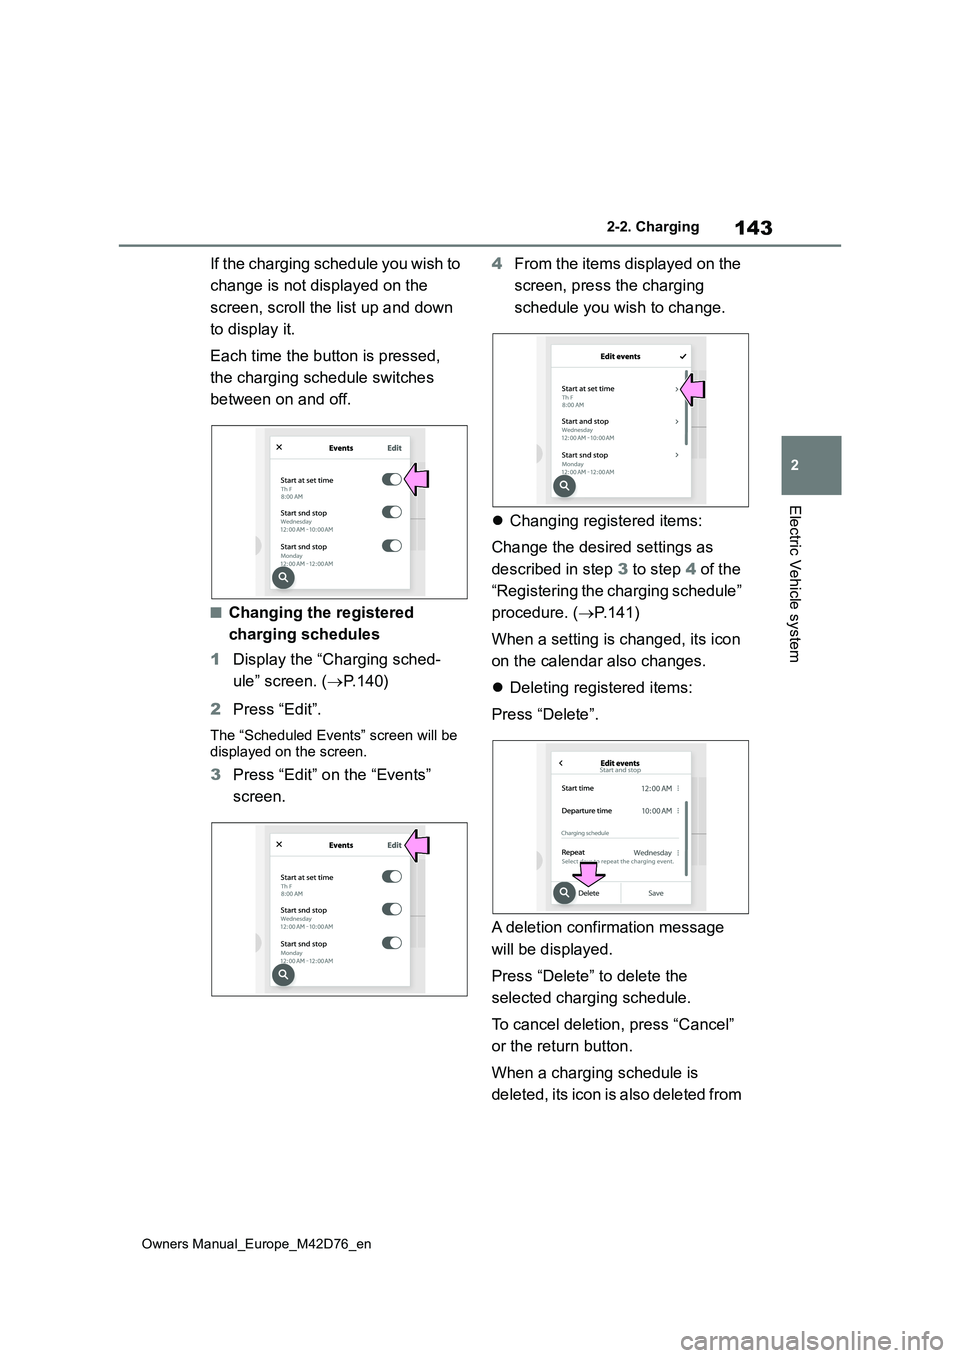
If the charging schedule you wish to
change is not displayed on the
screen, scroll the list up and down
to display it.
Each time the button is pressed,
the charging schedule switches
between on and off.
■Changing the registered
charging schedules
1 Display the “Charging sched-
ule” screen. ( P. 1 4 0 )
2 Press “Edit”.
The “Scheduled Events” screen will be displayed on the screen.
3 Press “Edit” on the “Events”
screen.
4 From the items displayed on the
screen, press the charging
schedule you wish to change.
Changing registered items:
Change the desired settings as
described in step 3 to step 4 of the
“Registering the charging schedule”
procedure. ( P.141)
When a setting is changed, its icon
on the calendar also changes.
Deleting registered items:
Press “Delete”.
A deletion confirmation message
will be displayed.
Press “Delete” to delete the
selected charging schedule.
To cancel deletion, press “Cancel”
or the return button.
When a charging schedule is
deleted, its icon is also deleted from
Page 146 of 674
144
Owners Manual_Europe_M42D76_en
2-2. Charging
the calendar.
■Turning “Charge now” on
1 Display the “Charging sched-
ule” screen. ( P. 1 4 0 )
2 Press “Charge now”.
Each time the button is pressed,
“Charge now” switches between on
and off.
After setting operations are com-
plete, charging starts when the AC
charging connector is connected.
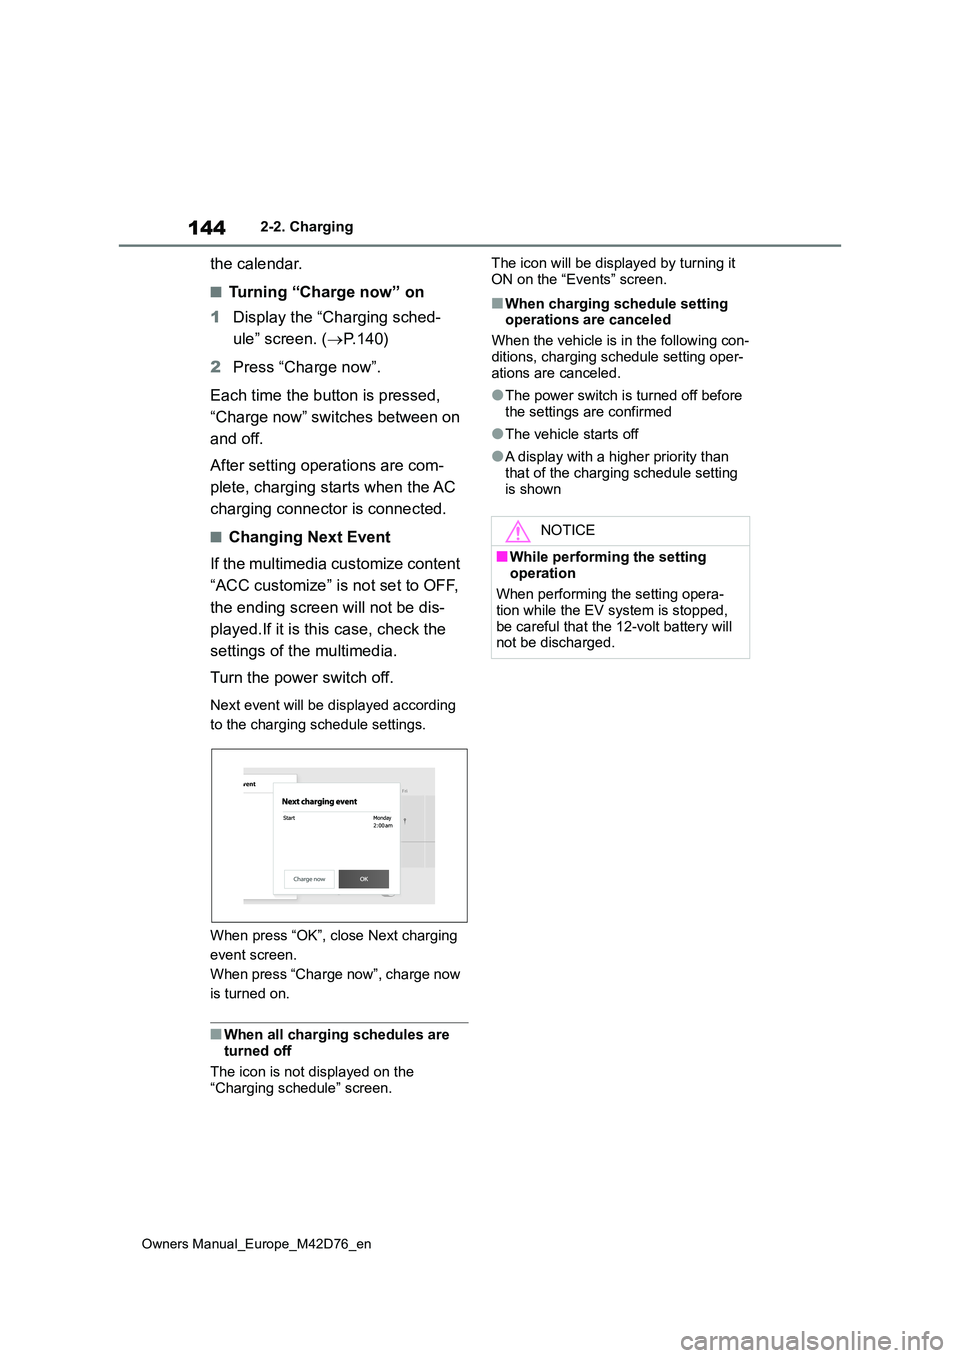
■Changing Next Event
If the multimedia customize content
“ACC customize” is not set to OFF,
the ending screen will not be dis-
played.If it is this case, check the
settings of the multimedia.
Turn the power switch off.
Next event will be displayed according
to the charging schedule settings.
When press “OK”, close Next charging
event screen.
When press “Charge now”, charge now
is turned on.
■When all charging schedules are turned off
The icon is not displayed on the
“Charging schedule” screen.
The icon will be displayed by turning it
ON on the “Events” screen.
■When charging schedule setting operations are canceled
When the vehicle is in the following con-
ditions, charging schedule setting oper- ations are canceled.
●The power switch is turned off before the settings are confirmed
●The vehicle starts off
●A display with a higher priority than
that of the charging schedule setting is shown
NOTICE
■While performing the setting
operation
When performing the setting opera- tion while the EV system is stopped,
be careful that the 12-volt battery will not be discharged.
Page 147 of 674
145
2
Owners Manual_Europe_M42D76_en
2-2. Charging
Electric Vehicle system
1Connect the charge cable to the
vehicle to start charging.
AC Charging: P.121
DC Charging: P. 1 2 9
2Turn the power switch to ON
while charging.
My Room Mode settings is automati- cally displayed on the multi-information
display.
3 Operate the meter control
switches to select “Yes”, and
then press “OK”.
My Room Mode is started and it is pos- sible to use the air conditioning system, audio system, etc.
Select “No” and press “OK” when My Room Mode is not being used.
To disable My Room Mode, turn the
power switch off.
My Room Mode will automatically be off when DC charging is completed.
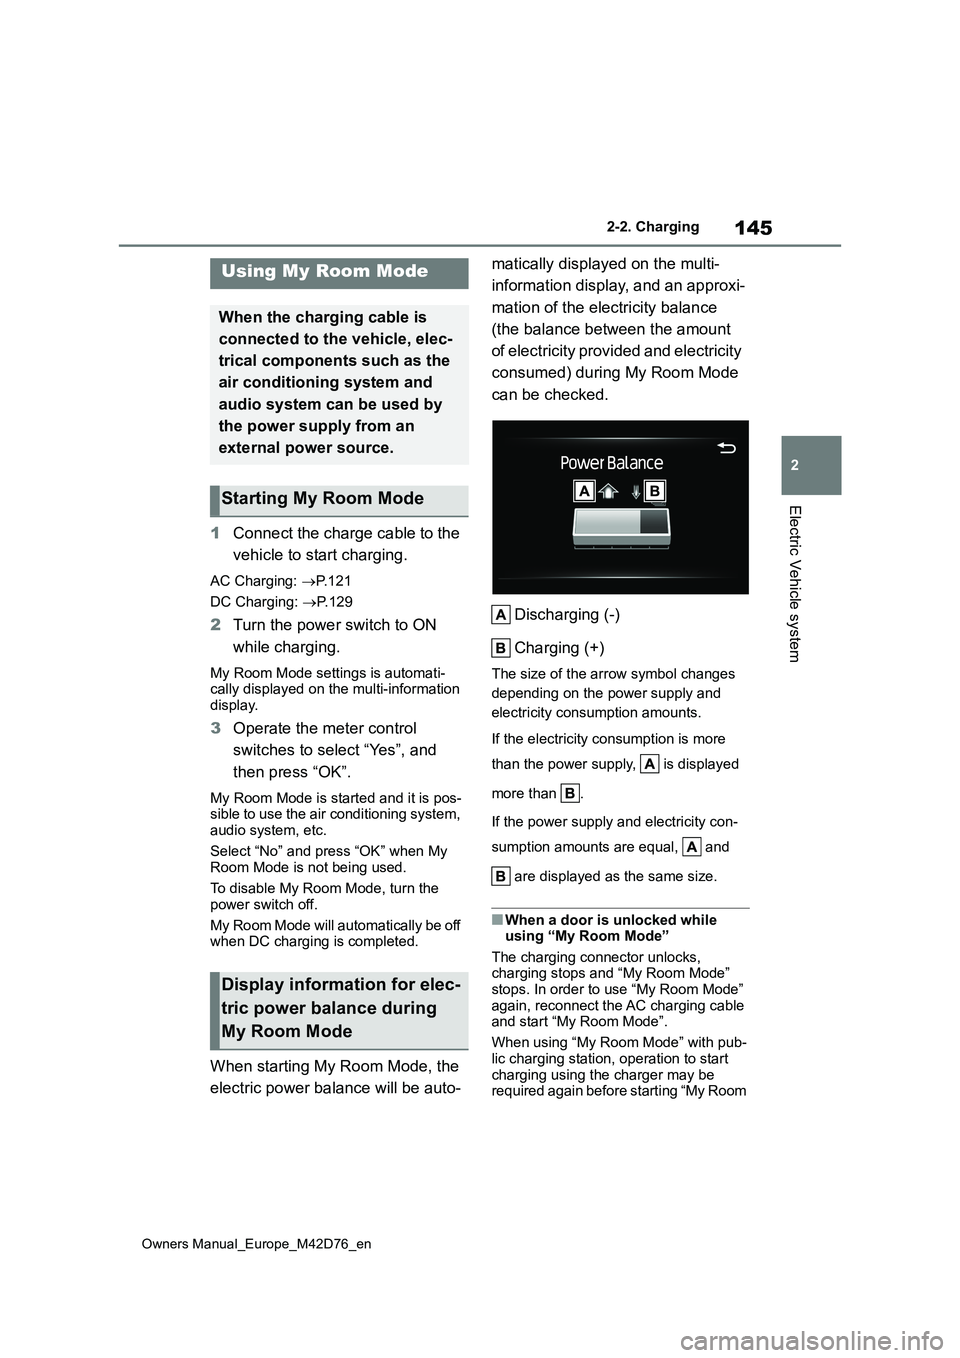
When starting My Room Mode, the
electric power balance will be auto-
matically displayed on the multi-
information display, and an approxi-
mation of the electricity balance
(the balance between the amount
of electricity provided and electricity
consumed) during My Room Mode
can be checked.
Discharging (-)
Charging (+)
The size of the arrow symbol changes
depending on the power supply and
electricity consumption amounts.
If the electricity consumption is more
than the power supply, is displayed
more than .
If the power supply and electricity con-
sumption amounts are equal, and
are displayed as the same size.
■When a door is unlocked while using “My Room Mode”
The charging connector unlocks, charging stops and “My Room Mode” stops. In order to use “My Room Mode”
again, reconnect the AC charging cable and start “My Room Mode”.
When using “My Room Mode” with pub-
lic charging station, operation to start charging using the charger may be required again before starting “My Room
Using My Room Mode
When the charging cable is
connected to the vehicle, elec-
trical components such as the
air conditioning system and
audio system can be used by
the power supply from an
external power source.
Starting My Room Mode
Display information for elec-
tric power balance during
My Room Mode
Page 148 of 674
146
Owners Manual_Europe_M42D76_en
2-2. Charging
Mode”.
■Meter display while charging
After turning the power switch to ON while charging, the power switch auto-matically turns off if My Room Mode is
not selected within approximately 100 seconds.
■When using My Room Mode the fol-lowing may occur
●When the remaining charge of the traction battery drops to the lower
limit, the air conditioning system auto- matically stops. In that case, the air conditioning system can not operate
until the remaining charge of the trac- tion battery increases. Turn off the power switch once, then use My
Room Mode after the remaining charge of the traction battery increases.
●If the doors are unlocked while using My Room mode, the AC charging con-
nector will be unlocked and My Room mode will be stopped. To use My Room mode again, perform the opera-
tion to start it. ( P.145) In addition, when using AC charger at the public charging station, it is necessary to
perform the operation to start the charger before using My Room mode.
●The charging time of the traction bat-tery gets longer.
●Noise may be heard from the radio depending on conditions of the radio
wave.
●The surrounding area of the onboard traction battery charger in the motor
compartment may become hot.
●The electric power steering system
warning light (yellow) may turn on, but this is not a malfunction.
■Using My Room Mode during DC charging
When using My Room mode during DC charging, the state of charge completion will be lower than when not using My
Room Mode.
■When “My Room Mode” is used while the traction battery is fully charged
When the power switch is turned on
while the traction battery is fully charged
and the charging connector that sup-
plies power is connected, “Charging
Port Lid is Open” is displayed on the
multi-information display. In this case,
press on the meter control switches
to display the setting screen of “My
Room Mode”, and then select “My
Room Mode”.
When “My Room Mode” is used while
the traction battery is fully charged, the electric power of the traction battery may be consumed. In this case,
charging may be performed again.
■Warning message display
When trying to start My Room Mode or My Room Mode is being used , if a message
is displayed on the multi-information display, refer to the cor responding table and perform the appropriate correction procedures.
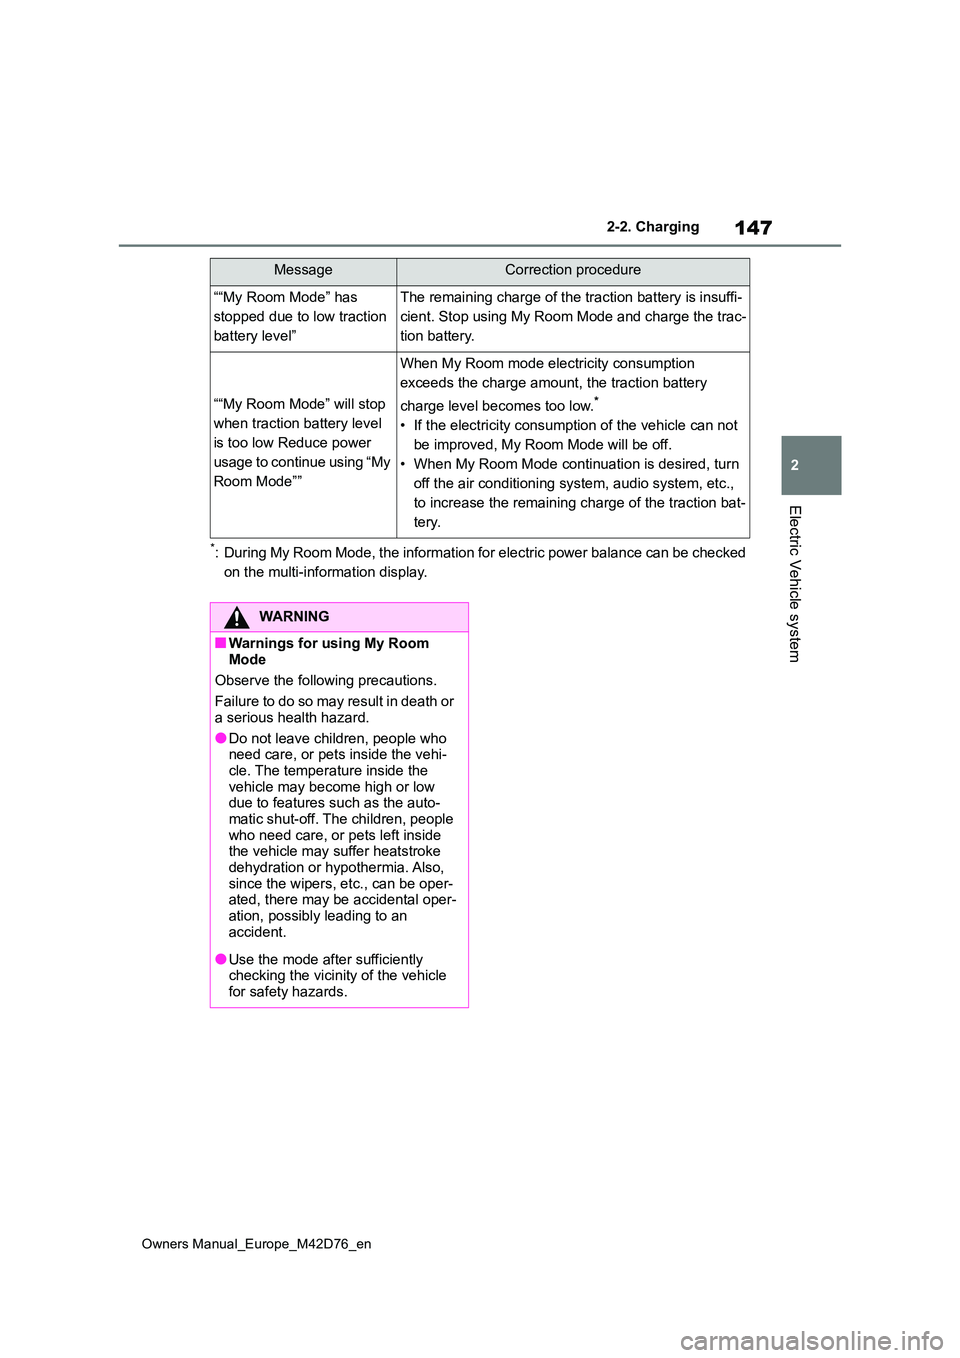
MessageCorrection procedure
“Traction Battery is too Low
for “My Room Mode””
There is no remaining charge of the traction battery to
start My Room Mode. Wait until the remaining charge
of the traction battery increases, start My Room Mode.
Page 149 of 674
147
2
Owners Manual_Europe_M42D76_en
2-2. Charging
Electric Vehicle system
*: During My Room Mode, the information for electric power balance can be checked
on the multi-information display.
““My Room Mode” has
stopped due to low traction
battery level”
The remaining charge of the traction battery is insuffi-
cient. Stop using My Room Mode and charge the trac-
tion battery.
““My Room Mode” will stop
when traction battery level
is too low Reduce power
usage to continue using “My
Room Mode””
When My Room mode electricity consumption
exceeds the charge amount, the traction battery
charge level becomes too low.*
• If the electricity consumption of the vehicle can not
be improved, My Room Mode will be off.
• When My Room Mode continuation is desired, turn
off the air conditioning system, audio system, etc.,
to increase the remaining charge of the traction bat-
tery.
MessageCorrection procedure
WARNING
■Warnings for using My Room
Mode
Observe the following precautions.
Failure to do so may result in death or
a serious health hazard.
●Do not leave children, people who need care, or pets inside the vehi-
cle. The temperature inside the vehicle may become high or low due to features such as the auto-
matic shut-off. The children, people who need care, or pets left inside the vehicle may suffer heatstroke
dehydration or hypothermia. Also, since the wipers, etc., can be oper-ated, there may be accidental oper-
ation, possibly leading to an accident.
●Use the mode after sufficiently checking the vicinity of the vehicle for safety hazards.
Page 150 of 674
148
Owners Manual_Europe_M42D76_en
2-2. Charging
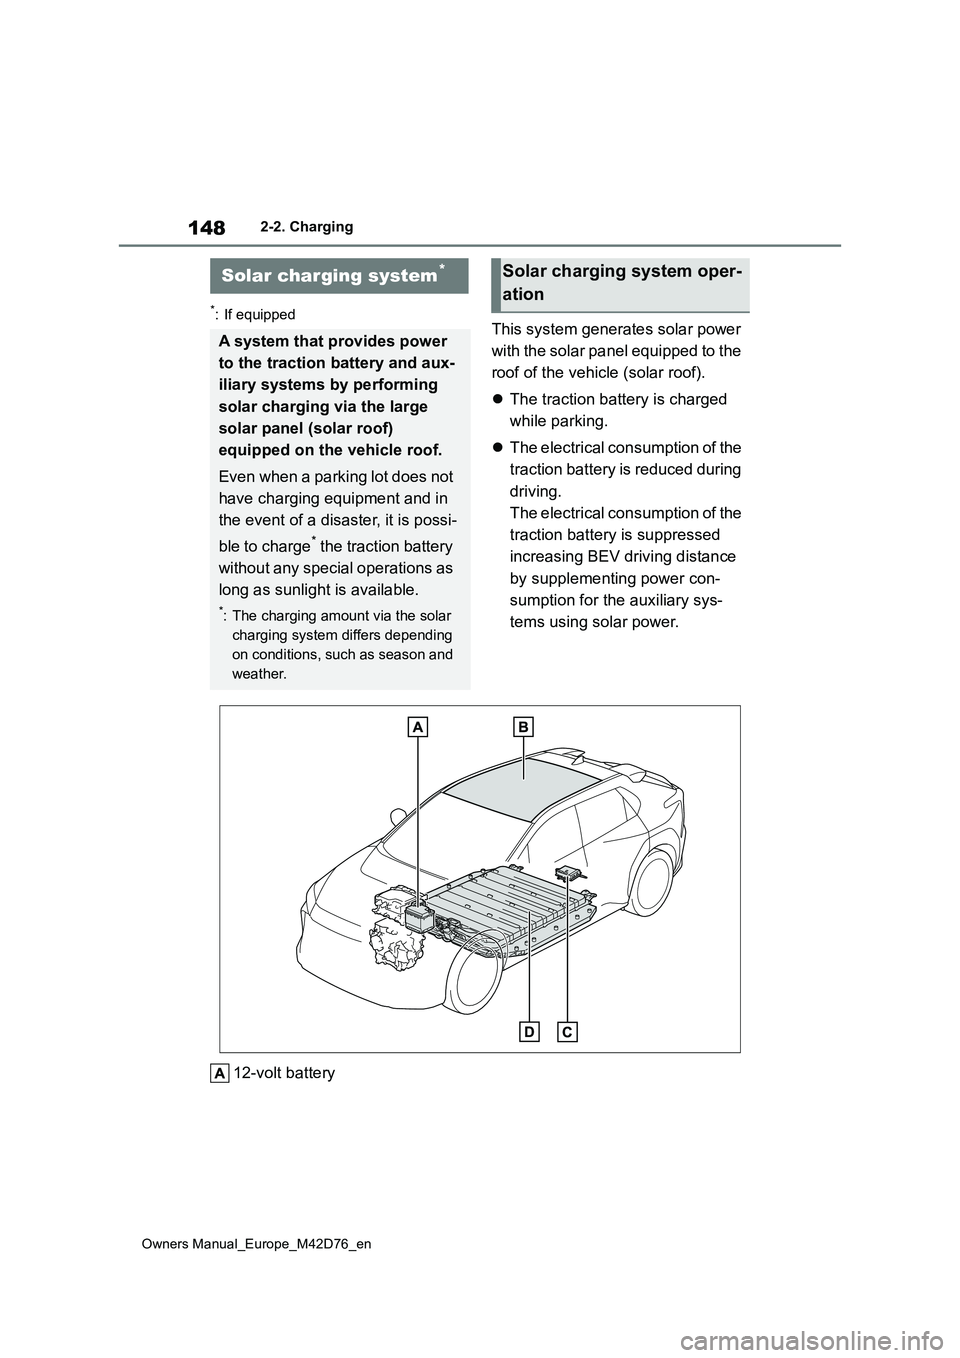
*: If equippedThis system generates solar power
with the solar panel equipped to the
roof of the vehicle (solar roof).
The traction battery is charged
while parking.
The electrical consumption of the
traction battery is reduced during
driving.
The electrical consumption of the
traction battery is suppressed
increasing BEV driving distance
by supplementing power con-
sumption for the auxiliary sys-
tems using solar power.
12-volt battery
Solar charging system*
A system that provides power
to the traction battery and aux-
iliary systems by performing
solar charging via the large
solar panel (solar roof)
equipped on the vehicle roof.
Even when a parking lot does not
have charging equipment and in
the event of a disaster, it is possi-
ble to charge* the traction battery
without any special operations as
long as sunlight is available.
*: The charging amount via the solar
charging system differs depending
on conditions, such as season and
weather.
Solar charging system oper-
ation