TOYOTA CAMRY V20 1986 Service Information
Manufacturer: TOYOTA, Model Year: 1986, Model line: CAMRY V20, Model: TOYOTA CAMRY V20 1986Pages: 2389, PDF Size: 84.44 MB
Page 421 of 2389
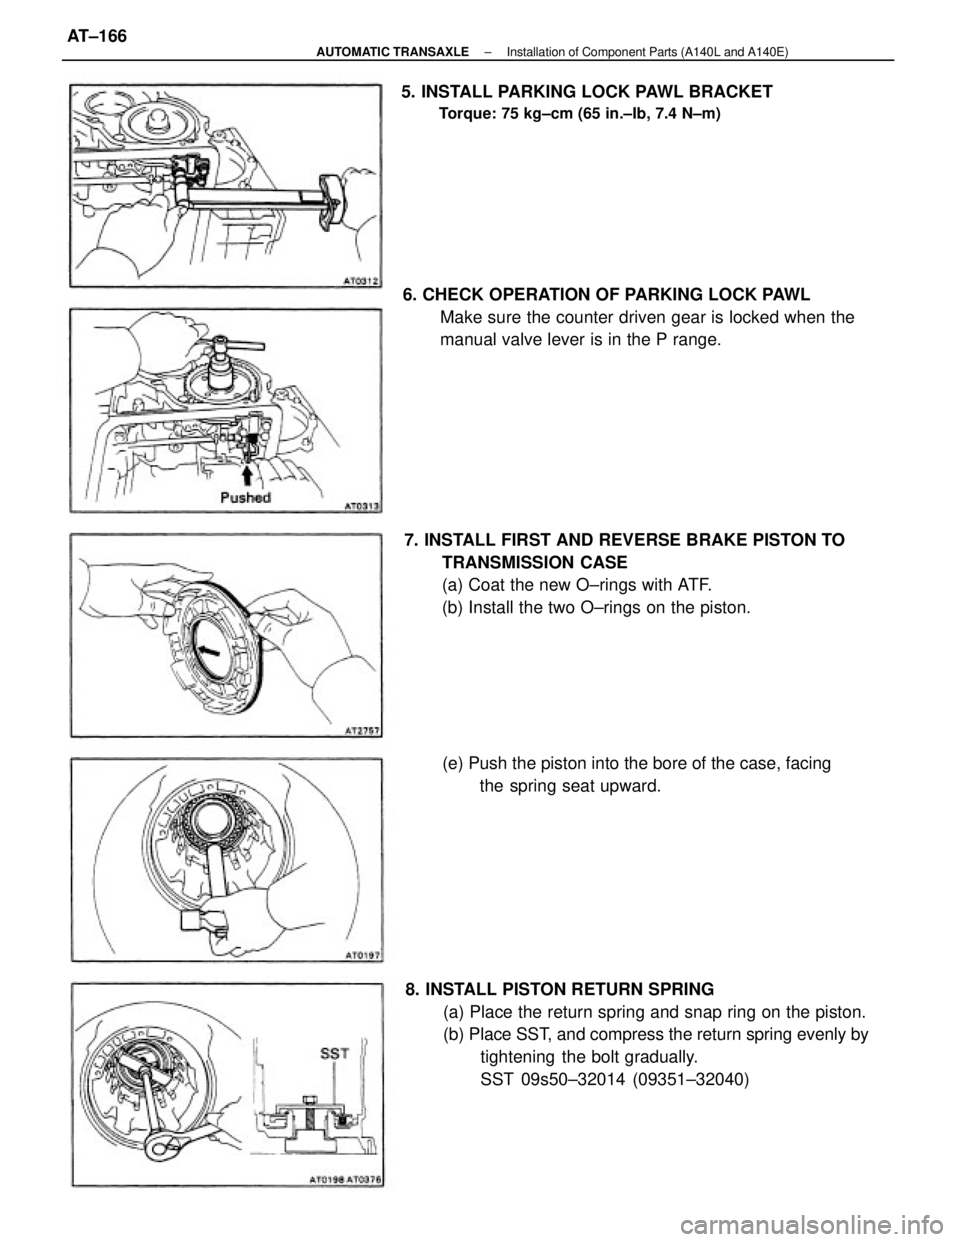
8. INSTALL PISTON RETURN SPRING
(a) Place the return spring and snap ring on the piston.
(b) Place SST, and compress the return spring evenly by
tightening the bolt gradually.
SST 09s50±32014 (09351±32040) 6. CHECK OPERATION OF PARKING LOCK PAWL
Make sure the counter driven gear is locked when the
manual valve lever is in the P range.
7. INSTALL FIRST AND REVERSE BRAKE PISTON TO
TRANSMISSION CASE
(a) Coat the new O±rings with ATF.
(b) Install the two O±rings on the piston.
(e) Push the piston into the bore of the case, facing
the spring seat upward. 5. INSTALL PARKING LOCK PAWL BRACKET
Torque: 75 kg±cm (65 in.±Ib, 7.4 N±m)
± AUTOMATIC TRANSAXLEInstallation of Component Parts (A140L and A140E)AT±166
Page 422 of 2389
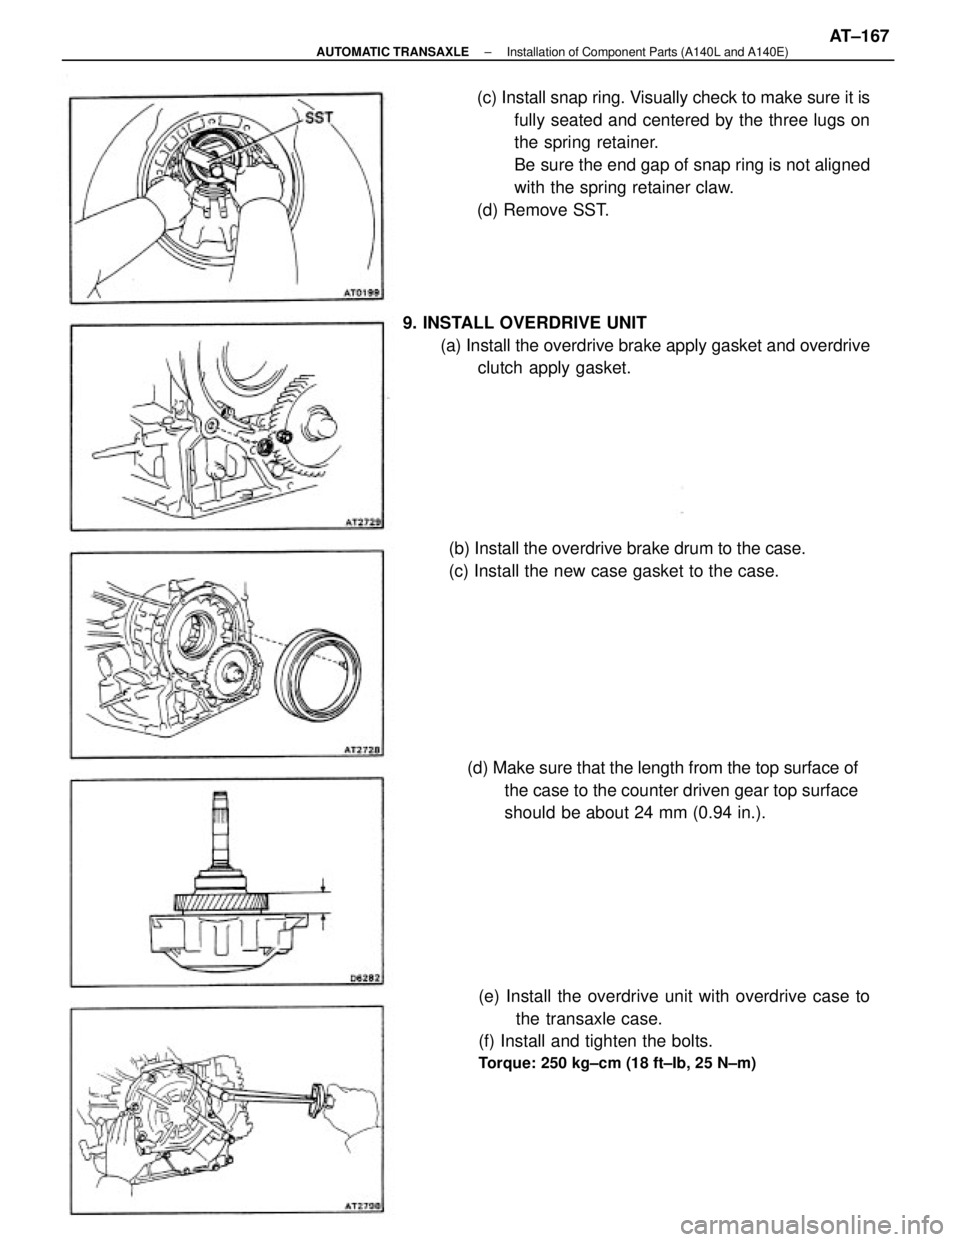
(c) Install snap ring. Visually check to make sure it is
fully seated and centered by the three lugs on
the spring retainer.
Be sure the end gap of snap ring is not aligned
with the spring retainer claw.
(d) Remove SST.
(e) Install the overdrive unit with overdrive case to
the transaxle case.
(f) Install and tighten the bolts.
Torque: 250 kg±cm (18 ft±Ib, 25 N±m)
9. INSTALL OVERDRIVE UNIT
(a) Install the overdrive brake apply gasket and overdrive
clutch apply gasket.
(d) Make sure that the length from the top surface of
the case to the counter driven gear top surface
should be about 24 mm (0.94 in.). (b) Install the overdrive brake drum to the case.
(c) Install the new case gasket to the case.
± AUTOMATIC TRANSAXLEInstallation of Component Parts (A140L and A140E)AT±167
Page 423 of 2389
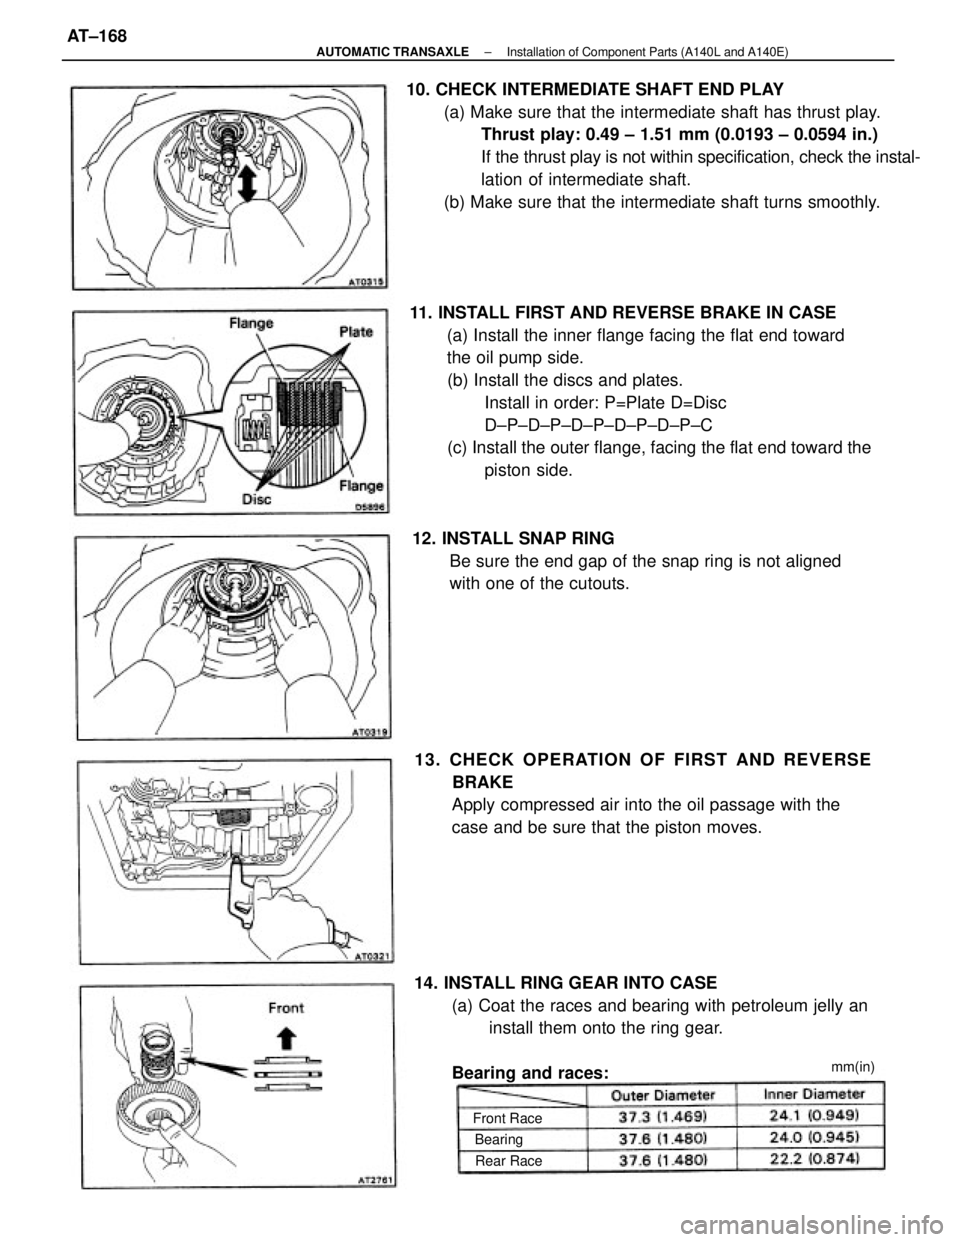
11. INSTALL FIRST AND REVERSE BRAKE IN CASE
(a) Install the inner flange facing the flat end toward
the oil pump side.
(b) Install the discs and plates.
Install in order: P=Plate D=Disc
D±P±D±P±D±P±D±P±D±P±C
(c) Install the outer flange, facing the flat end toward the
piston side. 10. CHECK INTERMEDIATE SHAFT END PLAY
(a) Make sure that the intermediate shaft has thrust play.
Thrust play: 0.49 ± 1.51 mm (0.0193 ± 0.0594 in.)
If the thrust play is not within specification, check the instal-
lation of intermediate shaft.
(b) Make sure that the intermediate shaft turns smoothly.
14. INSTALL RING GEAR INTO CASE
(a) Coat the races and bearing with petroleum jelly an
install them onto the ring gear.
Bearing and races: 13. CHECK OPERATION OF FIRST AND REVERSE
BRAKE
Apply compressed air into the oil passage with the
case and be sure that the piston moves. 12. INSTALL SNAP RING
Be sure the end gap of the snap ring is not aligned
with one of the cutouts.
Front Race
Rear Racemm(in)
Bearing
± AUTOMATIC TRANSAXLEInstallation of Component Parts (A140L and A140E)AT±168
Page 424 of 2389
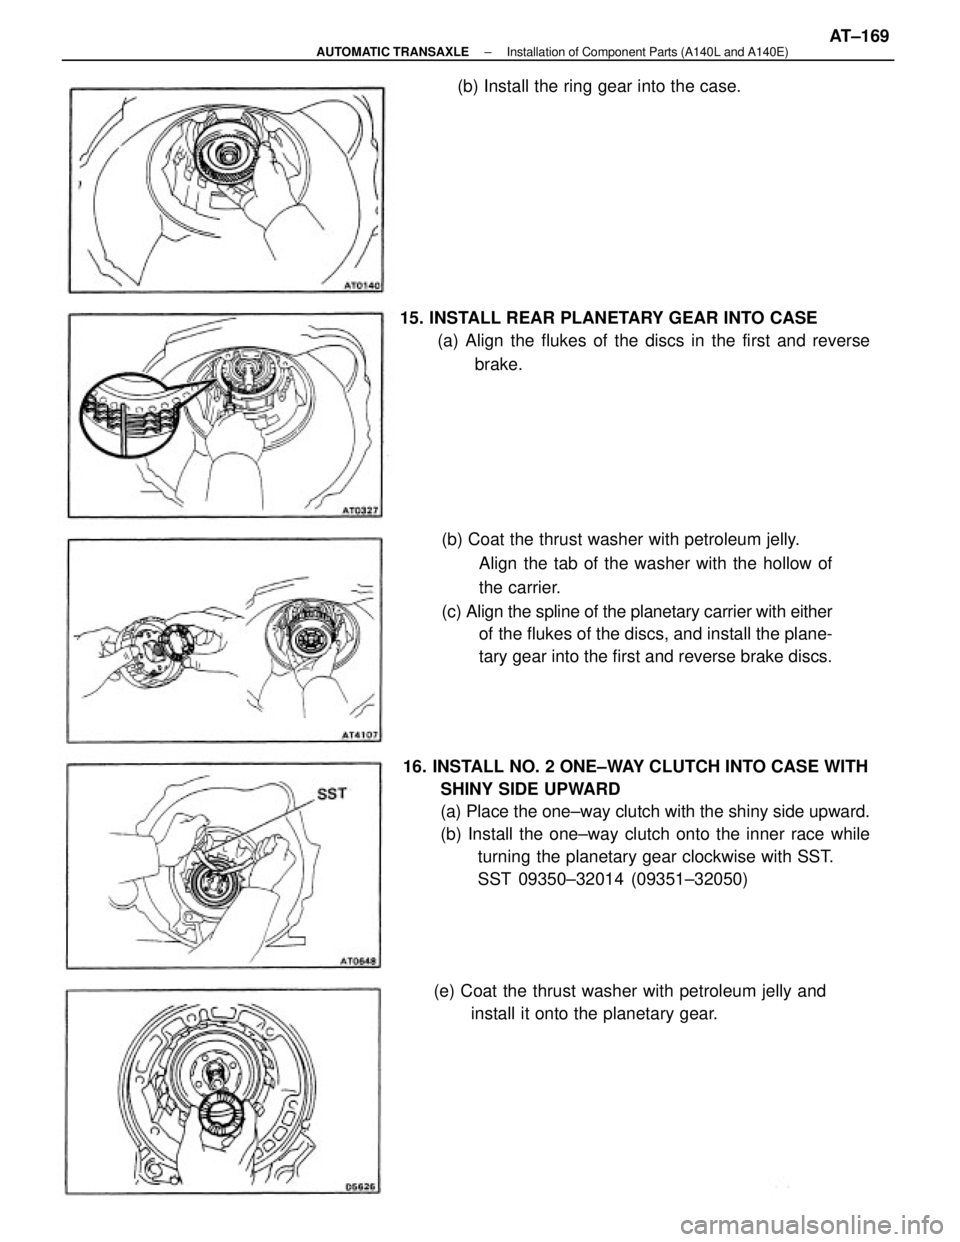
16. INSTALL NO. 2 ONE±WAY CLUTCH INTO CASE WITH
SHINY SIDE UPWARD
(a) Place the one±way clutch with the shiny side upward.
(b) Install the one±way clutch onto the inner race while
turning the planetary gear clockwise with SST.
SST 09350±32014 (09351±32050) (b) Coat the thrust washer with petroleum jelly.
Align the tab of the washer with the hollow of
the carrier.
(c) Align the spline of the planetary carrier with either
of the flukes of the discs, and install the plane-
tary gear into the first and reverse brake discs. 15. INSTALL REAR PLANETARY GEAR INTO CASE
(a) Align the flukes of the discs in the first and reverse
brake.
(e) Coat the thrust washer with petroleum jelly and
install it onto the planetary gear. (b) Install the ring gear into the case.
± AUTOMATIC TRANSAXLEInstallation of Component Parts (A140L and A140E)AT±169
Page 425 of 2389
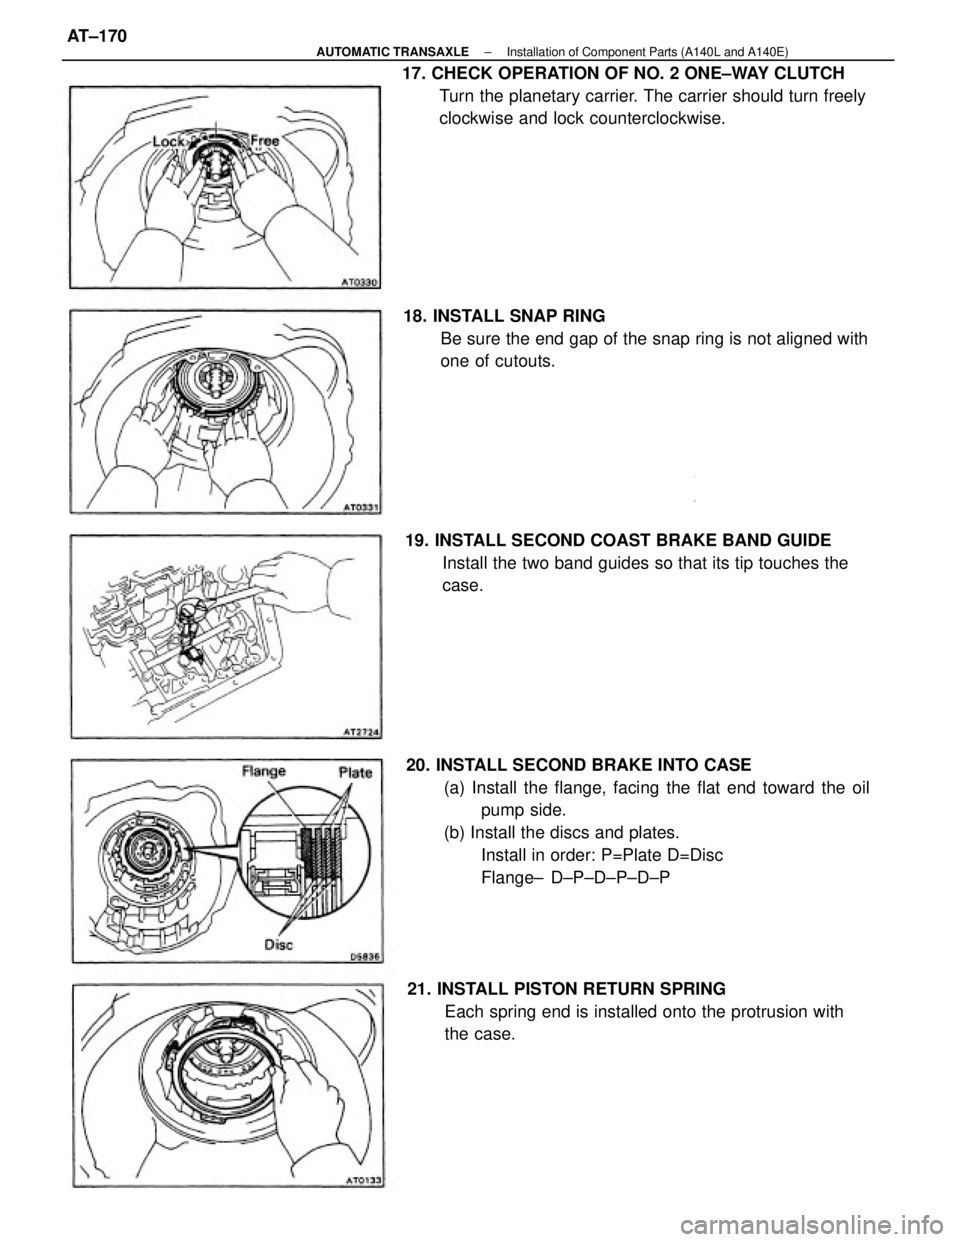
20. INSTALL SECOND BRAKE INTO CASE
(a) Install the flange, facing the flat end toward the oil
pump side.
(b) Install the discs and plates.
Install in order: P=Plate D=Disc
Flange± D±P±D±P±D±P 17. CHECK OPERATION OF NO. 2 ONE±WAY CLUTCH
Turn the planetary carrier. The carrier should turn freely
clockwise and lock counterclockwise.
18. INSTALL SNAP RING
Be sure the end gap of the snap ring is not aligned with
one of cutouts.
21. INSTALL PISTON RETURN SPRING
Each spring end is installed onto the protrusion with
the case. 19. INSTALL SECOND COAST BRAKE BAND GUIDE
Install the two band guides so that its tip touches the
case.
± AUTOMATIC TRANSAXLEInstallation of Component Parts (A140L and A140E)AT±170
Page 426 of 2389
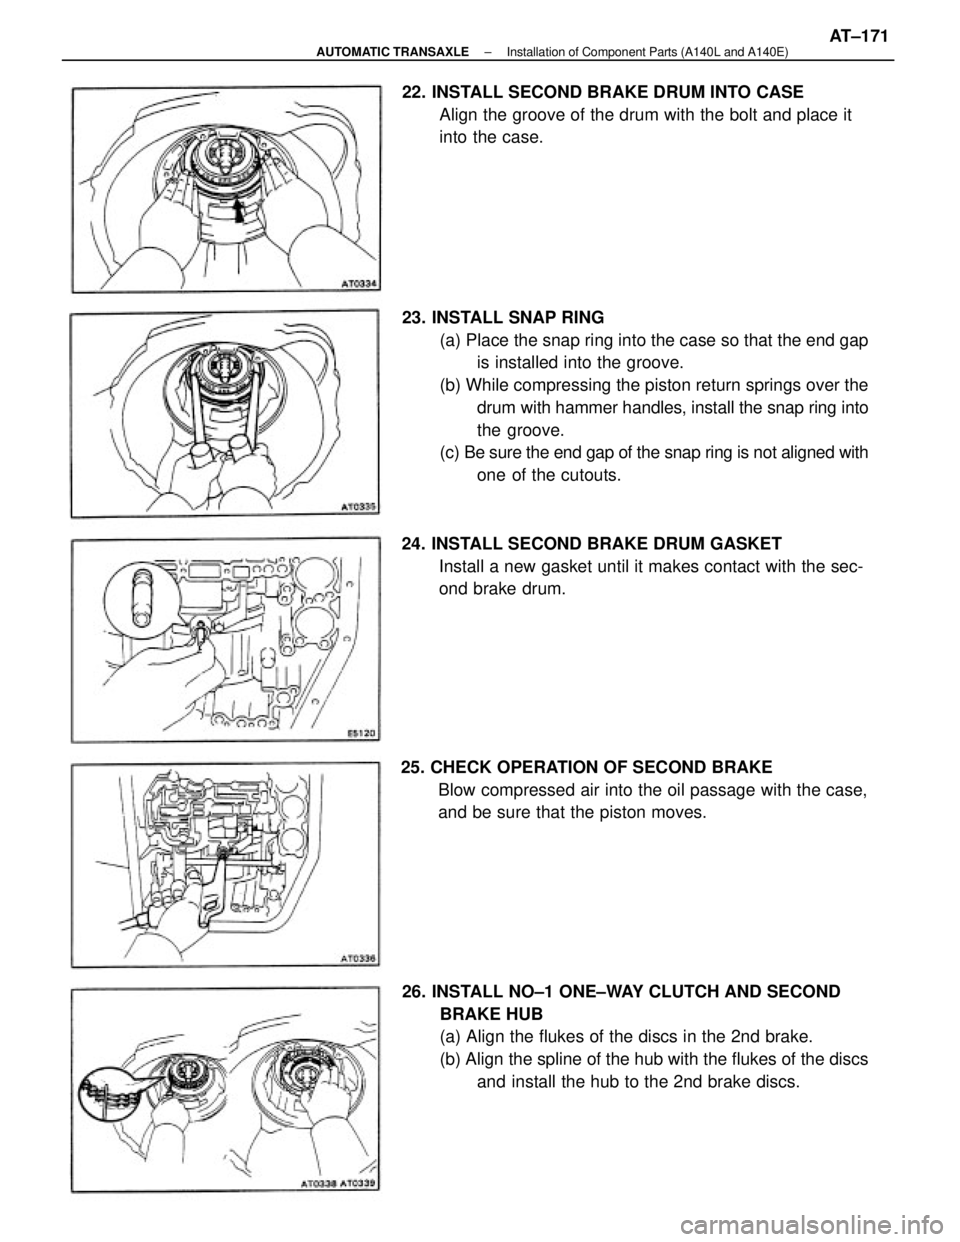
23. INSTALL SNAP RING
(a) Place the snap ring into the case so that the end gap
is installed into the groove.
(b) While compressing the piston return springs over the
drum with hammer handles, install the snap ring into
the groove.
(c) Be sure the end gap of the snap ring is not aligned with
one of the cutouts.
26. INSTALL NO±1 ONE±WAY CLUTCH AND SECOND
BRAKE HUB
(a) Align the flukes of the discs in the 2nd brake.
(b) Align the spline of the hub with the flukes of the discs
and install the hub to the 2nd brake discs. 25. CHECK OPERATION OF SECOND BRAKE
Blow compressed air into the oil passage with the case,
and be sure that the piston moves. 22. INSTALL SECOND BRAKE DRUM INTO CASE
Align the groove of the drum with the bolt and place it
into the case.
24. INSTALL SECOND BRAKE DRUM GASKET
Install a new gasket until it makes contact with the sec-
ond brake drum.
± AUTOMATIC TRANSAXLEInstallation of Component Parts (A140L and A140E)AT±171
Page 427 of 2389
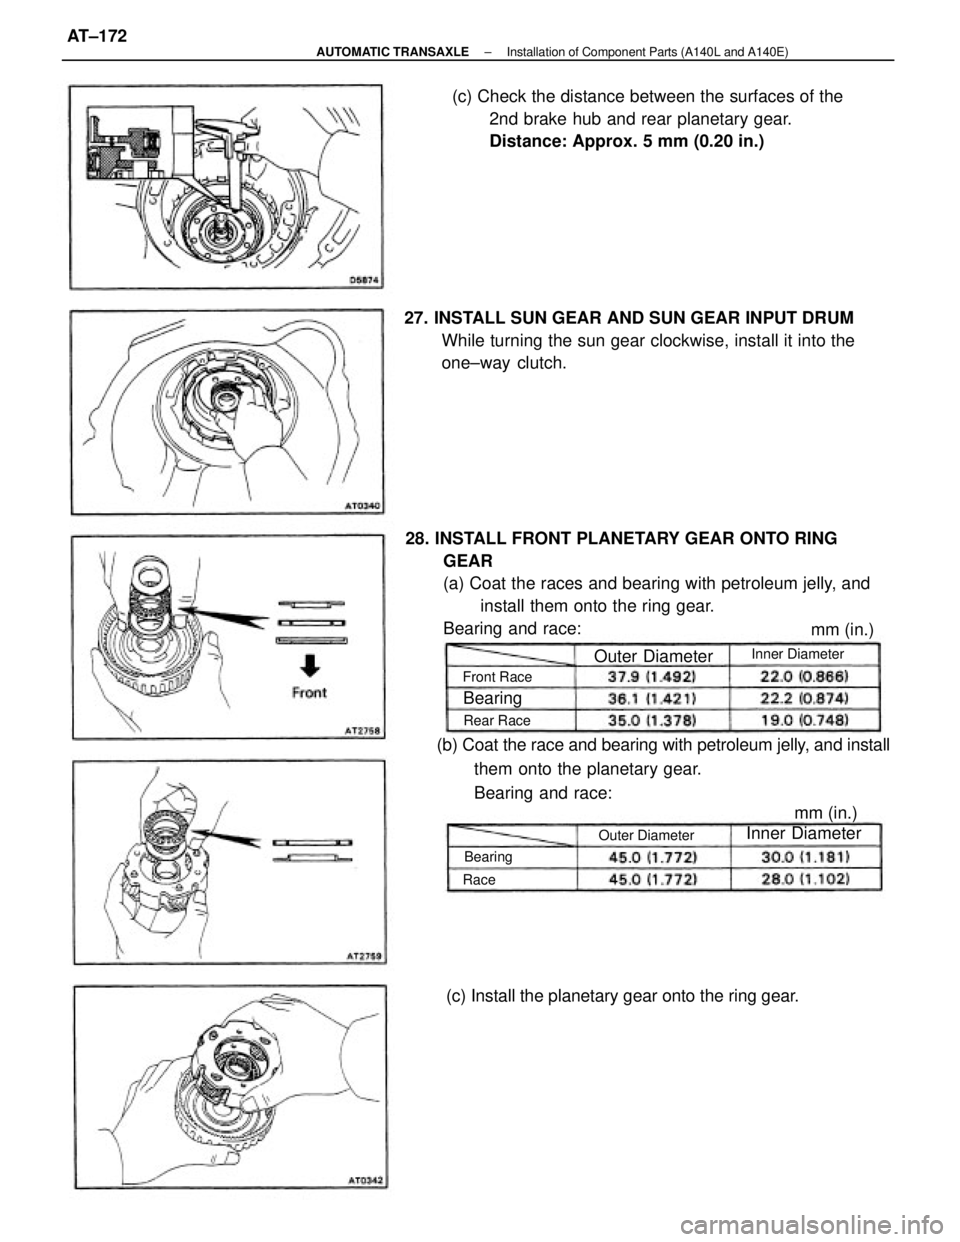
28. INSTALL FRONT PLANETARY GEAR ONTO RING
GEAR
(a) Coat the races and bearing with petroleum jelly, and
install them onto the ring gear.
Bearing and race:(c) Check the distance between the surfaces of the
2nd brake hub and rear planetary gear.
Distance: Approx. 5 mm (0.20 in.)
(b) Coat the race and bearing with petroleum jelly, and install
them onto the planetary gear.
Bearing and race: 27. INSTALL SUN GEAR AND SUN GEAR INPUT DRUM
While turning the sun gear clockwise, install it into the
one±way clutch.
(c) Install the planetary gear onto the ring gear.Outer Diameter
Outer DiameterInner DiameterInner Diameter
Front Race
mm (in.)
Rear Race
mm (in.)
Bearing
Bearing
Race
± AUTOMATIC TRANSAXLEInstallation of Component Parts (A140L and A140E)AT±172
Page 428 of 2389
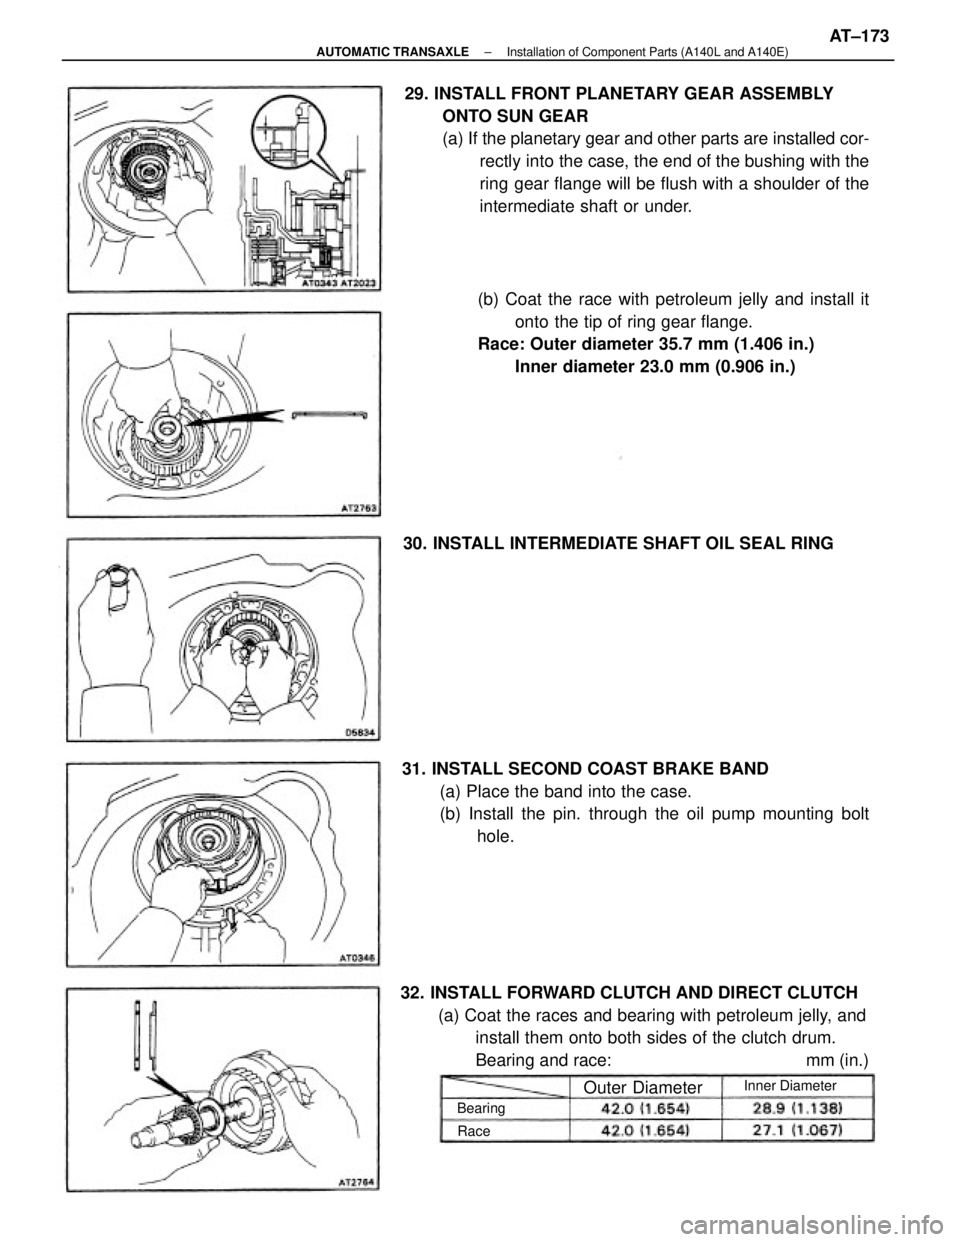
29. INSTALL FRONT PLANETARY GEAR ASSEMBLY
ONTO SUN GEAR
(a) If the planetary gear and other parts are installed cor-
rectly into the case, the end of the bushing with the
ring gear flange will be flush with a shoulder of the
intermediate shaft or under.
(b) Coat the race with petroleum jelly and install it
onto the tip of ring gear flange.
Race: Outer diameter 35.7 mm (1.406 in.)
Inner diameter 23.0 mm (0.906 in.)
32. INSTALL FORWARD CLUTCH AND DIRECT CLUTCH
(a) Coat the races and bearing with petroleum jelly, and
install them onto both sides of the clutch drum.
Bearing and race: mm (in.) 31. INSTALL SECOND COAST BRAKE BAND
(a) Place the band into the case.
(b) Install the pin. through the oil pump mounting bolt
hole. 30. INSTALL INTERMEDIATE SHAFT OIL SEAL RING
Outer Diameter
Inner Diameter
Bearing
Race
± AUTOMATIC TRANSAXLEInstallation of Component Parts (A140L and A140E)AT±173
Page 429 of 2389
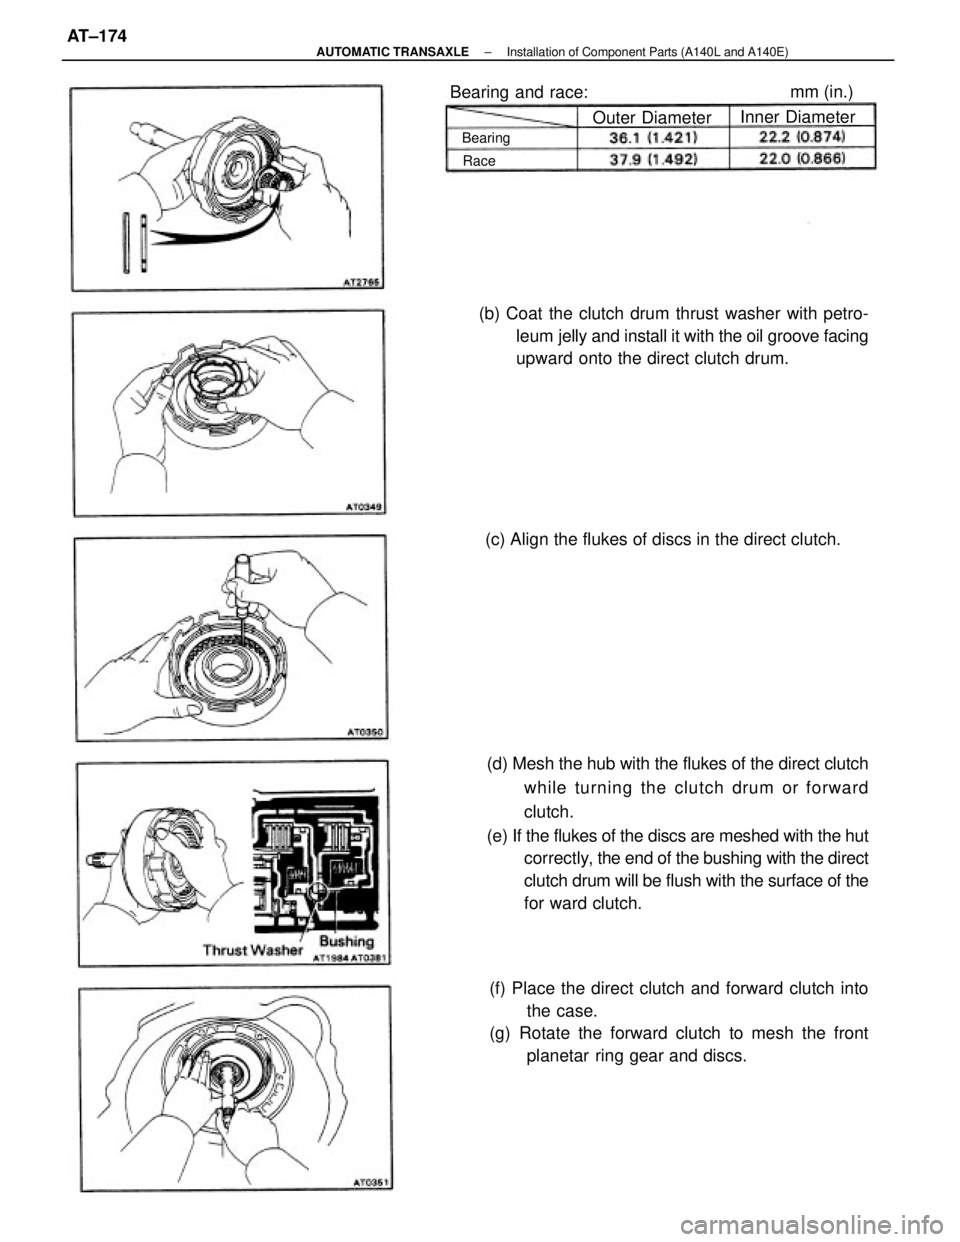
(d) Mesh the hub with the flukes of the direct clutch
while turning the clutch drum or forward
clutch.
(e) If the flukes of the discs are meshed with the hut
correctly, the end of the bushing with the direct
clutch drum will be flush with the surface of the
for ward clutch.
(f) Place the direct clutch and forward clutch into
the case.
(g) Rotate the forward clutch to mesh the front
planetar ring gear and discs. (b) Coat the clutch drum thrust washer with petro-
leum jelly and install it with the oil groove facing
upward onto the direct clutch drum.
(c) Align the flukes of discs in the direct clutch. Bearing and race:
Outer DiameterInner Diametermm (in.)
Bearing
Race
± AUTOMATIC TRANSAXLEInstallation of Component Parts (A140L and A140E)AT±174
Page 430 of 2389
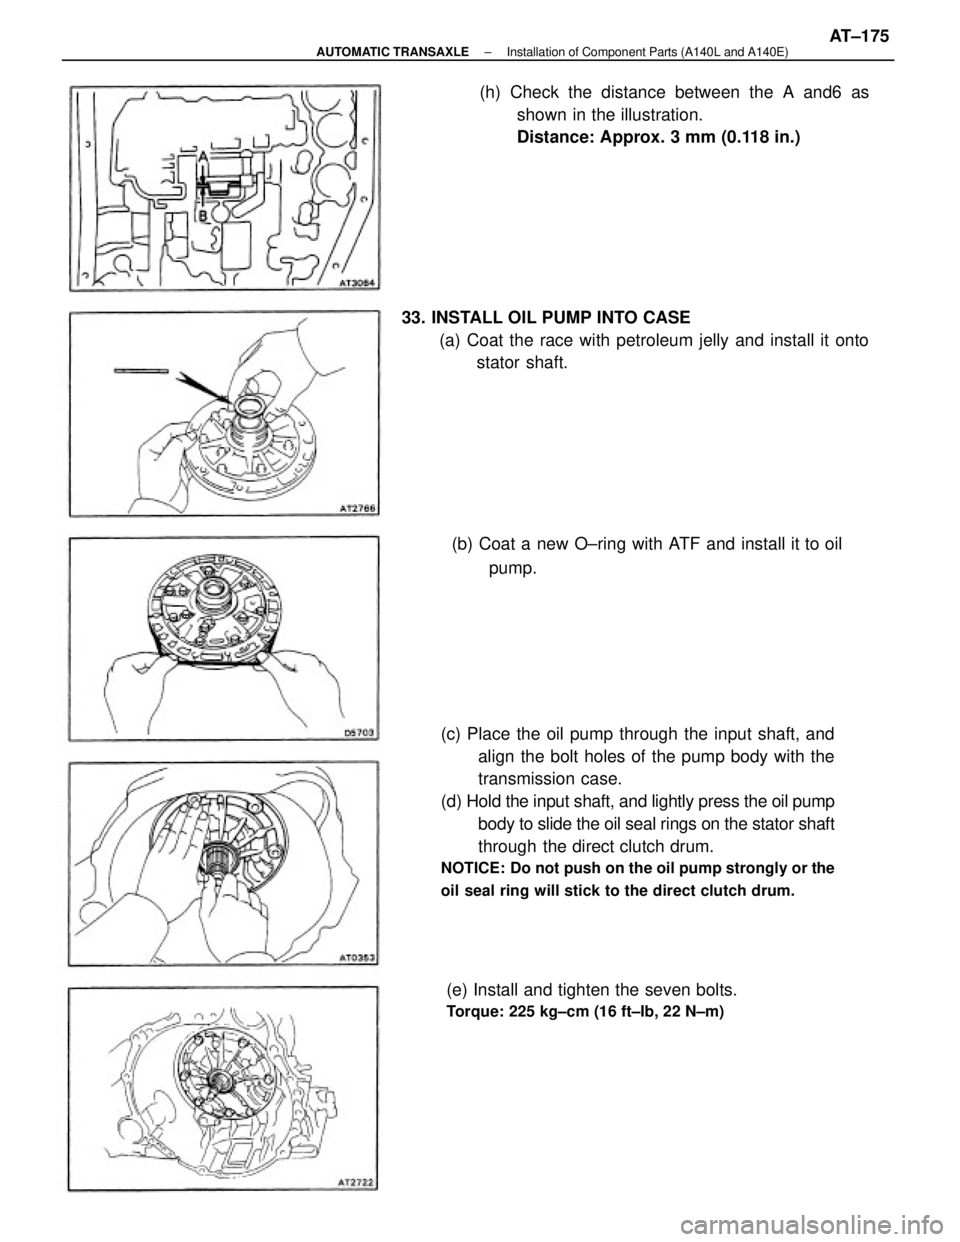
(c) Place the oil pump through the input shaft, and
align the bolt holes of the pump body with the
transmission case.
(d) Hold the input shaft, and lightly press the oil pump
body to slide the oil seal rings on the stator shaft
through the direct clutch drum.
NOTICE: Do not push on the oil pump strongly or the
oil seal ring will stick to the direct clutch drum.
33. INSTALL OIL PUMP INTO CASE
(a) Coat the race with petroleum jelly and install it onto
stator shaft.(h) Check the distance between the A and6 as
shown in the illustration.
Distance: Approx. 3 mm (0.118 in.)
(e) Install and tighten the seven bolts.
Torque: 225 kg±cm (16 ft±Ib, 22 N±m)
(b) Coat a new O±ring with ATF and install it to oil
pump.
± AUTOMATIC TRANSAXLEInstallation of Component Parts (A140L and A140E)AT±175