TOYOTA RAV4 1996 Service Repair Manual
Manufacturer: TOYOTA, Model Year: 1996, Model line: RAV4, Model: TOYOTA RAV4 1996Pages: 1632, PDF Size: 41.64 MB
Page 1311 of 1632
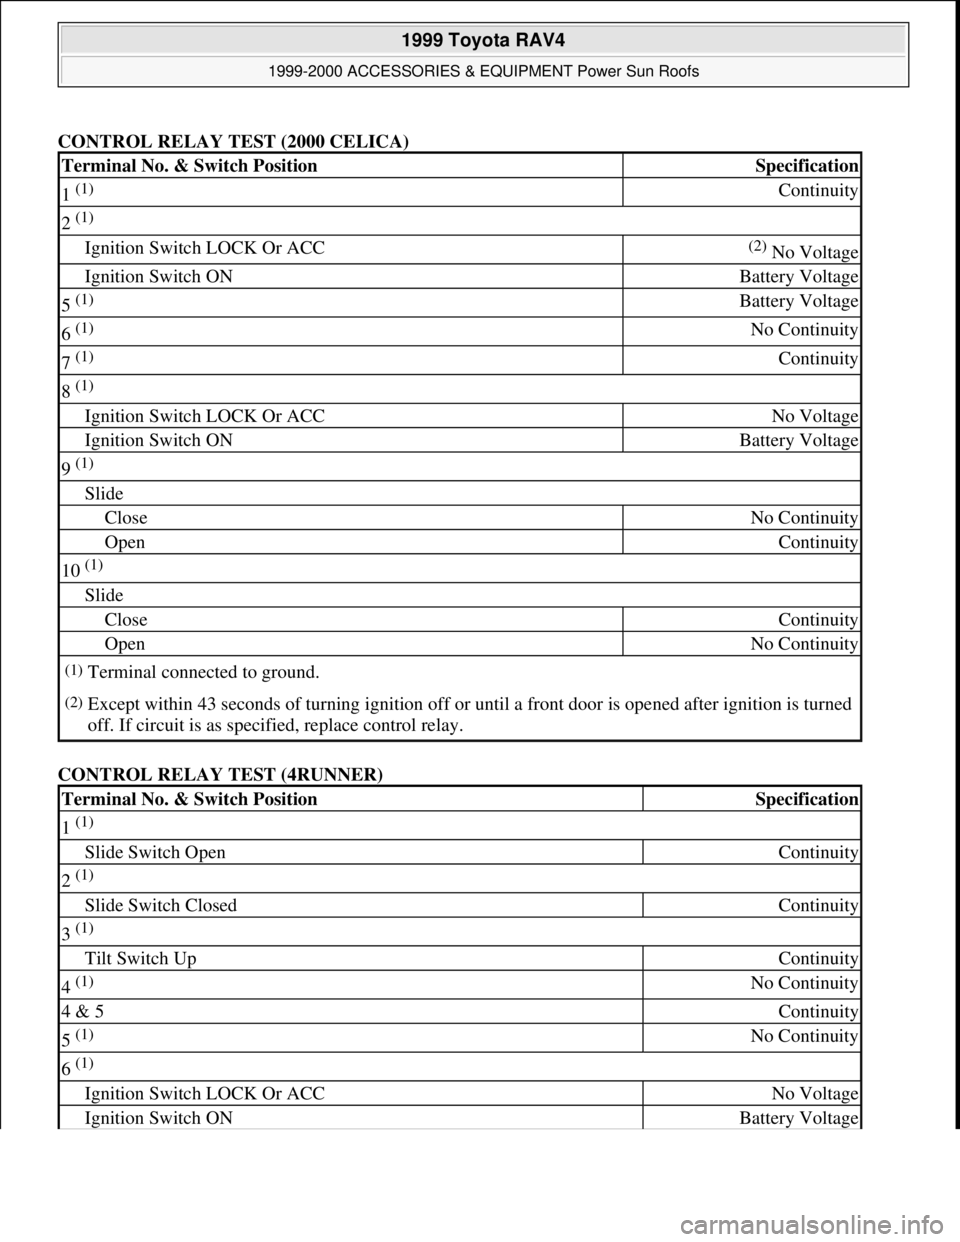
CONTROL RELAY TEST (2000 CELICA)
CONTROL RELAY TEST (4RUNNER)
Terminal No. & Switch PositionSpecification
1 (1) Continuity
2 (1)
Ignition Switch LOCK Or ACC(2) No Voltage
Ignition Switch ONBattery Voltage
5 (1) Battery Voltage
6 (1) No Continuity
7 (1) Continuity
8 (1)
Ignition Switch LOCK Or ACCNo Voltage
Ignition Switch ONBattery Voltage
9 (1)
Slide
CloseNo Continuity
OpenContinuity
10 (1)
Slide
CloseContinuity
OpenNo Continuity
(1)Terminal connected to ground.
(2)Except within 43 seconds of turning ignition off or until a front door is opened after ignition is turned
off. If circuit is as specified, replace control relay.
Terminal No. & Switch PositionSpecification
1 (1)
Slide Switch OpenContinuity
2 (1)
Slide Switch ClosedContinuity
3 (1)
Tilt Switch UpContinuity
4 (1) No Continuity
4 & 5Continuity
5 (1) No Continuity
6 (1)
Ignition Switch LOCK Or ACCNo Voltage
Ignition Switch ONBattery Voltage
1999 Toyota RAV4
1999-2000 ACCESSORIES & EQUIPMENT Power Sun Roofs
Microsoft
Sunday, November 22, 2009 10:58:30 AMPage 31 © 2005 Mitchell Repair Information Company, LLC.
Page 1312 of 1632
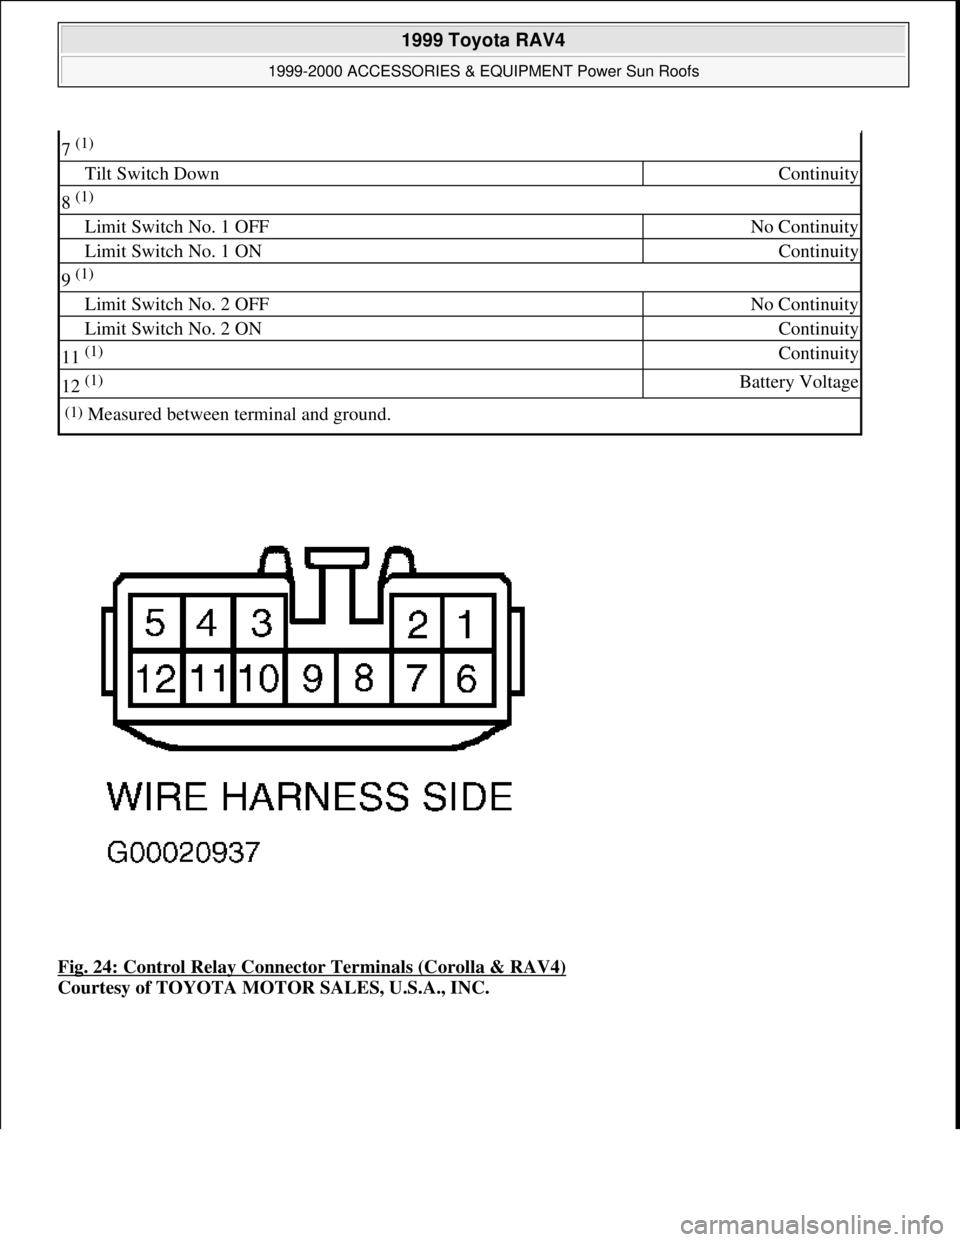
Fig. 24: Control Relay Connector Terminals (Corolla & RAV4)
Courtesy of TOYOTA MOTOR SALES, U.S.A., INC.
7 (1)
Tilt Switch DownContinuity
8 (1)
Limit Switch No. 1 OFFNo Continuity
Limit Switch No. 1 ONContinuity
9 (1)
Limit Switch No. 2 OFFNo Continuity
Limit Switch No. 2 ONContinuity
11 (1) Continuity
12 (1) Battery Voltage
(1)Measured between terminal and ground.
1999 Toyota RAV4
1999-2000 ACCESSORIES & EQUIPMENT Power Sun Roofs
Microsoft
Sunday, November 22, 2009 10:58:30 AMPage 32 © 2005 Mitchell Repair Information Company, LLC.
Page 1313 of 1632
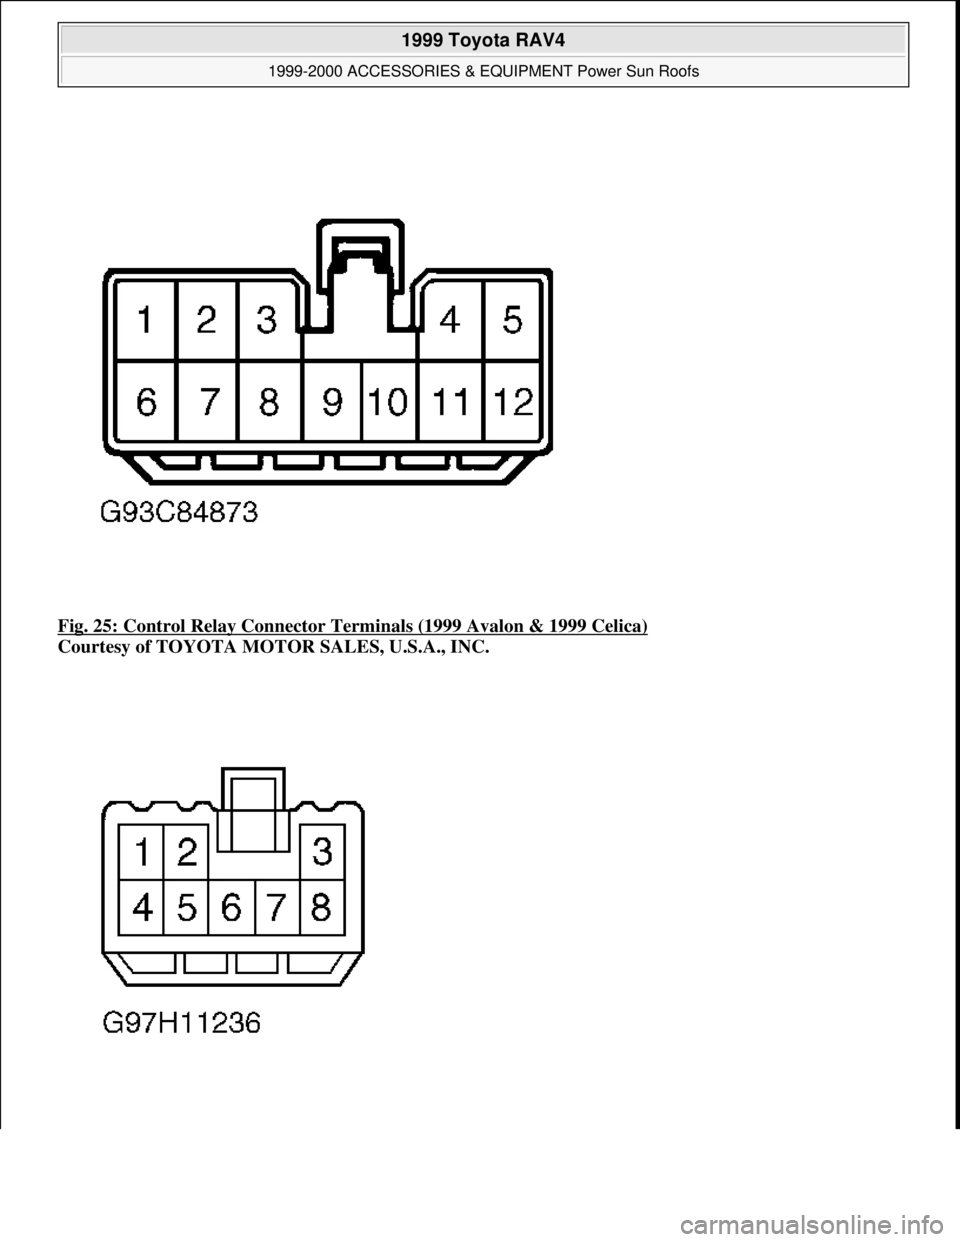
Fig. 25: Control Relay Connector Terminals (1999 Avalon & 1999 Celica)
Courtesy of TOYOTA MOTOR SALES, U.S.A., INC.
1999 Toyota RAV4
1999-2000 ACCESSORIES & EQUIPMENT Power Sun Roofs
Microsoft
Sunday, November 22, 2009 10:58:30 AMPage 33 © 2005 Mitchell Repair Information Company, LLC.
Page 1314 of 1632
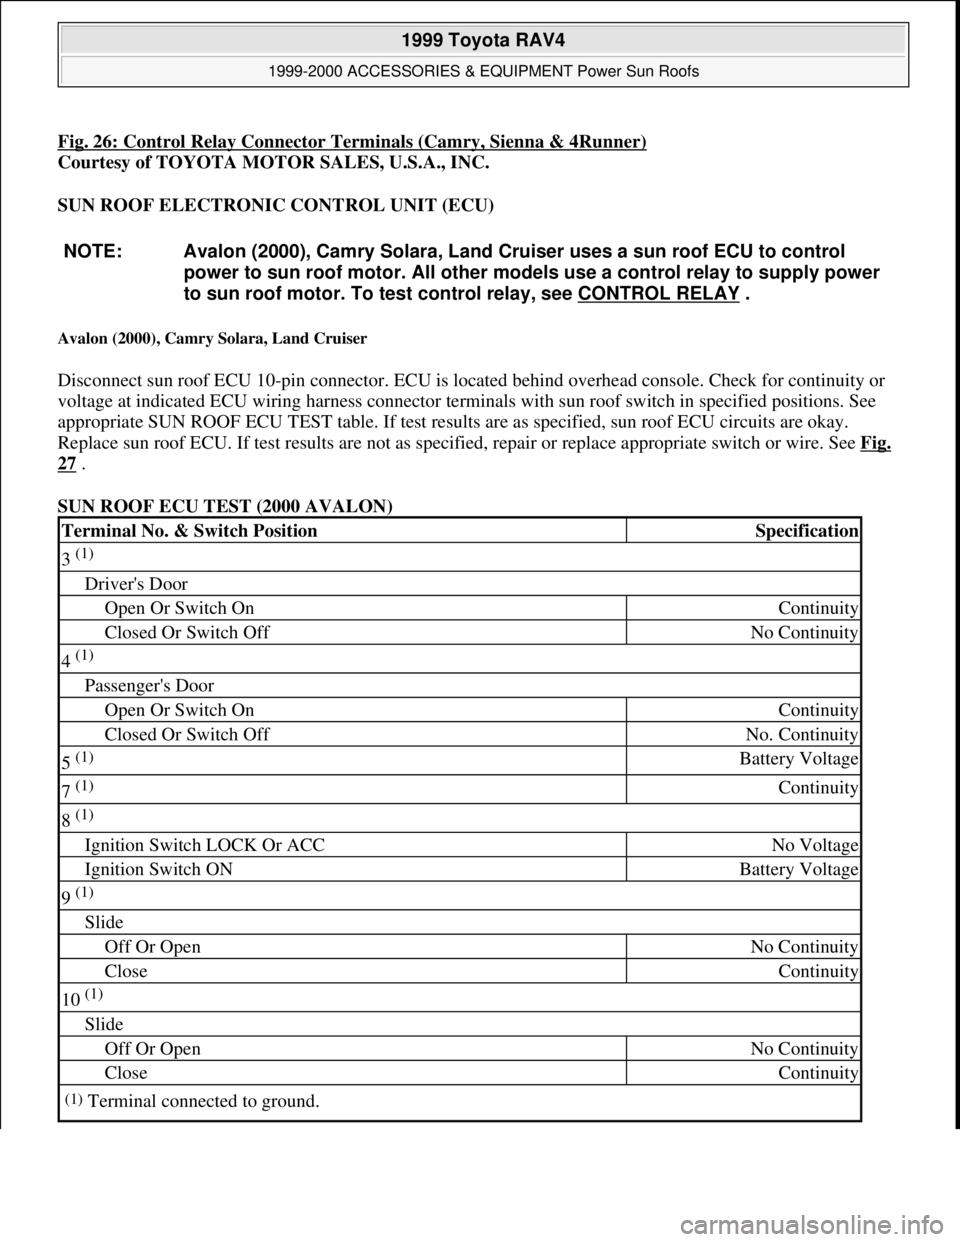
Fig. 26: Control Relay Connector Terminals (Camry, Sienna & 4Runner)
Courtesy of TOYOTA MOTOR SALES, U.S.A., INC.
SUN ROOF ELECTRONIC CONTROL UNIT (ECU)
Avalon (2000), Camry Solara, Land Cruiser
Disconnect sun roof ECU 10-pin connector. ECU is located behind overhead console. Check for continuity or
voltage at indicated ECU wiring harness connector terminals with sun roof switch in specified positions. See
appropriate SUN ROOF ECU TEST table. If test results are as specified, sun roof ECU circuits are okay.
Replace sun roof ECU. If test results are not as specified, repair or replace appropriate switch or wire. See Fig.
27 .
SUN ROOF ECU TEST (2000 AVALON) NOTE: Avalon (2000), Camry Solara, Land Cruiser uses a sun roof ECU to control
power to sun roof motor. All other models use a control relay to supply power
to sun roof motor. To test control relay, see CONTROL RELAY
.
Terminal No. & Switch PositionSpecification
3 (1)
Driver's Door
Open Or Switch OnContinuity
Closed Or Switch OffNo Continuity
4 (1)
Passenger's Door
Open Or Switch OnContinuity
Closed Or Switch OffNo. Continuity
5 (1) Battery Voltage
7 (1) Continuity
8 (1)
Ignition Switch LOCK Or ACCNo Voltage
Ignition Switch ONBattery Voltage
9 (1)
Slide
Off Or OpenNo Continuity
CloseContinuity
10 (1)
Slide
Off Or OpenNo Continuity
CloseContinuity
(1)Terminal connected to ground.
1999 Toyota RAV4
1999-2000 ACCESSORIES & EQUIPMENT Power Sun Roofs
Microsoft
Sunday, November 22, 2009 10:58:30 AMPage 34 © 2005 Mitchell Repair Information Company, LLC.
Page 1315 of 1632
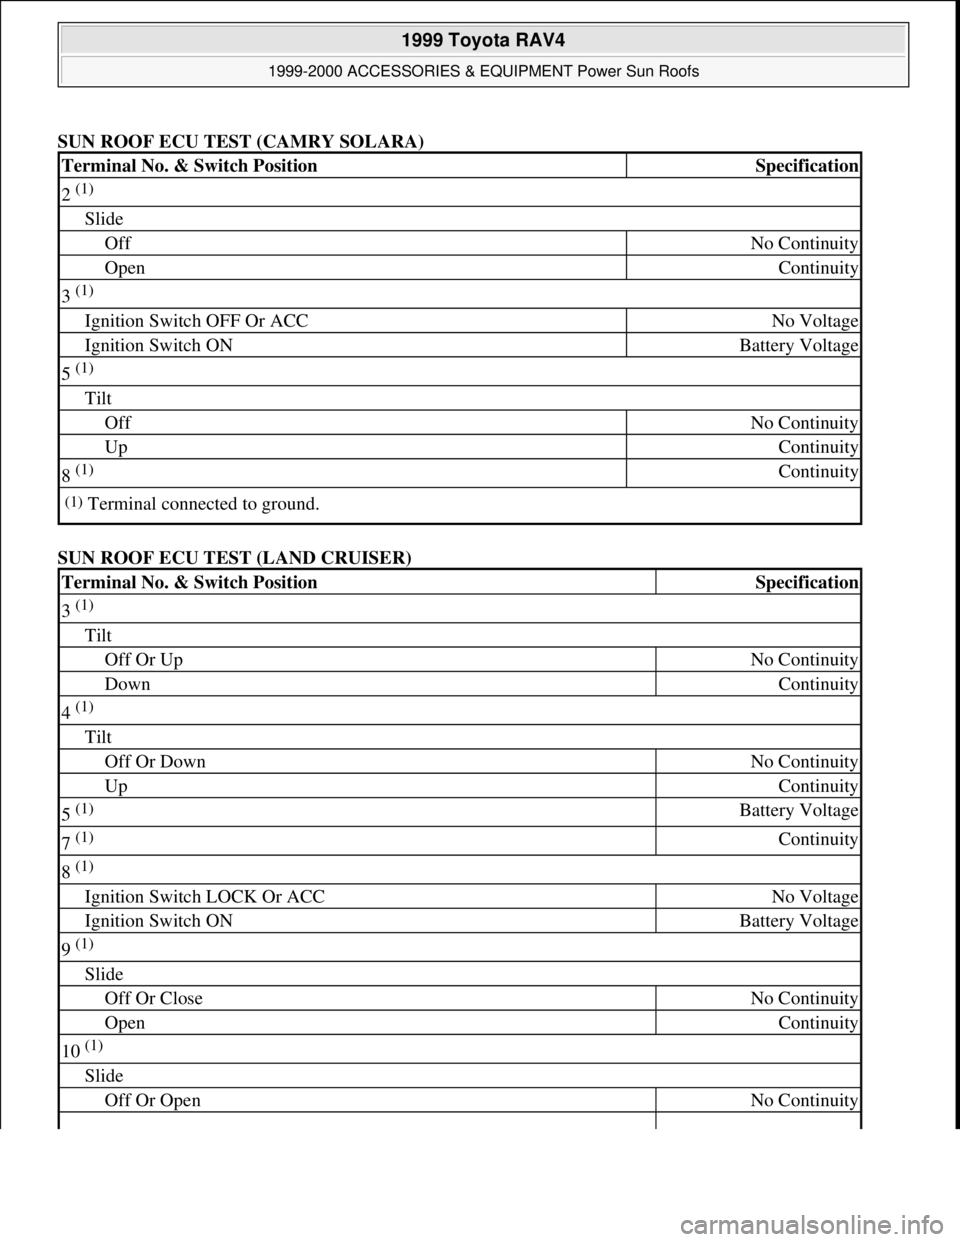
SUN ROOF ECU TEST (CAMRY SOLARA)
SUN ROOF ECU TEST (LAND CRUISER)
Terminal No. & Switch PositionSpecification
2 (1)
Slide
OffNo Continuity
OpenContinuity
3 (1)
Ignition Switch OFF Or ACCNo Voltage
Ignition Switch ONBattery Voltage
5 (1)
Tilt
OffNo Continuity
UpContinuity
8 (1) Continuity
(1)Terminal connected to ground.
Terminal No. & Switch PositionSpecification
3 (1)
Tilt
Off Or UpNo Continuity
DownContinuity
4 (1)
Tilt
Off Or DownNo Continuity
UpContinuity
5 (1) Battery Voltage
7 (1) Continuity
8 (1)
Ignition Switch LOCK Or ACCNo Voltage
Ignition Switch ONBattery Voltage
9 (1)
Slide
Off Or CloseNo Continuity
OpenContinuity
10 (1)
Slide
Off Or OpenNo Continuity
1999 Toyota RAV4
1999-2000 ACCESSORIES & EQUIPMENT Power Sun Roofs
Microsoft
Sunday, November 22, 2009 10:58:30 AMPage 35 © 2005 Mitchell Repair Information Company, LLC.
Page 1316 of 1632
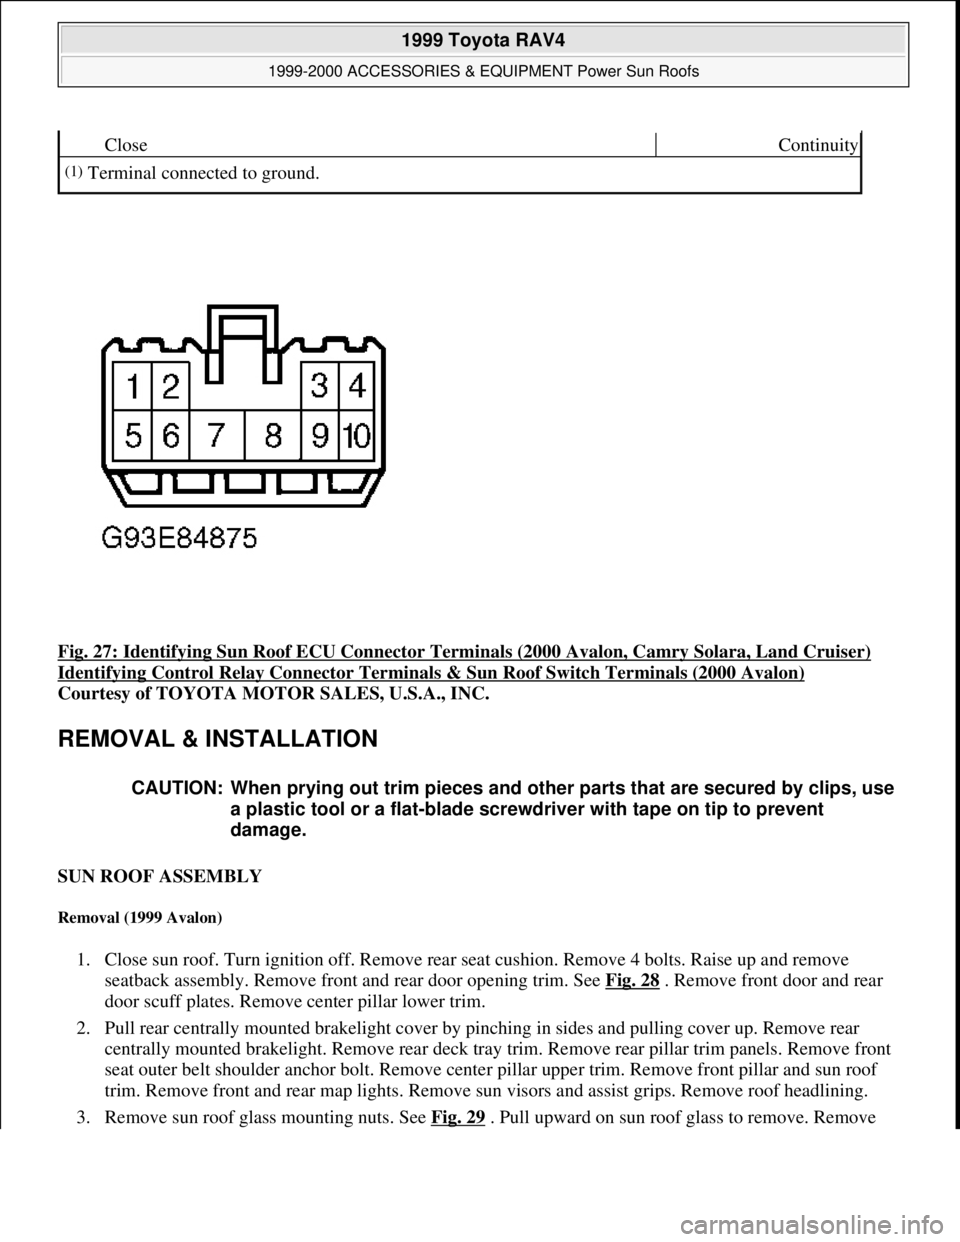
Fig. 27: Identifying Sun Roof ECU Connector Terminals (2000 Avalon, Camry Solara, Land Cruiser)
Identifying Control Relay Connector Terminals & Sun Roof Switch Terminals (2000 Avalon)
Courtesy of TOYOTA MOTOR SALES, U.S.A., INC.
REMOVAL & INSTALLATION
SUN ROOF ASSEMBLY
Removal (1999 Avalon)
1. Close sun roof. Turn ignition off. Remove rear seat cushion. Remove 4 bolts. Raise up and remove
seatback assembly. Remove front and rear door opening trim. See Fig. 28
. Remove front door and rear
door scuff plates. Remove center pillar lower trim.
2. Pull rear centrally mounted brakelight cover by pinching in sides and pulling cover up. Remove rear
centrally mounted brakelight. Remove rear deck tray trim. Remove rear pillar trim panels. Remove front
seat outer belt shoulder anchor bolt. Remove center pillar upper trim. Remove front pillar and sun roof
trim. Remove front and rear map lights. Remove sun visors and assist grips. Remove roof headlining.
3. Remove sun roof
glass mounting nuts. See Fig. 29. Pull upward on sun roof glass to remove. Remove
CloseContinuity
(1)Terminal connected to ground.
CAUTION: When prying out trim pieces and other parts that are secured by clips, use
a plastic tool or a flat-blade screwdriver with tape on tip to prevent
damage.
1999 Toyota RAV4
1999-2000 ACCESSORIES & EQUIPMENT Power Sun Roofs
Microsoft
Sunday, November 22, 2009 10:58:30 AMPage 36 © 2005 Mitchell Repair Information Company, LLC.
Page 1317 of 1632
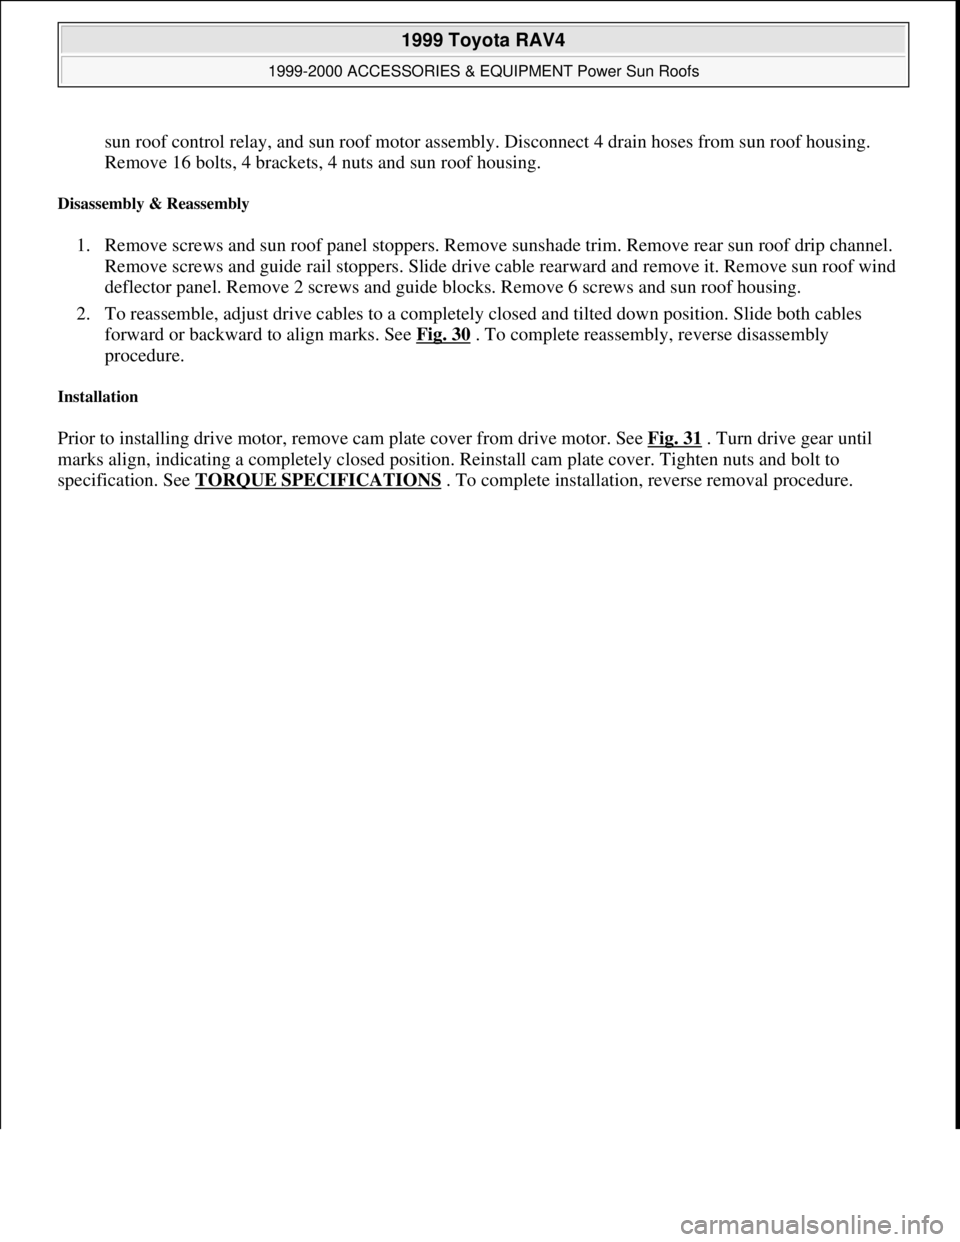
sun roof control relay, and sun roof motor assembly. Disconnect 4 drain hoses from sun roof housing.
Remove 16 bolts, 4 brackets, 4 nuts and sun roof housing.
Disassembly & Reassembly
1. Remove screws and sun roof panel stoppers. Remove sunshade trim. Remove rear sun roof drip channel.
Remove screws and guide rail stoppers. Slide drive cable rearward and remove it. Remove sun roof wind
deflector panel. Remove 2 screws and guide blocks. Remove 6 screws and sun roof housing.
2. To reassemble, adjust drive cables to a completely closed and tilted down position. Slide both cables
forward or backward to align marks. See Fig. 30
. To complete reassembly, reverse disassembly
procedure.
Installation
Prior to installing drive motor, remove cam plate cover from drive motor. See Fig. 31 . Turn drive gear until
marks align, indicating a completely closed position. Reinstall cam plate cover. Tighten nuts and bolt to
specification. See TORQUE SPECIFICATIONS
. To complete installation, reverse removal procedure.
1999 Toyota RAV4
1999-2000 ACCESSORIES & EQUIPMENT Power Sun Roofs
Microsoft
Sunday, November 22, 2009 10:58:30 AMPage 37 © 2005 Mitchell Repair Information Company, LLC.
Page 1318 of 1632
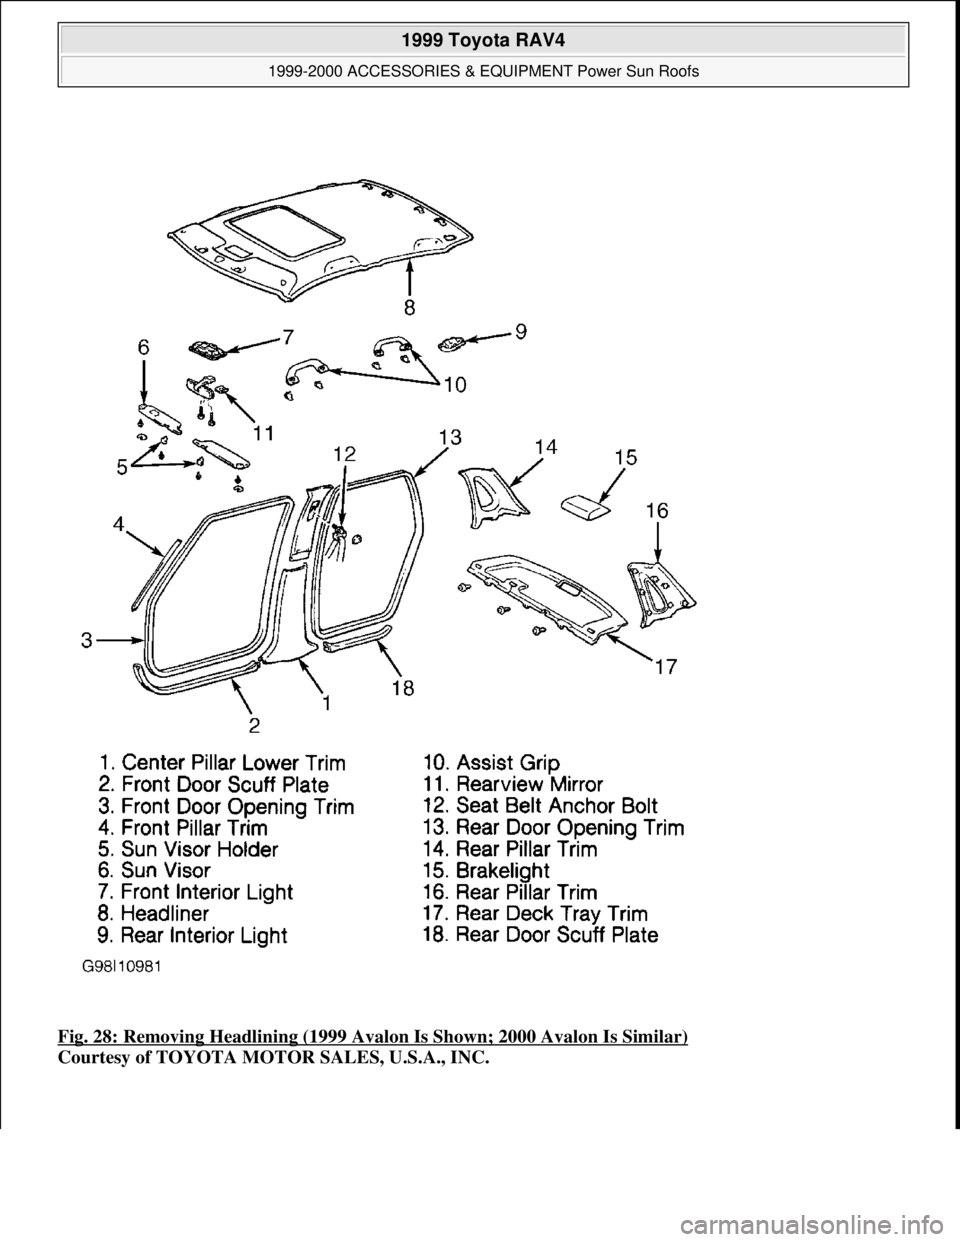
Fig. 28: Removing Headlining (1999 Avalon Is Shown; 2000 Avalon Is Similar)
Courtesy of TOYOTA MOTOR SALES, U.S.A., INC.
1999 Toyota RAV4
1999-2000 ACCESSORIES & EQUIPMENT Power Sun Roofs
Microsoft
Sunday, November 22, 2009 10:58:30 AMPage 38 © 2005 Mitchell Repair Information Company, LLC.
Page 1319 of 1632
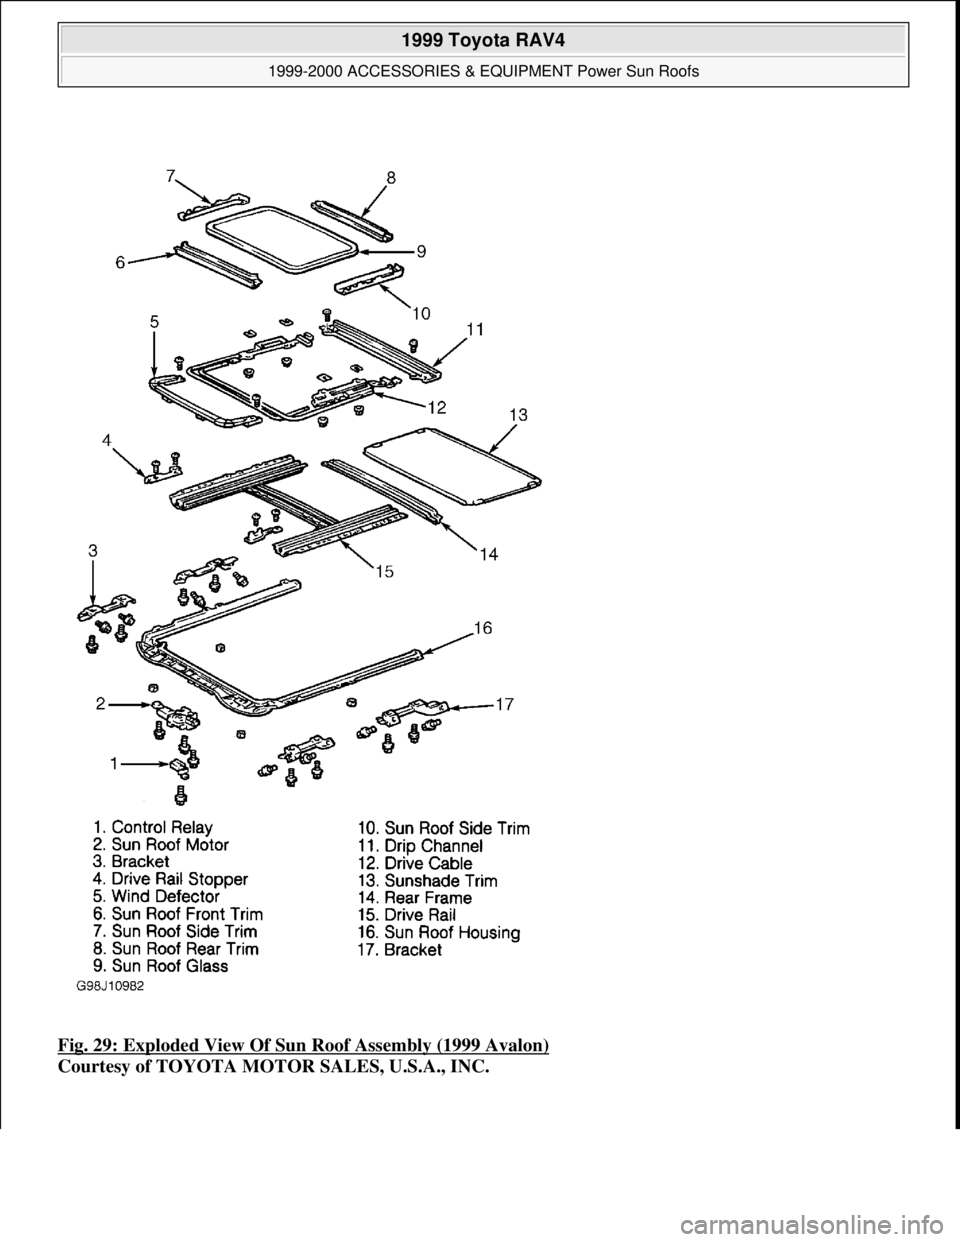
Fig. 29: Exploded View Of Sun Roof Assembly (1999 Avalon)
Courtesy of TOYOTA MOTOR SALES, U.S.A., INC.
1999 Toyota RAV4
1999-2000 ACCESSORIES & EQUIPMENT Power Sun Roofs
Microsoft
Sunday, November 22, 2009 10:58:30 AMPage 39 © 2005 Mitchell Repair Information Company, LLC.
Page 1320 of 1632
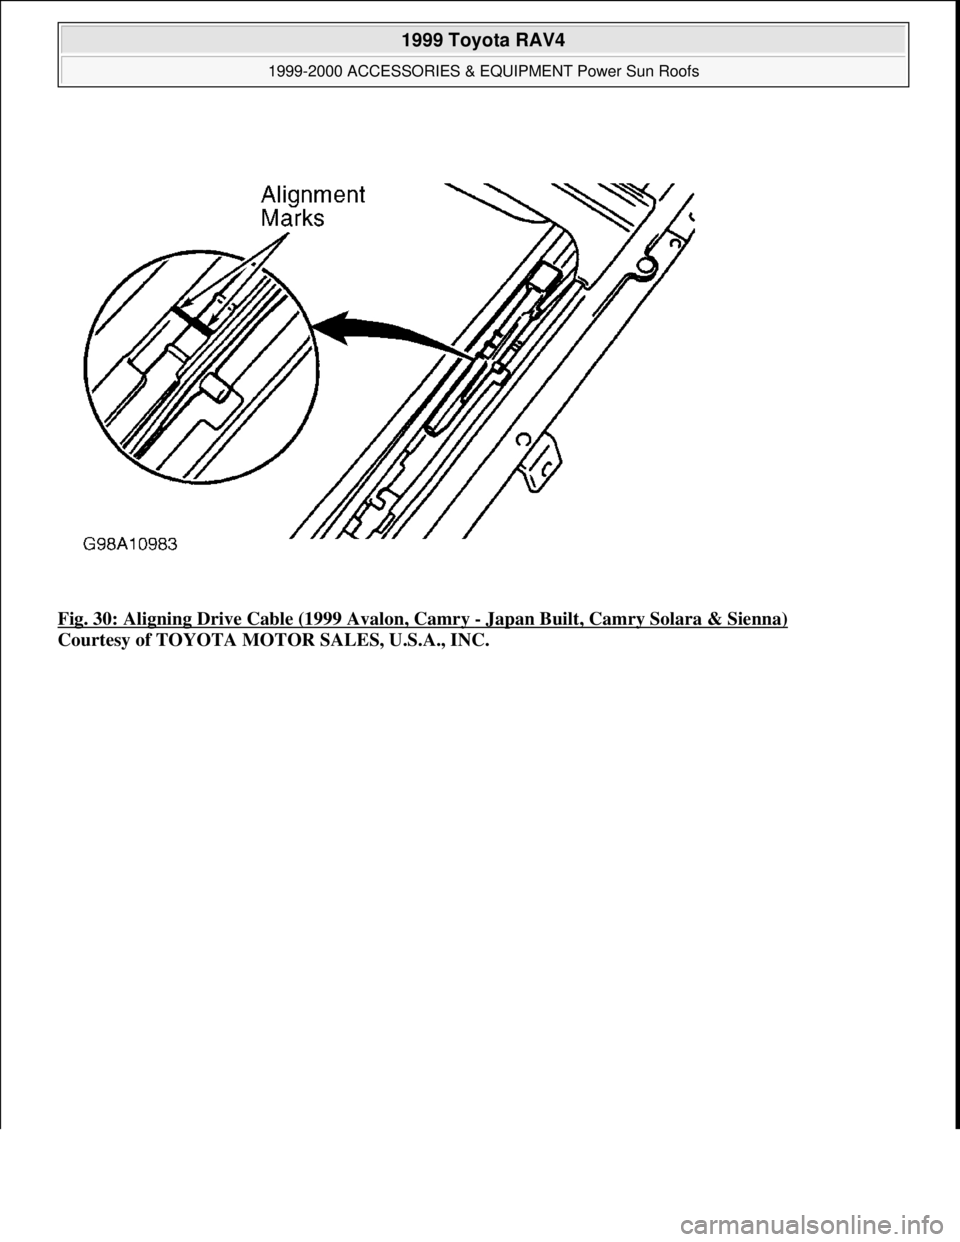
Fig. 30: Aligning Drive Cable (1999 Avalon, Camry - Japan Built, Camry Solara & Sienna)
Courtesy of TOYOTA MOTOR SALES, U.S.A., INC.
1999 Toyota RAV4
1999-2000 ACCESSORIES & EQUIPMENT Power Sun Roofs
Microsoft
Sunday, November 22, 2009 10:58:30 AMPage 40 © 2005 Mitchell Repair Information Company, LLC.