TOYOTA RAV4 1996 Service Repair Manual
Manufacturer: TOYOTA, Model Year: 1996, Model line: RAV4, Model: TOYOTA RAV4 1996Pages: 1632, PDF Size: 41.64 MB
Page 1291 of 1632
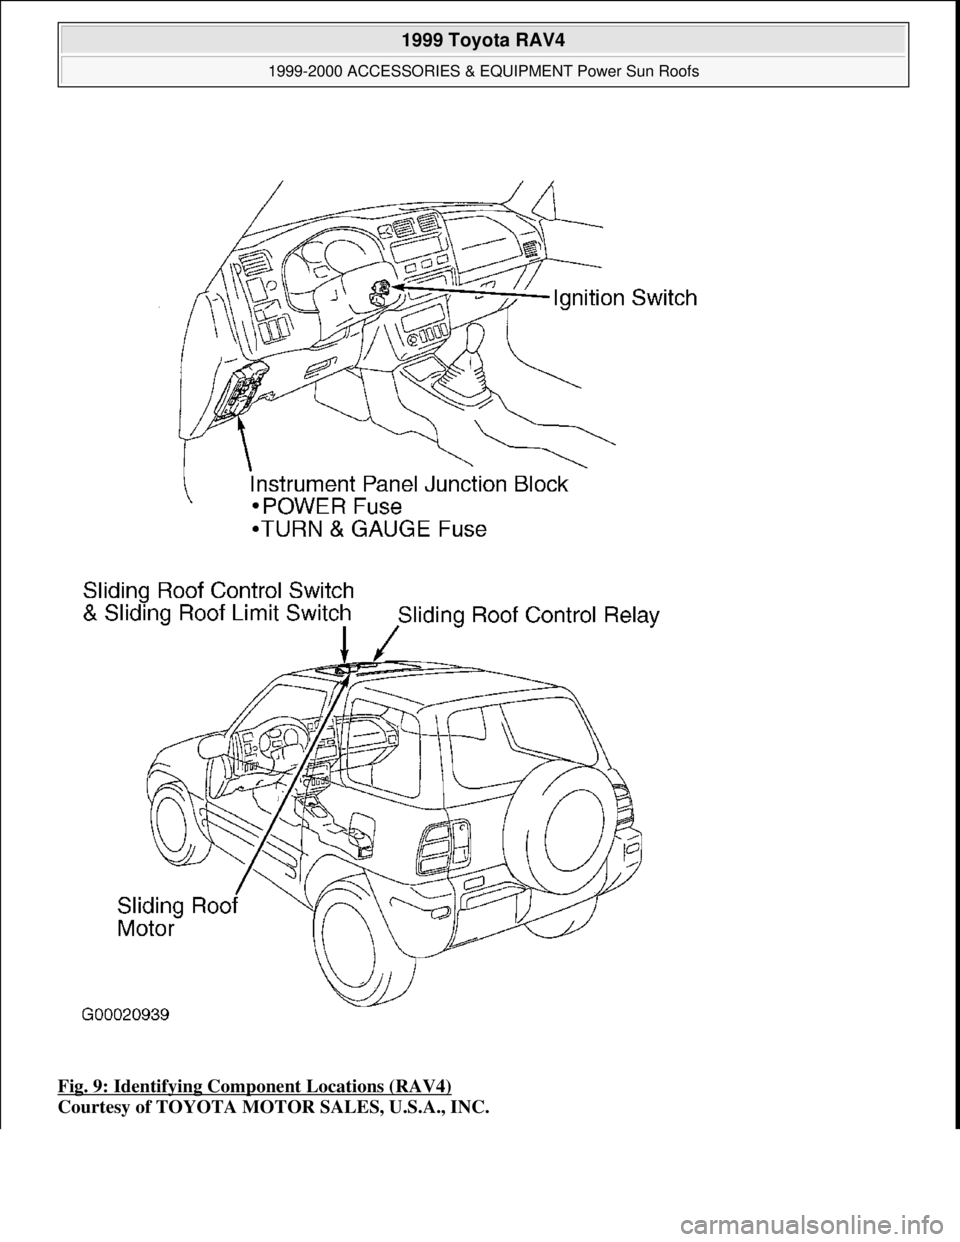
Fig. 9: Identifying Component Locations (RAV4)
Courtesy of TOYOTA MOTOR SALES, U.S.A., INC.
1999 Toyota RAV4
1999-2000 ACCESSORIES & EQUIPMENT Power Sun Roofs
Microsoft
Sunday, November 22, 2009 10:58:29 AMPage 11 © 2005 Mitchell Repair Information Company, LLC.
Page 1292 of 1632
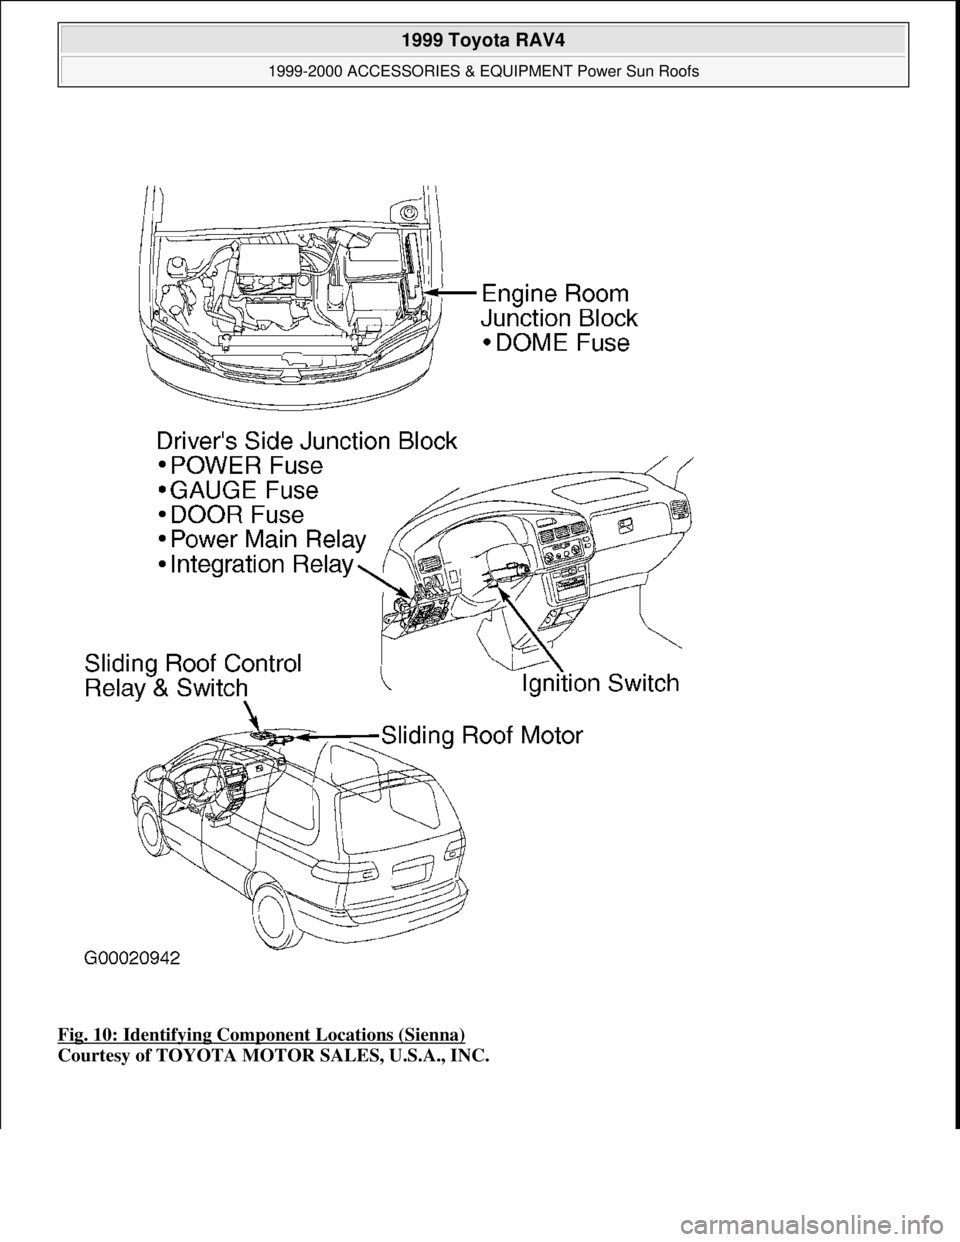
Fig. 10: Identifying Component Locations (Sienna)
Courtesy of TOYOTA MOTOR SALES, U.S.A., INC.
1999 Toyota RAV4
1999-2000 ACCESSORIES & EQUIPMENT Power Sun Roofs
Microsoft
Sunday, November 22, 2009 10:58:29 AMPage 12 © 2005 Mitchell Repair Information Company, LLC.
Page 1293 of 1632
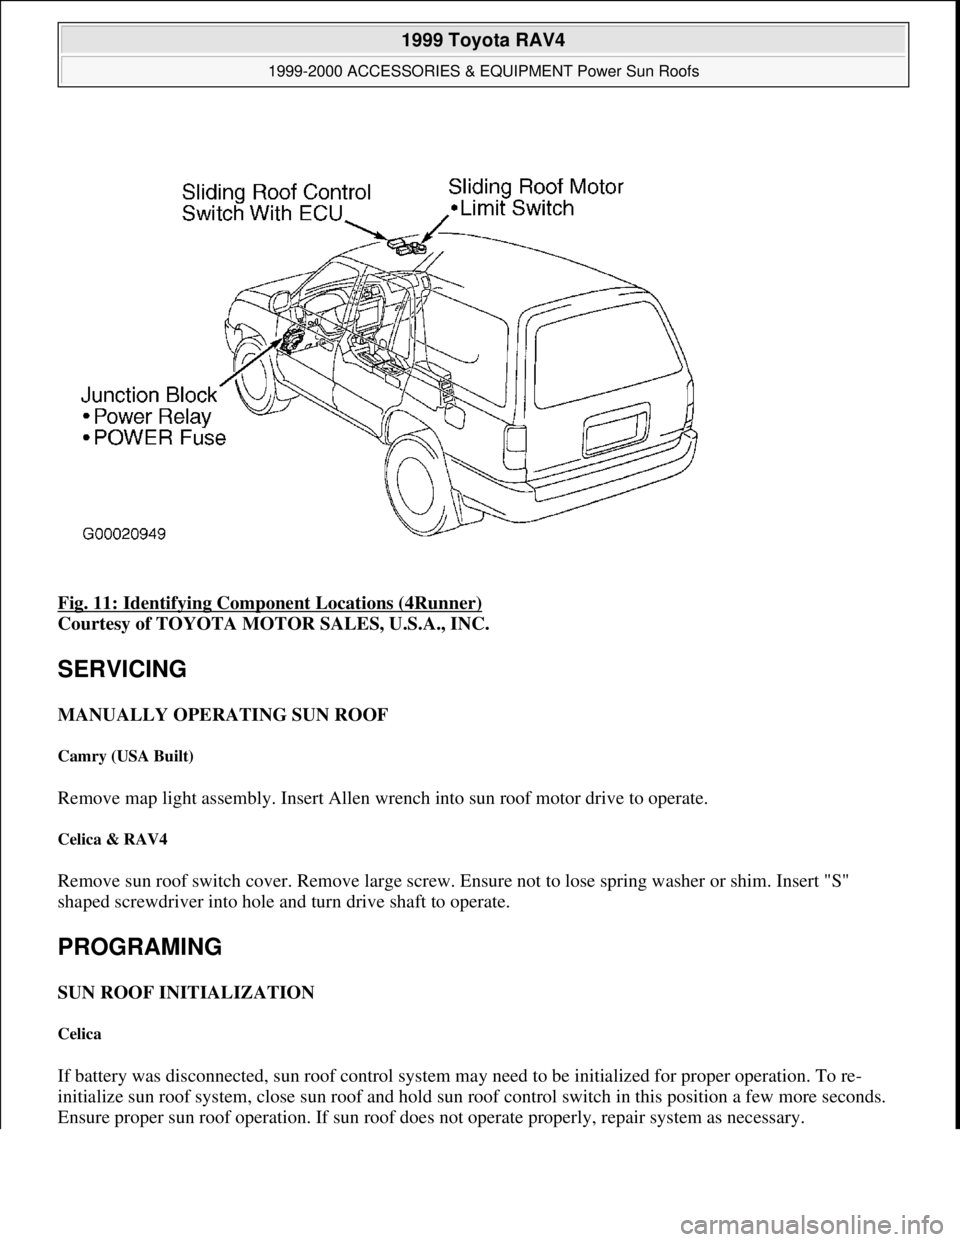
Fig. 11: Identifying Component Locations (4Runner)
Courtesy of TOYOTA MOTOR SALES, U.S.A., INC.
SERVICING
MANUALLY OPERATING SUN ROOF
Camry (USA Built)
Remove map light assembly. Insert Allen wrench into sun roof motor drive to operate.
Celica & RAV4
Remove sun roof switch cover. Remove large screw. Ensure not to lose spring washer or shim. Insert "S"
shaped screwdriver into hole and turn drive shaft to operate.
PROGRAMING
SUN ROOF INITIALIZATION
Celica
If battery was disconnected, sun roof control system may need to be initialized for proper operation. To re-
initialize sun roof system, close sun roof and hold sun roof control switch in this position a few more seconds.
Ensure proper sun roof operation. If sun roof does not operate properly, repair system as necessary.
1999 Toyota RAV4
1999-2000 ACCESSORIES & EQUIPMENT Power Sun Roofs
Microsoft
Sunday, November 22, 2009 10:58:29 AMPage 13 © 2005 Mitchell Repair Information Company, LLC.
Page 1294 of 1632
ADJUSTMENTS
SUN ROOF HEIGHT
Corolla, Celica (1999), RAV4 & 4Runner
Completely close sun roof. Measure sun roof height. Roof panel should be even with glass weatherstrip, within
0.06" (1.5 mm). If adjustment is required, pry out trim panels from left and right sides of sun roof opening.
Install or remove shims between bracket and sun roof as necessary. Recheck sun roof height.
Camry
Completely close sun roof. Measure sun roof height. On USA-built Camry, roof panel should be even with glass
weatherstrip, within 0.06" (1.5 mm). On Japan-built Camry and Camry Solara, roof panel should be even with
glass weatherstrip, within 0.06" (1.5 mm) at front, and +0.06" (1.5 mm) or -0.04" (1.0 mm) at rear. On all
models, if adjustment is required, pry out trim panels from left and right sides of sun roof opening. Install or
remove shims between bracket and sun roof as necessary. Recheck sun roof height.
Land Cruiser
Completely close sun roof. Measure sun roof height. Roof panel should be even with glass weatherstrip, within
0.06" (1.5 mm) at front, and +0.06" (1.5 mm) or -0.04" (1.0 mm) on all sides except rear. Roof panel should be
even with glass weatherstrip, within 0.06" (1.5 mm) at rear. If adjustment is required, pry out trim panels from
left and right sides of sun roof opening. Install or remove shims between bracket and sun roof as necessary.
Recheck sun roof height.
Avalon, Celica (2000) & Sienna
Completely close sun roof. Measure sun roof height. Roof panel should be even with glass weatherstrip, within
0.06" (1.5 mm) at front, and +0.06" (1.5 mm) or -0.04" (1.0 mm) at rear. If adjustment is required, pry out trim
panels from left and right sides of sun roof opening. Install or remove shims between bracket and sun roof as
necessary. Recheck sun roof height.
SUN ROOF CLOSING CLEARANCE
RAV4 (4-Door), Land Cruiser & 4Runner
If sun roof closing clearances are unequal between right and left sides, pry out trim panels from left and right
sides of sun roof opening. Loosen sun roof slider mount nuts (RAV4 4-door and 4Runner; screws on Land
Cruiser). Move either side forward or backward as necessary. Tighten sun roof slider mount nuts. Recheck sun
roof alignment and operation.
SUN ROOF FRONT-TO-REAR ALIGNMENT
Avalon (1999), Camry, Camry Solara & Sienna
If front-to-rear position of sun roof is incorrect, pry out trim panels from left and right sides of sun roof opening.
1999 Toyota RAV4
1999-2000 ACCESSORIES & EQUIPMENT Power Sun Roofs
Microsoft
Sunday, November 22, 2009 10:58:29 AMPage 14 © 2005 Mitchell Repair Information Company, LLC.
Page 1295 of 1632
Loosen Torx screws securing sun roof glass. Move sun roof to front or rear as necessary. Tighten Torx screws.
Corolla, Celica (2000) & RAV4 (2-Door)
If front-to-rear position of sun roof is incorrect, loosen Torx screws securing sun roof glass. Move sun roof to
front or rear as necessary. Tighten Torx screws.
Celica (1999), RAV4 (4-Door) & 4Runner
If front-to-rear position of sun roof is incorrect, pry out trim panels from left and right sides of sun roof opening.
Loosen sun roof slider mount nuts. Move sun roof to front or rear as necessary. If front-to-rear position still
does not adjust, remove sun roof glass and adjust guide rail. Using screwdriver, slide link front or rear to align
marks. See Fig. 45
, Fig. 60 or Fig. 65 . Tighten sun roof slider mount nuts.
Land Cruiser
If front-to-rear position of sun roof is incorrect, pry out trim panels from left and right sides of sun roof opening.
Loosen screws securing sun roof glass. Move sun roof to front or rear as necessary. Tighten screws.
SUN ROOF SIDE-TO-SIDE ALIGNMENT
Camry, Camry Solara, Celica (2000), Corolla, Land Cruiser & Sienna
If sun roof closing clearances are unequal between right and left sides, ensure sun roof is completely closed.
Remove sun roof motor assembly and sun roof glass. Adjust drive rail by sliding cables forward or backward.
Align 2 marks shown. See Fig. 45
, Fig. 60 or Fig. 65 . Reinstall sun roof motor assembly.
Avalon & RAV4 (2-Door)
If sun roof is mounted to right or left of center line in roof opening, close sun roof. Remove sun roof motor and
glass. See SUN ROOF ASSEMBLY
under REMOVAL & INSTALLATION. Adjust drive rail by sliding
cables forward or backward. Align 2 marks shown. See Fig. 30
, Fig. 33 or Fig. 52 . Tighten sun roof slider
mount nuts.
Celica (1999), RAV4 (4-Door) & 4Runner
If sun roof is mounted to right or left of center line in roof opening, pry out trim panels from left and right sides
of sun roof opening. Loosen sun roof rear slider mount nuts. Move sun roof right or left as necessary. Tighten
sun roof slider mount nuts.
TROUBLE SHOOTING
PRELIMINARY INSPECTION
With engine running, check time necessary for sun roof to open or close. Open and close time should be about
5-6 seconds. Check for abnormal noise or binding during sun roof operation. Check for water leakage. Adjust as
necessary. See ADJUSTMENTS
.
1999 Toyota RAV4
1999-2000 ACCESSORIES & EQUIPMENT Power Sun Roofs
Microsoft
Sunday, November 22, 2009 10:58:29 AMPage 15 © 2005 Mitchell Repair Information Company, LLC.
Page 1296 of 1632
SUN ROOF DOES NOT CLOSE
Celica (2000)
1. If when sun roof is closing, it stops and reverses direction, perform the following: with ignition on and
sun roof in open position, operate close switch for at least 10 seconds until sun roof is completely closed.
This will prohibit jam protection system operation. Go to next step.
2. Check sun roof operation. If sun roof system operates normally, a temporary malfunction occurred. If sun
roof system does not operate normally, check for a mechanical problem.
COMPONENT TESTS
LIMIT SWITCHES
Avalon & Celica (1999)
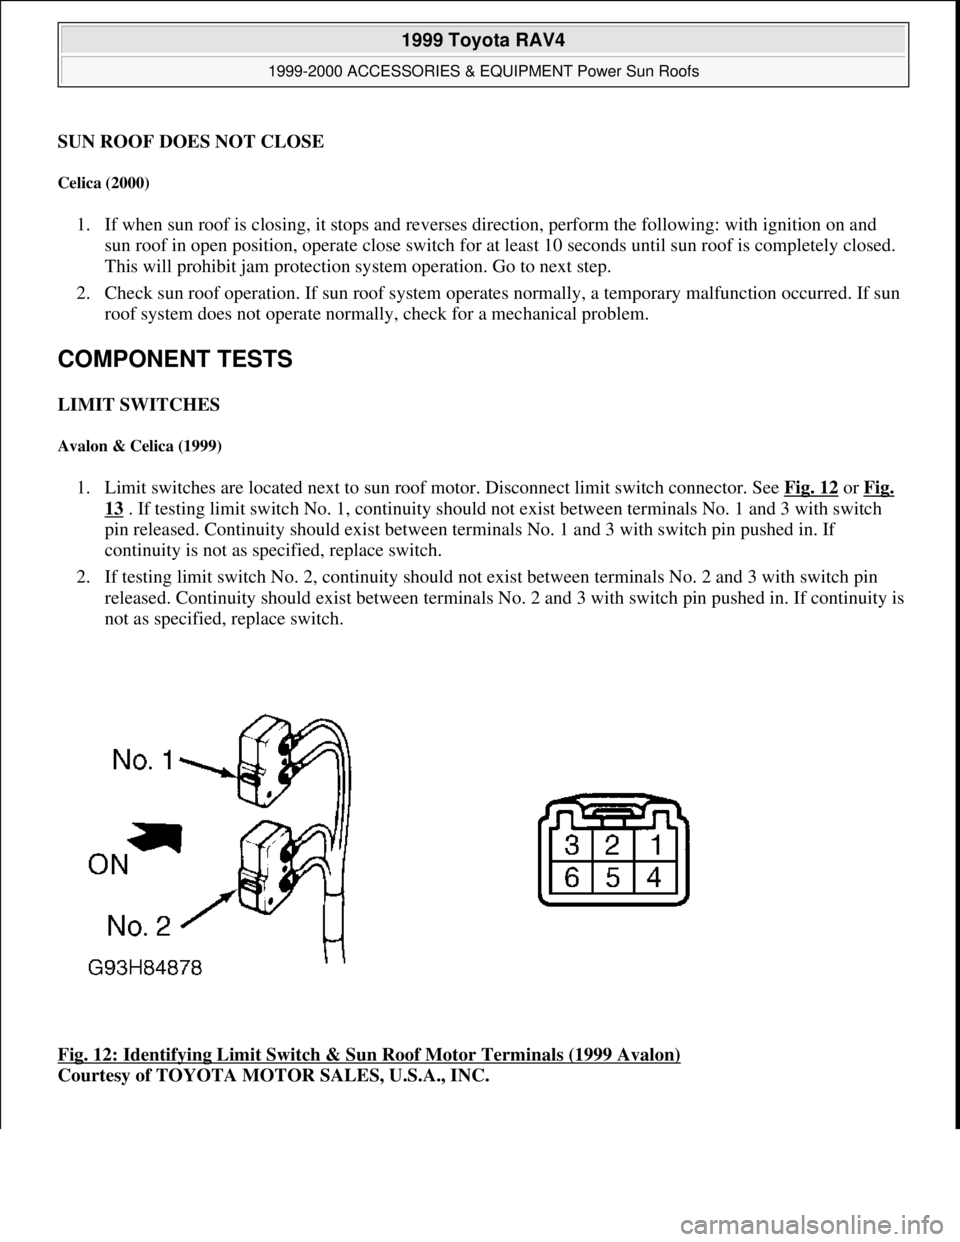
1. Limit switches are located next to sun roof motor. Disconnect limit switch connector. See Fig. 12 or Fig.
13 . If testing limit switch No. 1, continuity should not exist between terminals No. 1 and 3 with switch
pin released. Continuity should exist between terminals No. 1 and 3 with switch pin pushed in. If
continuity is not as specified, replace switch.
2. If testing limit switch No. 2, continuity should not exist between terminals No. 2 and 3 with switch pin
released. Continuity should exist between terminals No. 2 and 3 with switch pin pushed in. If continuity is
not as specified, replace switch.
Fig. 12: Identifying Limit Switch & Sun Roof Motor Terminals (1999 Avalon)
Courtesy of TOYOTA MOTOR SALES, U.S.A., INC.
1999 Toyota RAV4
1999-2000 ACCESSORIES & EQUIPMENT Power Sun Roofs
Microsoft
Sunday, November 22, 2009 10:58:29 AMPage 16 © 2005 Mitchell Repair Information Company, LLC.
Page 1297 of 1632
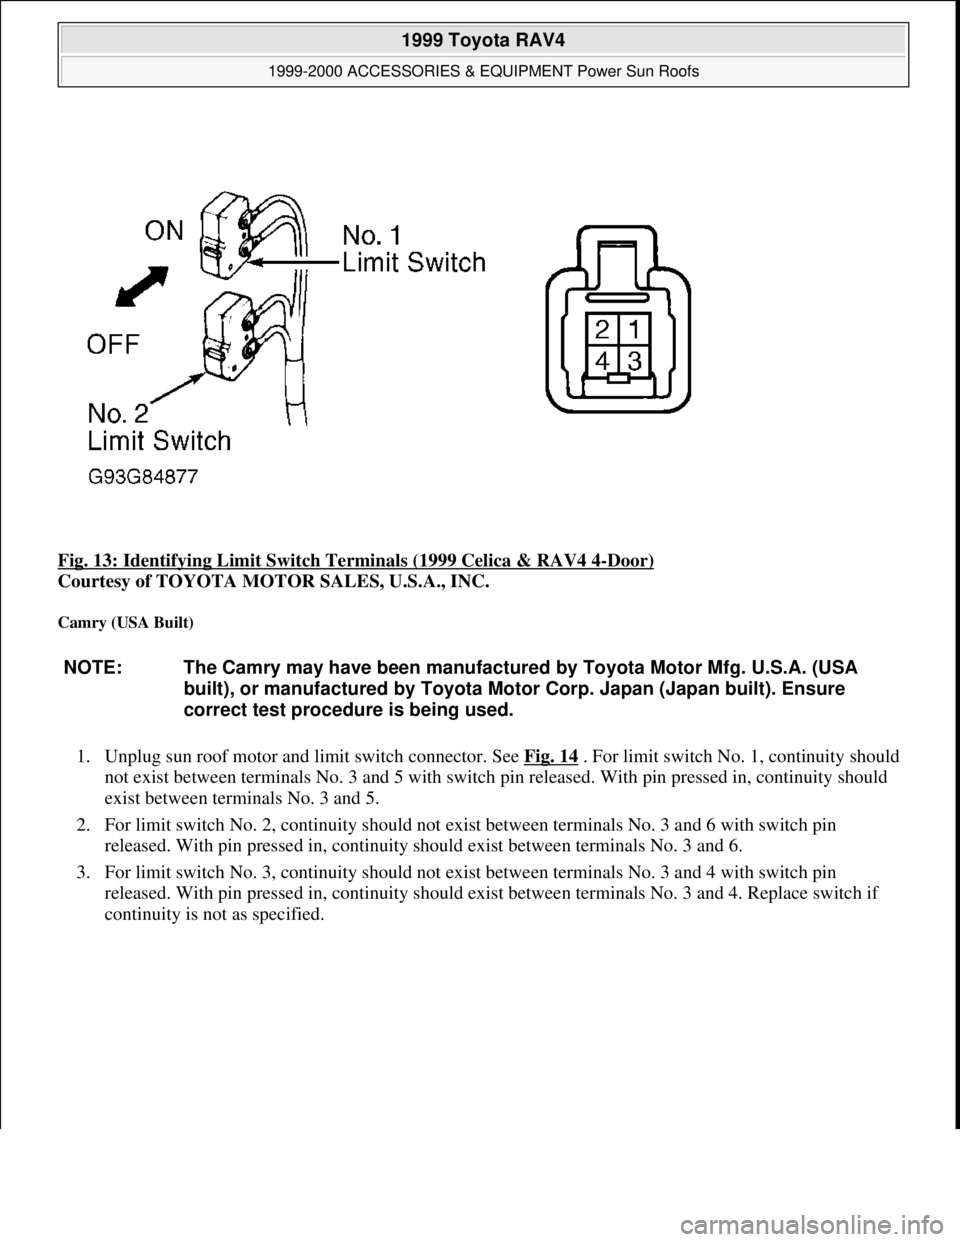
Fig. 13: Identifying Limit Switch Terminals (1999 Celica & RAV4 4-Door)
Courtesy of TOYOTA MOTOR SALES, U.S.A., INC.
Camry (USA Built)
1. Unplug sun roof motor and limit switch connector. See Fig. 14 . For limit switch No. 1, continuity should
not exist between terminals No. 3 and 5 with switch pin released. With pin pressed in, continuity should
exist between terminals No. 3 and 5.
2. For limit switch No. 2, continuity should not exist between terminals No. 3 and 6 with switch pin
released. With pin pressed in, continuity should exist between terminals No. 3 and 6.
3. For limit switch No. 3, continuity should not exist between terminals No. 3 and 4 with switch pin
released. With pin pressed in, continuity should exist between terminals No. 3 and 4. Replace switch if
continuity is not as specified.
NOTE: The Camry may have been manufactured by Toyota Motor Mfg. U.S.A. (USA
built), or manufactured by Toyota Motor Corp. Japan (Japan built). Ensure
correct test procedure is being used.
1999 Toyota RAV4
1999-2000 ACCESSORIES & EQUIPMENT Power Sun Roofs
Microsoft
Sunday, November 22, 2009 10:58:29 AMPage 17 © 2005 Mitchell Repair Information Company, LLC.
Page 1298 of 1632
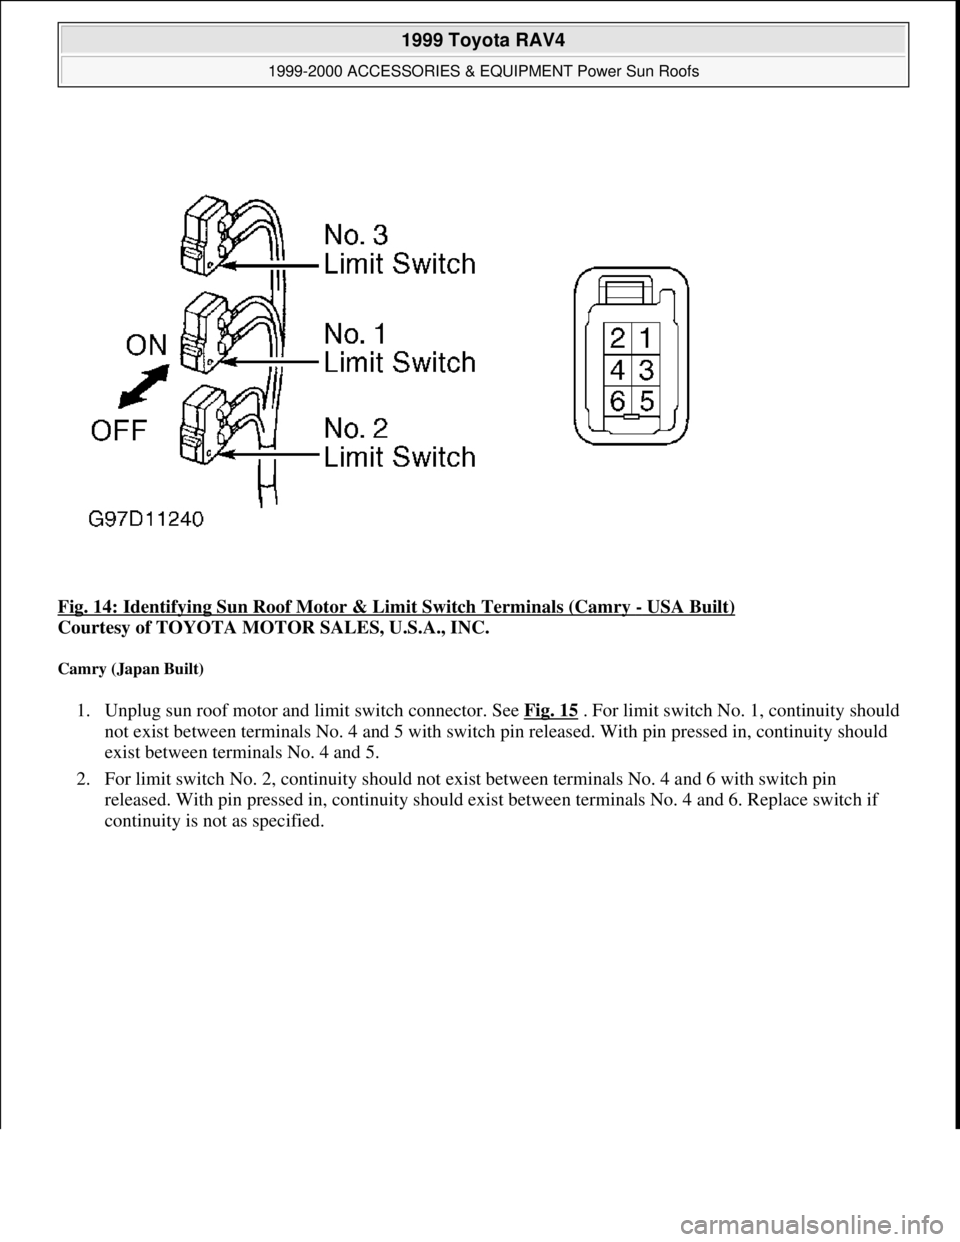
Fig. 14: Identifying Sun Roof Motor & Limit Switch Terminals (Camry - USA Built)
Courtesy of TOYOTA MOTOR SALES, U.S.A., INC.
Camry (Japan Built)
1. Unplug sun roof motor and limit switch connector. See Fig. 15 . For limit switch No. 1, continuity should
not exist between terminals No. 4 and 5 with switch pin released. With pin pressed in, continuity should
exist between terminals No. 4 and 5.
2. For limit switch No. 2, continuity should not exist between terminals No. 4 and 6 with switch pin
released. With pin pressed in, continuity should exist between terminals No. 4 and 6. Replace switch if
continuit
y is not as specified.
1999 Toyota RAV4
1999-2000 ACCESSORIES & EQUIPMENT Power Sun Roofs
Microsoft
Sunday, November 22, 2009 10:58:29 AMPage 18 © 2005 Mitchell Repair Information Company, LLC.
Page 1299 of 1632
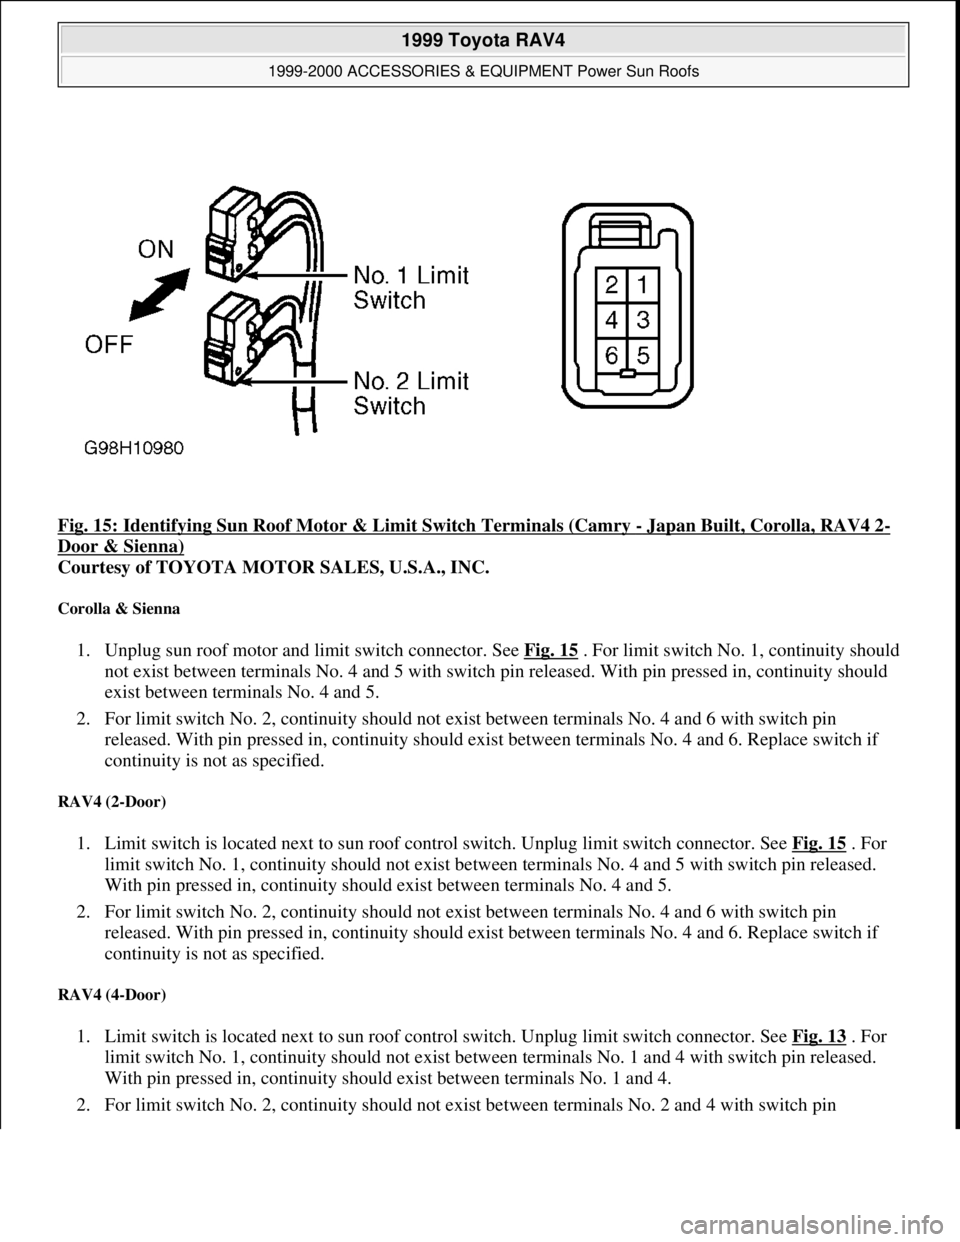
Fig. 15: Identifying Sun Roof Motor & Limit Switch Terminals (Camry - Japan Built, Corolla, RAV4 2-
Door & Sienna)
Courtesy of TOYOTA MOTOR SALES, U.S.A., INC.
Corolla & Sienna
1. Unplug sun roof motor and limit switch connector. See Fig. 15 . For limit switch No. 1, continuity should
not exist between terminals No. 4 and 5 with switch pin released. With pin pressed in, continuity should
exist between terminals No. 4 and 5.
2. For limit switch No. 2, continuity should not exist between terminals No. 4 and 6 with switch pin
released. With pin pressed in, continuity should exist between terminals No. 4 and 6. Replace switch if
continuity is not as specified.
RAV4 (2-Door)
1. Limit switch is located next to sun roof control switch. Unplug limit switch connector. See Fig. 15 . For
limit switch No. 1, continuity should not exist between terminals No. 4 and 5 with switch pin released.
With pin pressed in, continuity should exist between terminals No. 4 and 5.
2. For limit switch No. 2, continuity should not exist between terminals No. 4 and 6 with switch pin
released. With pin pressed in, continuity should exist between terminals No. 4 and 6. Replace switch if
continuity is not as specified.
RAV4 (4-Door)
1. Limit switch is located next to sun roof control switch. Unplug limit switch connector. See Fig. 13 . For
limit switch No. 1, continuity should not exist between terminals No. 1 and 4 with switch pin released.
With pin pressed in, continuity should exist between terminals No. 1 and 4.
2. For limit switch No. 2, continuit
y should not exist between terminals No. 2 and 4 with switch pin
1999 Toyota RAV4
1999-2000 ACCESSORIES & EQUIPMENT Power Sun Roofs
Microsoft
Sunday, November 22, 2009 10:58:29 AMPage 19 © 2005 Mitchell Repair Information Company, LLC.
Page 1300 of 1632
released. With pin pressed in, continuity should exist between terminals No. 2 and 4. Replace switch if
continuity is not as specified.
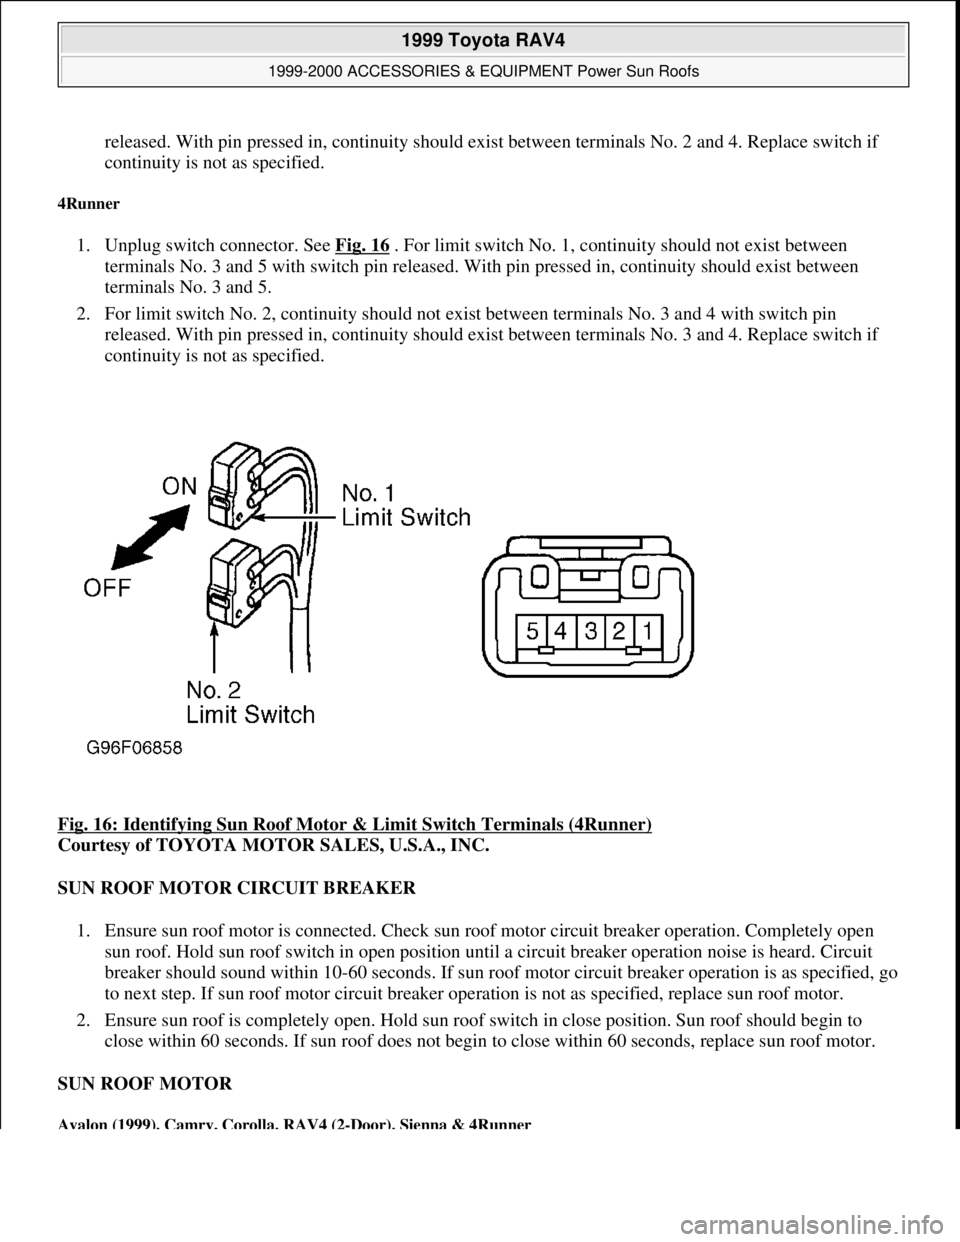
4Runner
1. Unplug switch connector. See Fig. 16 . For limit switch No. 1, continuity should not exist between
terminals No. 3 and 5 with switch pin released. With pin pressed in, continuity should exist between
terminals No. 3 and 5.
2. For limit switch No. 2, continuity should not exist between terminals No. 3 and 4 with switch pin
released. With pin pressed in, continuity should exist between terminals No. 3 and 4. Replace switch if
continuity is not as specified.
Fig. 16: Identifying Sun Roof Motor & Limit Switch Terminals (4Runner)
Courtesy of TOYOTA MOTOR SALES, U.S.A., INC.
SUN ROOF MOTOR CIRCUIT BREAKER
1. Ensure sun roof motor is connected. Check sun roof motor circuit breaker operation. Completely open
sun roof. Hold sun roof switch in open position until a circuit breaker operation noise is heard. Circuit
breaker should sound within 10-60 seconds. If sun roof motor circuit breaker operation is as specified, go
to next step. If sun roof motor circuit breaker operation is not as specified, replace sun roof motor.
2. Ensure sun roof is completely open. Hold sun roof switch in close position. Sun roof should begin to
close within 60 seconds. If sun roof does not begin to close within 60 seconds, replace sun roof motor.
SUN ROOF MOTOR
Avalon (1999), Camry, Corolla, RAV4 (2-Door), Sienna & 4Runner
1999 Toyota RAV4
1999-2000 ACCESSORIES & EQUIPMENT Power Sun Roofs
Microsoft
Sunday, November 22, 2009 10:58:29 AMPage 20 © 2005 Mitchell Repair Information Company, LLC.