TOYOTA RAV4 1996 Service Repair Manual
Manufacturer: TOYOTA, Model Year: 1996, Model line: RAV4, Model: TOYOTA RAV4 1996Pages: 1632, PDF Size: 41.64 MB
Page 1321 of 1632
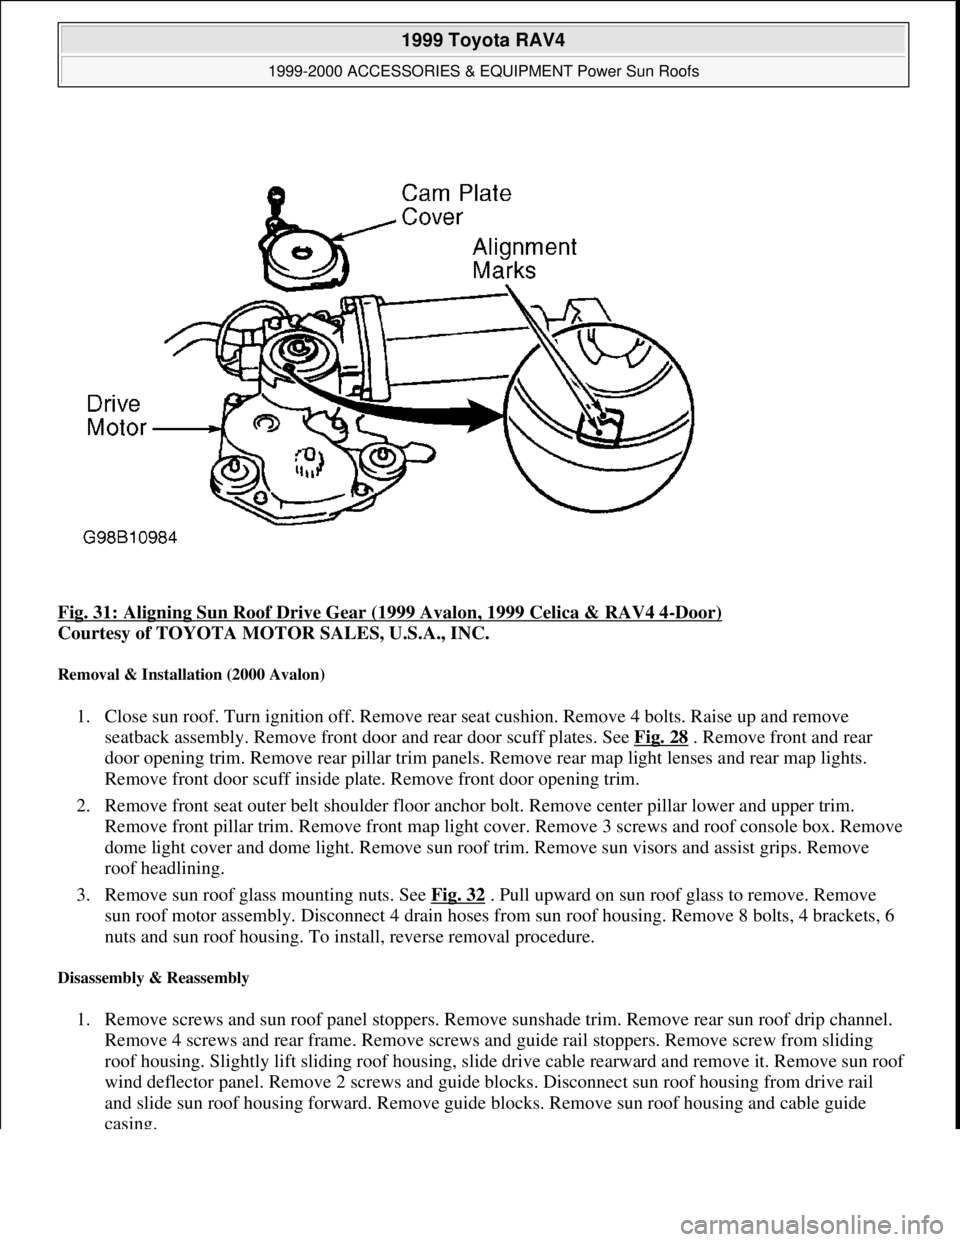
Fig. 31: Aligning Sun Roof Drive Gear (1999 Avalon, 1999 Celica & RAV4 4-Door)
Courtesy of TOYOTA MOTOR SALES, U.S.A., INC.
Removal & Installation (2000 Avalon)
1. Close sun roof. Turn ignition off. Remove rear seat cushion. Remove 4 bolts. Raise up and remove
seatback assembly. Remove front door and rear door scuff plates. See Fig. 28
. Remove front and rear
door opening trim. Remove rear pillar trim panels. Remove rear map light lenses and rear map lights.
Remove front door scuff inside plate. Remove front door opening trim.
2. Remove front seat outer belt shoulder floor anchor bolt. Remove center pillar lower and upper trim.
Remove front pillar trim. Remove front map light cover. Remove 3 screws and roof console box. Remove
dome light cover and dome light. Remove sun roof trim. Remove sun visors and assist grips. Remove
roof headlining.
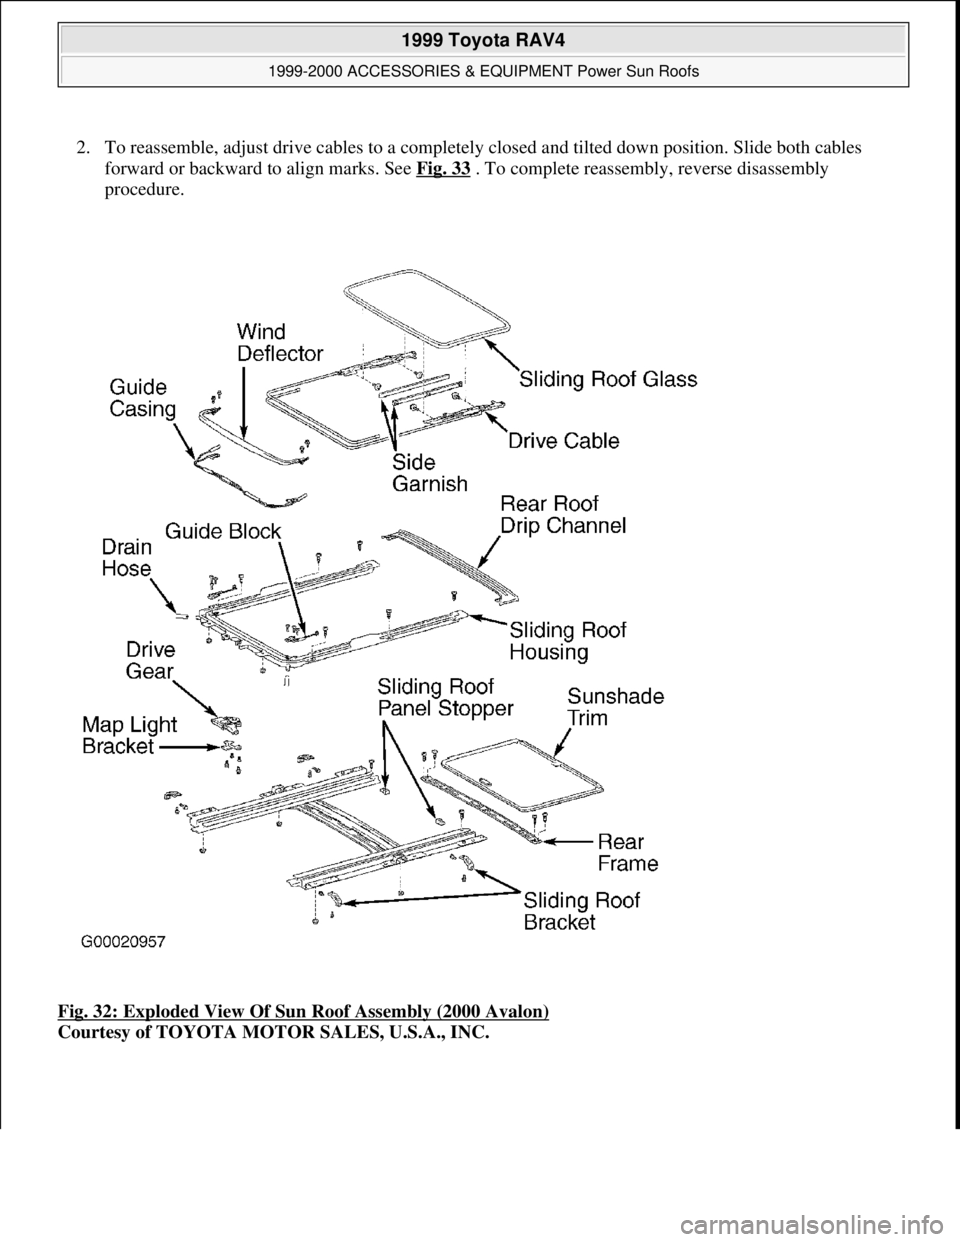
3. Remove sun roof glass mounting nuts. See Fig. 32
. Pull upward on sun roof glass to remove. Remove
sun roof motor assembly. Disconnect 4 drain hoses from sun roof housing. Remove 8 bolts, 4 brackets, 6
nuts and sun roof housing. To install, reverse removal procedure.
Disassembly & Reassembly
1. Remove screws and sun roof panel stoppers. Remove sunshade trim. Remove rear sun roof drip channel.
Remove 4 screws and rear frame. Remove screws and guide rail stoppers. Remove screw from sliding
roof housing. Slightly lift sliding roof housing, slide drive cable rearward and remove it. Remove sun roo
f
wind deflector panel. Remove 2 screws and guide blocks. Disconnect sun roof housing from drive rail
and slide sun roof housing forward. Remove guide blocks. Remove sun roof housing and cable guide
casing.
1999 Toyota RAV4
1999-2000 ACCESSORIES & EQUIPMENT Power Sun Roofs
Microsoft
Sunday, November 22, 2009 10:58:30 AMPage 41 © 2005 Mitchell Repair Information Company, LLC.
Page 1322 of 1632
2. To reassemble, adjust drive cables to a completely closed and tilted down position. Slide both cables
forward or backward to align marks. See Fig. 33
. To complete reassembly, reverse disassembly
procedure.
Fig. 32: Exploded View Of Sun Roof Assembly (2000 Avalon)
Courtesy of TOYOTA MOTOR SALES, U.S.A., INC.
1999 Toyota RAV4
1999-2000 ACCESSORIES & EQUIPMENT Power Sun Roofs
Microsoft
Sunday, November 22, 2009 10:58:30 AMPage 42 © 2005 Mitchell Repair Information Company, LLC.
Page 1323 of 1632
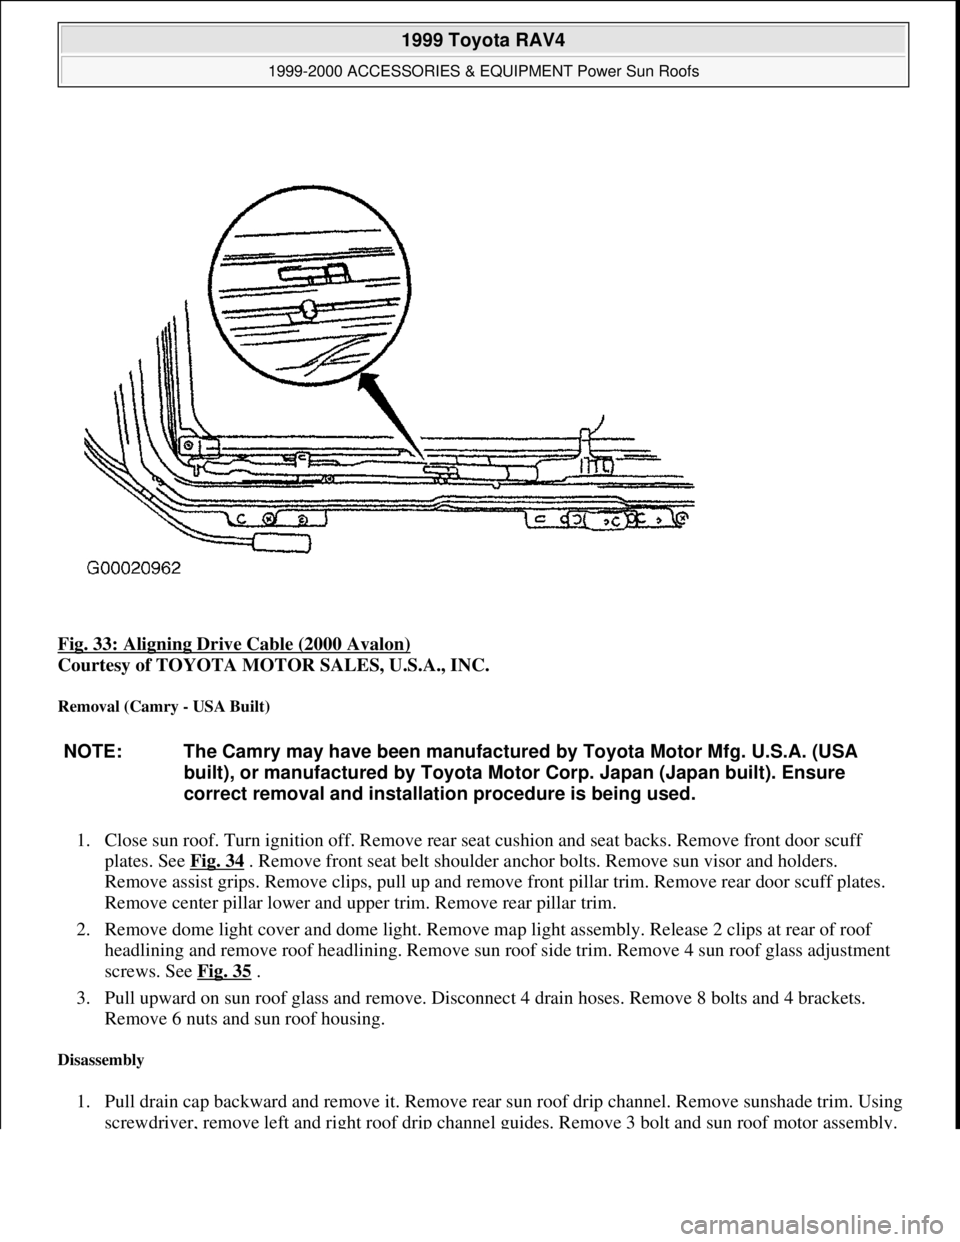
Fig. 33: Aligning Drive Cable (2000 Avalon)
Courtesy of TOYOTA MOTOR SALES, U.S.A., INC.
Removal (Camry - USA Built)
1. Close sun roof. Turn ignition off. Remove rear seat cushion and seat backs. Remove front door scuff
plates. See Fig. 34
. Remove front seat belt shoulder anchor bolts. Remove sun visor and holders.
Remove assist grips. Remove clips, pull up and remove front pillar trim. Remove rear door scuff plates.
Remove center pillar lower and upper trim. Remove rear pillar trim.
2. Remove dome light cover and dome light. Remove map light assembly. Release 2 clips at rear of roof
headlining and remove roof headlining. Remove sun roof side trim. Remove 4 sun roof glass adjustment
screws. See Fig. 35
.
3. Pull upward on sun roof glass and remove. Disconnect 4 drain hoses. Remove 8 bolts and 4 brackets.
Remove 6 nuts and sun roof housing.
Disassembly
1. Pull drain cap backward and remove it. Remove rear sun roof drip channel. Remove sunshade trim. Using
screwdriver, remove left and ri
ght roof drip channel guides. Remove 3 bolt and sun roof motor assembly.
NOTE: The Camry may have been manufactured by Toyota Motor Mfg. U.S.A. (USA
built), or manufactured by Toyota Motor Corp. Japan (Japan built). Ensure
correct removal and installation procedure is being used.
1999 Toyota RAV4
1999-2000 ACCESSORIES & EQUIPMENT Power Sun Roofs
Microsoft
Sunday, November 22, 2009 10:58:30 AMPage 43 © 2005 Mitchell Repair Information Company, LLC.
Page 1324 of 1632
Using a drill, remove stop rivets from each side rail. Slide left and right sun roof lift arm and drive cable
from side rail.
2. Remove right and left roof lift arm and cable assemblies. Remove 2 screws from front rail assembly.
Using a drill, remove 4 side rail rivets. Ensure not to damage side rail rivet holes when drilling. Remove
deflector and spring assembly. Remove sun roof wind deflector panel.
Reassembly
1. To reassemble, apply seal packing to drain cap. Align rear roof drip channel with roof drip channel guide
hook. Prior to installing drive motor, use an Allen wrench and align motor housing pointer to gear
pointer. See Fig. 36
.
2. Install NEW left and right sun roof lift arm and cable assembly rivets. Ensure not to sandwich sun roof
wind deflector between upper and lower sections of front rail assembly. Install NEW sealing type rivets
when installing sun roof wind deflector.
Installation
1. Soak sun roof side trim in water to soften it before installing. Adjust height of glass panel using 4
adjusting screws.
2. If sun roof housing was disassembled, adjust drive cable to a completely closed and tilted down position.
Using a screwdriver, slide left and right cable assemblies forward or backward to align holes in cable arm
and lift arm. Insert a .12" (3 mm) pin to ensure holes are aligned. Ensure hook is positioned as shown. See
Fig. 37
.
3. Remove alignment pin. Cycle assembly once (vent position closed, slide open and slide completely
closed). After cycling assembly closed, ensure alignment holes align. See Fig. 38
. If holes are not
aligned, repeat procedure.
4. A slight interference between guide pin and curved lead-in on side rail should exist. Cycle sun roof and
ensure hook engages wind deflector spring smoothly. If clicking sound is heard, adjustment is incorrect.
To readjust guide pin, loosen screw and adjust pin so there is a slight interference. Tighten nuts and bolt
to specification. See TORQUE SPECIFICATIONS
. To complete installation, reverse removal
procedure.
1999 Toyota RAV4
1999-2000 ACCESSORIES & EQUIPMENT Power Sun Roofs
Microsoft
Sunday, November 22, 2009 10:58:30 AMPage 44 © 2005 Mitchell Repair Information Company, LLC.
Page 1325 of 1632
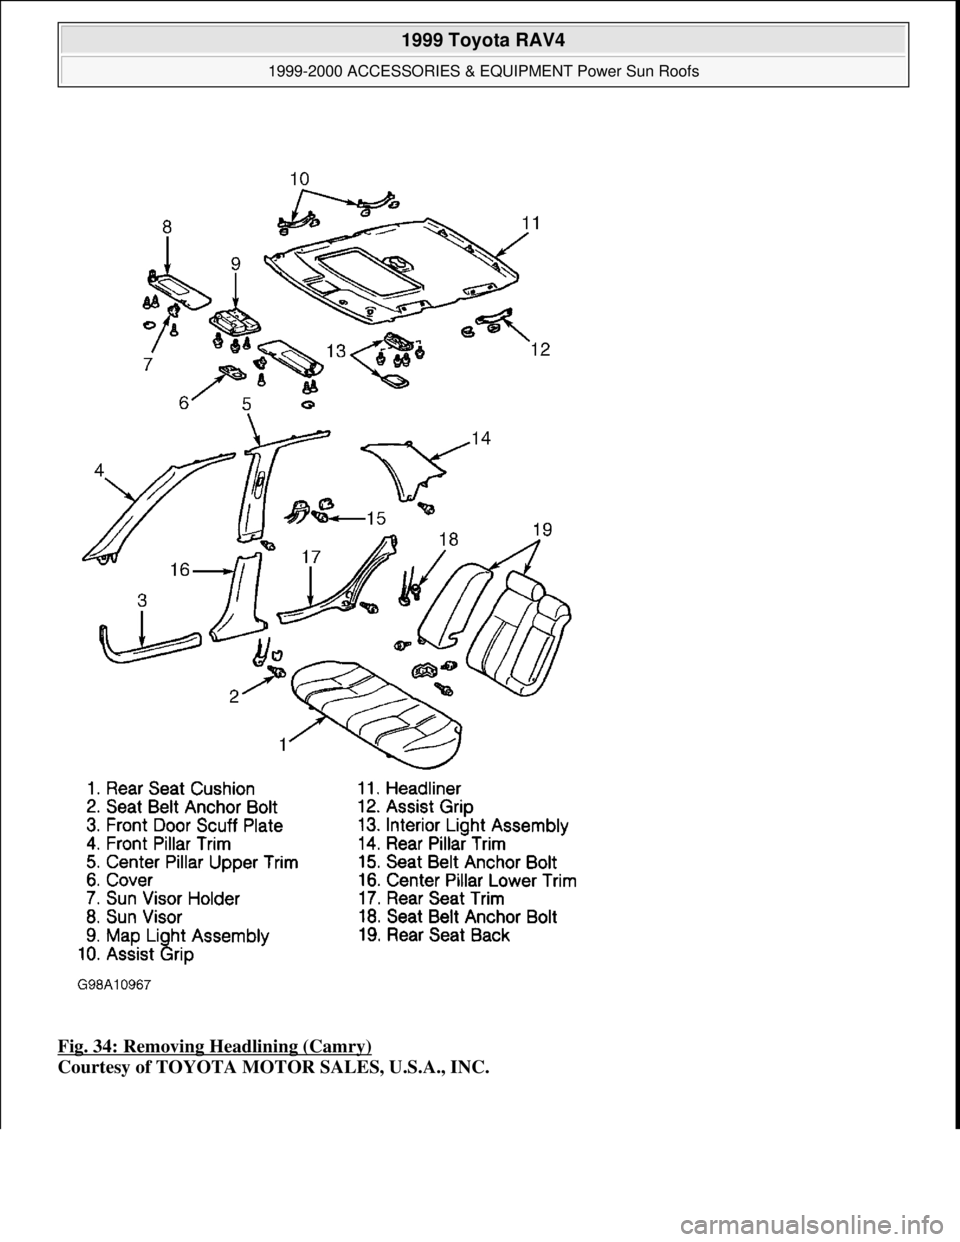
Fig. 34: Removing Headlining (Camry)
Courtesy of TOYOTA MOTOR SALES, U.S.A., INC.
1999 Toyota RAV4
1999-2000 ACCESSORIES & EQUIPMENT Power Sun Roofs
Microsoft
Sunday, November 22, 2009 10:58:30 AMPage 45 © 2005 Mitchell Repair Information Company, LLC.
Page 1326 of 1632
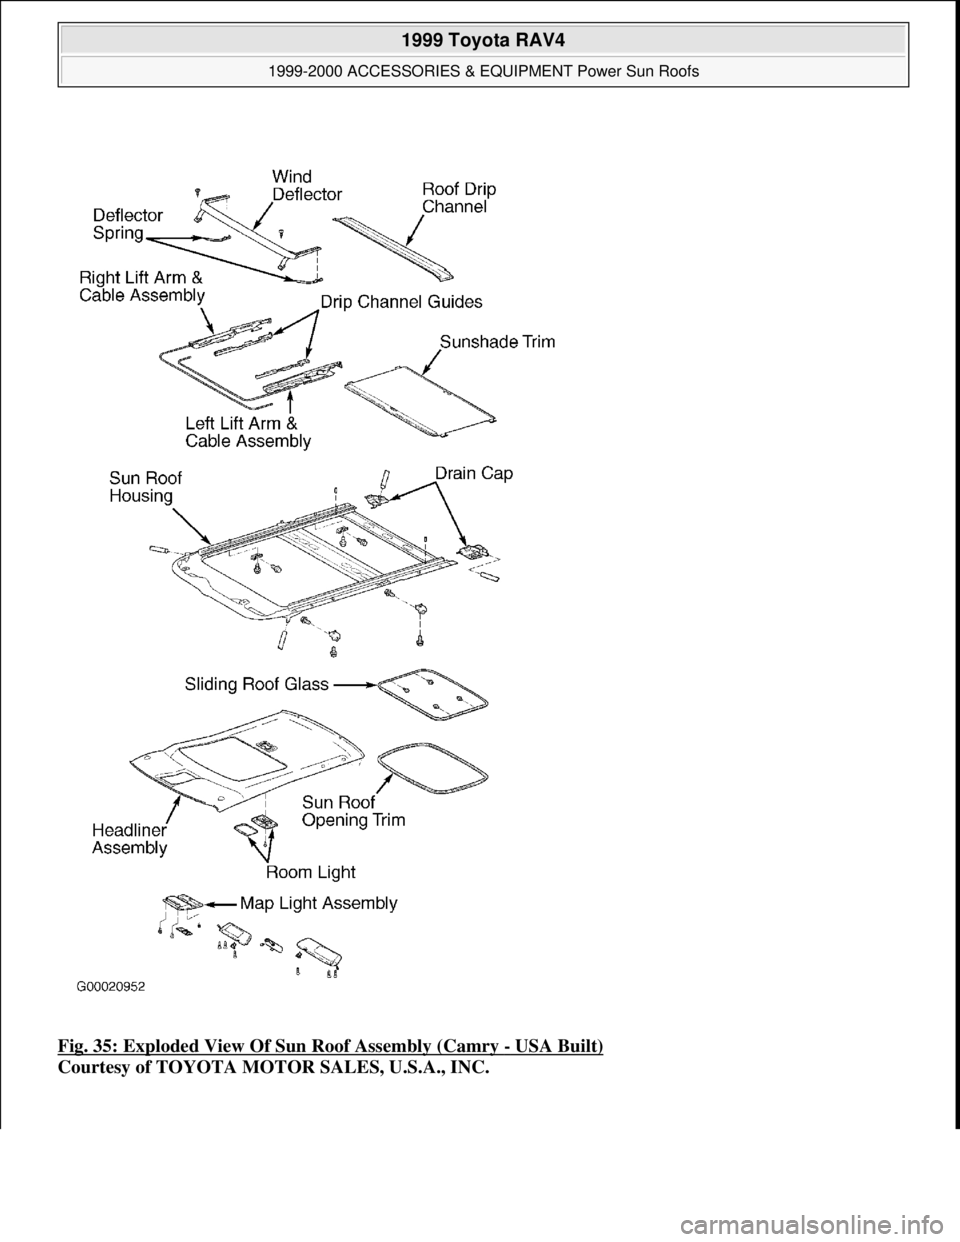
Fig. 35: Exploded View Of Sun Roof Assembly (Camry - USA Built)
Courtesy of TOYOTA MOTOR SALES, U.S.A., INC.
1999 Toyota RAV4
1999-2000 ACCESSORIES & EQUIPMENT Power Sun Roofs
Microsoft
Sunday, November 22, 2009 10:58:30 AMPage 46 © 2005 Mitchell Repair Information Company, LLC.
Page 1327 of 1632
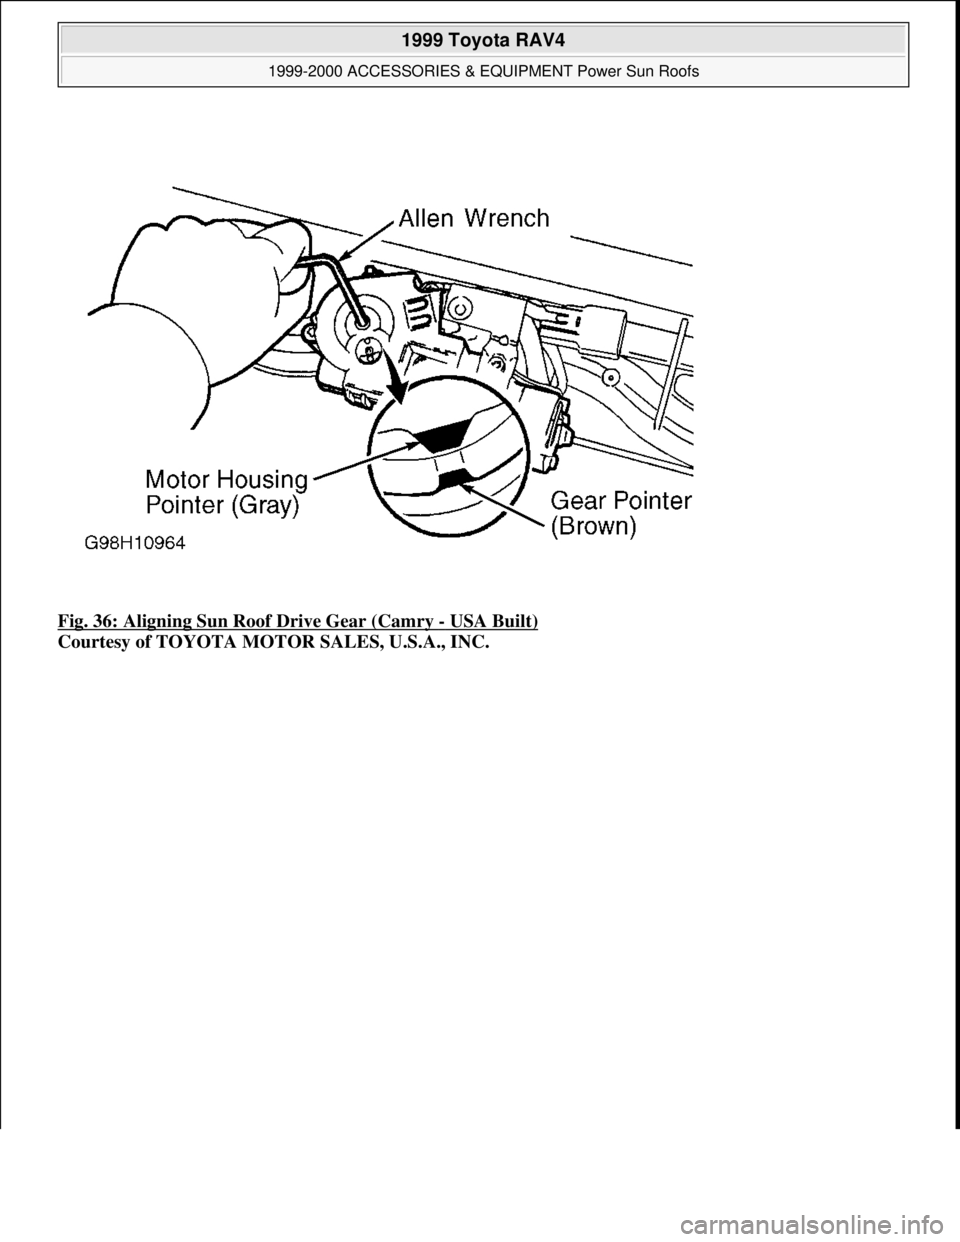
Fig. 36: Aligning Sun Roof Drive Gear (Camry - USA Built)
Courtesy of TOYOTA MOTOR SALES, U.S.A., INC.
1999 Toyota RAV4
1999-2000 ACCESSORIES & EQUIPMENT Power Sun Roofs
Microsoft
Sunday, November 22, 2009 10:58:30 AMPage 47 © 2005 Mitchell Repair Information Company, LLC.
Page 1328 of 1632
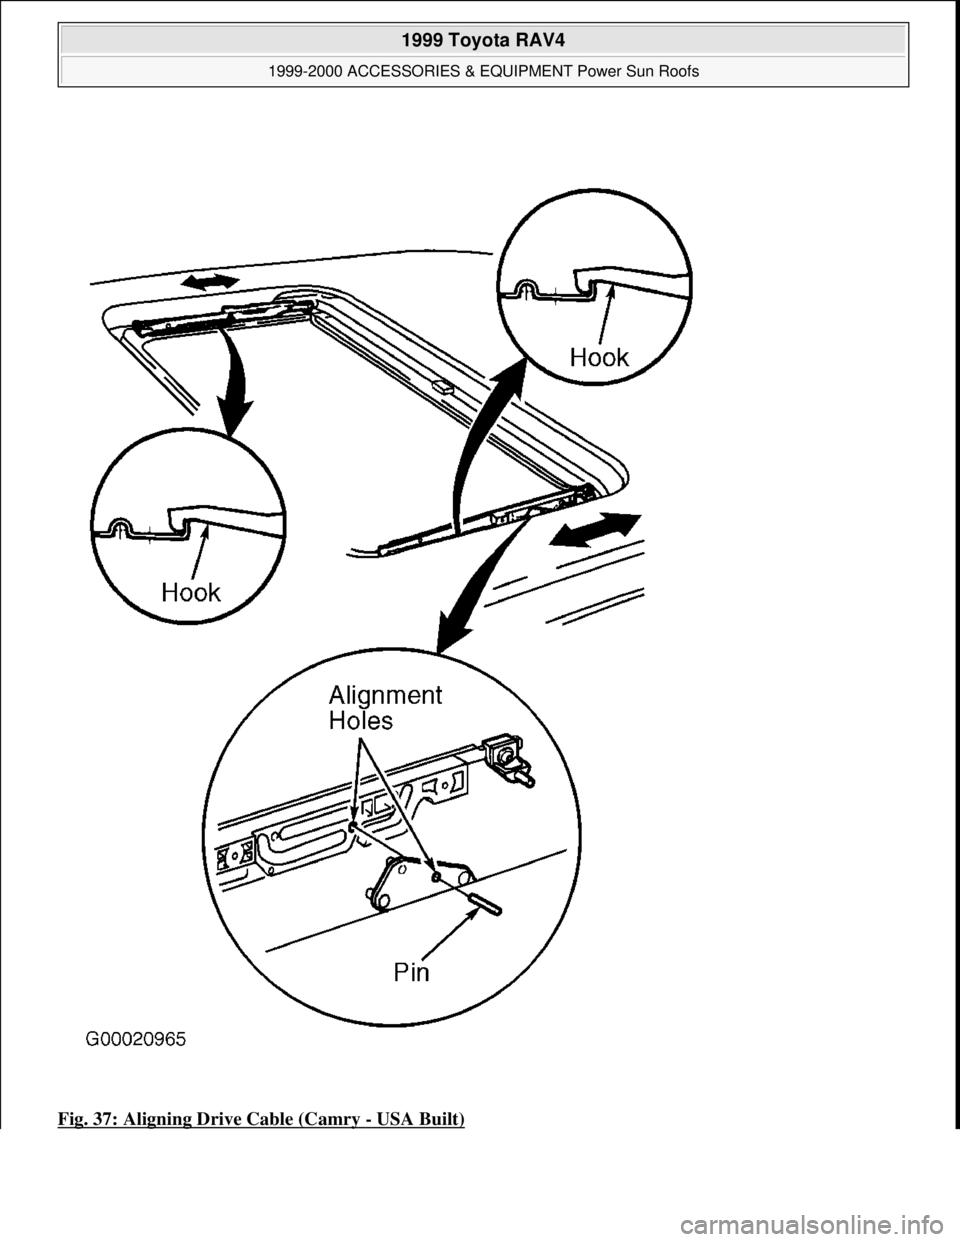
Fig. 37: Aligning Drive Cable (Camry - USA Built)
1999 Toyota RAV4
1999-2000 ACCESSORIES & EQUIPMENT Power Sun Roofs
Microsoft
Sunday, November 22, 2009 10:58:30 AMPage 48 © 2005 Mitchell Repair Information Company, LLC.
Page 1329 of 1632
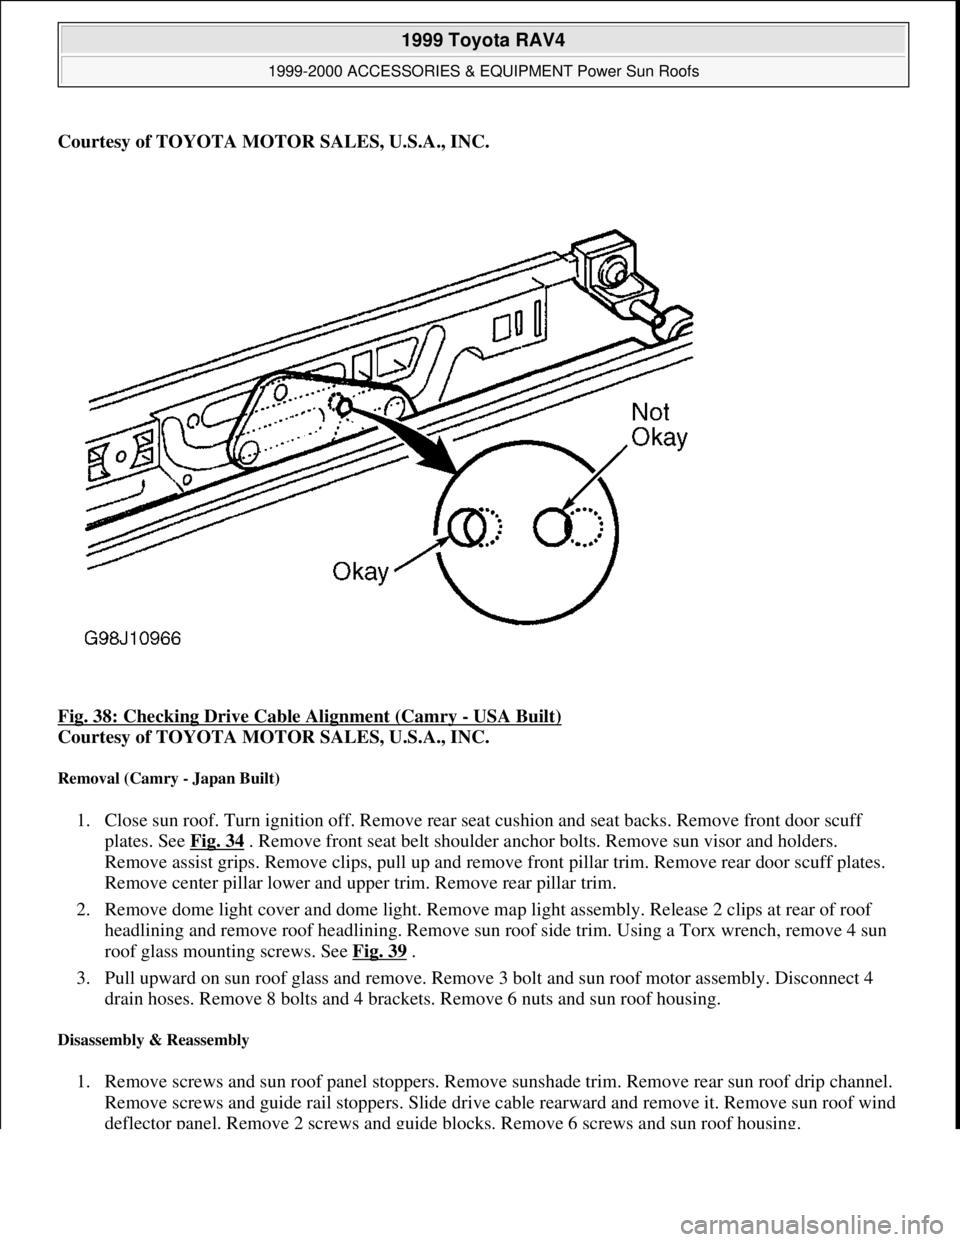
Courtesy of TOYOTA MOTOR SALES, U.S.A., INC.
Fig. 38: Checking Drive Cable Alignment (Camry
- USA Built)
Courtesy of TOYOTA MOTOR SALES, U.S.A., INC.
Removal (Camry - Japan Built)
1. Close sun roof. Turn ignition off. Remove rear seat cushion and seat backs. Remove front door scuff
plates. See Fig. 34
. Remove front seat belt shoulder anchor bolts. Remove sun visor and holders.
Remove assist grips. Remove clips, pull up and remove front pillar trim. Remove rear door scuff plates.
Remove center pillar lower and upper trim. Remove rear pillar trim.
2. Remove dome light cover and dome light. Remove map light assembly. Release 2 clips at rear of roof
headlining and remove roof headlining. Remove sun roof side trim. Using a Torx wrench, remove 4 sun
roof glass mounting screws. See Fig. 39
.
3. Pull upward on sun roof glass and remove. Remove 3 bolt and sun roof motor assembly. Disconnect 4
drain hoses. Remove 8 bolts and 4 brackets. Remove 6 nuts and sun roof housing.
Disassembly & Reassembly
1. Remove screws and sun roof panel stoppers. Remove sunshade trim. Remove rear sun roof drip channel.
Remove screws and guide rail stoppers. Slide drive cable rearward and remove it. Remove sun roof wind
deflector panel. Remove 2 screws and guide blocks. Remove 6 screws and sun roof housing.
1999 Toyota RAV4
1999-2000 ACCESSORIES & EQUIPMENT Power Sun Roofs
Microsoft
Sunday, November 22, 2009 10:58:30 AMPage 49 © 2005 Mitchell Repair Information Company, LLC.
Page 1330 of 1632

2. To reassemble, adjust drive cables to a completely closed and tilted down position. Slide both cables
forward or backward to align marks. See Fig. 30
. To complete reassembly, reverse disassembly
procedure.
Installation
Prior to installing drive motor, remove cam plate cover from sun roof drive motor. See Fig. 40 . Turn drive gear
until marks align, indicating a full closed position. Reinstall cam plate cover. Ensure sun roof is properly
aligned. See ADJUSTMENTS
. Tighten nuts and bolt to specification. See TORQUE SPECIFICATIONS .
To complete installation, reverse removal procedure.
1999 Toyota RAV4
1999-2000 ACCESSORIES & EQUIPMENT Power Sun Roofs
Microsoft
Sunday, November 22, 2009 10:58:30 AMPage 50 © 2005 Mitchell Repair Information Company, LLC.