TOYOTA RAV4 2006 Service Repair Manual
Manufacturer: TOYOTA, Model Year: 2006, Model line: RAV4, Model: TOYOTA RAV4 2006Pages: 2000, PDF Size: 45.84 MB
Page 581 of 2000
EM–242AZ-FE ENGINE MECHANICAL – TIMING CHAIN
EM
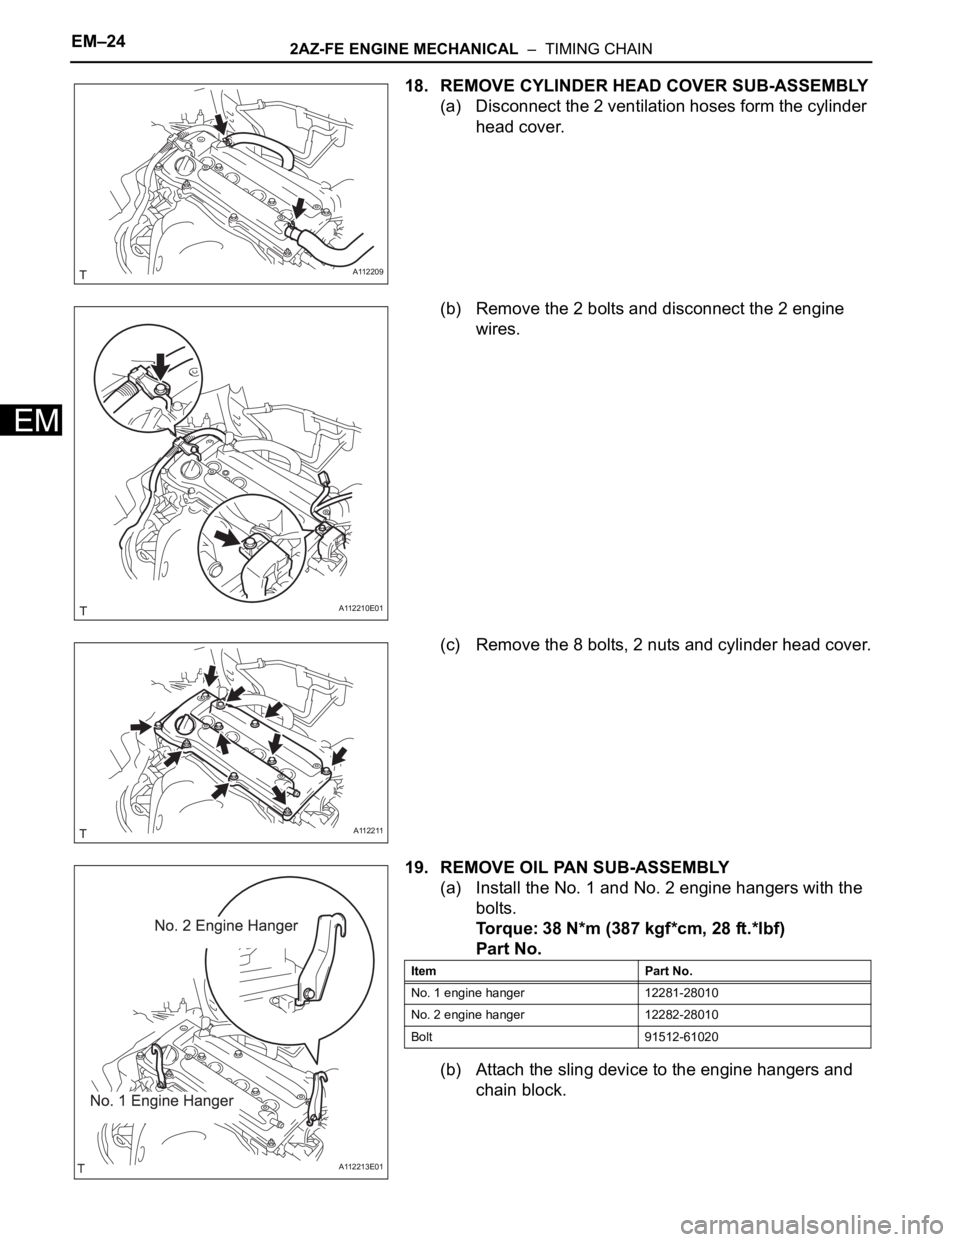
18. REMOVE CYLINDER HEAD COVER SUB-ASSEMBLY
(a) Disconnect the 2 ventilation hoses form the cylinder
head cover.
(b) Remove the 2 bolts and disconnect the 2 engine
wires.
(c) Remove the 8 bolts, 2 nuts and cylinder head cover.
19. REMOVE OIL PAN SUB-ASSEMBLY
(a) Install the No. 1 and No. 2 engine hangers with the
bolts.
Torque: 38 N*m (387 kgf*cm, 28 ft.*lbf)
Part No.
(b) Attach the sling device to the engine hangers and
chain block.
A112209
A112210E01
A112211
A112213E01
Item Part No.
No. 1 engine hanger 12281-28010
No. 2 engine hanger 12282-28010
Bolt 91512-61020
Page 582 of 2000
2AZ-FE ENGINE MECHANICAL – TIMING CHAINEM–25
EM
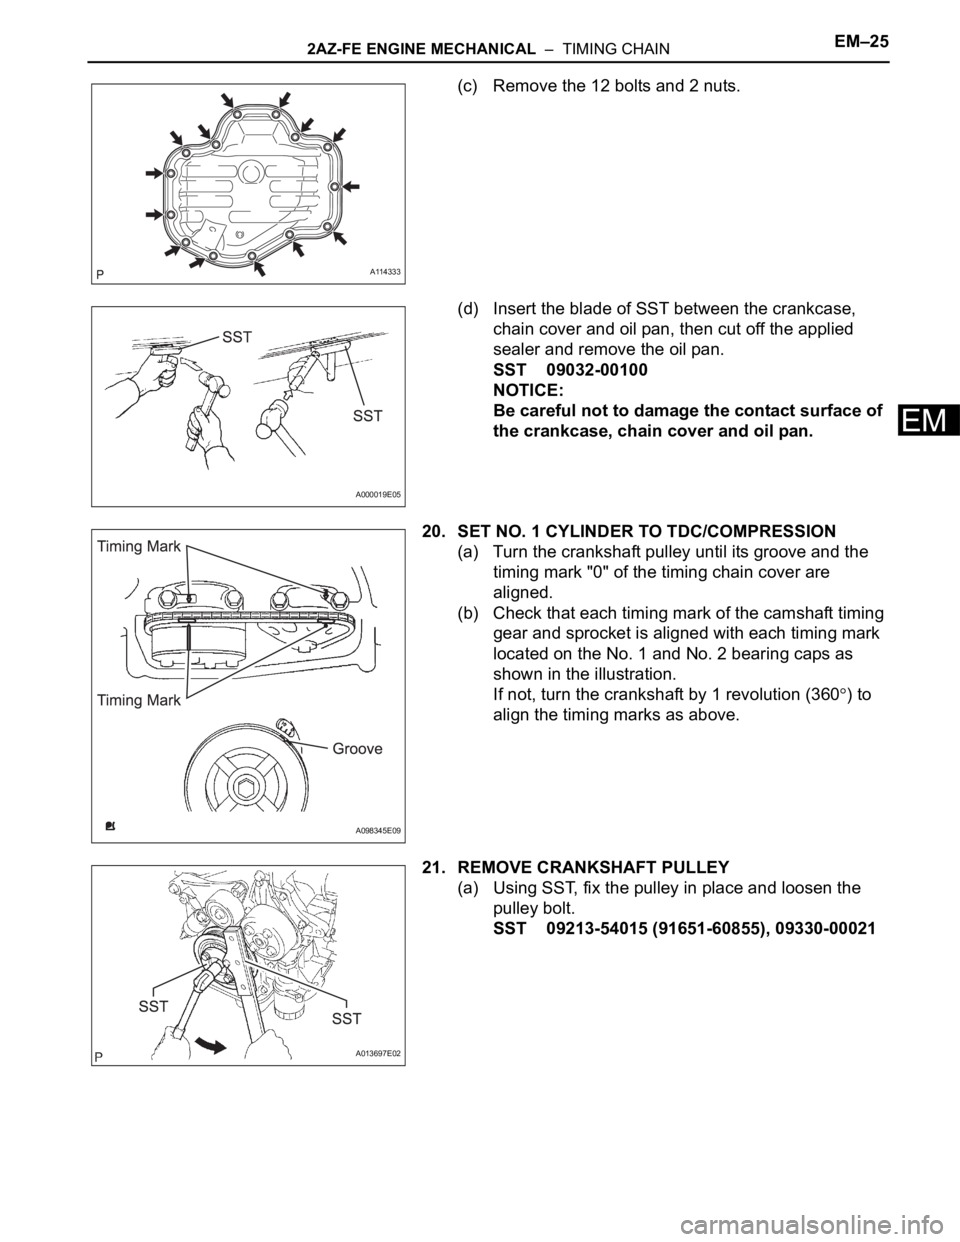
(c) Remove the 12 bolts and 2 nuts.
(d) Insert the blade of SST between the crankcase,
chain cover and oil pan, then cut off the applied
sealer and remove the oil pan.
SST 09032-00100
NOTICE:
Be careful not to damage the contact surface of
the crankcase, chain cover and oil pan.
20. SET NO. 1 CYLINDER TO TDC/COMPRESSION
(a) Turn the crankshaft pulley until its groove and the
timing mark "0" of the timing chain cover are
aligned.
(b) Check that each timing mark of the camshaft timing
gear and sprocket is aligned with each timing mark
located on the No. 1 and No. 2 bearing caps as
shown in the illustration.
If not, turn the crankshaft by 1 revolution (360
) to
align the timing marks as above.
21. REMOVE CRANKSHAFT PULLEY
(a) Using SST, fix the pulley in place and loosen the
pulley bolt.
SST 09213-54015 (91651-60855), 09330-00021
A114333
A000019E05
A098345E09
A013697E02
Page 583 of 2000
EM–262AZ-FE ENGINE MECHANICAL – TIMING CHAIN
EM
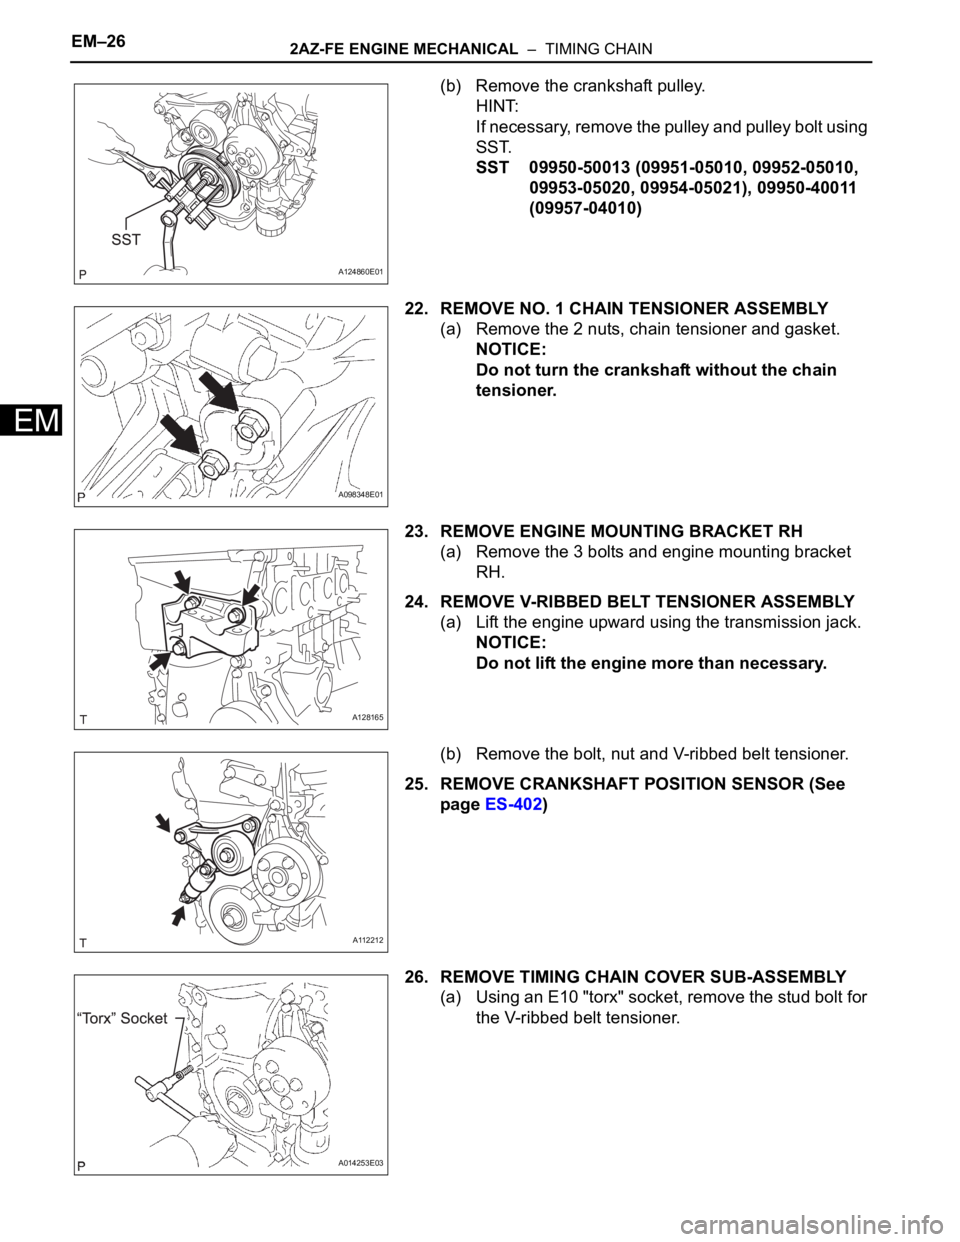
(b) Remove the crankshaft pulley.
HINT:
If necessary, remove the pulley and pulley bolt using
SST.
SST 09950-50013 (09951-05010, 09952-05010,
09953-05020, 09954-05021), 09950-40011
(09957-04010)
22. REMOVE NO. 1 CHAIN TENSIONER ASSEMBLY
(a) Remove the 2 nuts, chain tensioner and gasket.
NOTICE:
Do not turn the crankshaft without the chain
tensioner.
23. REMOVE ENGINE MOUNTING BRACKET RH
(a) Remove the 3 bolts and engine mounting bracket
RH.
24. REMOVE V-RIBBED BELT TENSIONER ASSEMBLY
(a) Lift the engine upward using the transmission jack.
NOTICE:
Do not lift the engine more than necessary.
(b) Remove the bolt, nut and V-ribbed belt tensioner.
25. REMOVE CRANKSHAFT POSITION SENSOR (See
page ES-402)
26. REMOVE TIMING CHAIN COVER SUB-ASSEMBLY
(a) Using an E10 "torx" socket, remove the stud bolt for
the V-ribbed belt tensioner.
A124860E01
A098348E01
A128165
A112212
A014253E03
Page 584 of 2000
2AZ-FE ENGINE MECHANICAL – TIMING CHAINEM–27
EM
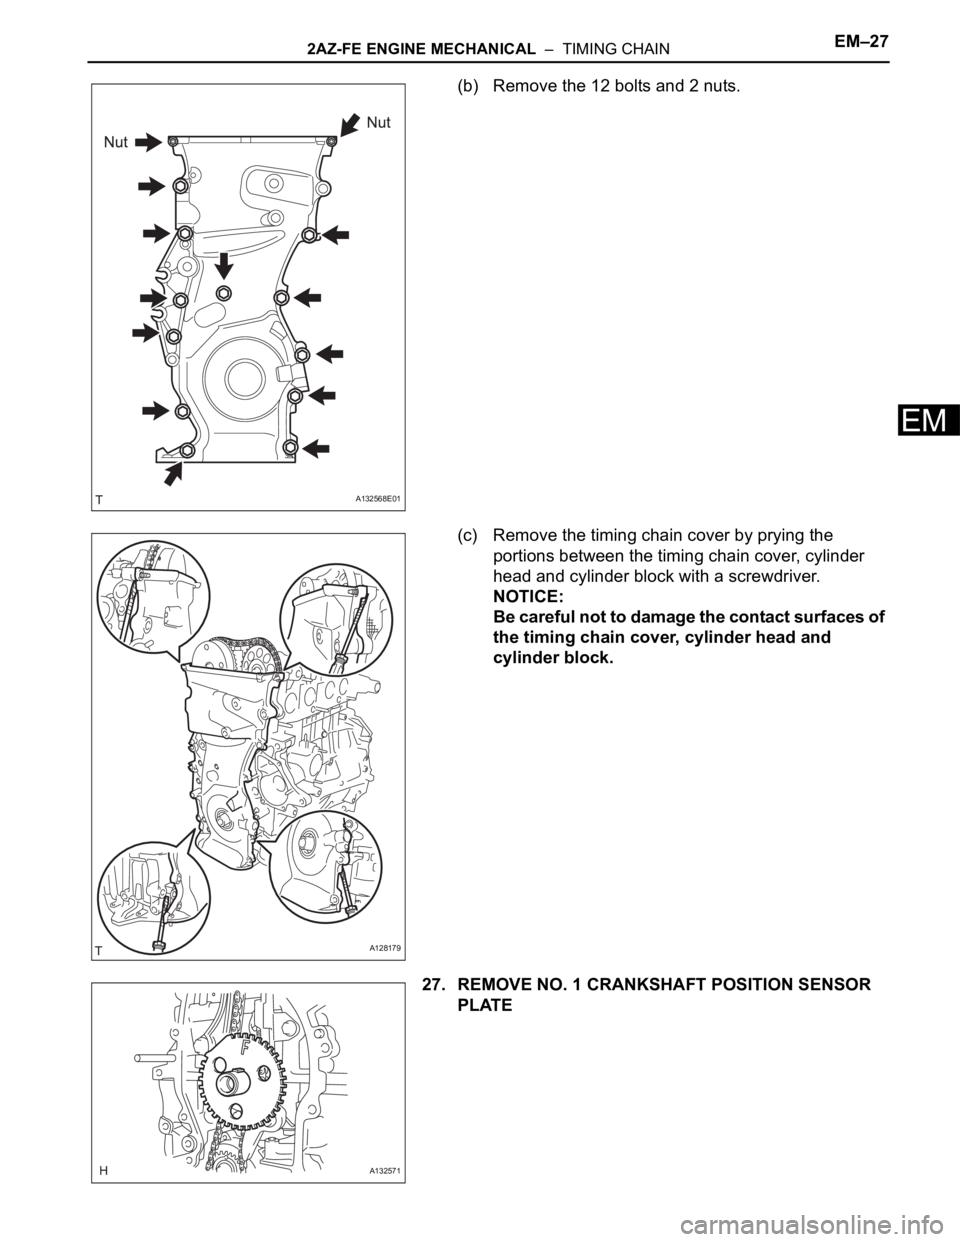
(b) Remove the 12 bolts and 2 nuts.
(c) Remove the timing chain cover by prying the
portions between the timing chain cover, cylinder
head and cylinder block with a screwdriver.
NOTICE:
Be careful not to damage the contact surfaces of
the timing chain cover, cylinder head and
cylinder block.
27. REMOVE NO. 1 CRANKSHAFT POSITION SENSOR
PLATE
A132568E01
A128179
A132571
Page 585 of 2000
EM–282AZ-FE ENGINE MECHANICAL – TIMING CHAIN
EM
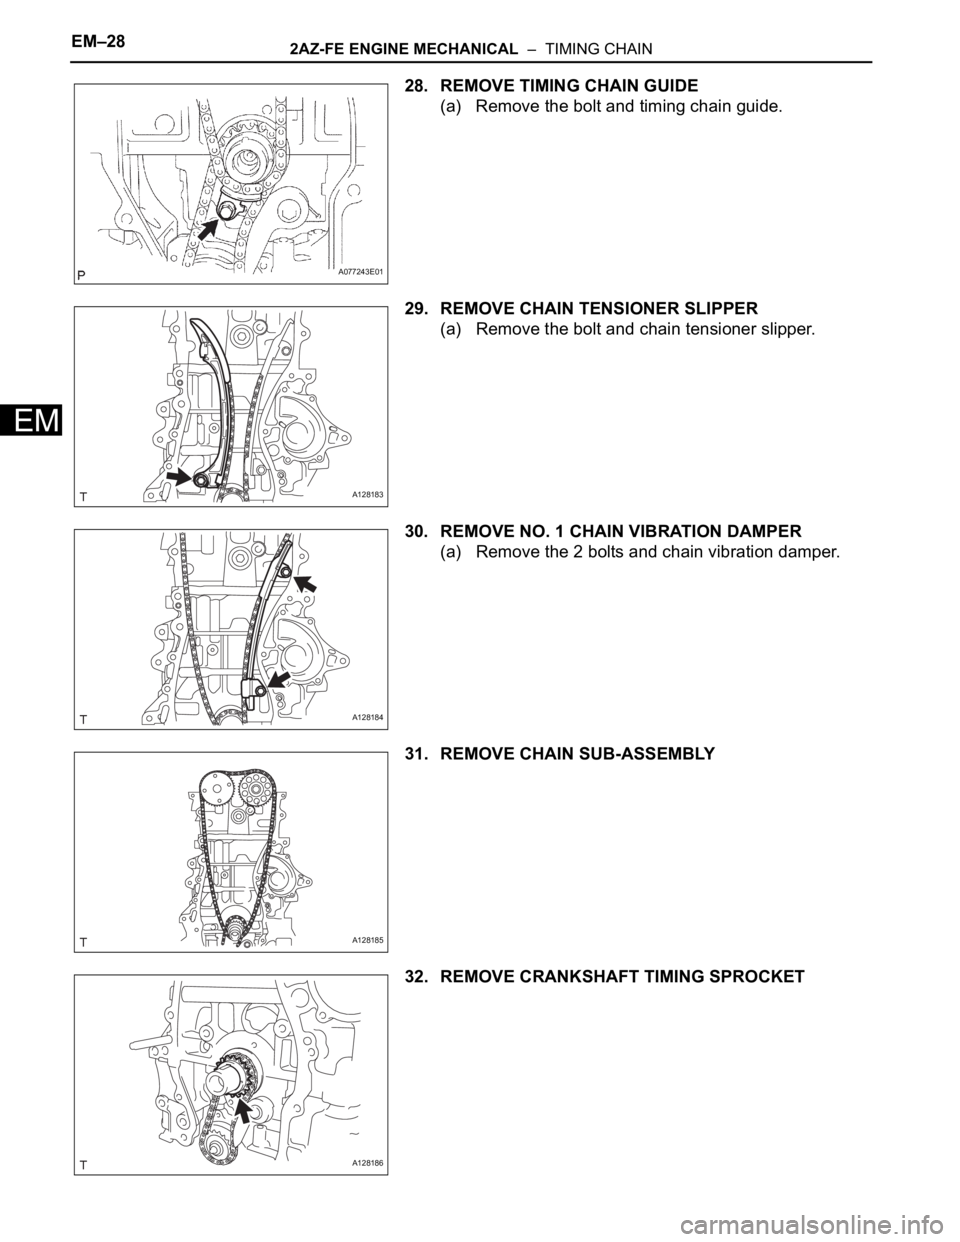
28. REMOVE TIMING CHAIN GUIDE
(a) Remove the bolt and timing chain guide.
29. REMOVE CHAIN TENSIONER SLIPPER
(a) Remove the bolt and chain tensioner slipper.
30. REMOVE NO. 1 CHAIN VIBRATION DAMPER
(a) Remove the 2 bolts and chain vibration damper.
31. REMOVE CHAIN SUB-ASSEMBLY
32. REMOVE CRANKSHAFT TIMING SPROCKET
A077243E01
A128183
A128184
A128185
A128186
Page 586 of 2000
2AZ-FE ENGINE MECHANICAL – TIMING CHAINEM–29
EM
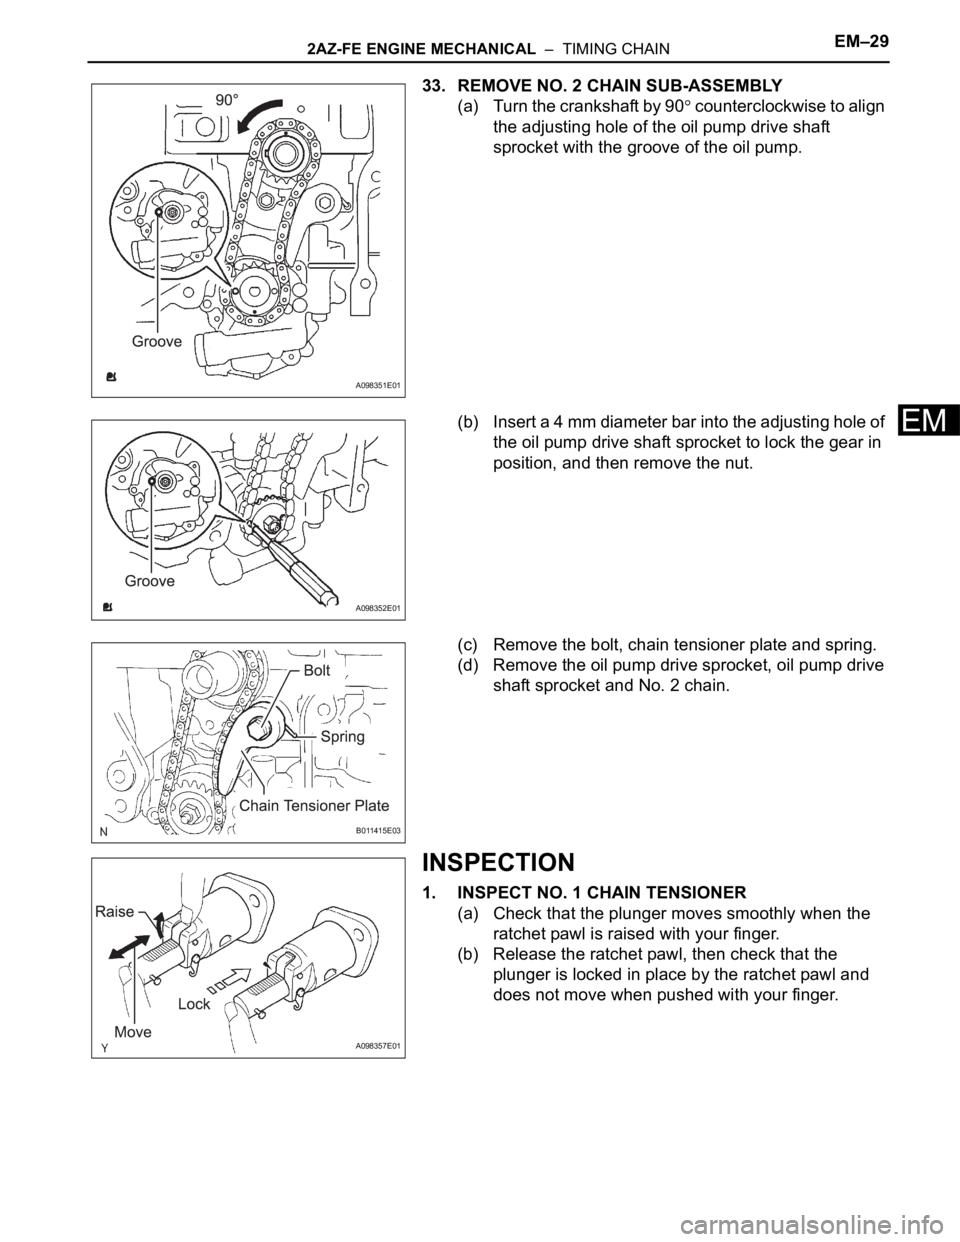
33. REMOVE NO. 2 CHAIN SUB-ASSEMBLY
(a) Turn the crankshaft by 90
counterclockwise to align
the adjusting hole of the oil pump drive shaft
sprocket with the groove of the oil pump.
(b) Insert a 4 mm diameter bar into the adjusting hole of
the oil pump drive shaft sprocket to lock the gear in
position, and then remove the nut.
(c) Remove the bolt, chain tensioner plate and spring.
(d) Remove the oil pump drive sprocket, oil pump drive
shaft sprocket and No. 2 chain.
INSPECTION
1. INSPECT NO. 1 CHAIN TENSIONER
(a) Check that the plunger moves smoothly when the
ratchet pawl is raised with your finger.
(b) Release the ratchet pawl, then check that the
plunger is locked in place by the ratchet pawl and
does not move when pushed with your finger.
A098351E01
A098352E01
B011415E03
A098357E01
Page 587 of 2000
EM–302AZ-FE ENGINE MECHANICAL – TIMING CHAIN
EM
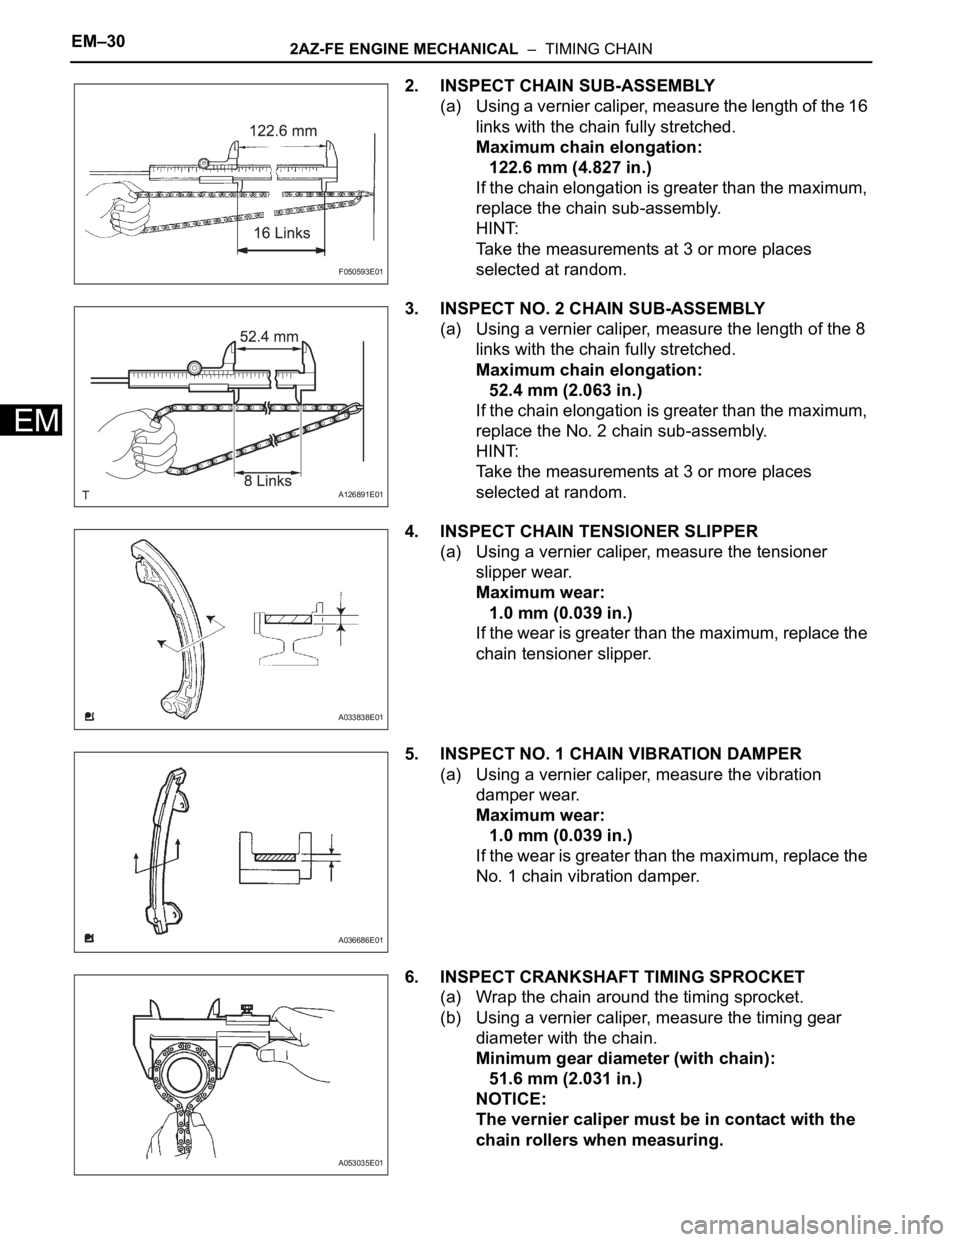
2. INSPECT CHAIN SUB-ASSEMBLY
(a) Using a vernier caliper, measure the length of the 16
links with the chain fully stretched.
Maximum chain elongation:
122.6 mm (4.827 in.)
If the chain elongation is greater than the maximum,
replace the chain sub-assembly.
HINT:
Take the measurements at 3 or more places
selected at random.
3. INSPECT NO. 2 CHAIN SUB-ASSEMBLY
(a) Using a vernier caliper, measure the length of the 8
links with the chain fully stretched.
Maximum chain elongation:
52.4 mm (2.063 in.)
If the chain elongation is greater than the maximum,
replace the No. 2 chain sub-assembly.
HINT:
Take the measurements at 3 or more places
selected at random.
4. INSPECT CHAIN TENSIONER SLIPPER
(a) Using a vernier caliper, measure the tensioner
slipper wear.
Maximum wear:
1.0 mm (0.039 in.)
If the wear is greater than the maximum, replace the
chain tensioner slipper.
5. INSPECT NO. 1 CHAIN VIBRATION DAMPER
(a) Using a vernier caliper, measure the vibration
damper wear.
Maximum wear:
1.0 mm (0.039 in.)
If the wear is greater than the maximum, replace the
No. 1 chain vibration damper.
6. INSPECT CRANKSHAFT TIMING SPROCKET
(a) Wrap the chain around the timing sprocket.
(b) Using a vernier caliper, measure the timing gear
diameter with the chain.
Minimum gear diameter (with chain):
51.6 mm (2.031 in.)
NOTICE:
The vernier caliper must be in contact with the
chain rollers when measuring.
F050593E01
A126891E01
A033838E01
A036686E01
A053035E01
Page 588 of 2000
2AZ-FE ENGINE MECHANICAL – TIMING CHAINEM–31
EM
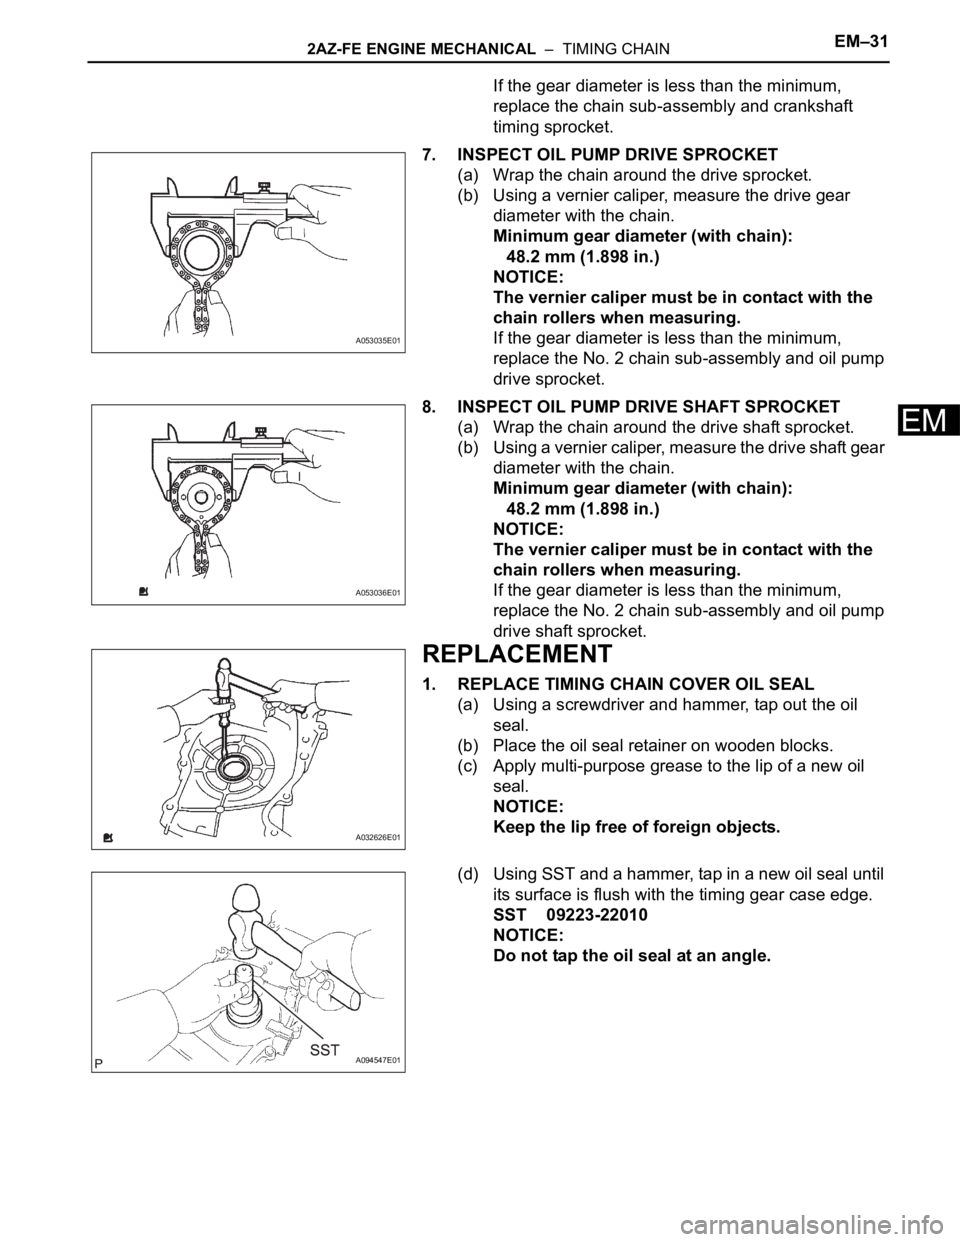
If the gear diameter is less than the minimum,
replace the chain sub-assembly and crankshaft
timing sprocket.
7. INSPECT OIL PUMP DRIVE SPROCKET
(a) Wrap the chain around the drive sprocket.
(b) Using a vernier caliper, measure the drive gear
diameter with the chain.
Minimum gear diameter (with chain):
48.2 mm (1.898 in.)
NOTICE:
The vernier caliper must be in contact with the
chain rollers when measuring.
If the gear diameter is less than the minimum,
replace the No. 2 chain sub-assembly and oil pump
drive sprocket.
8. INSPECT OIL PUMP DRIVE SHAFT SPROCKET
(a) Wrap the chain around the drive shaft sprocket.
(b) Using a vernier caliper, measure the drive shaft gear
diameter with the chain.
Minimum gear diameter (with chain):
48.2 mm (1.898 in.)
NOTICE:
The vernier caliper must be in contact with the
chain rollers when measuring.
If the gear diameter is less than the minimum,
replace the No. 2 chain sub-assembly and oil pump
drive shaft sprocket.
REPLACEMENT
1. REPLACE TIMING CHAIN COVER OIL SEAL
(a) Using a screwdriver and hammer, tap out the oil
seal.
(b) Place the oil seal retainer on wooden blocks.
(c) Apply multi-purpose grease to the lip of a new oil
seal.
NOTICE:
Keep the lip free of foreign objects.
(d) Using SST and a hammer, tap in a new oil seal until
its surface is flush with the timing gear case edge.
SST 09223-22010
NOTICE:
Do not tap the oil seal at an angle.
A053035E01
A053036E01
A032626E01
A094547E01
Page 589 of 2000
EM–322AZ-FE ENGINE MECHANICAL – TIMING CHAIN
EM
INSTALLATION
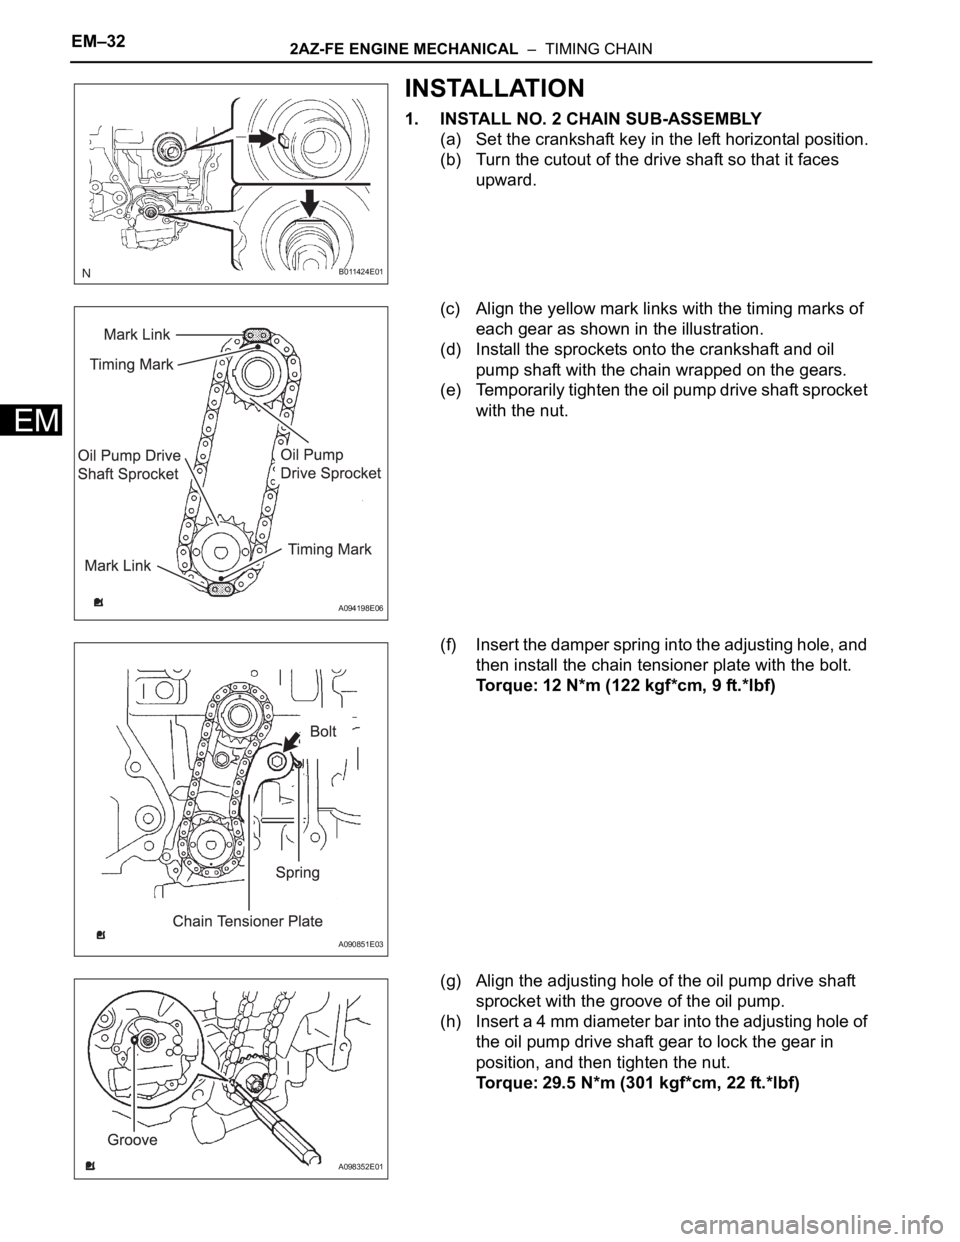
1. INSTALL NO. 2 CHAIN SUB-ASSEMBLY
(a) Set the crankshaft key in the left horizontal position.
(b) Turn the cutout of the drive shaft so that it faces
upward.
(c) Align the yellow mark links with the timing marks of
each gear as shown in the illustration.
(d) Install the sprockets onto the crankshaft and oil
pump shaft with the chain wrapped on the gears.
(e) Temporarily tighten the oil pump drive shaft sprocket
with the nut.
(f) Insert the damper spring into the adjusting hole, and
then install the chain tensioner plate with the bolt.
Torque: 12 N*m (122 kgf*cm, 9 ft.*lbf)
(g) Align the adjusting hole of the oil pump drive shaft
sprocket with the groove of the oil pump.
(h) Insert a 4 mm diameter bar into the adjusting hole of
the oil pump drive shaft gear to lock the gear in
position, and then tighten the nut.
Torque: 29.5 N*m (301 kgf*cm, 22 ft.*lbf)
B011424E01
A094198E06
A090851E03
A098352E01
Page 590 of 2000
2AZ-FE ENGINE MECHANICAL – TIMING CHAINEM–33
EM
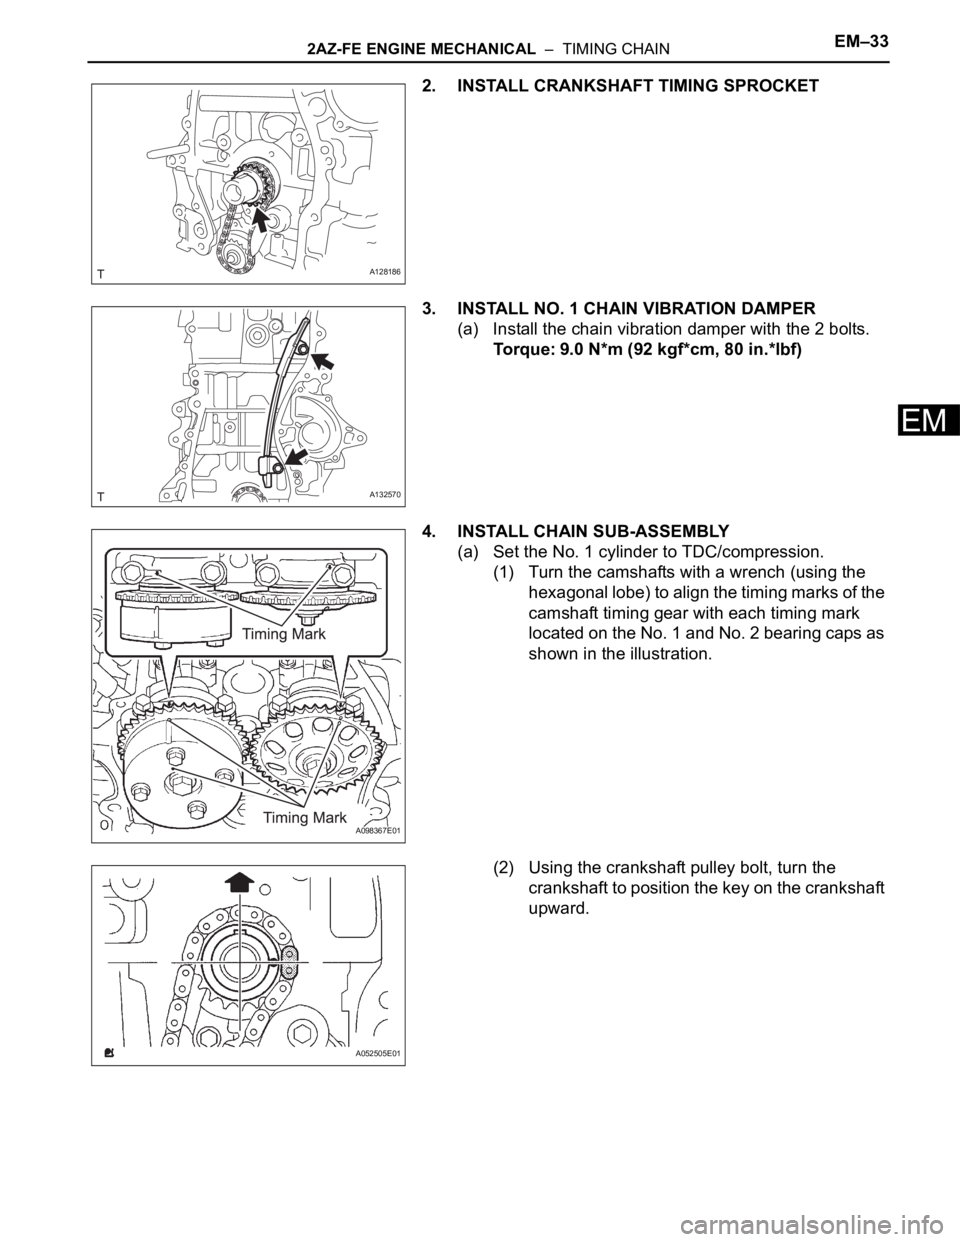
2. INSTALL CRANKSHAFT TIMING SPROCKET
3. INSTALL NO. 1 CHAIN VIBRATION DAMPER
(a) Install the chain vibration damper with the 2 bolts.
Torque: 9.0 N*m (92 kgf*cm, 80 in.*lbf)
4. INSTALL CHAIN SUB-ASSEMBLY
(a) Set the No. 1 cylinder to TDC/compression.
(1) Turn the camshafts with a wrench (using the
hexagonal lobe) to align the timing marks of the
camshaft timing gear with each timing mark
located on the No. 1 and No. 2 bearing caps as
shown in the illustration.
(2) Using the crankshaft pulley bolt, turn the
crankshaft to position the key on the crankshaft
upward.
A128186
A132570
A098367E01
A052505E01